

Expenses

 1:44
1:44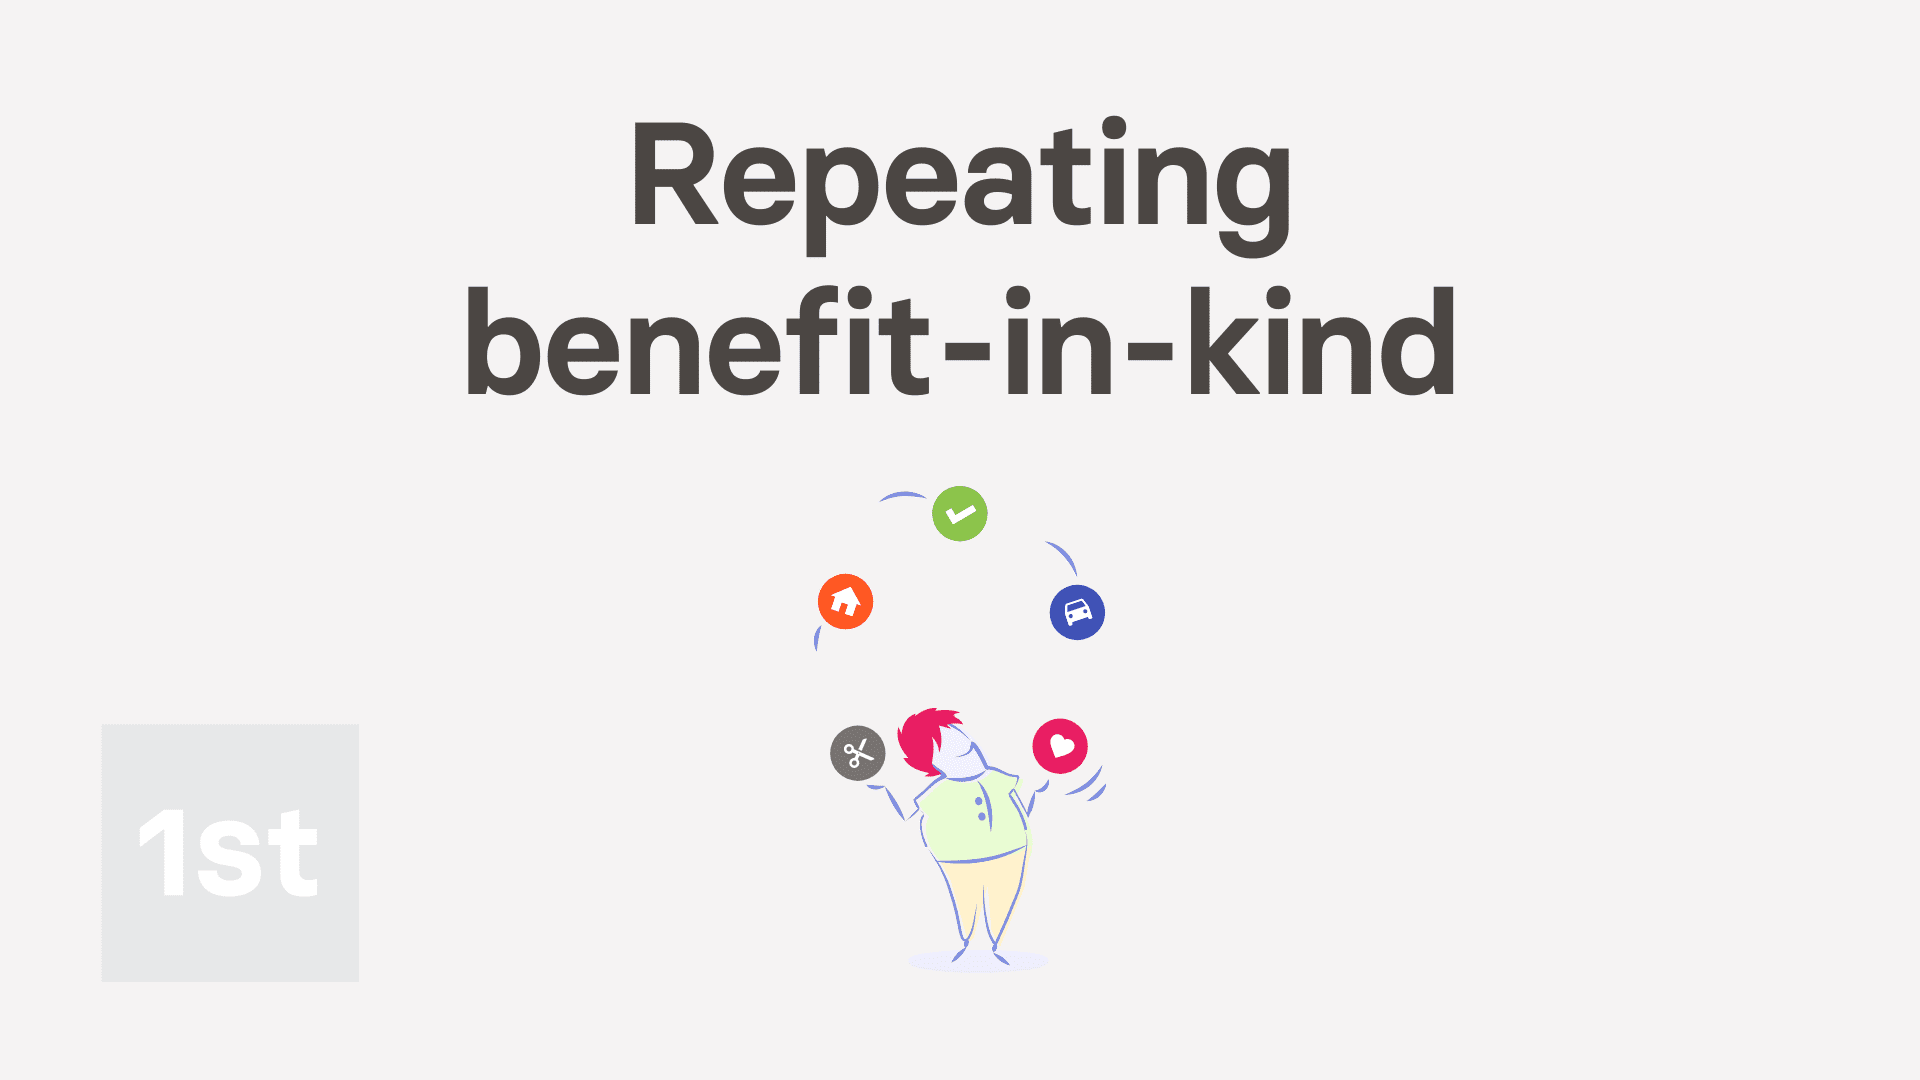 2:37
2:37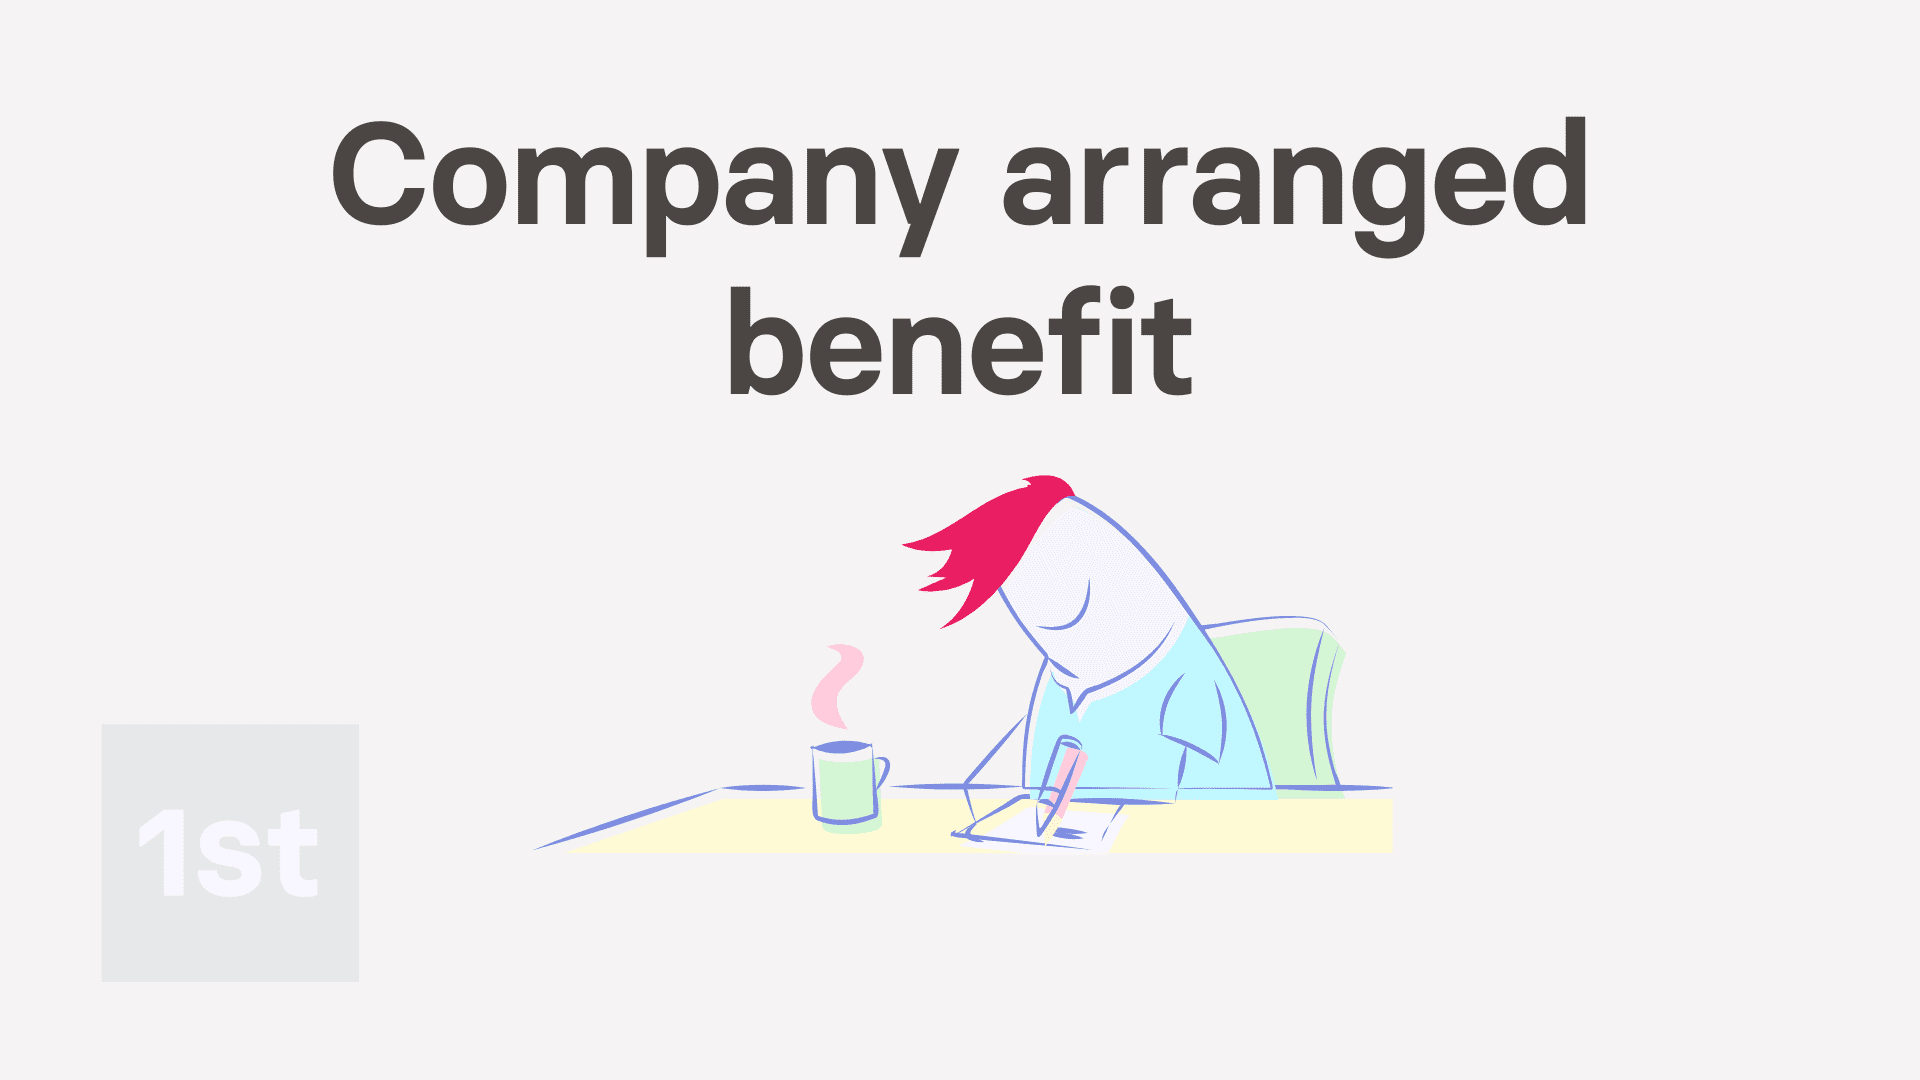 2:28
2:28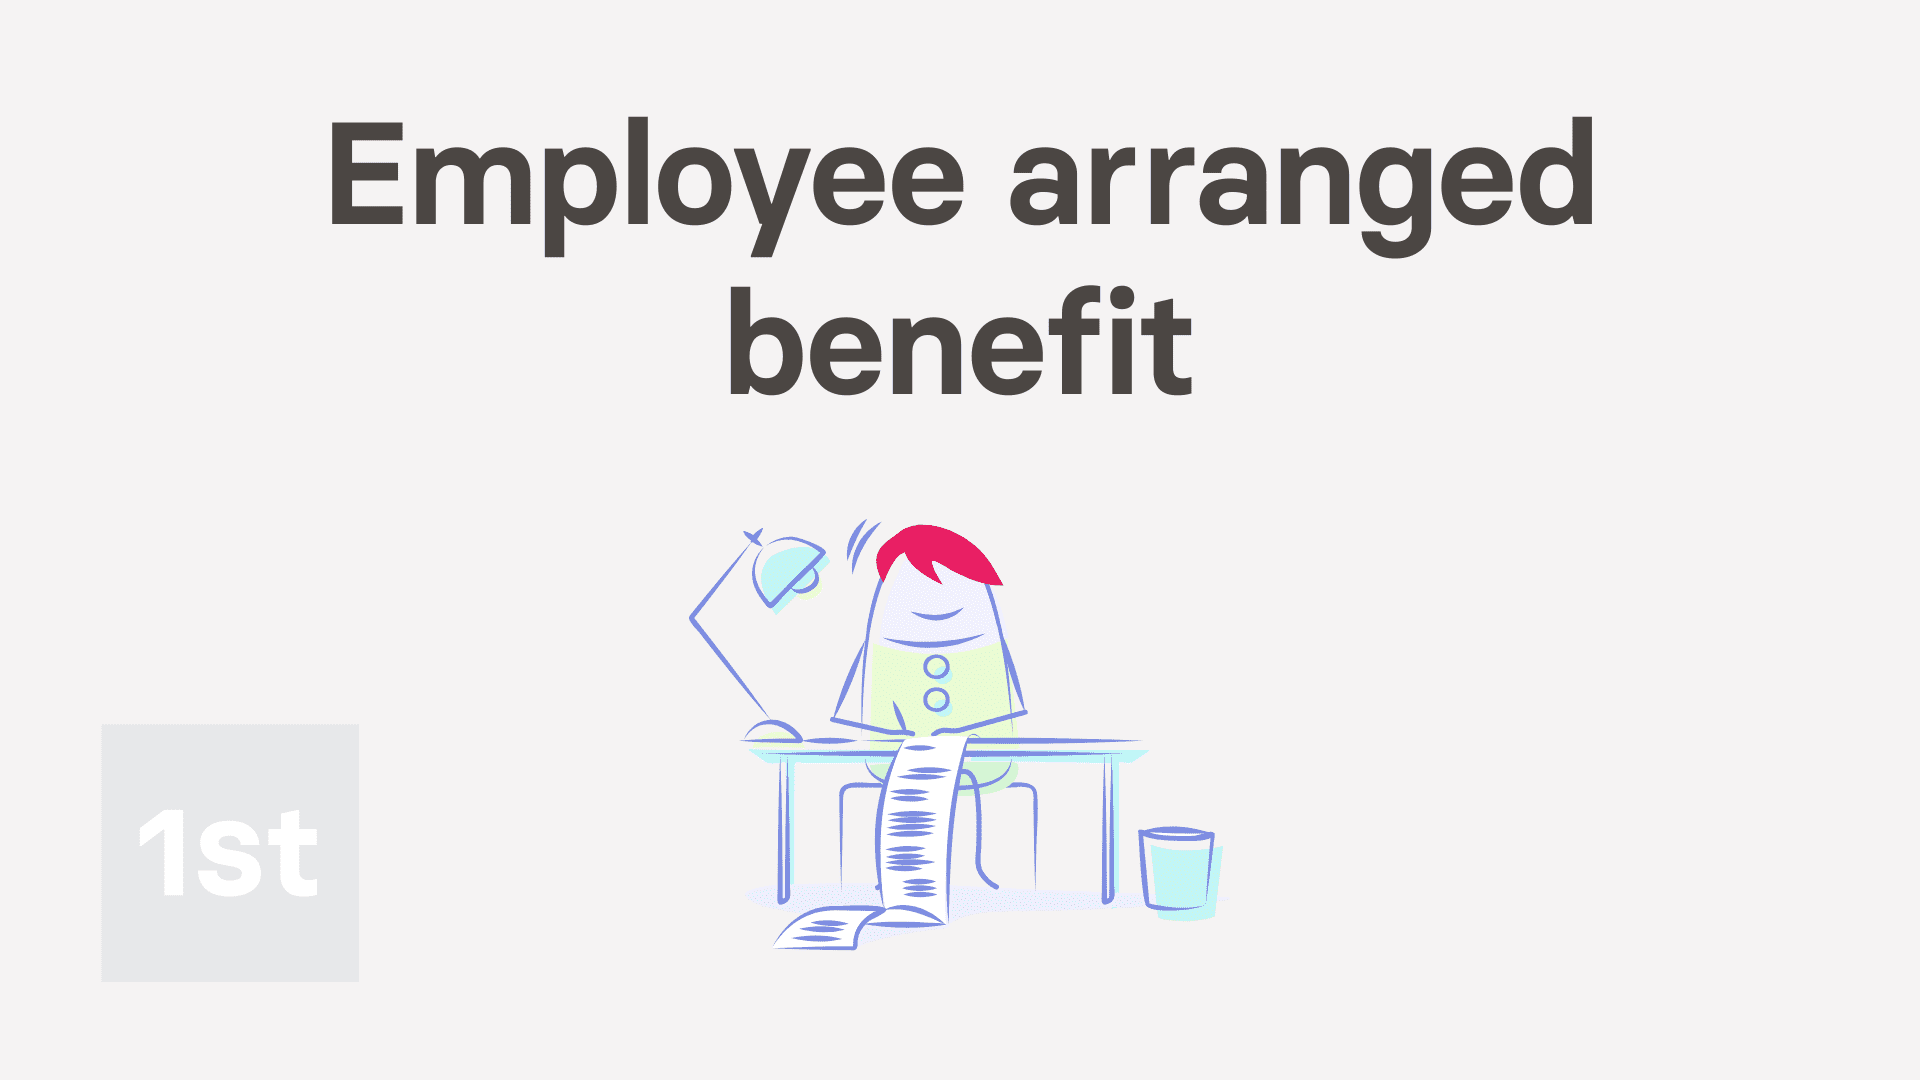 2:25
2:25 1:53
1:53 1:45
1:45 1:10
1:10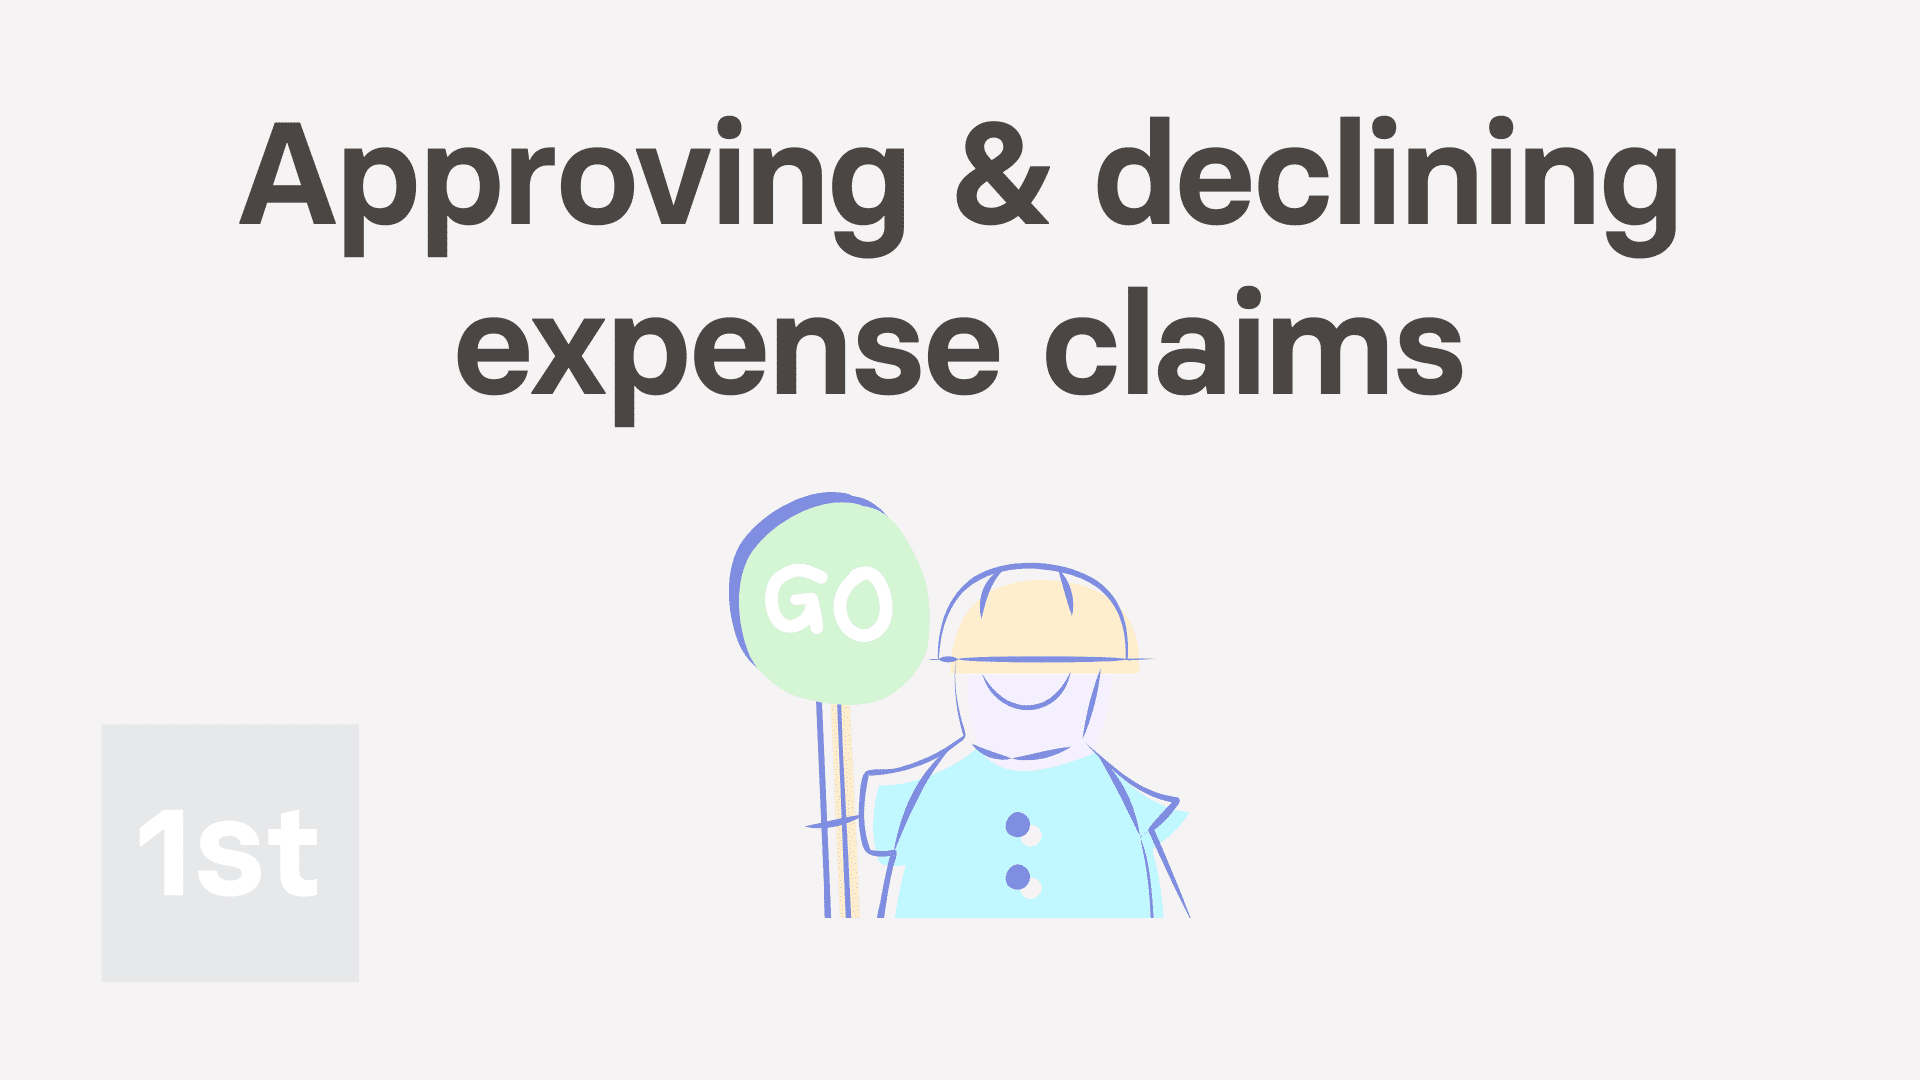 2:18
2:18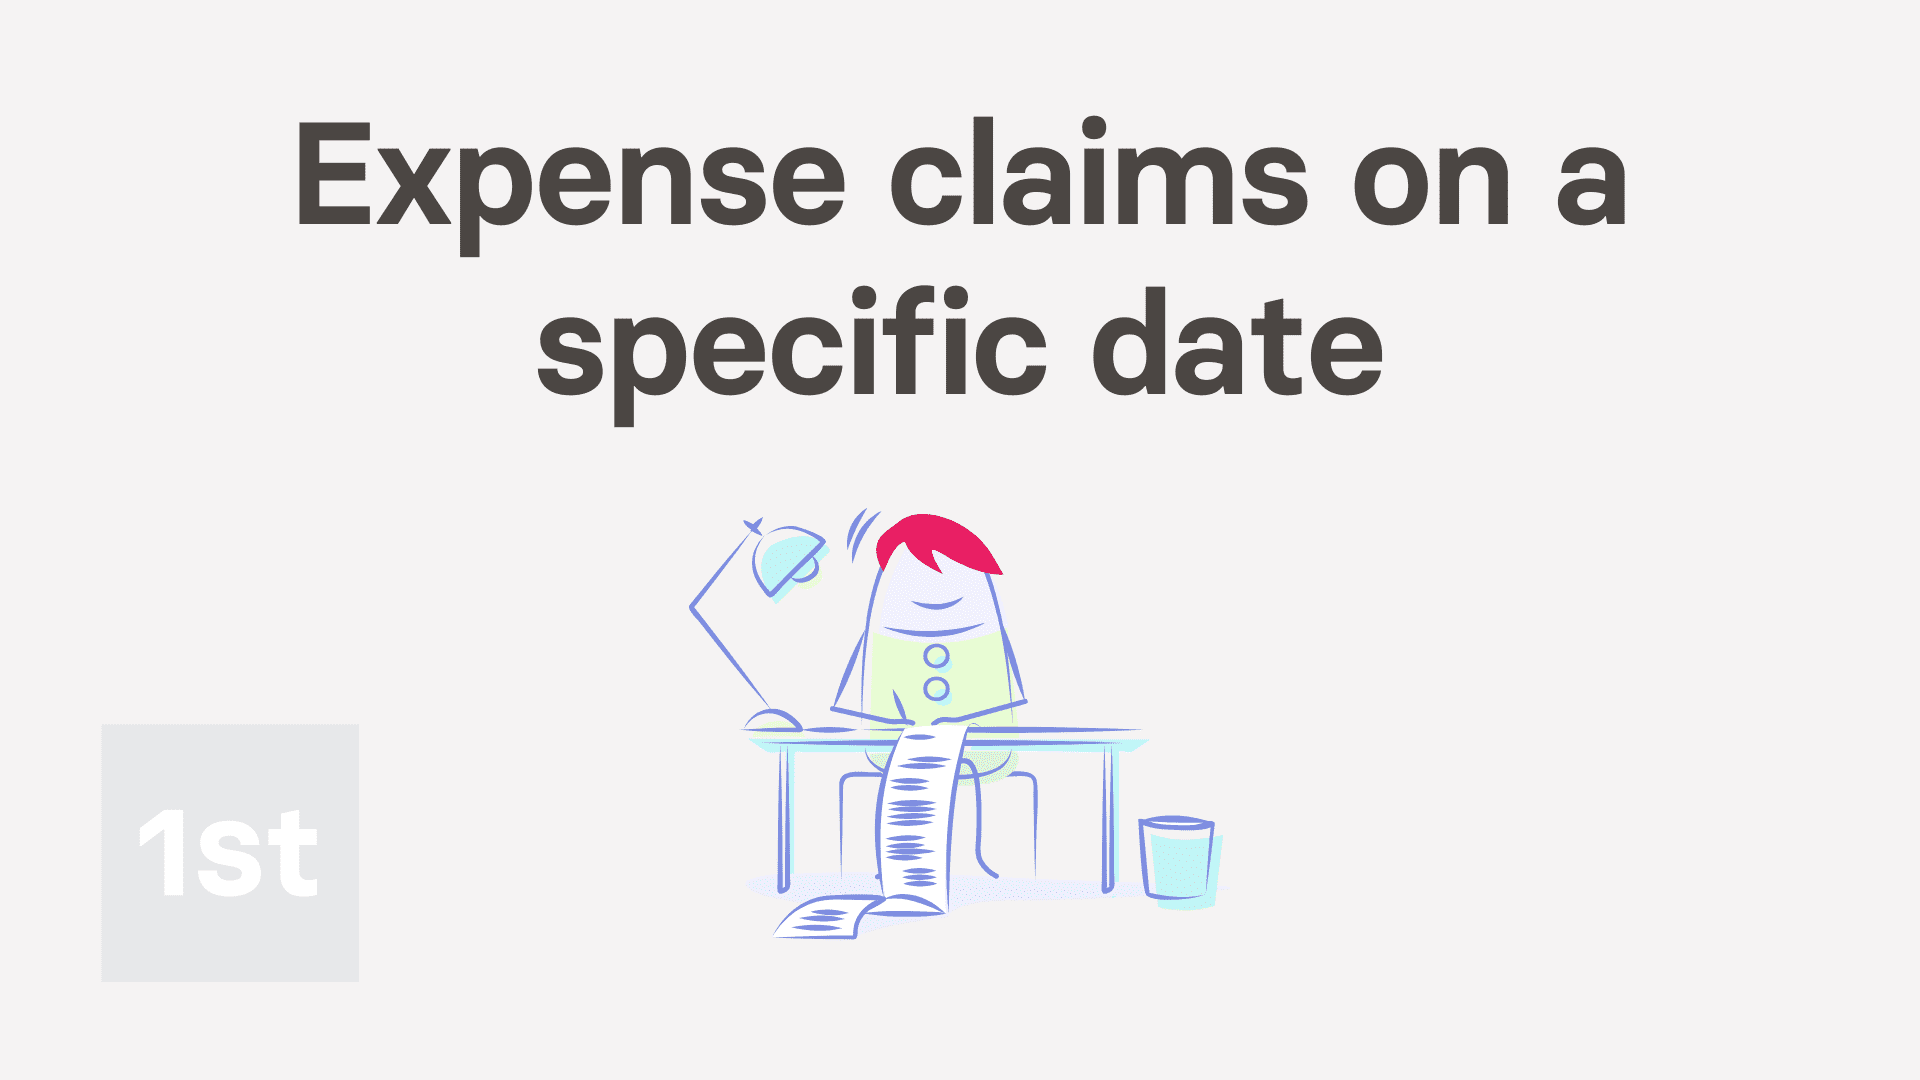 2:15
2:15 2:48
2:48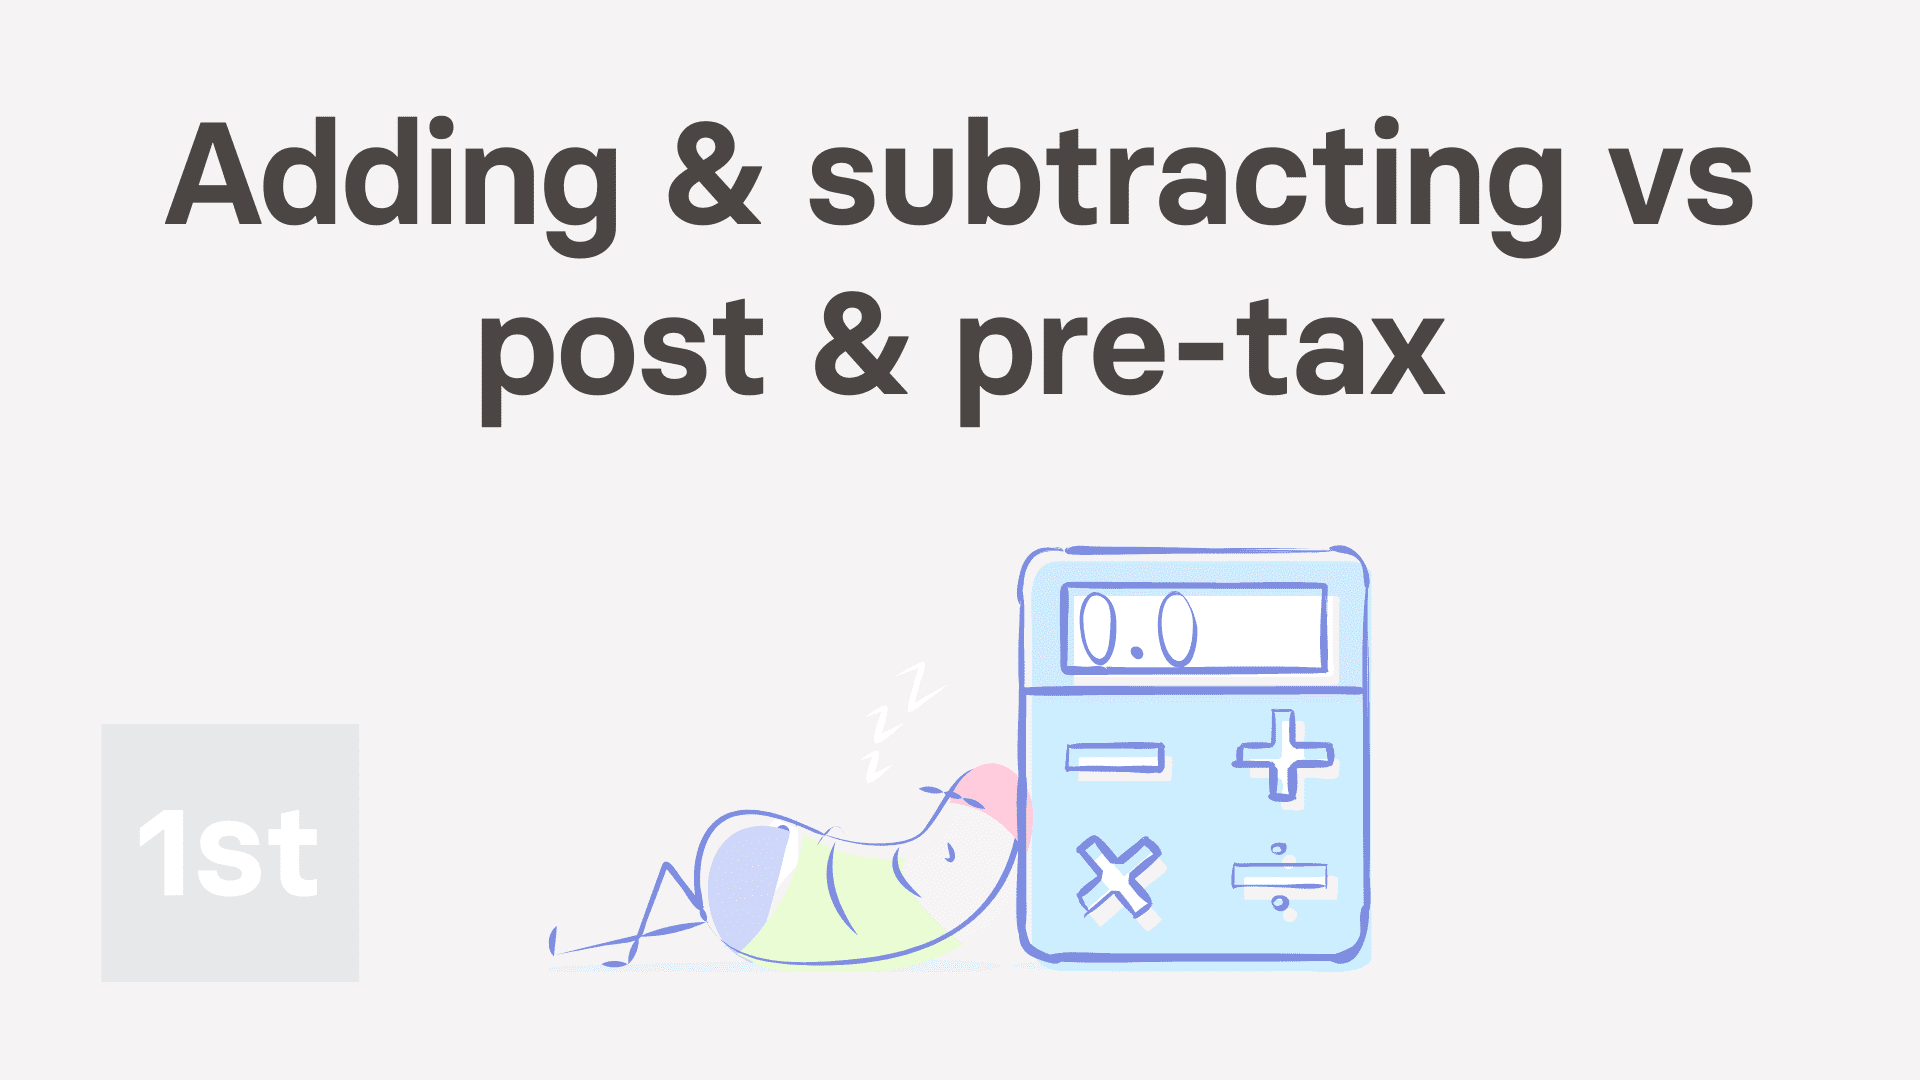 4:14
4:14 4:22
4:22 6:12
6:12 3:30
3:30 2:13
2:13 2:14
2:14 4:43
4:43 2:01
2:01 1:40
1:40 2:33
2:33 1:53
1:53 1:21
1:21 2:12
2:12 2:47
2:47 5:12
5:12Benefits-in-kind. 1. How do I give to a person as one-time?
 1:44
1:44
"Benefits-in-kind. 1. How do I give to a person as one-time?"
When your company pays for a benefit that a person uses outside of work, it's considered a "Benefit-in-kind". In some cases, you may want to set it up as only a one-time "Benefit-in-kind", so it's added to the person's payslip only once.
To give a person a one-time "Benefit-in-kind":
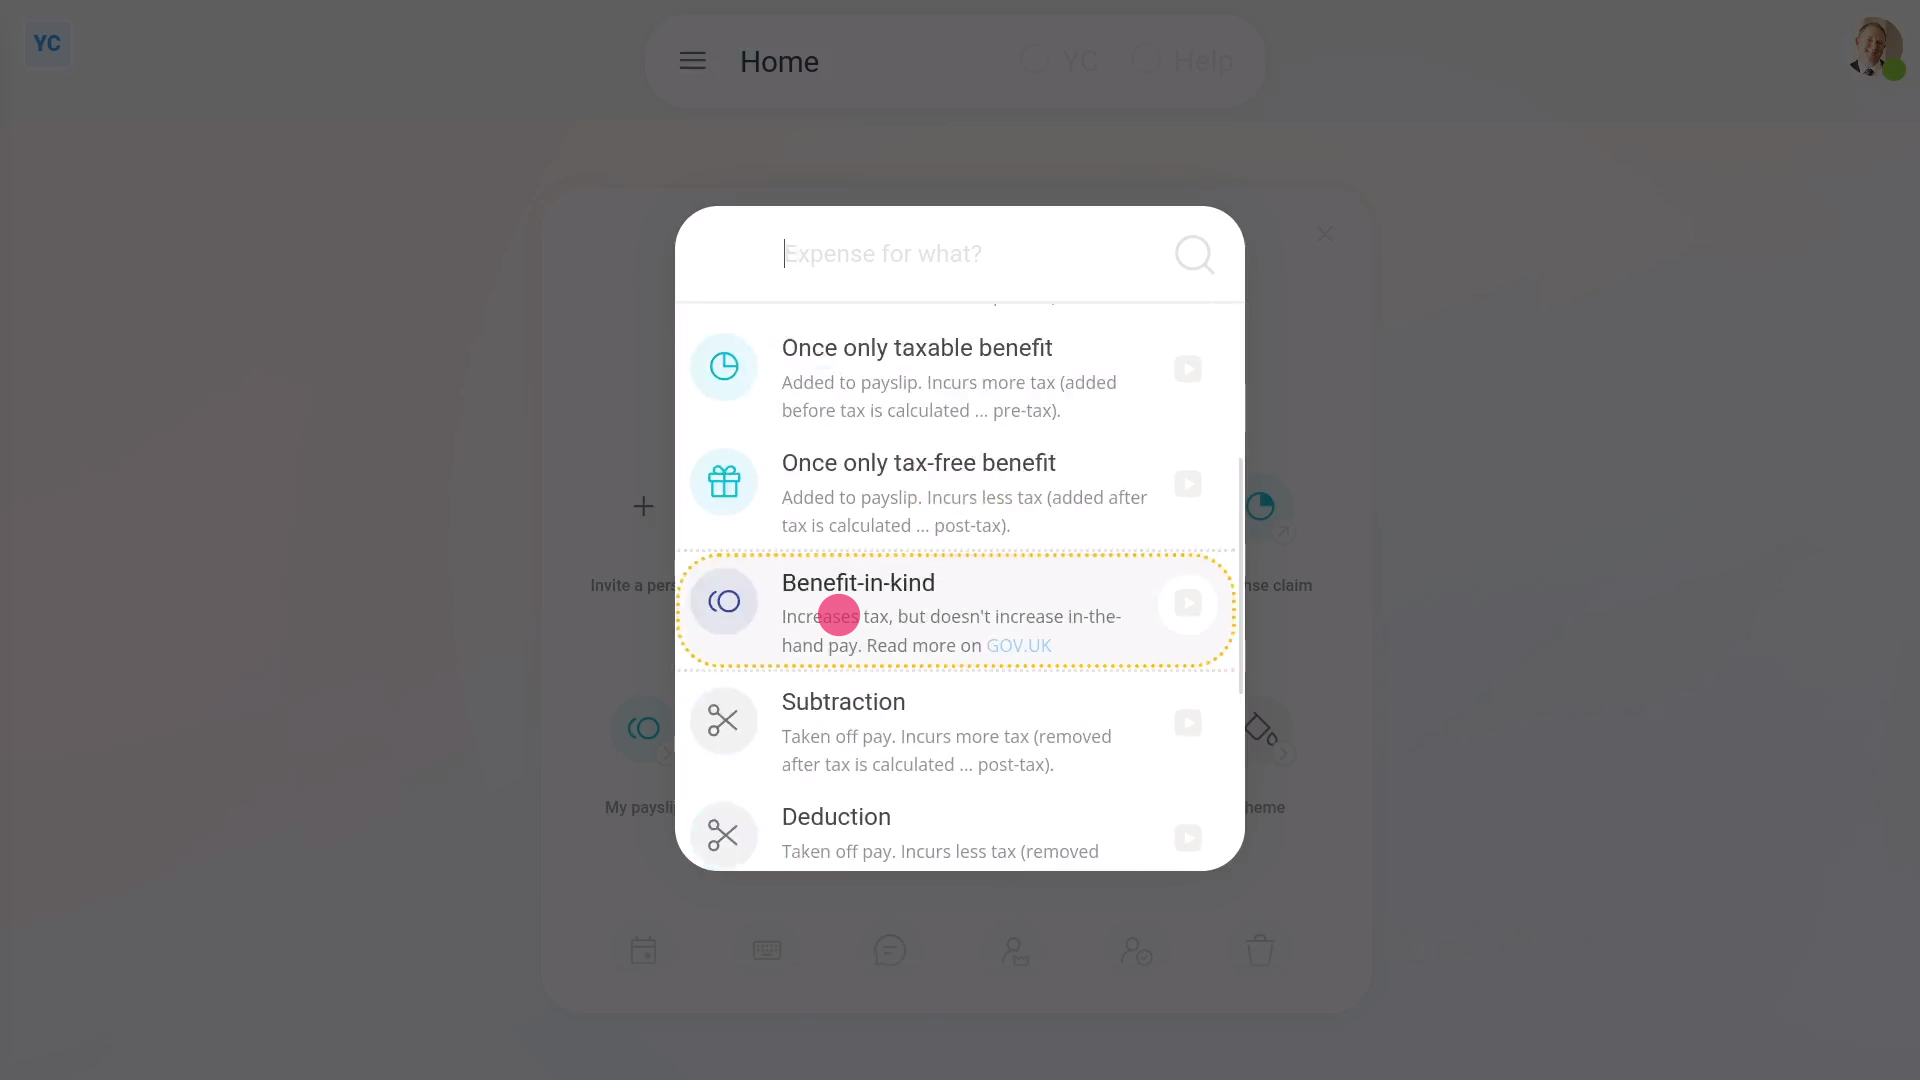
- First, tap: MenuExpense claim
- Select the person who's getting the one-time: "Benefit-in-kind"
- Scroll down, and select: Benefit-in-kind
- You can attach an image, like a receipt, or tap: Skip image
- Type in how much the "Benefit-in-kind" is worth, and tap: Next
- Then type a short description of the one-time "Benefit-in-kind", and tap: Next
- And because it's a payroll admin who's entering it, the expense is automatically approved.
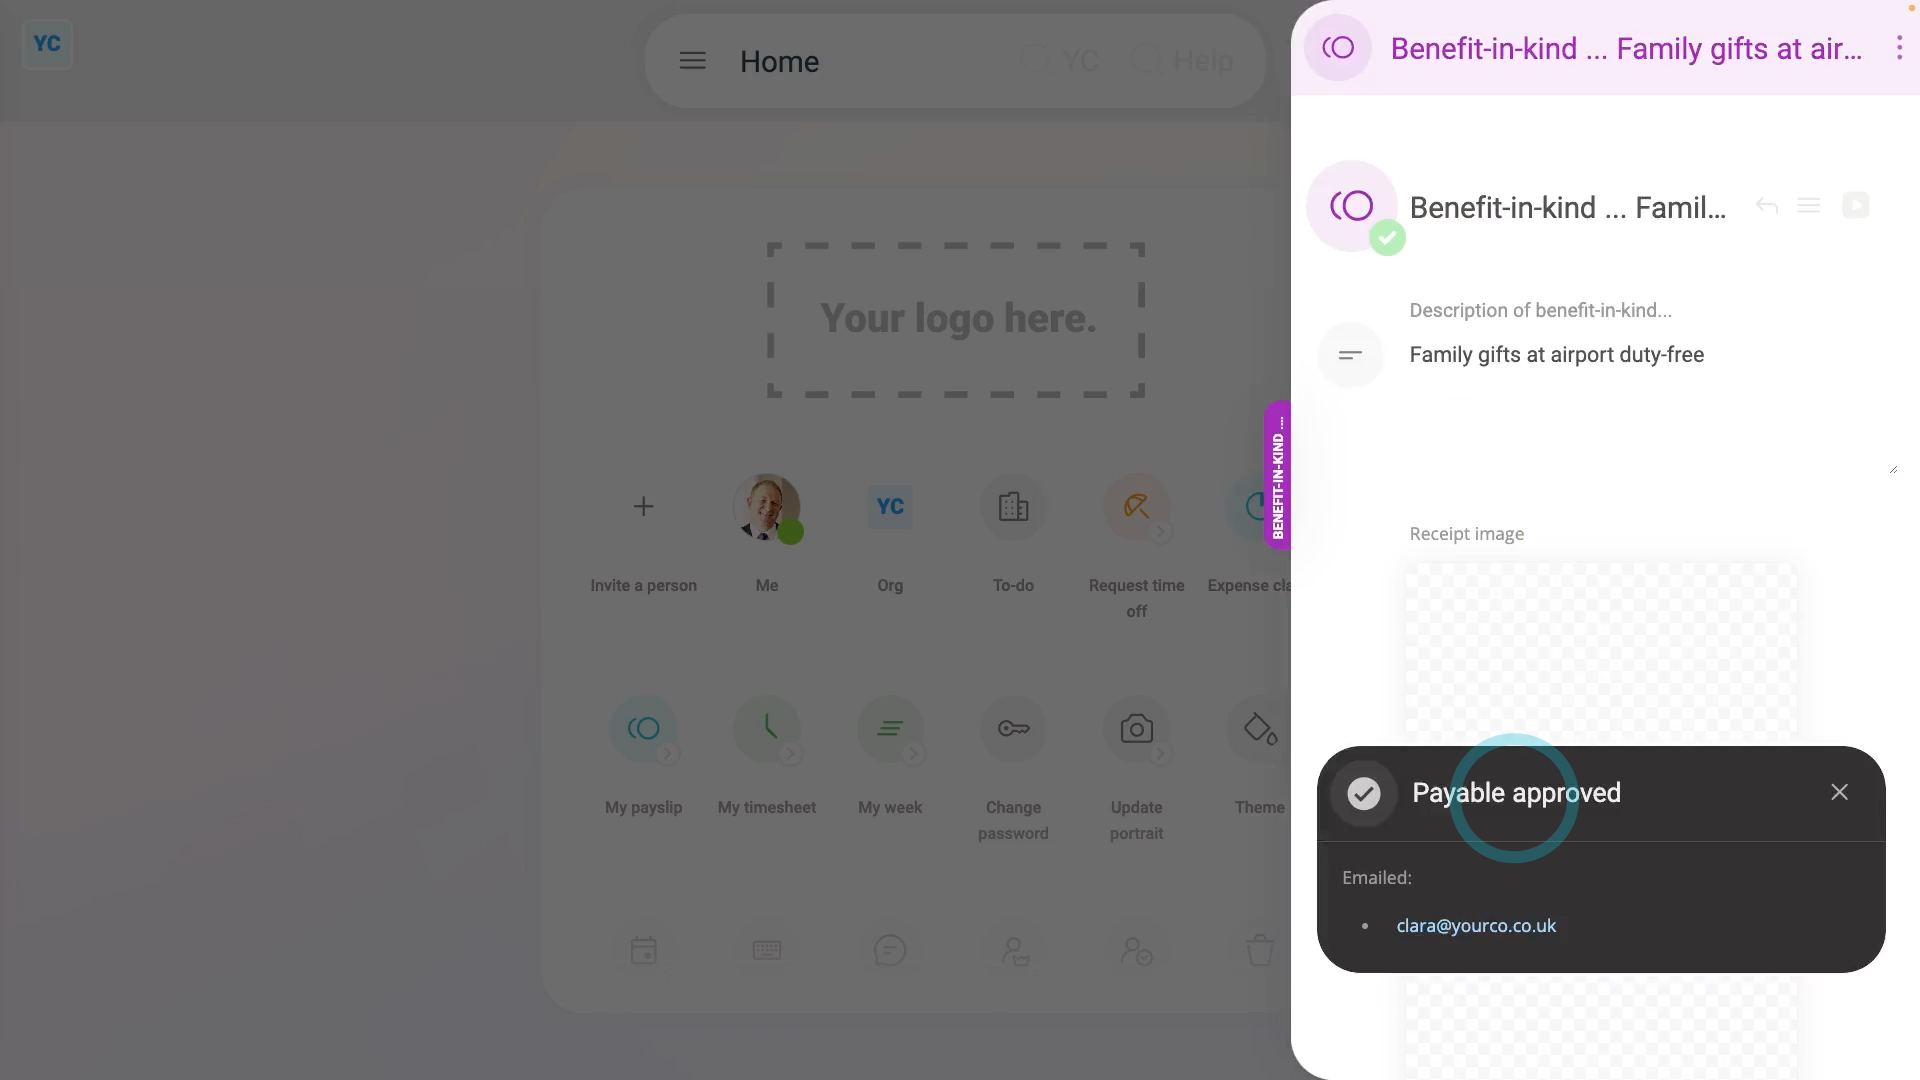
- Now, to see how it shows up on the person's payslip, scroll down and tap: See on payslip
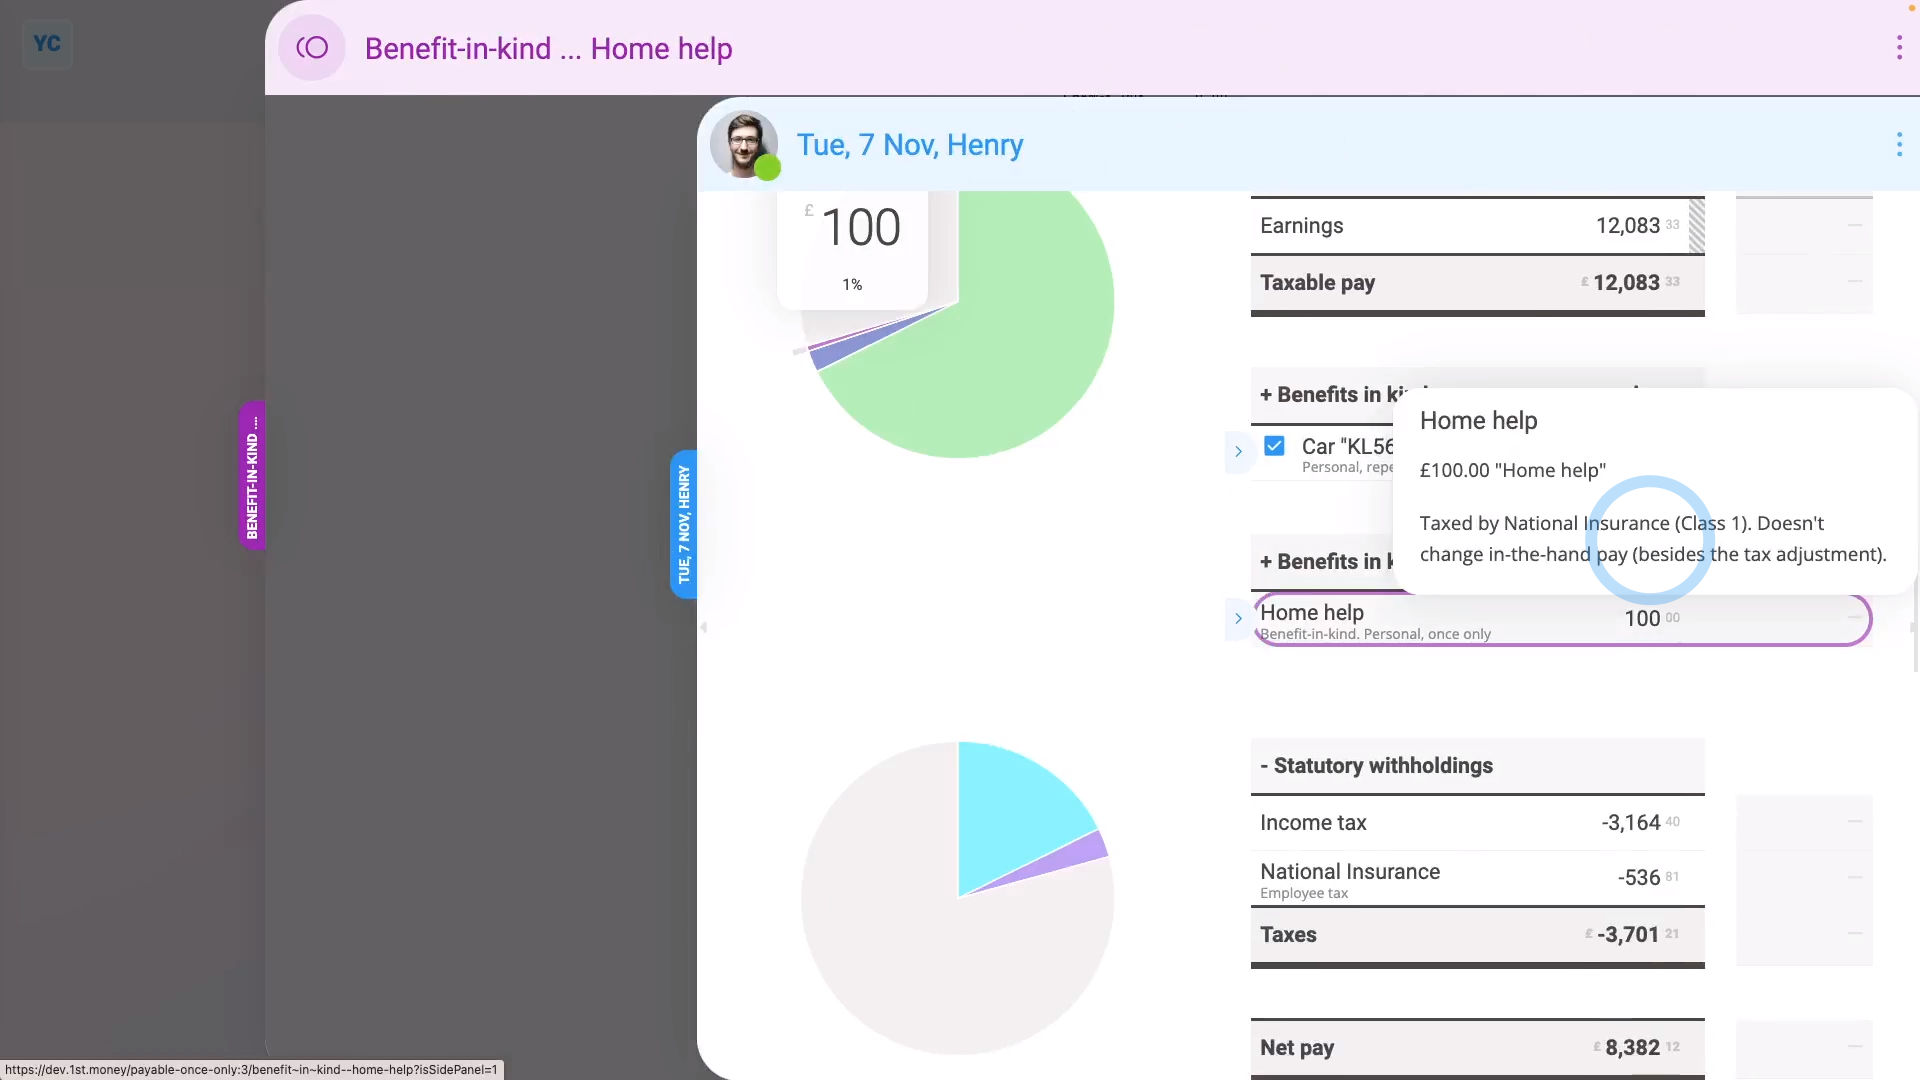
- And finally, when you hover your mouse over the "Benefit-in-kind" amount, you'll see the details.
Also remember that:
- A "Benefit-in-kind" increases the person's tax, and doesn't increase the person's in-the-hand pay.
- However, the person still gains by receiving the non-cash benefit.
To learn more:
- About how to add a "Benefit-in-kind" that's added to the person's payslip every payday, watch the video on: Repeating benefit-in-kind
 Repeating benefit-in-kind
And that's it! That's all you need to do to give a person a one-time benefit-in-kind!
Benefits-in-kind. 2. How do I give to a person as repeating?
 2:37
2:37
"Benefits-in-kind. 2. How do I give to a person as repeating?"
When your company pays for a benefit that a person uses outside of work, it's considered a "Benefit-in-kind". In some cases, you may want to set it up as a repeating "Benefit-in-kind", so it's added to the person's payslip every payday.
To add or remove a person's repeating "Benefit-in-kind":
- First, select the person who's getting the repeating "Benefit-in-kind" on: MenuPeople
- To make a new repeat payable, go to: PayPay settings
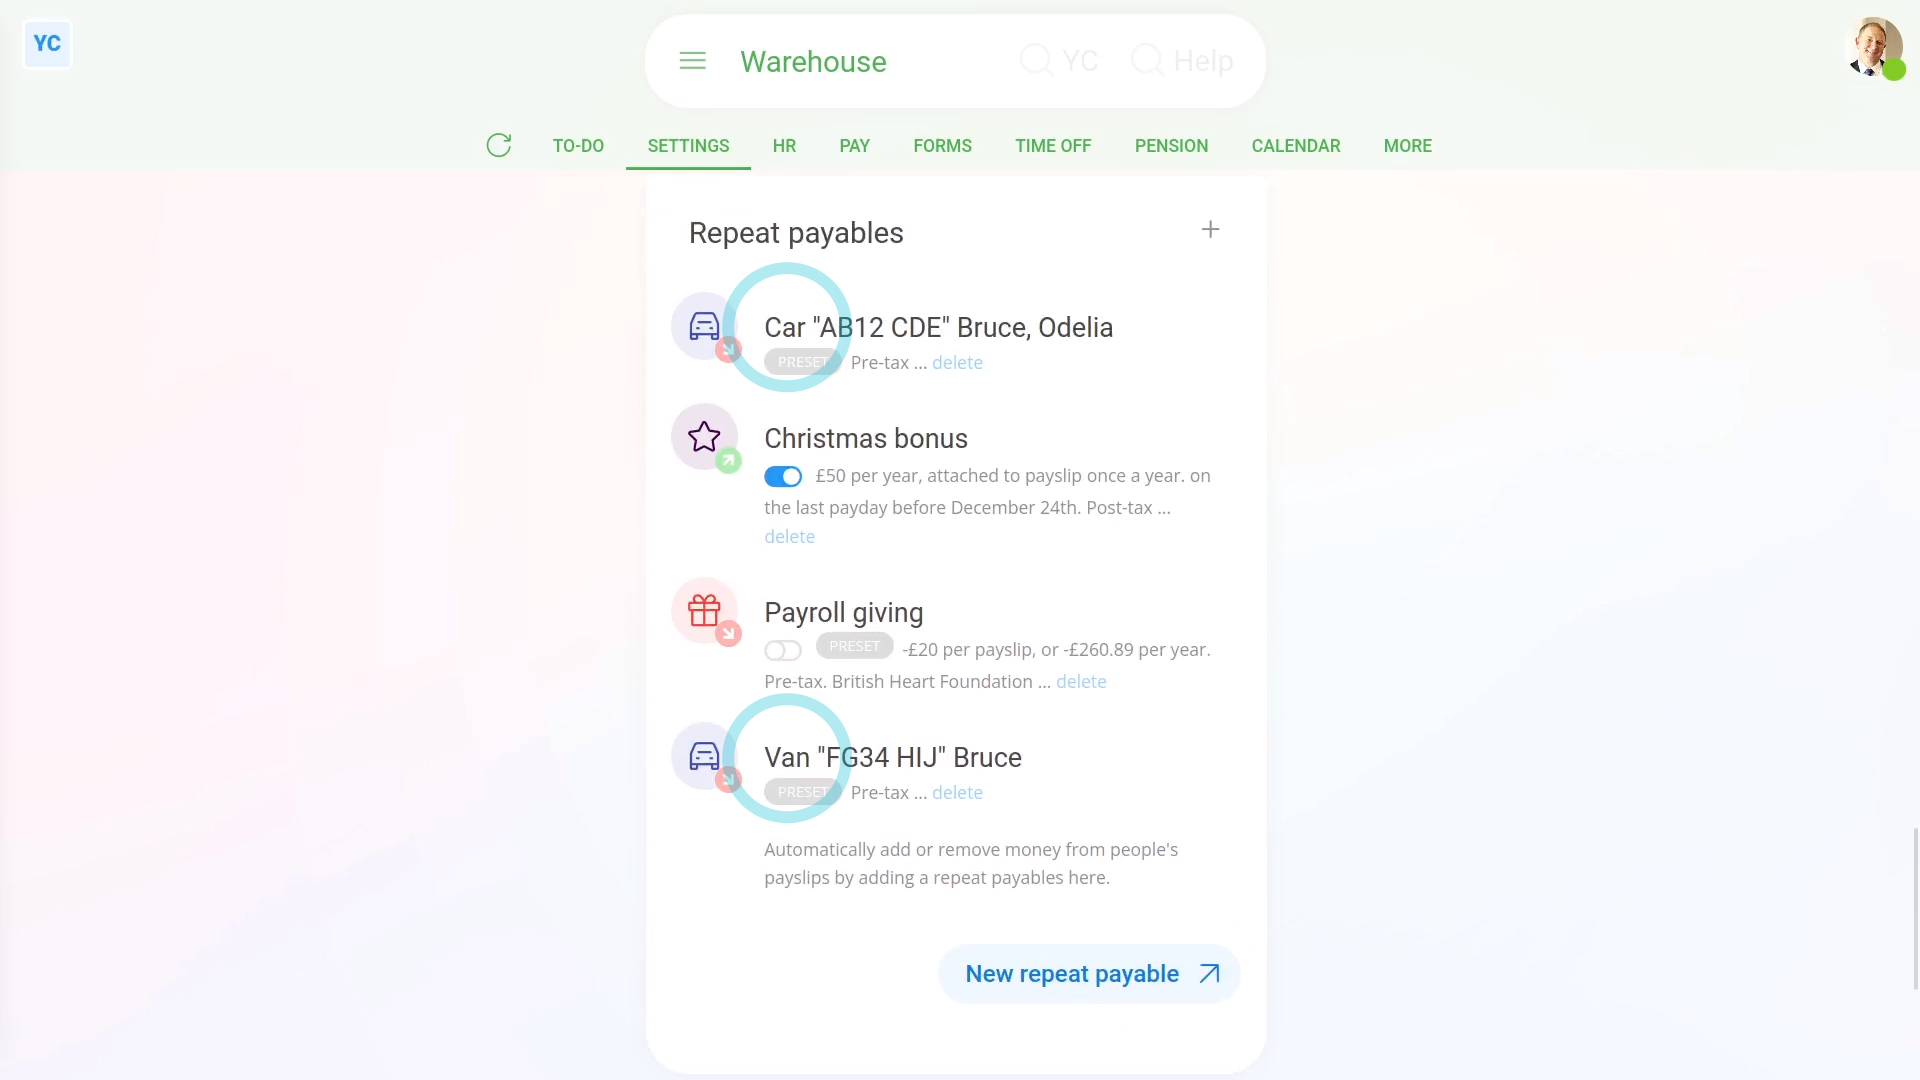
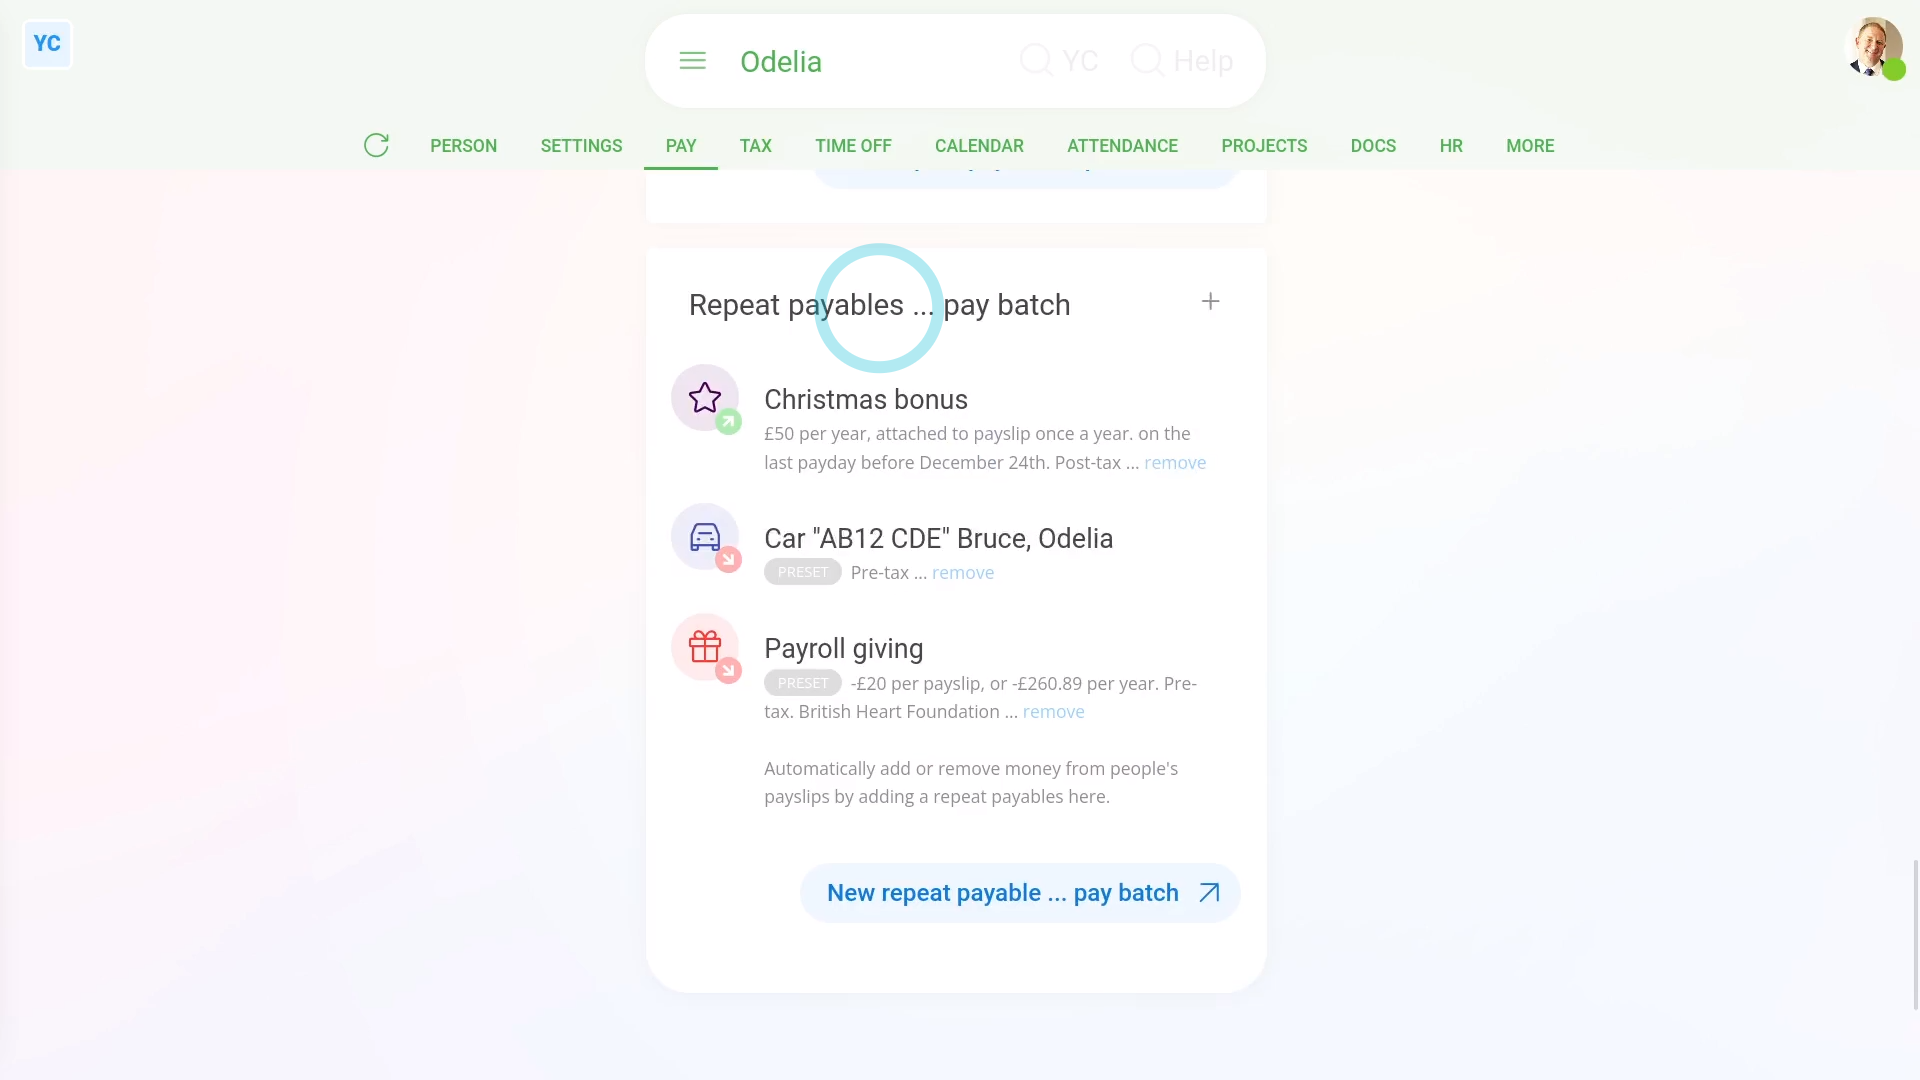
- And scroll down to the "Repeat payables ... personal" heading.
- Then tap: New repeat payable
- Next, select: Benefit-in-kind
- Next, type in a Description of the benefit-in-kind.
- Select the time frame for the: Amount type
- And then type in the: Amount
- If there's a co-pay, or an amount that the person's agreed can be taken off their pay, enter that also in: Employee deducted co-pay
- By default, "Arranged by" is already set to: "Company"
- Then tap: Save
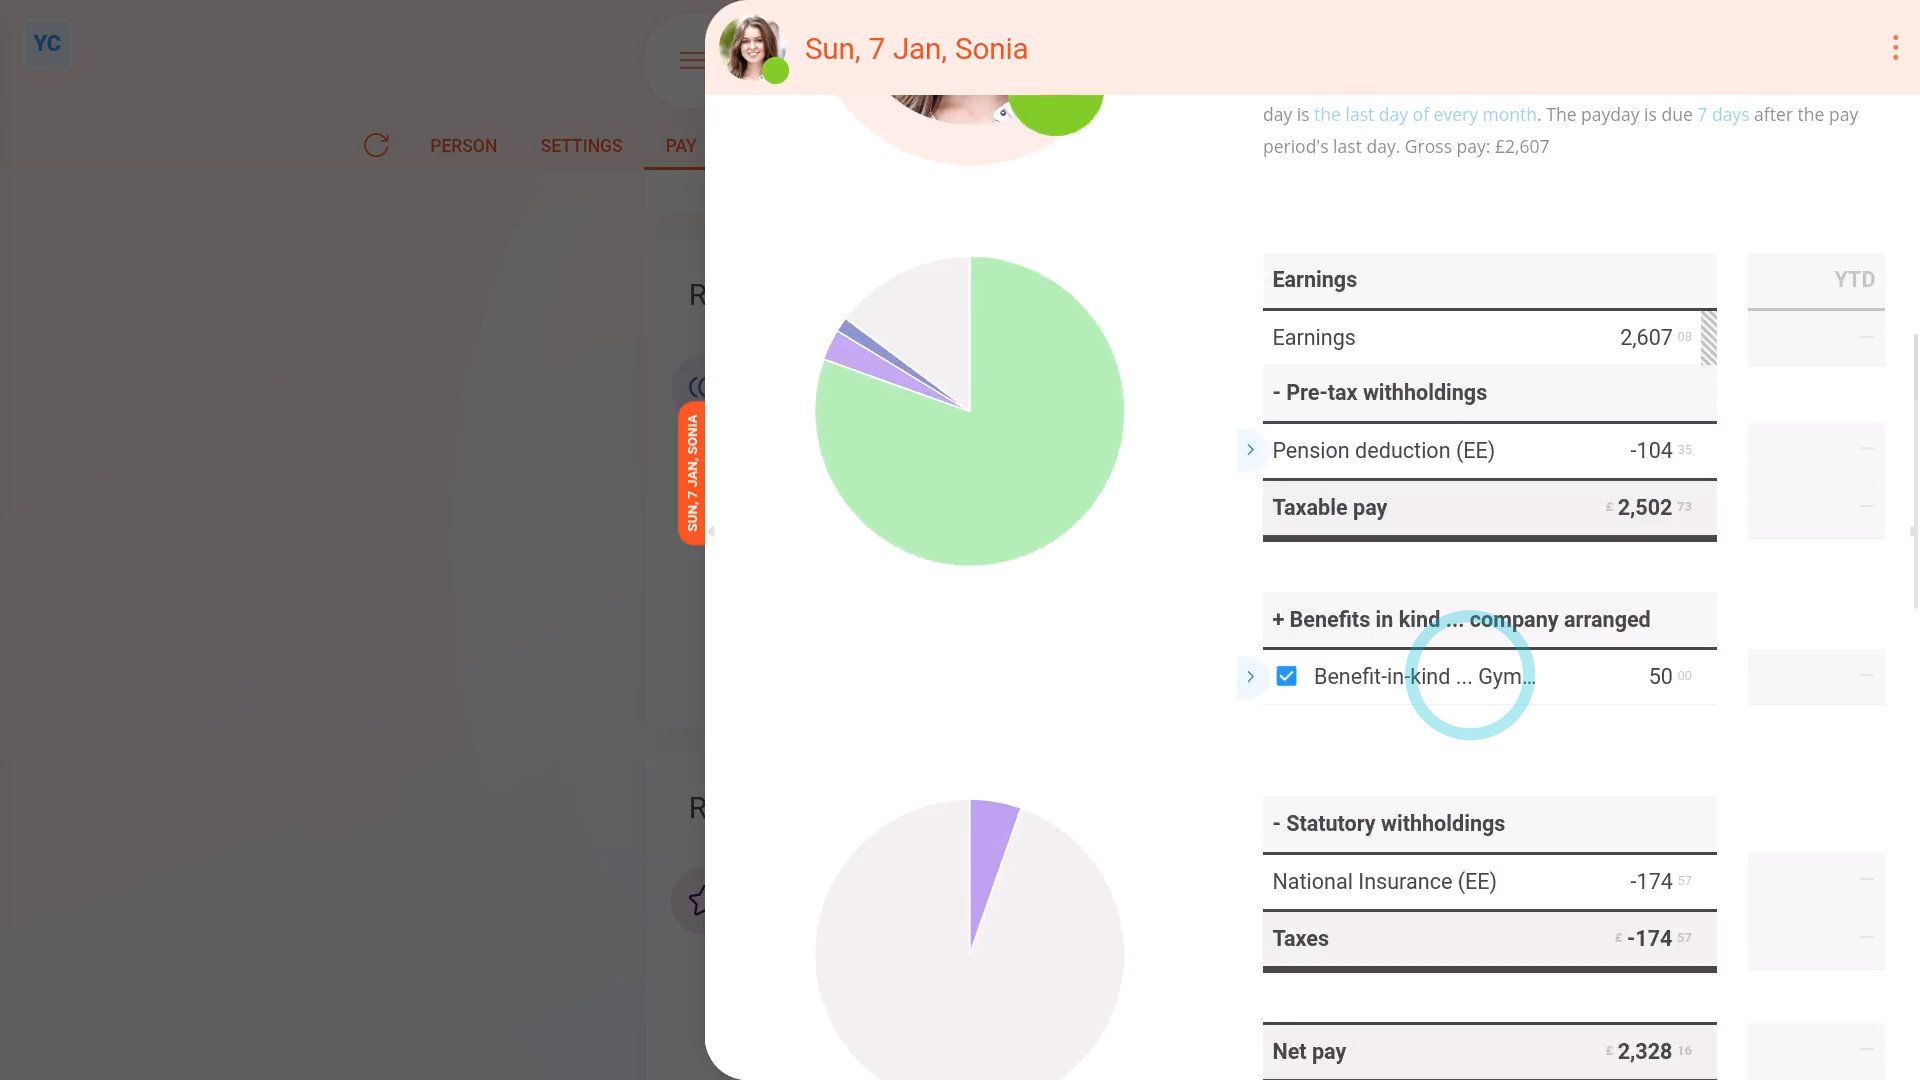
- Then on the repeat payable list, hover your mouse over the repeat payable, and tap the "See on payslip" button:
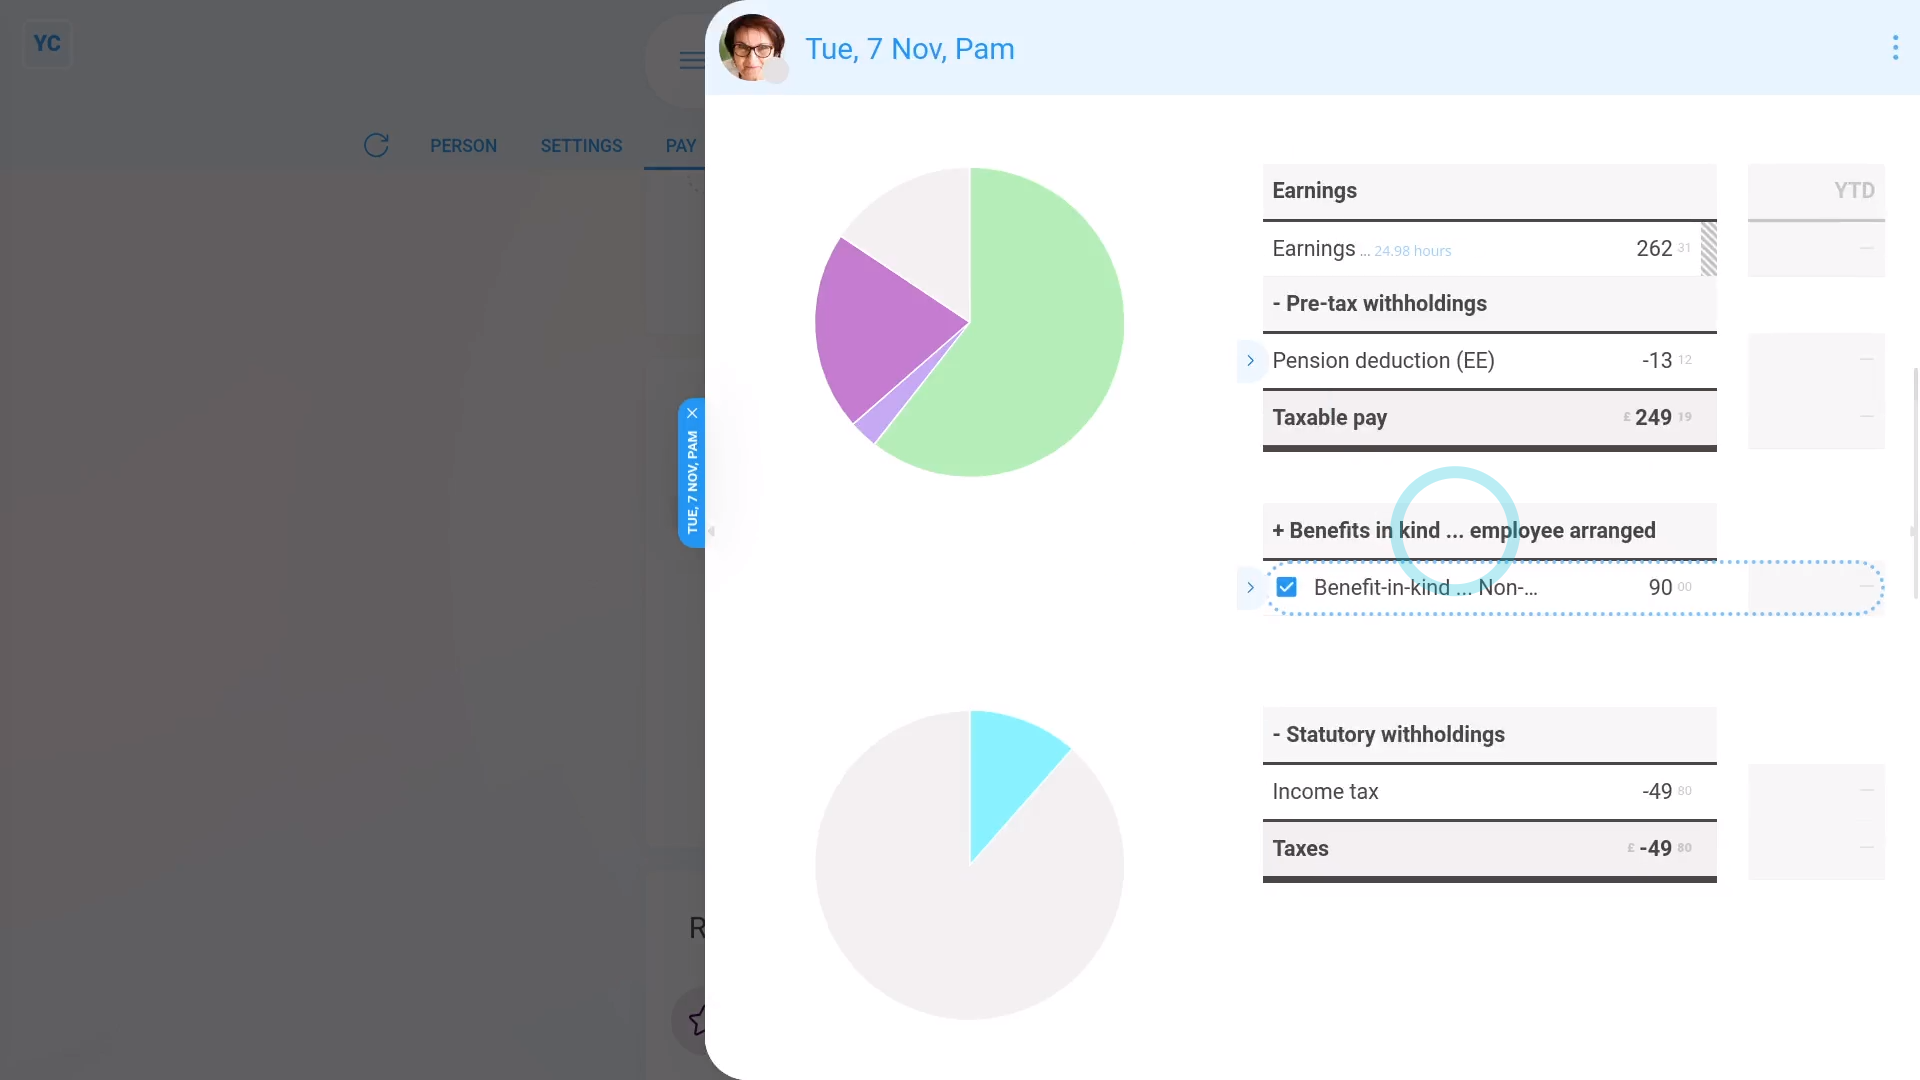
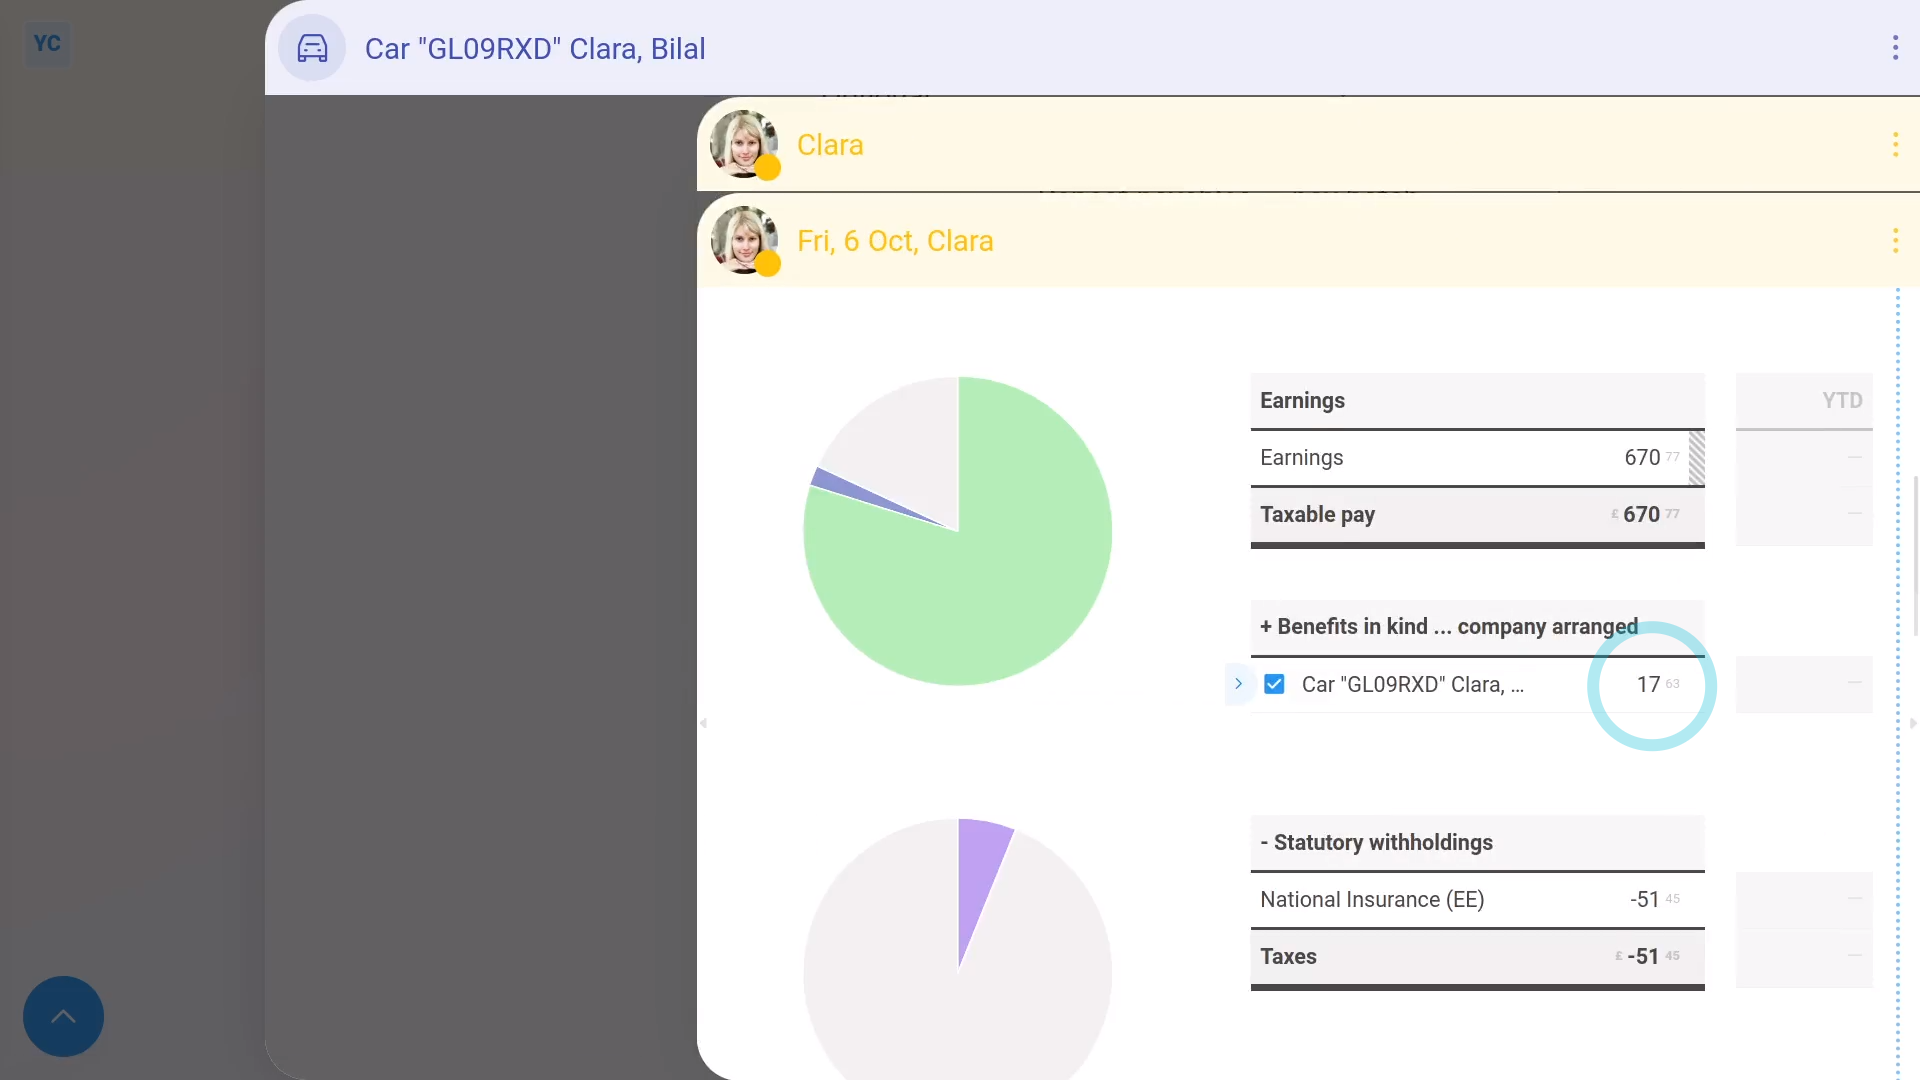
- You'll now see an amount showing under: "Benefits-in-kind ... company arranged"
- And if you hover your mouse over the amount, you'll see a breakdown of the calculation.
- Then if you tap the "Next payslip" circle, you'll see the same amounts repeated on every payday. Including: "Benefit-in-kind"
- If you later decide you want to remove, or stop the repeating "Benefit-in-kind", tap its "Edit" button:
- Then scroll down and tap the "Advanced" heading, and set the "Ends on" date.
- And finally, once you tap Save, if the date you set ends the repeating "Benefit-in-kind" before the "pay period" starts, you'll see it disappear.
Also remember that:
- A "Benefit-in-kind" increases the person's tax, and doesn't increase the person's in-the-hand pay.
- However, the person still gains by receiving the non-cash benefit.
To learn more:
- About how to do a one-time "Benefit-in-kind", watch the video on: One-time benefit-in-kind
And that's it! That's all you need to do to set up a repeating "Benefit-in-kind" for a person!
Benefits-in-kind. 3. How do I add as company arranged?
 2:28
2:28
"Benefits-in-kind. 3. How do I add as company arranged?"
A company arranged benefit-in-kind is a way for the company to provide something beneficial to an employee beyond only money.

To add a company arranged benefit-in-kind:
- First, select the person who's getting the company arranged benefit-in-kind, on: MenuPeople
- Next, go to: PayPay settings
- And scroll down to the "Repeat payables ... personal" heading.
- Then tap: New repeat payable
- Next, select: Benefit-in-kind
- Next, type in a Description of the benefit-in-kind.
- Select the time frame for the: Amount type
- And then type in the: Amount
- By default, "Arranged by" is already set to: "Company"
- Then scroll down and tap the "Advanced" heading.
- If there's a co-pay, or an amount that the person's agreed can be taken off their pay, enter that also in: Employee deducted co-pay
- Then tap: Save
- Now, to see how it shows up on the person's payslip, hover your mouse over the repeat payable, and tap the "See on payslip" button:
- You'll now see an amount showing under: "Benefits-in-kind ... company arranged"
- There may have been a co-pay, or an amount that the person's agreed can be taken off their pay. If so, you'll also see that amount showing as: "Employee deducted co-pay"
- And finally, if you hover your mouse over the amounts, you'll see a breakdown of their calculations.
Keep in mind that:
- As a "Benefits-in-kind ... company arranged", the benefit is taxed by both "Income Tax" and: "National Insurance (Class 1A)"
- Which results in the person paying slightly higher taxes, compared to a: "Benefits-in-kind ... employee arranged"
- Also, because it's a benefit-in-kind, there's no change to the person's in-the-hand pay (besides the tax adjustment).
To learn more:
- About a "Benefits-in-kind ... employee arranged", watch the video on: Employee arranged benefit
And that's it! That's everything you need to know about adding a company arranged benefit-in-kind.
Benefits-in-kind. 4. How do I add as employee arranged?
 2:25
2:25
"Benefits-in-kind. 4. How do I add as employee arranged?"
An employee arranged benefit-in-kind, that's paid by the company, is taxed with National Insurance (Class 1) only.
To add an employee arranged benefit-in-kind:
- First, select the person who's getting the employee arranged benefit-in-kind, on: MenuPeople
- Next, go to: PayPay settings
- And scroll down to the "Repeat payables ... personal" heading.
- Then tap: New repeat payable
- Next, select: Benefit-in-kind
- Next, type in a Description of the benefit-in-kind.
- Select the time frame for the: Amount type
- And then type in the: Amount
- Next, change "Arranged by" to: "Employee"
- Then scroll down and tap the "Advanced" heading.
- If there's a co-pay, or an amount that the person's agreed can be taken off their pay, enter that also in: Employee deducted co-pay
- Then tap: Save
- Now, to see how it shows up on the person's payslip, hover your mouse over the repeat payable, and tap the "See on payslip" button:
- You'll now see an amount showing under: "Benefits-in-kind ... employee arranged"
- There may have been a co-pay, or an amount that the person's agreed can be taken off their pay. If so, you'll also see that amount showing as: "Employee deducted co-pay"
- And finally, if you hover your mouse over the amounts, you'll see a breakdown of their calculations.
Keep in mind that:
- As a "Benefits-in-kind ... employee arranged", the benefit is taxed by "National Insurance (Class 1)" only.
- Which results in the person paying slightly lower taxes, compared to a: "Benefits-in-kind ... company arranged"
- Also, because it's a benefit-in-kind, there's no change to the person's in-the-hand pay (besides the tax adjustment).
To learn more:
- About a "Benefits-in-kind ... company arranged", watch the video on: Company arranged benefit
And that's it! That's everything you need to know about adding an employee arranged benefit-in-kind.
Benefits-in-kind. 5. How do I deduct the co-pay?
 1:53
1:53
"Benefits-in-kind. 5. How do I deduct the co-pay?"
As part of receiving a benefit-in-kind, in some cases a person agrees to having a co-pay or an amount taken off their pay.
To add a co-pay deduction to a benefit-in-kind:
- First, select the person who's agreed to a co-pay deduction for a benefit-in-kind, on: MenuPeople
- Next, go to: PayPay settings
- And scroll down to the "Repeat payables" heading.
- And tap the "Benefit-in-kind" that you'd like to add a co-pay deduction to.
- Once it slides out on the right, tap the "Advanced" heading.
- And enter the co-pay, or amount that the person's agreed can be taken off their pay in: Employee deducted co-pay
- Then tap: Save
- And you'll now see, in your listing, that the co-pay deduction has been saved.
- To see the co-pay deduction on the person's payslip, hover your mouse over the benefit-in-kind, and tap the "See on payslip" button:
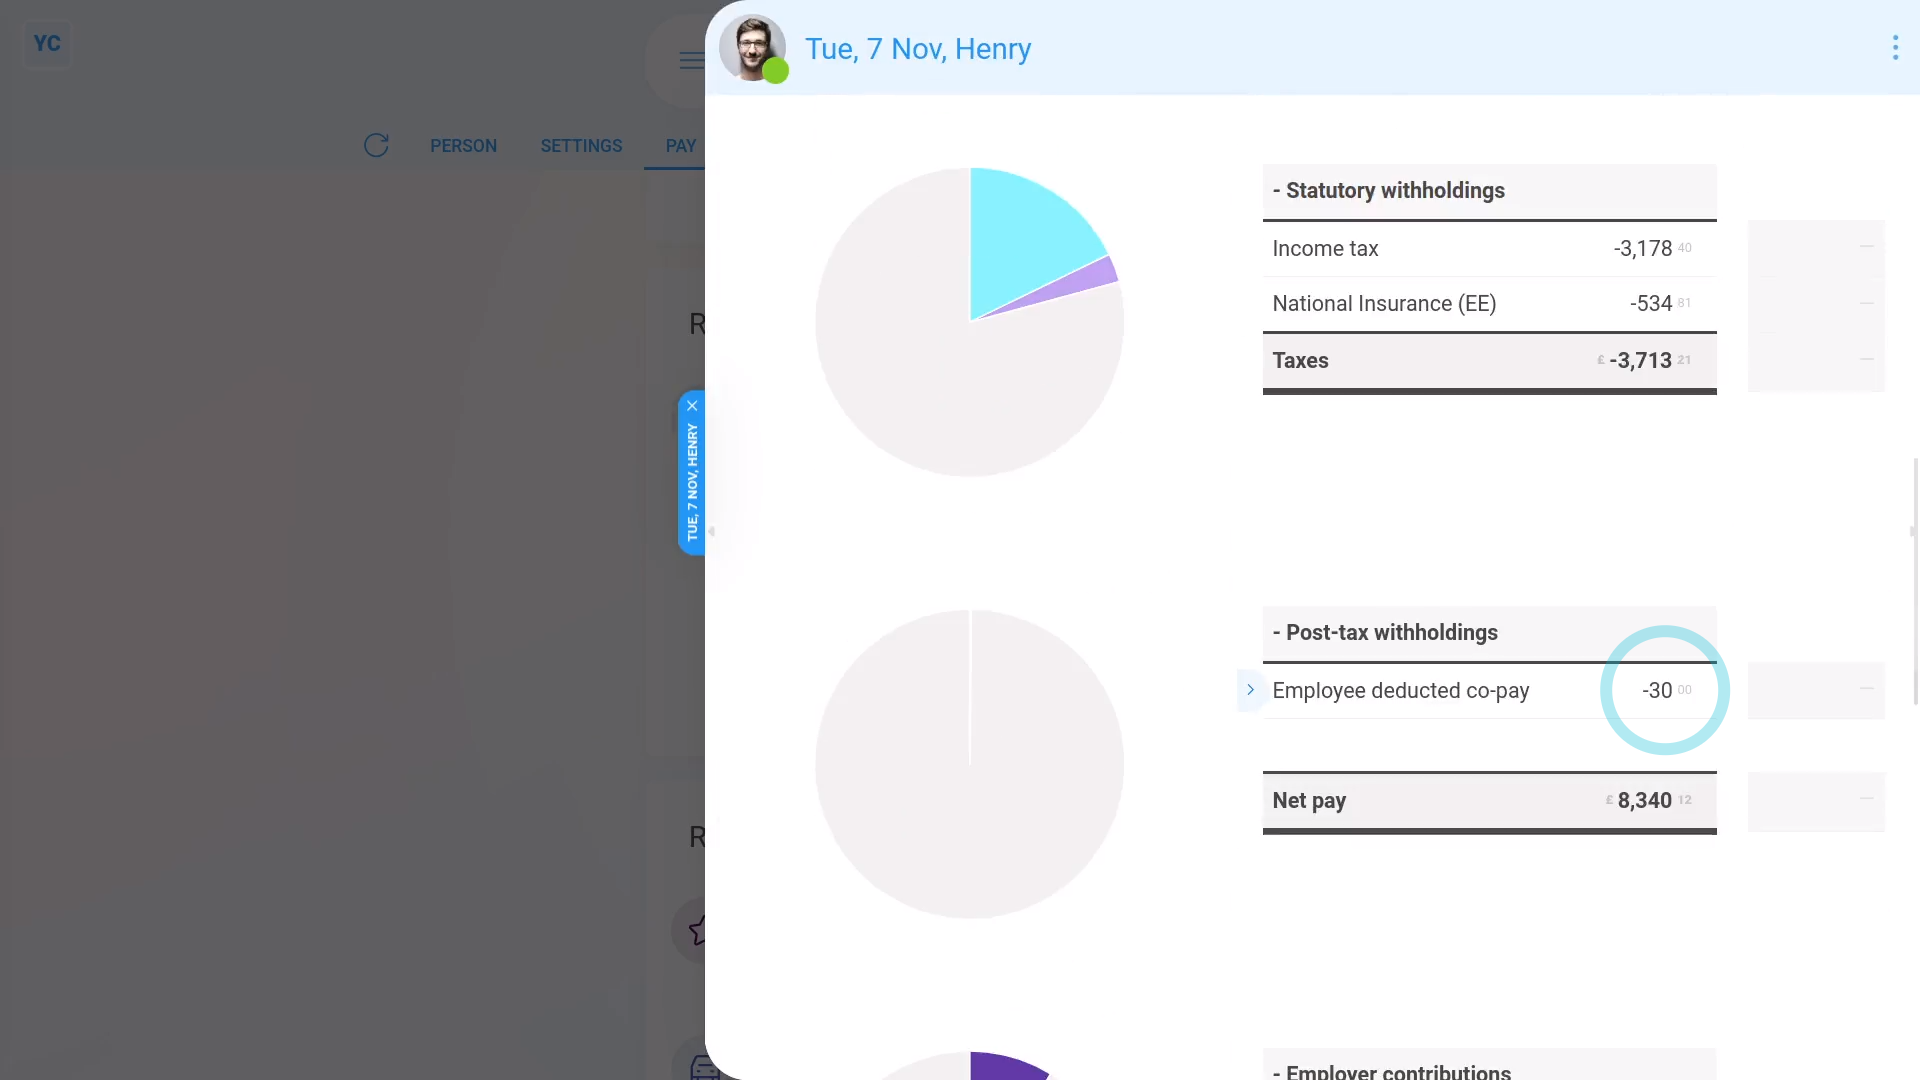
- You'll now see the "Employee deducted co-pay" showing under: "Post-tax withholdings"
- And if you hover your mouse over the amount, you'll see a breakdown of the calculation.
- And finally, if you scroll back up to "Benefits-in-kind ... company arranged", you'll also see that the benefit-in-kind has been correctly reduced by the co-pay amount.
Keep in mind that:
- A co-pay deduction can be added to any type of benefit-in-kind.
- Including person or pay batch, and one-time or repeating.
And that's it! That's all you need to do to deduct a co-pay or amount a person's agreed to pay towards a benefit-in-kind!
Expense claims. 1. How do I submit one?
 1:45
1:45
"Expense claims. 1. How do I submit one?"
When you spend your personal money to buy something for your employer, you can claim the cost back by submitting an expense claim.
To submit an expense claim:
- First, tap: MenuExpense claim
- If you've got an image, like a receipt, that you'd like to include, you can upload, or take a photo of it.
- Then tap: Next
- Type in the amount you're requesting.
- And tap: Next
- You can add notes to help your payday admin know why you're requesting the expense.
- Or you can select one from the list.
- Then tap: Next
- And now you're all done submitting your expense.
- If you want to submit another one, tap: Request another
- Otherwise, tap Close to review your expense claim.
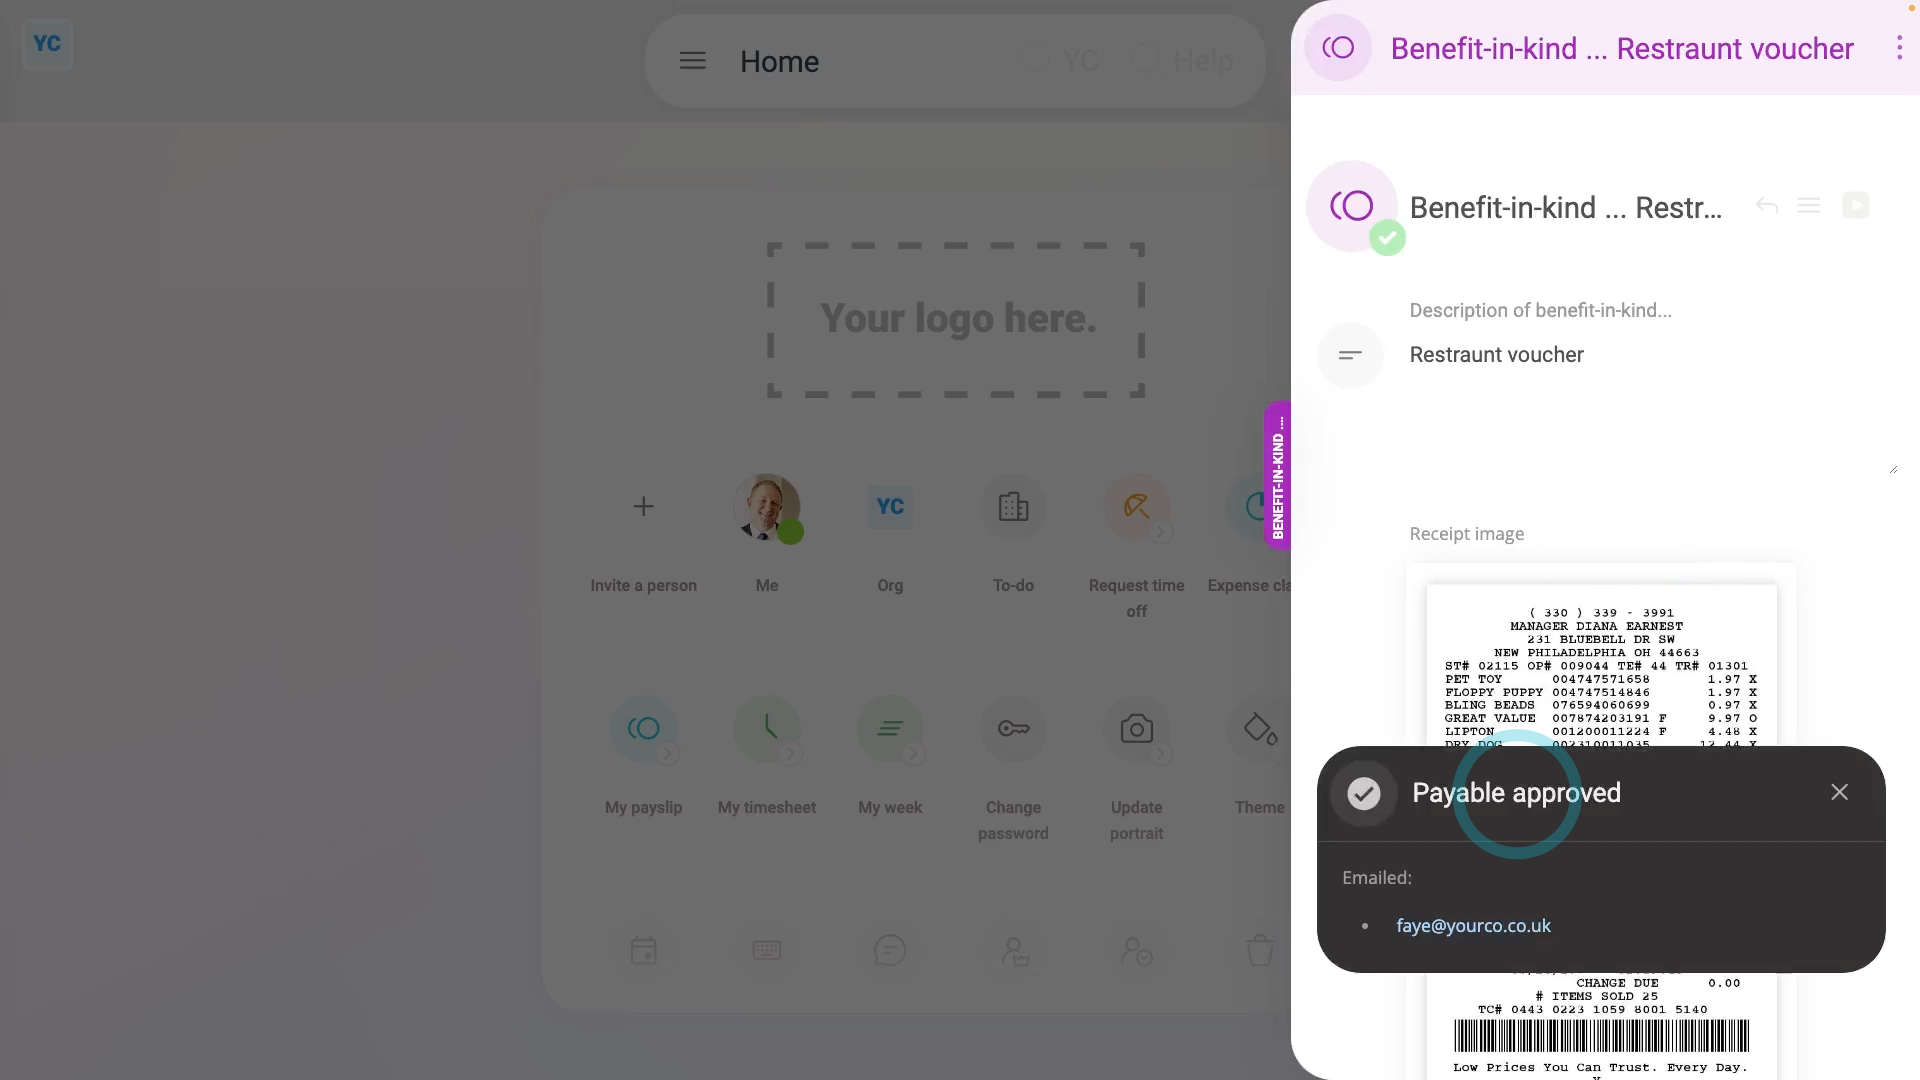
- Then in the background, an email's been sent to your payday admin to approve your expense claim.
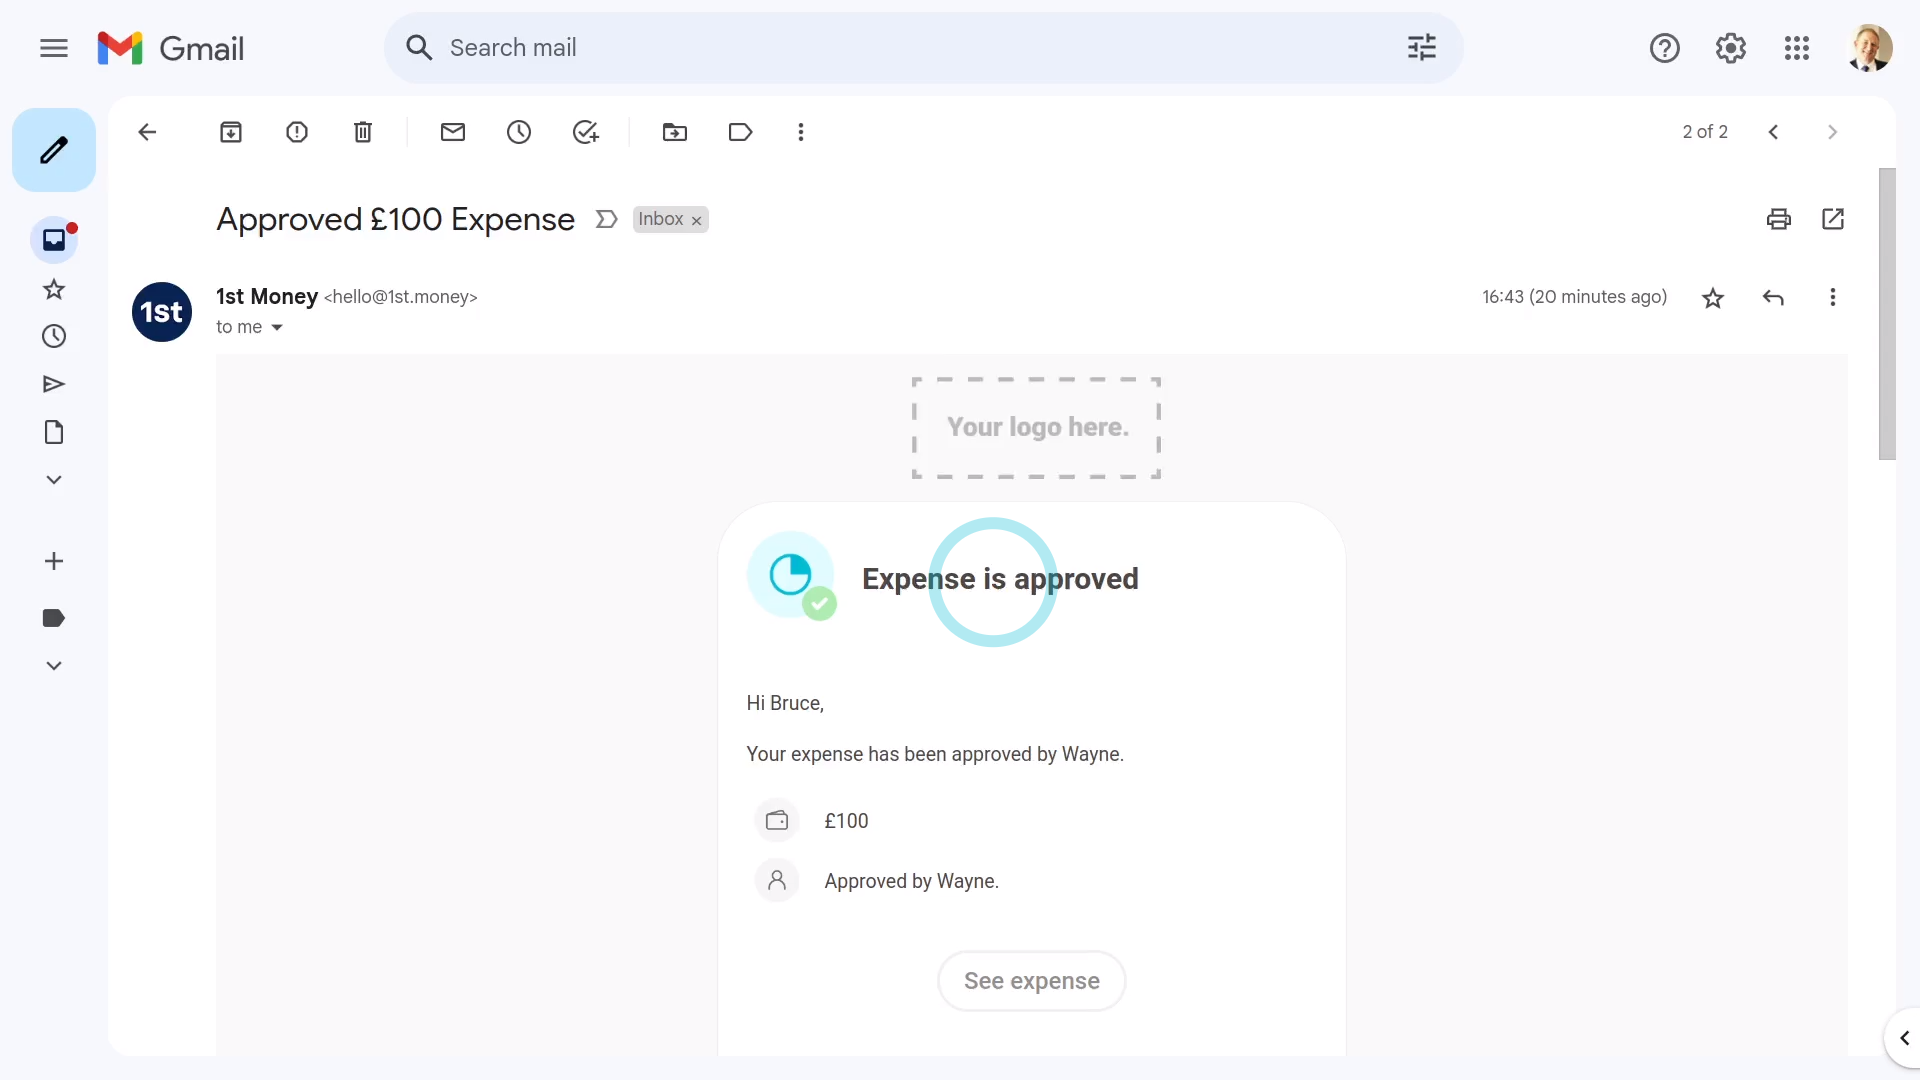
- Once your payday admin's approved your expense, you'll get an email.
- From the email, tap: See expense
- And you'll see the green tick indicating that it's been approved.
- And finally, when you scroll down you'll see (at the bottom) the date of the payslip that it's to be paid with.
Keep in mind that:
- Any expense claim payment that's paid back to you is paid free of any tax deductions.
- Once approved, your expense claim is paid back to you along with your normal payslip.
And that's it! That's everything you need to know about submitting an expense claim!
Expense claims. 2. How do I resubmit if it's declined?
 1:10
1:10
"Expense claims. 2. How do I resubmit if it's declined?"
If your payday admin declined one of your expense claims, you'll get an email letting you resubmit it.
To resubmit a declined expense claim:
- First, tap: Edit for resubmit
- Then type more notes in the box explaining why your payday admin might reconsider approving your expense claim.
- And when you're finished, tap: Save
- Then in the background, another email's now sent to your payday admin, again asking them to approve your expense claim.
- Once your payday admin's approved your resubmitted expense, you'll get an email.
- From the email, tap: See expense
- And you'll see the green tick indicating that it's now been approved.
- And finally, when you scroll down you'll see (at the bottom) the date of the payslip that it's to be paid with.
And that's it! That's everything you need to know about resubmitting an expense claim!
Expense claims. 3. How do I approve or decline?
 2:18
2:18
"Expense claims. 3. How do I approve or decline?"
When a person requests an expense claim, as their payday person, you'll get an email asking you to approve it.
To approve or decline a submitted expense claim:
- First, as their payday person, you'll be the one to receive expense claim emails.
- Approving from your email:
If you'd like to change the request, or you're not sure if you're ready to approve it, tap the blue "Edit request" link. - In some cases, if you don't approve of the expense, tap: Declined
- In most cases, however, to approve the expense, tap: Approved
- Which is all you need to do to see the "Expense approved" confirmation.
- Also, in the background, an approval email's sent to the person.
- What the requesting person sees:
When the requesting person opens their email inbox, the person sees an email letting them know that their expense has been approved. - Then from the "Approved" email, the person can tap See expense to see more details.
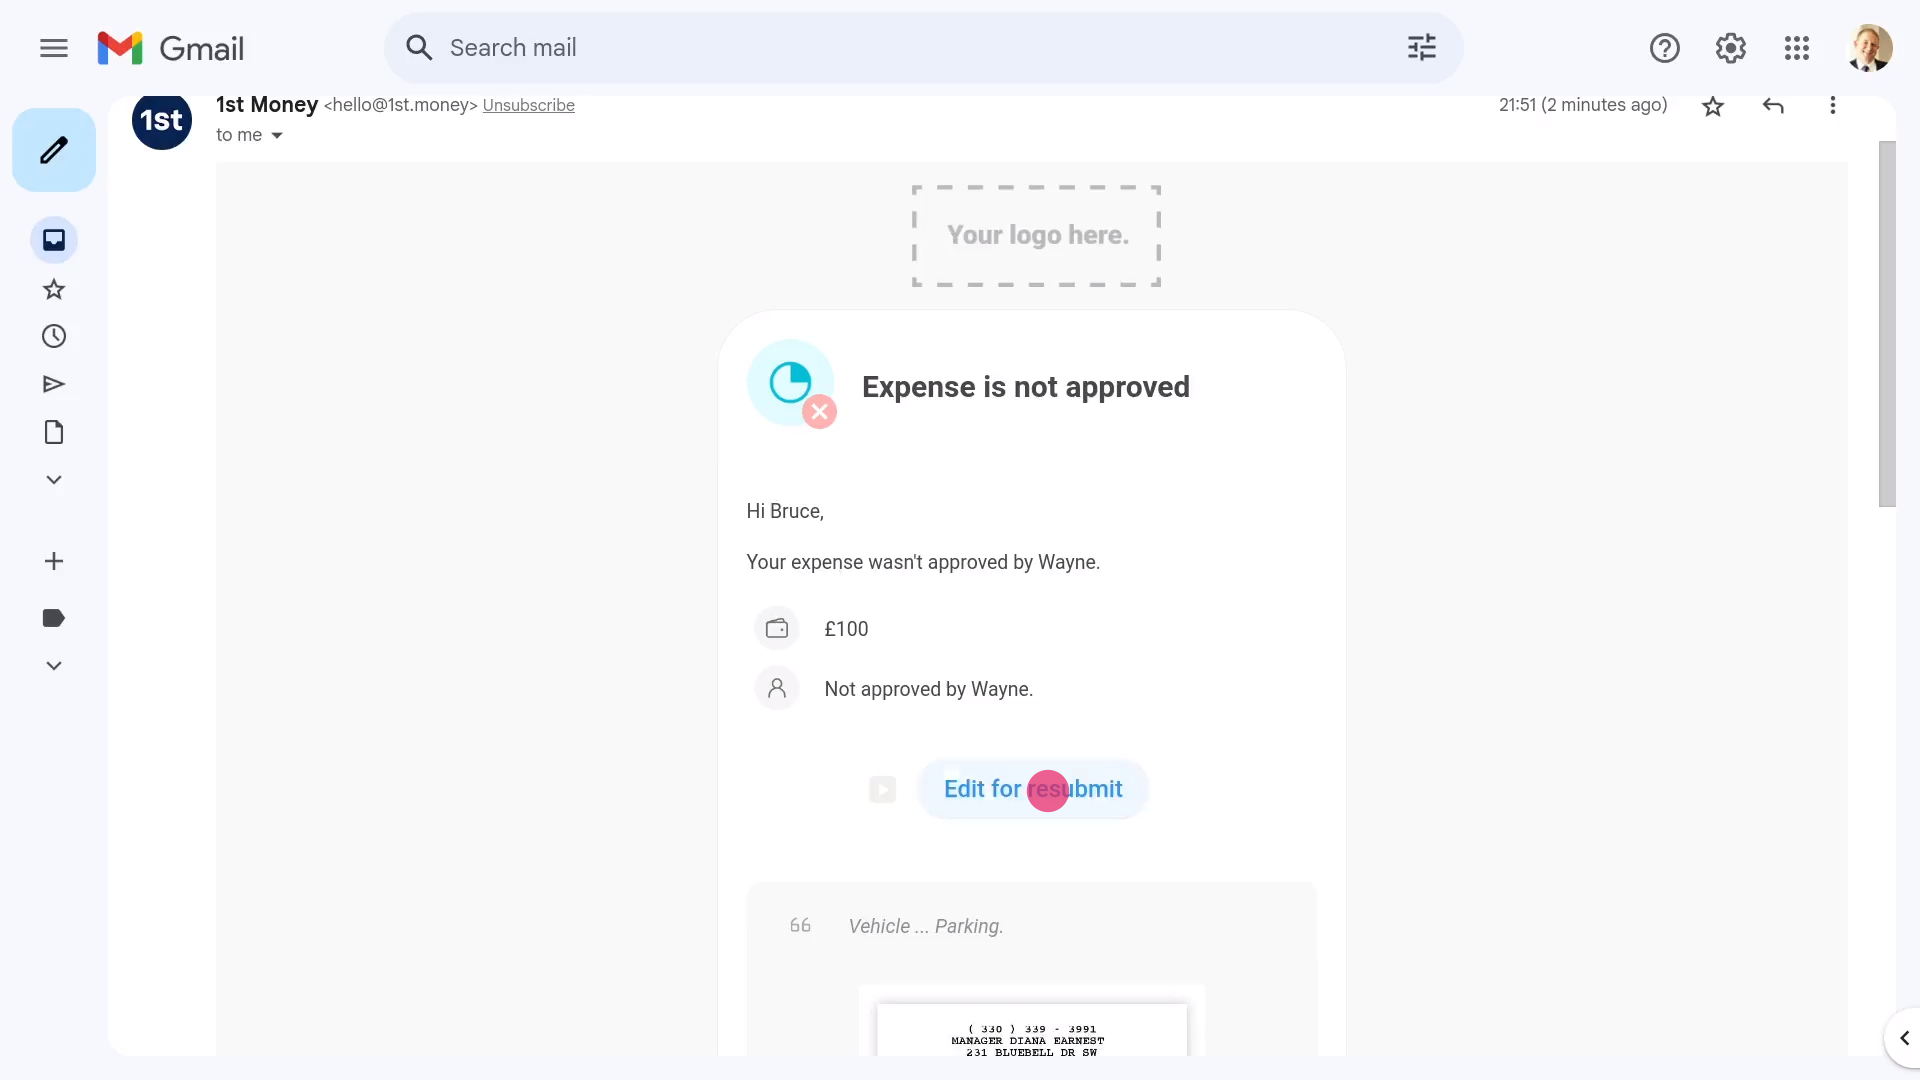
- Alternatively, when it's been declined, the person sees an email letting them know that their expense hasn't been approved.
- Then from the declined email, the person can tap: Edit for resubmit
- Approving on payday:
Another place to approve expense claims is on payday, when you're processing: "Pay now" - On payday, if there's any expense claims that have been missed, or haven't been approved, those expense claims are highlighted for you in orange. The expense claims are labelled as: "payables"
- To complete expense claims on the spot, while finishing the payday, tap the orange circle.
- Then tap: See expense
- And then tap Approved or: Declined
- Next, back on "Pay now", to reload the page, tap the "Reload tab" button: (at the top)
- And finally, now that all the expense claims have been dealt with, you can tap File now to complete the payday payments.
And that's it! That's everything you need to know about approving expense claims!
Expense claims. 4. How do I set it to be paid on a specific date?
 2:15
2:15
"Expense claims. 4. How do I set it to be paid on a specific date?"
To have an expense claim paid on a specific date, you'll need to add it to a specific payslip of the person.
To add an expense claim to a payslip that's paid on a specific date:
- First, open the person who you'd like to pay the expense claim to, on: MenuPeople
- Then go to the person's: Calendar
- Tap back through the months and look for the blue circle that matches the payday date. Which is the payslip that you'd like to pay the expense claim on.
- Once you find the payslip you're looking for, tap the blue circle, and then tap: Payslip
- Now that you're on the payslip you want it paid with, tap Expense claim, and select: Expense
- Enter the expense details, like attaching an image, setting the amount, and adding a description.
- And because it's a payroll admin who's entering it, the expense is automatically approved.
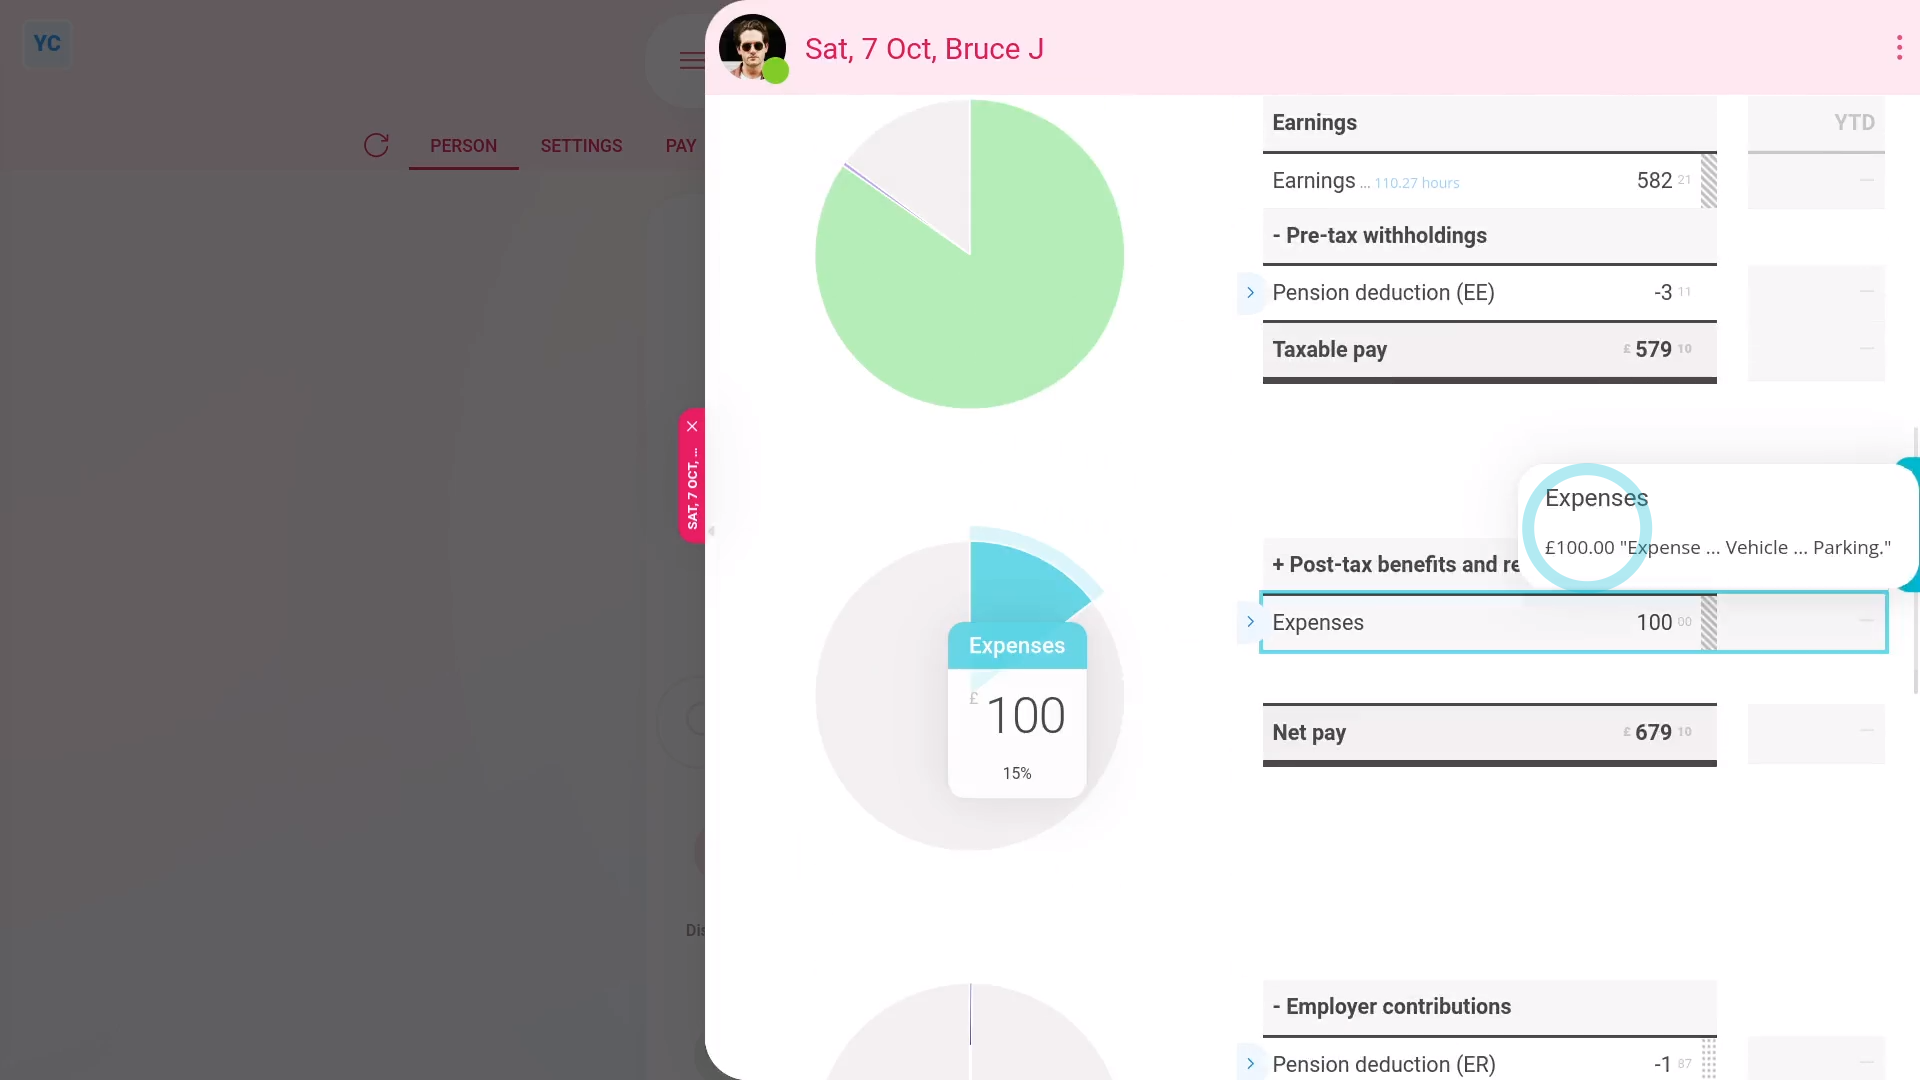
- When you tap back to the payslip, and hover your mouse over the "Expenses" amount, you'll see the details.
- And finally, when you scroll to the top of the payslip, you'll see the date that the payslip's expected to be paid.
Keep in mind that:
- Expense claims, by default, are always attached to the next payslip that's due to be filed.
- Which means that expense claims are generally paid relatively quickly.
- Also, any person can attach an expense claim to a specific payslip. No special permissions are required to attach to a specific date.
- However, only payroll admins can approve expense claims.
You may notice:
- If a payslip's already been filed, the payslip's locked and you can't attach your expense claim.
- If it's locked, look for the next un-filed payslip to attach it to instead.
And that's it! That's everything you need to know about adding expense claims on a specific date!
Expense claims. 5. How do I delete one?
 2:48
2:48
"Expense claims. 5. How do I delete one?"
If you no longer want an approved, but unpaid, expense claim to be processed, you're welcome to delete it whenever you like.
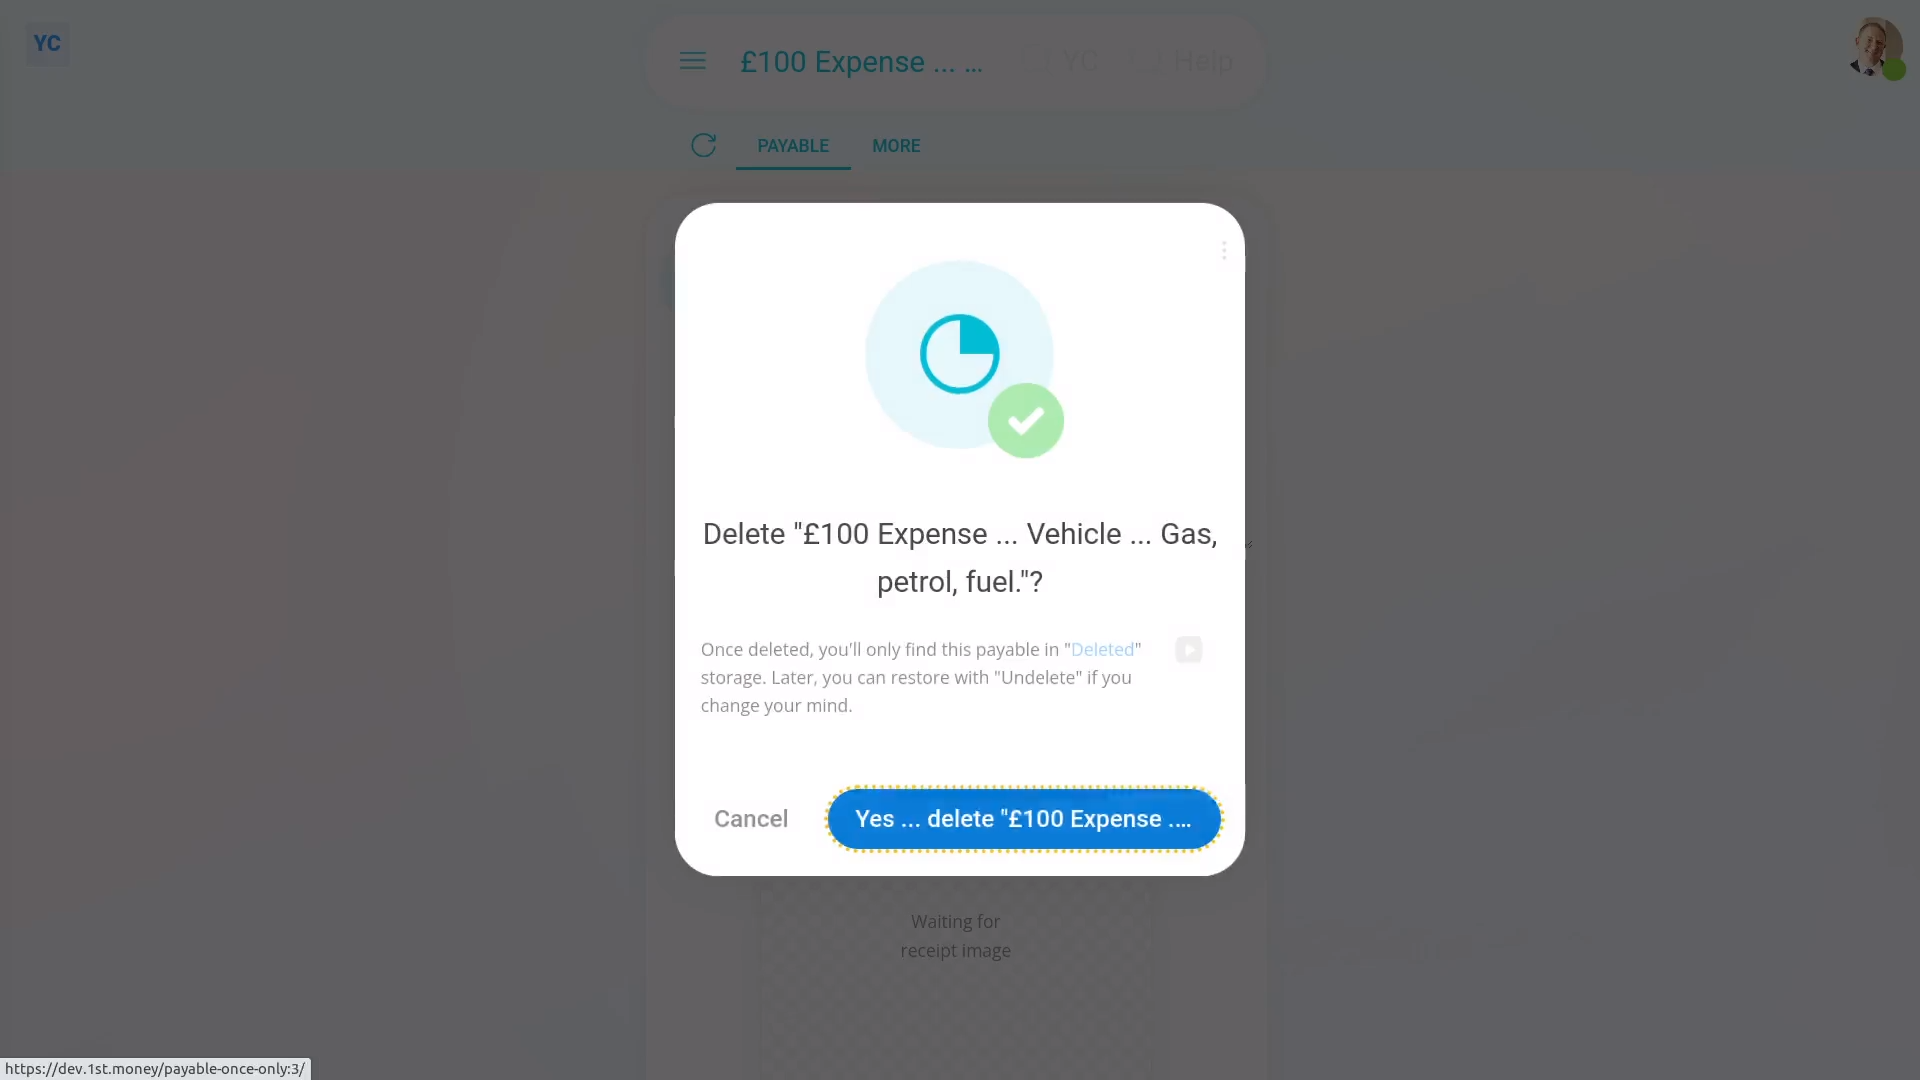
To delete a person's expense claim:
- First, open the person who's got the expense claim you'd like to delete, on: MenuPeople
- Then tap: PayPayslip
- Then scroll down and tap the expense claim you'd like to delete.
- To open it in a new tab, tap the three dots: (in the top-right corner)
- Then tap: Open in new tab
- Now that the expense claim's open in its own window...
- Tap More, then: Delete
- Then tap: Yes ... delete
- Now that the expense claim's deleted, it no longer shows on the payslip.
- And finally, It won't be included in the payslip payment, even if it's been approved.
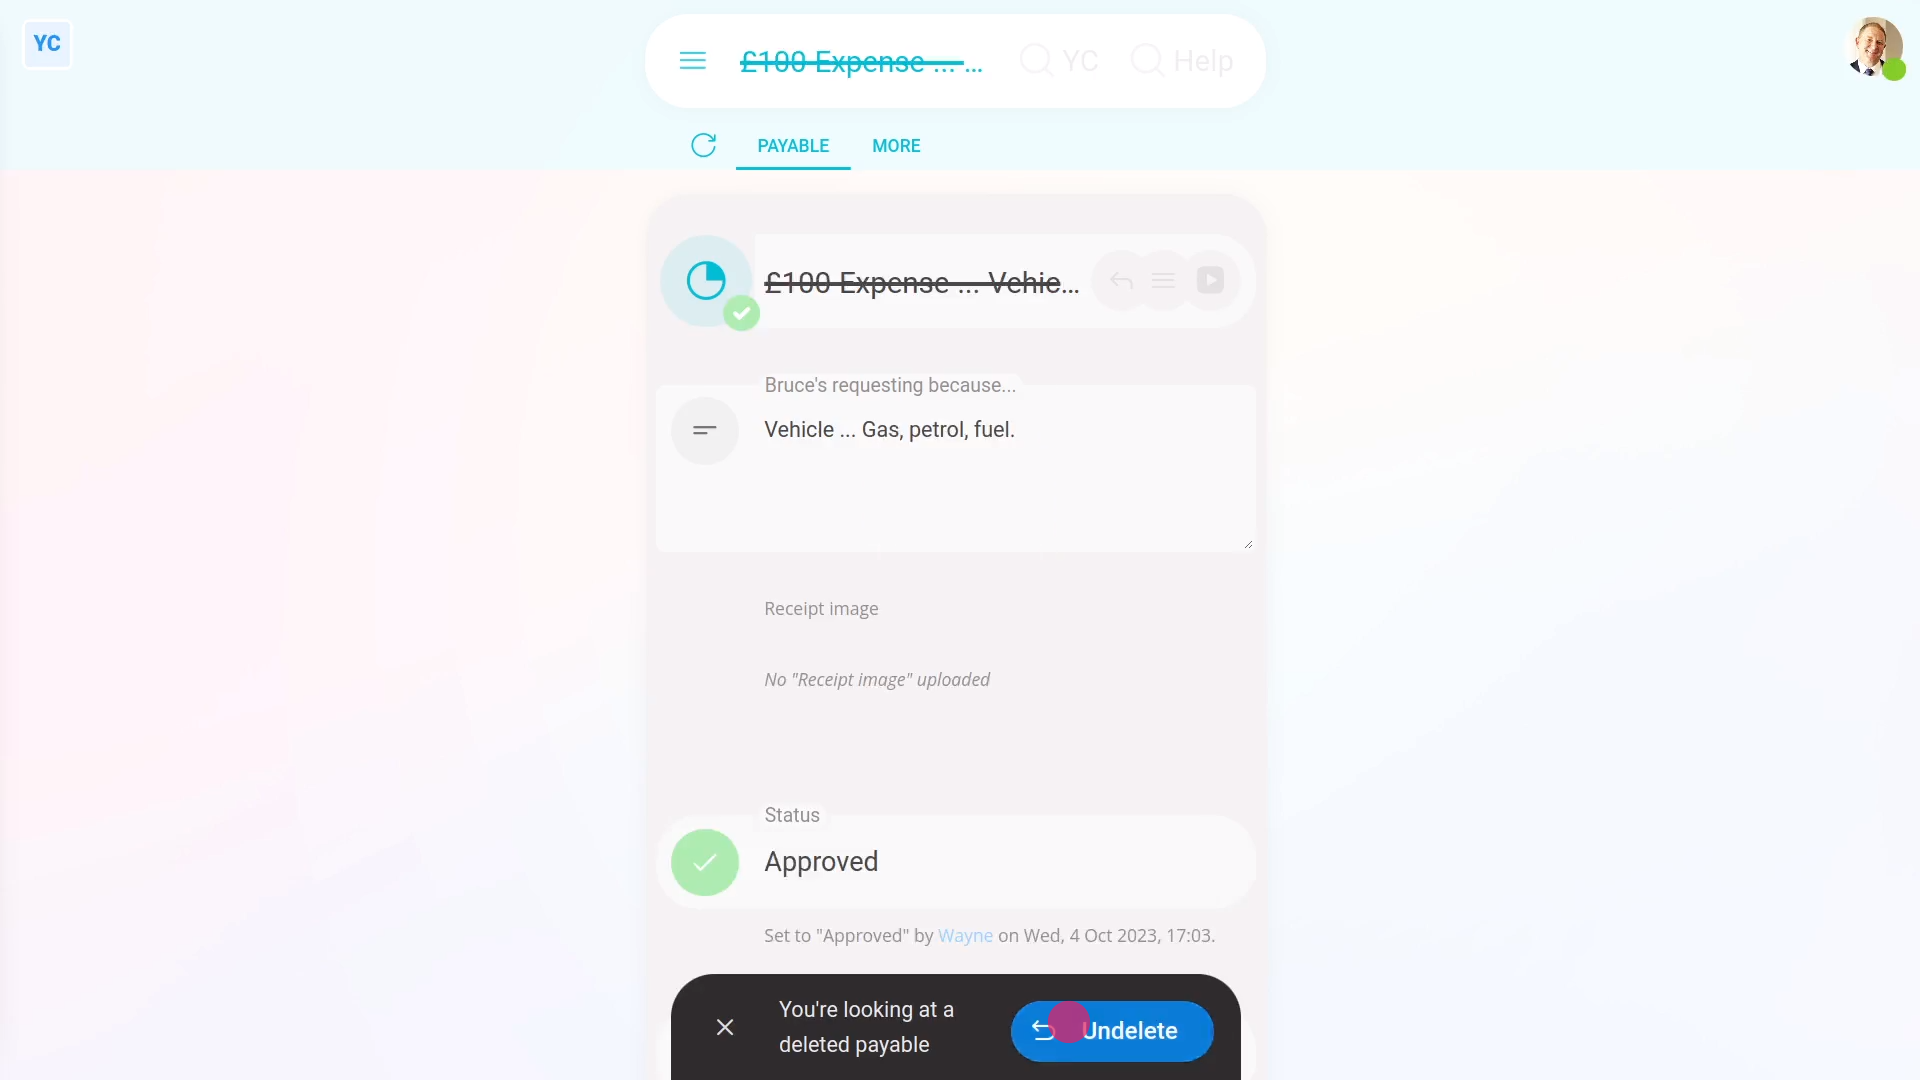
To undelete an expense claim:
- First, open the person who's got the expense claim you'd like to undelete, on: MenuPeople
- Then go to the person's: Calendar
- Tap back through the months and look for the blue circle that matches the payday date. Which is the payslip that you'd like to undelete.
- Once you find the payslip you're looking for, tap the blue circle, and then tap: Payslip
- To open the payslip in a new tab, tap the three dots: (in the top-right corner)
- Then tap: Open in new tab
- Now that the payslip's open in its own window, tap: MenuDeleted bin
- Next, you'll see a category for every kind of item that can be deleted. Tap: Expenses
- And then tap the expense claim you'd like to undelete.
- Next, tap: Undelete (at the bottom)
- And the deleted expense claim is immediately undeleted.
- And finally, to see the undelete expense claim on the person's payslip, tap the "See on payslip" button:
Keep in mind that:
- Deleting an expense claim has the same effect as denying approval.
- Also, only people who've got "Full payroll admin" permissions can delete or undelete expense claims.
- And remember that all deletes and undeletes are always permanently recorded in: "History"
- That means any payroll admin can always look back in time, and see who did any delete, and when the delete was done.
And that's it! That's everything you need to know about deleting or undeleting an expense claim!
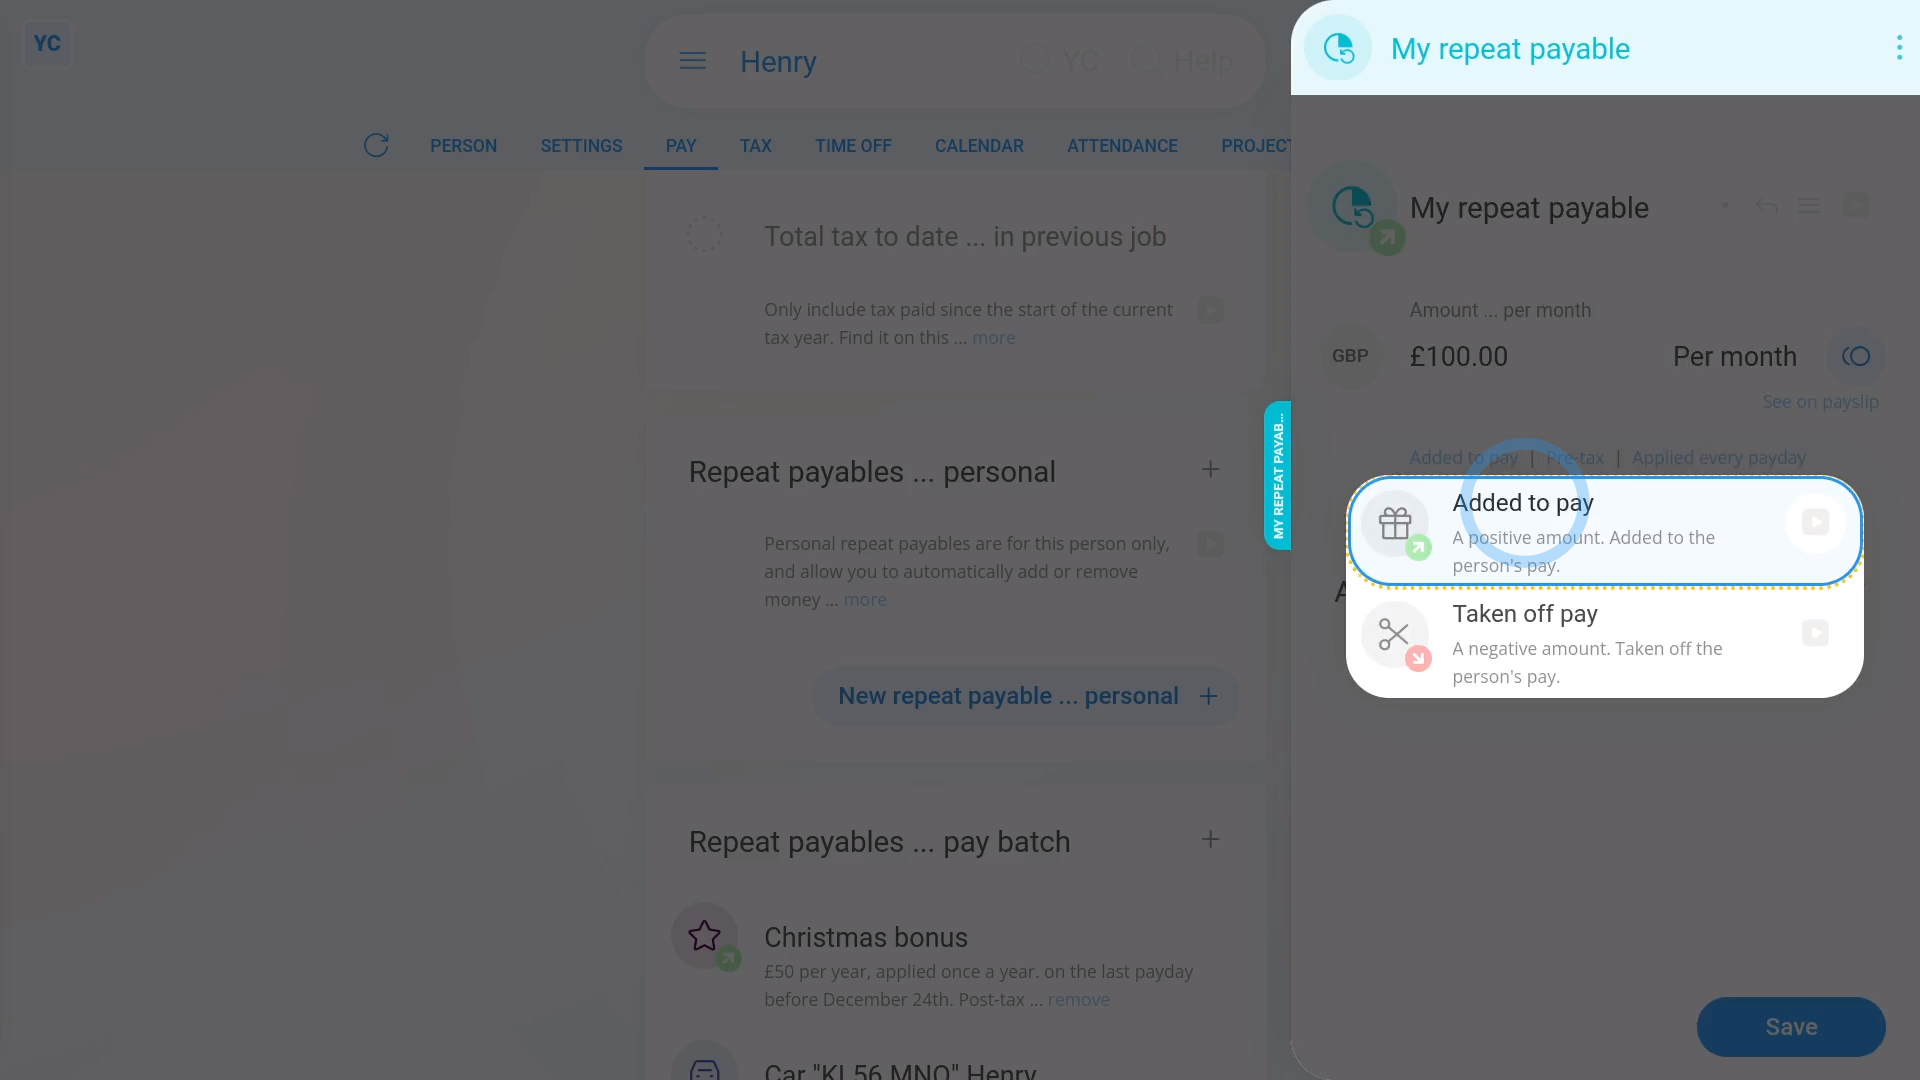
How do I understand added vs taken off, and post-tax vs pre-tax?
 4:14
4:14
"How do I understand added vs taken off, and post-tax vs pre-tax?"
The "added" vs "taken off", and "post-tax" vs "pre-tax" options can be tricky to understand.
To see a payable's four "added" vs "taken off", and "post-tax" vs "pre-tax" options:
- First, tap: MenuExpense claim
- Select the person who the expense is being applied to.
- Now you can decide whether the expense claim's "Added to pay" or: "Taken off pay"
- And whether the expense claim's "Post-tax", or: "Pre-tax"
- To see the four "added" vs "taken off", and "post-tax" vs "pre-tax" options for a repeat payable:
- First, open: MenuPeople
- And then go to: PayPay settings
- And scroll down to the "Repeat payables ... personal" heading.
- Then tap: New repeat payable
- And select the type.
- And give the repeat payable a name and an amount.
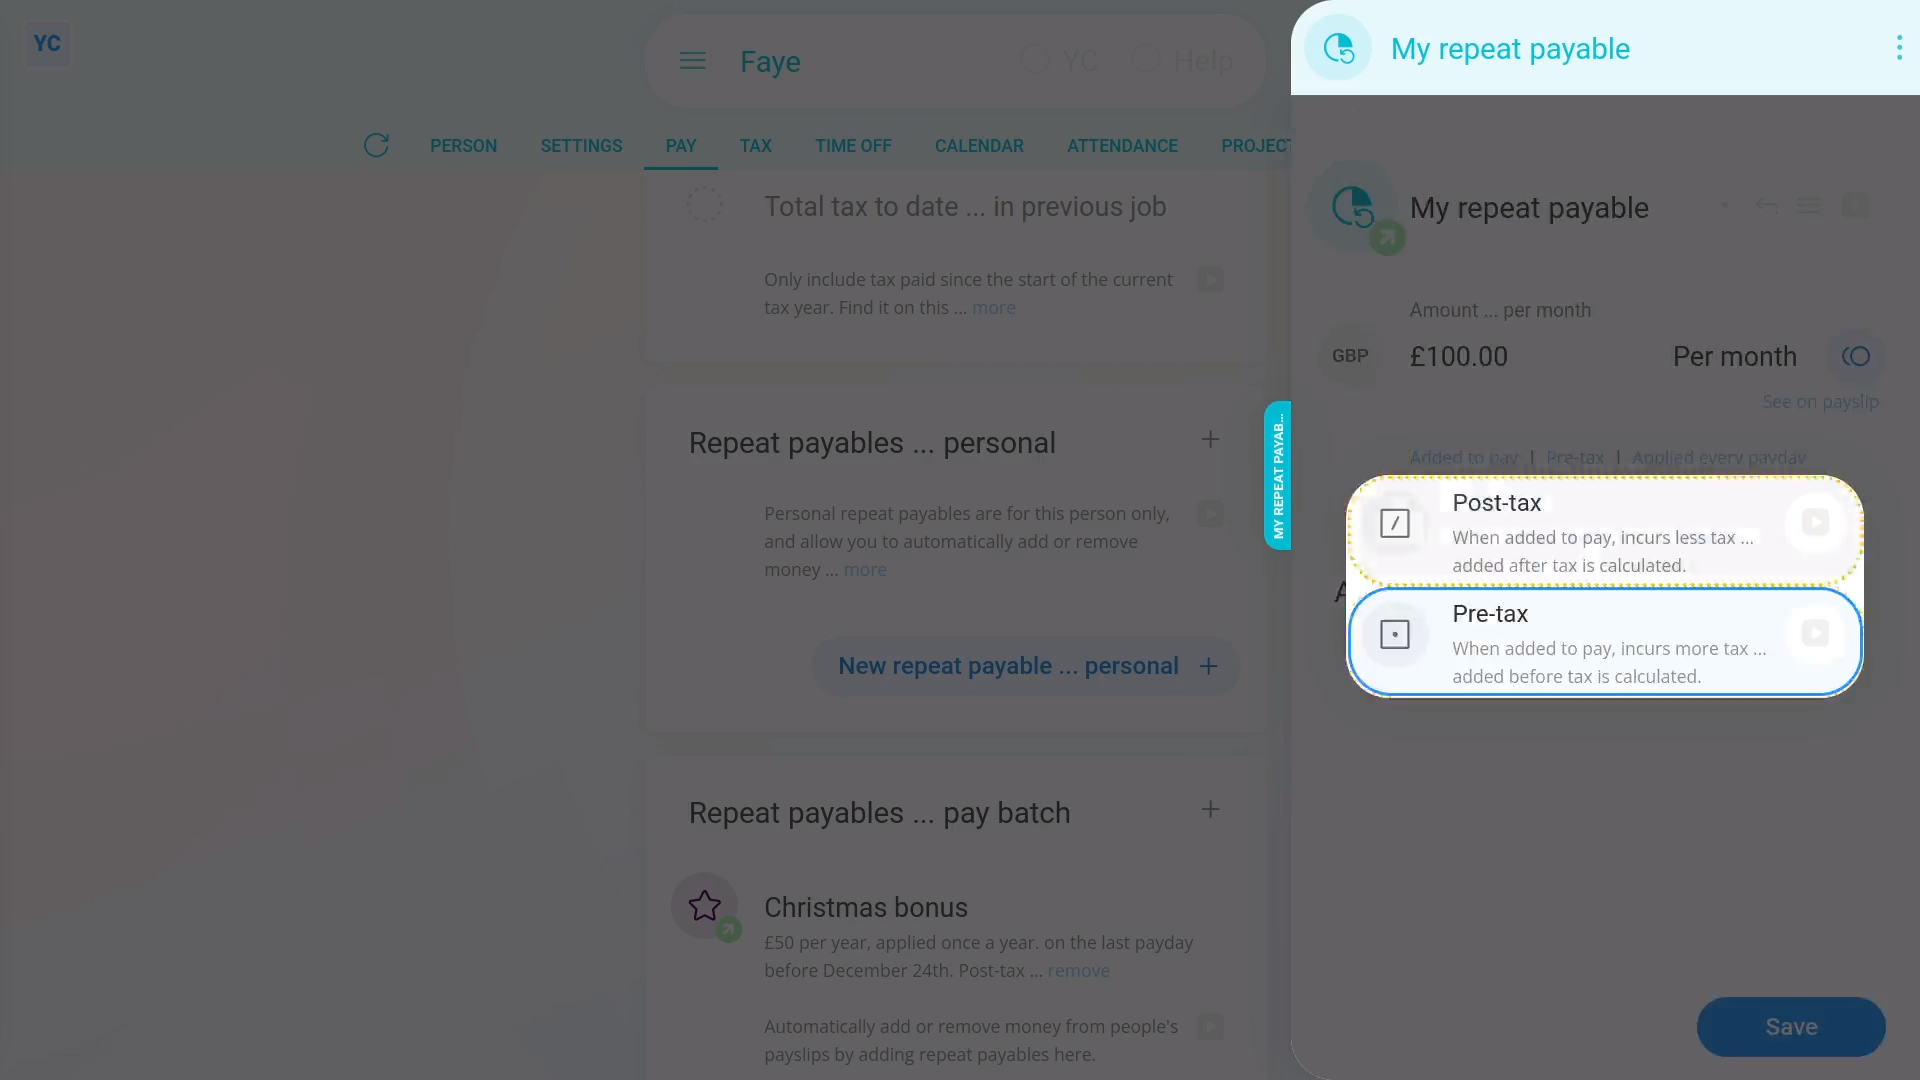
- Next up, set it to "Added to pay" with "Post-tax" selected.
- Now, when you tap See on payslip, you'll see the expense listed under the heading: "Post-tax benefits and reimbursements"
- You'll also notice that it's listed below the "Taxes" row.
- The person's better off, as their pay gets added the full amount, without taxes taken off.
- The person's received the full amount added to their pay because it's post-tax.
- Examples of "Post-tax" amounts that are "Added to pay" include: expense claims, out-of-pocket expense reimbursements, company travel expenses, and "per diems" like company business trip costs.
- Next, try setting it to "Taken off pay" with "Post-tax" selected.
- Now, when you tap See on payslip, you'll see the expense listed under the heading: "Post-tax withholdings"
- You'll also notice that it's listed below the "Taxes" row.
- The person's worse off, as their pay is having an amount removed, after already having been reduced by taxes.
- The person's had the full amount taken off their pay because it's post-tax.
- Examples of "Post-tax" amounts that are "Taken off pay" include: garnishments, child payments, alimony payments, debt repayments, County Court judgements (CCJs), employee paid insurance or medical premiums, charitable donations, and employee purchased uniforms or equipment.
- Following that, set it to "Added to pay" with "Pre-tax" selected.
- Now, when you tap See on payslip, you'll see the expense listed under the heading: "Pre-tax benefits"
- You'll also notice that it's listed above the "Taxable pay" row.
- The person's worse off, as their pay is having an amount added, which is then about to be reduced by taxes.
- Examples of "Pre-tax" amounts that are "Added to pay" include: bonuses, employer paid retirement contributions, and underpayment corrections.
- Next, set it to "Taken off pay" with "Pre-tax" selected.
- Now, when you tap See on payslip, you'll see the expense listed under the heading: "Pre-tax withholdings"
- You'll also notice that it's listed above the "Taxable pay" row.
- The person's better off, as their pay is having an amount taken off, which hasn't been reduced by taxes yet. It's then paid out towards something that's wanted.
- And finally, examples of "Pre-tax" amounts that are "Taken off pay" include: government approved employee retirement, health, or savings plans. It also includes government approved commuter schemes, and government approved charitable giving schemes.
And that's it! That's everything you need to know about a repeat payable's "added" vs "taken off", and "pre-tax" vs "post-tax" options!
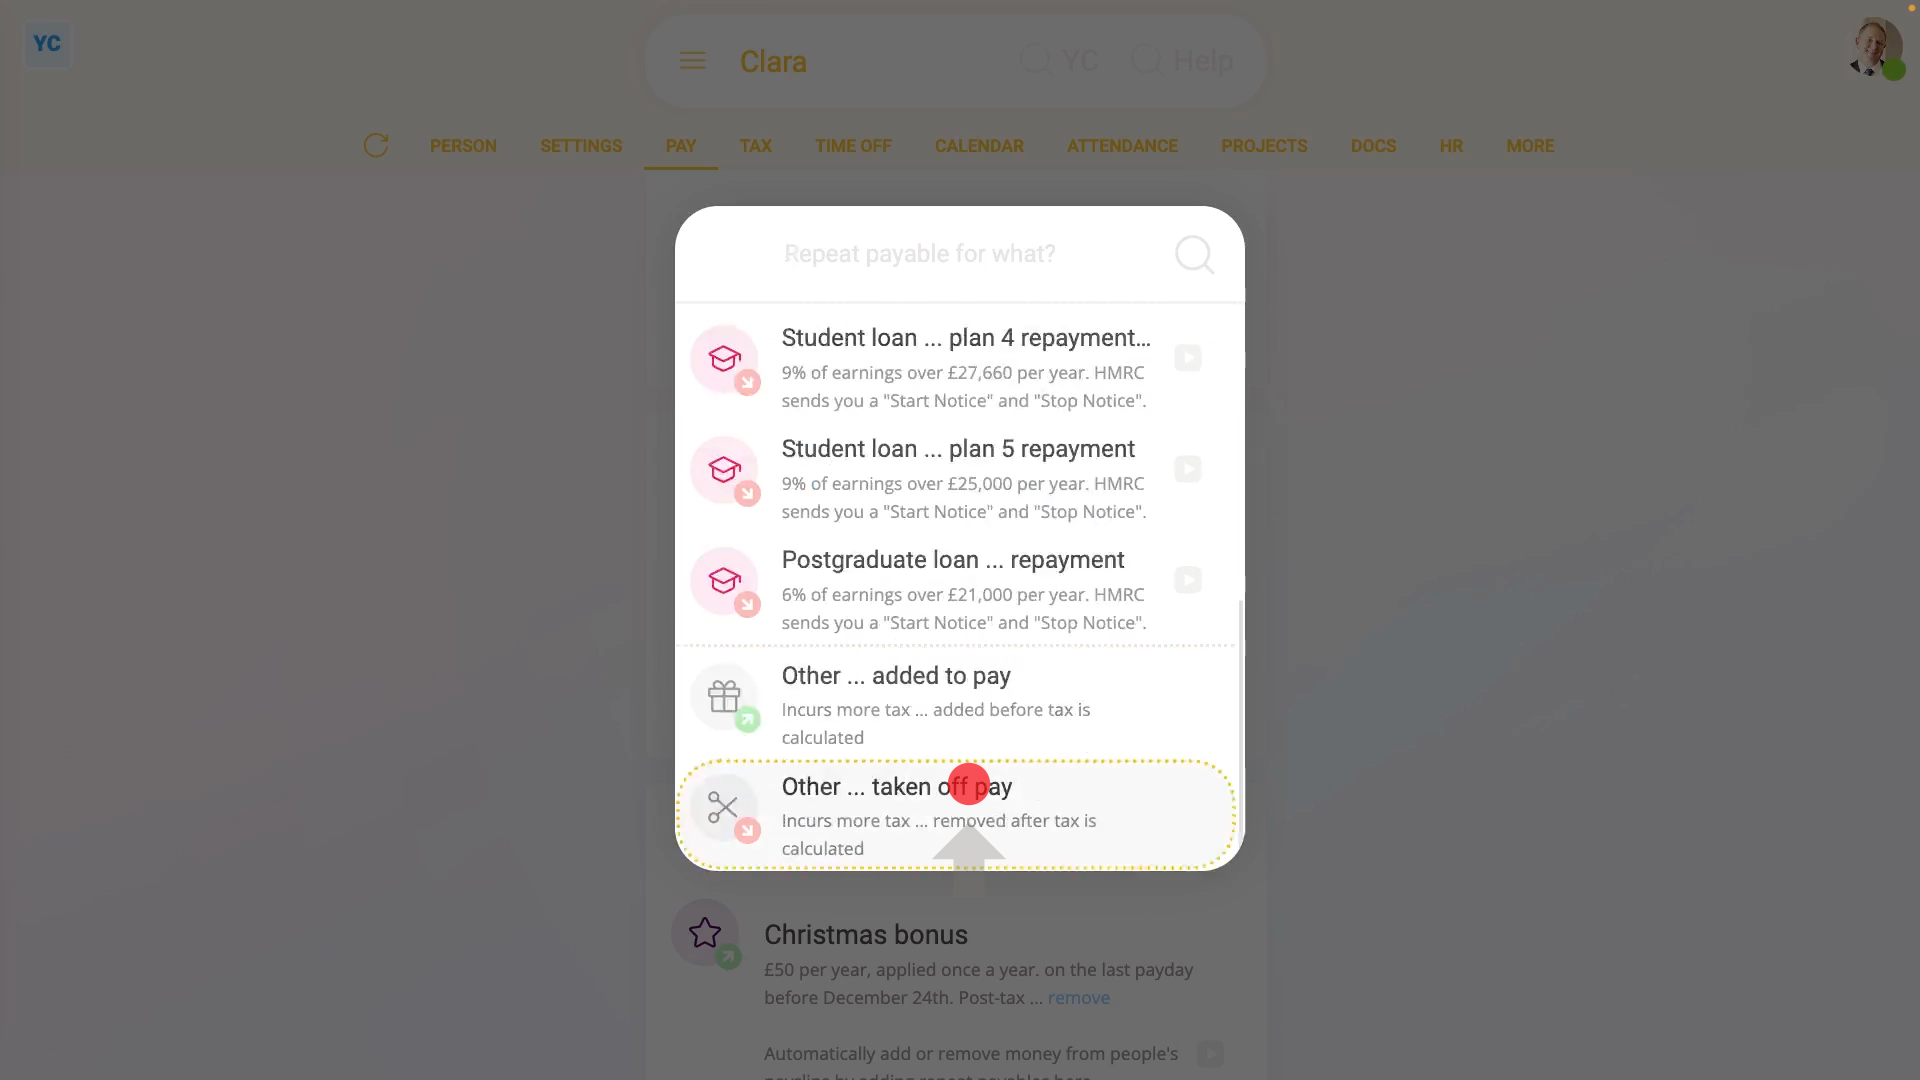
Loans. How do I set up postgraduate loan repayments?
 4:22
4:22
"Loans. How do I set up postgraduate loan repayments?"
Like student loans, postgraduate loans are a deduction that's automatically taken off a person's pay, and then marked for onward payment to HMRC.
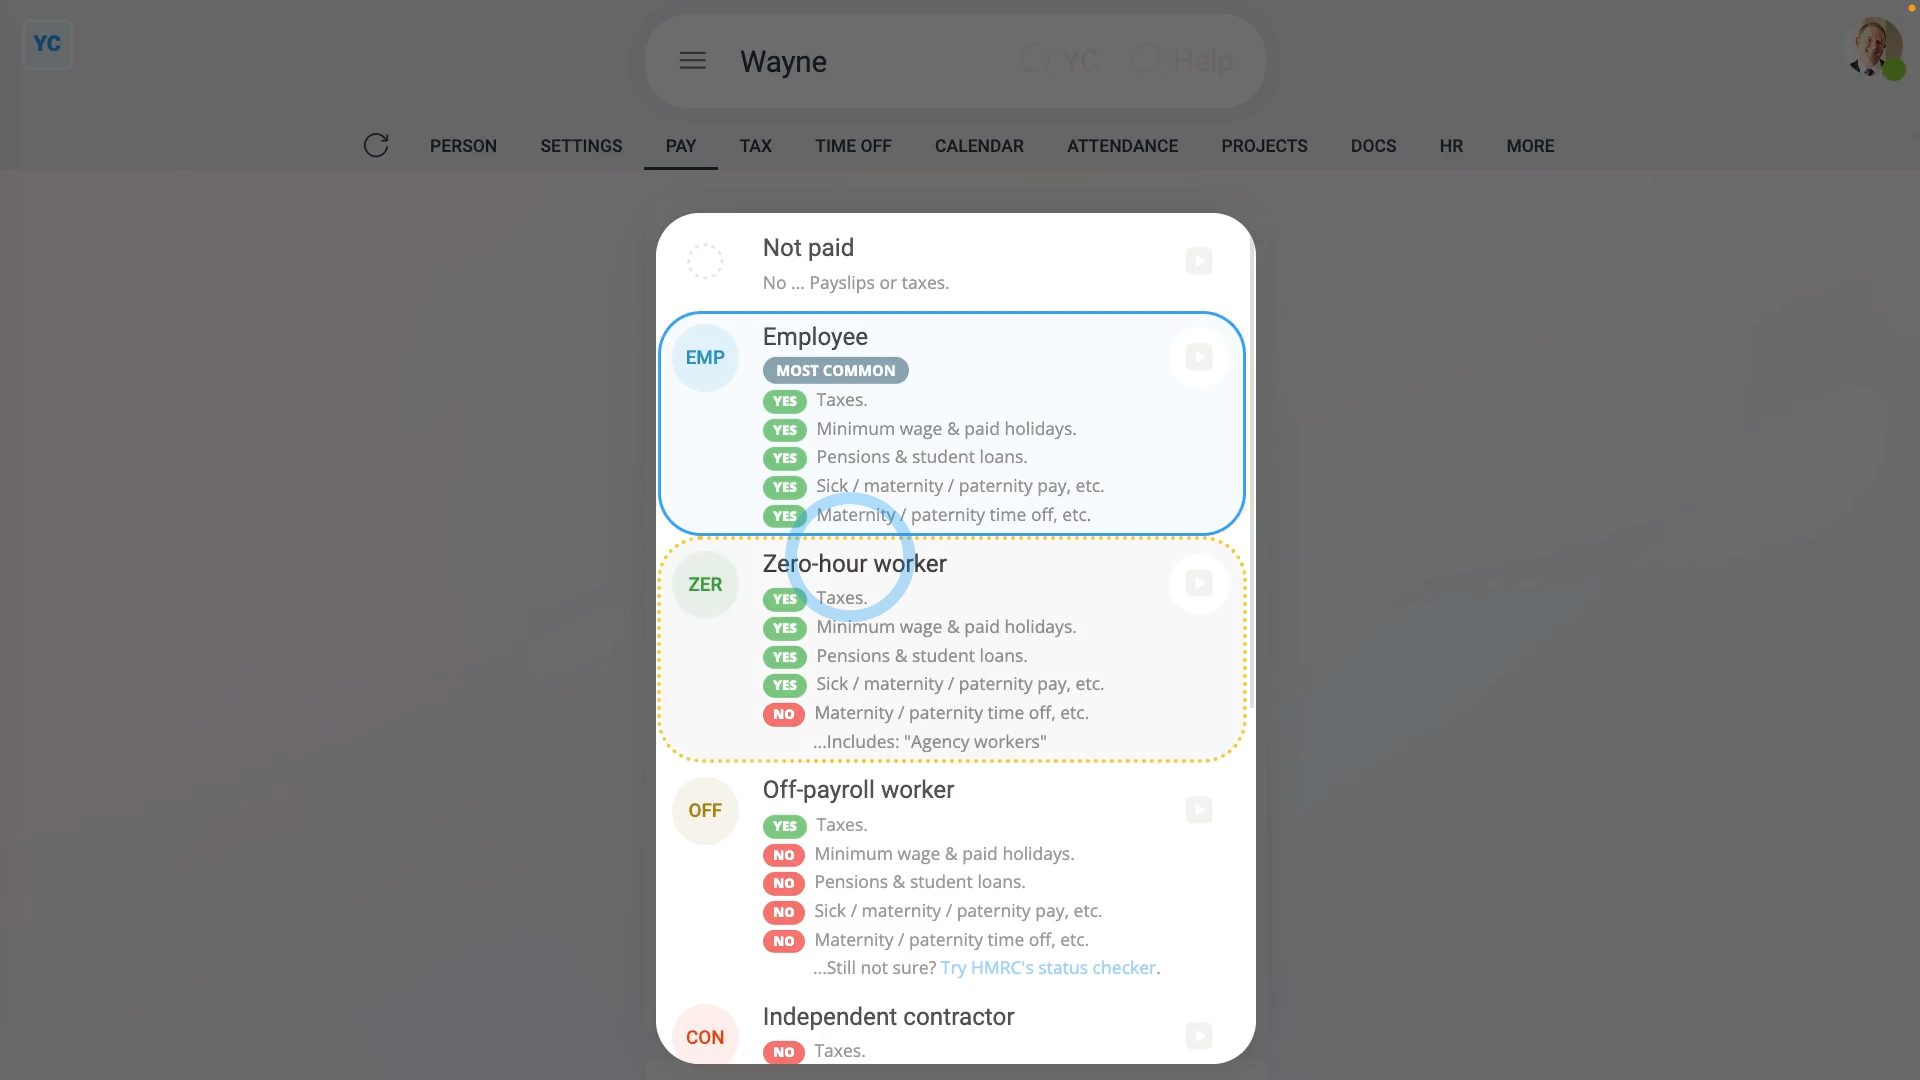
There's two ways to set up a person's postgraduate loan repayments:
- First, when the postgraduate loan repayments are set up by you manually.
- Or second, when it's automatically set up by HMRC through an: "HMRC notice"
Before starting, it's important to note that postgraduate loan repayments only apply to the employment types of: "Employees" and: "Zero-hour workers"
The first way to add a postgraduate loan repayment ... is manually:
- First, select the person who's getting the postgraduate loan repayment added on: MenuPeople
- And then go to: PayPay settings
- And scroll down to the "Repeat payables ... personal" heading.
- Then tap: New repeat payable
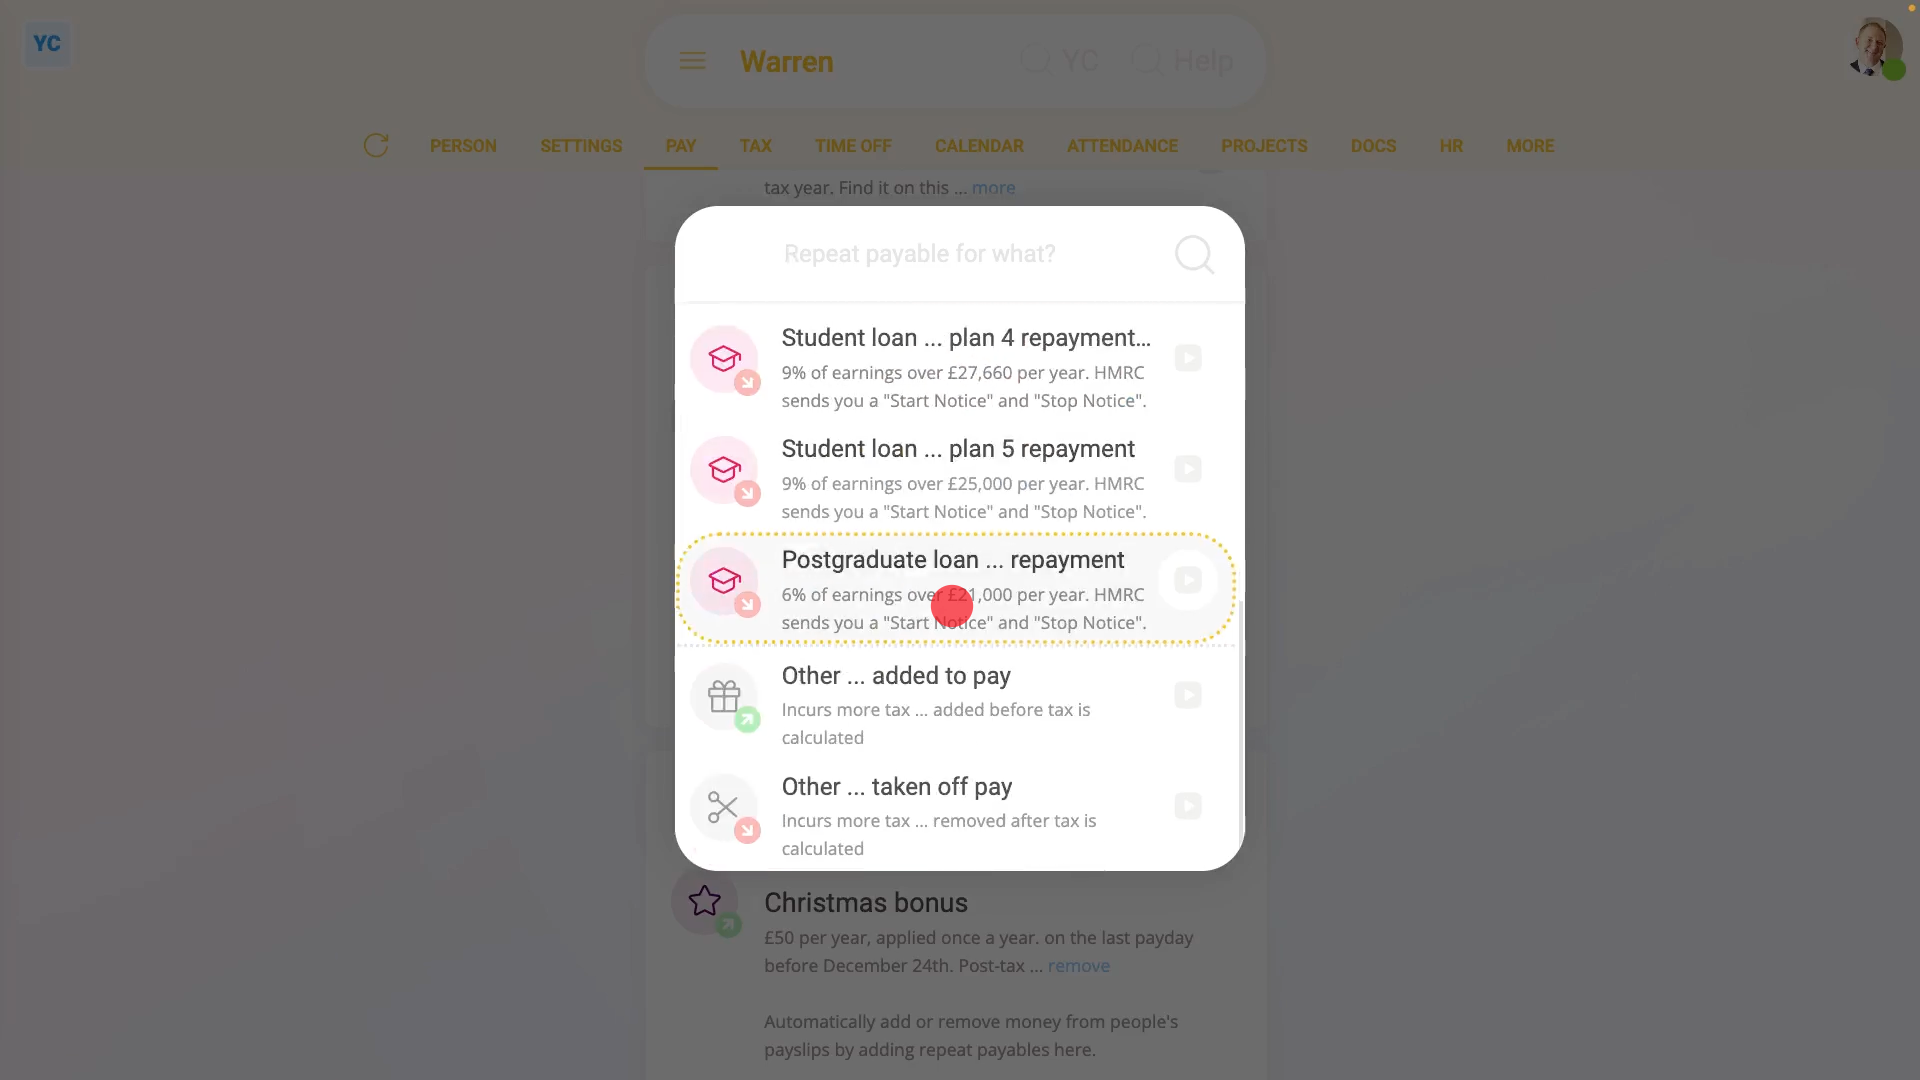
- Next, select: Postgraduate loan ... repayment
- For 99% of postgraduate loan repayments, all the defaults are now already correct.
- Including the "Payee", which is the bank account that the postgraduate loan repayments are paid to. The payee is automatically set to HMRC and can't be changed.
- You can now tap off, and you'll see that the person's postgraduate loan repayments are all set up.
- If you're curious to see how the postgraduate loan repayments look on the person's payslip, hover your mouse over the postgraduate loan, and tap the "See on payslip" button:
- You'll now see a payslip amount showing under: "Post-tax withholdings"
- And if you hover your mouse over the amount, you'll see a breakdown of the postgraduate loan repayment calculation.
- Also, if a person already has student loan repayments, it's quite normal for them to also have postgraduate loan repayments side-by-side. Having two loans is quite common if the person's gone on to do postgraduate studies.
- And finally, if you scroll up and tap the "Next payslip" circle, you'll see the same amount repeated on every payday, as expected.
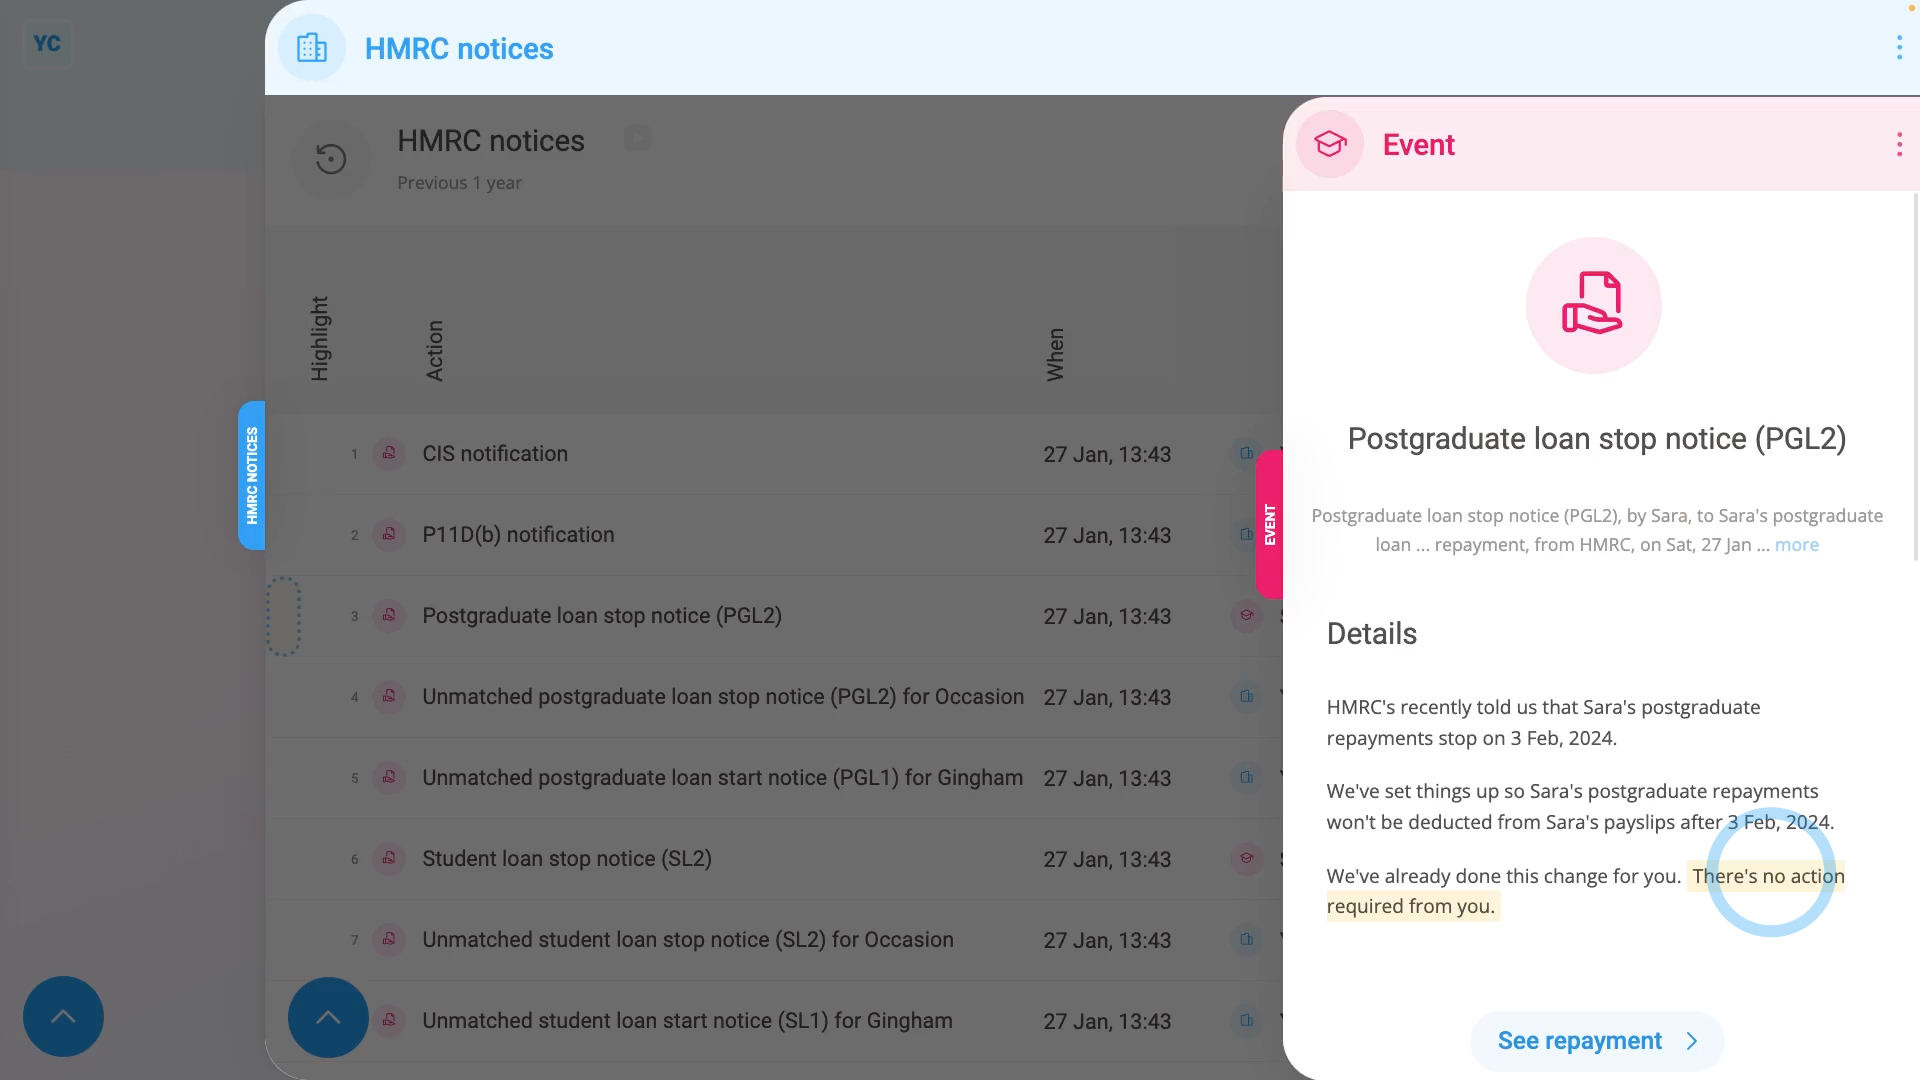
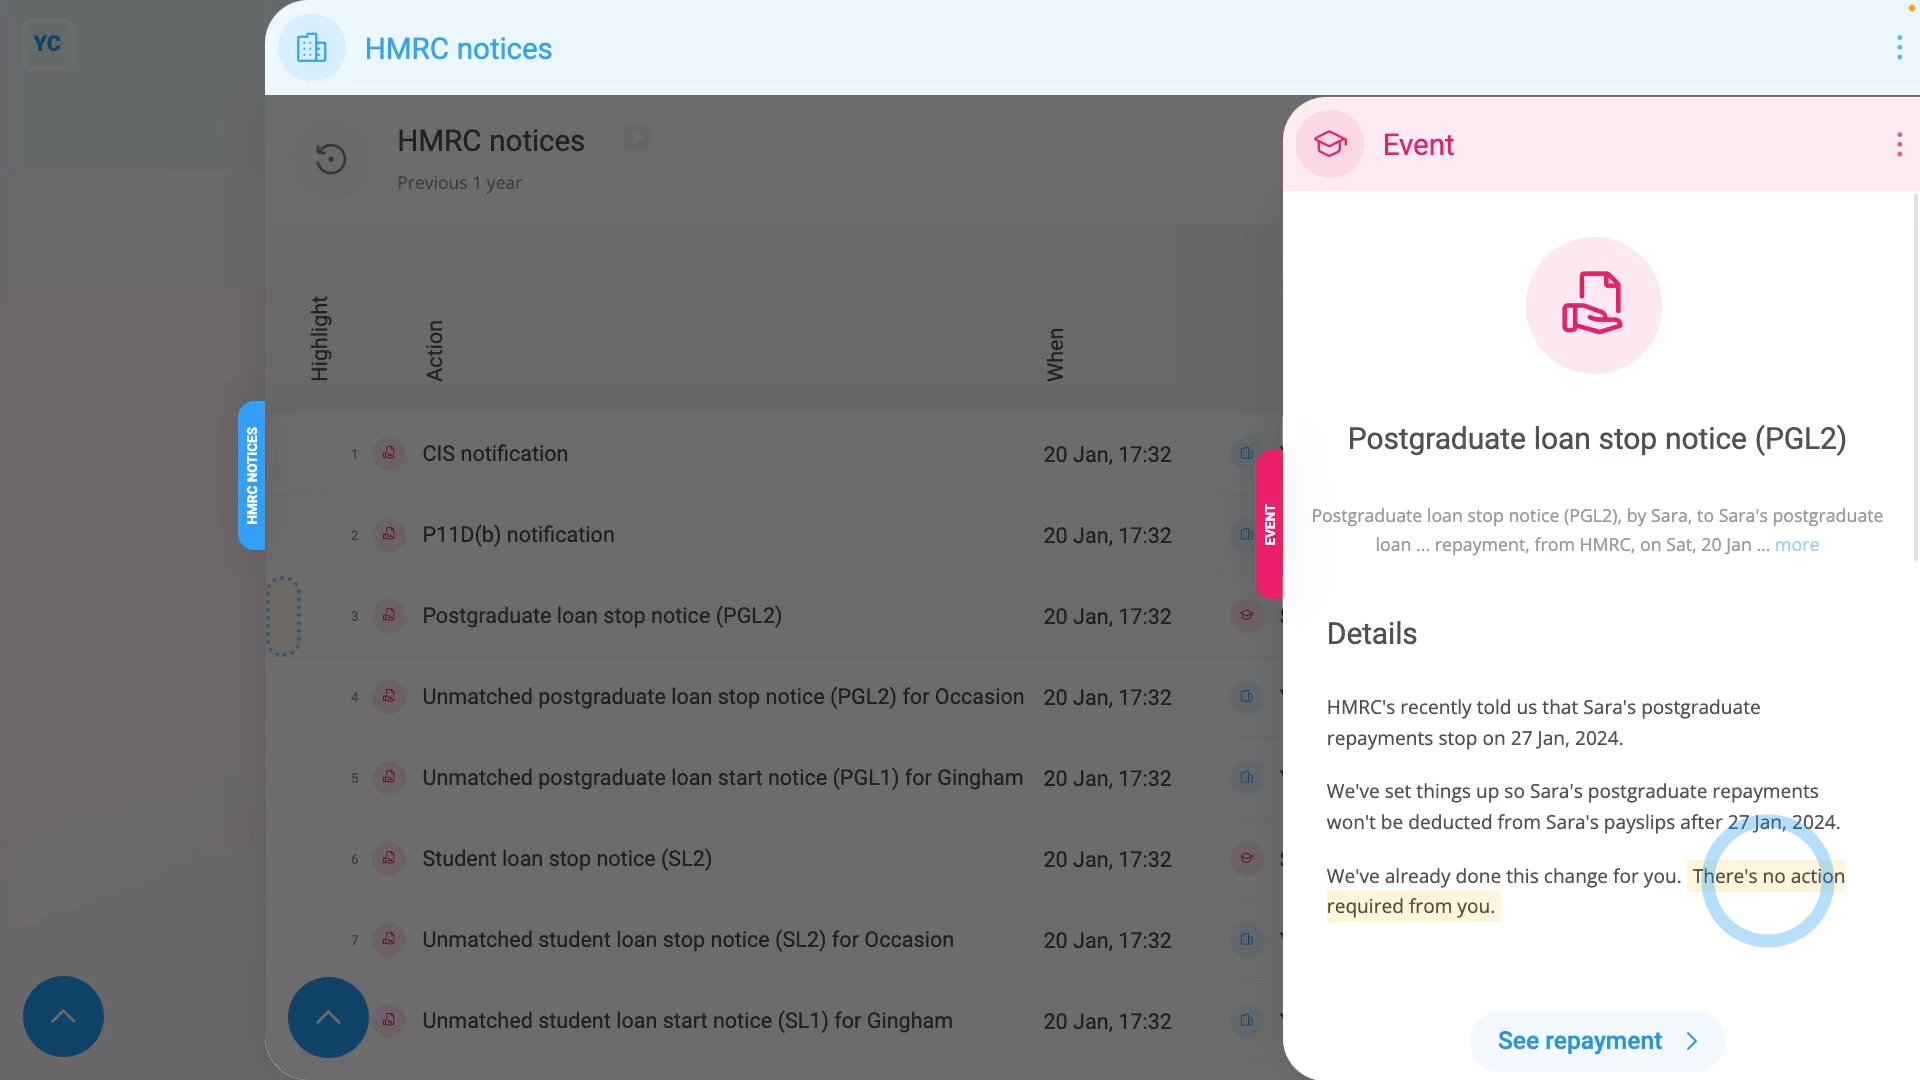
The second way to add a postgraduate loan repayment ... is when it's automatically set up, or modified, by HMRC through an "HMRC notice":
- First, to see the "HMRC notices", select the pay batch on: MenuPay batches
- Then tap: FormsHMRC notices
- You'll now see all your pay batch's HMRC notices from over the last year.
- Examples of "HMRC notice" actions include: starting or stopping a postgraduate loan repayment, or modifying the postgraduate loan repayment type.
- To see an HMRC notice's full message, tap the blue "See event" button: (at the start of any row)
- As long as the "HMRC notice" can be matched to a person, the action in the notice is auto-scheduled to be carried out by 1st Money.
- So in most cases: "There's no action required from you."
- Also, for every auto-scheduled change that involves a person, two copies of an HMRC notice are emailed out.
- And finally, one is emailed to the person involved, and the other to the pay batch's payday admin, so everyone knows what's happened.
Keep in mind that:
- If the option for postgraduate loan repayments doesn't show up in the list, check that the person's employment type is one of: "Employee" and: "Zero-hour workers"
- Which are the only two employment types that're eligible for postgraduate loans.
- Also, postgraduate loans can only be set up manually because postgraduate loans don't automatically show up as an option during onboarding.
To learn more:
- About "HMRC notices", watch the video on: HMRC notices
- To learn about deleting a postgraduate loan repayment, watch the video on: Deleting a repeat payable
And that's it! That's all you need to do to set up a postgraduate loan repayment!
Loans. How do I set up student loan repayments?
 6:12
6:12
"Loans. How do I set up student loan repayments?"
Student loans are a deduction that's automatically taken off a person's pay, and then marked for onward payment to HMRC.

There's three ways to set up a person's student loan repayments:
- First, during onboarding, when you enter the person's P45 details.
- Second, when the student loan repayments are set up by you manually.
- Or third, when it's automatically set up by HMRC through an: "HMRC notice"
Before starting, it's important to note that student loan repayments only apply to the employment types of: "Employees" and: "Zero-hour workers"
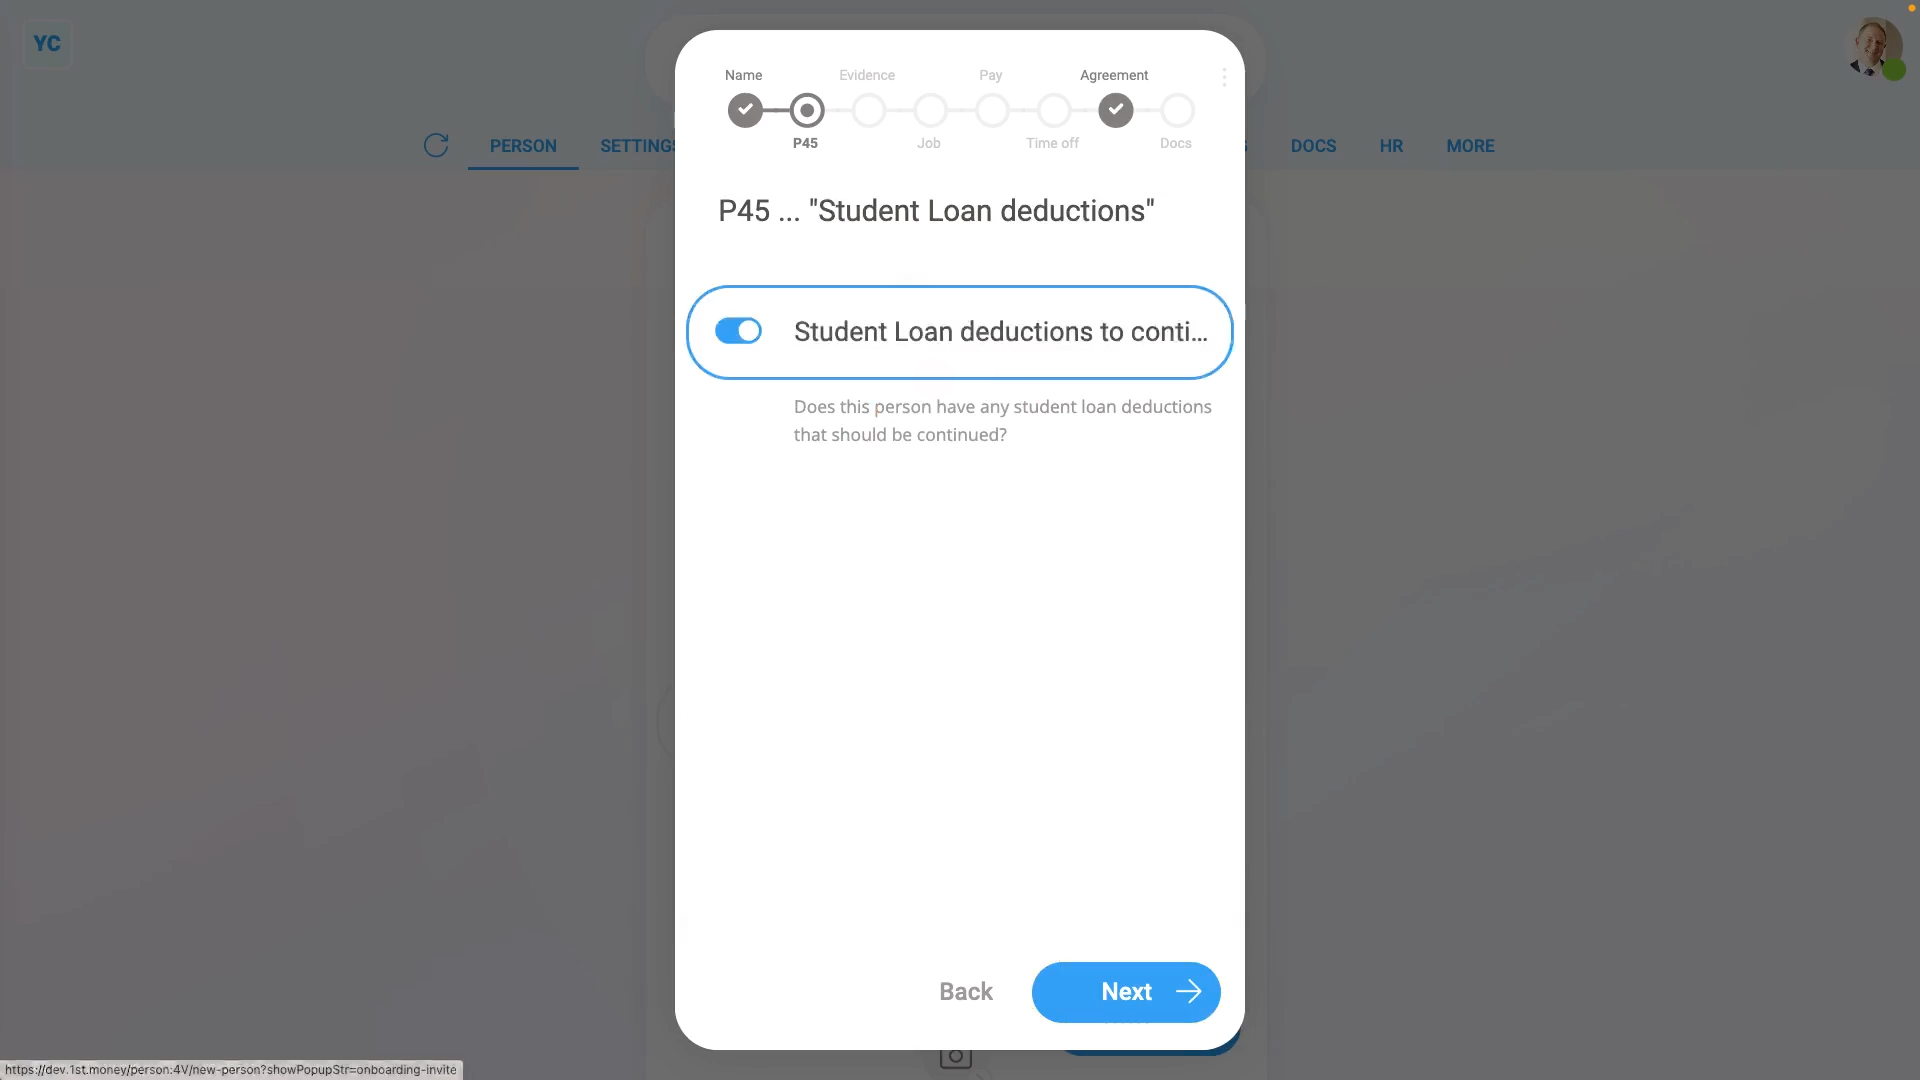
The first way to add a student loan repayment ... is during onboarding:
- First, to start the normal onboarding process, tap: MenuPeopleInvite a person
- Once it's open, tap Add a new person, and enter the person's email and tap: Invite
- Next, fill in the person's name, and tap: Next
- Then when asked about their P45, tap: Yes
- And enter, from their P45, their "Leaving date" from their previous job, and tap: Next
- Then also from their P45, enter the "Employee's National Insurance number", and tap: Next
- Now set their "Title" and "Middle name", and tap: Next
- And then turn on their "Student loan deductions", and tap: Next
- Normally, you'd continue by filling in all the onboarding details, but for the example, you can tap off the popup to close the onboarding process.
- And now, to see that their student loan repayments have been correctly added, go to: PayPay settings
- And scroll down to the "Repeat payables ... personal" heading.
- By default, you'll see it's added a "Plan 2" student loan.
- You're welcome to manually change the student loan plan number. For example, to "Plan 1", "Plan 4", or: "Plan 5"
- However, once HMRC receives your first payroll submission for the person, HMRC sends an "HMRC notice" to change the person to the correct student loan plan. Which happens in the background automatically.
- If however, you want to manually change the student loan plan number, tap the student loan.
- Then tap the "Change type" button: (at the top)
- And tap the new student loan plan number.
- And finally, you'll see the person's been correctly updated to the student loan repayment calculations of the new plan type.
The second way to add a student loan repayment ... is manually:
- First, select the person who's getting the student loan repayment added on: MenuPeople
- And then go to: PayPay settings
- And scroll down to the "Repeat payables ... personal" heading.
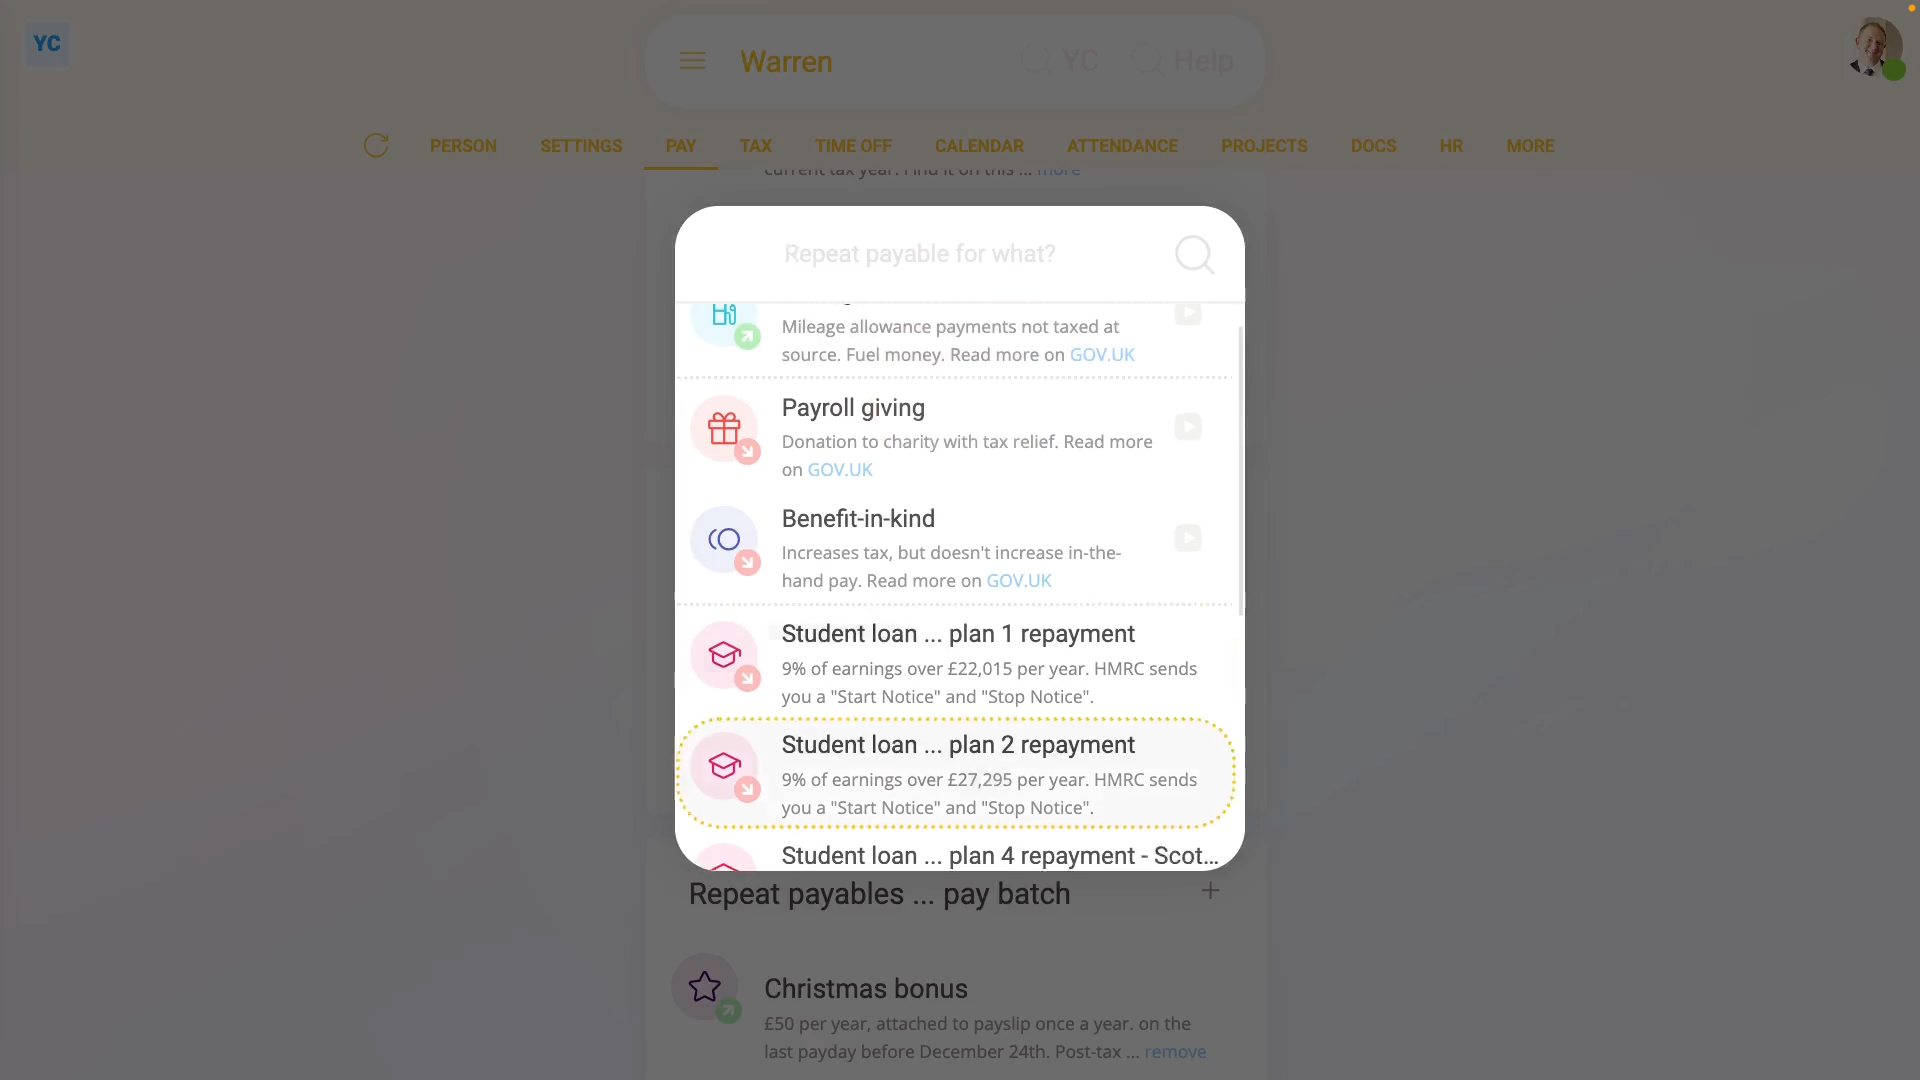
- Then tap: New repeat payable
- Next, select: Student loan ... plan 2 repayment
- For 99% of student loan repayments, all the defaults are now already correct.
- Including the "Payee", which is the bank account that the student loan repayments are paid to. The payee is automatically set to HMRC and can't be changed.
- You can now tap off, and you'll see that the person's student loan repayments are all set up.
- If you're curious to see how the student loan repayments look on the person's payslip, hover your mouse over the student loan, and tap the "See on payslip" button:
- You'll now see a payslip amount showing under: "Post-tax withholdings"
- And if you hover your mouse over the amount, you'll see a breakdown of the student loan repayment calculation.
- And finally, if you scroll up and tap the "Next payslip" circle, you'll see the same amount repeated on every payday, as expected.
The third way to add a student loan repayment ... is when it's automatically set up, or modified, by HMRC through an "HMRC notice":
- First, to see the "HMRC notices", select the pay batch on: MenuPay batches
- Then tap: FormsHMRC notices
- You'll now see all your pay batch's HMRC notices from over the last year.
- Examples of "HMRC notice" actions include: starting or stopping a student loan repayment, or modifying the student loan repayment type.
- To see an HMRC notice's full message, tap the blue "See event" button: (at the start of any row)
- As long as the "HMRC notice" can be matched to a person, the action is auto-scheduled to be carried out by 1st Money.
- So in most cases: "There's no action required from you."
- Also, for every auto-scheduled change that involves a person, two copies of an HMRC notice are emailed out.
- And finally, one is emailed to the person involved, and the other to the pay batch's payday admin, so everyone knows what's happened.
Keep in mind that:
- If the option for student loan repayments doesn't show up in the list, check that the person's employment type is one of: "Employee" and: "Zero-hour worker"
- Which are the only two employment types that're eligible for student loans.
To learn more:
- About "HMRC notices", watch the video on: HMRC notices
- To learn about deleting a student loan repayment, watch the video on: Deleting a repeat payable
And that's it! That's all you need to do to set up a student loan repayment!
Repeat payable. 1. When would I use a personal vs a pay batch?
 3:30
3:30
"Repeat payable. 1. When would I use a personal vs a pay batch?"
Repeat payables can either be stored under a single person, or stored under a pay batch.
To store a repeat payable under a single person:
- First, select the person on: MenuPeople
- And then go to: PayPay settings
- And scroll down to the "Repeat payables ... personal" heading.
- Then tap: New repeat payable
- And select the type.
- And give the repeat payable a name and an amount.
- And finally, tap Save, and your new repeat payable is now set up for a single person.
You may notice:
- That a personal repeat payable can only be added to a single person. There's no option to add it to more than one person.
- Besides being limited to a single person, the personal repeat payable has all the other features of a pay batch repeat payable.
- However, some specialist types of repeat payable are only available as personal repeat payables. Including: mileage allowance, benefit-in-kind, and student loan repayments.
To instead store a repeat payable under a pay batch:
- First, select the pay batch on: MenuPay batches
- And then go to: PayRepeat payables
- Then tap: New repeat payable
- And select the type.
- And give the repeat payable a name and an amount.
- Now, so that anyone who joins the pay batch from now on also automatically gets the repeat payable, tap Advanced and turn on: Auto-add to new people
- Next, tap Add people and add the people you want to receive the repeat payable, then tap: Save
- And finally, your new repeat payable is now set up for a pay batch, and has been added to some people in that pay batch.
You may also notice:
- That a pay batch repeat payable can be added to as many people in the pay batch as you want. But it can't be added to people outside the pay batch.
- Also, with the Auto-add to new people switch turned on, new people automatically get the repeat payable as your company adds more people.
- However, some specialist types of repeat payable are only available as pay batch repeat payables, like: Company vehicles.
- Besides those small differences, personal and pay batch repeat payables are very similar.
For advanced usage:
- You may have a situation where you want many people to receive the same repeat payable, but have one person who's paid a different amount.
- For example, where everybody receives a monthly bonus, but one person's paid double the amount.
- In that case create a pay batch repeat payable of the standard bonus amount, and add everyone to it.
- Next, take the person who's paid double out of the pay batch repeat payable.
- And make a personal repeat payable of double the amount, for them only.
And that's it! That's everything you need to know about choosing between personal repeat payables and pay batch repeat payables!
Repeat payable. 2. How do I delete or undelete?
 2:13
2:13
"Repeat payable. 2. How do I delete or undelete?"
If you no longer need a repeat payable, you're welcome to delete it whenever you like.
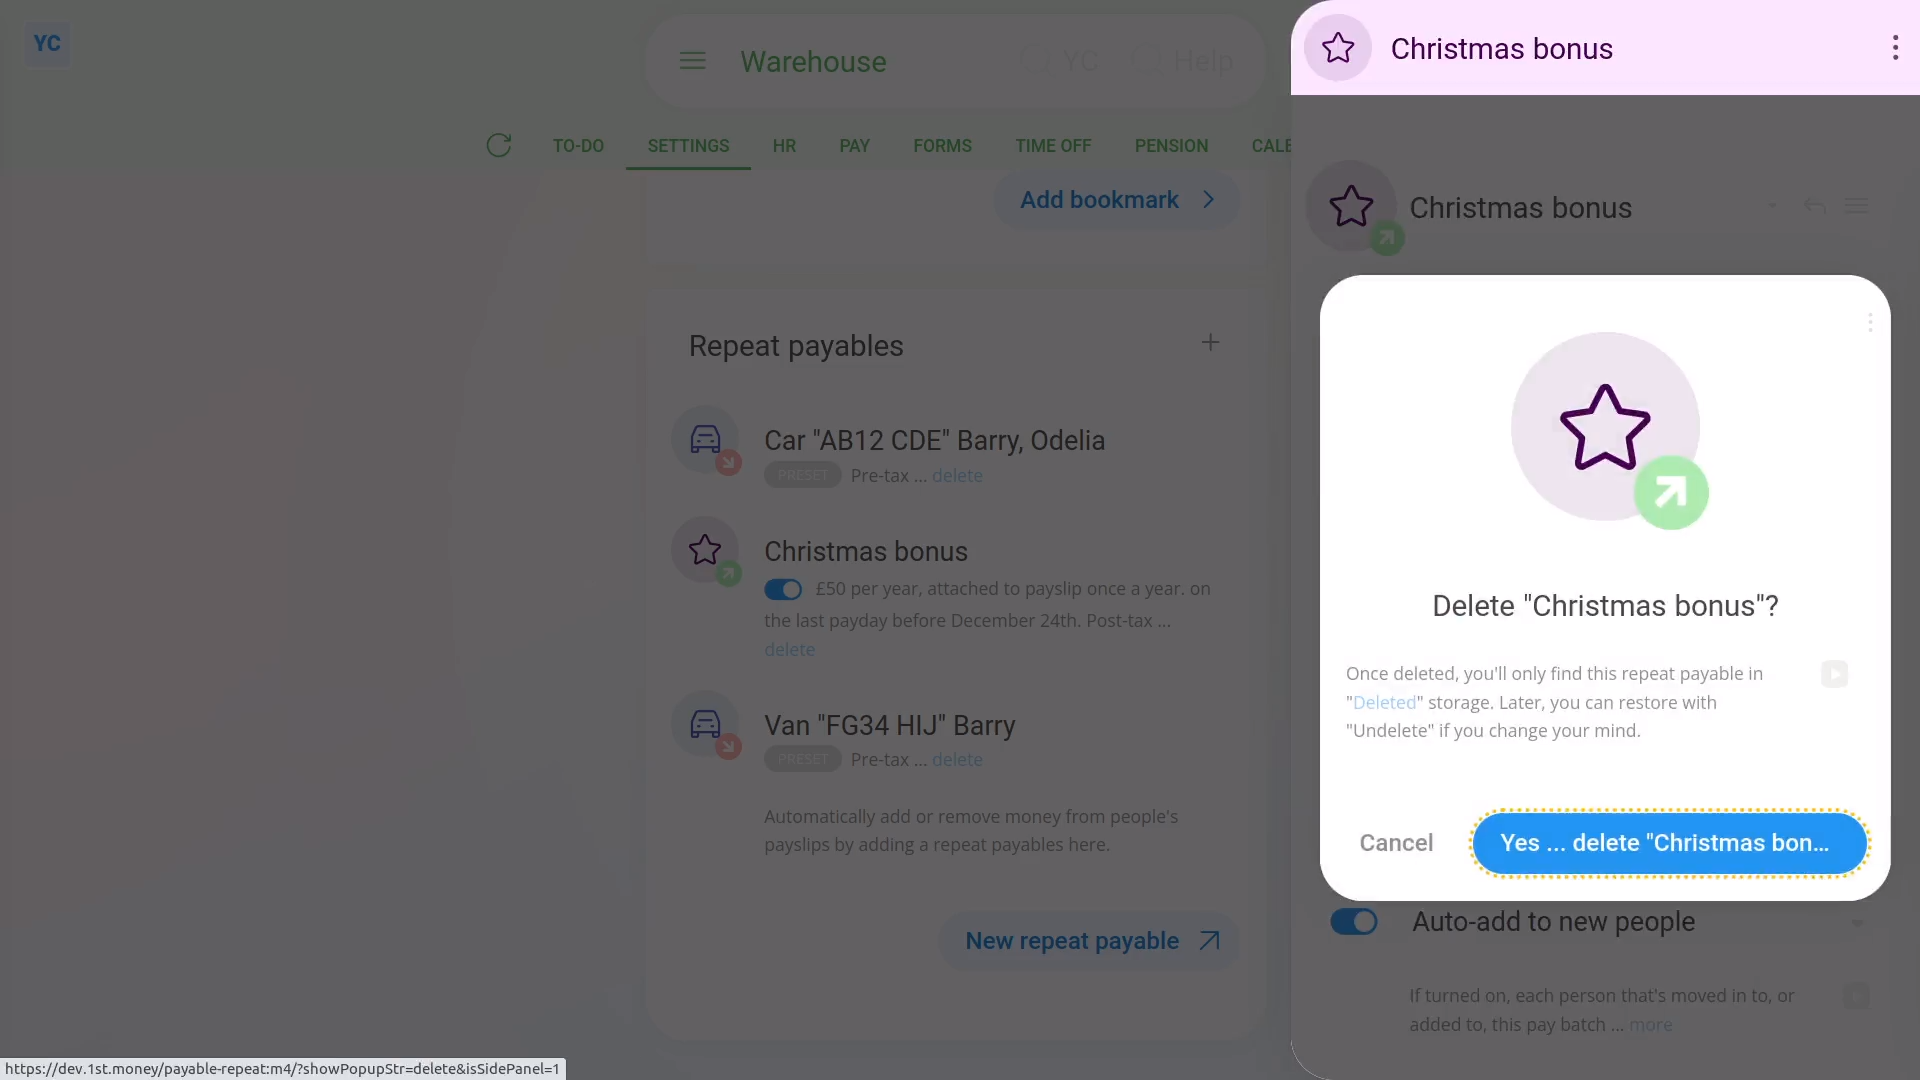
To delete a repeat payable:
- First, select the pay batch on: MenuPay batches
- Then tap: SettingsPay batch settings
- Then scroll right down to "Repeat payables" and find the one you'd like to delete.
- Then tap the blue "delete" link.
- Once it slides out on the right, tap: Yes ... delete
- Now, the repeat payable's deleted, including removing it from any people's un-filed payslips.
- However, from now on, for any payslip that's yet to be filed, the repeat payable never shows up again.
- And finally, for any payslip that's already filed, all previous repeat payable payments remain unaffected.
To undelete a repeat payable from your "deleted bin":
- First, tap: MenuDeleted bin
- Next, you'll see a category for every kind of item that can be deleted. Tap: Repeat payables
- And then tap the repeat payable you'd like to undelete.
- Next, tap: Undelete (at the bottom)
- And the deleted repeat payable is immediately undeleted.
- And finally, you'll still need to add it back to each person that's to receive the repeat payable.
Keep in mind that:
- Only people who've got "Full payroll admin" permissions can delete or undelete repeat payables.
- And remember that all deletes and undeletes are always permanently recorded in: "History"
- That means any payroll admin can always look back in time, and see who did any delete, and when the delete was done.
To learn more:
- About the fastest way to add lots of people to a repeat payable, watch the video on: Adding everyone to a repeat payable
And that's it! That's everything you need to know about deleting or undeleting a repeat payable!
Repeat payable. 3. How do I set the start and end dates?
 2:14
2:14
"Repeat payable. 3. How do I set the start and end dates?"
Sometimes, you may want to set the start or end dates for a repeat payable's payments to only happen between.
To set start or end dates for a repeat payable:
- First, select the person or pay batch on: MenuPay batches
- Then tap: SettingsPay batch settings
- Then scroll right down to "Repeat payables" and find the one you'd like to set the start or end dates for.
- Once it slides out on the right, look for the "Advanced" heading.
- And pick your date for Starts on (optional) and then your date for Ends on (optional).
- Then tap: Save
- To see the change on a person's payslip, open it again, scroll to the bottom, and tap one of the people getting it.
- Then on the repeat payable list, hover your mouse over the repeat payable, and tap the "See on payslip" button:
- If the repeat payable isn't showing on the payslip, check the "pay period" dates under the heading.
- In some cases, depending on the start date, you may have to tap through to the next payslip to see it.
- And finally, once it's showing, if you hover your mouse over the amount, you'll see a breakdown of the calculations.
You may notice:
- The start or end can be set to any date that at least covers some part of the pay period's dates.
- However, if it's outside the pay period, then that repeat payable won't be included in that payslip.
Keep in mind that:
- You don't have to set both start and end dates.
- If you only set a start date, or only set an end date, it still works fine.
- If you set neither a start or end date, then the repeat payable appears on all payslips, from now on, until it's deleted.
And that's it! That's everything you need to know about setting start or end dates for repeat payables!
Repeat payable. 4. How do I set the amount time frame?
 4:43
4:43
"Repeat payable. 4. How do I set the amount time frame?"
The amount time frame gives you a lot of flexibility when it comes to setting payment amounts. The payment amount can then be added or removed from each payslip.
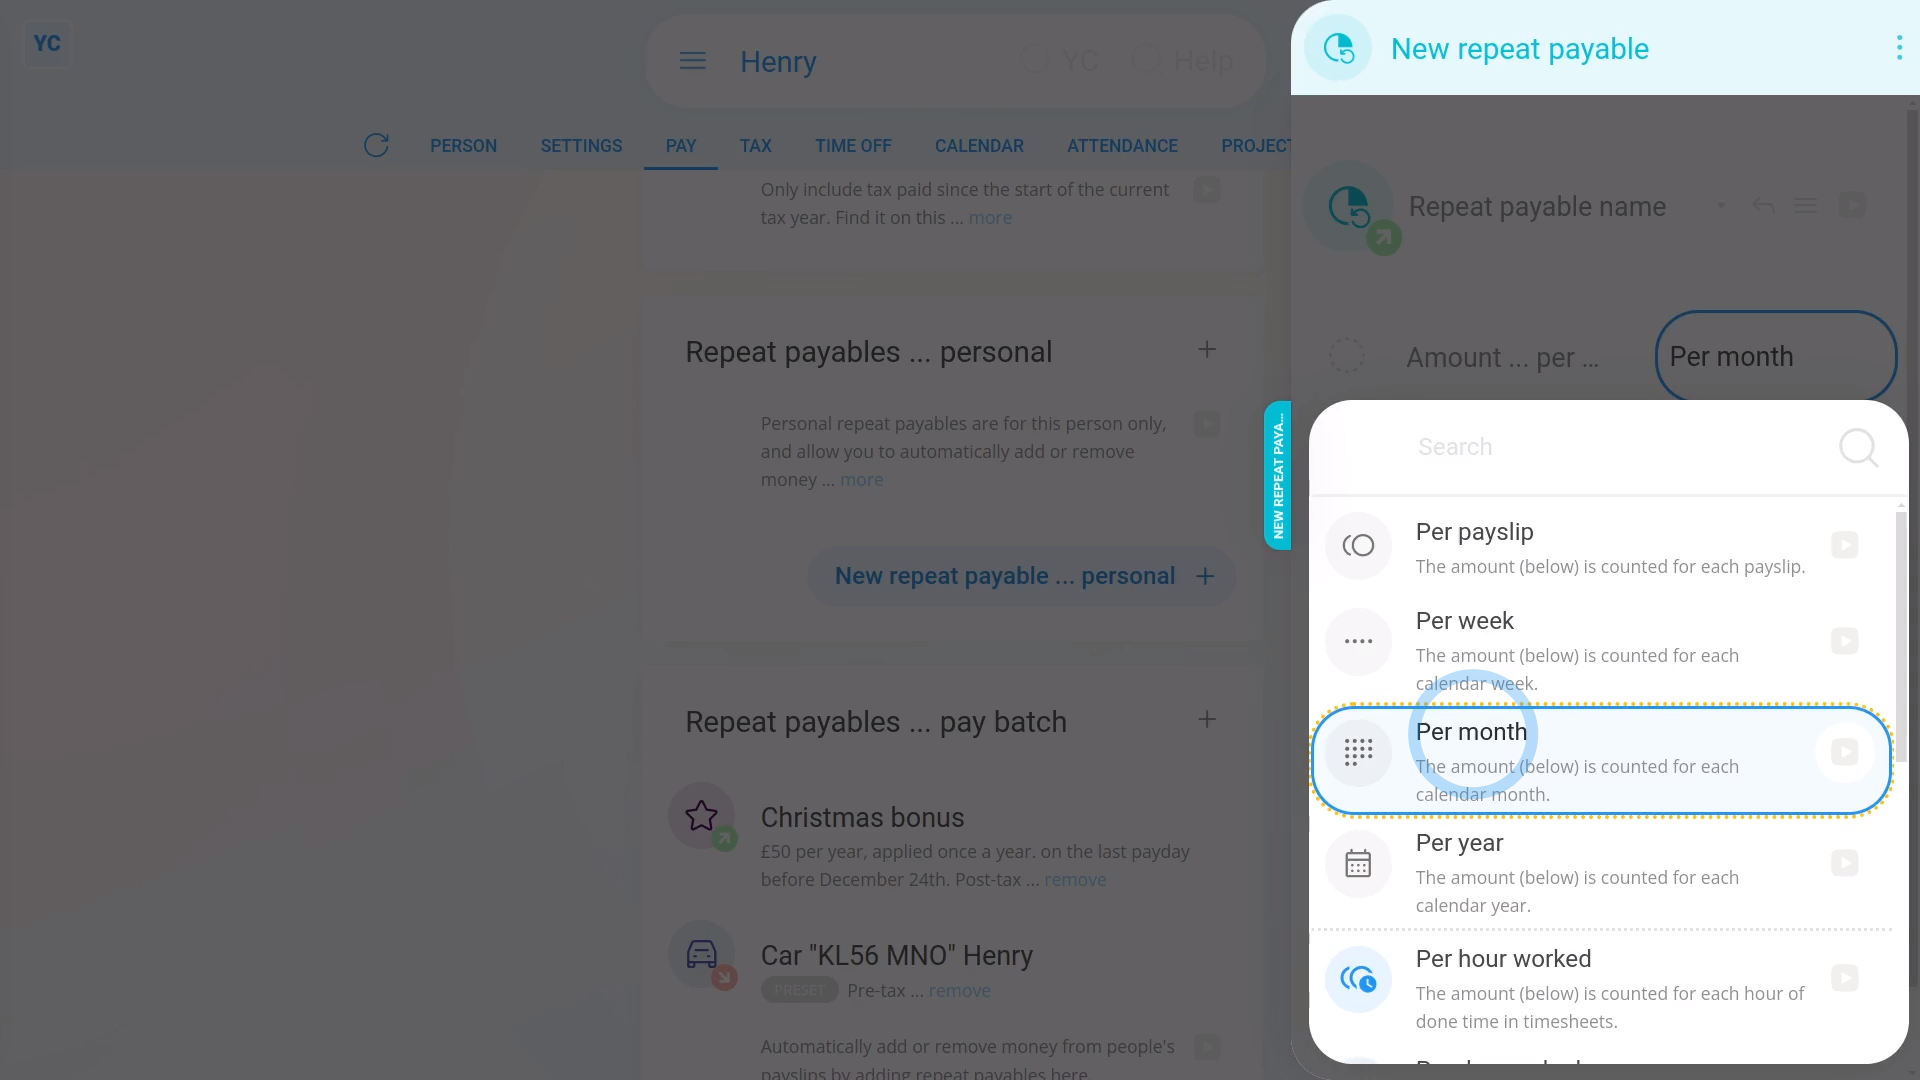
To see a repeat payable's amount time frames:
- First, open: MenuPeople
- And then go to: PayPay settings
- And scroll down to the "Repeat payables ... personal" heading.
- Then tap: New repeat payable
- And select the type.
- And finally, tap Per month, to see the list of options.
Per payslip: Lets you add or remove an exact amount of pay per payslip. For example, if you enter an amount of 100, then exactly 100 is added or removed from each payslip.
Per week: Lets you multiply the amount by the number of weeks in the person's pay period. For example, if you enter an amount of 10 a week, and the person's paid every two weeks. In that case, 10 is multiplied by 2 weeks, so 20 is added or removed from their payslip.
Per month: Lets you divide the amount by the number of months in the person's pay period. For example, if you enter an amount of 100 a month, and the person's paid twice a month. In that case, 50 is added or removed from their payslip.
Per year: Lets you set an annual amount, and the software works out how much to add or remove for each payslip. For example, if you enter an amount of 120 a year, and the person's paid monthly. In that case, 10 is added or removed from each monthly payslip.
Per hour worked: Lets you multiply the amount by the number of hours of done time the person had in that pay period. For example, if you enter an amount of 10 an hour, and the person had 200 hours of done time in the pay period. In that case, 2000 is added or removed from their payslip. The option only applies if your people do timesheets each day.
Per day worked: Lets you multiply the amount by the number of days, that have any done time, that a person had in that pay period. For example, if you enter an amount of 10 a day, and the person had 20 days with done time in the pay period. In that case, 200 is added or removed from their payslip. The option only applies if your people do timesheets each day.
Per month ... hours worked: Lets you set a monthly amount for if the person works 100% of their full target hours. If the person works less than 100% of their target, the person gets a proportion of the monthly amount, per hour worked, relative to their target. The option only applies if your people do timesheets each day, and the person's got target hours set. If the person works more than their target, the person gets the 100% amount (and no more).
Per month ... days worked: Lets you set a monthly amount for if the person works 100% of their full target days. If the person works less than 100% of their target, the person gets a proportion of the monthly amount, per day worked, relative to their target. The option only applies if your people do timesheets each day, and the person's got target hours set. If the person works more than their target, the person gets the 100% amount (and no more).
Per year ... hours worked: Lets you set a yearly amount for if the person works 100% of their full target hours. If the person works less than 100% of their target, the person gets a proportion of the yearly amount, per hour worked, relative to their target. The option only applies if your people do timesheets each day, and the person's got target hours set. If the person works more than their target, the person gets the 100% amount (and no more).
Per year ... days worked: Lets you set a yearly amount for if the person works 100% of their full target days. If the person works less than 100% of their target, the person gets a proportion of the yearly amount, per day worked, relative to their target. The option only applies if your people do timesheets each day, and the person's got target hours set. If the person works more than their target, the person gets the 100% amount (and no more).
Keep in mind that:
- You can select any of the options, but "Per payslip" is the most common.
And that's it! That's everything you need to know about using amount time frames!
Repeat payable. 5. How do I set when it's added to a person's pay?
 2:01
2:01
"Repeat payable. 5. How do I set when it's added to a person's pay?"
The "paid every" option gives you a lot of flexibility when it comes to choosing how often a repeat payable's added to each payslip.

To see a repeat payable's "paid every" options:
- First, open: MenuPeople
- And then go to: PayPay settings
- And scroll down to the "Repeat payables ... personal" heading.
- Then tap: New repeat payable
- And select the type.
- And finally, tap the blue "Applied every payday" link.
Every payday: Lets you add the repeat payable to every payslip. The "Every payday" option is the most common option.
The first payday ... every month: Lets you add the repeat payable to the first payday of each calendar month, based on the payslip's due date.
The first pay period ... every month: Lets you add the repeat payable to the first pay period of each calendar month, based on the pay period's end date.
The last payday ... every month: Lets you add the repeat payable to the last payday of each calendar month, based on the payslip's due date.
The last pay period ... every month: Lets you add the repeat payable to the last pay period of each calendar month, based on the pay period's end date.
Once a year: Lets you add the repeat payable to only one payslip in the year, by setting the payslip date. The "Once a year" option is useful when paying Christmas or annual bonus payments.
To learn more:
- About setting Christmas or annual bonus payments, watch the video on: Yearly repeat payables & Christmas bonus
And that's it! That's everything you need to know about repeat payable's "paid every" option!
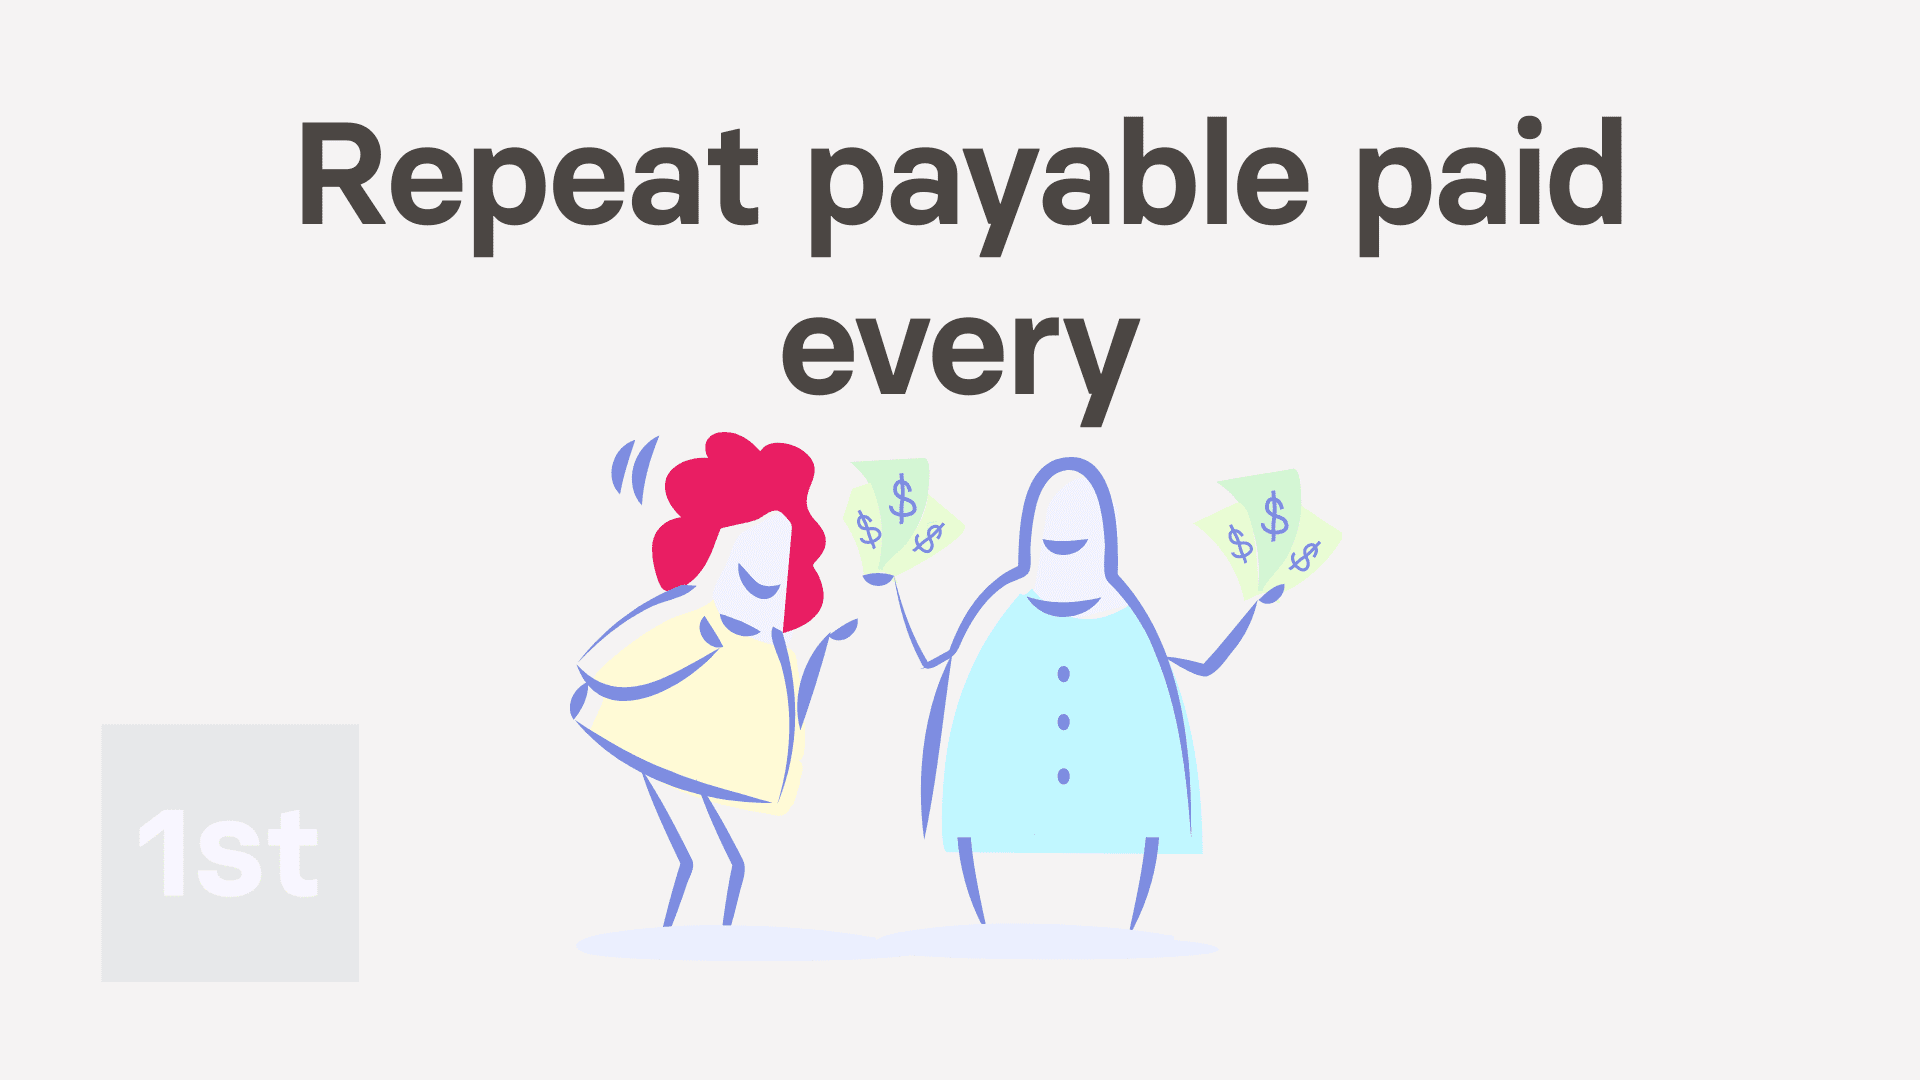
Repeat payable. 6. How do I understand added vs taken off?
 1:40
1:40
"Repeat payable. 6. How do I understand added vs taken off?"
The repeat payable's "added" vs "taken off" options let you control how much a person gets paid every payday, on top of their salary.
To see a repeat payable's "added" vs "taken off" options:
- First, open: MenuPeople
- And then go to: PayPay settings
- And scroll down to the "Repeat payables ... personal" heading.
- Then tap: New repeat payable
- And select the type.
- And give the repeat payable a name and an amount.
- Then tap the blue "Added to pay" link.
- Now you can select between "Added to pay" vs: "Taken off pay"
- If you select "Added to pay" an amount is added to the person's pay.
- Select "Added to pay" if you're setting up a repeating bonus, or a regularly scheduled payment.
- Once selected, you'll notice a green up arrow (at the top) to remind you that you're adding to their pay.
- If you select "Taken off pay" an amount is deducted from the person's pay.
- Select "Taken off pay" if you're removing an amount every payday, perhaps for paying back an advance.
- And finally, once selected, you'll notice a red down arrow (at the top) to remind you that you're taking money off their pay.
And that's it! That's everything you need to know about a repeat payable's "added" vs "taken off" options!
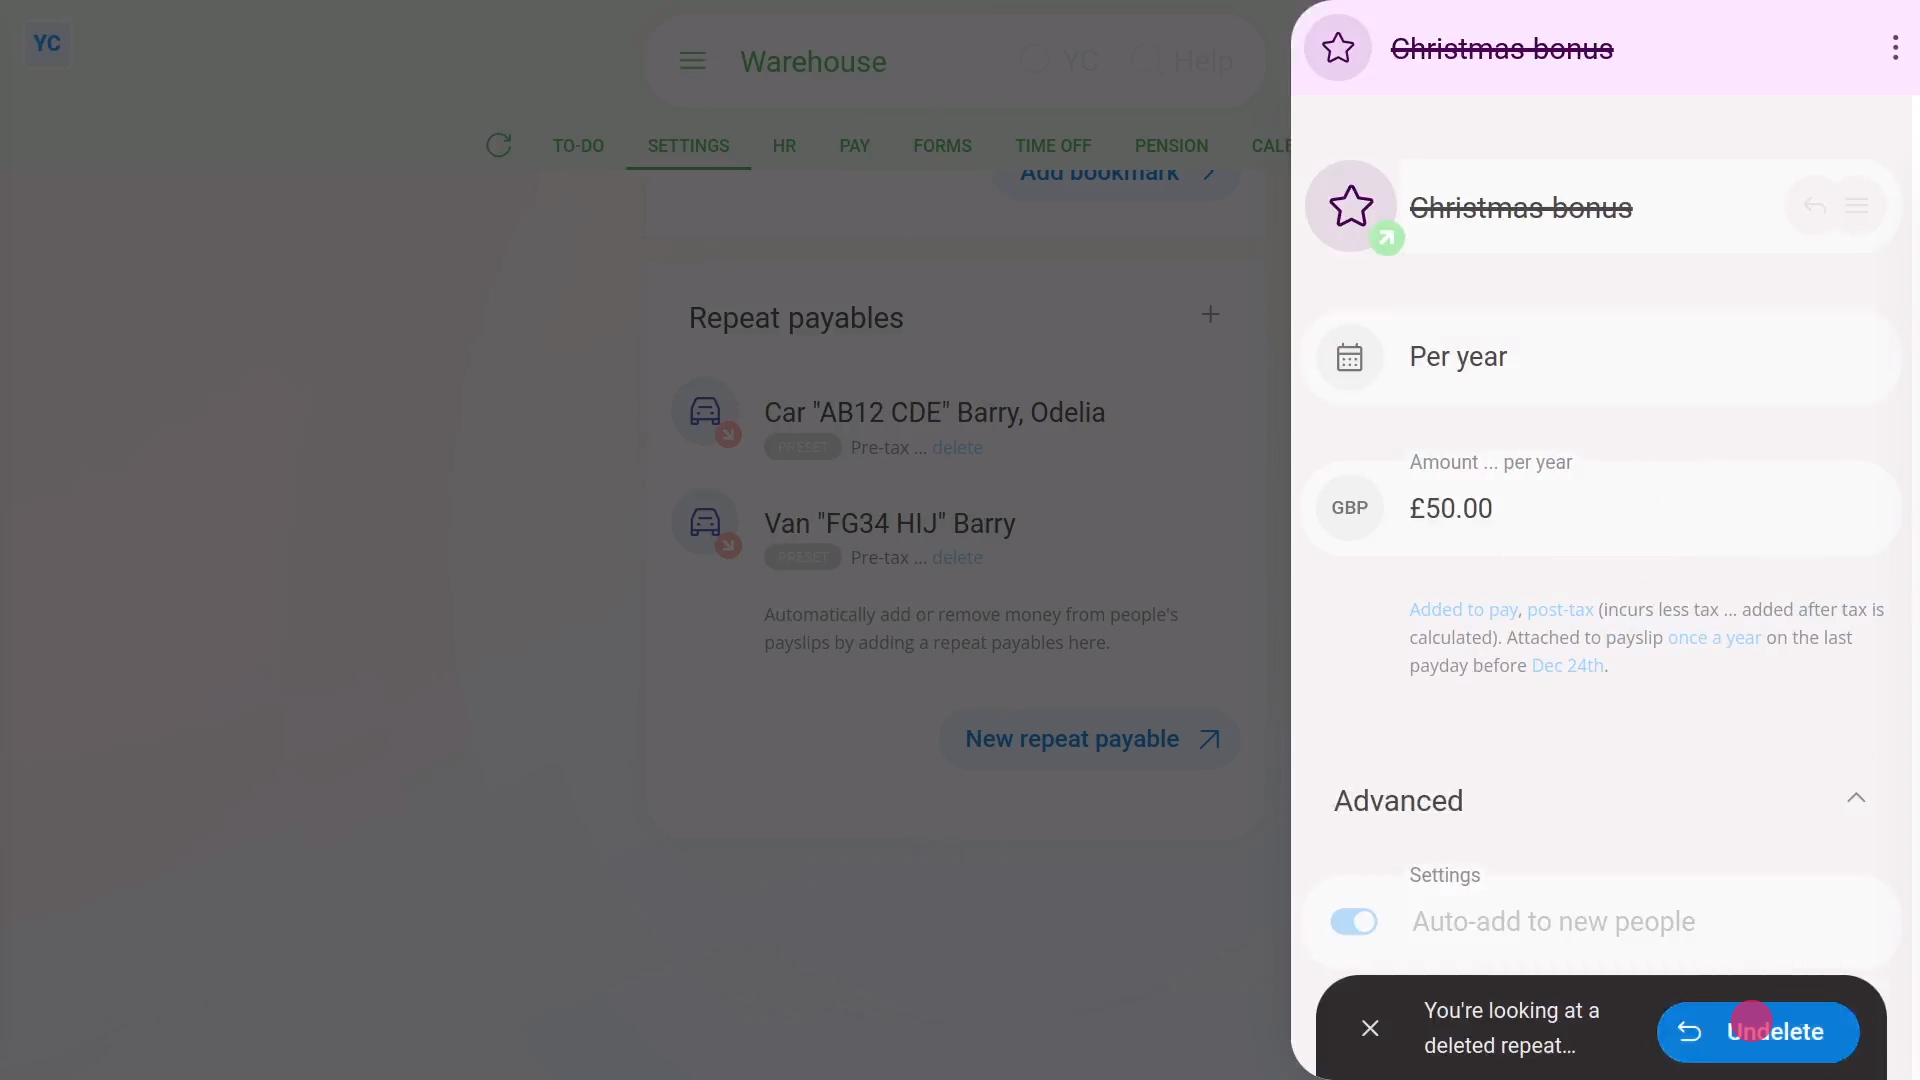
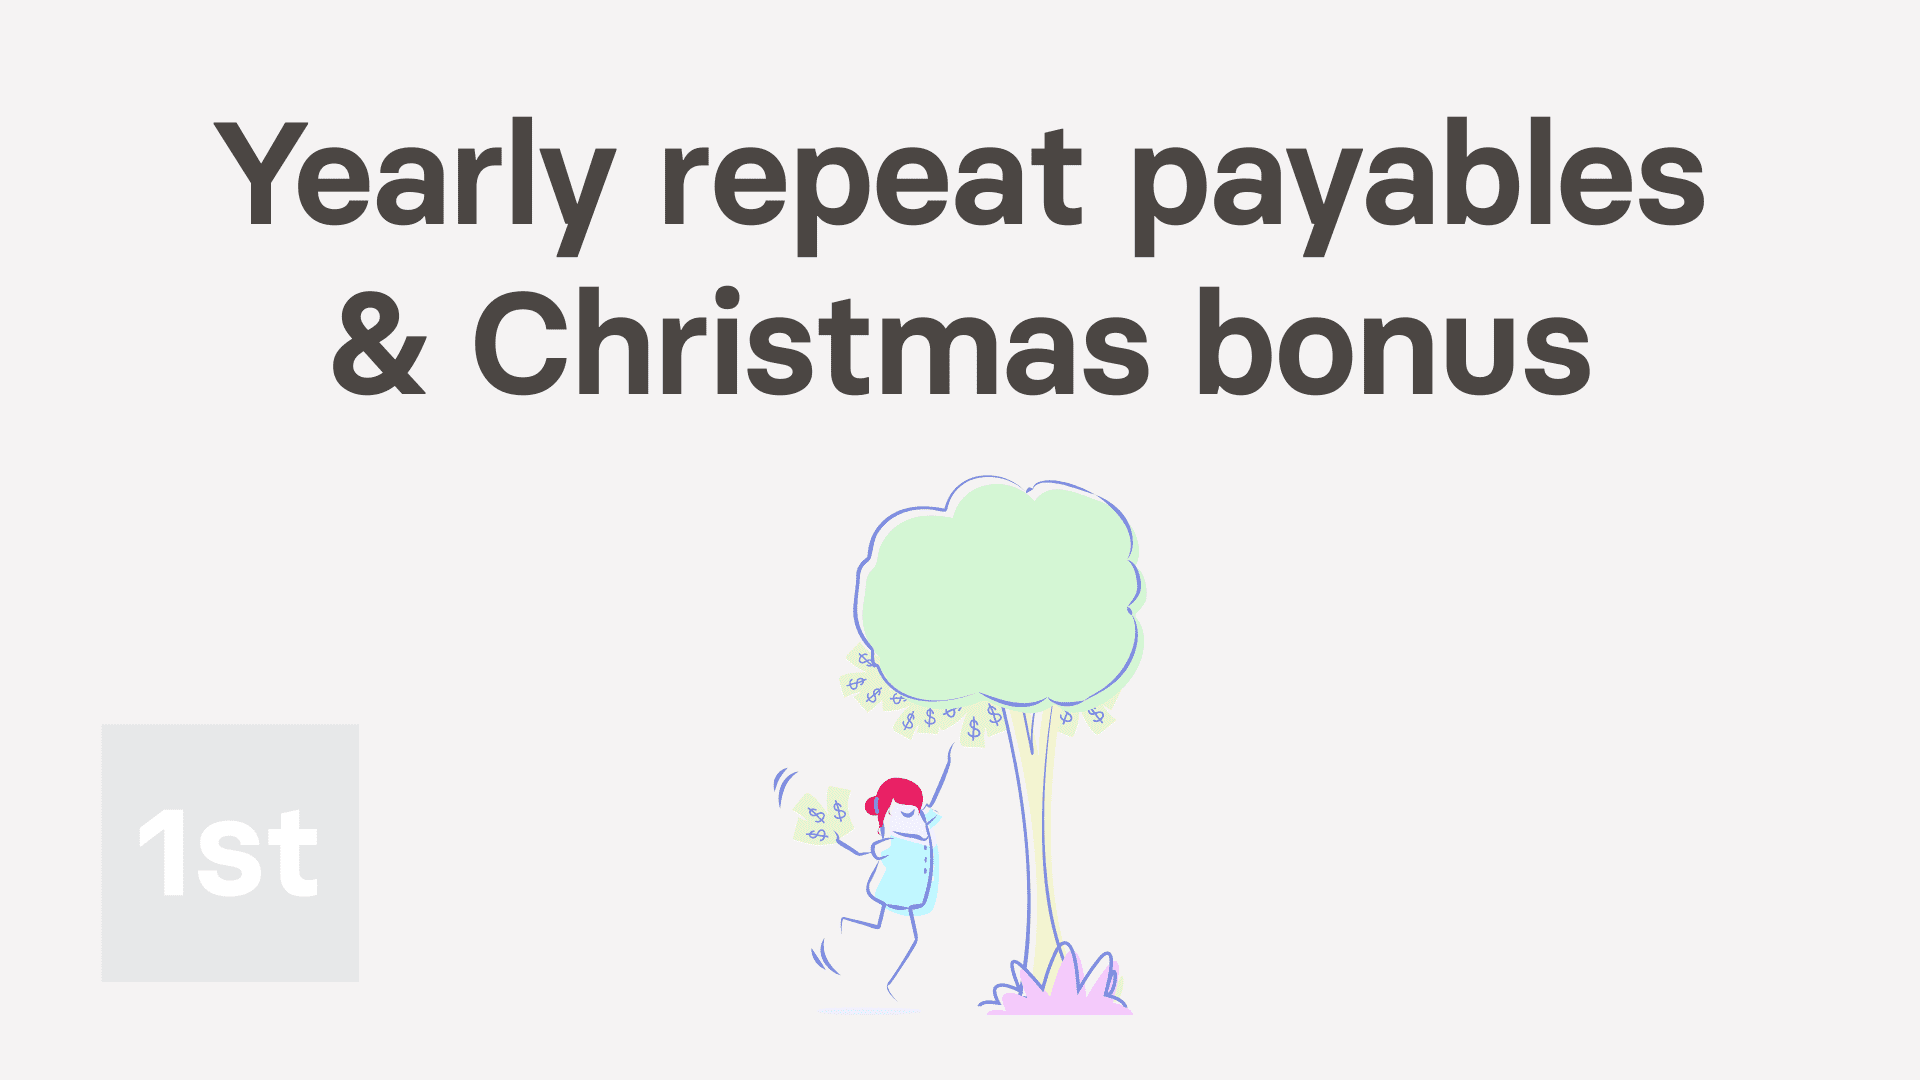
Repeat payable. How's a Christmas bonus or other yearly repeat set?
 2:33
2:33
"Repeat payable. How's a Christmas bonus or other yearly repeat set?"
Yearly repeat payables, or Christmas bonuses, are a payment that's automatically added to a person's pay once a year.

To set up a yearly repeat payable, or Christmas bonus:
- First, select the person who's getting the yearly repeat payable, or Christmas bonus, on: MenuPeople
- And then go to: PayPay settings
- And scroll down to the "Repeat payables ... personal" heading.
- Then tap: New repeat payable
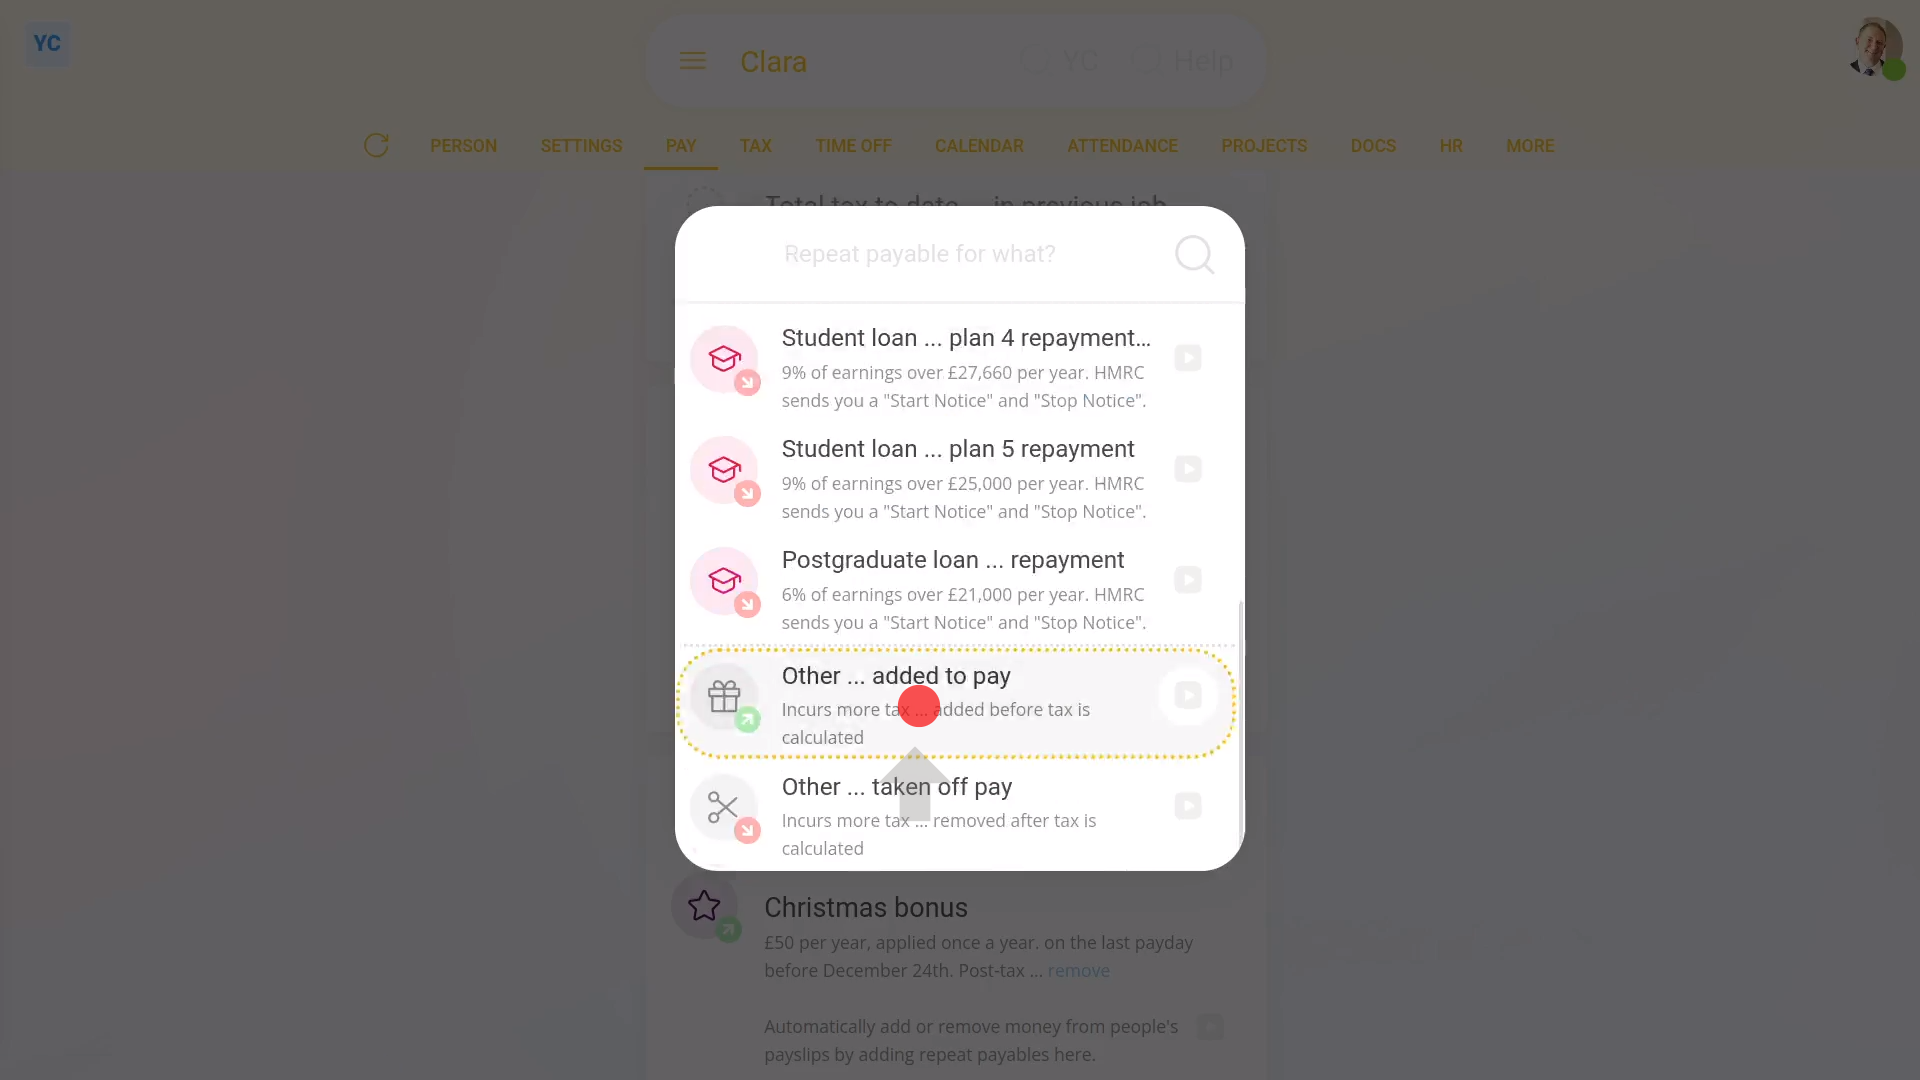
- And select: Other ... added to pay
- Next, give the new repeat payable a name.
- And enter the yearly amount payable.
- And set the time frame to: "Per year"
- Keep in mind that the time frame setting doesn't set how often it's paid, rather it sets over what time frame the amount's calculated.
- And because it's a bonus, check it's set to: "pre-tax"
- Once you've set the amount, you're then free to decide how often it's to be added to their pay.
- Next, change it from "every payday" to: "Once a year"
- And don't forget to set the date for the Christmas bonus to be paid. For example, 10 days before Christmas.
- Now that the payment amount and frequency are set, tap See on payslip to see the payslip that it's paid with.
- And scroll to the top, to check that the "Payday due" date is before Christmas.
- Now, when you close it, you'll see a summary of the yearly repeat payable, or Christmas bonus.
- And finally, to see it on the payslip one last time, tap the "See on payslip" button:
Keep in mind that:
- Because it's a repeat payable, the payment continues to be paid every year from now on, as long as the person's otherwise getting a payslip.
- You can stop it anytime by deleting it.
To learn more:
- To learn about a deleting a repeat payable, watch the video on: Deleting a repeat payable
And that's it! That's all you need to do to set up a repeat payable, or Christmas bonus, to be paid into a person's salary every year!
Repeat payable. How can I remind myself to come back and update it?
 1:53
1:53
"Repeat payable. How can I remind myself to come back and update it?"
Setting up an email reminder is a convenient way to remind you to come back and check on something later.
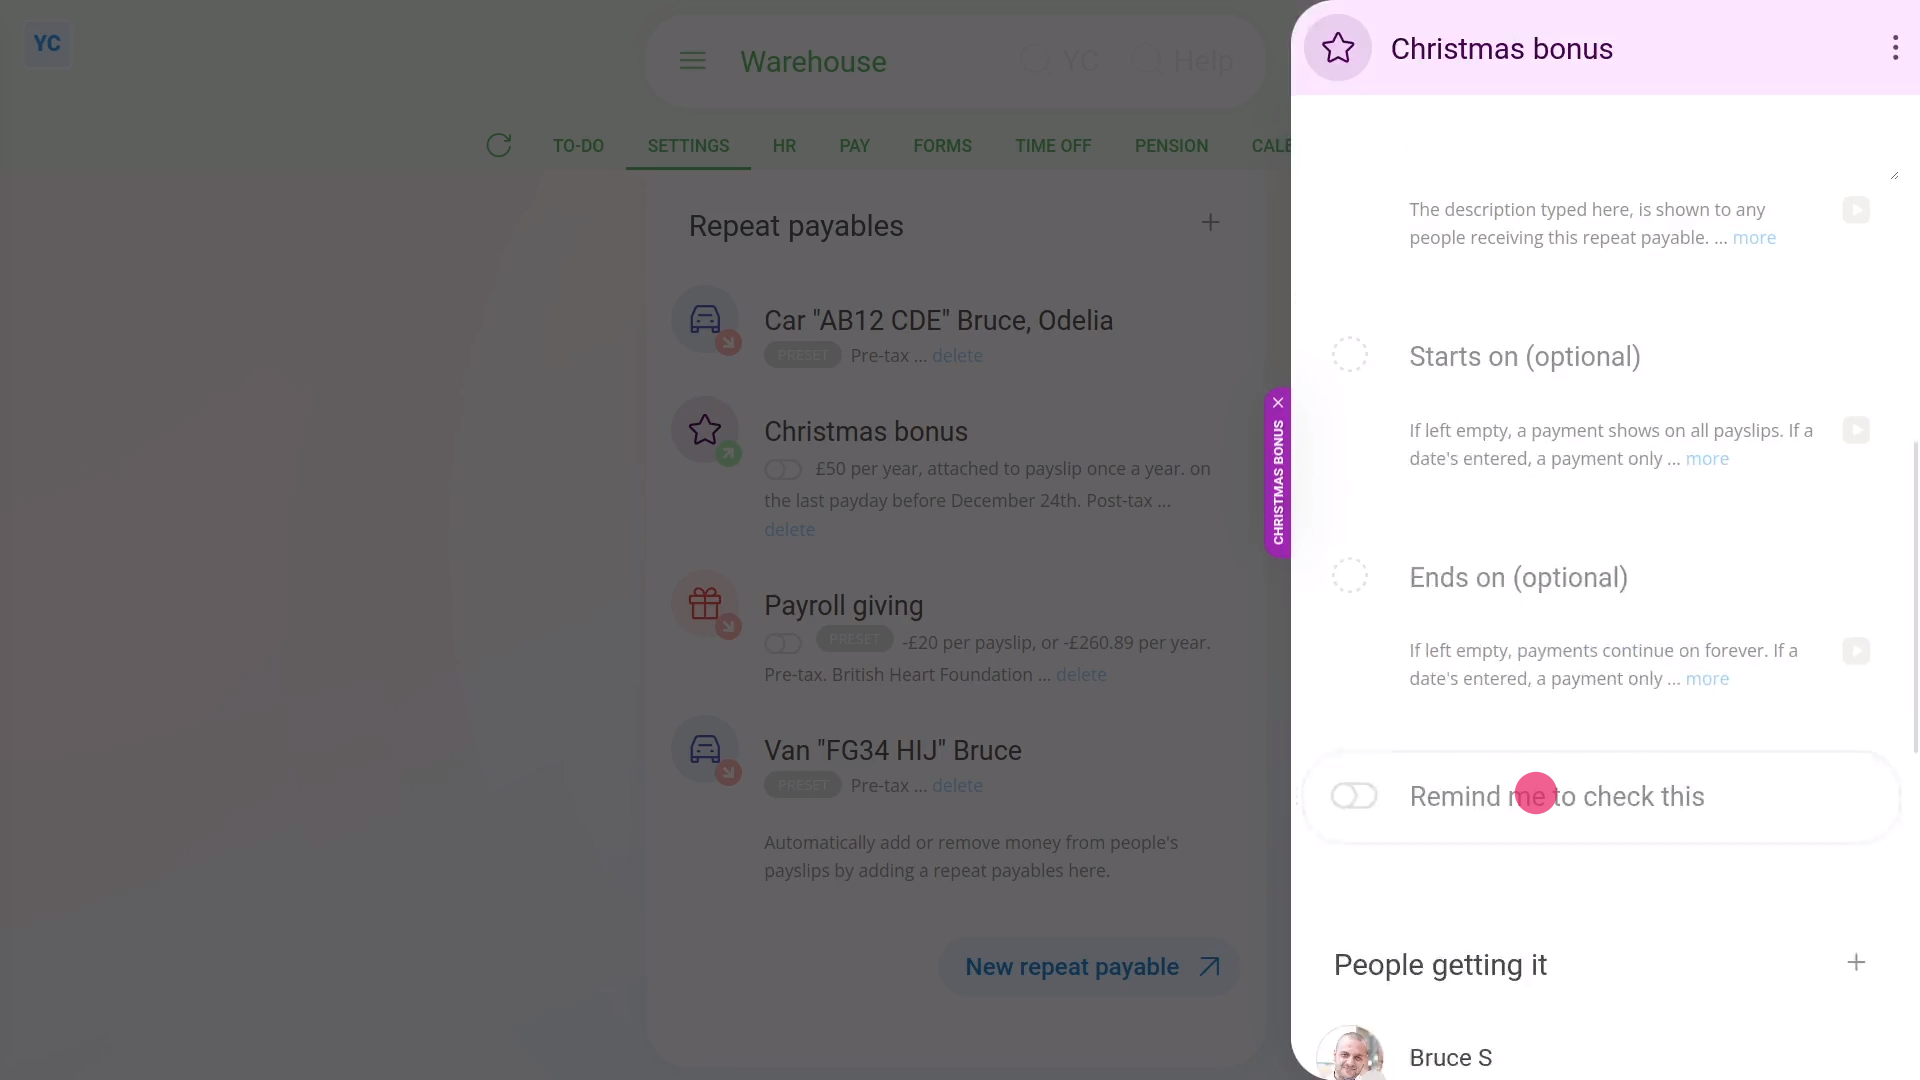
To turn on an email reminder for a repeat payable:
- First, select the pay batch on: MenuPay batches
- Then tap: SettingsPay batch settings
- Then scroll right down to "Repeat payables" and find the one you'd like to set an email reminder for.
- Once it slides out on the right, tap the "Advanced" heading.
- The scroll down and turn on: Remind me to check this
- Then pick the date you'd like to be emailed the reminder.
- Once you tap Save, your email reminder's all set up.
- On the date of your reminder, you'll get the email reminder.
- Once you get an email reminder, tap the blue button to reopen your repeat payable.
- And finally, you'll be taken right back to the repeat payable that you asked to be reminded about.
You may notice:
- Once you return back, that the reminder's now been automatically turned off. It's turned off because the reminder's already been sent.
- Once set, reminders are only ever sent once, and always sent to the email of the person who turned it on.
- If you need another reminder, you can always turn on the reminder again.
Keep in mind that:
- If the payday admin for the pay batch is another person, a copy of the email reminder is also sent to the payday admin.
And that's it! That's everything you need to know about turning on an email reminder for a repeat payable!
Repeat payable. How do I add a description?
 1:21
1:21
"Repeat payable. How do I add a description?"
Sometimes, you may want to add a description to your repeat payables.
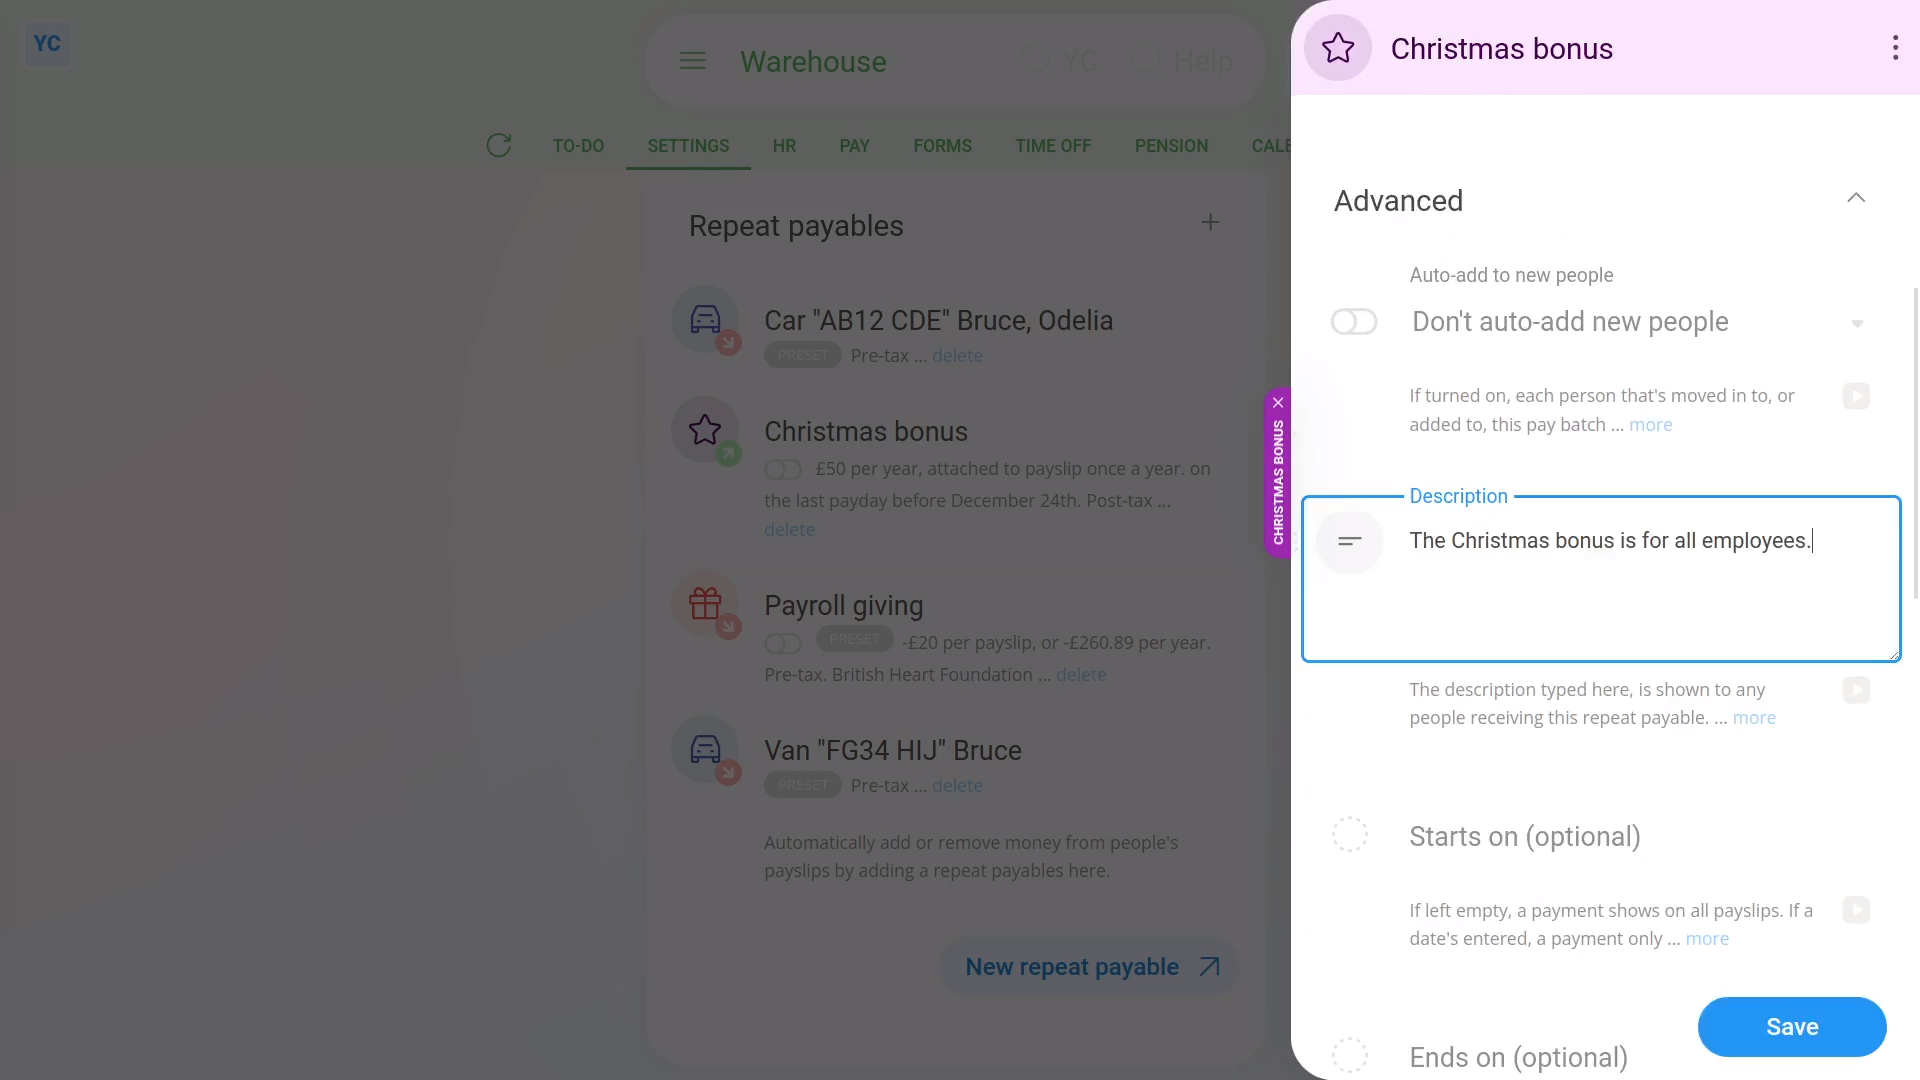
To add to a description to a repeat payable:
- First, select the person or pay batch on: MenuPay batches
- Then tap: SettingsPay batch settings
- Then scroll right down to "Repeat payables" and find the one you'd like to add a description to.
- Once it slides out on the right, tap the "Advanced" heading.
- And type your description into: Description
- Then tap: Save
- And finally, you'll see the description that you typed, which can now also be seen by your people.
You may notice:
- The description can be seen by all the people who get the repeat payable.
- Which can be a useful way to help them understand what the repeat payable is for.
Keep in mind that:
- The description option is available for most person and pay batch repeat payables.
And that's it! That's everything you need to know about adding a description to a repeat payable!
Repeat payable. How do I add many people and auto-add new people?
 2:12
2:12
"Repeat payable. How do I add many people and auto-add new people?"
Sometimes you've recently created a brand new repeat payable, and you're looking for the fastest way of adding it to lots of your existing people.
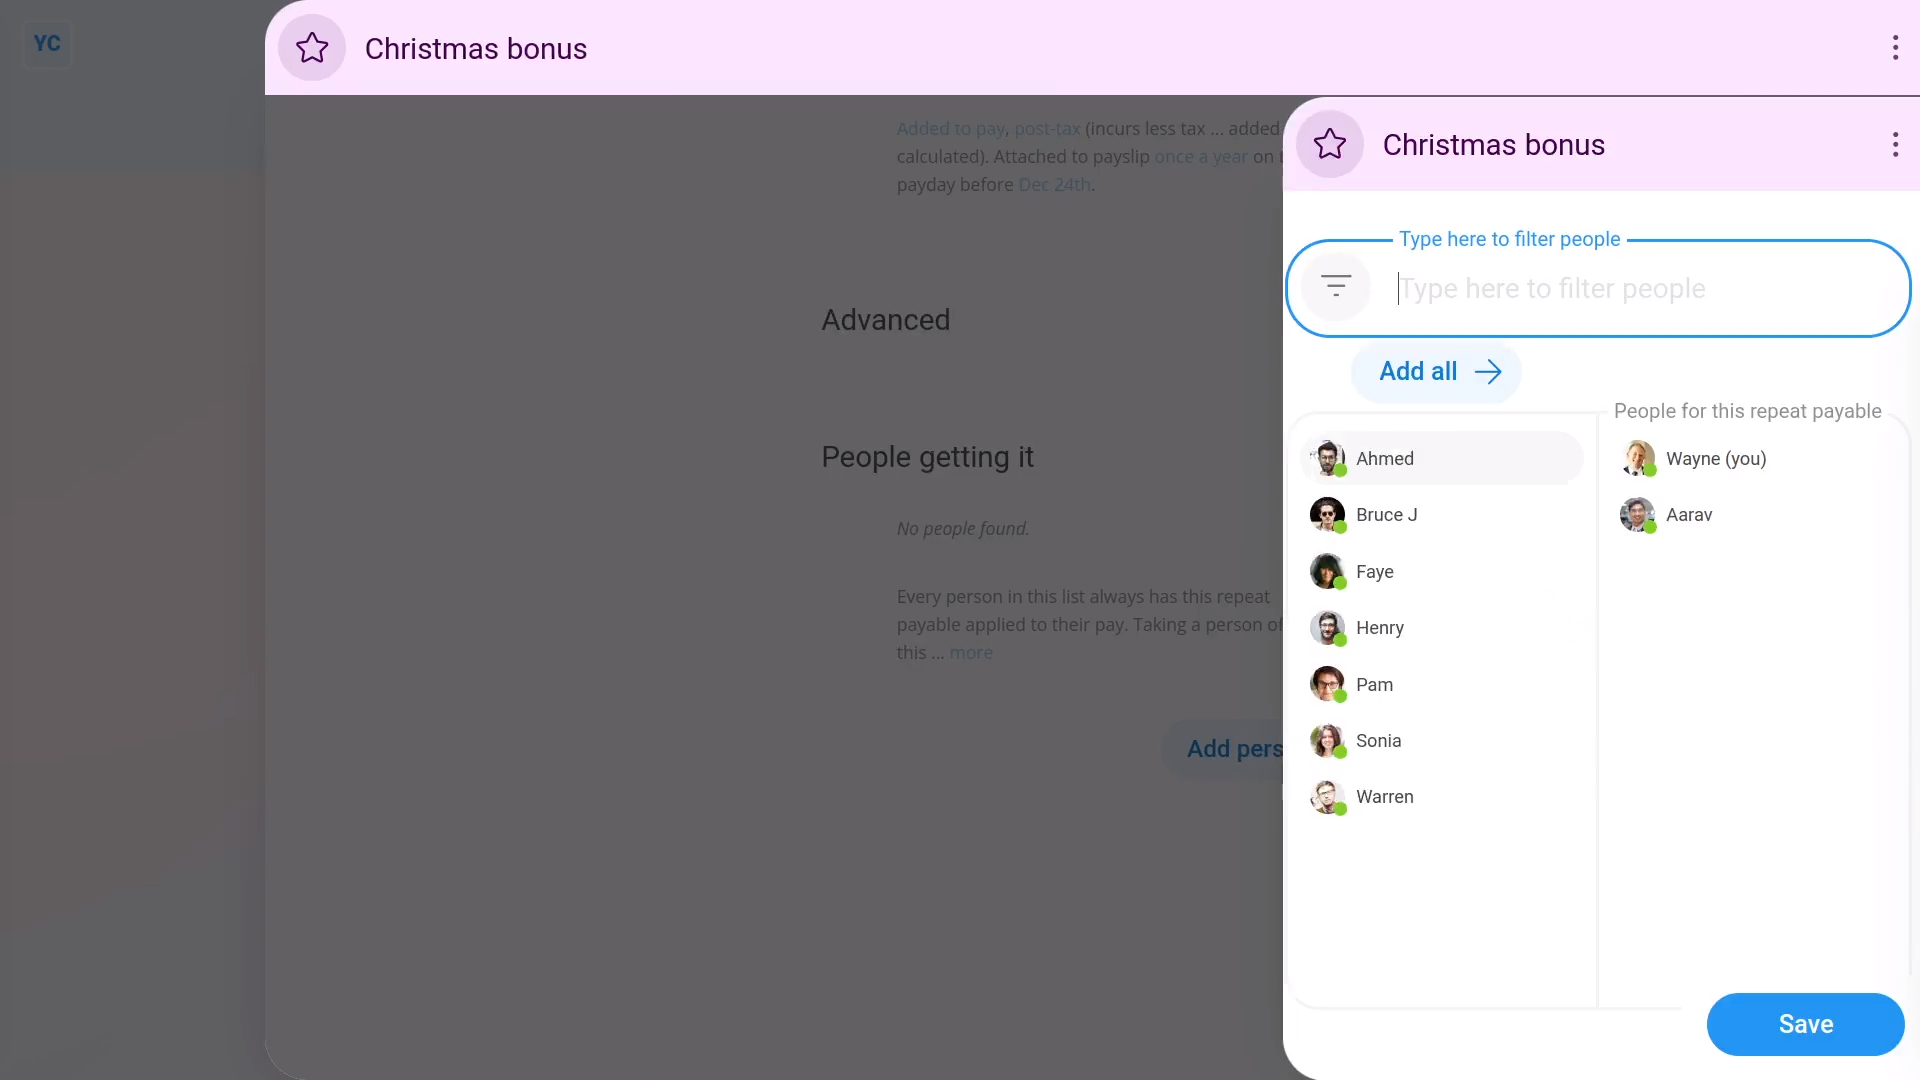
To add a repeat payable to lots of people:
- First, select the pay batch on: MenuPay batches
- Then tap: SettingsPay batch settings
- Then scroll right down to "Repeat payables", and for the one you're adding people to, tap the "Edit" button:
- Once it slides out on the right, scroll down and tap: Add people
- Now, when it again slides out on the right, tap each person you want to add.
- Alternatively, to add the repeat payable to everyone, tap: Add all (that shows when you hover)
- Then tap: Save
- Now, you'll now see all the people you added listed (at the bottom).
- And finally, when you tap any of the people you've added, you'll see the repeat payable included as theirs.

To set a repeat payable so that it's auto added to any new person who's added to a pay batch:
- First, select the pay batch on: MenuPay batches
- Then tap: SettingsPay batch settings
- Then scroll right down to "Repeat payables", and for the one you're setting auto add, tap the "Edit" button:
- Once it slides out on the right, tap the "Advanced" heading.
- Then turn on: Auto-add to new people
- And tap: Save
- And finally, for any new people you add or move in to the pay batch, the repeat payable's auto-added to them all, from now on.
You may notice:
- Besides every newly created person automatically having the repeat payable added to their pay.
- Additionally, every existing person that's moved into the pay batch, also automatically gets the repeat payable added to their pay.
And that's it! That's all you need to do to add lots of people to any repeat payable!
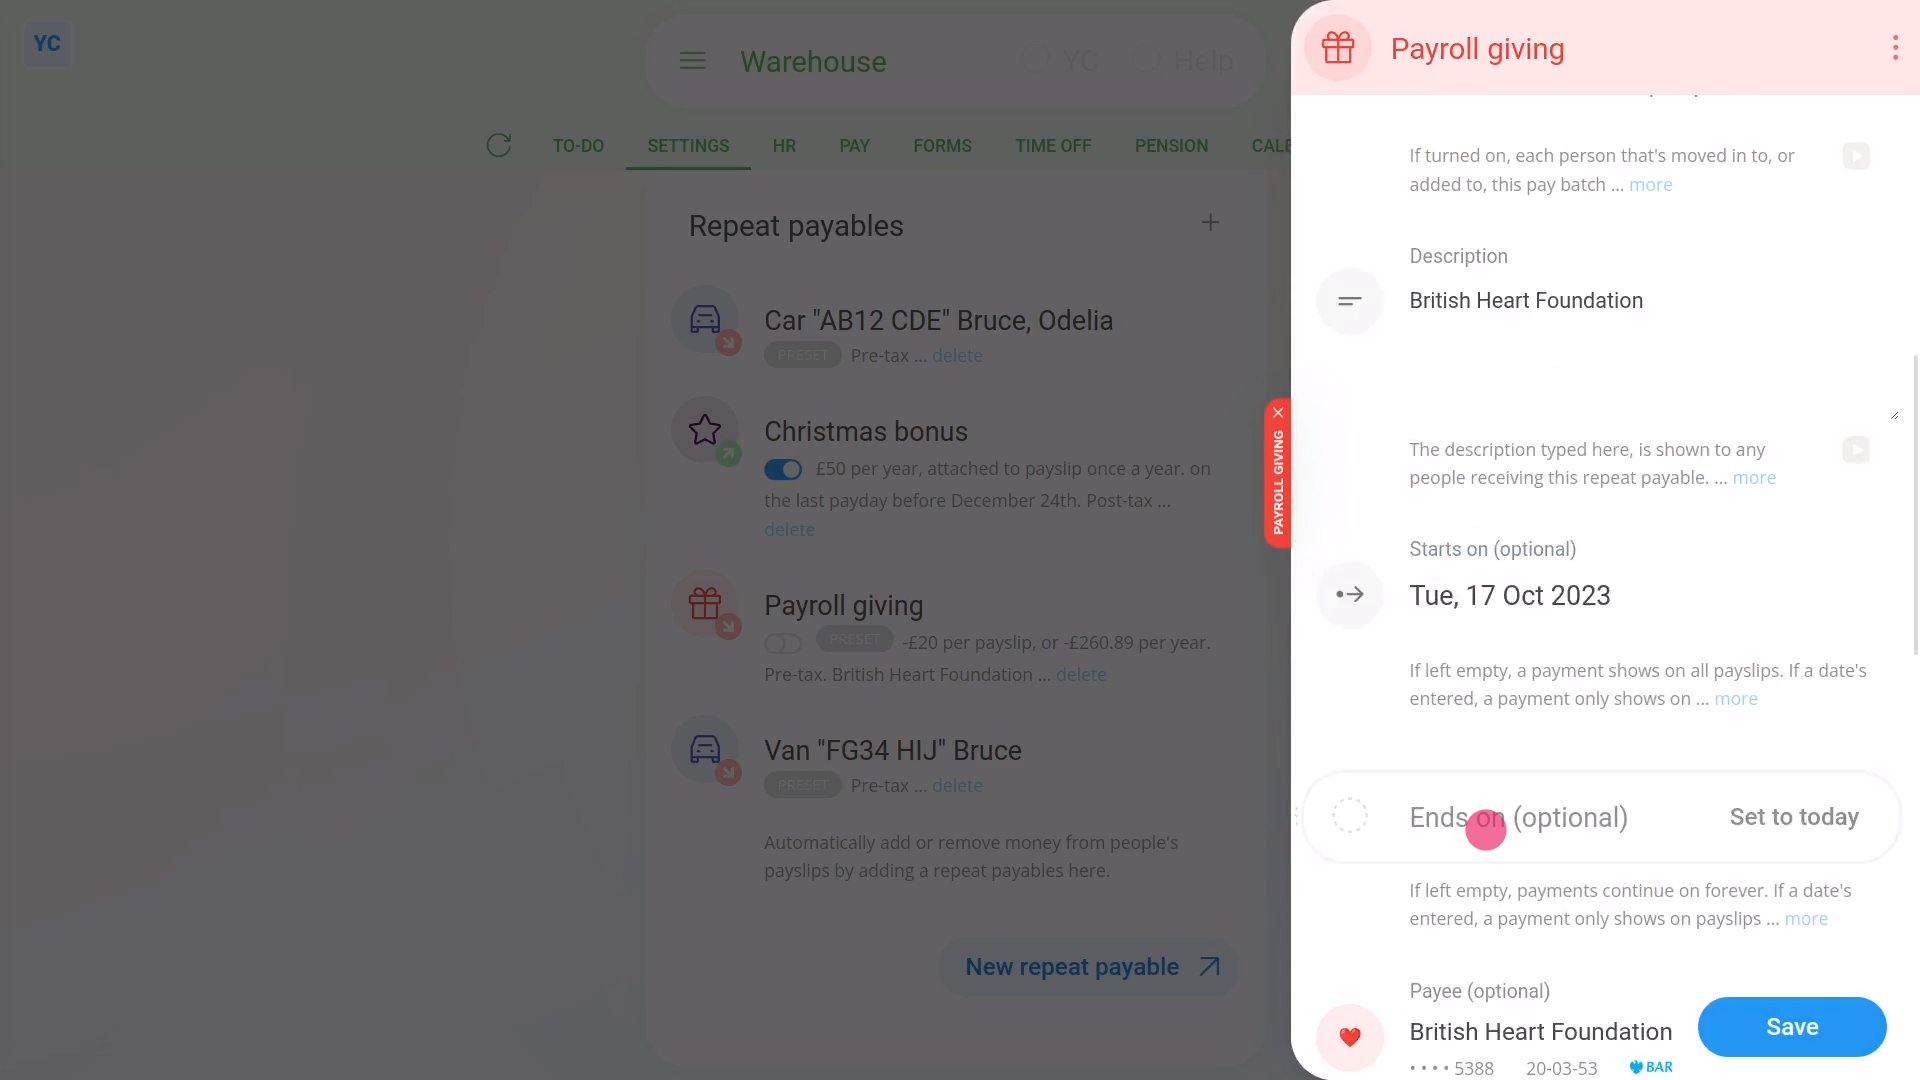
Repeat payable. How do I set a bank to pay it to, and payroll giving?
 2:47
2:47
"Repeat payable. How do I set a bank to pay it to, and payroll giving?"
Adding a payee to a repeat payable allows the deducted amount to be onward paid into a bank account.
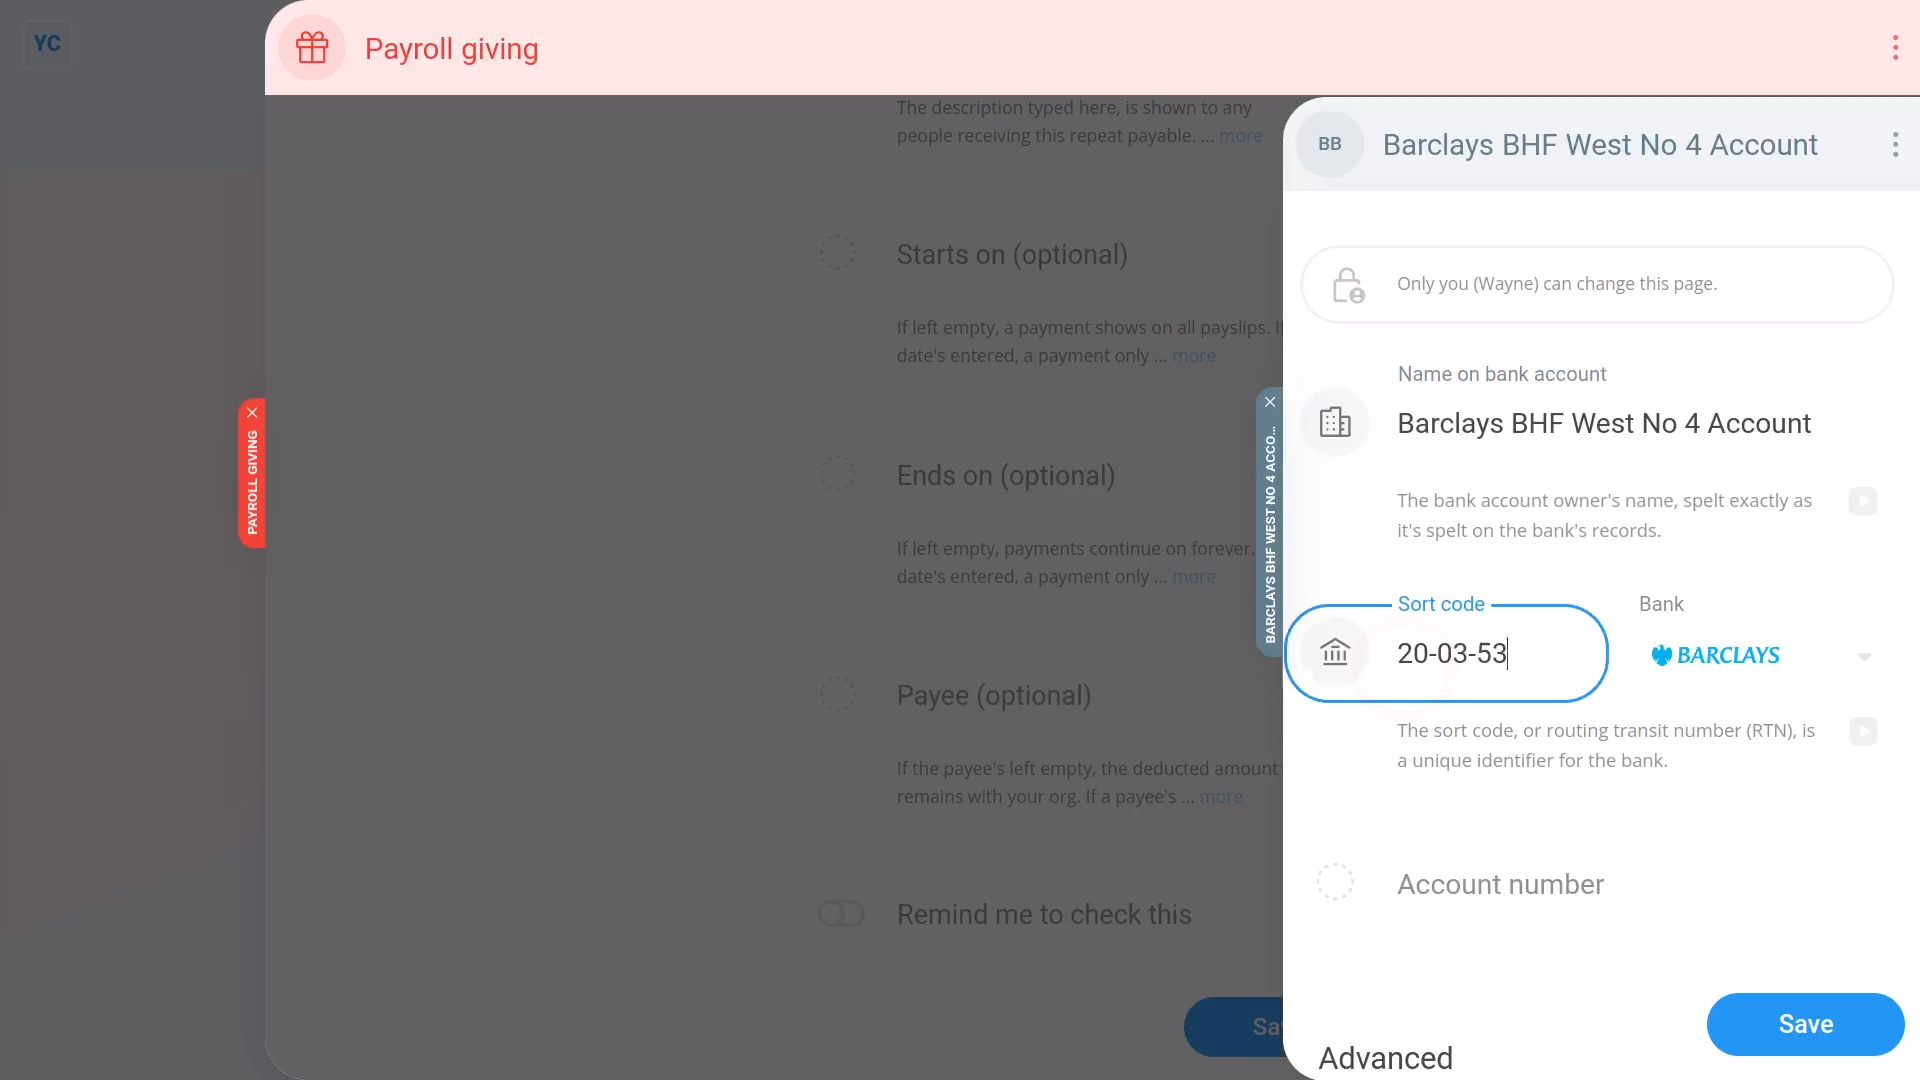
To create a new repeat payable, and set a new payee to receive any amount taken off:
- First, select the person or pay batch that you're setting the payee for, on: MenuPeople
- Next, go to: PayPay settings
- And scroll down to the "Repeat payables ... personal" heading.
- Then tap: New repeat payable
- Next, select either Payroll giving or: Other ... taken off pay
- Type in the amount to be taken off each payday.
- Then tap the "Advanced" heading, and scroll down to: "Payee"
- If the payee that you're looking for isn't in the list, tap New to make a new one.
- Next, type in all the payee's details, including their bank account details.
- Then tap: Save
- And the payee's all set up.
- Now, to see how it shows up on the person's payslip, hover your mouse over the repeat payable, and tap the "See on payslip" button:
- And finally, if you hover your mouse over the amount, you'll see a breakdown of the calculations.
You may notice:
- If you use "Payroll giving", the amount taken off is "Pre-tax". In other words, the person pays less tax by using: "Payroll giving"
- Also, setting a payee is an option that only shows for repeat payables where you take an agreed amount off a person's payslip.
Keep in mind that:
- The payee option is available for both person and pay batch repeat payables where money is taken off.
- Also, if no payee is set, the money is still taken off the person's payslip, but thereafter it stays in the employer's account.
- And with no payee set, the employer is then responsible to onward pay the money manually.
And that's it! That's everything you need to know about setting a bank account to pay agreed salary deductions to!
Repeat payable. How do I set up a CCJ to be paid out every month?
 5:12
5:12
"Repeat payable. How do I set up a CCJ to be paid out every month?"
Monthly repeat payables, or CCJs, are a deduction that's automatically taken off a person's pay every month, and then marked for onward payment.
To set up a monthly repeat payable, or CCJ:
- First, select the person who's getting the monthly repeat payable, or CCJ on: MenuPeople
- And then go to: PayPay settings
- And scroll down to the "Repeat payables ... personal" heading.
- Then tap: New repeat payable
- And select: Other ... taken off pay
- Next, give the new repeat payable a name.
- And enter the monthly amount payable.
- By default, when calculating the amount, it's set to: "Per month"
- To change it, tap Per month and select your preferred amount time frame.
- Keep in mind that the time frame setting doesn't set how often it's paid, rather it sets over what time frame the amount's calculated.
- For example, if you set the amount to a larger "per year" amount and then set how often it's deducted to "every month ... last payday". It'd then deduct 1/12th of the yearly amount every month.
- Once you've set the amount, you're then free to decide how often it's to be deducted from their pay.
- Now, to see the monthly deduction, tap the "See on payslip" button:
- However, it's recommended to deduct "Every payday" so that the deductions get spread evenly over the person's pay.
- For people that're paid weekly, it now cuts the monthly amount to something close to a 1/4 sized weekly amount. Tap the "See on payslip" button again to see it.
- Now that the deduction amount and frequency are set, tap Advanced to set the remaining options.
- In the description, you can enter notes that are shared with the person.
- Setting "starts on" and "ends on" dates gives you more control over when deductions start and stop.
- In most cases, leave "starts on" as empty, as it automatically starts from today. Then set "ends on" to the date the deduction is to stop.
- In some cases, the Court judgement document may give you a bank account to pay the deduction to. If so, enter those details as a new: "Payee"
- Also be sure to tap Advanced and type in the Bank reference from the Court judgement document.
- And also change the Account type to "Business", and then tap: Save
- And now the payee for the deduction's all set.
- Now, when you close it, you'll see a summary of the monthly repeat payable, or CCJ, including the description that you entered.
- And finally, to see it on the payslip one last time, tap the "See on payslip" button:
Keep in mind that:
- If a person's paid monthly, you won't see "Per month" listed as an amount time frame, so instead select the "Per payslip" option.
- Also watch out for when a person's paid weekly, but you set it to only deduct from the last payslip of each month. In which case, you may need to tap through a few payslips before you see the deduction.
- In some cases, the CCJ may not supply bank details, or for any other reason, you didn't set the payee. In that case, the amount's still deducted from the person's pay and remains in the company's bank account.
- It's now up to you, as the employer, to make sure the onward payment is made, using whatever payment details the CCJ gave you.
Also remember that:
- A CCJ, or County Court judgement, is where you, as the employer, are issued with a legal notice to deduct pay from a person.
- The deduction is then required to be onward paid to the county court or some other debt collection agency.
- A CCJ enables the court system to collect fines or debt repayments directly from an employee's salary, at source.
- The payment collection is enforced by the law, and can't be refused.
To learn more:
- To learn about a deleting a repeat payable, watch the video on: Deleting a repeat payable
And that's it! That's all you need to do to set up a repeat payable, or CCJ, to be paid out from a person's salary every month!
A. Assets transferred
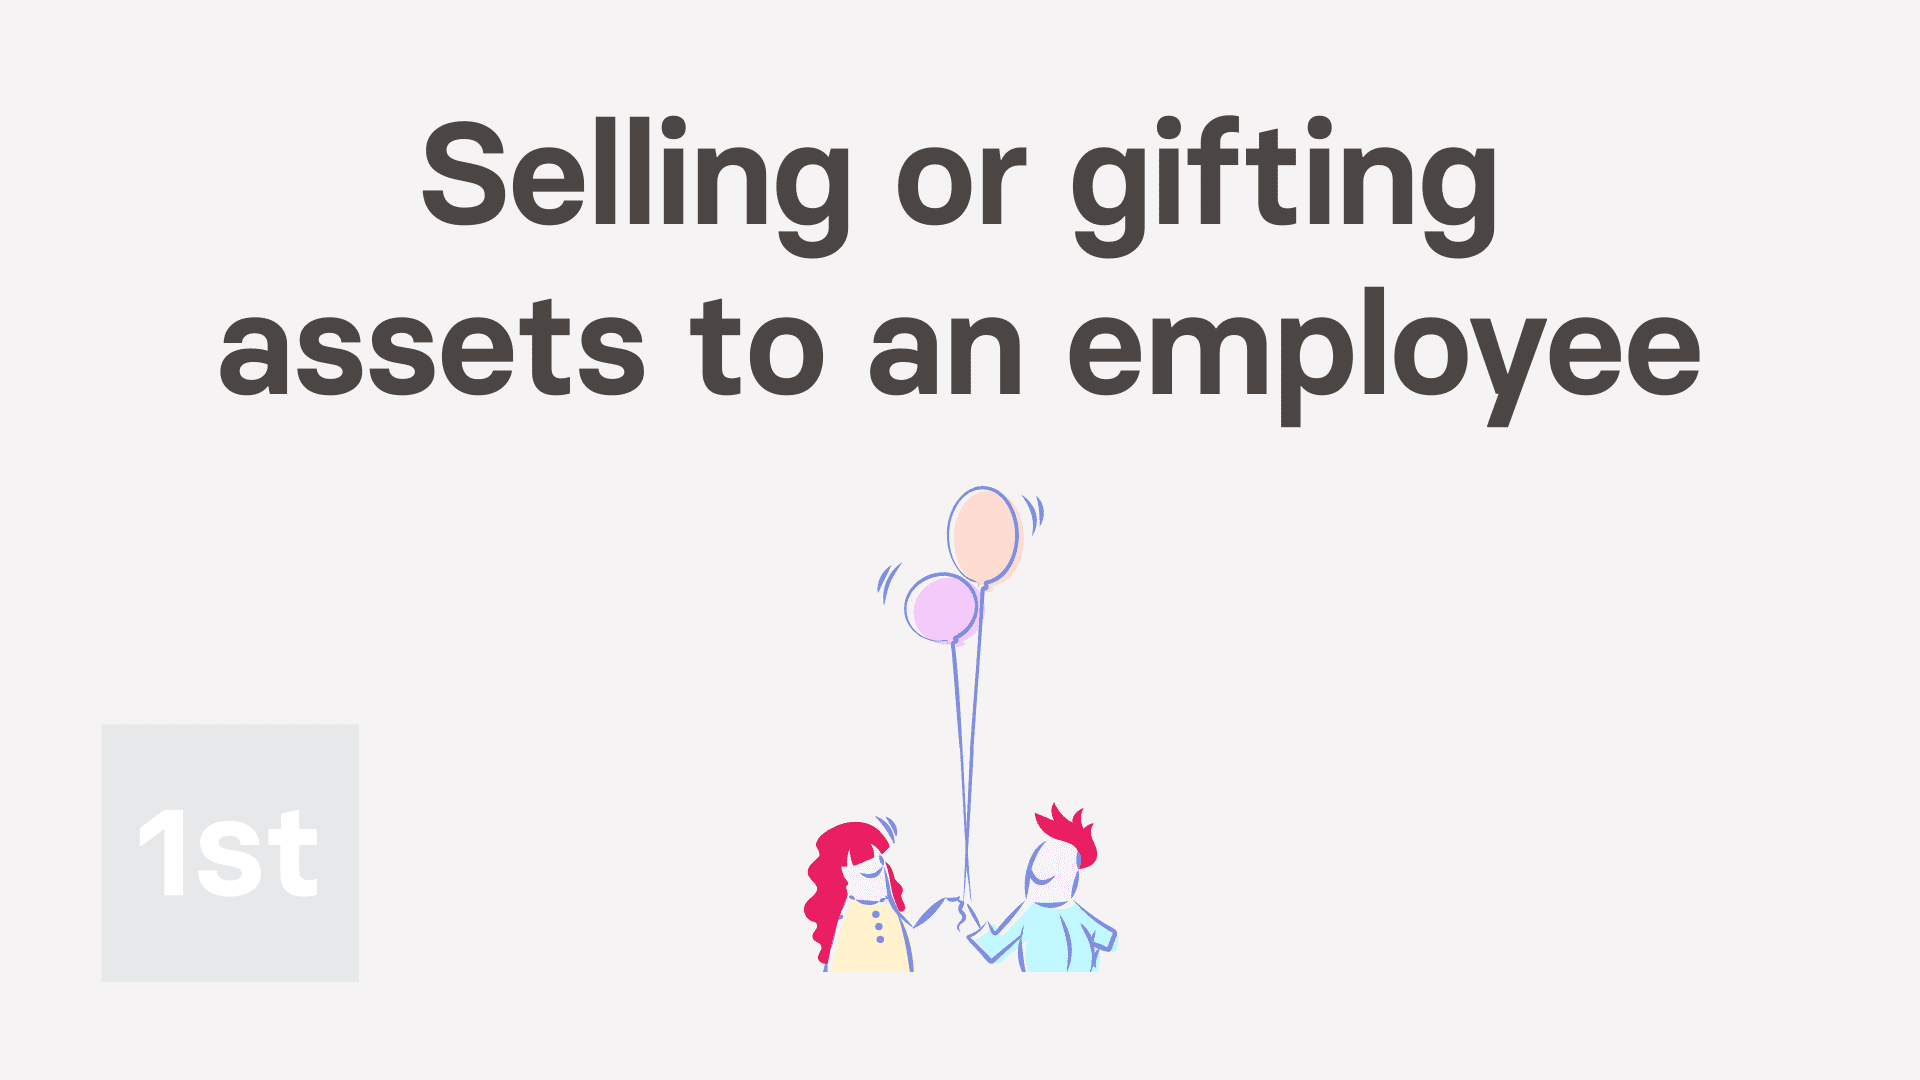
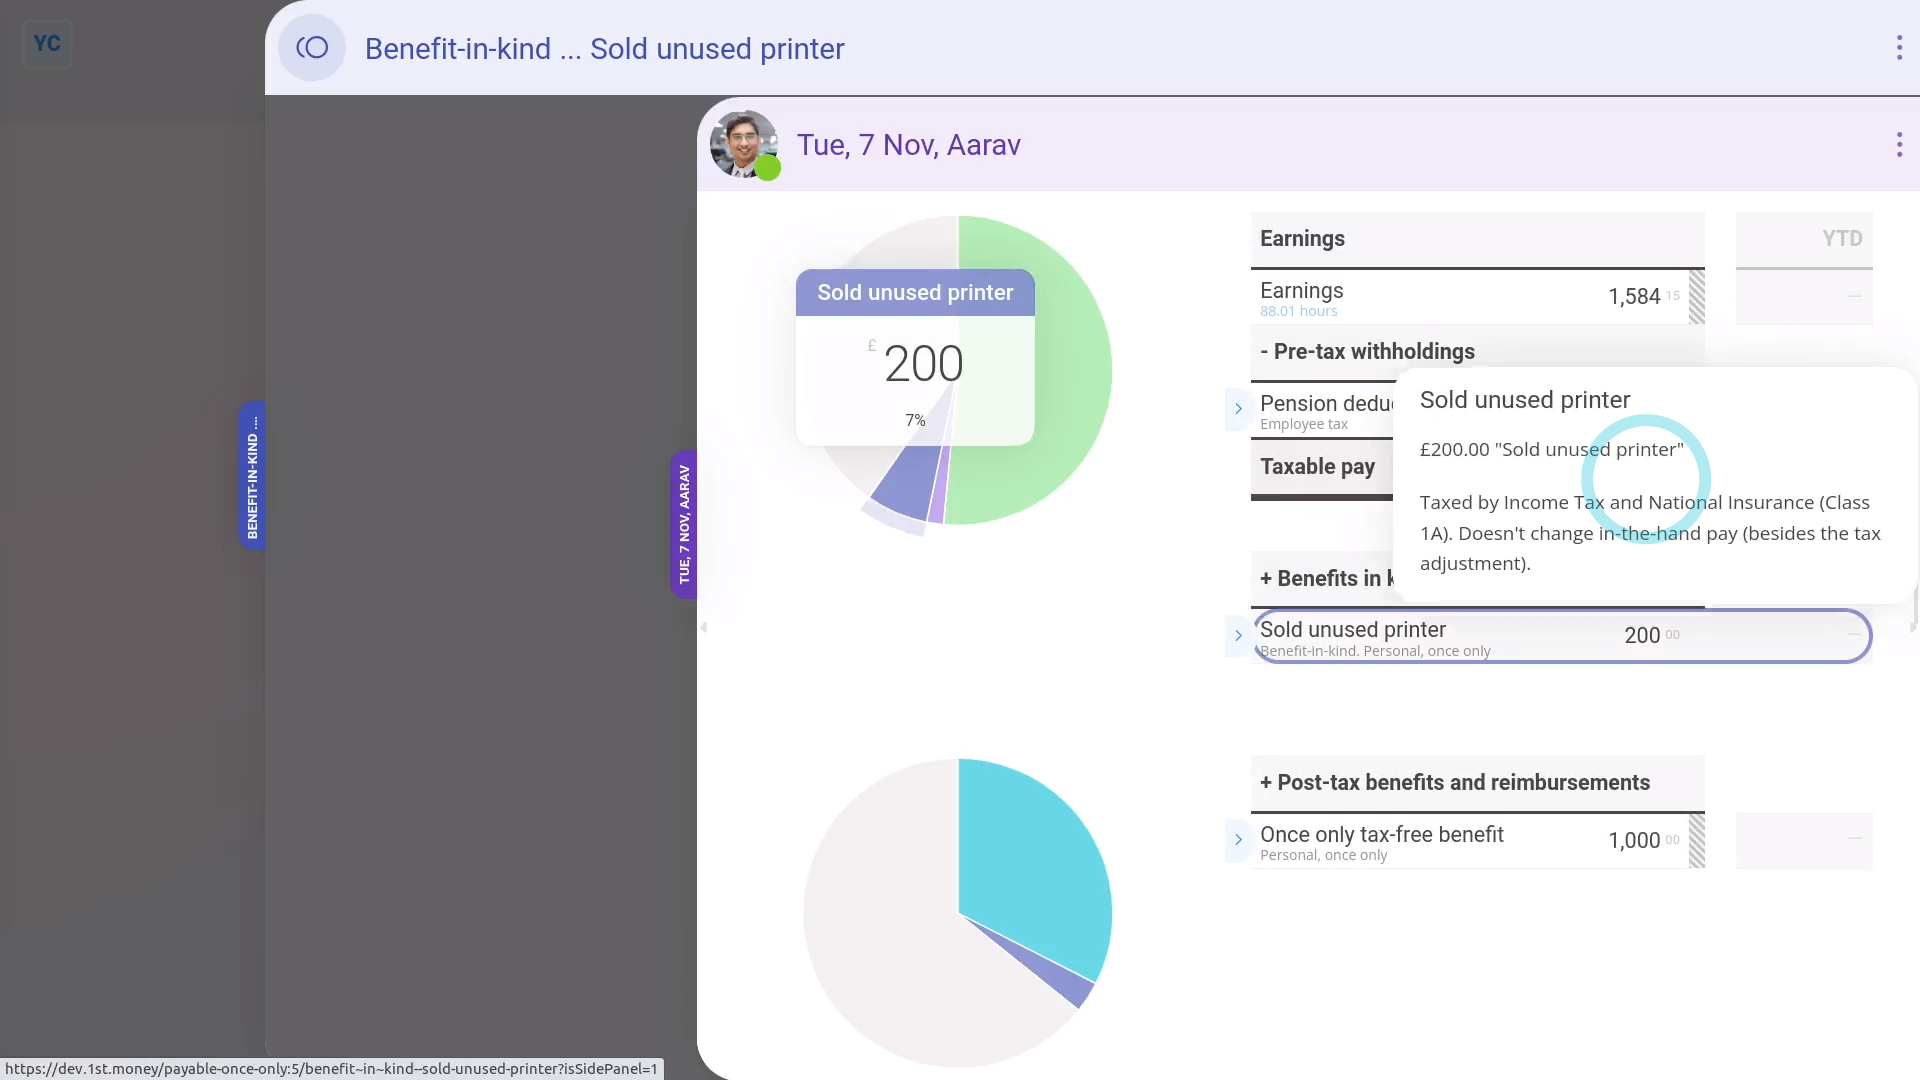
1. If an asset's sold or gifted to an employee, how's it recorded?
 2:17
2:17
"If an asset's sold or gifted to an employee, how's it recorded?"
When the company sells or gifts an asset to an employee, it's considered a: "Benefit-in-kind"
To record selling or gifting of assets to employees:
- First, tap: MenuExpense claim
- Select the person who's being sold or given the asset.
- Then tap: Benefit-in-kind
- You can attach an image, like a receipt, or tap: Skip image
- Type in how much the asset is worth when you're transferring it to the employee.
- Optionally, you can also enter an amount in Employee deducted co-pay if you're selling the asset. Or, in other words, if the employee's paying an amount towards the asset.
- By default, "Arranged by" is already set to: "Company"
- Then tap: Next
- Then type a short description of the asset, and tap: Next
- And because it's a payroll admin who's entering it, the expense is automatically approved.
- Now, to see how it shows up on the person's payslip, scroll down and tap: See on payslip
- And when you hover your mouse over the "Benefit-in-kind" amount, you'll see the details.
- There may have been a co-pay, or an amount that the person's agreed can be taken off their pay. If so, you'll also see that amount showing as "Employee deducted co-pay" with its own notes when you hover.
- And finally, you'll know that the asset's value has been taxed by Income Tax (PAYE) correctly.
Keep in mind that:
- The co-pay amount is automatically set to be deducted from the person's pay.
- The company doesn't have to separately collect the co-pay amount from the person.
- Also, a benefit-in-kind increases the employee's taxable pay, but doesn't increase the employee's in-the-hand pay.
- However, the person still gains by receiving the non-cash asset.
And that's it! That's everything you need to know about selling or gifting an asset to an employee!
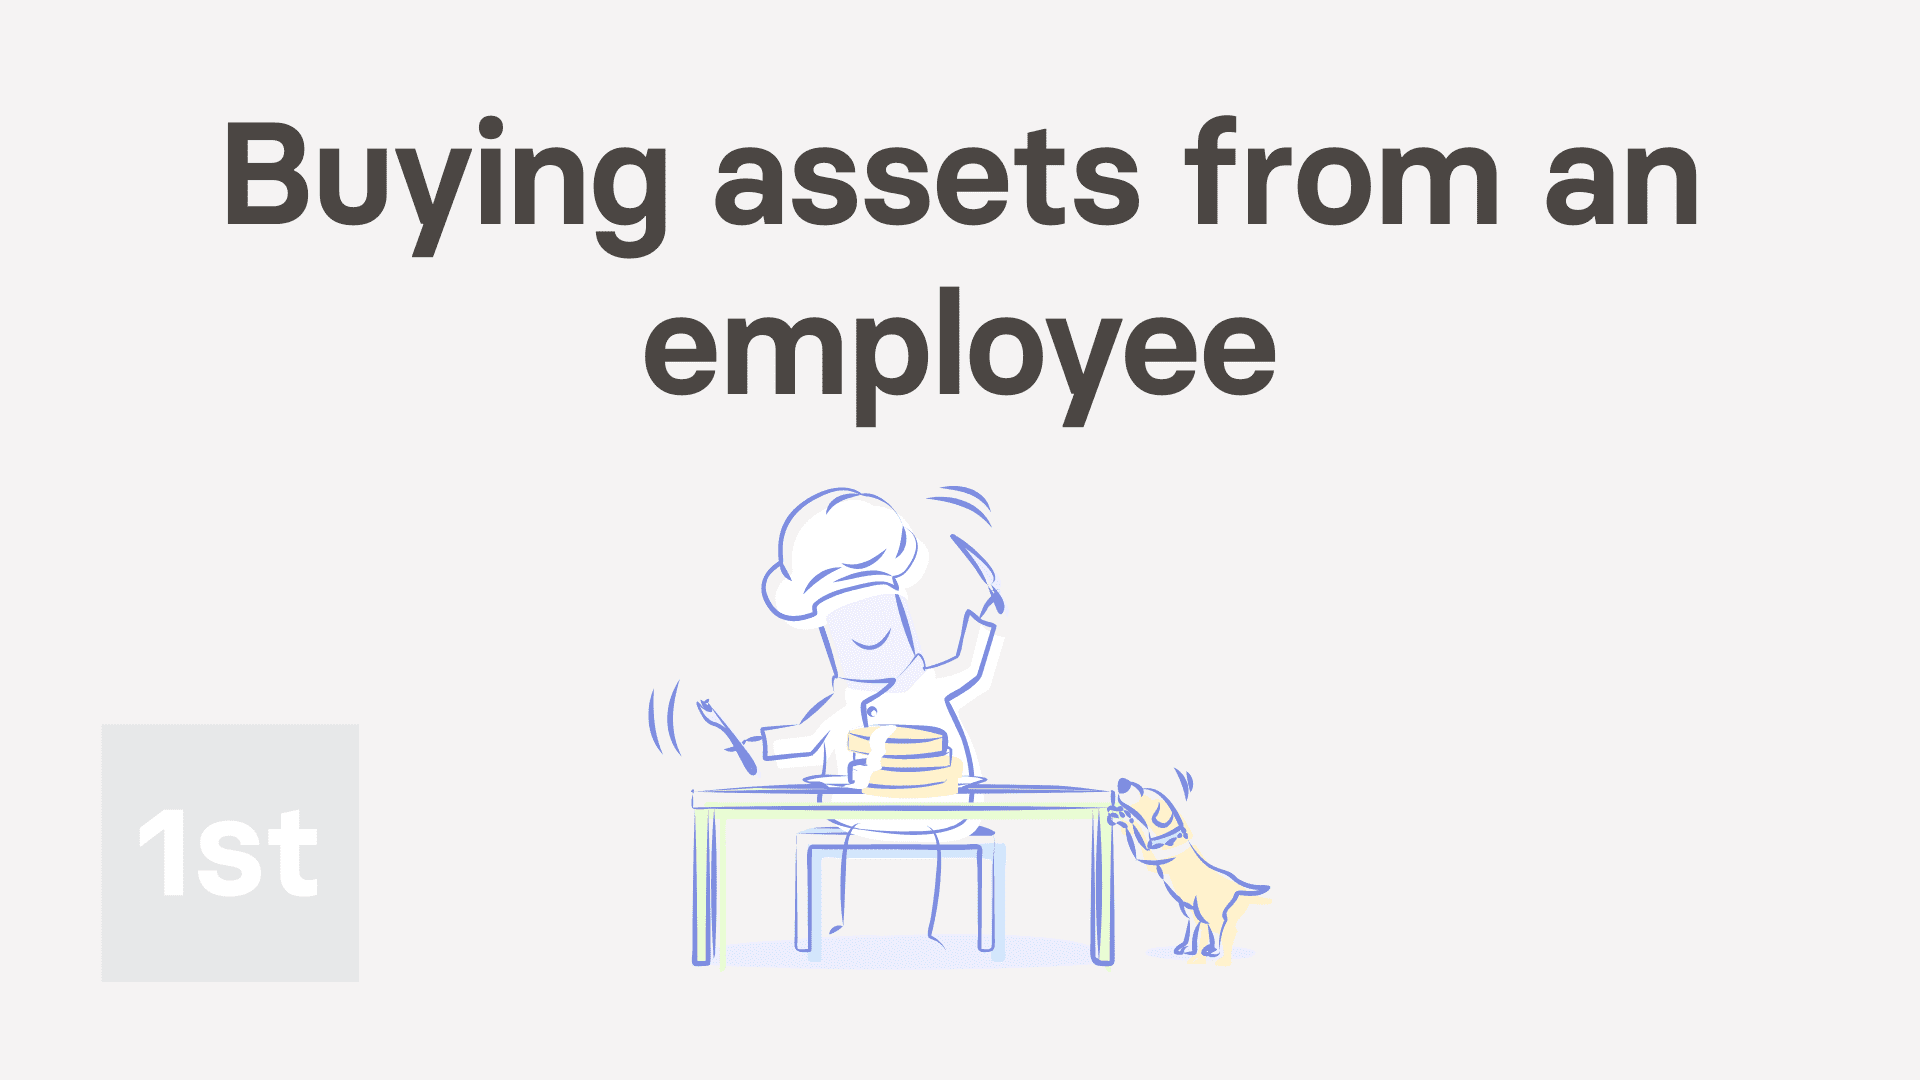
2. If a company buys an asset from an employee, how's it recorded?
 1:49
1:49
"If a company buys an asset from an employee, how's it recorded?"
When the company buys an asset from an employee, the buying price of the asset is tax-free.

To record buying an asset from an employee:
- First, tap: MenuExpense claim
- Select the person who the company is buying the asset from.
- Then tap: Once only tax-free benefit
- You can attach an image, like a sale agreement, or tap: Skip image
- Type in how much the asset is worth when you're buying it from the employee, and tap: Next
- Then for "Requesting because", type a short description of the asset the company's buying, and tap: Next
- And because it's a payroll admin who's entering it, the expense is automatically approved.
- Now, to see how it shows up on the person's payslip, scroll down and tap: See on payslip
- And when you hover your mouse over the "Once only tax-free benefit" amount, you'll see the details.
- And finally, you'll know that the asset's value is being correctly paid to the employee, free of tax.
Keep in mind that:
- If the company buys an asset from an employee for more than it's market value, the amount over the market value is taxable.
- To record it, still do the steps above, to record the amount up to the market value.
- And then also add a "Once only taxable benefit" expense for the amount over the market value.
And that's it! That's everything you need to know about buying an asset from an employee!
B. Payments made on behalf of employee
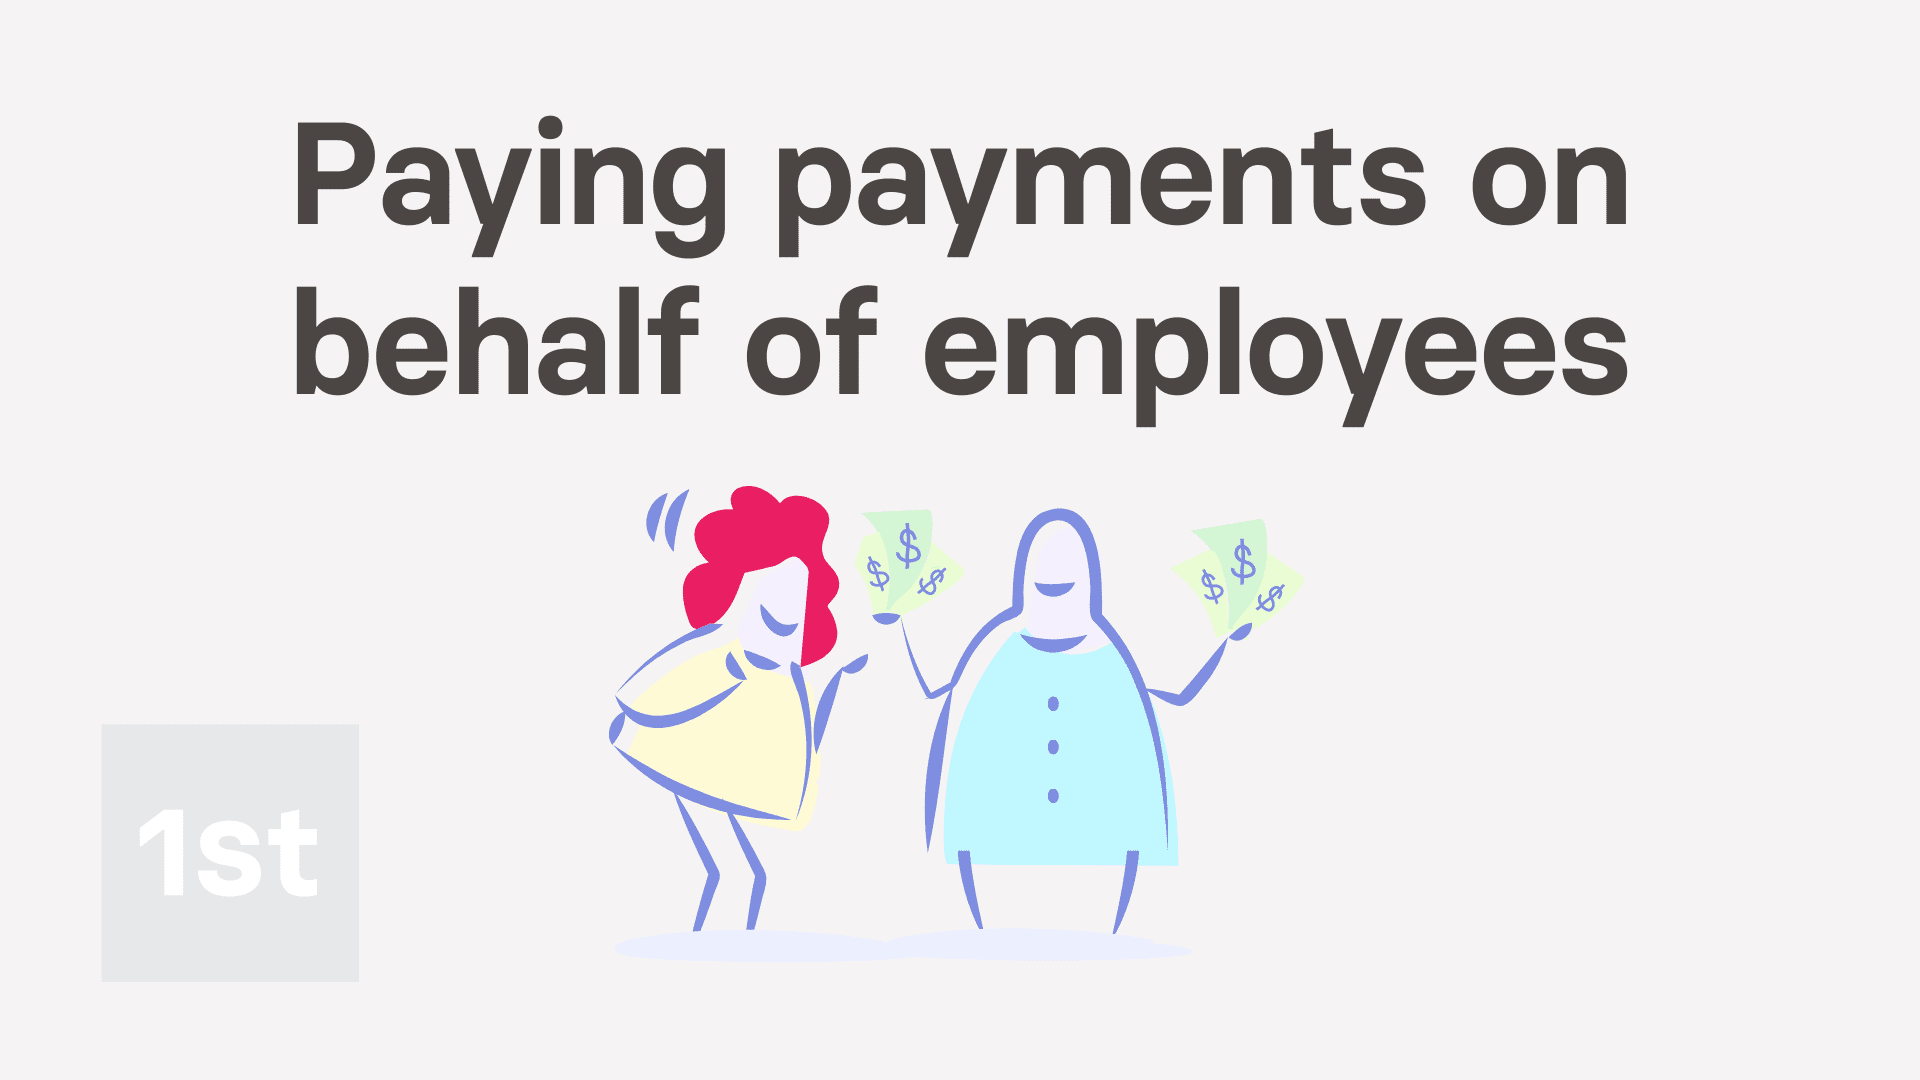
If a company pays an employee's personal payments, how's it recorded?
 2:22
2:22
"If a company pays an employee's personal payments, how's it recorded?"
When the company pays for an employee's personal payments, it needs to be recorded as a: "Benefit-in-kind"
To record a company paying for an employee's personal payments as a "Benefit-in-kind":
- First, tap: MenuExpense claim
- Select the person who the company's paying the personal payments for.
- Next, tap: Benefit-in-kind
- If you've got an image, like a receipt, that you'd like to include, you can upload, or take a photo of it.
- Then tap: Next
- Type in the value of the personal payments the company's paying.
- Set "Arranged by" to "Employee", and tap: Next
- Optionally, type in a short description about the personal payment expense, and tap: Next
- And because it's a payroll admin who's entering it, the expense is automatically approved.
- Now, to see how it shows up on the person's payslip, scroll down and tap: See on payslip
- And when you hover your mouse over the "Benefit-in-kind" amount, you'll see the details.
- And finally, you'll know that the personal payment's value is being correctly recorded and taxed.
Keep in mind that:
- In some cases, the employee has themselves paid for the personal payment cost, and is asking the company for a once-only reimbursement.
- To add a "Once only taxable benefit" reimbursement, tap: MenuExpense claim, select the person, and tap: Once only taxable benefit
- Also, if the personal payment repeats every week, month, or every payday, set it up as a repeating: "Benefit-in-kind"
To learn more:
- About how to set up a repeating "Benefit-in-kind", watch the video on: Repeating benefit-in-kind
- Also, to learn more about personal payments, go to GOV.UK.
And that's it! That's everything you need to know about paying for an employee's personal payments!
C. Vouchers and credit cards
1. If vouchers are given to an employee, how's it recorded?
 2:23
2:23
"If vouchers are given to an employee, how's it recorded?"
When the company gives employees a voucher, it needs to be recorded as a: "Benefit-in-kind"
To record a voucher given to an employee by a company:
- First, tap: MenuExpense claim
- Select the person who's been given the voucher.
- Next, tap: Benefit-in-kind
- If you've got an image, like a receipt, that you'd like to include, you can upload, or take a photo of it.
- Then tap: Next
- Type in the value of the voucher.
- Set "Arranged by" to: "Employee"
- Optionally, if there's a co-pay, or an amount that the person's agreed can be taken off their pay, enter that also in: Employee deducted co-pay
- Then tap: Next
- Optionally, type in a short description about the voucher, and tap: Next
- And because it's a payroll admin who's entering it, the expense is automatically approved.
- Now, to see how it shows up on the person's payslip, scroll down and tap: See on payslip
- And when you hover your mouse over the "Benefit-in-kind" amount, you'll see the details.
- There may have been a co-pay, or an amount that the person's agreed can be taken off their pay. If so, you'll also see that amount showing as "Employee deducted co-pay" with its own notes when you hover.
- And finally, you'll know that the voucher's value is being correctly recorded and taxed.
Keep in mind that:
- The co-pay amount is automatically set to be deducted from the person's pay.
- The company doesn't have to separately collect the co-pay amount from the person.
- Also, there's no difference in the treatment of vouchers that're exchangeable for goods and services, compared to vouchers that're exchangeable for cash only.
And that's it! That's everything you need to know about how to record a voucher given to an employee by a company!
2. How do I record employee personal items bought on a company card?
 2:17
2:17
"How do I record employee personal items bought on a company card?"
When an employee buys personal items on a company credit card, it's normally recorded as a: "Benefit-in-kind"
To record a benefit-in-kind when an employee buys personal items on a company credit card:
- First, tap: MenuExpense claim
- Select the person who used a company credit card to buy personal items.
- Then tap: Benefit-in-kind
- You can attach an image, like a receipt, or tap: Skip image
- Type in how much was spent by the employee.
- Set "Arranged by" to "Employee", and tap: Next
- Next, type in a short description of what was purchased, and tap: Next
- And because it's a payroll admin who's entering it, the expense is automatically approved.
- Now, to see how it shows up on the person's payslip, scroll down and tap: See on payslip
- And when you hover your mouse over the "Benefit-in-kind" amount, you'll see the details.
- And finally, you'll know that the purchased items' value is being correctly recorded and taxed.
Keep in mind that:
- Recording an employee's personal items purchases applies equally to those done with a company debit card, or other company charge card.
- Also, it applies equally whether the company approved of the purchase or not.
- However, in most cases, the employee's company credit card purchase was for approved business purposes, like business travel, and not for personal items.
- For any business related purchase, using a company credit card, nothing needs to be recorded in their payroll.
And that's it! That's everything you need to know about what to do when an employee buys personal items on a company credit card!
D. Living accommodation
1. If a company provides living accomodation, how's it recorded?
 1:40
1:40
"If a company provides living accomodation, how's it recorded?"
When the company provides living accomodation to an employee, the expense is considered a: "Benefit-in-kind"
HMRC has two systems for submitting expenses:
- The old "P11D" system, that's being phased out.
- And the new "payrolling" system, that's replacing it.
Unfortunately, HMRC hasn't included "D. Living accommodation" expenses in their new "payrolling" system.
Which means that if you've got "D. Living accommodation" expenses to submit, HMRC requires ALL employers to submit it using the old "P11D" system (submitted per year, per employee).
By "ALL employers" it means, regardless of whether you've moved to the new "payrolling" system, or if you're still on the old "P11D" system. All employers who've got any "D. Living accommodation" expenses must submit them through the old "P11D" system. It's the only way HMRC is willing to receive them.
Because it's the only way HMRC's willing to receive them, if you've got "D. Living accommodation" expenses, you'll need to talk to your accountant on how to submit them through the old "P11D" system.
To also learn more:
- About how to calculate the "cash equivalent" of the living accomodation, go to GOV.UK.
And that's it! That's everything you need to know about providing living accomodation to an employee!
E. Mileage allowance
How do I set up a repeating mileage allowance?
 2:13
2:13
"How do I set up a repeating mileage allowance?"
When a person's themself paying their work related travelling costs, you could set them up with a repeating mileage allowance.
To set up a repeating mileage allowance:
- First, select the person who's getting the allowance on: MenuPeople
- Next, go to: PayPay settings
- And scroll down to the "Repeat payables ... personal" heading.
- Then tap: New repeat payable
- Next, select: Mileage allowance
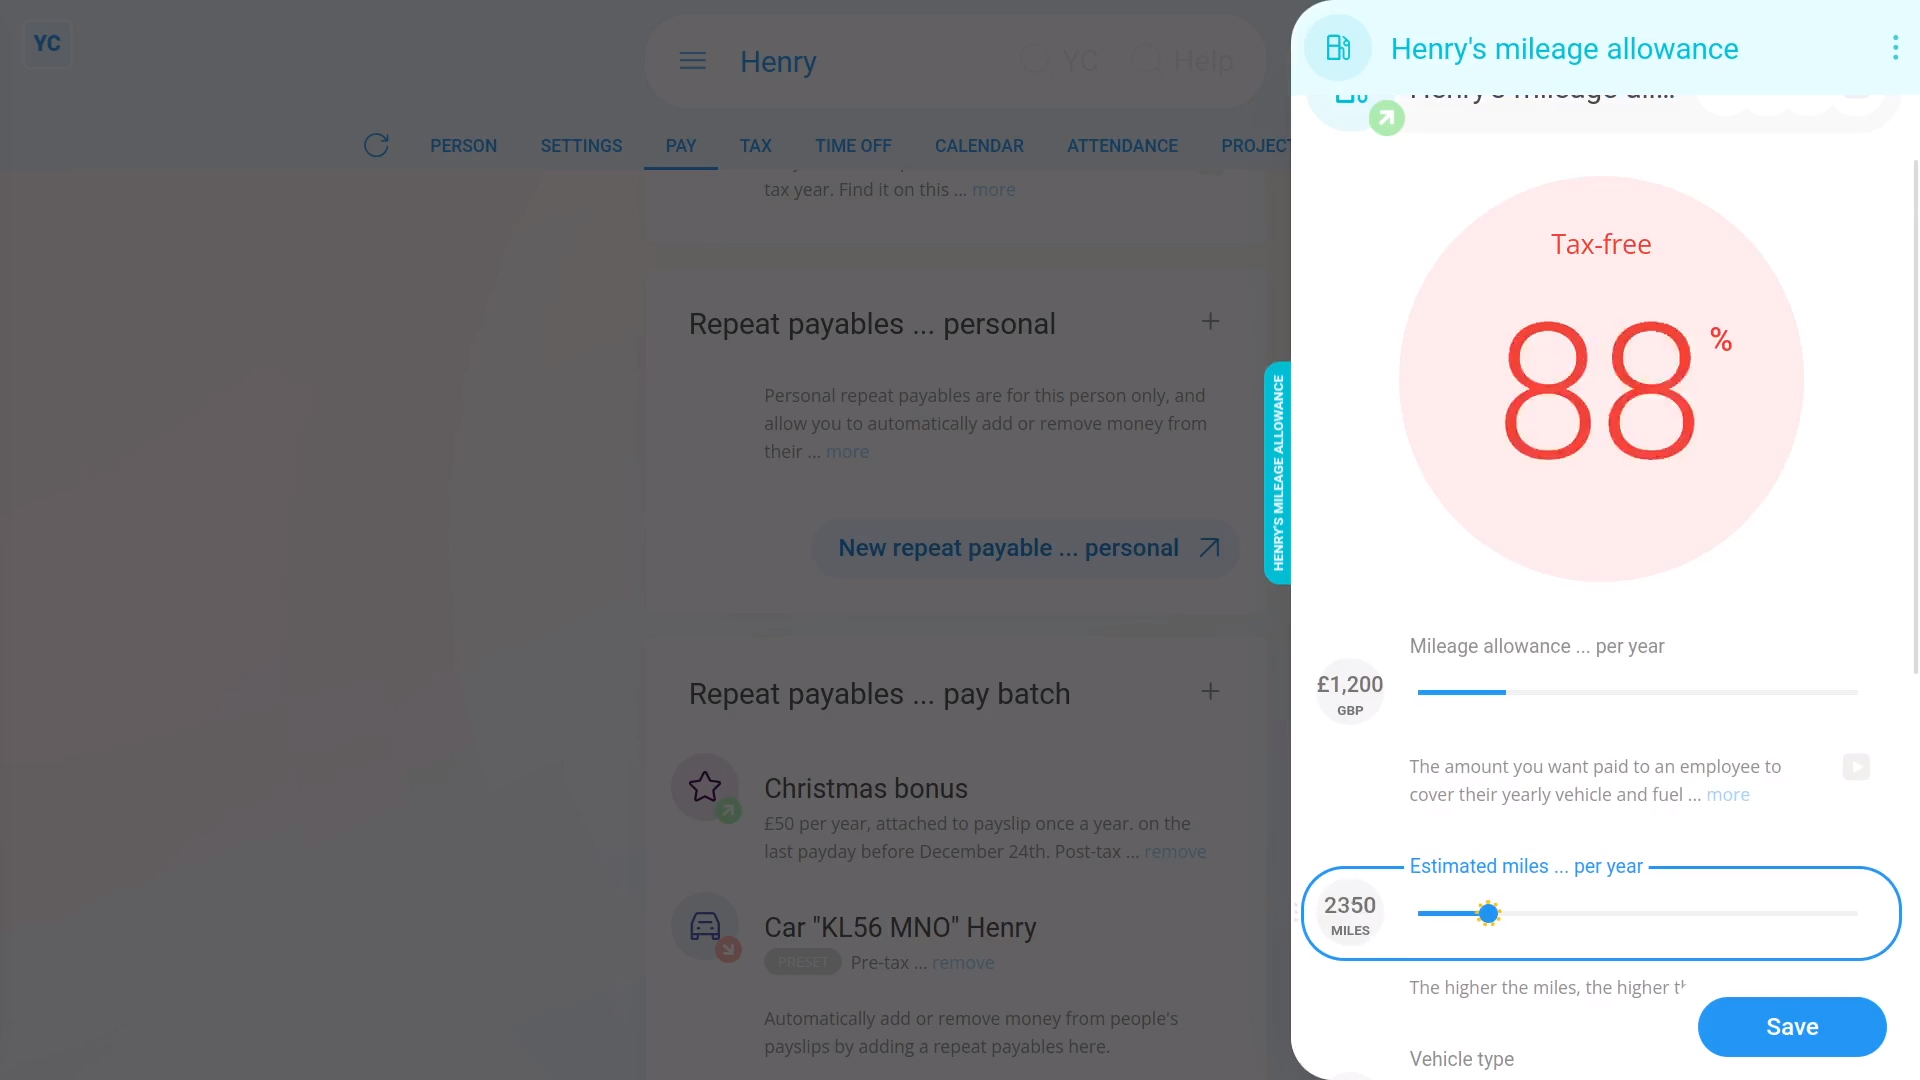
- Start setting Mileage allowance ... per year by dragging the slider.
- You can also type in a number if you'd like.
- Next, set Estimated miles ... per year to an estimate of how many miles the person travels in one year.
- You'll notice as you drag the slider, the big tax-free percent (at the top) changes.
- The higher the miles, the more of the mileage allowance is tax-free.
- If you've got a high enough number of miles, the mileage allowance becomes 100% tax-free.
- Next, tap: Save
- And the tax-free mileage allowance is now added to the person's payslip every payday.
- To see the mileage allowance on the person's payslip.
- Hover your mouse over the mileage allowance, and tap the "See on payslip" button:
- And you'll see the mileage allowance showing under: "Post-tax benefits and reimbursements"
- And finally, if you hover your mouse over the mileage allowance amount, you'll see a breakdown of the calculation.
Keep in mind that:
- If the person's mileage allowance numbers allow it to be 100% tax-free, the entire amount is shown under the "Post-tax benefits and reimbursements" section.
- However, if it's less than 100% tax-free, the mileage allowance is then split between the "Post-tax benefits and reimbursements" and the "Pre-tax benefits" sections.
- Any amount in the "Pre-tax benefits" section means it's taxable, like the person's regular pay.
And that's it! That's all you need to do, to set up a repeating mileage allowance!
F-G. Cars and vans, and car and van fuel
1. How do I set up a company vehicle benefit for private use?
 2:59
2:59
"How do I set up a company vehicle benefit for private use?"
When a company vehicle is used for private purposes, add it to the person's pay as a company vehicle benefit.
To add a repeating company vehicle benefit to a person's pay:
- First, select the pay batch of the people using the company vehicle, on: MenuPay batches
- To make a new repeat payable, tap: PayRepeat payables
- Then tap: New repeat payable
- And select: Company vehicle ... private use
- If the vehicle is a van, then tap Vehicle type, and select: Van
- Next, enter the vehicle's Make and model
- Next, type in your vehicle's Number plate
- Then enter the vehicle's: Purchase + accessories price
- And: Date first registered
- Next, select the: Fuel type
- If the vehicle's hybrid or electric, enter the: Electric max. range
- If you know your vehicle's CO2 emissions, enter it.
- Otherwise, to look it up, tap the blue "Lookup CO2 emissions" link.
- On the GOV.UK site, type in your vehicle's number plate, then tap Continue, then Yes, then Continue again.
- Scroll down, and copy the "CO2 emissions" number.
- Then back in 1st Money, type it in.
- Next, to add the people who'll be using the vehicle, scroll down and tap: Add people
- And select the people to add. Multiple people can be added.
- Then tap Save, and the vehicle benefit is shared with the selected people, as a percentage each.
- To see a vehicle benefit on a person's payslip, tap the person.
- Then hover your mouse over the vehicle benefit, and tap the "See on payslip" button:
- And you'll see the vehicle benefit showing under: "Benefits-in-kind ... company arranged"
- And finally, if you hover your mouse over the benefit amount, you'll see a breakdown of the calculation.
Keep in mind that:
- A "Benefit-in-kind" increases the person's taxable pay, and doesn't increase the person's in-the-hand pay.
- Also, a new vehicle benefit shows up on each person's next un-filed payslip.
- And it won't affect any of their previously filed payslips.
To learn more:
- About when an employer pays for private fuel costs, watch the video on: Private fuel
- To learn more about sharing a company vehicle between people, watch the video on: Sharing a vehicle
And that's it! That's everything you need to know about setting up a company vehicle benefit!
2. How do I find a company vehicle benefit so I can make changes?
 1:22
1:22
"How do I find a company vehicle benefit so I can make changes?"
Sometimes you may want to make changes to an existing company vehicle benefit.
To find a vehicle benefit in a pay batch:
- First, select the pay batch on: MenuPay batches
- Then tap: SettingsPay batch settings
- Then scroll to the bottom and look for the "Repeat payables" heading.
- And all the pay batch's repeat payables, including vehicle benefits, are listed.
- And finally, when you tap one, you'll see all the vehicle benefit settings.
To find a person's vehicle benefit:
- First, select the person using the vehicle on: MenuPeople
- Then tap: PayPay settings
- And scroll down to the bottom, and look for the "repeat payables ... pay batch" heading.
- And all the person's repeat payables, including vehicle benefits, are listed.
- And finally, when you tap one, you'll see all the vehicle benefit settings.
And that's it! That's everything you need to know about finding a vehicle benefit to make changes!
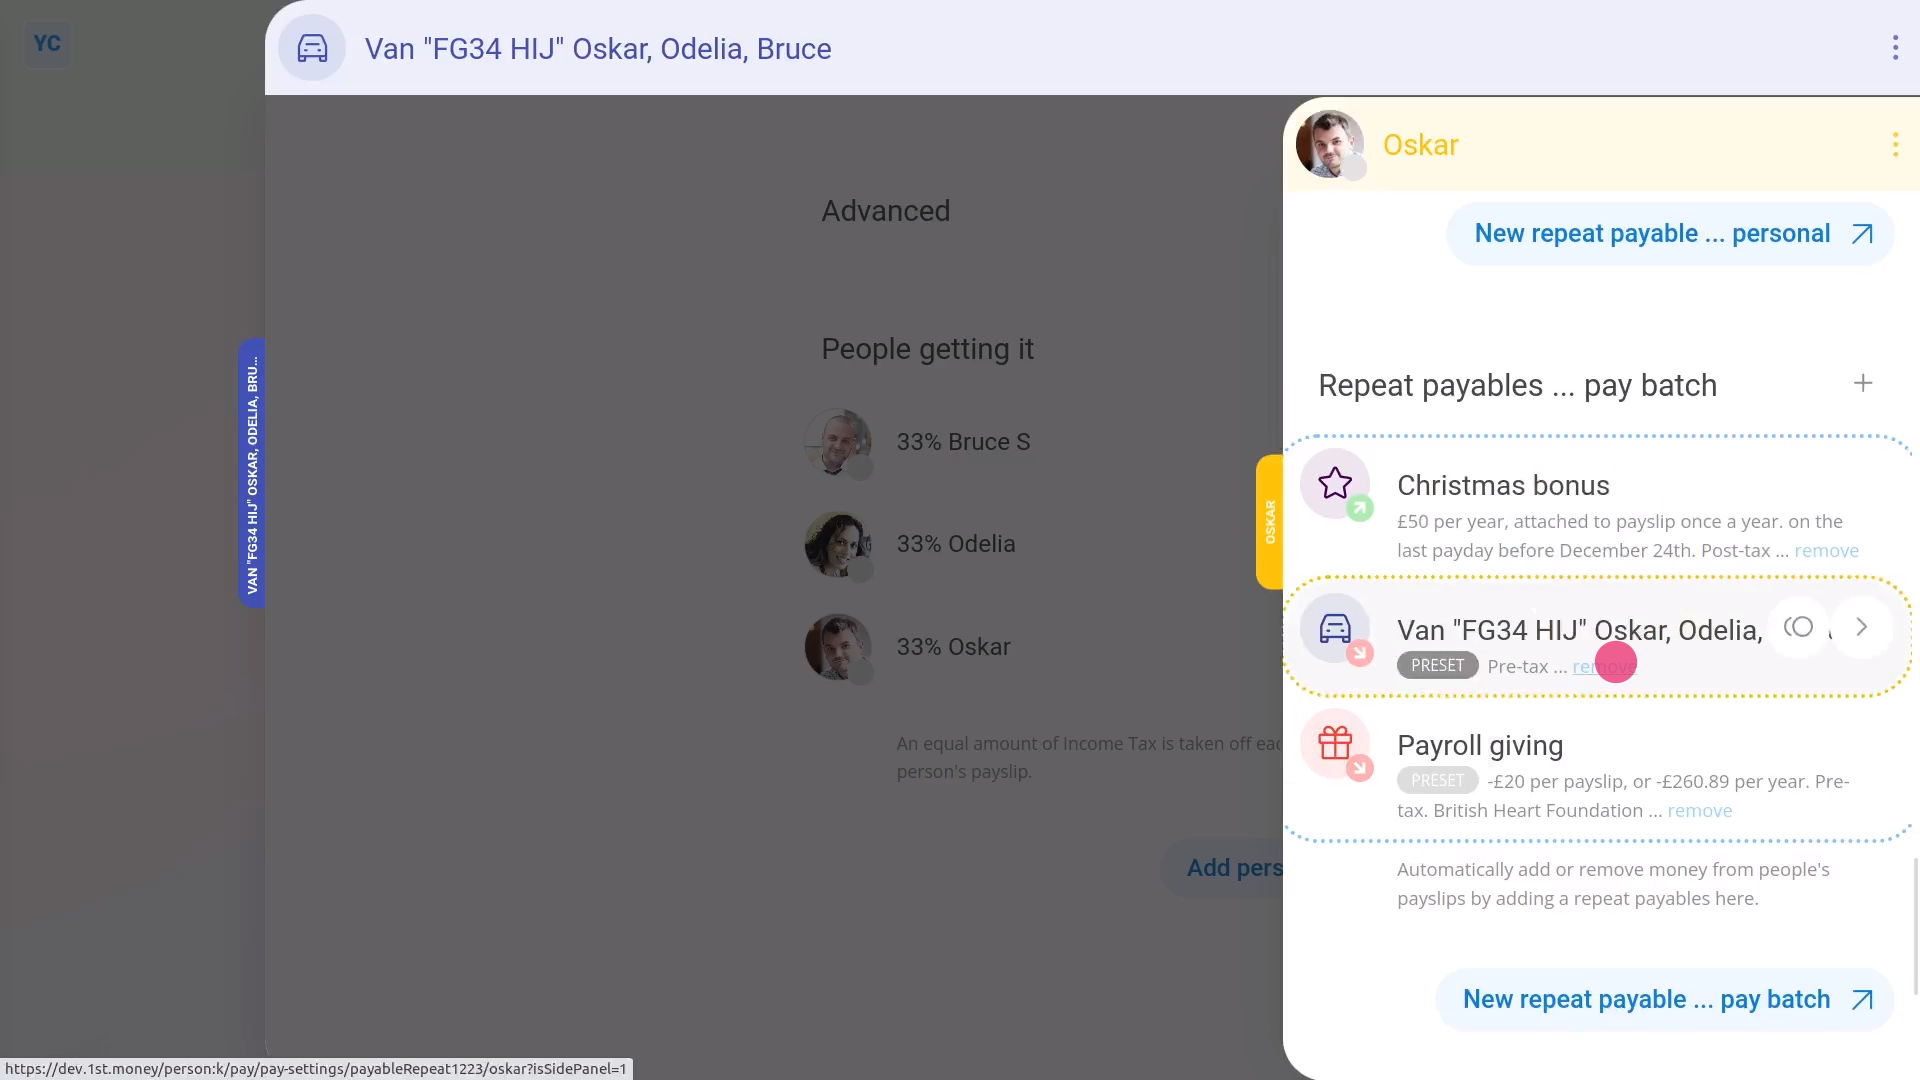
3. How do I add or remove people from a company vehicle benefit?
 2:30
2:30
"How do I add or remove people from a company vehicle benefit?"
When you share a vehicle between people, the benefit is split equally on each person's payslip.
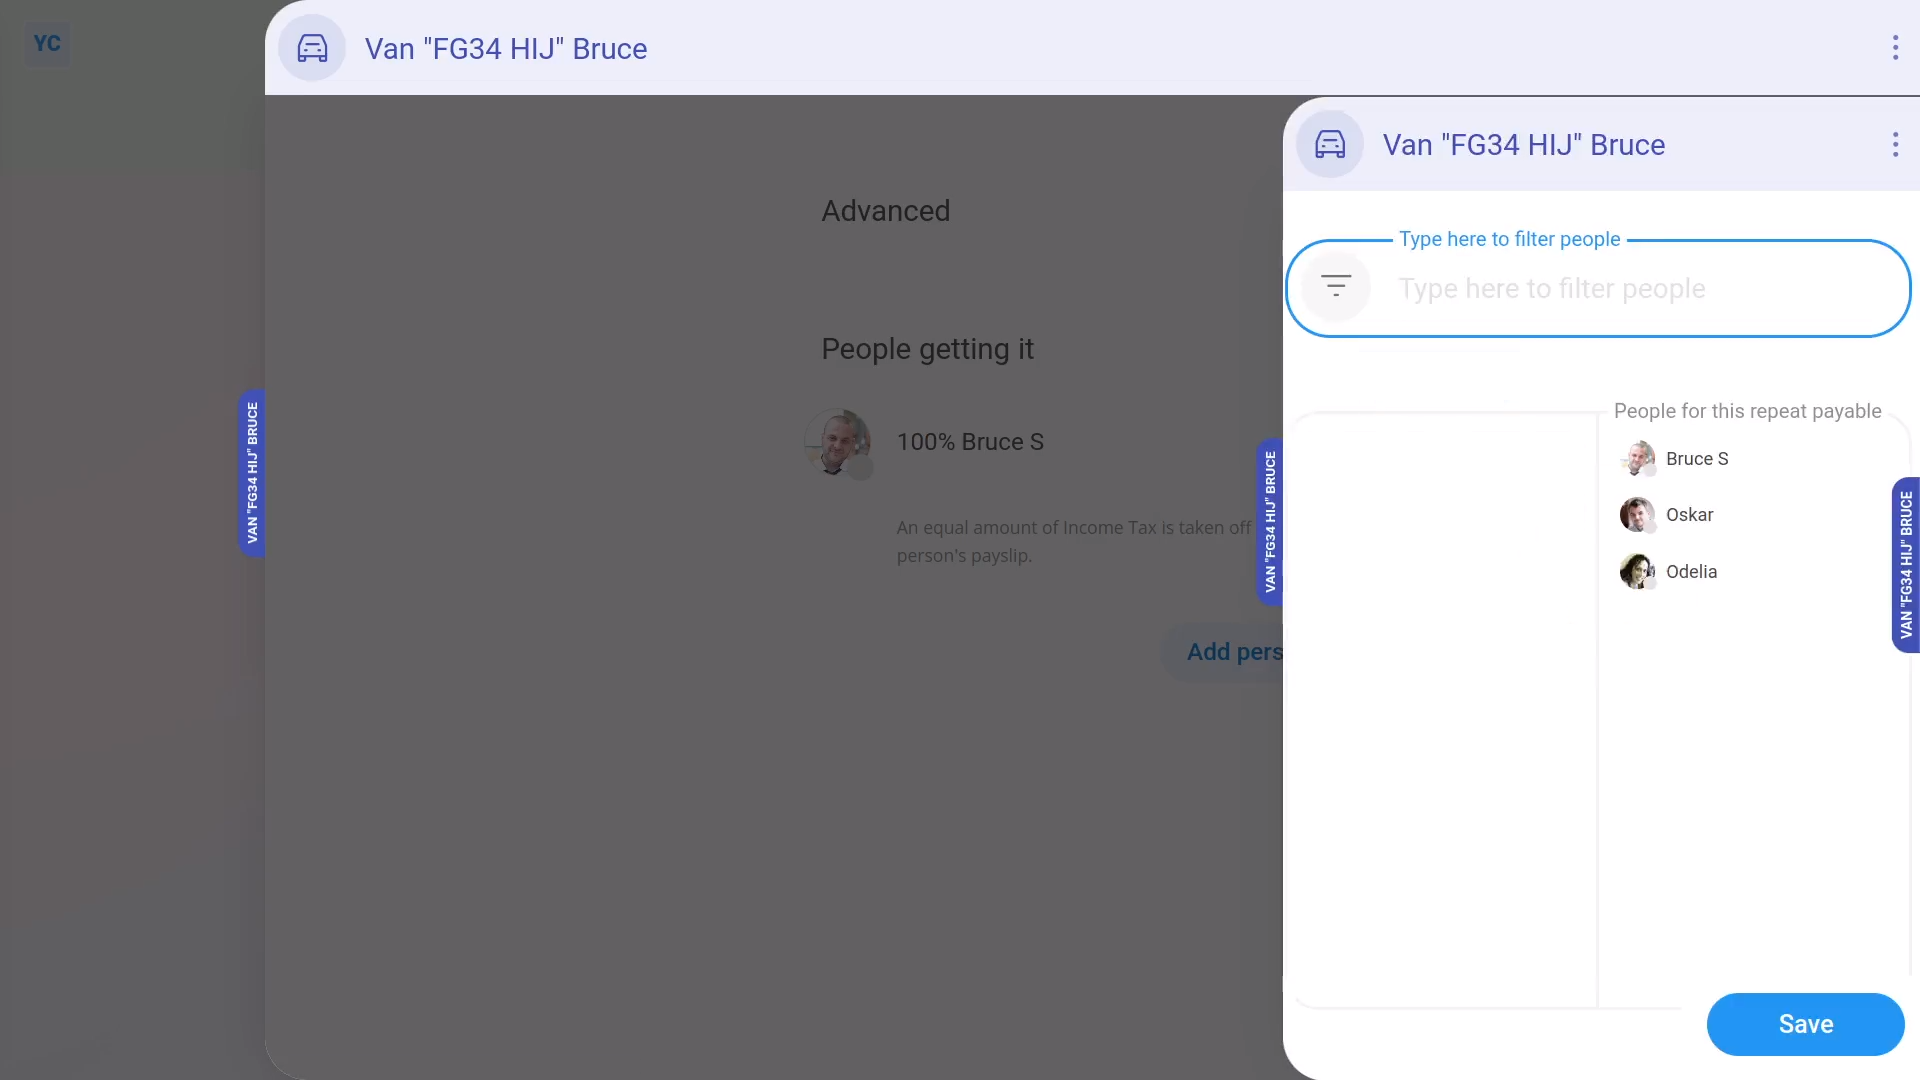
To add multiple people to an existing company vehicle benefit:
- First, select the pay batch on: MenuPay batches
- Then tap: SettingsPay batch settings
- Then scroll to the bottom and look for the "Repeat payables" heading.
- And tap the company vehicle benefit you'd like to add people to.
- To add people, scroll down and tap: Add people
- Add as many people as you want, to equally share the vehicle between them, then tap: Save
- And your selected people now share the vehicle equally.
- To see the money value of the vehicle sharing, tap the first vehicle sharing person.
- Then hover your mouse over the vehicle benefit, and tap the "See on payslip" button:
- And you'll see the vehicle benefit showing under: "Benefits-in-kind ... company arranged"
- And finally, when you hover your mouse over the benefit amount, you'll see a breakdown of the sharing calculation between your selected people.
To remove a person from an existing shared company vehicle benefit:
- First, select the pay batch on: MenuPay batches
- Then tap: SettingsPay batch settings
- Then scroll to the bottom and look for the "Repeat payables" heading.
- And tap the company vehicle benefit you'd like to remove people from.
- To remove people, scroll down to the list of existing people.
- And tap the person you'd like to remove.
- Then tap the blue "remove" link, and tap: Yes ... remove
- And finally, now that the person's been removed, only the names of your remaining people are left.
Keep in mind that:
- A company vehicle benefit is always shared equally between the listed people. There's no way to manually adjust the percentages.
- Also, the change of adding or removing a person shows up on each person's next un-filed payslip.
- And it won't affect any of their previously filed payslips.
And that's it! That's all you need to do to add or remove people from your company vehicle benefits!
4. How do I update a vehicle benefit payslip deduction?
 1:54
1:54
"How do I update a vehicle benefit payslip deduction?"
When a company vehicle is used for private purposes, and the person's agreed to have money automatically deducted, you'll need to update the company vehicle benefit.
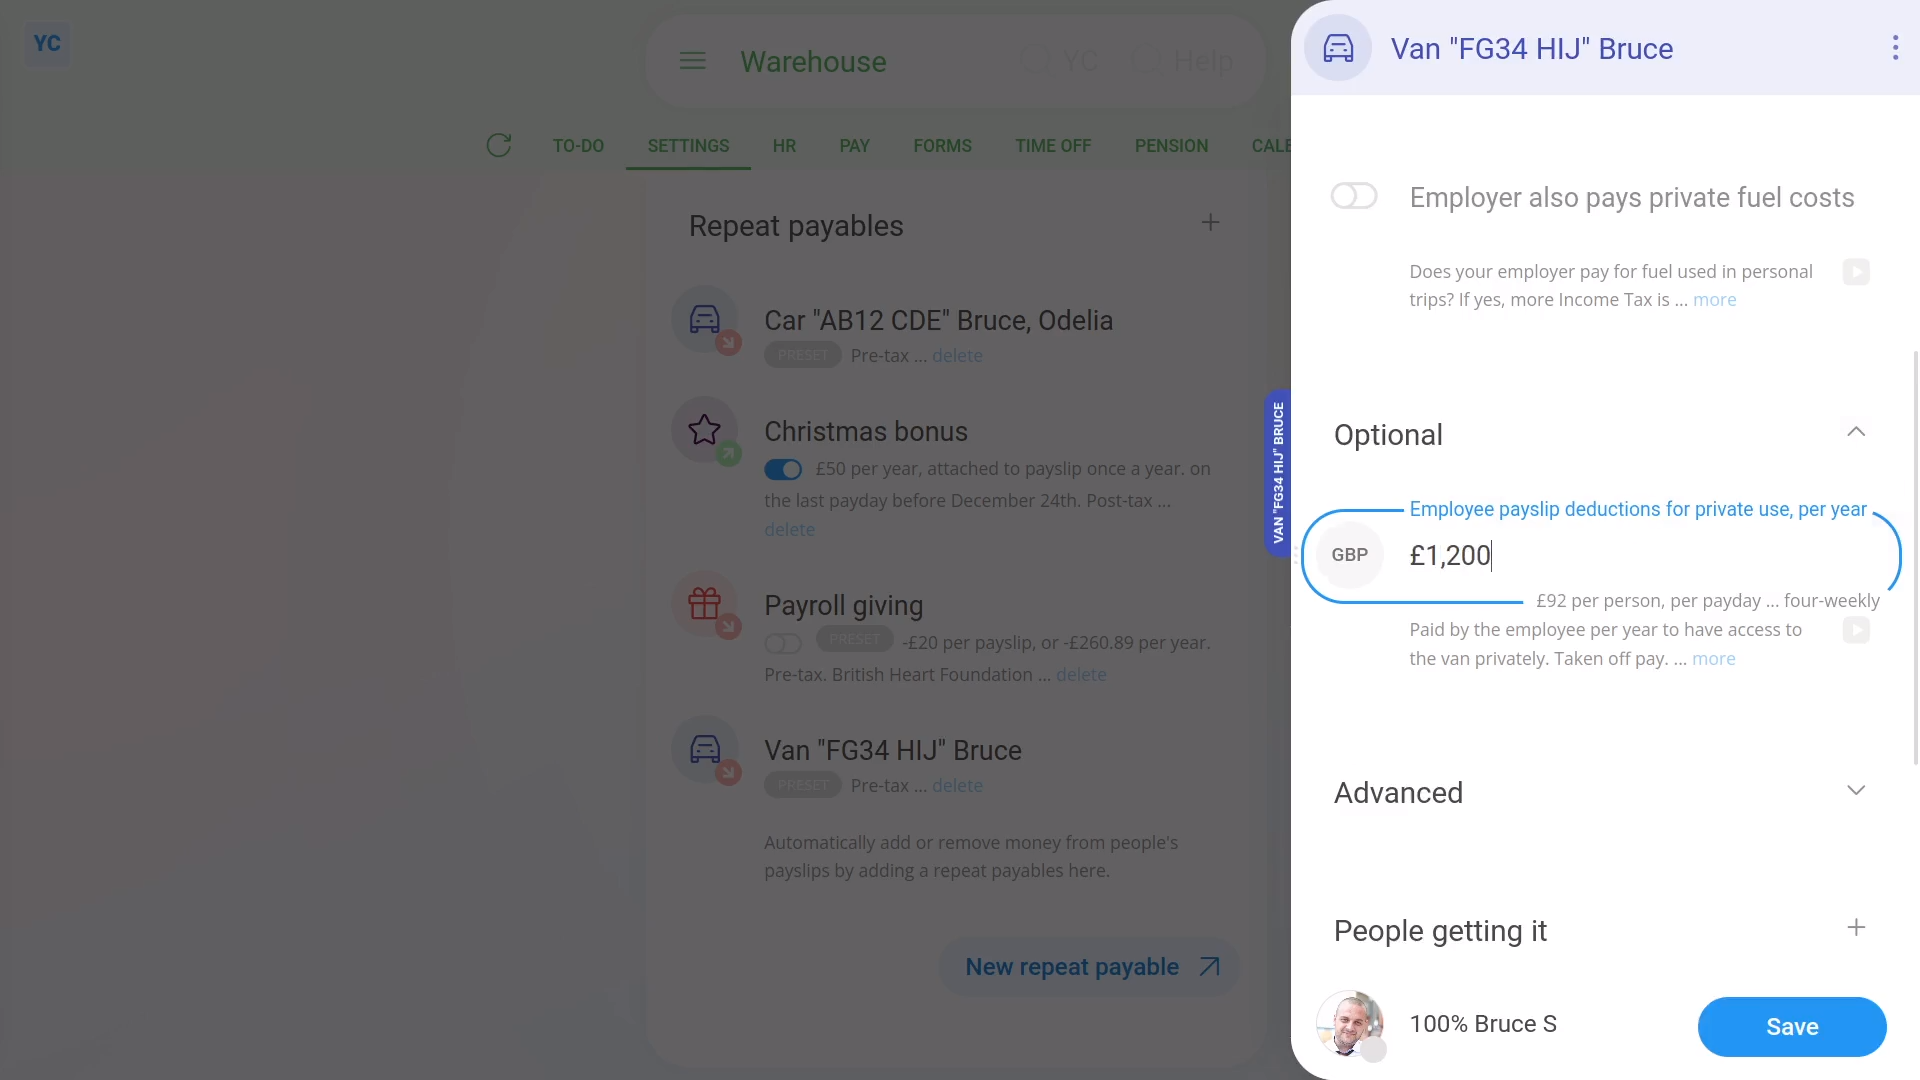
To set up a payslip deduction for a person's private use of a company vehicle:
- First, select the pay batch on: MenuPay batches
- Then tap: SettingsPay batch settings
- Then scroll to the bottom and look for the "Repeat payables" heading.
- And tap the company vehicle benefit you'd like to set up a "Vehicle private use" deduction for.
- Then scroll down and expand the "Optional" heading.
- Then in Employee payslip deductions for private use, enter how much is to be deducted, every year, to drive the vehicle privately.
- Next, tap Save, and the "Vehicle private use" deduction is added to the payslips of the people using the vehicle.
- To see the "Vehicle private use" deduction on the people's payslips, tap the company vehicle benefit again.
- Next, scroll down, then tap the person.
- Then hover your mouse over the vehicle benefit, and tap the "See on payslip" button:
- And you'll see the "Vehicle private use" showing under: "Post-tax withholdings"
- And finally, when you hover your mouse over the benefit amount, you'll see a breakdown of the "Vehicle private use" calculation.
Keep in mind that:
- The change of adding or removing "Vehicle private use" shows up on each person's next un-filed payslip.
- And it won't affect any of their previously filed payslips.
And that's it! That's everything you need to know about deducting for private use of a company vehicle.
5. How do I do a vehicle benefit to cover private fuel use?
 2:03
2:03
"How do I do a vehicle benefit to cover private fuel use?"
When a company vehicle is used for private purposes, and the fuel is covered by the company, you'll need to update the company vehicle benefit.
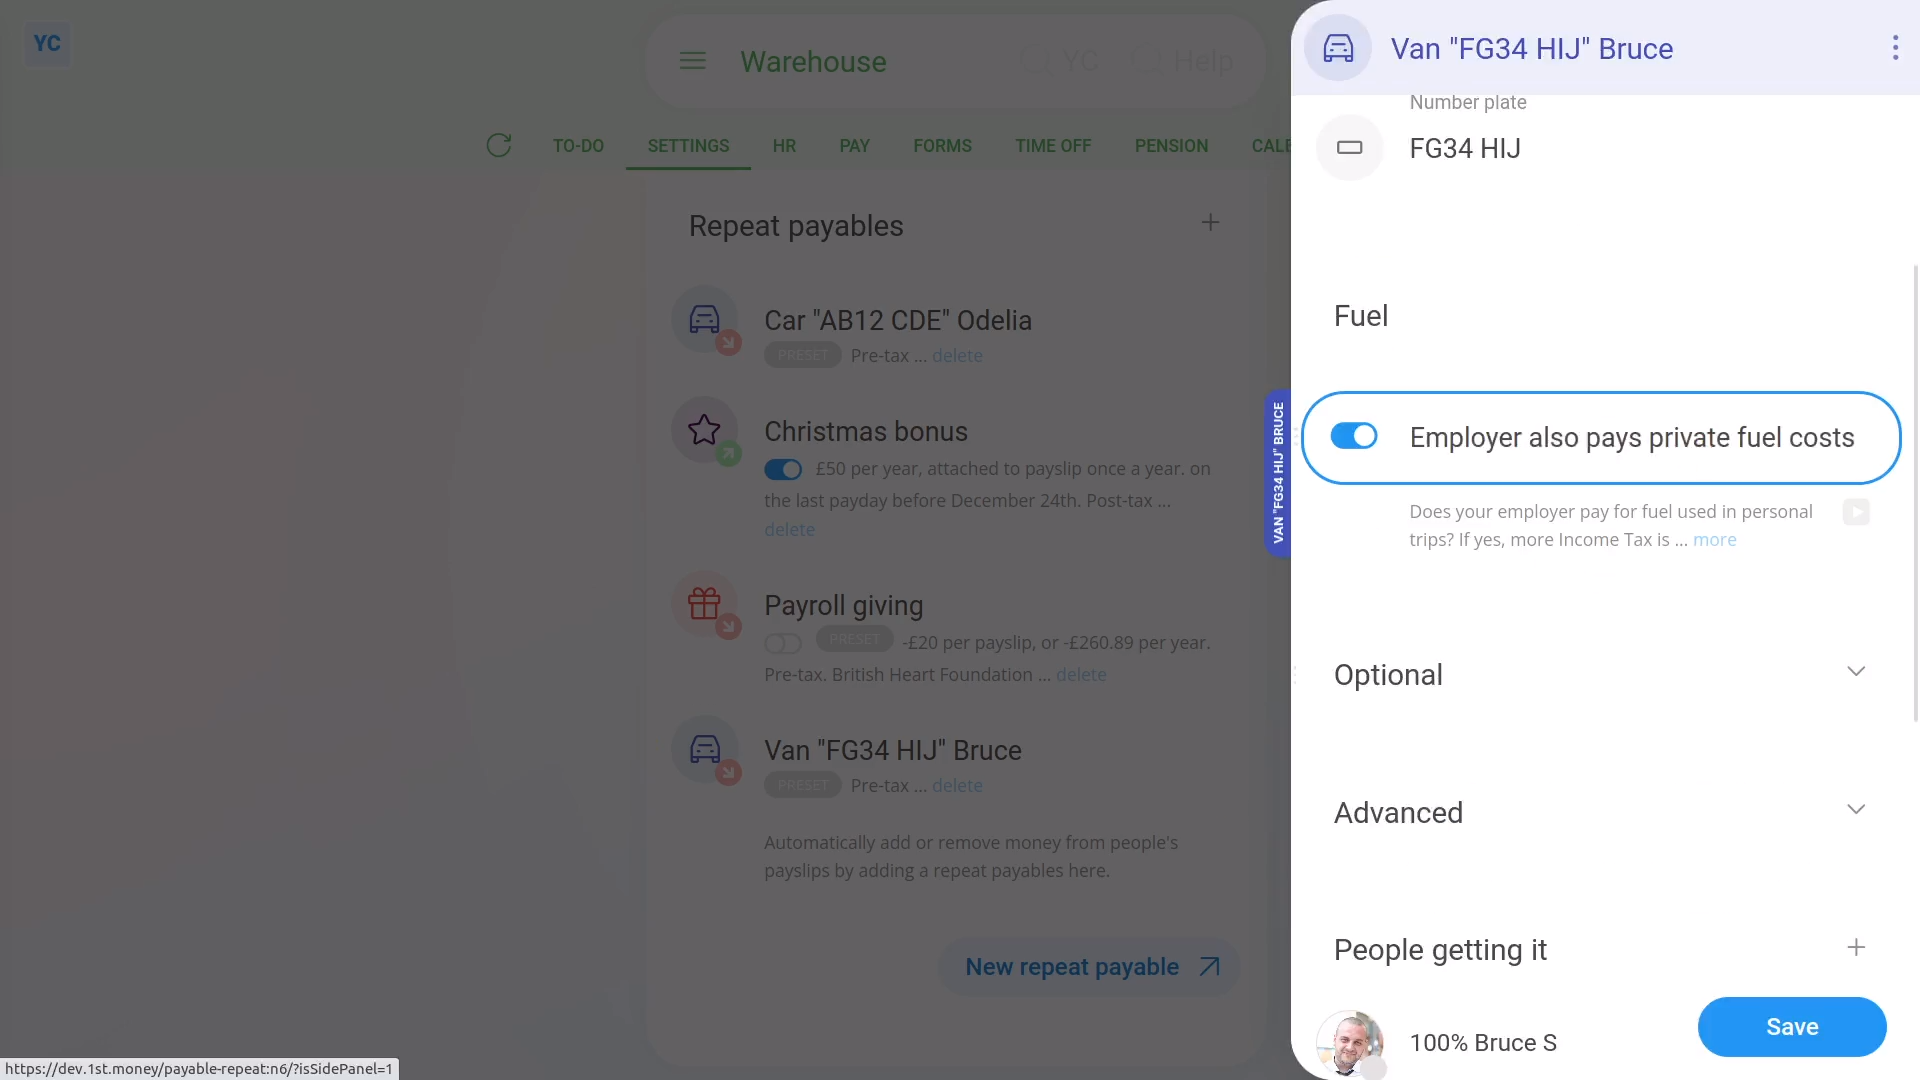
To update a pay batch's vehicle benefit to include private fuel use:
- First, select the pay batch on: MenuPay batches
- Then tap: SettingsPay batch settings
- Then scroll to the bottom and look for the "Repeat payables" heading.
- And tap the company vehicle benefit you'd like to include private fuel use for.
- Then scroll down to the "Fuel" heading.
- And turn on: Employer also pays private fuel costs
- Next, tap Save, and the private fuel use is added to the payslips of the people using the vehicle.
- To see the private fuel use on the people's payslips, tap the company vehicle benefit again.
- Then scroll down, and expand the "Advanced" heading.
- And you'll see the yearly private fuel "Benefit-in-kind" cash equivalent.
- And you'll also see that it's been added to the vehicle benefit's: "Total yearly cash equivalent"
- Next, scroll down, then tap the person.
- Then hover your mouse over the vehicle benefit, and tap the "See on payslip" button:
- And you'll see the vehicle benefit showing under: "Benefits-in-kind ... company arranged"
- And finally, when you hover your mouse over the benefit amount, you'll see a breakdown of the calculation which now includes the private fuel use amount.
Keep in mind that:
- The change of adding or removing private fuel use shows up on each person's next un-filed payslip.
- And it won't affect any of their previously filed payslips.
And that's it! That's all you need to do, to update a vehicle benefit if your company covers a person's cost of fuel.
6. How can an employee part-pay a company car's cost?
 2:02
2:02
"How can an employee part-pay a company car's cost?"
When a person's agreed to pay for part of the purchase cost of a company car, you'll need to update the company vehicle benefit.
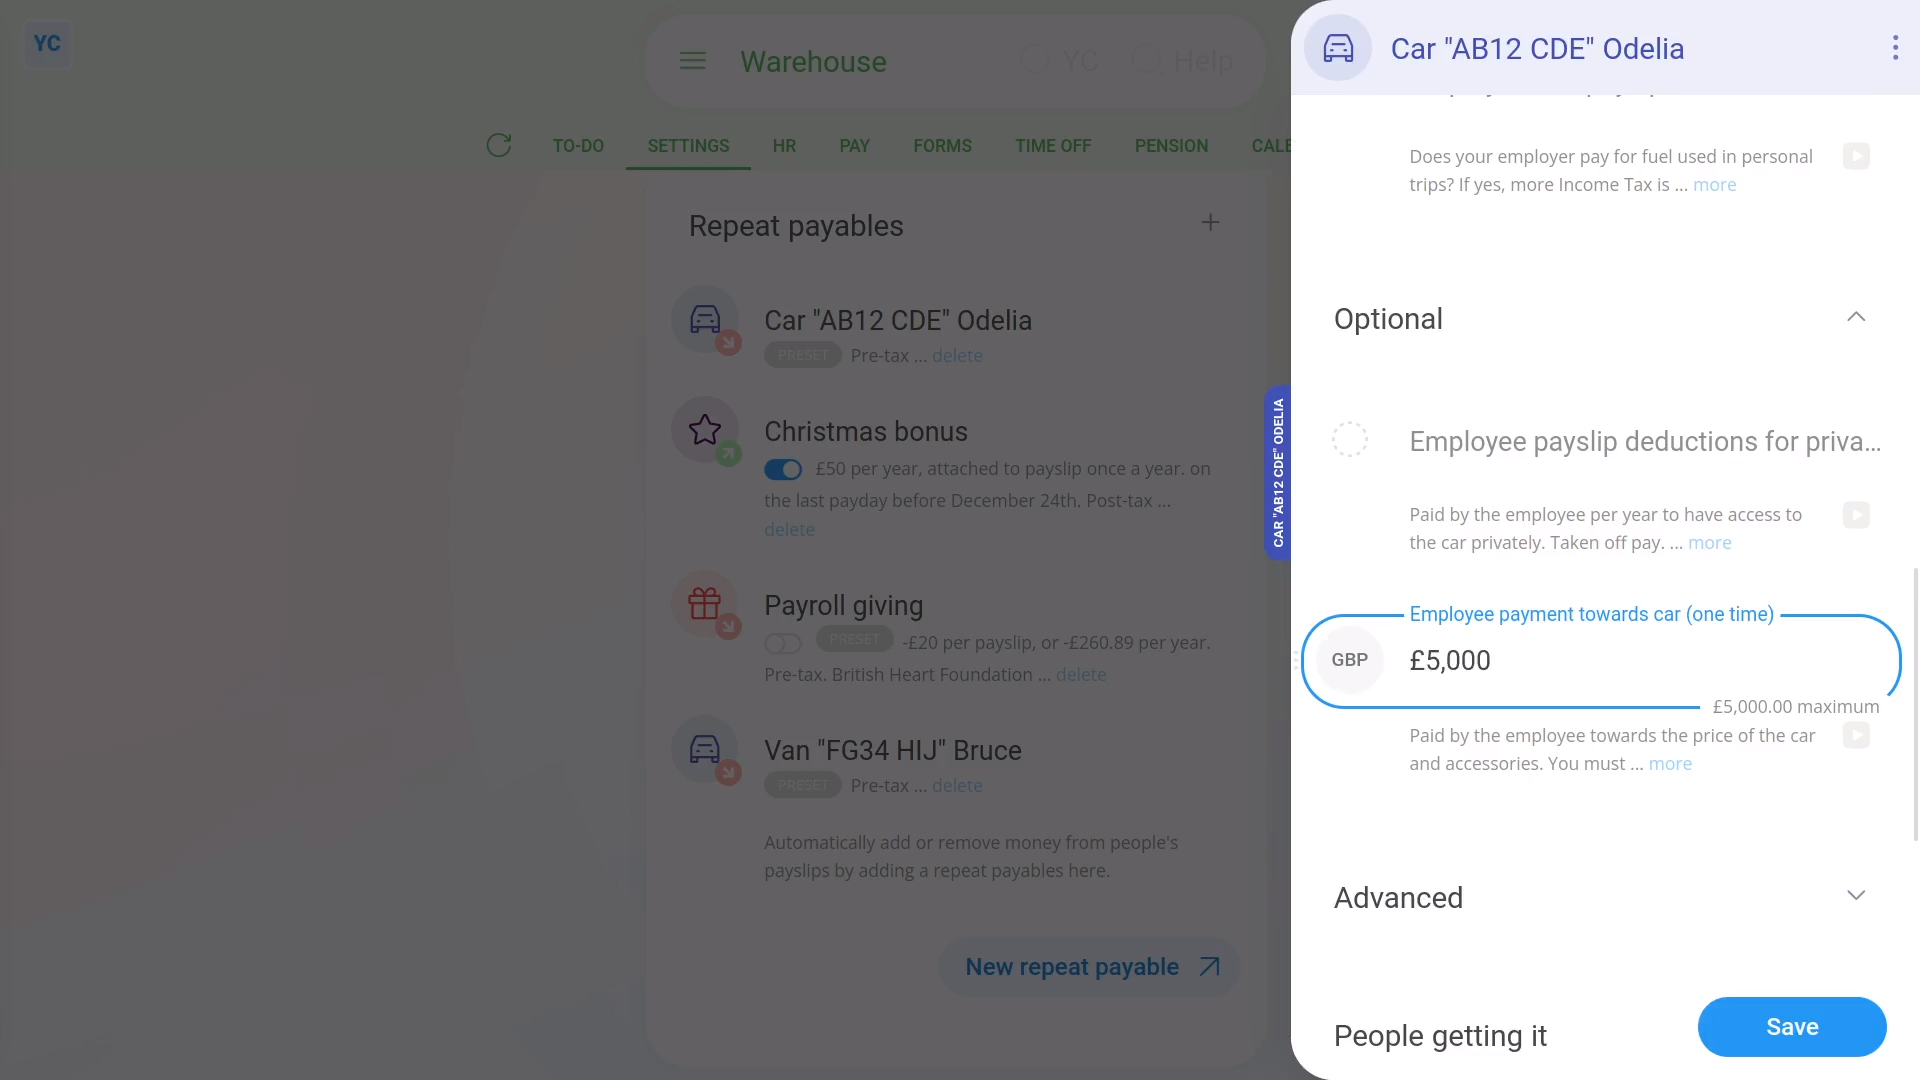
To update a vehicle benefit if a person's agreed to pay for part of a company car's purchase cost:
- First, select the pay batch on: MenuPay batches
- Then tap: SettingsPay batch settings
- Then scroll to the bottom and look for the "Repeat payables" heading.
- And tap the company vehicle benefit you'd like to store an "Employee payment towards car" for.
- Then scroll down and expand the "Optional" heading.
- Then in Employee payment towards car, enter how much the employee is paying, one-time.
- The amount of the one-time payment isn't automatically deducted by 1st Money from any payslip.
- Read the note which explains how you must separately arrange the payment.
- Next, tap: Save
- To see how the "Employee payment towards car" affects people's payslips, tap the company vehicle benefit again.
- Next, scroll down, then tap the person.
- Then hover your mouse over the vehicle benefit, and tap the "See on payslip" button:
- And you'll see the vehicle benefit showing under: "Benefits-in-kind ... company arranged"
- And finally, when you hover your mouse over the benefit amount, you'll see the breakdown. In the breakdown the "per year" amount is now lower because of the: "Employee payment towards car"
Keep in mind that:
- The "Employee payment towards car" option doesn't show if the "Vehicle type" is set to: "Van"
- Also, the money deducted, to pay for part of the purchase cost of a company car is sometimes also known as: "capital contributions"
And that's it! That's all you need to do, if a person's agreed to pay for part of a company car's purchase cost.
H. Low interest loans
1. If a company provides low interest loans, how's it recorded?
 1:33
1:33
"If a company provides low interest loans, how's it recorded?"
When the company provides low interest loans, including zero interest loans, to an employee, the expense is considered a: "Benefit-in-kind"
HMRC has two systems for submitting expenses:
- The old "P11D" system, that's being phased out.
- And the new "payrolling" system, that's replacing it.
Unfortunately, HMRC hasn't included "H. Low interest loans" expenses in their new "payrolling" system.
Which means that if you've got "H. Low interest loans" expenses to submit, HMRC requires ALL employers to submit it using the old "P11D" system (submitted per year, per employee).
By "ALL employers" it means, regardless of whether you've moved to the new "payrolling" system, or if you're still on the old "P11D" system. All employers who've got any "H. Low interest loans" expenses must submit them through the old "P11D" system. It's the only way HMRC is willing to receive them.
Because it's the only way HMRC's willing to receive them, if you've got "H. Low interest loans" expenses, you'll need to talk to your accountant on how to submit them through the old "P11D" system.
And that's it! That's everything you need to know about providing low interest loans to an employee!
I. Private medical
How do I record company provided medical benefits for an employee?
 3:39
3:39
"How do I record company provided medical benefits for an employee?"
When your company provides private medical or dental benefits for an employee, it's considered a "Benefit-in-kind". However, some private medical or dental benefits are exempt.
To learn more:
- About which private medical or dental benefits are exempt, go to GOV.UK.
- If the medical benefit you're providing IS EXEMPT, go ahead and provide the benefit tax-free. In other words, there's nothing to set for the employee's pay.
- However, if it's NOT EXEMPT you'll need to add it as a repeating: "Benefit-in-kind"
To add a private medical or dental benefit to an employee's pay, as a repeating "Benefit-in-kind":
- First, select the person who's getting the private medical or dental benefit on: MenuPeople
- To make a new repeat payable, go to: PayPay settings
- And scroll down to the "Repeat payables ... personal" heading.
- Then tap: New repeat payable
- Next, select: Benefit-in-kind
- Next, type in a Description of the benefit-in-kind.
- Select the monthly time frame: Amount type
- And then type in the monthly cost: Amount
- By default, "Arranged by" is already set to: "Company"
- Then scroll down and tap the "Advanced" heading.
- Optionally, if there's a co-pay, or a monthly amount that the person's agreed can be taken off their pay, enter that also in: Employee deducted co-pay
- Then tap: Save
- Then on the repeat payable list, hover your mouse over the repeat payable, and tap the "See on payslip" button:
- You'll now see an amount showing under: "Benefits-in-kind ... company arranged"
- And if you hover your mouse over the amount, you'll see a breakdown of the calculation.
- There may have been a co-pay, or an amount that the person's agreed can be taken off their pay. If so, you'll also see that amount showing as "Employee deducted co-pay" with its own notes when you hover.
- Then if you tap the "Next payslip" circle, you'll see the same amounts repeated on every payday. Including "Benefit-in-kind" and: "Employee deducted co-pay"
- If you later decide you want to remove, or stop the repeating "Benefit-in-kind", tap its "Edit" button:
- And finally, you can change any part of it, including changing the "Ends on" date to finish earlier, if required.
Keep in mind that:
- The co-pay amount is automatically set to be deducted from the person's pay.
- The company doesn't have to separately collect the co-pay amount from the person.
- Also, in some cases, the employee has themselves paid for the private medical or dental cost, and is asking the company for a once-only reimbursement.
- To add a once-only "Benefit-in-kind" reimbursement, tap: MenuExpense claim, select the person, and tap: Once only taxable benefit
To also learn more:
- About when to set "Arranged by" to "Company" or "Employee" for medical benefits, go to GOV.UK.
And that's it! That's all you need to do to add an employee's private medical or dental benefit!
J. Qualifying relocation
How do I enter both 'qualifying' and remaining moving costs?
 4:14
4:14
"How do I enter both "qualifying" and remaining moving costs?"
When moving house, your "qualifying" moving cost can be up to the tax-free maximum of £8,000, and is recorded as a "Standard moving expense". Anything over the tax-free maximum of £8,000 is recorded as a: "Remaining moving expense"
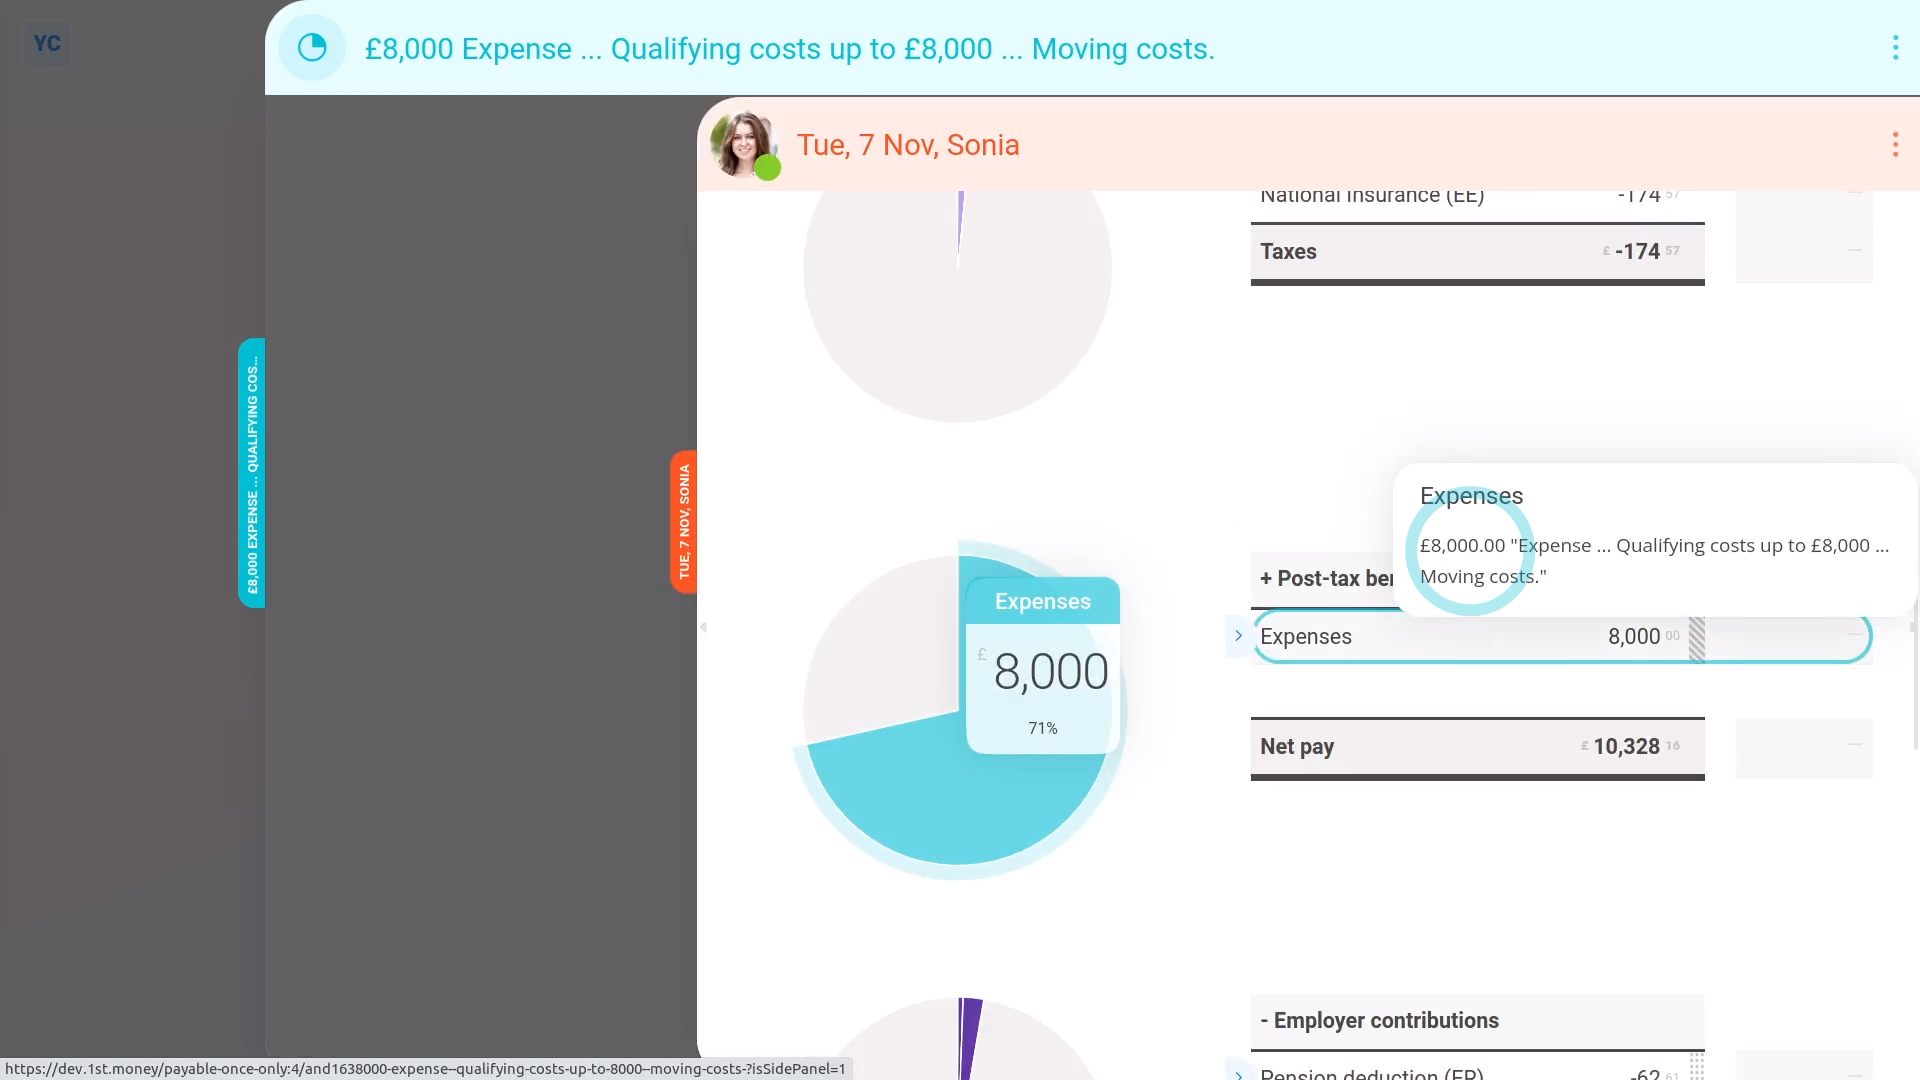
To create a "Standard moving expense" for your part up to a tax-free maximum of £8,000:
- First, if your total "qualifying" moving costs are over the £8,000 tax-free limit, you'll need to start by creating a "Standard moving expense" for the original £8,000.
- And then separately create a "Remaining moving expense" for the remaining amount.
- However, keep in mind, if your total cost's less than the £8,000 tax-free limit, you'll only need to do the first step.
- To start with the first step, tap: MenuExpense claim
- Select the person who's moving.
- Then tap: Expense
- If you've got an image, like a receipt, that you'd like to include, you can upload, or take a photo of it.
- Then tap: Next
- If your amount's less than £8,000, then enter it. However, if it's over, enter only £8,000, and tap: Next
- And select "Moving costs", then tap: Next
- And because it's a payroll admin who's entering it, the expense is automatically approved.
- Now, to see how it shows up on the person's payslip, scroll down and tap: See on payslip
- And finally, when you hover your mouse over the "Expenses" amount, you'll see the details.
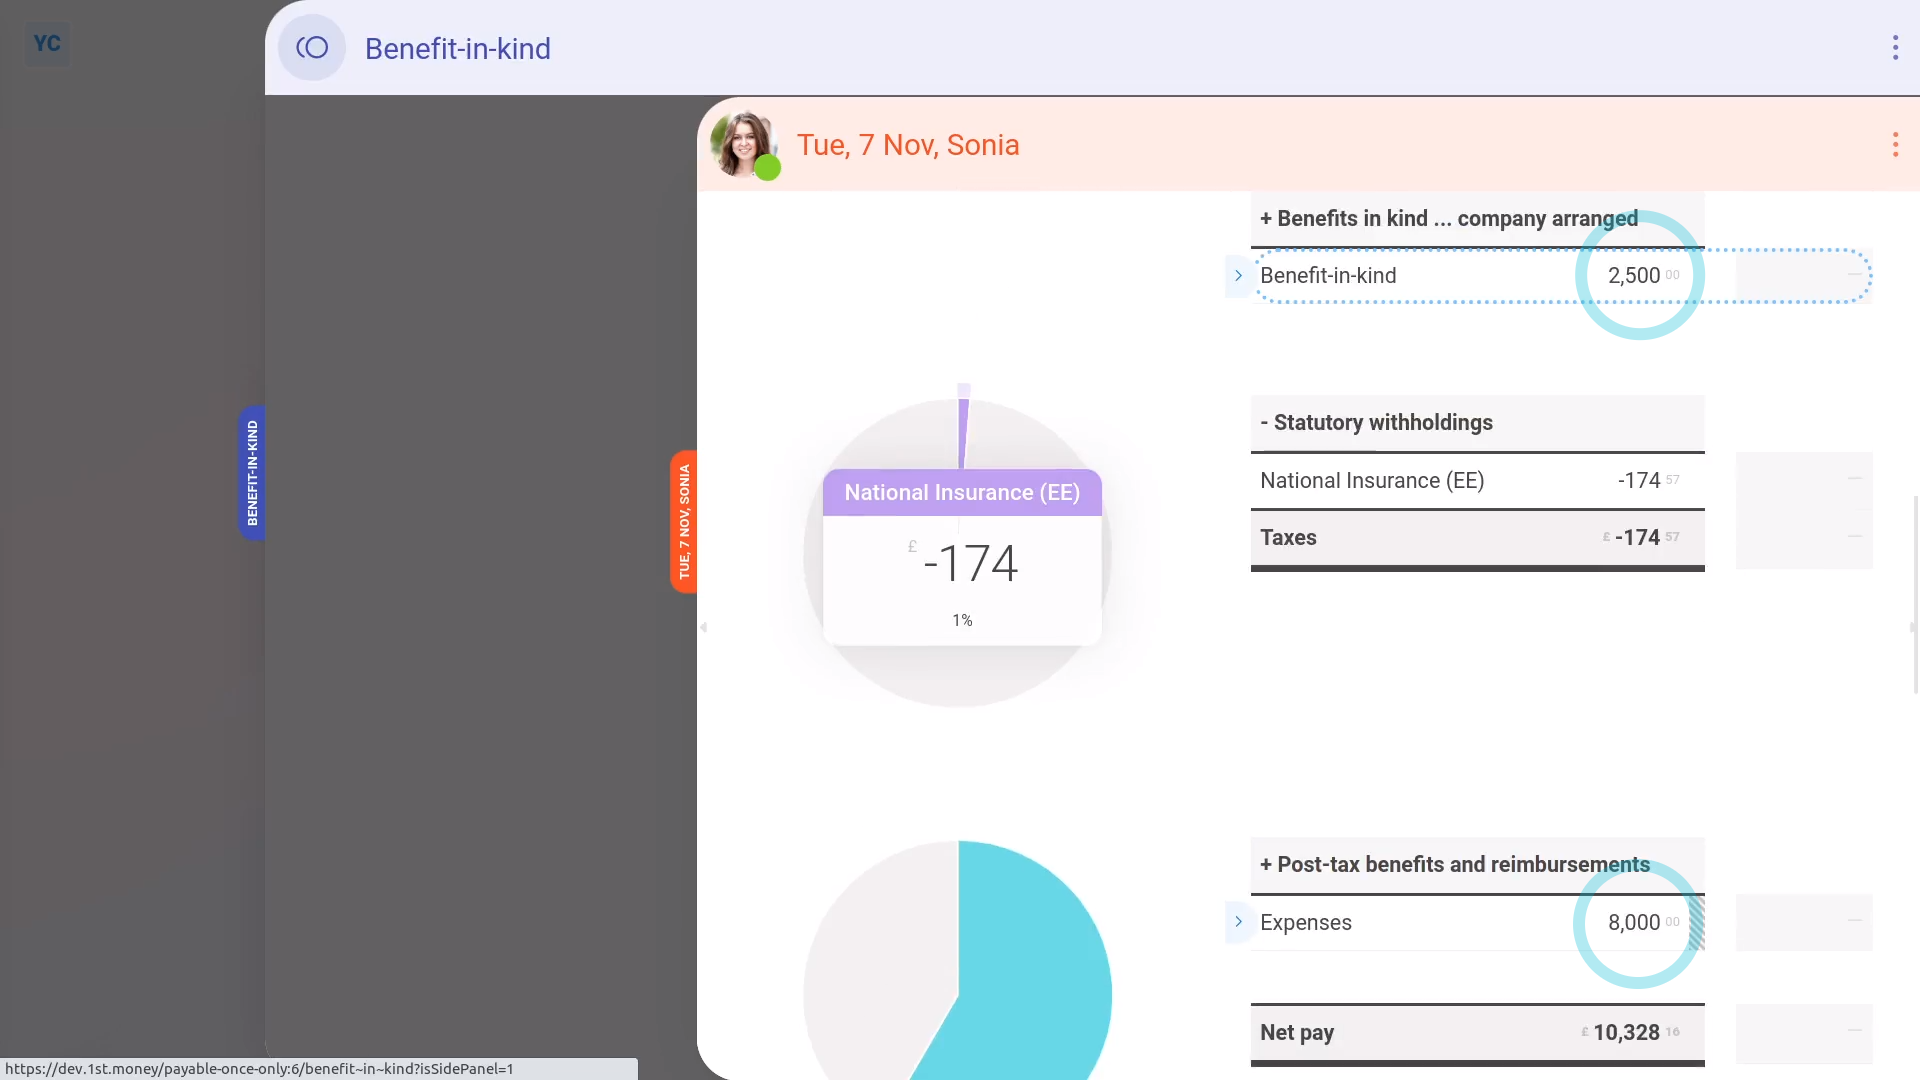
To create an optional "Remaining moving expense" for only when a person's moving cost was over your tax-free maximum of £8,000:
- First, again tap: MenuExpense claim
- And again select the person who's moving.
- Scroll down and select: Benefit-in-kind
- You can re-attach the same image again, or tap: Skip image
- Next, calculate the amount that's remaining, over the £8,000 tax-free limit.
- Then enter that remaining amount only.
- Leave "Arranged by" as "Company", and tap: Next
- Leave the description empty, and tap: Next
- And because it's a payroll admin who's entering it, the expense is automatically approved.
- Now, to see how it shows up on the person's payslip, scroll down and tap: See on payslip
- And when you hover your mouse over the "Benefit-in-kind" amount, you'll see the details.
- And finally, it's in addition to the "Expenses" amount you entered earlier. Both are repaid together on the same payslip.
Keep in mind that:
- Qualifying moving costs include buying or selling the house, moving, buying things for the house, and bridging loans.
- If the moving costs are "qualifying" and less than the tax-free maximum of £8,000, there's no tax or National Insurance to pay.
- If it turns out that the moving expense isn't "qualifying", as an admin, create an "Expense claim" for the person as a: "Once only taxable benefit"
- To add a "Once only taxable benefit" reimbursement, tap: MenuExpense claim, select the person, and tap: Once only taxable benefit
Also remember that:
- All the steps assume that it's a payroll admin who's entering the moving costs.
- If it's the person who's entering them, the only thing that changes is that the payroll admin still needs to approve them.
- The expense claims won't show up on the person's payslip until the payroll admin has approved them.
To learn more:
- About what's included in the "qualifying" relocation costs, go to GOV.UK.
- Also, if you're searching the internet for more info, HMRC sometimes labels "moving costs" as: "qualifying costs"
And that's it! That's everything you need to know about adding "qualifying" moving costs!
K. Services supplied
How do I record company services provided for employee personal use?
 3:31
3:31
"How do I record company services provided for employee personal use?"
When your company provides other services for an employee, it's considered a "Benefit-in-kind". Examples of other services include paying for car parking, club and gym memberships, entertainment, mobile phones, holidays, and more.
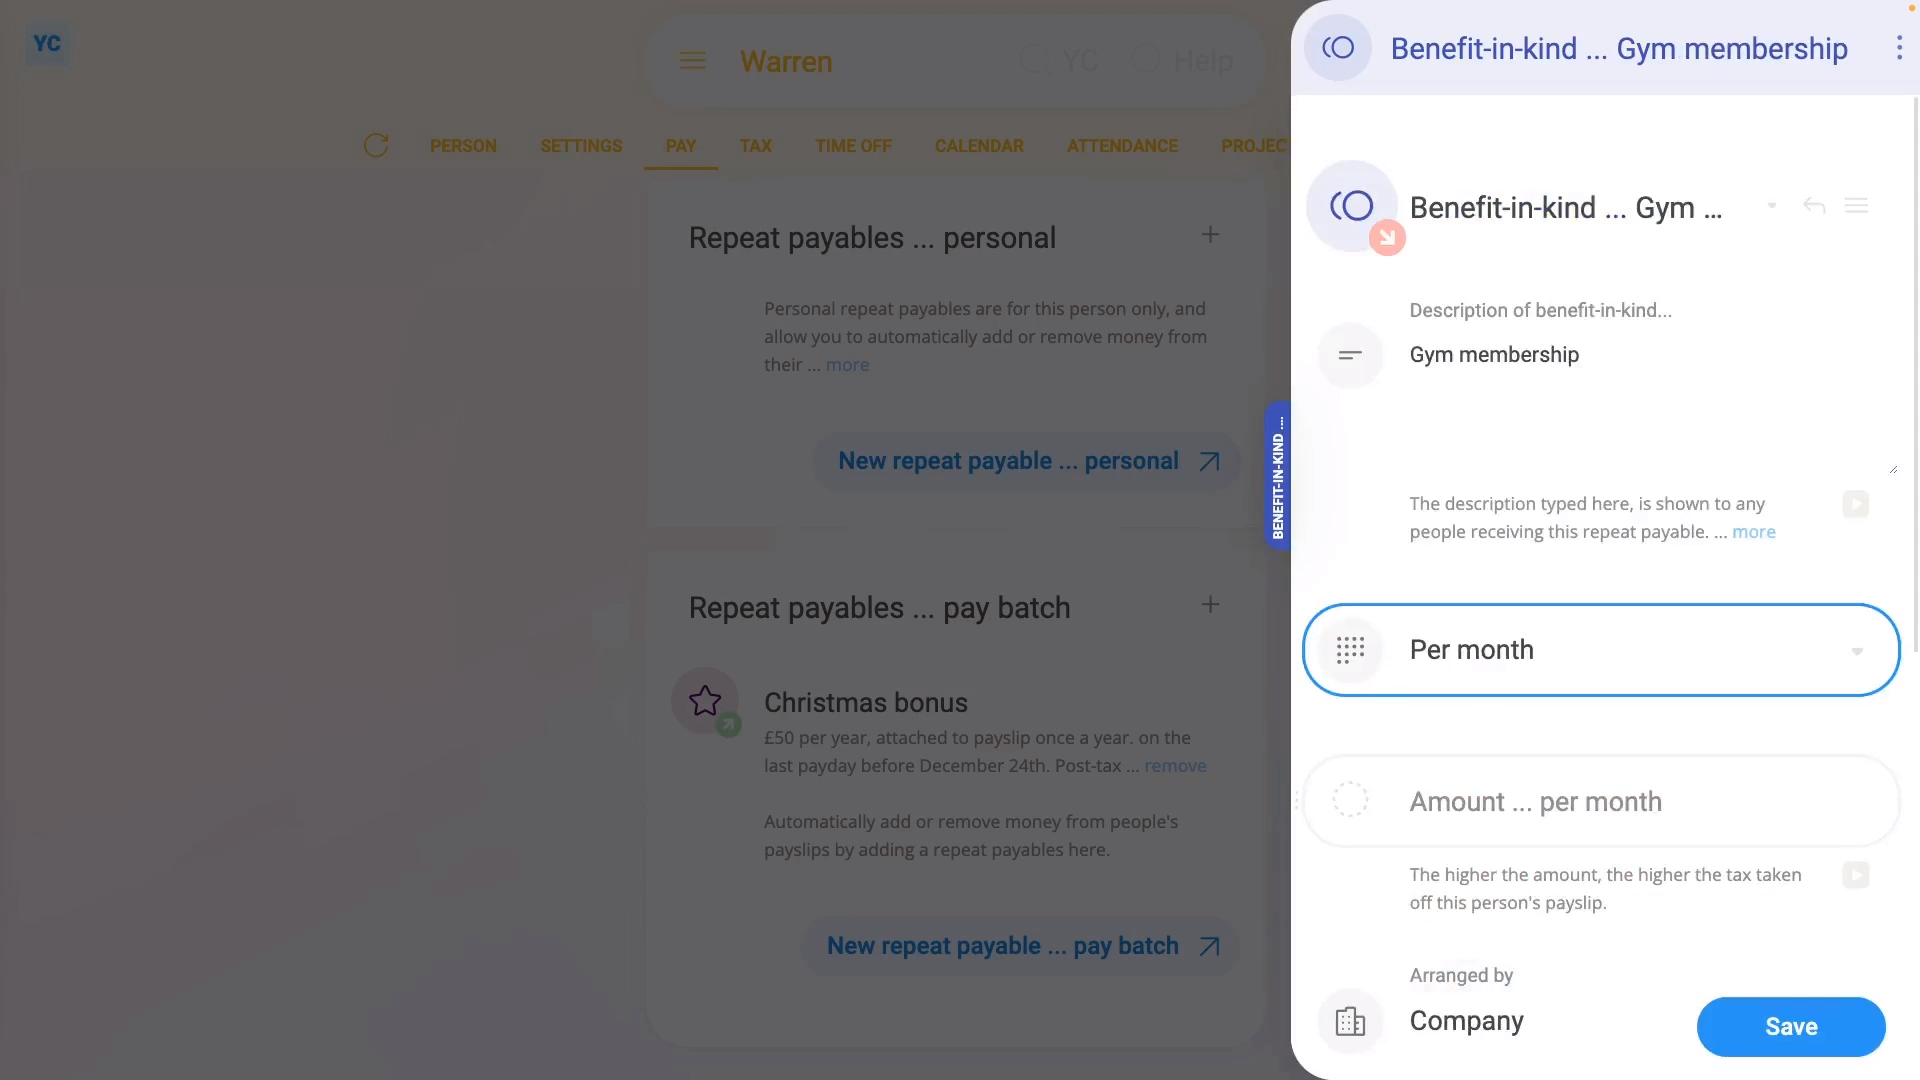
To add other services benefits to an employee's pay, as a repeating "Benefit-in-kind":
- First, select the person who's getting the other services benefits on: MenuPeople
- To make a new repeat payable, go to: PayPay settings
- And scroll down to the "Repeat payables ... personal" heading.
- Then tap: New repeat payable
- Next, select: Benefit-in-kind
- Next, type in a Description of the benefit-in-kind.
- Select the monthly time frame: Amount type
- And then type in the monthly cost: Amount
- By default, "Arranged by" is already set to: "Company"
- Then scroll down and tap the "Advanced" heading.
- Optionally, if there's a co-pay, or a monthly amount that the person's agreed can be taken off their pay, enter that also in: Employee deducted co-pay
- Then tap: Save
- Then on the repeat payable list, hover your mouse over the repeat payable, and tap the "See on payslip" button:
- You'll now see an amount showing under: "Benefits-in-kind ... company arranged"
- And if you hover your mouse over the amount, you'll see a breakdown of the calculation.
- There may have been a co-pay, or an amount that the person's agreed can be taken off their pay. If so, you'll also see that amount showing as "Employee deducted co-pay" with its own notes when you hover.
- Then if you tap the "Next payslip" circle, you'll see the same amounts repeated on every payday. Including "Benefit-in-kind" and: "Employee deducted co-pay"
- If you later decide you want to remove, or stop the repeating "Benefit-in-kind", tap its "Edit" button:
- And finally, you can change any part of it, including changing the "Ends on" date to finish earlier, if required.
Keep in mind that:
- The co-pay amount is automatically set to be deducted from the person's pay.
- The company doesn't have to separately collect the co-pay amount from the person.
- Also, in some cases, the employee has themselves paid for the other services benefit cost, and is asking the company for a once-only reimbursement.
- To add a "Once only taxable benefit" reimbursement, tap: MenuExpense claim, select the person, and tap: Once only taxable benefit
To learn more:
- HMRC provides specific guidance for each service, including:
- Car parking charges;
- Club membership;
- Entertainment;
- Mobile phones;
- Holidays;
- And also Sporting or recreational facilities.
And that's it! That's all you need to do to add an employee's other services benefits!
L. Assets placed at employee's disposal
If a company provides an asset for an employee's personal use, how's it recorded?
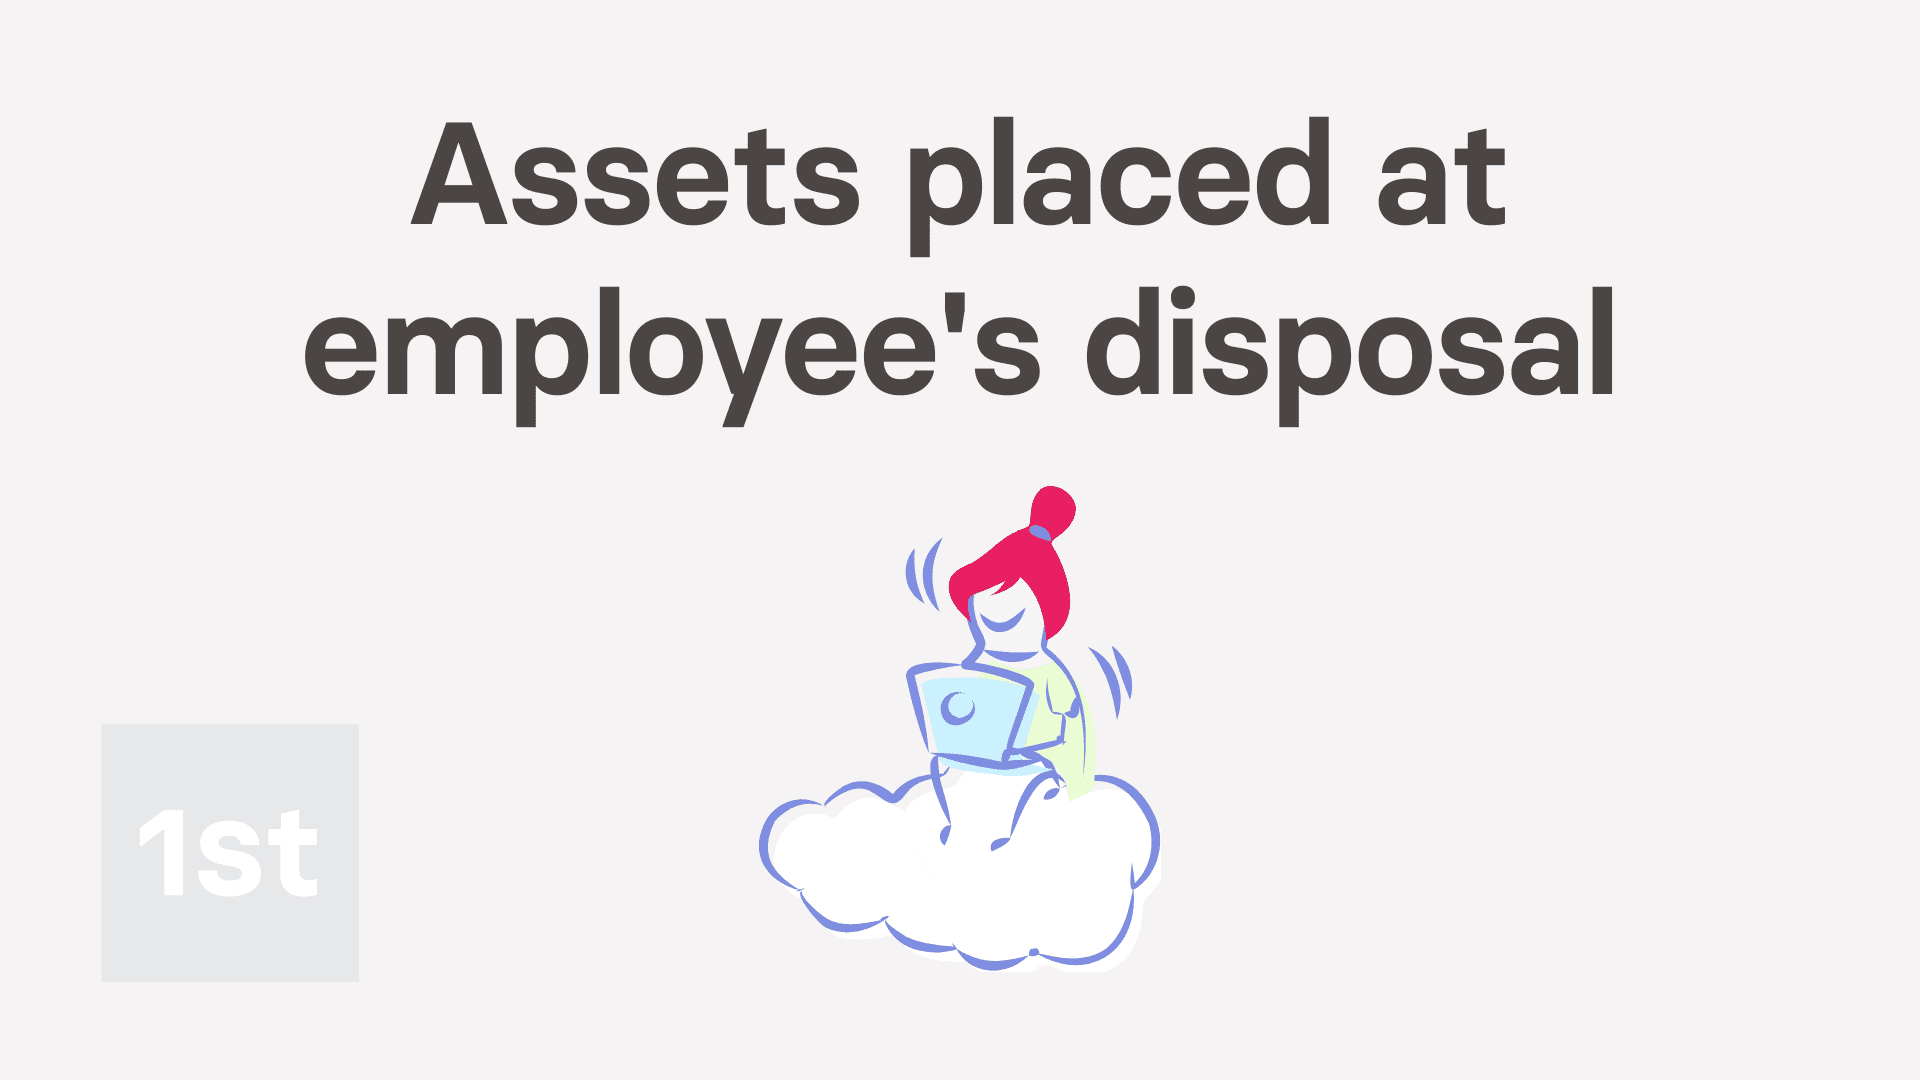 3:23
3:23
"If a company provides an asset for an employee's personal use, how's it recorded?"
When your company provides an asset for an employee's personal use, it's considered a "Benefit-in-kind". HMRC recommends to take 20% of the asset's value, and set it up as a repeating "Benefit-in-kind", spread over five years.
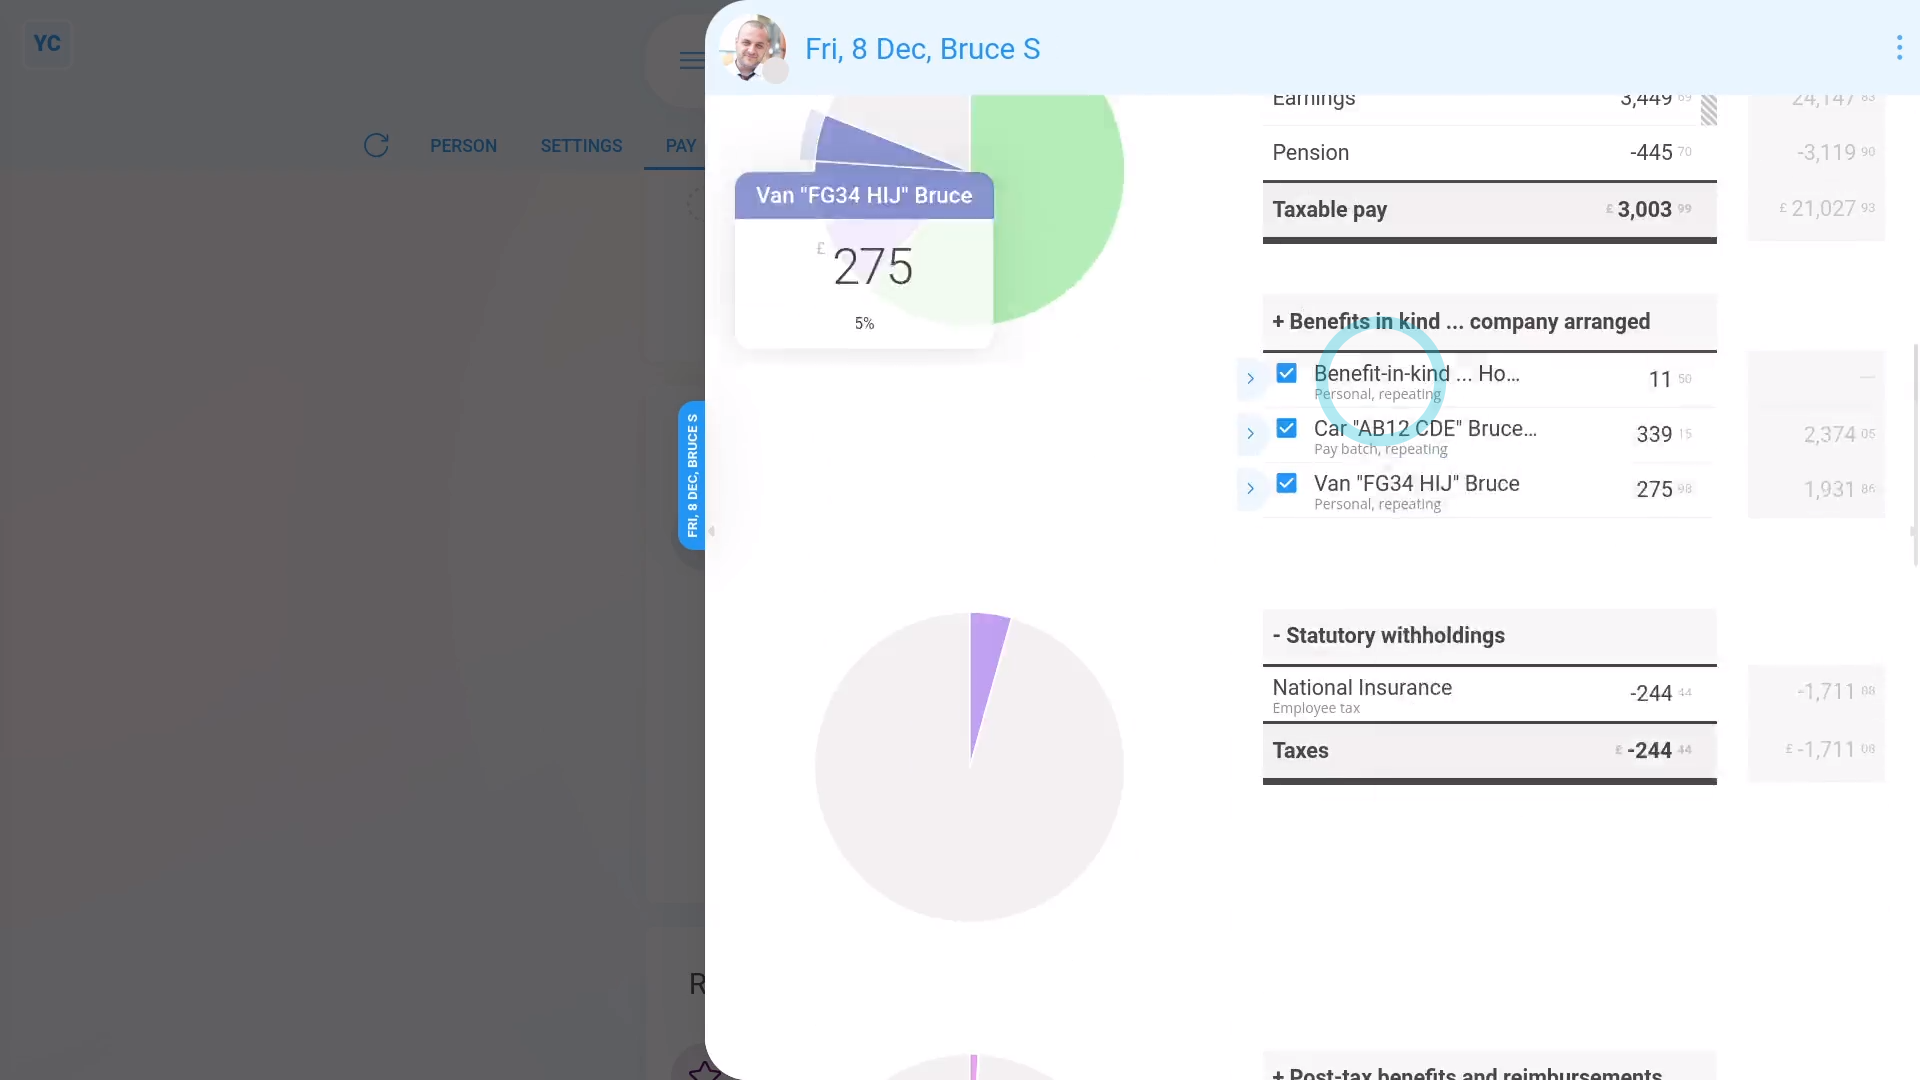
To add an asset provided by a company, for an employee's personal use, as a repeating "Benefit-in-kind":
- First, select the person who's getting personal use of the company provided asset on: MenuPeople
- To make a new repeat payable, go to: PayPay settings
- And scroll down to the "Repeat payables ... personal" heading.
- Then tap: New repeat payable
- Next, select: Benefit-in-kind
- Next, type in a Description of the benefit-in-kind.
- Select the yearly time frame: Amount type
- And then type in 20% of the asset's value as the yearly payment value, spread over five years: Amount
- By default, "Arranged by" is already set to: "Company"
- Then scroll down and tap the "Advanced" heading.
- Optionally, if there's a co-pay, or a yearly amount that the person's agreed can be taken off their pay, enter that also in: Employee deducted co-pay
- And then to set the repeat payable to end in exactly five years, in Ends on (optional), tap Set to today, and then tap in to manually change the date, and add five years to it.
- Then tap: Save
- Then on the repeat payable list, hover your mouse over the repeat payable, and tap the "See on payslip" button:
- You'll now see an amount showing under: "Benefits-in-kind ... company arranged"
- And if you hover your mouse over the amount, you'll see a breakdown of the calculation.
- There may have been a co-pay, or an amount that the person's agreed can be taken off their pay. If so, you'll also see that amount showing as "Employee deducted co-pay" with its own notes when you hover.
- Then if you tap the "Next payslip" circle, you'll see the same amounts repeated on every payday. Including "Benefit-in-kind" and: "Employee deducted co-pay" (repeated for the next five years)
- If you later decide you want to remove, or stop the repeating "Benefit-in-kind", tap its "Edit" button:
- And finally, you can change any part of it, including changing the "Ends on" date to finish earlier, if required.
Keep in mind that:
- The co-pay amount is automatically set to be deducted from the person's pay.
- The company doesn't have to separately collect the co-pay amount from the person.
- Also, a "Benefit-in-kind" increases the person's tax, and doesn't increase the person's in-the-hand pay.
- However, the person still gains by receiving use of the non-cash asset.
And that's it! That's all you need to do to add an asset for an employee's personal use!
M. Other items
How do I record company provided items for employee personal use?
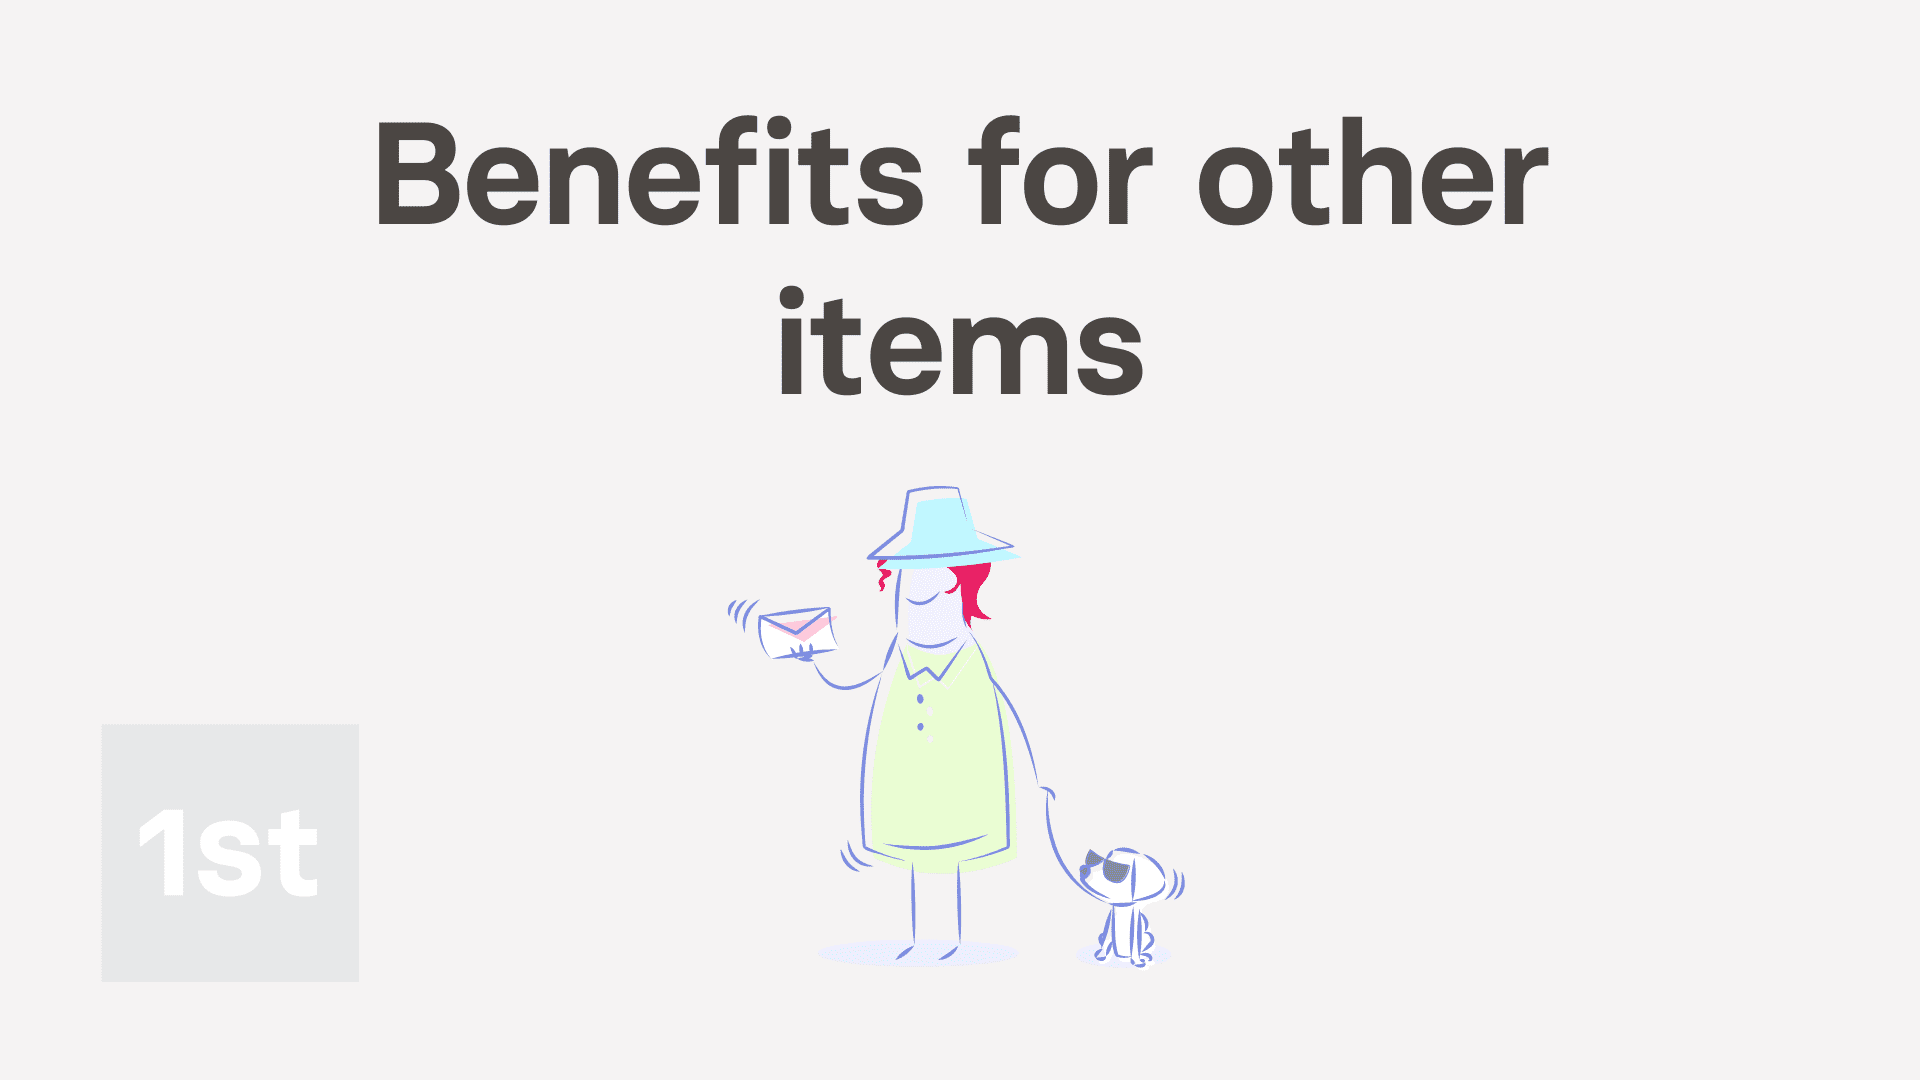 2:52
2:52
"How do I record company provided items for employee personal use?"
When your company provides other items for an employee, it's considered a "Benefit-in-kind". Examples of other items include subscriptions, professional fees, and more. However, some other item benefits are exempt.
To learn more:
- About which other item benefits are exempt, go to GOV.UK.
- If the other item benefit you're providing IS EXEMPT, go ahead and provide the benefit tax-free. In other words, there's nothing to set for the employee's pay.
- However, if it's NOT EXEMPT you'll need to add it as a repeating: "Benefit-in-kind"
To add other item benefits to an employee's pay, as a repeating "Benefit-in-kind":
- First, select the person who's getting the other item benefits on: MenuPeople
- To make a new repeat payable, go to: PayPay settings
- And scroll down to the "Repeat payables ... personal" heading.
- Then tap: New repeat payable
- Next, select: Benefit-in-kind
- Next, type in a Description of the benefit-in-kind.
- Select the yearly time frame: Amount type
- And then type in the yearly cost: Amount
- By default, "Arranged by" is already set to: "Company"
- Then tap: Save
- Then on the repeat payable list, hover your mouse over the repeat payable, and tap the "See on payslip" button:
- You'll now see an amount showing under: "Benefits-in-kind ... company arranged"
- And if you hover your mouse over the amount, you'll see a breakdown of the calculation.
- Then if you tap the "Next payslip" circle, you'll see the same amount repeated on every payday. Including: "Benefit-in-kind"
- If you later decide you want to remove, or stop the repeating "Benefit-in-kind", tap its "Edit" button:
- And finally, you can change any part of it, including changing the "Ends on" date to finish earlier, if required.
Keep in mind that:
- In some cases, the employee has themselves paid for the other items benefit cost, and is asking the company for a once-only reimbursement.
- To add a "Once only taxable benefit" reimbursement, tap: MenuExpense claim, select the person, and tap: Once only taxable benefit
And that's it! That's all you need to do to add an employee's other item benefits!
N. Expense payments on behalf of employee
If a company pays an employee's personal expenses, how's it recorded?
 2:54
2:54
"If a company pays an employee's personal expenses, how's it recorded?"
When the company pays for an employee's personal expenses, it needs to be recorded as a: "Benefit-in-kind"
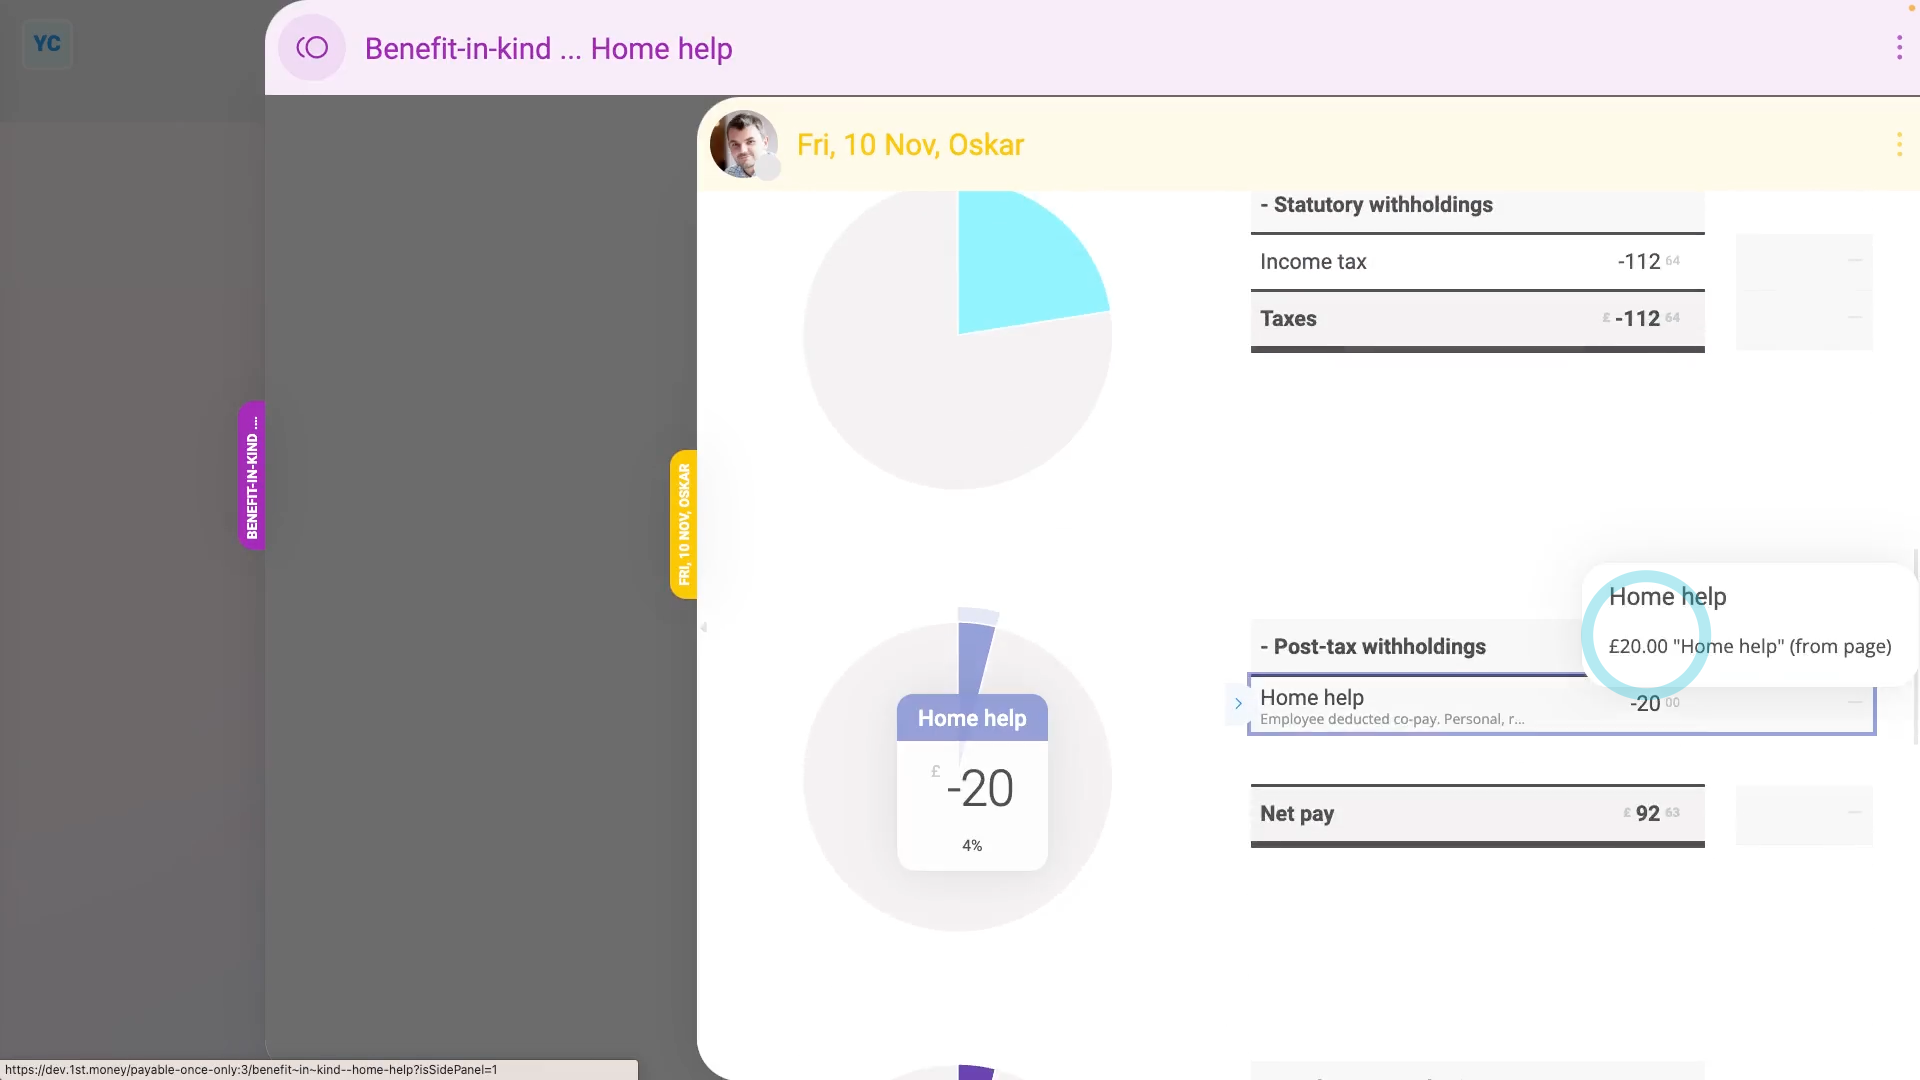
To record a company paying for an employee's personal expenses as a "Benefit-in-kind":
- First, tap: MenuExpense claim
- Select the person who the company's paying the personal expenses for.
- Next, tap: Benefit-in-kind
- If you've got an image, like a receipt, that you'd like to include, you can upload, or take a photo of it.
- Then tap: Next
- Type in the value of the personal expenses the company's paying.
- Next, change "Arranged by" to: "Employee"
- Optionally, if there's a co-pay, or a yearly amount that the person's agreed can be taken off their pay, enter that also in: Employee deducted co-pay
- Then tap: Next
- Optionally, type in a short description about the personal expense, and tap: Next
- And because it's a payroll admin who's entering it, the expense is automatically approved.
- Now, to see how it shows up on the person's payslip, scroll down and tap: See on payslip
- And when you hover your mouse over the "Benefit-in-kind" amount, you'll see the details.
- There may have been a co-pay, or an amount that the person's agreed can be taken off their pay. If so, you'll also see that amount showing as "Employee deducted co-pay" with its own notes when you hover.
- And finally, you'll know that the personal expense's value is being correctly recorded and taxed.
Keep in mind that:
- The co-pay amount is automatically set to be deducted from the person's pay.
- The company doesn't have to separately collect the co-pay amount from the person.
- Also, in some cases, the employee has themselves paid for the personal expense cost, and is asking the company for a once-only reimbursement.
- To add a "Once only taxable benefit" reimbursement, tap: MenuExpense claim, select the person, and tap: Once only taxable benefit
- Also, if the personal expense payment is repeating every week, month, or every payday, set it up as a repeating: "Benefit-in-kind"
To learn more:
- About how to set up a repeating "Benefit-in-kind", watch the video on: Repeating benefit-in-kind
- Also, to learn more about personal bills, go to GOV.UK.
And that's it! That's everything you need to know about paying for an employee's personal expenses!