

Pay batches
 2:49
2:49 1:53
1:53 3:05
3:05 2:31
2:31 3:19
3:19 1:47
1:47 2:18
2:18 3:14
3:14 1:44
1:44 2:46
2:46 2:11
2:11 2:46
2:461. How do I create a new pay batch and set its tax country or state?

 2:49
2:49
"How do I create a new pay batch and set its tax country or state?"
If you employ different groups of people, each group may need different tax settings from different countries or states. Such groupings can be done with a different pay batch each.
To create a new pay batch and set its tax country or state:
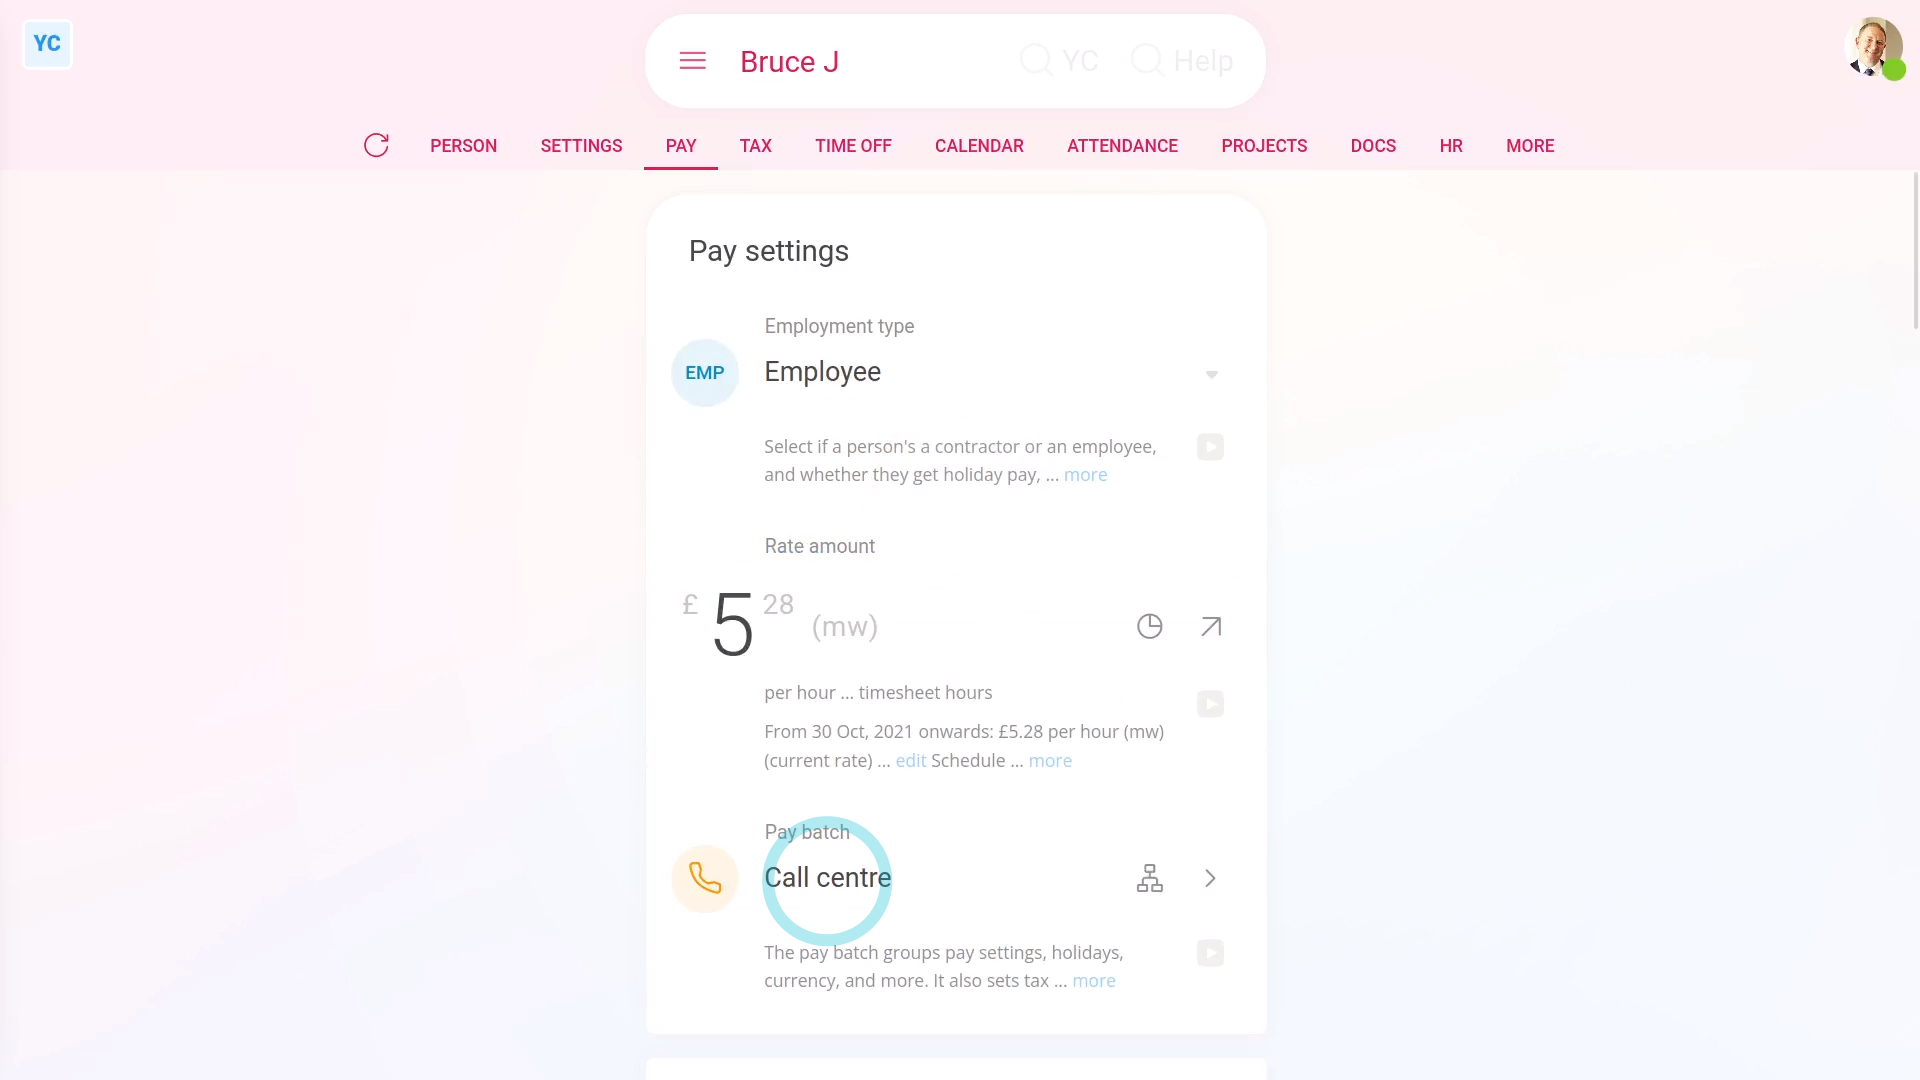
- First, to create a pay batch, tap: MenuPay batchesNew pay batch
- And type in the pay batch's name.
- Optionally, you can also tap the circle and set the list colour and image.
- By default, it sets the country to its best guess, based on where you're located.
- To change the country, tap it, and select the country you'll be employing people in.
- Depending on the country you select, you may then also be asked to select the state, province, or territory you'll be employing people in.
- Now your new pay batch is all set. To add people, scroll down and tap: Add people
- Tap the people you want to add, then tap: Save
- And finally, if you tap on one of the newly added people, and tap Set rate, you'll see that their pay is in the currency of the country you selected.
You may notice:
- That each time you change from one country or state to another, the page reloads.
- And each time it reloads, some of the defaults, like the default payday settings, may change.
- The automatic changes are intentional, and give you the most common default settings for each country or state.
- If the automatic changes aren't what you want, go ahead and tap them to change them to what you prefer.
Keep in mind that:
- Setting the pay batch's country is the only way to set the payment currency for any group of people.
- Also, in addition to setting the currency, you're also setting all the tax rules for that group of people.
- Also remember that once you pay any people in the pay batch, the country and state options become locked. In which case, you can't change it any more.
- However, even though it may be locked, you can always create more new pay batches. And then set the new pay batches to any country or state of your choice.
And that's it! That's everything you need to know about creating a new pay batch and setting its tax country and state!
2. What do I need to consider when setting a person's pay batch?
 1:53
1:53
"What do I need to consider when setting a person's pay batch?"
Most small employers only ever need a single pay batch. However, larger, or more complicated employers may want to set up multiple pay batches.
To set a person's pay batch:
- First, usually a person's pay batch is set during onboarding.
- However, there's two other places you can set a person's pay batch.
- To set a person's pay batch for only one person:
Select the person on: MenuPeople - Then tap: PayPay settings
- And change the setting for: Pay batch
- Once you change their pay batch, it auto-saves.
- To set a lot of people's pay batch all in one go:
Select the pay batch you want to move the people into, on: MenuPay batches - Then tap: SettingsPay batch settings
- And scroll down and tap: Add people
- Once it slides out on the right, tap all the people you want to add.
- And tap: Save
- And finally, you'll see all the people you tapped now show up in the list of pay batch people.
Keep in mind that:
- Once a person's been added to a pay batch, that person automatically receives the pay batch's settings, including.
- The pay batch's tax rules, calculations, currency, payday schedule, and repeat payables.
- The person also automatically receive the pay batch's time off settings, public holidays, pension settings, and advanced settings.
And that's it! That's everything you need to know about setting a person's pay batch!
3. How do I see a list of the upcoming tasks for my pay batch?
 3:05
3:05
"How do I see a list of the upcoming tasks for my pay batch?"
As each week or month passes, a range of payroll tasks become due. Including paydays, tax payments, tax form submissions, and much more.
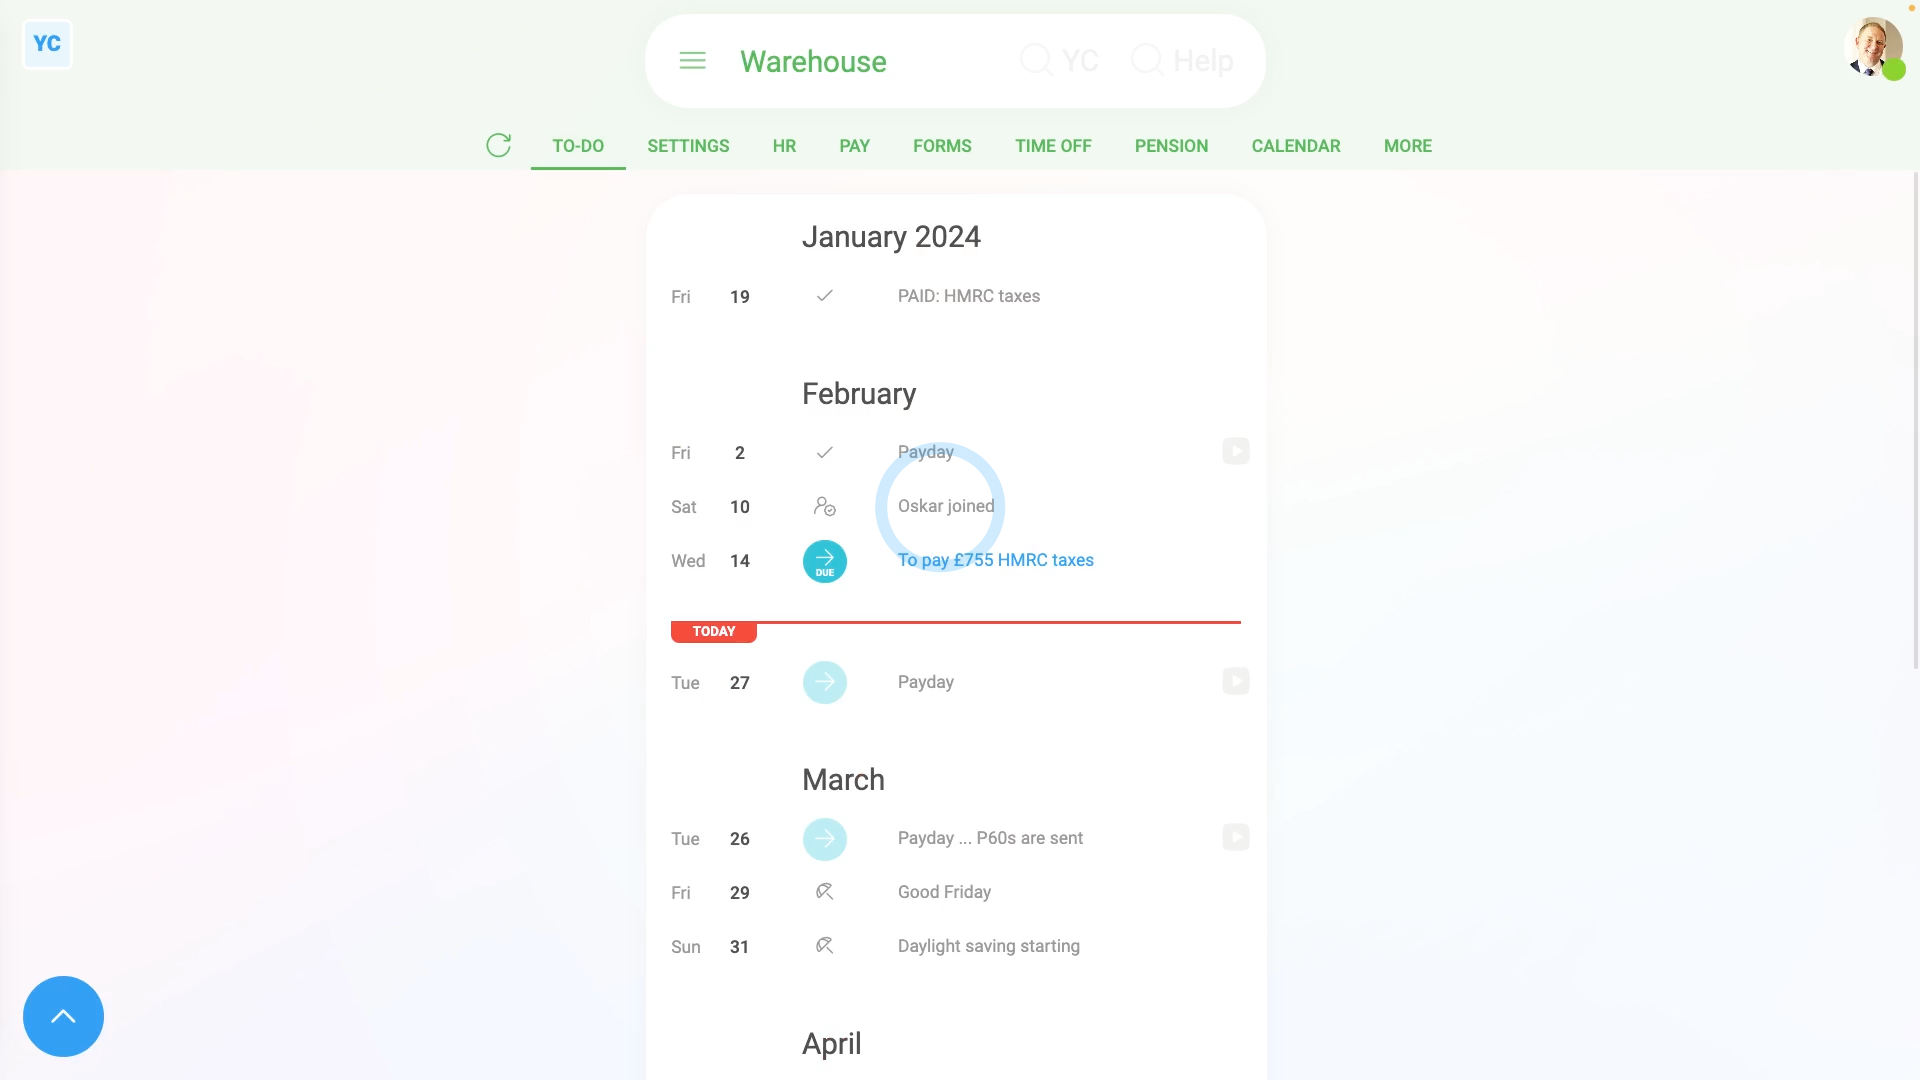
To see a list of a pay batch's upcoming tasks:
- First, select the pay batch on: MenuPay batches
- If you've already filed payslips from a pay batch, then its "To-do" tab is automatically the first tab you're shown.
- Otherwise, to open it, tap: To-do (at the top)
- By default, you'll see a list of the last one "From" months of tasks (at the top).
- Then below that you'll see the red "Today" line.
- And then below that you'll see the next three "To" months of tasks.
- To quickly show more "To" months of tasks:
Scroll to the bottom of the page, and tap the down arrow button to add one month: (at the bottom) - To change the number of "From" and "To" months that're shown:
Tap open the bottom menu: - Then tap "From" and "To" and set them to the number of months you'd like to see.
- And you'll see the range of the listing of tasks update.
- To complete all your "Due" tasks:
Look for any bold blue circles saying: "Due" - When you hover your mouse over any "Due" circle, you'll see important info. Including when it's actually due, how long before the deadline it's recommended to do it, and other notes.
- To do the task, tap on the link, and then work your way through the blue buttons until you reach the end.
- Then once you tap back to the "To-do" tab, you'll notice that the task you completed is now marked with a tick.
- And when you hover your mouse over the tick, you'll see info about who did it, and when it was done.
- Keep working your way through all the bold blue "Due" circles until each has changed to a tick.
- You can leave the light blue circles until a future date.
- The light blue circles are there as a reminder of tasks that could become "Due" in the coming weeks and months.
- To learn more about each one, hover your mouse over it and read the notes.
- And finally, if you're not sure about how to do any task, tap the watch button for each one to learn how it's done.
Keep in mind that:
- If you've got multiple pay batches, each covering different countries, the tasks and dates could each be quite different.
- However, if you've got multiple pay batches, all set to the same country, their tasks and dates may likely be quite similar.
- Regardless, always remember to check back regularly on all your pay batches, so you don't miss any upcoming tasks that become due.
And that's it! That's everything you need to know about keeping on top of any upcoming tasks in your pay batches!
4. How do I pay payslips each payday?
 2:31
2:31
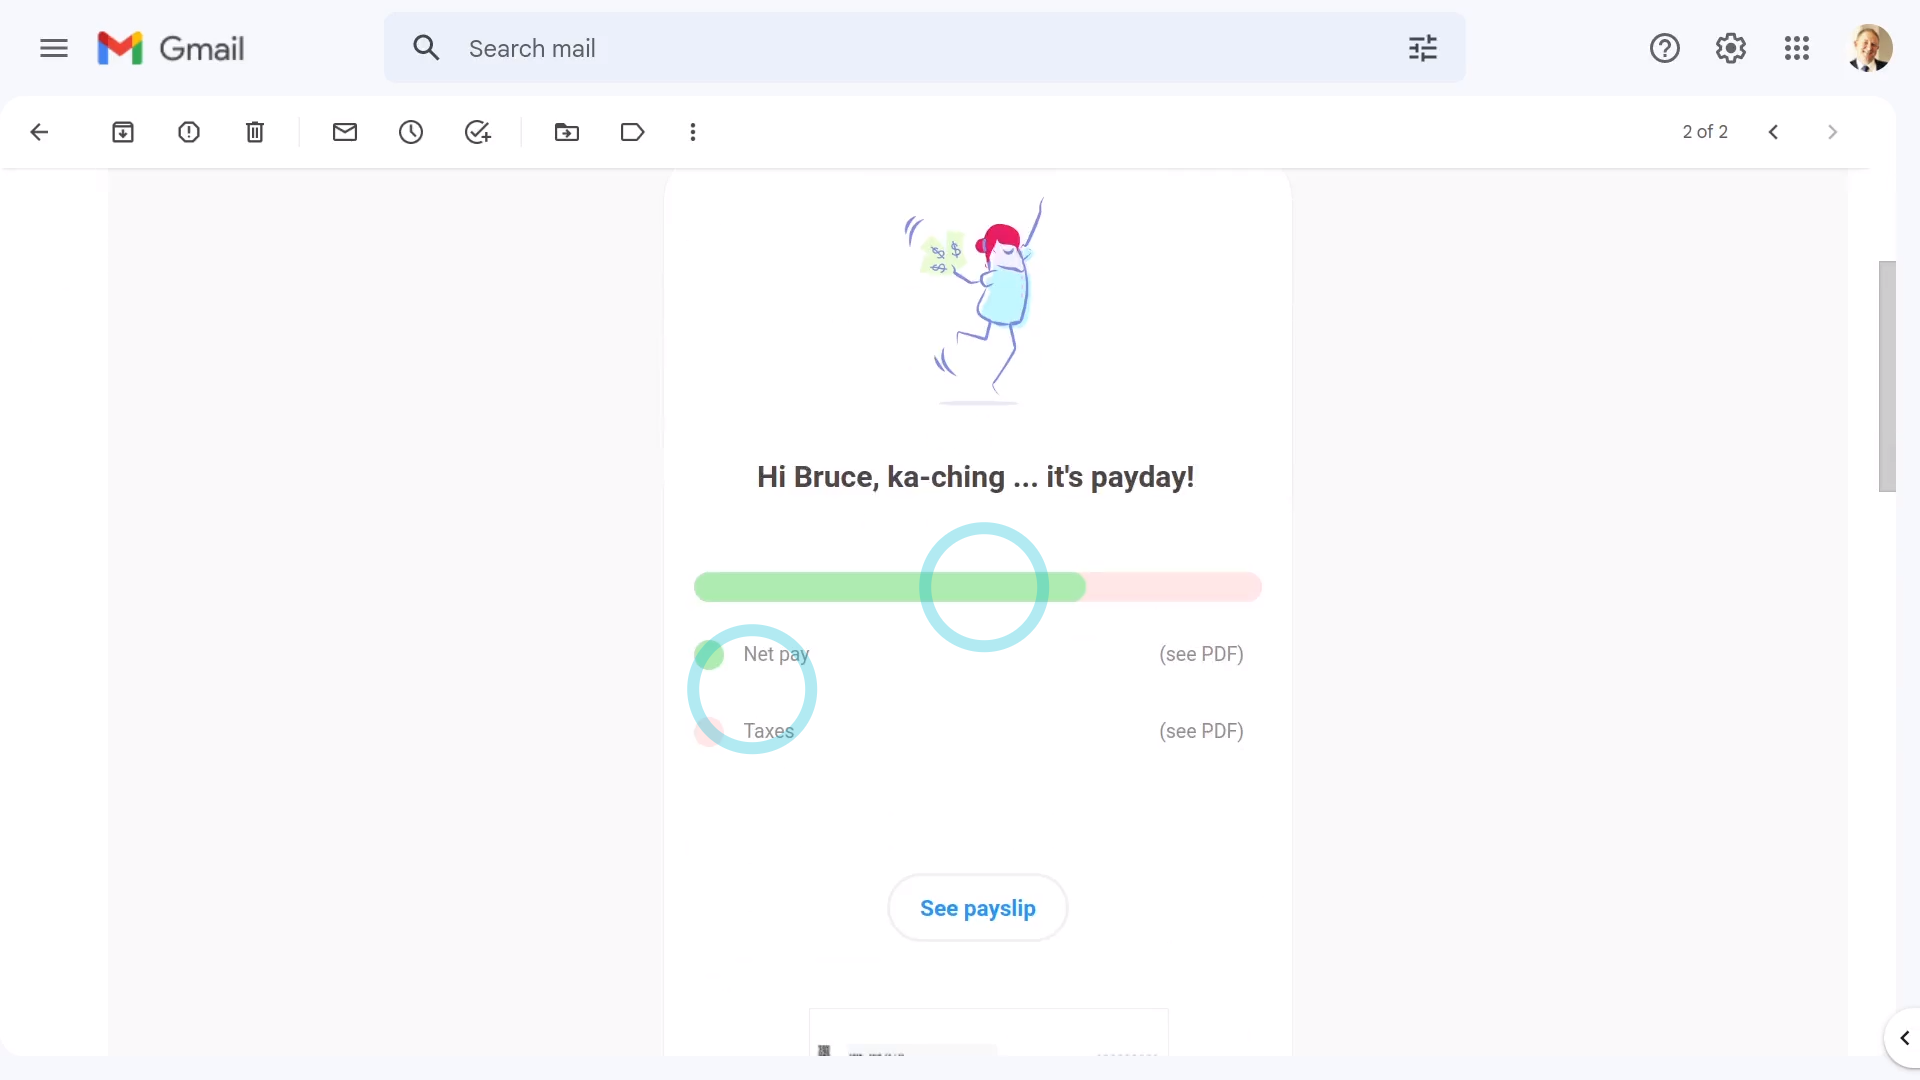
"How do I pay payslips each payday?"
Your pay batch's "To-do" list is there to remind you of when it's time to pay payslips.
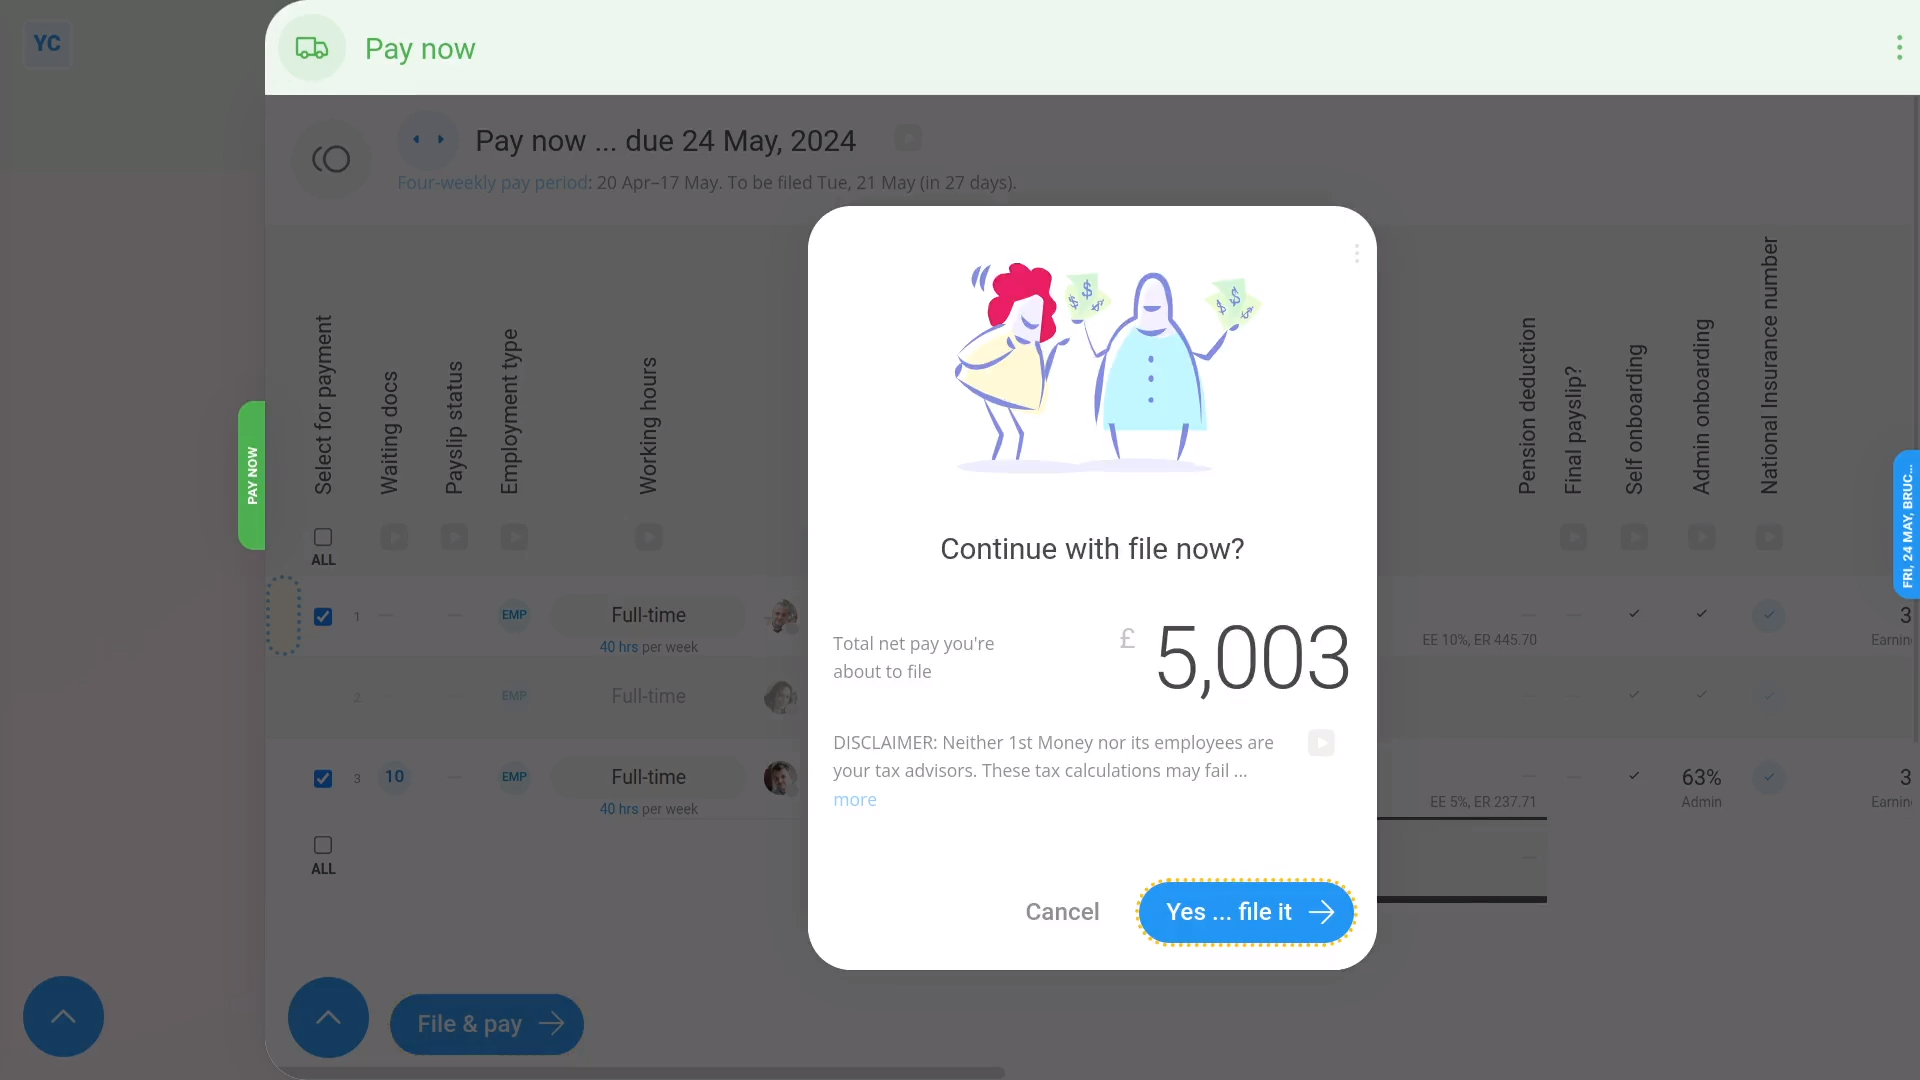
To pay payslips:
- First, select the pay batch on: MenuPay batches
- Then on the To-do tab, tap the upcoming: "Payday"
- Once the "Payday" is open, you'll see details about each payslip, like net pay, taxes, and more.
- To see even more details about any payslip, tap the blue "See payslip" button: (at the start of any row)
- Sometimes you may have a reason to skip a person for now, and pay them later. To skip paying a payslip for now, turn off the row.
- Then when you're ready, tap: File now
- By default, each person gets emailed a PDF of their payslip.
- And by default, you'll also get an email with a PDF of everybody's payslips, in case you'd like to print them.
- But you can turn any payday emails off if you'd like.
- And finally, tap: Yes ... file it
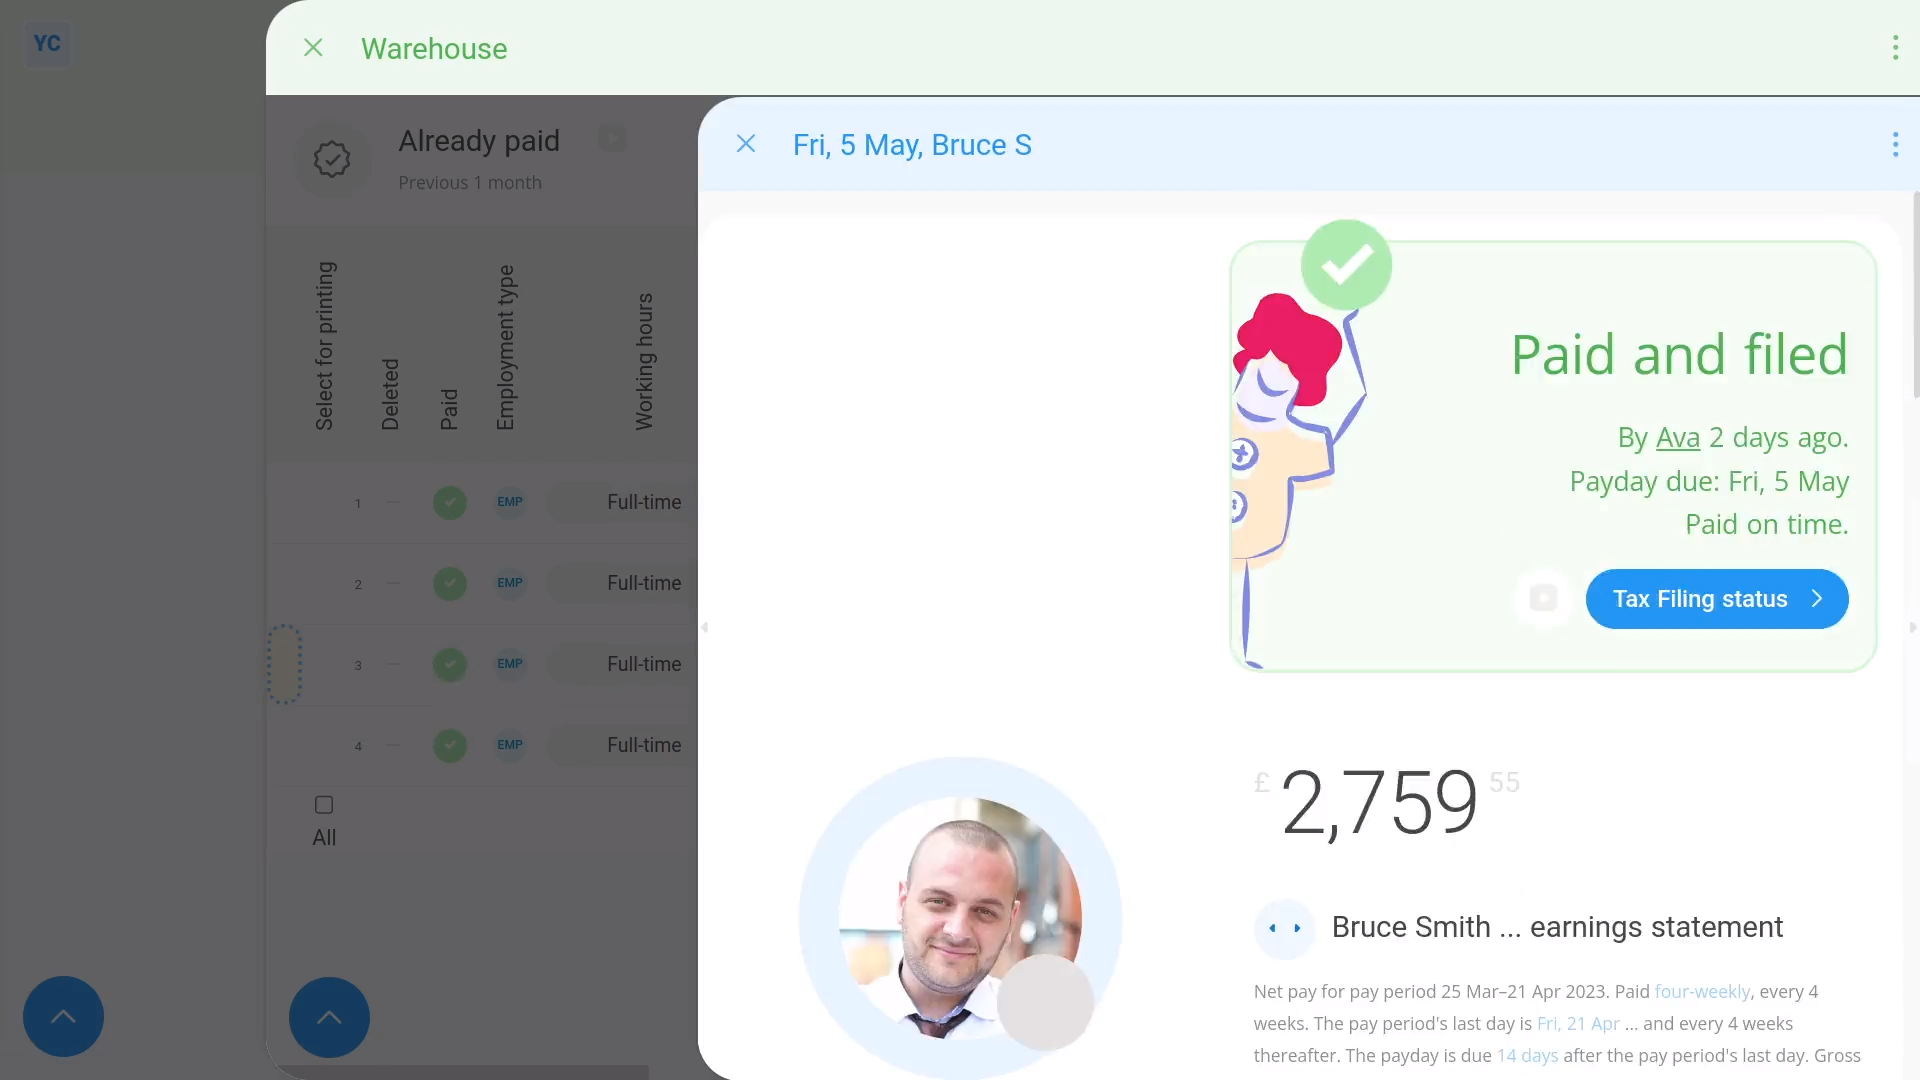
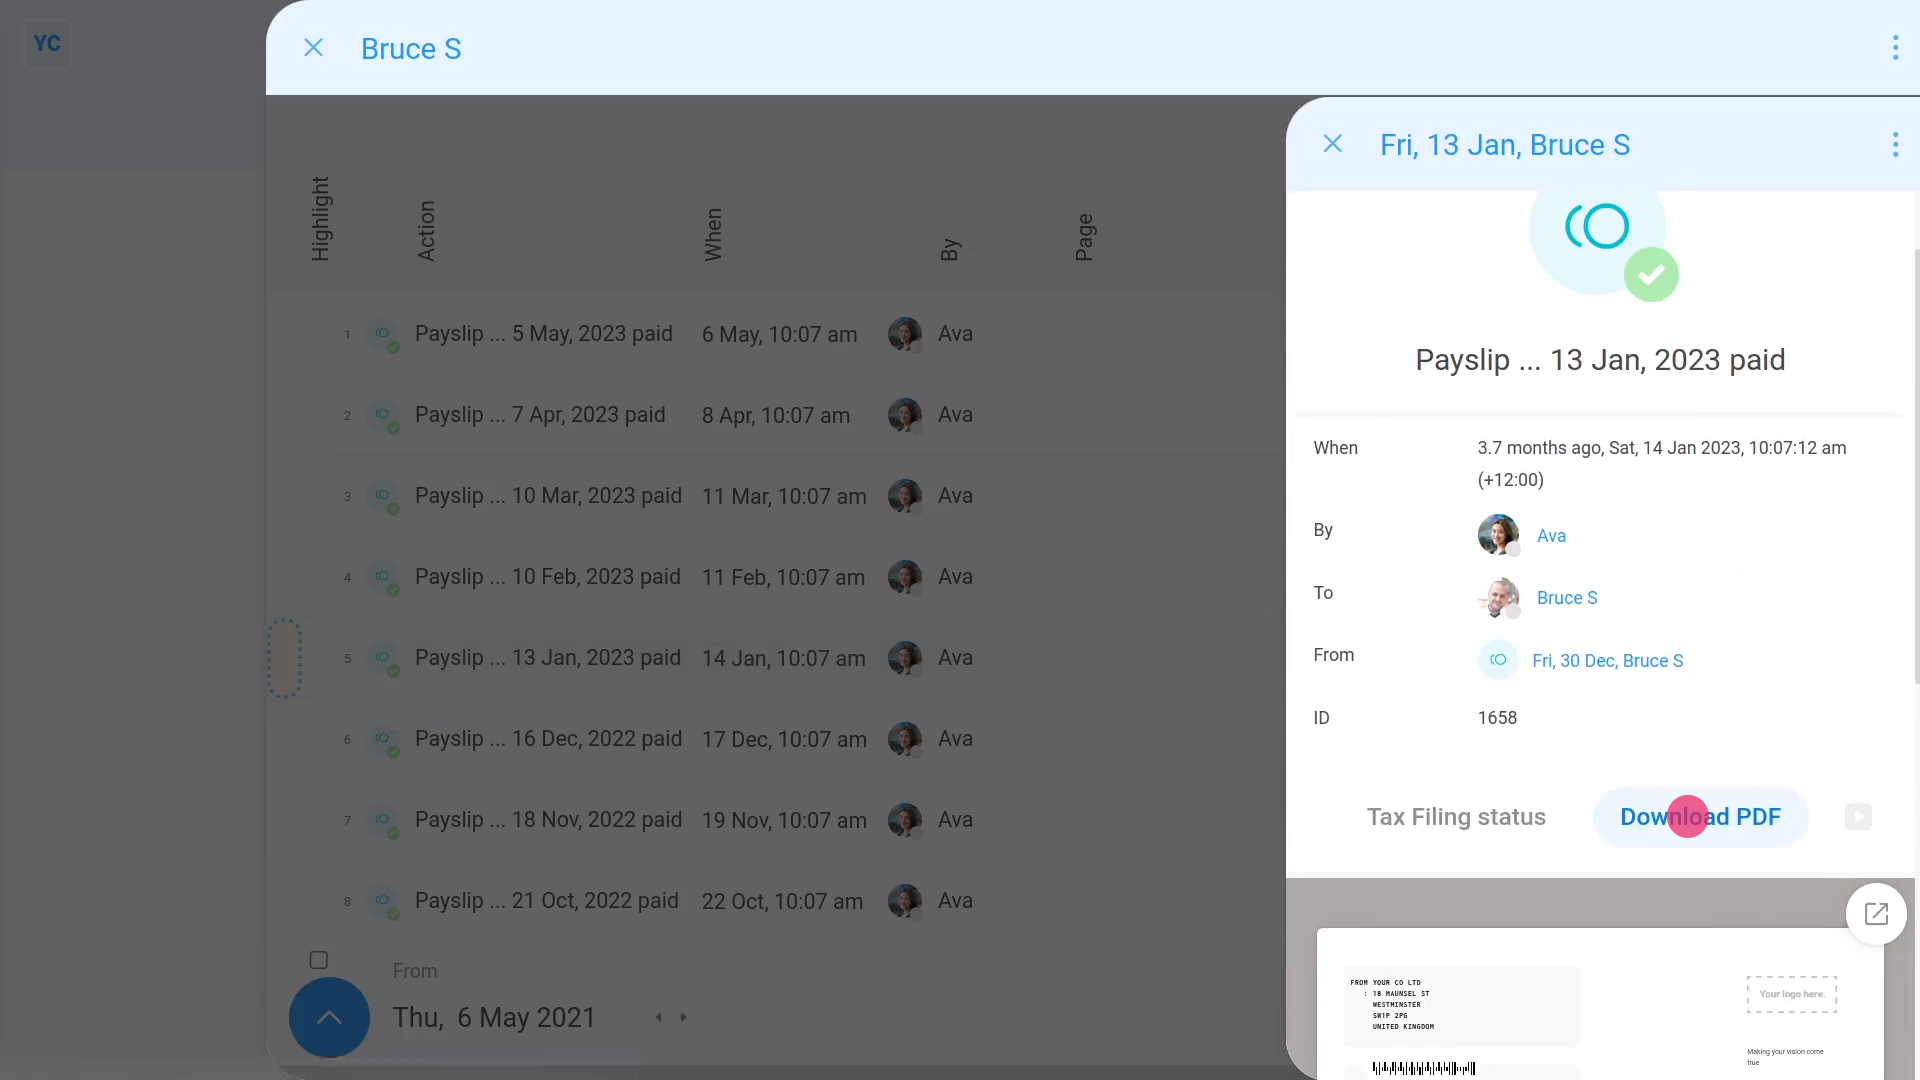
Immediately after paying payslips, 1st Money sends details of the filed payslips to HMRC.
To know that a payslip submission has been filed with HMRC:
- First, find the "Paid" column with the green ticks.
- Then hover your mouse over each green tick:
- If you see an hourglass status , it means HMRC is still receiving your payslip submission.
- Once HMRC accepts the payslips, the hourglass status changes to a green tick:
- To see even more "Tax Filing" details, tap the tick status:
- And finally, you'll see who made the submission, how many payslips were submitted, and much more.
For advanced usage:
- To see the actual submission that was sent to HMRC, scroll down further, and tap Show details, or: Show XML
- HMRC calls the "Tax Filing" of filed payslips a "Full Payment Submission", or FPS.
Keep in mind that:
- If you ever want to refresh the status, tap the three dots: (in the top-right corner)
- Then tap: Reload
And that's it! That's everything you need to know about what happens when you pay payslips!
5. How do I see payslips that've already been filed?
 3:19
3:19
"How do I see payslips that've already been filed?"
The "Payslips history" report shows you all filed payslips for the pay batch, over any time frame.
To see payslips that've already been filed:
- First, select the pay batch on: MenuPay batches
- Then tap: PayPayslips history
- Now, you'll see a list of payslips that were filed in the last month.
- To see more details about a payslip, tap the blue "See payslip" button: (at the start of any row)
- And you'll see the payslip open out (on the side).
- As you scroll across the "Payslips history" report, you'll see info about each filed payslip, like net pay, taxable pay, etc.
- If you tap an amount, it opens the payslip, and highlights the amount you tapped.
- And finally, on some amounts in the payslip, you can mouse over the amount, and you'll see an explanation of how it's calculated.
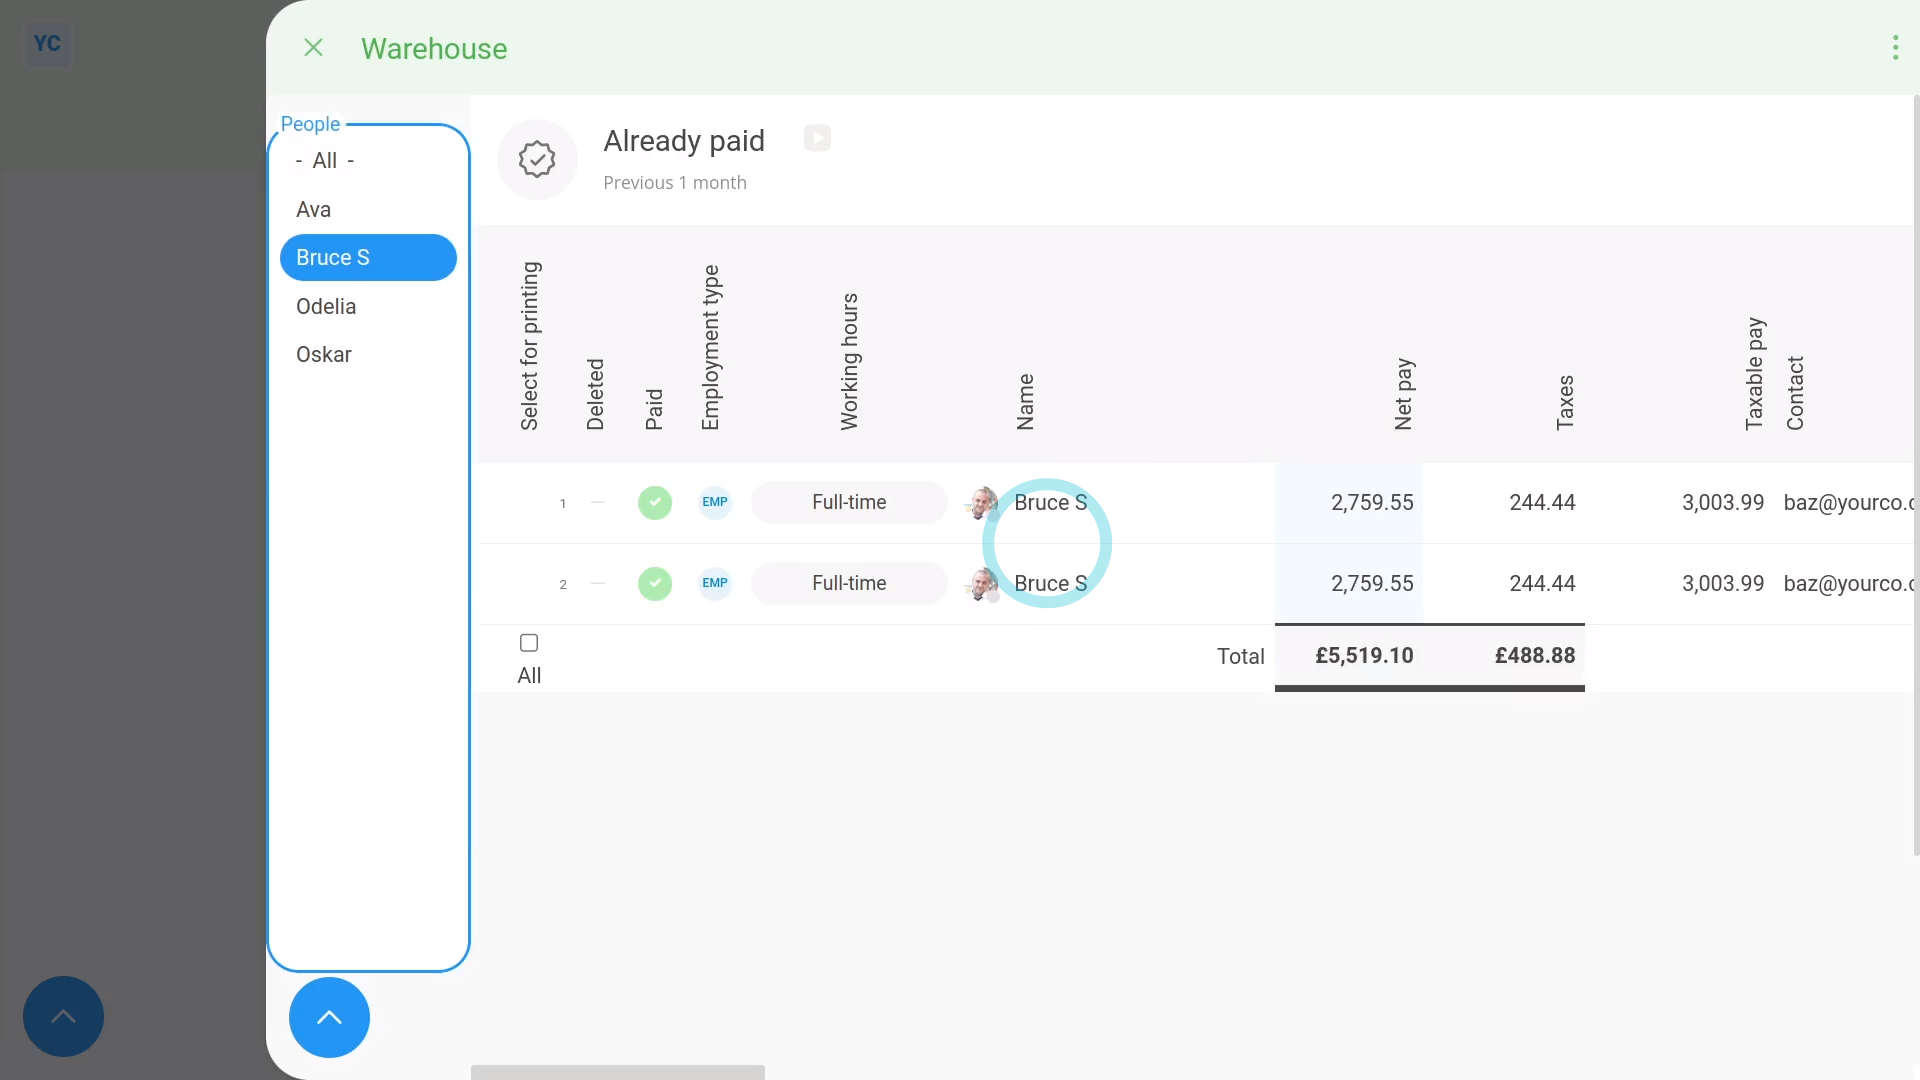
To see filed payslips for only a set of selected people:
- First, tap:
Show settingsShow people - Then Ctrl+Tap the people you want to see filed payslips for.
- Now it's only listing filed payslips for the people you chose.
- And finally, it's also showing the totals for only the selected people.
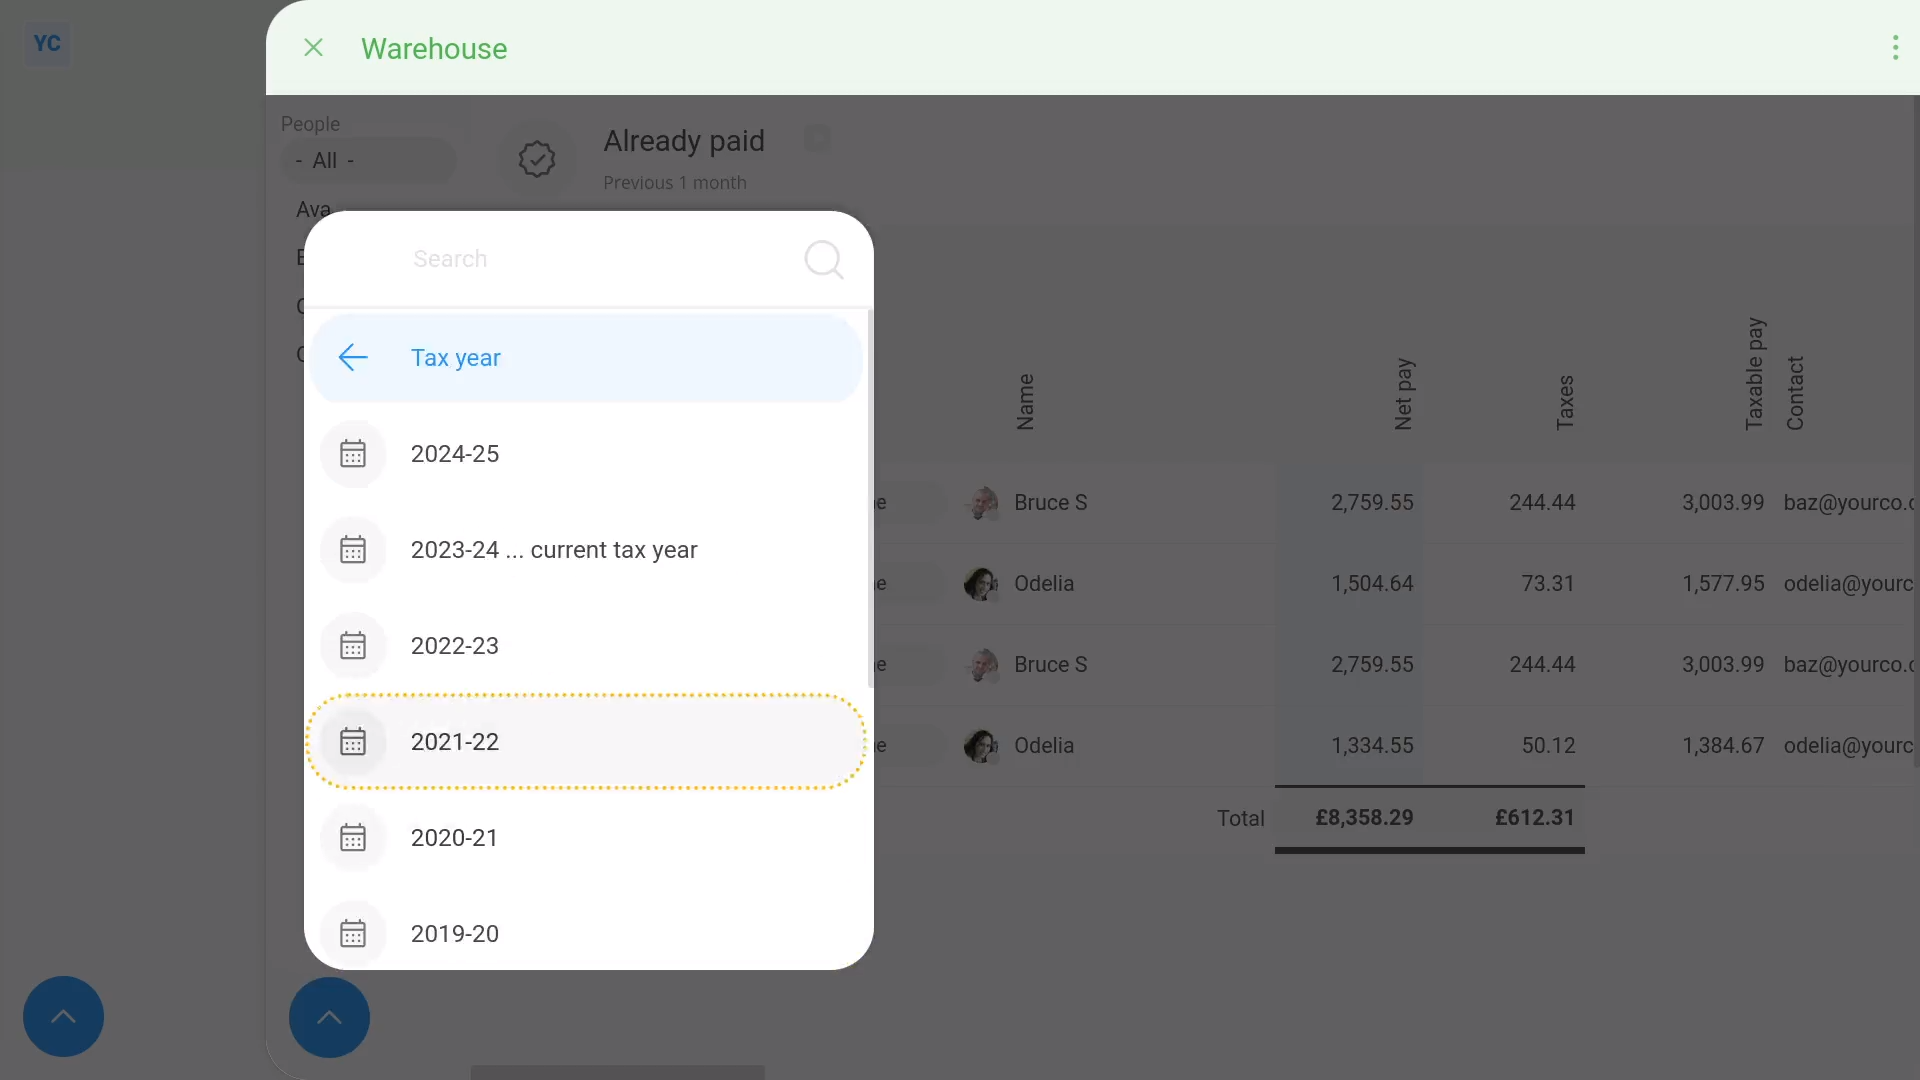
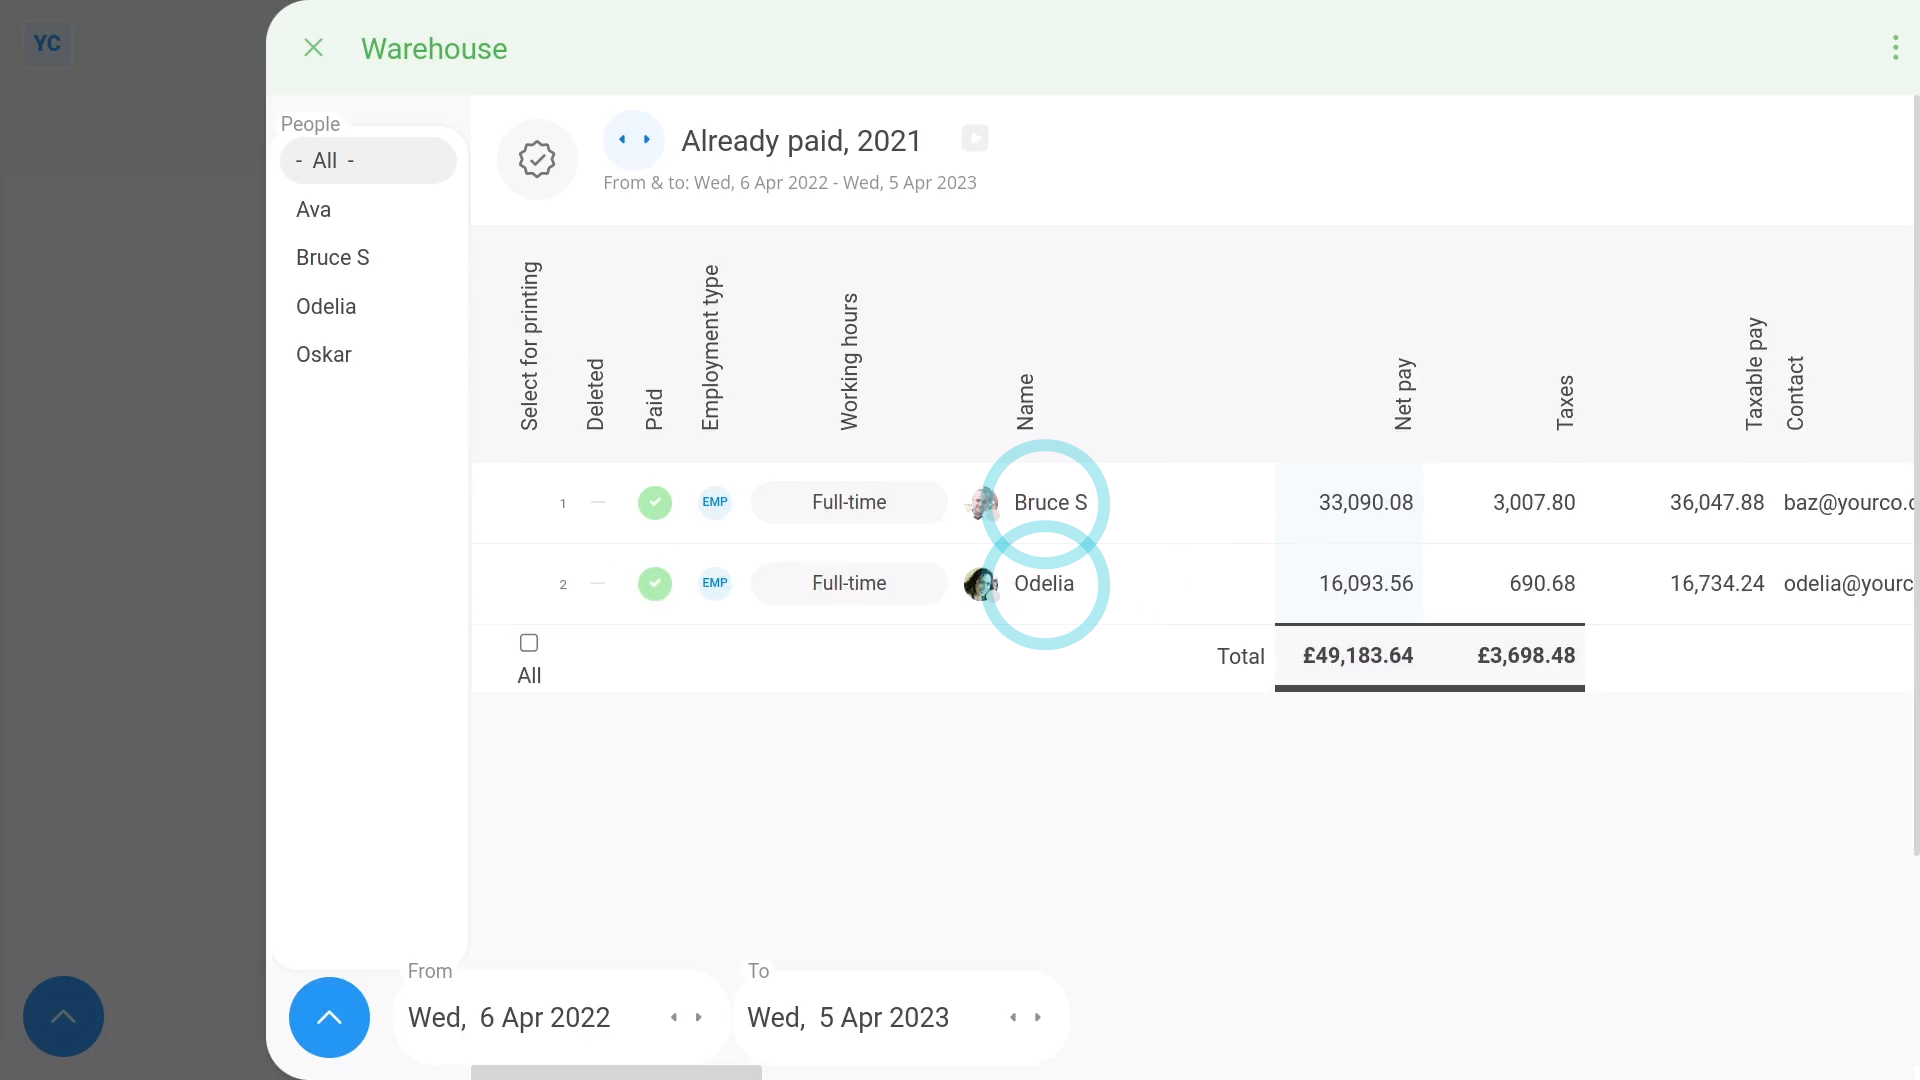
To show all of a pay batch's filed payslips for a single tax year:
- First, tap:
Show settingsDatesTax year - Then select your tax year.
- And finally, you're now looking at all the payslips for the entire tax year.
To show only one row of filed payslip summed amounts for each person:
- First, tap:
Show settingsCombine payslips by person - Now there's only one row for each person.
- And finally, you'll see the sum of each person's payslip amounts over the entire tax year.
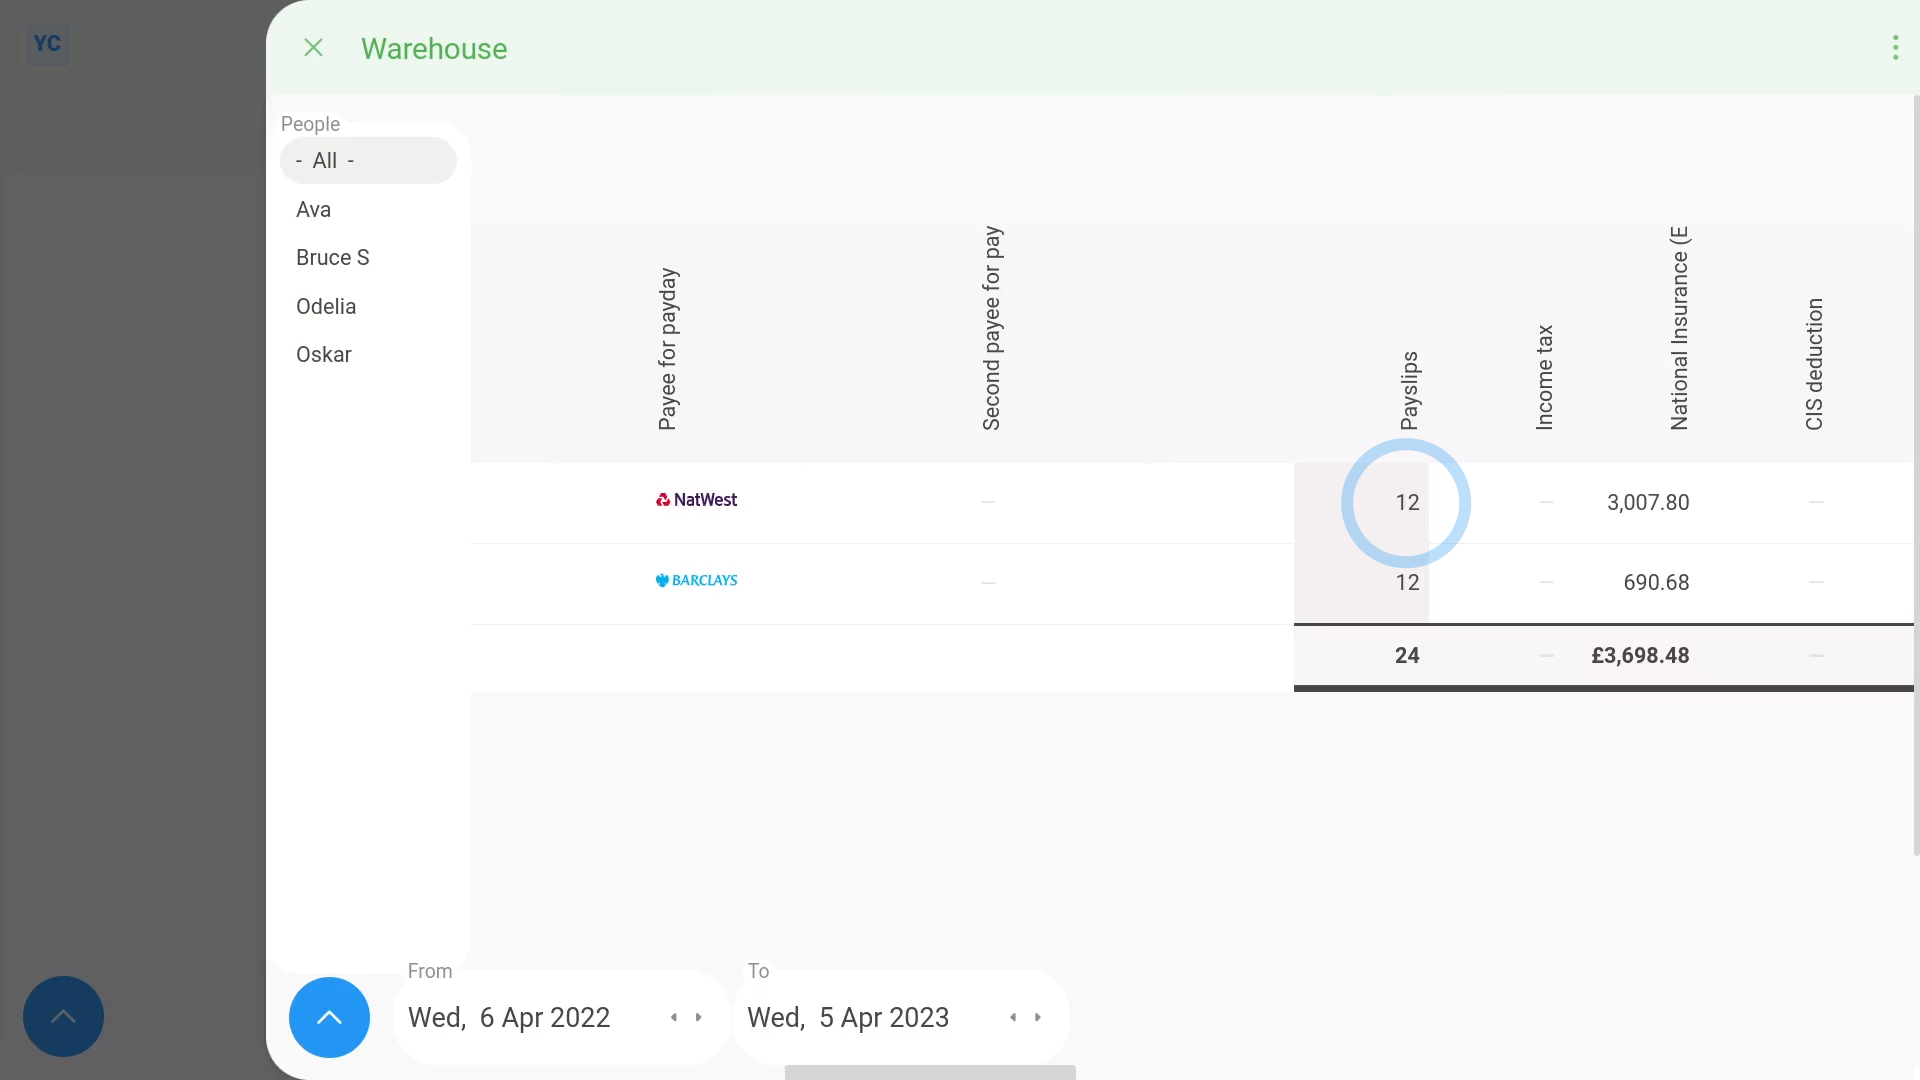
To check that filed payslip amounts cover all of a year's payslips:
- First, scroll over to the "payslips" column.
- If the people were paid monthly, make sure it says: "12"
- If a person joined part-way through the year, the amount may be less than twelve.
- And finally, if a person was paid weekly, the amount would be more like 52, or 53.
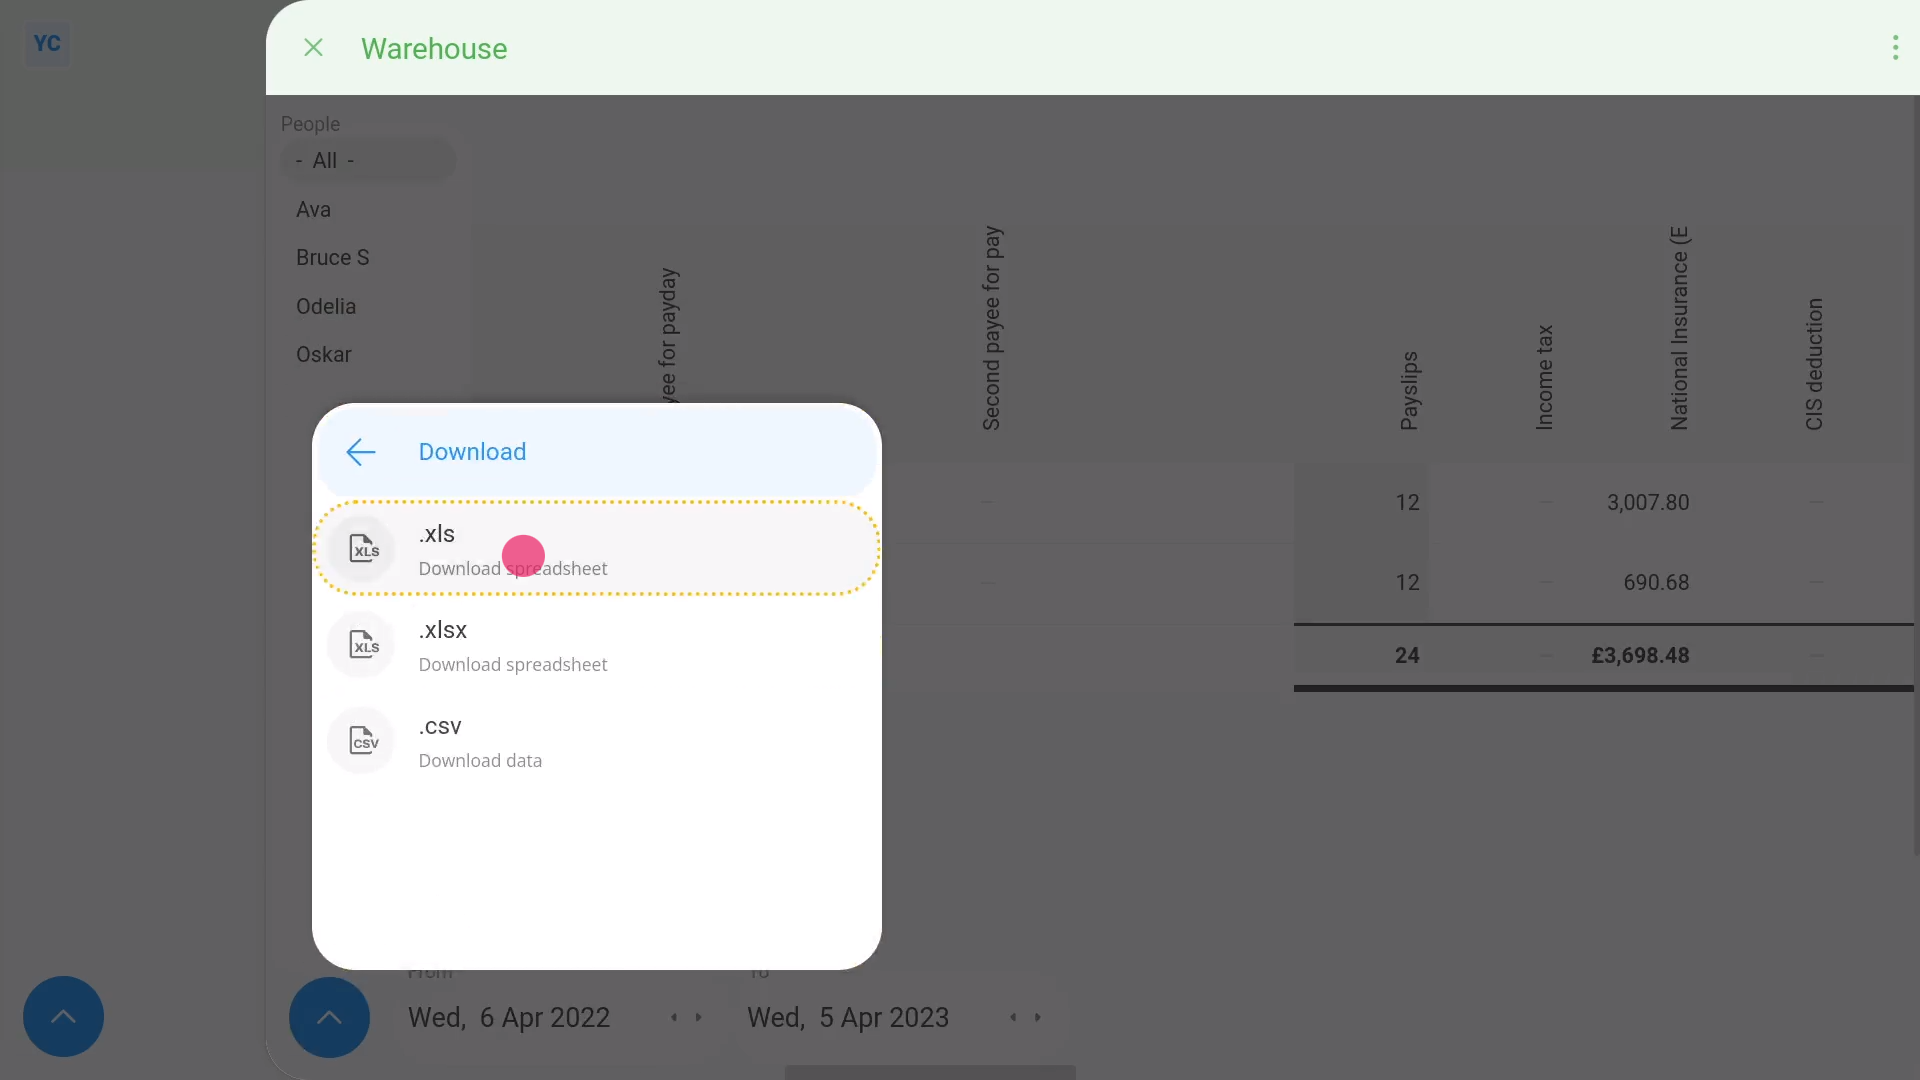
To download filed payslip amounts to an XLS file:
- First, get all your date filters set.
- Then to download the amounts to an XLS file, tap:
Show settingsMoreDownload.xls - And finally, you've now got an XLS file for your own calculations.
Keep in mind that:
- The "Payslips history" report is only available to people with payroll admin permissions.
To learn more:
- About how to download a printable PDF of a set of filed payslips, watch the video on: Multi-payslip PDF
 Multi-payslip PDF
And that's it! That's everything you need to know about using your pay batch's "Payslips history" report!
How do I change paper size of PDFs I download?
 1:47
1:47
"How do I change paper size of PDFs I download?"
The "PDF paper size" setting lets you set the paper size of all your payslip and HR doc PDFs. It also aligns your postal mailing addresses with standard windowed envelopes.
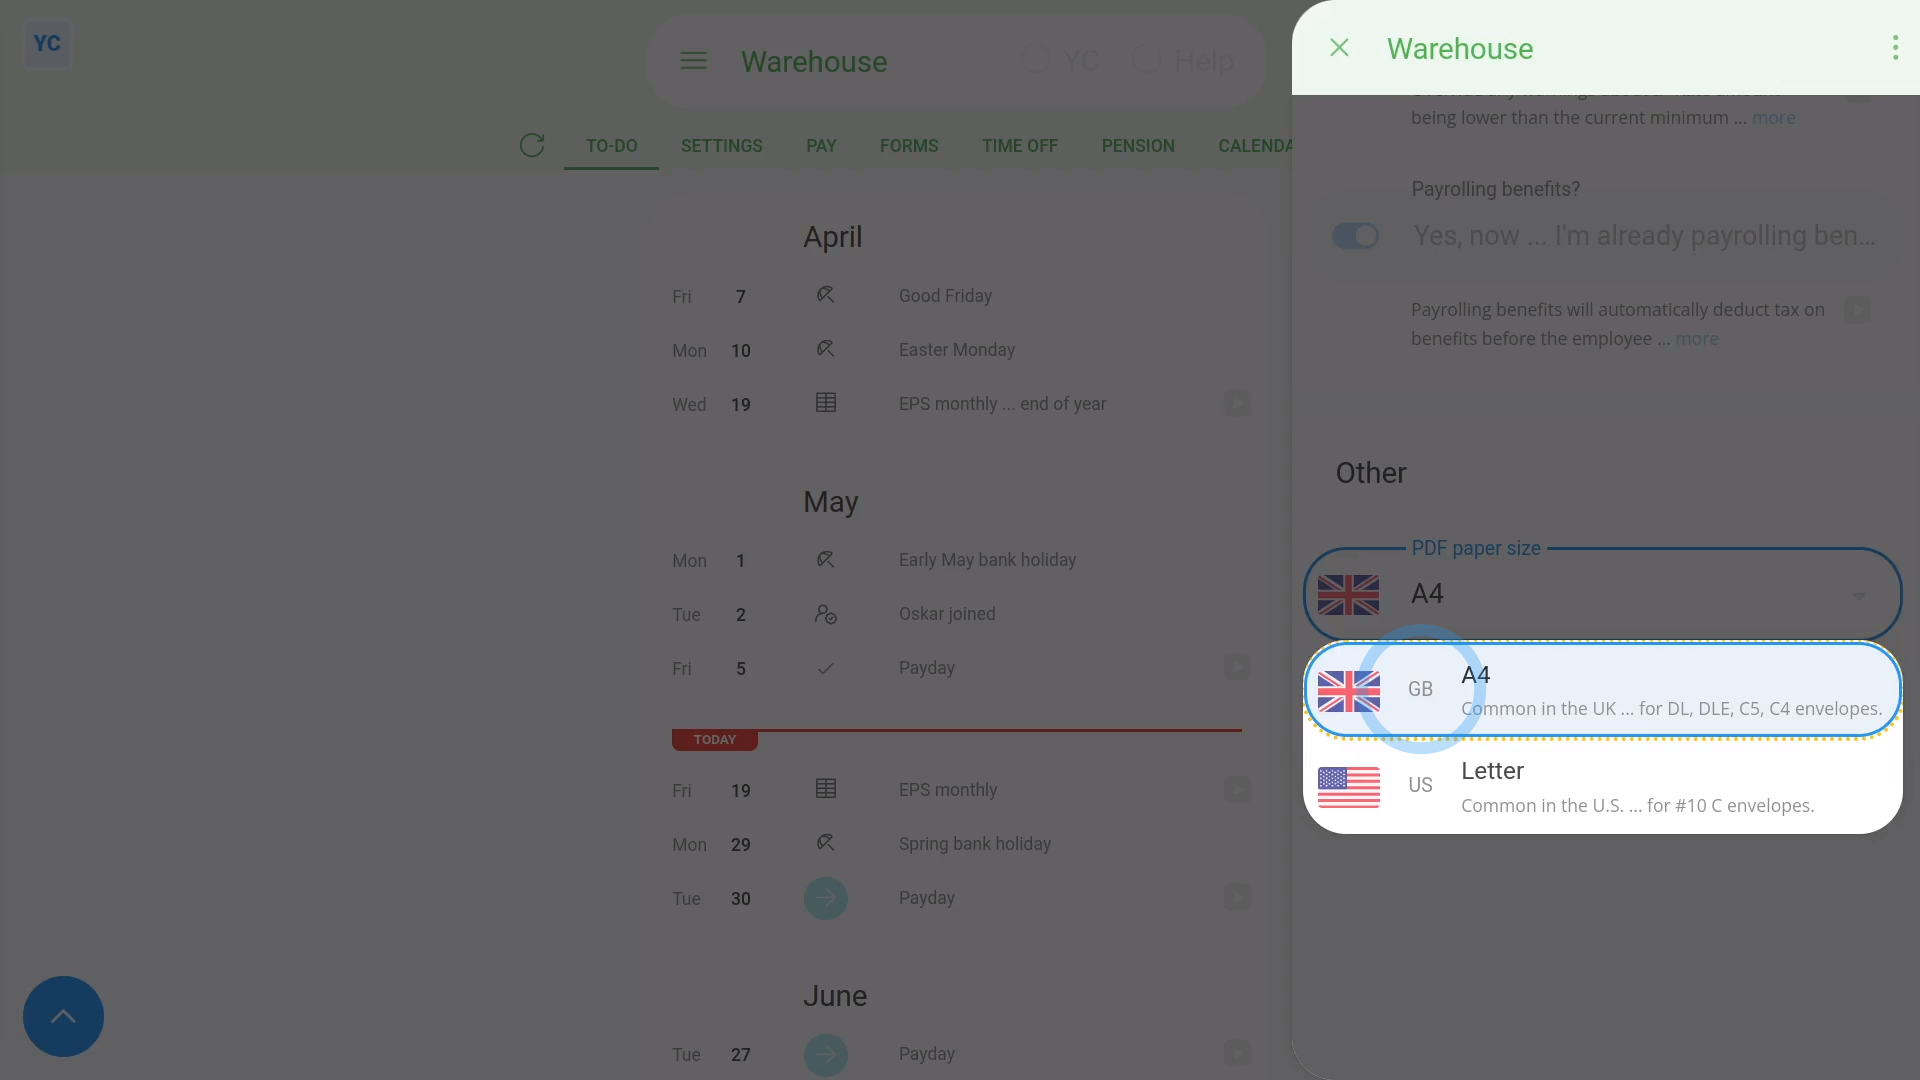
To set a pay batch's PDF paper size:
- First, select the pay batch on: MenuPay batches
- Then tap: SettingsAdvanced
- Then scroll all the way down to the "Other" heading.
- By default, "PDF paper size" is set to whichever paper size is most common in the pay batch's country.
- Select your preferred paper size by changing: PDF paper size
- And finally, tap: Save
To download somebody's payslip, and see its paper size:
- First, select the person on: MenuPeople
- Then tap: PayPayslips history
- Once you've selected a payslip, tap the blue "See event" button: (at the start of the row)
- Then once it slides out on the right, tap: Download PDF
- Once it's downloaded, tap the PDF to open it.
- Next, tap the "Print" button:
- And then tap: "More settings"
- And finally, you'll see the "Paper size" of the PDF is set, as expected.
Keep in mind that:
- If you ever find that the address isn't positioned in the envelope's window, you may need to check your: PDF paper size
And that's it! That's everything you need to know about changing a pay batch's PDF paper size!
How do I delete or undelete a pay batch?
 2:18
2:18
"How do I delete or undelete a pay batch?"
If you no longer need a pay batch, you're welcome to delete it whenever you like.
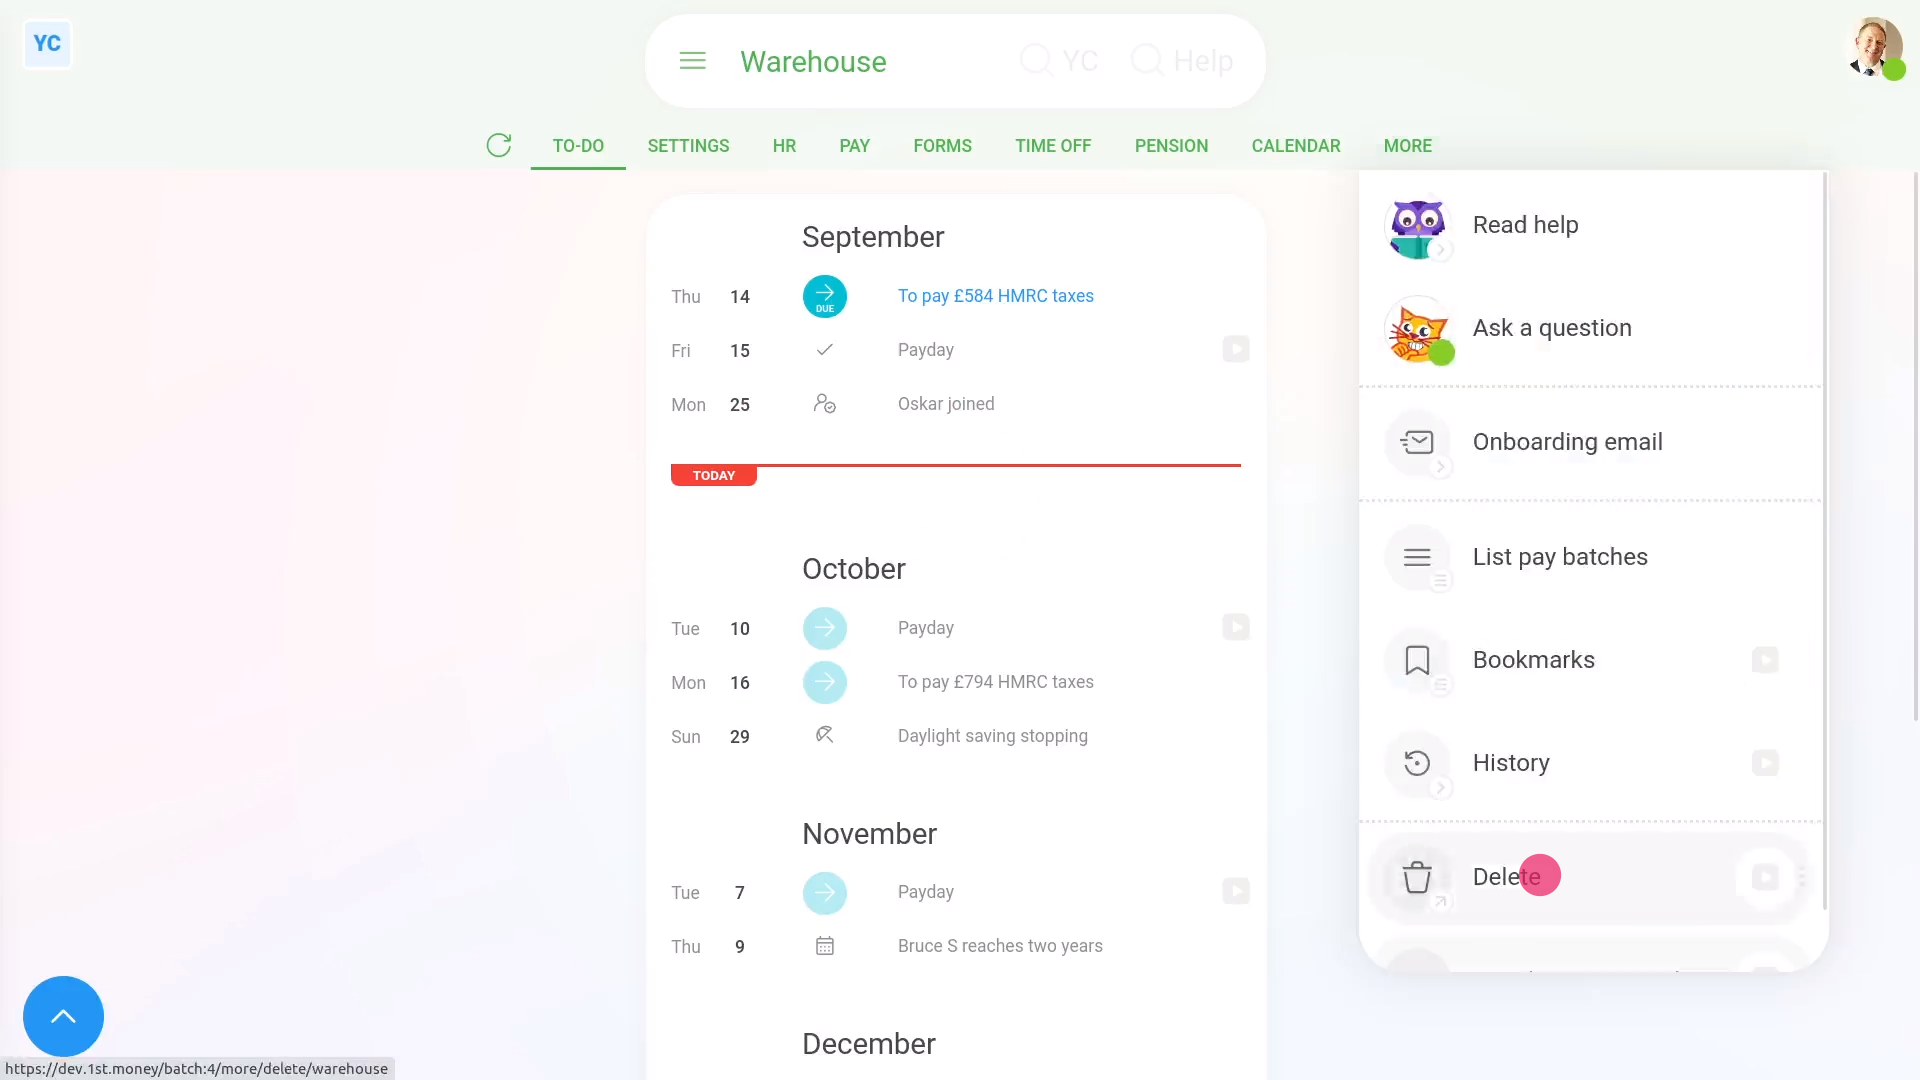
To delete a pay batch:
- First, select the pay batch on: MenuPay batches
- Then once the pay batch's open, tap More, then: Delete
- And then tap: Yes ... delete
- Sometimes you may get a warning asking you to move the people in the pay batch to a different pay batch.
- If so, tap See "Move all", and select the pay batch to move everyone to.
- And then tap: Yes ... move all
- Now, the pay batch's deleted.
- The pay batch is also locked, so it can't be changed anymore.
- And finally, if you change your mind and want the pay batch back again, tap Undelete, and it's immediately undeleted.
If it's been a while since you deleted a pay batch, and you want to undelete it, you'll first need to find it in the: "deleted bin"
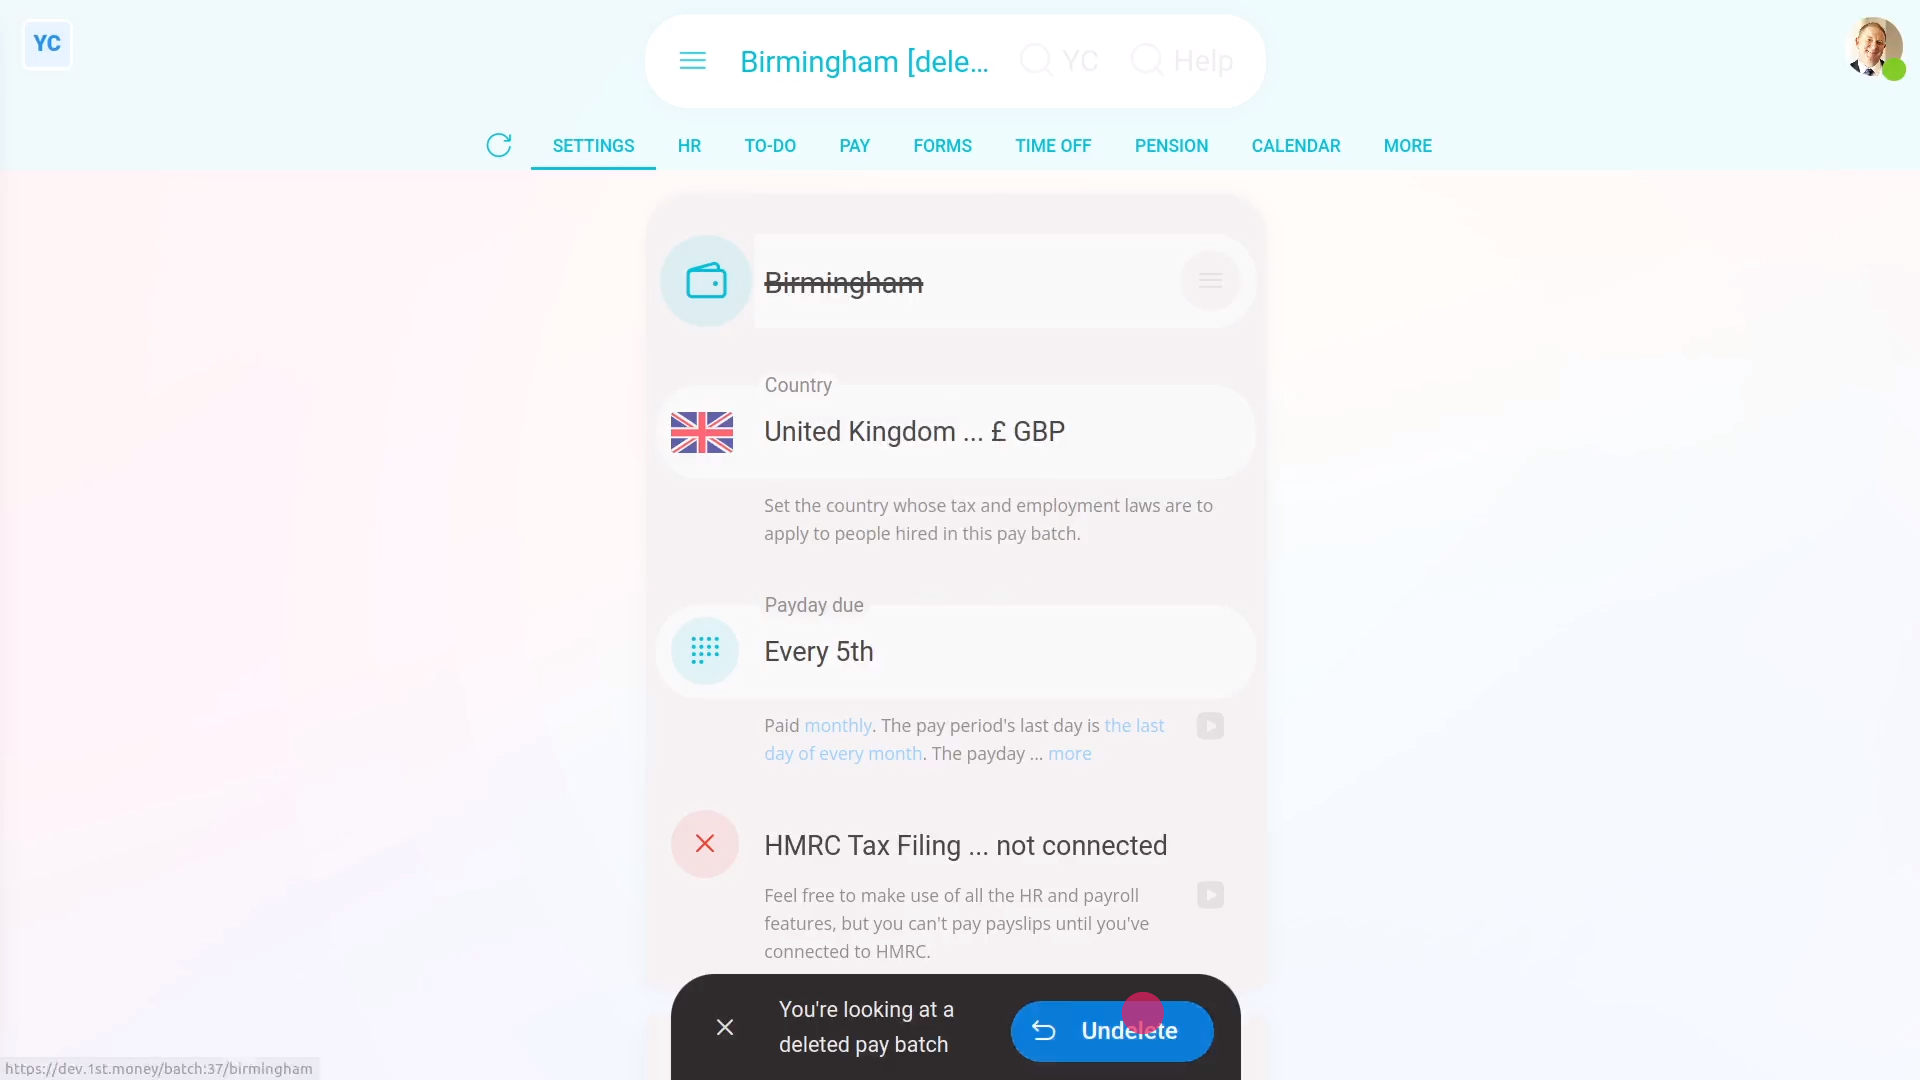
To undelete a pay batch from your "deleted bin":
- First, tap: MenuDeleted bin
- Next, you'll see a category for every kind of item that can be deleted. Tap: Pay batches
- And then tap the pay batch you'd like to undelete.
- Next, tap: Undelete (at the bottom)
- And finally, the deleted pay batch is immediately undeleted.
Keep in mind that:
- Only people who've got "Full payroll admin" permissions can delete or undelete pay batches.
- And remember that all deletes and undeletes are always permanently recorded in: "History"
- That means any admin can always look back in time, and see who did any delete, and when the delete was done.
- Also, if you've already started paying people in a pay batch, before deleting the pay batch, first do the steps to: "Stop being an employer"
To learn more:
- About how to "Stop being an employer", watch the video on: EPS: Stop being an employer
And that's it! That's everything you need to know about deleting or undeleting a pay batch!
How do I send out payslips on payday?
 3:14
3:14
"How do I send out payslips on payday?"
There's two emails that can be automatically sent each time you pay payslips.
- For the email of "an individual person's payslip":
An email is sent to each person, with their individual payslip. The email includes a PDF of their own pay, and their own taxes. - For an email of "everyone's printable payslips":
A printable PDF of everyone's payslips is emailed to a payroll admin.
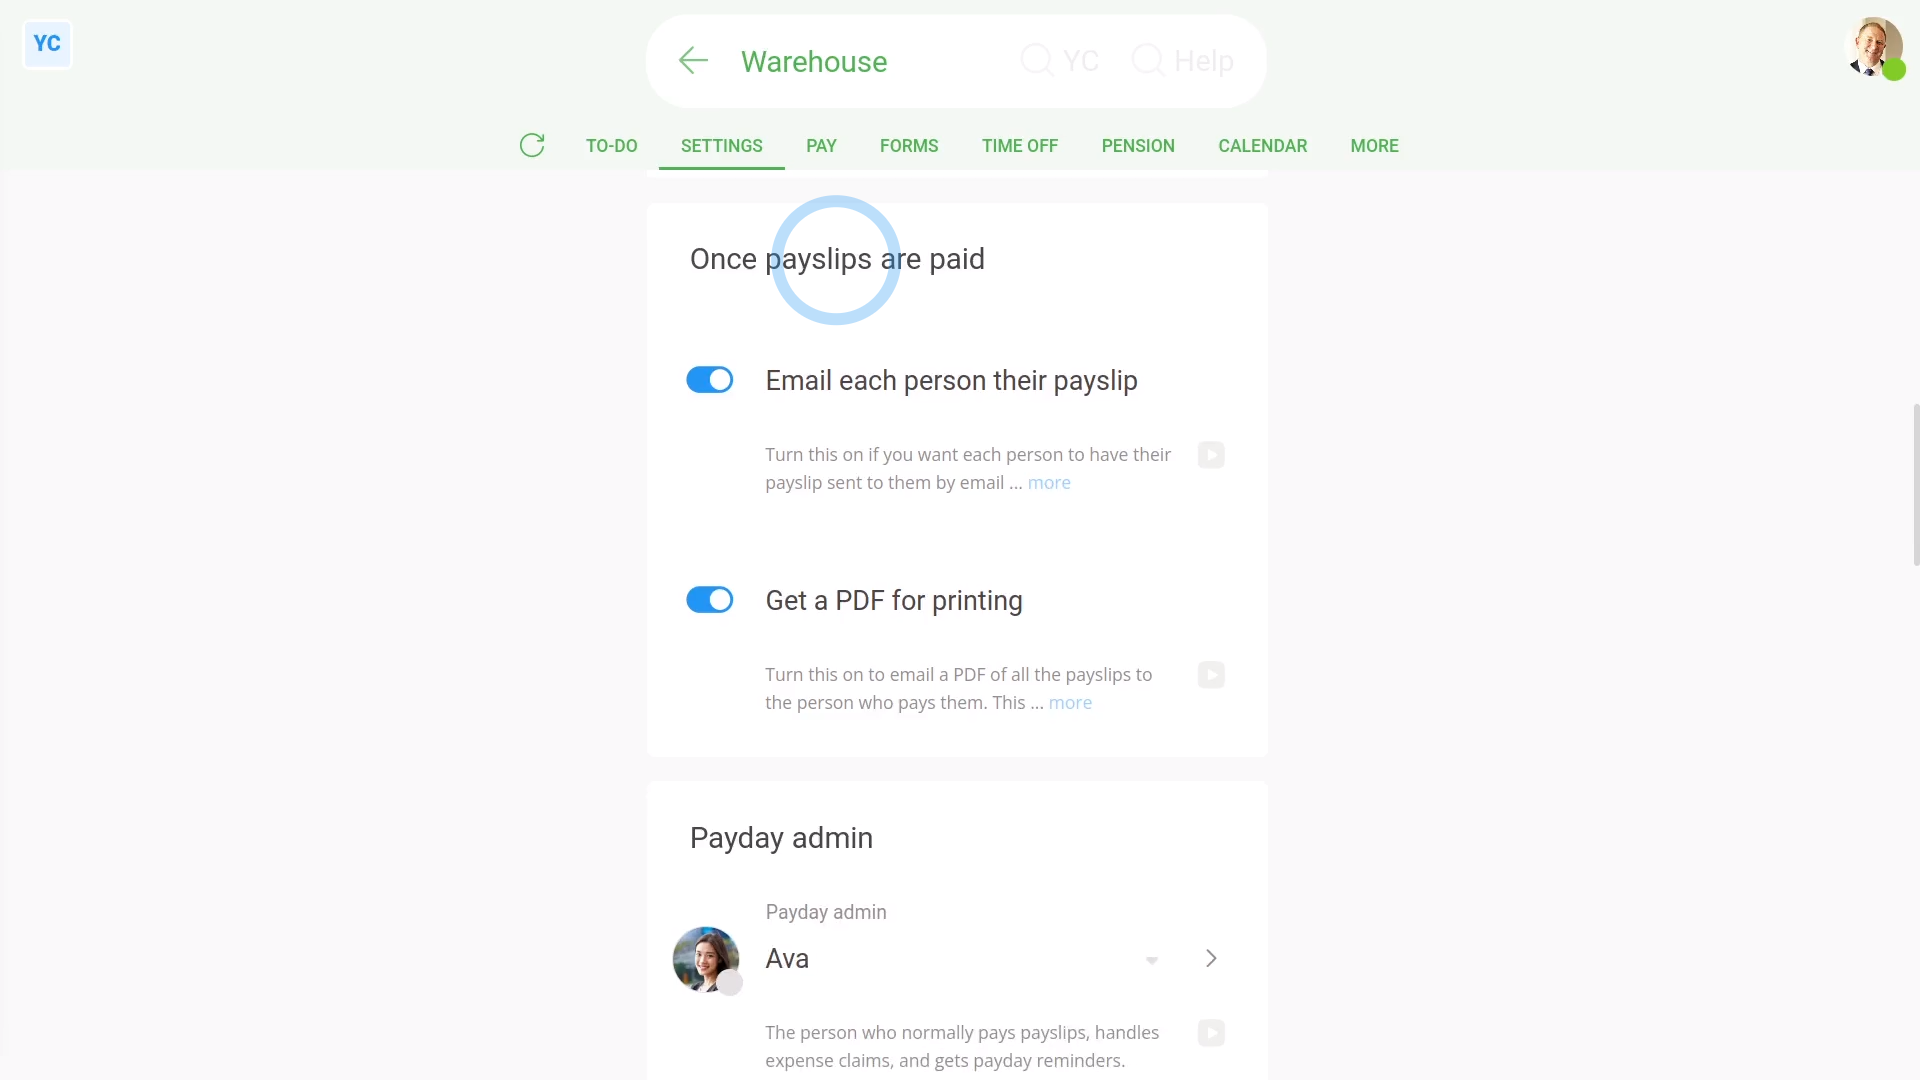
To turn payday emails on, or off:
- First, select the pay batch on: MenuPay batches
- Then tap: SettingsPay batch settings
- Then scroll down to the "Once payslips are paid" heading.
- Next, decide which payday emails you want sent on payday.
- And finally, tap: Save
To see how payday emails look:
- First, select the pay batch on: MenuPay batches
- Then on the To-do tab, tap the upcoming: "Payday"
- Then tap: File now
- You'll see that it's remembered any email send settings you've previously set.
- You're still welcome to turn the payday emails on or off, then tap: Yes ... file it
- It takes a few seconds while all your tax calculations are double checked, and payday emails are prepared for sending.
- And then the payday emails arrive into each person's email inbox in less than 60 seconds.
- Now, look in your email inbox, to see if both payday emails have arrived.
- For the email of "an individual person's payslip":
Each person gets a nice preview of their pay and taxes. - And when you scroll to the bottom, you'll see a PDF of their payslip attached.
- Then for the email of "everyone's printable payslips":
When you scroll to the bottom, you'll see a larger PDF attached. - The PDF contains all the payslips you've recently paid, each on it's own page, ready for printing.
- When you're ready, tap the "Print" button:
- And finally, if you want to save the PDF, tap the "Download" button:
Keep in mind that:
- The email with everyone's printable payslips is sent to the person who tapped File now, which is always a payroll admin.
- And remember that both payday emails are optional. Even if you turn them both off, your "Tax Filing" is still sent to HMRC, as you'd expect.
- Also, any person who wants to, can turn on PDF encryption, to protect all their emailed PDFs with a PIN.
To learn more:
- About how to not get the PDF by email, and instead download it directly, watch the video on: Multi-payslip PDF
- And to learn about PDF encryption, watch the video on: Setting your PDF doc PIN
And that's it! That's everything you need to know about sending payday emails!
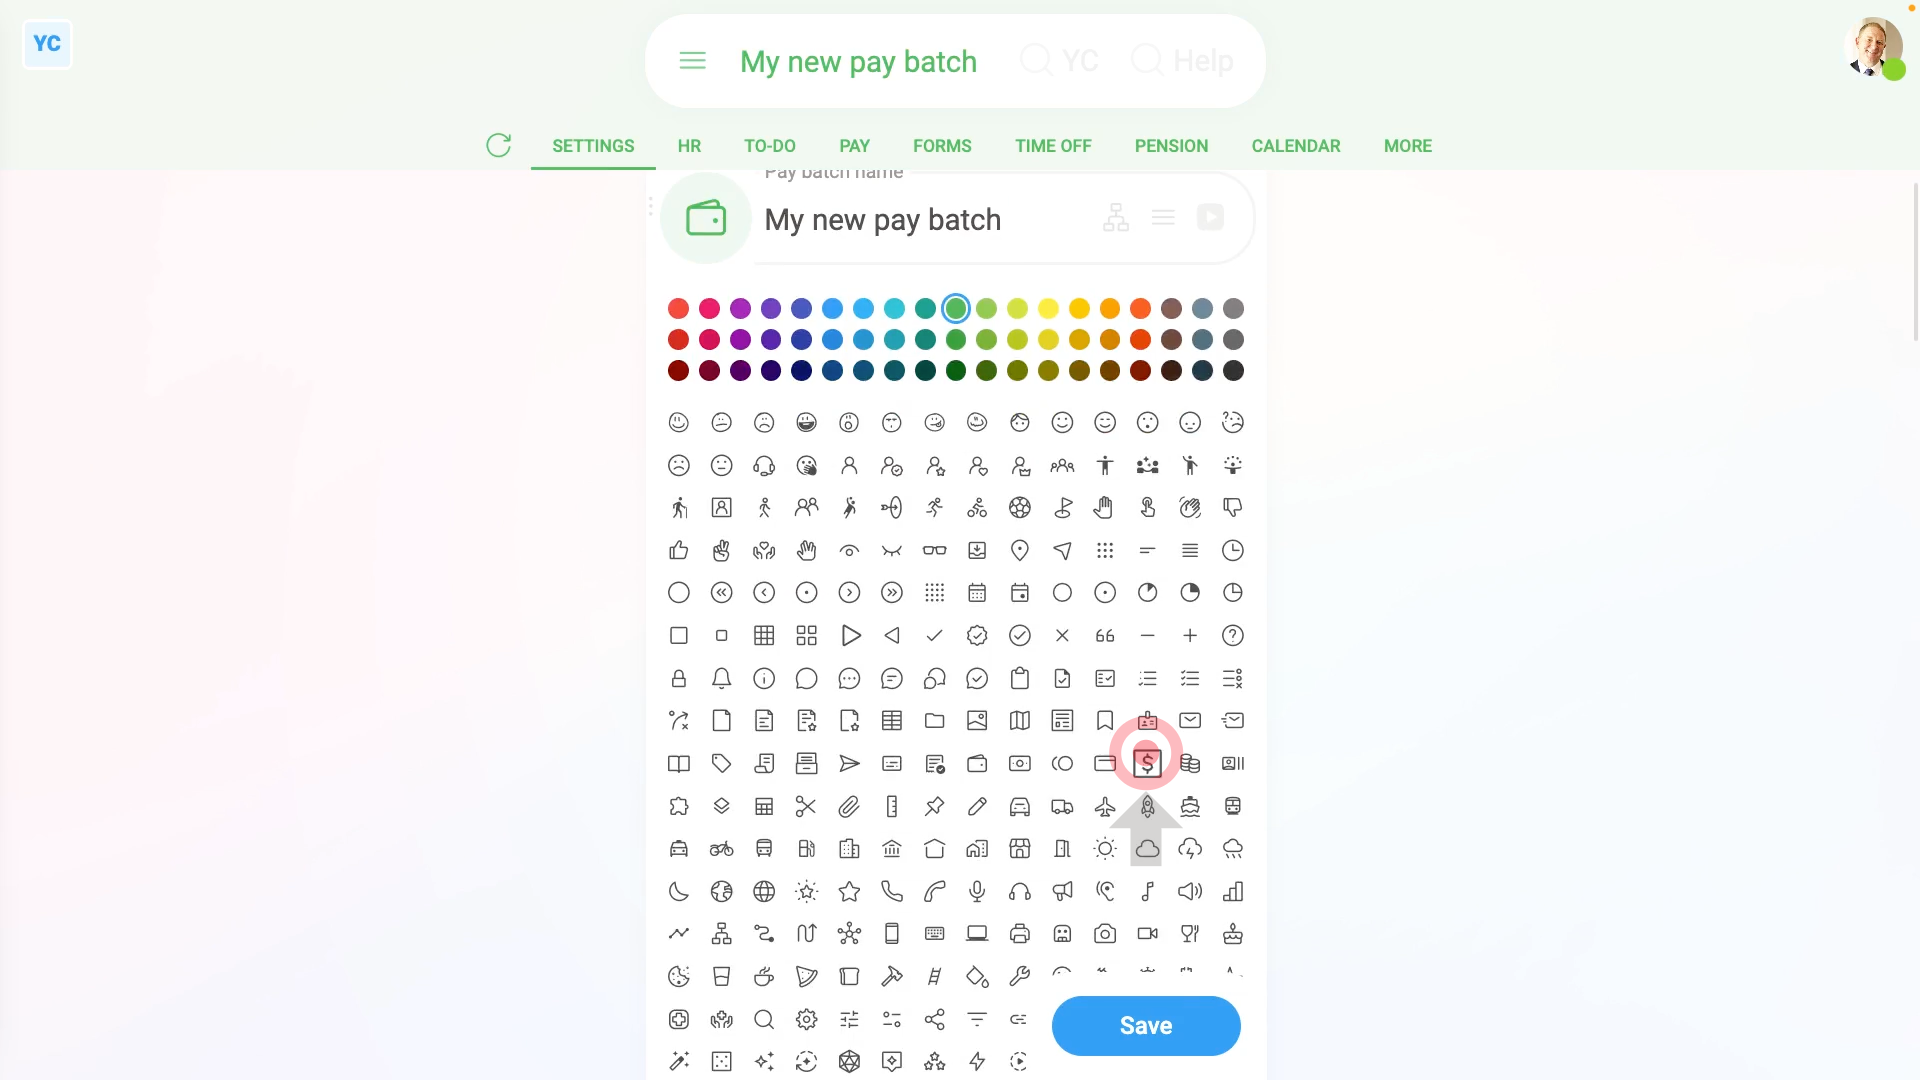
How do I set a pay batch's Unique Taxpayer Reference?
 1:44
1:44
"How do I set a pay batch's Unique Taxpayer Reference?"
The Unique Taxpayer Reference, or UTR, is a 10-digit code that uniquely identifies you or your business. Your UTR is used by HMRC whenever HMRC is dealing with your tax.
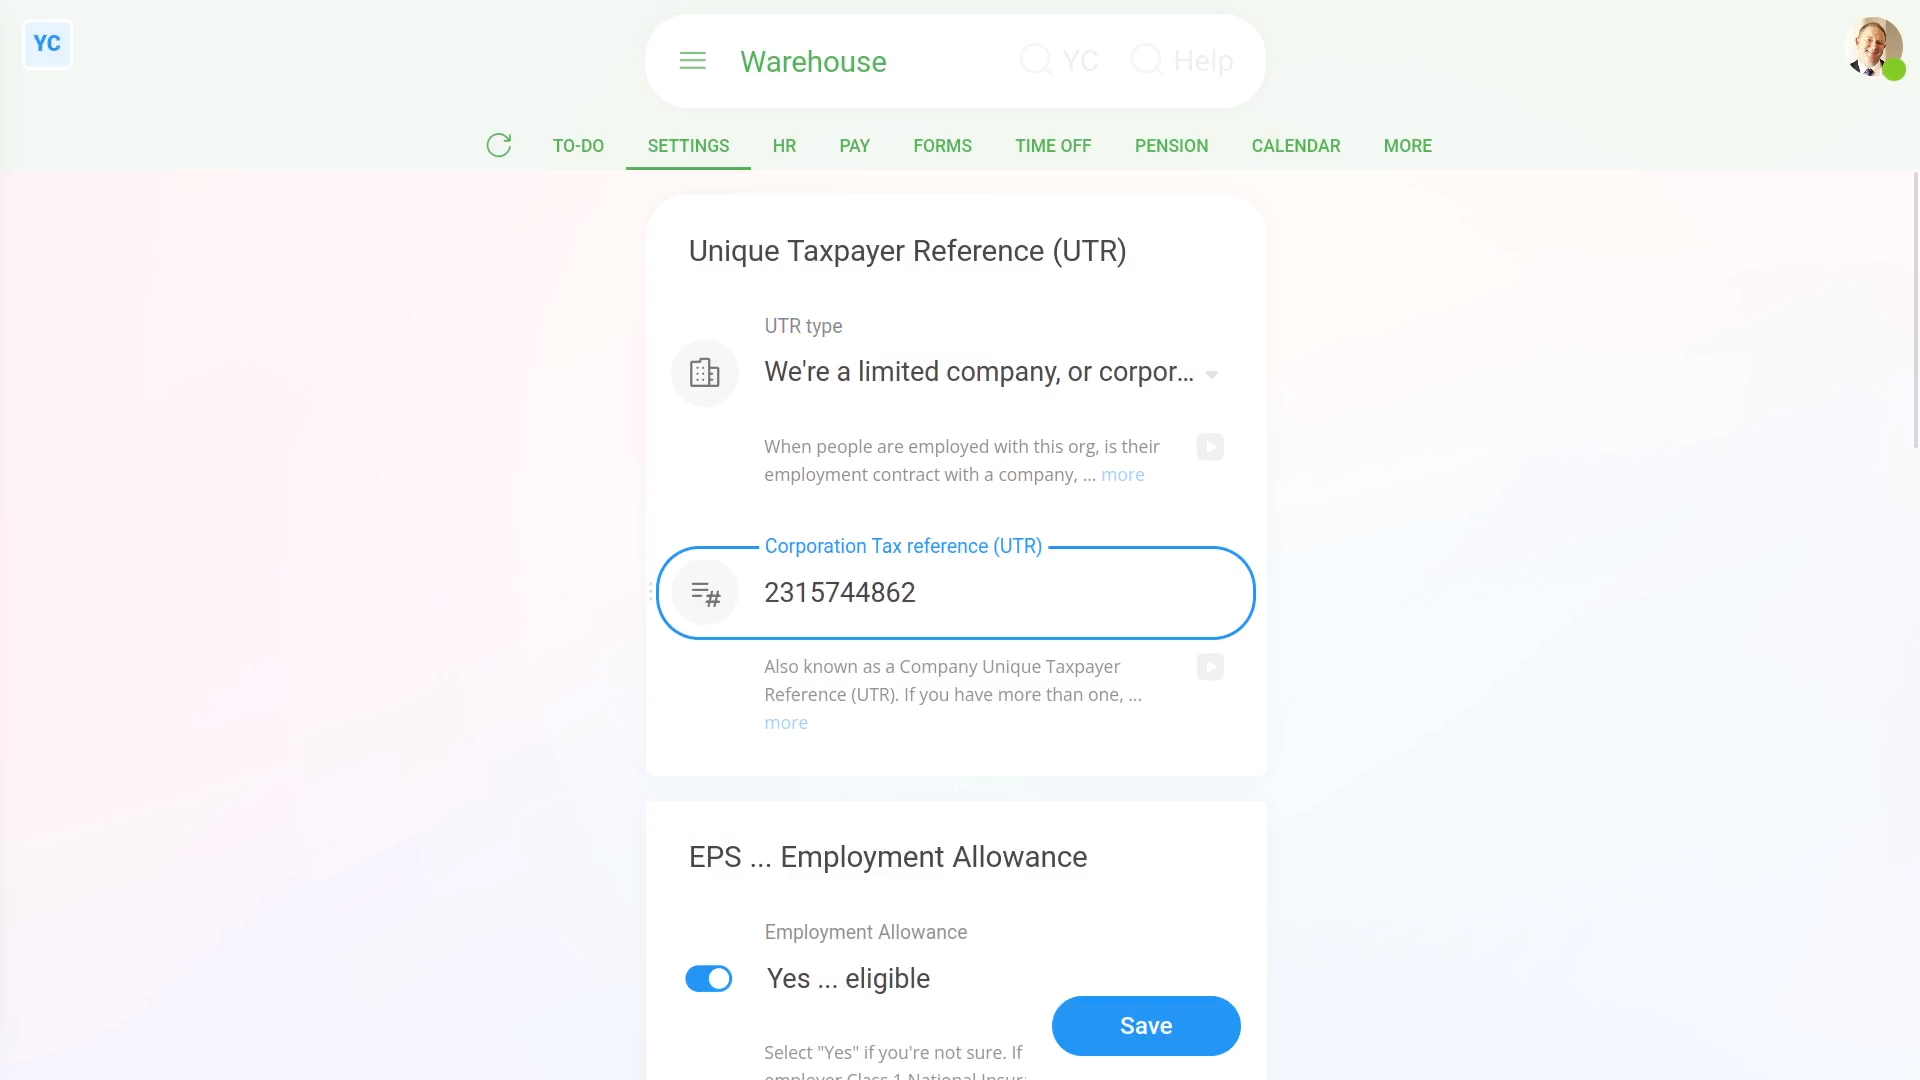
To set a pay batch's UTR:
- First, select the pay batch on: MenuPay batches
- Then tap: SettingsTax settings
- Next, you'll need to decide if you're doing your Tax Filing as a company or a sole trader.
- And then you can type in your 10-digit UTR code.
- If you need help finding your UTR, tap the link to HMRC's website, and rea d HMRC's advice.
- And finally, tap: Save
Keep in mind that:
- Each pay batch can have a different UTR, or all your pay batch's can all share the same UTR. It's up to you.
- Each time you tap File now, your UTR is included, when your Tax Filing's sent to HMRC.
- Once the UTR is set, there normally isn't any reason to change it.
- If you're still waiting for your UTR to be sent to you, from HMRC, you can still run File now as long as you've set up your HMRC connection.
To learn more:
- About setting up your HMRC company connection, watch the video on: HMRC Tax Filing company connection
And that's it! That's everything you need to know about setting a pay batch's Unique Taxpayer Reference!
What are HMRC notices for?
 2:46
2:46
"What are HMRC notices for?"
Whenever there's a change that HMRC wants you to know about, you'll get a forwarded message called an: "HMRC notice"
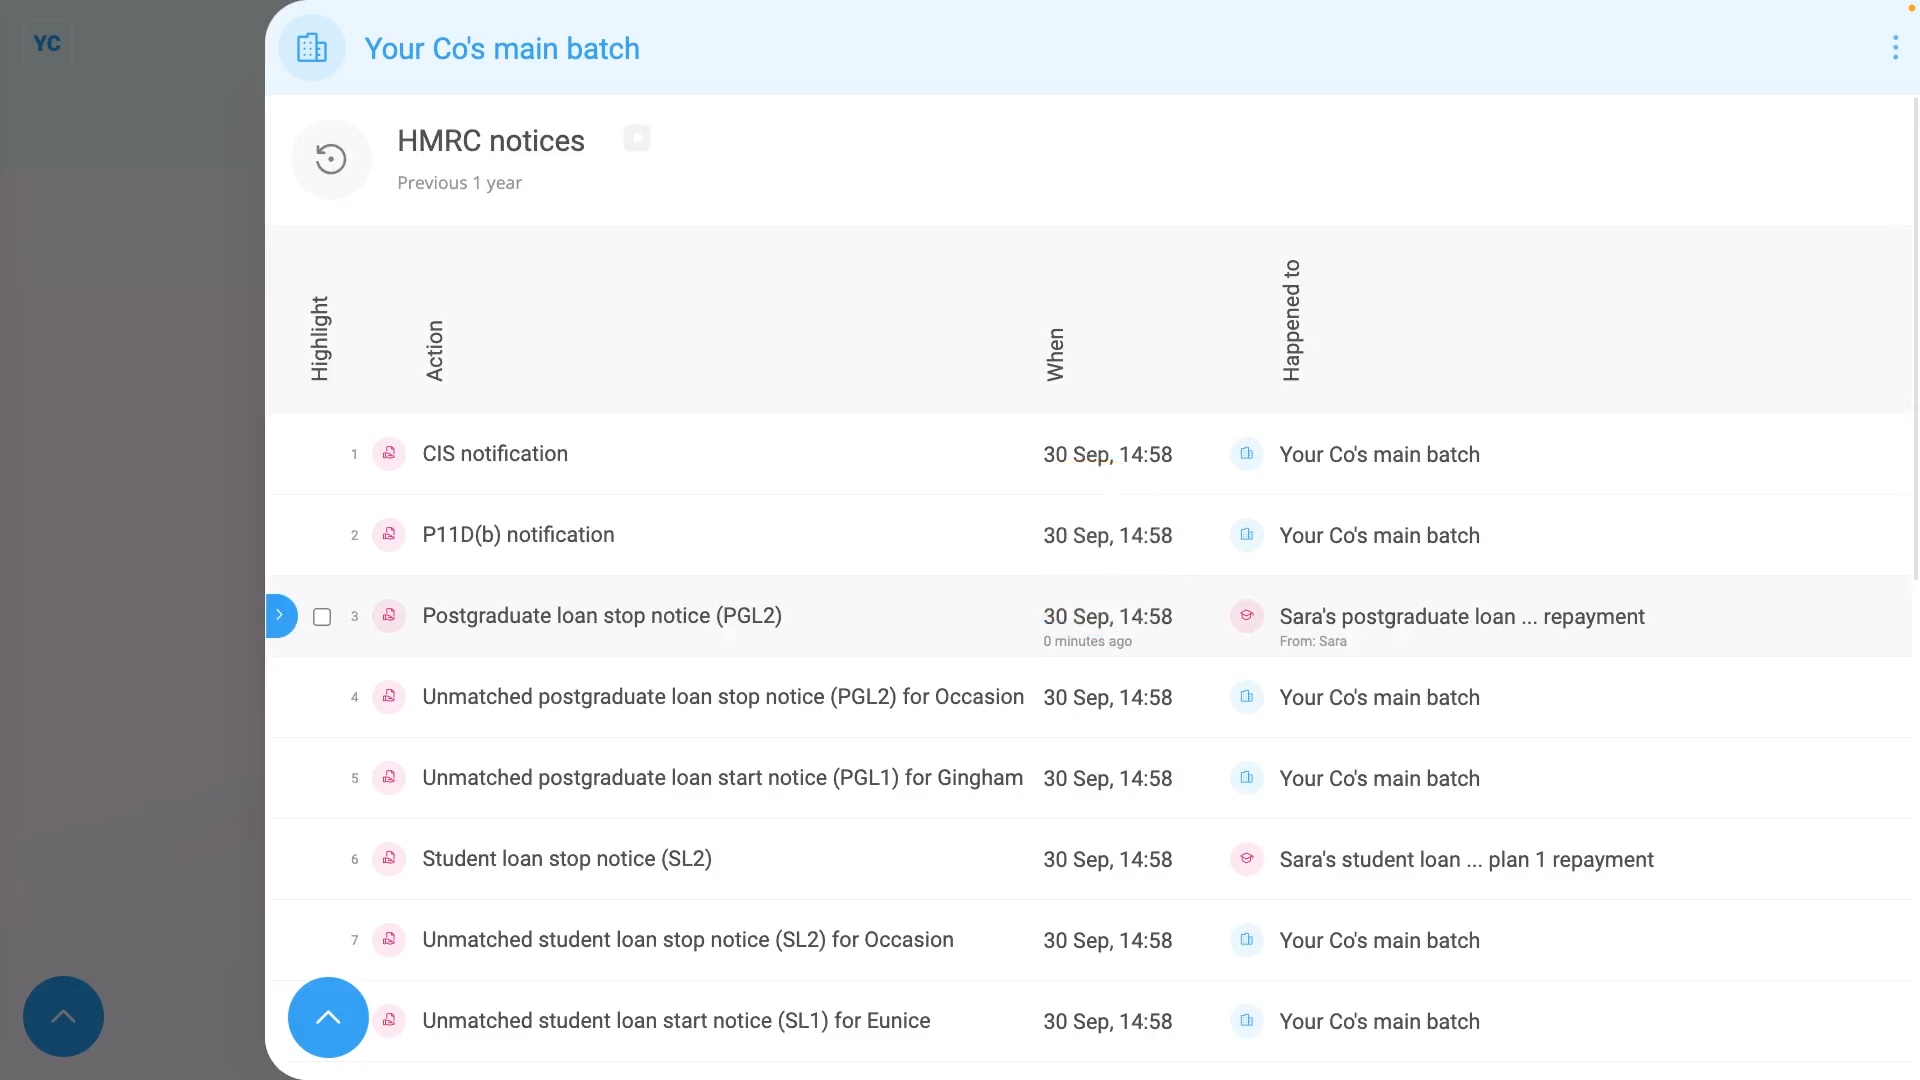
To see a pay batch's "HMRC notices":
- First, select the pay batch on: MenuPay batches
- Then tap: FormsHMRC notices
- You'll now see all your pay batch's HMRC notices from over the last year.
- To see an HMRC notice's full message, tap the blue "See event" button: (at the start of any row)
- And you'll see the body of the notice. If you tap the blue "more" link, you'll also see when it was received, and which person was involved.
- Where possible, if the notice is a settings change, it's auto-scheduled, and done for you.
- An example of an auto-scheduled change is when HMRC changes somebody's tax code.
- Another example, is when one of your people starts, or stops, a student loan repayment plan.
- Where possible you'll see a button, that takes you to see the change.
- And if a change is scheduled for an upcoming date, you'll also see a note about the scheduled change.
- If you disagree with the change, to remove a scheduled change, tap the blue "remove" link.
- Then tap: Yes ... remove and the scheduled change has been removed.
- To see HMRC notices from further back in time, tap:
Show settingsDatesPrevious 2 years - And you'll see the older HMRC notices in the listing.
- To only see HMRC notices involving a set of selected people, tap:
Show settingsSide settings ... show - Then on the To list, Ctrl+Tap the people you'd like to see HMRC notices for.
- And finally, you'll now only see HMRC notices for your selected people.
Keep in mind that:
- If you've ever got multiple pay batches all sharing the same "Employer PAYE reference", those pay batches each show the same set of: "HMRC notices"
- Also, for every auto-scheduled change that involves a person, two copies of an HMRC notice are emailed out.
- One is emailed to the person involved, and the other to the pay batch's payday admin.
- However, some "HMRC notices" are only ever emailed to the payday admin.
- Including company tax setting changes, info updates like P11D(b) messages, CIS messages, and annual reminders.
And that's it! That's everything you need to know about HMRC notices!
What does a payday admin do?
 2:11
2:11
"What does a payday admin do?"
The payday admin is the person who's in charge of responding to any of the pay batch's payday reminders. Including reminders about payslips, expense claims, and Tax Filing.
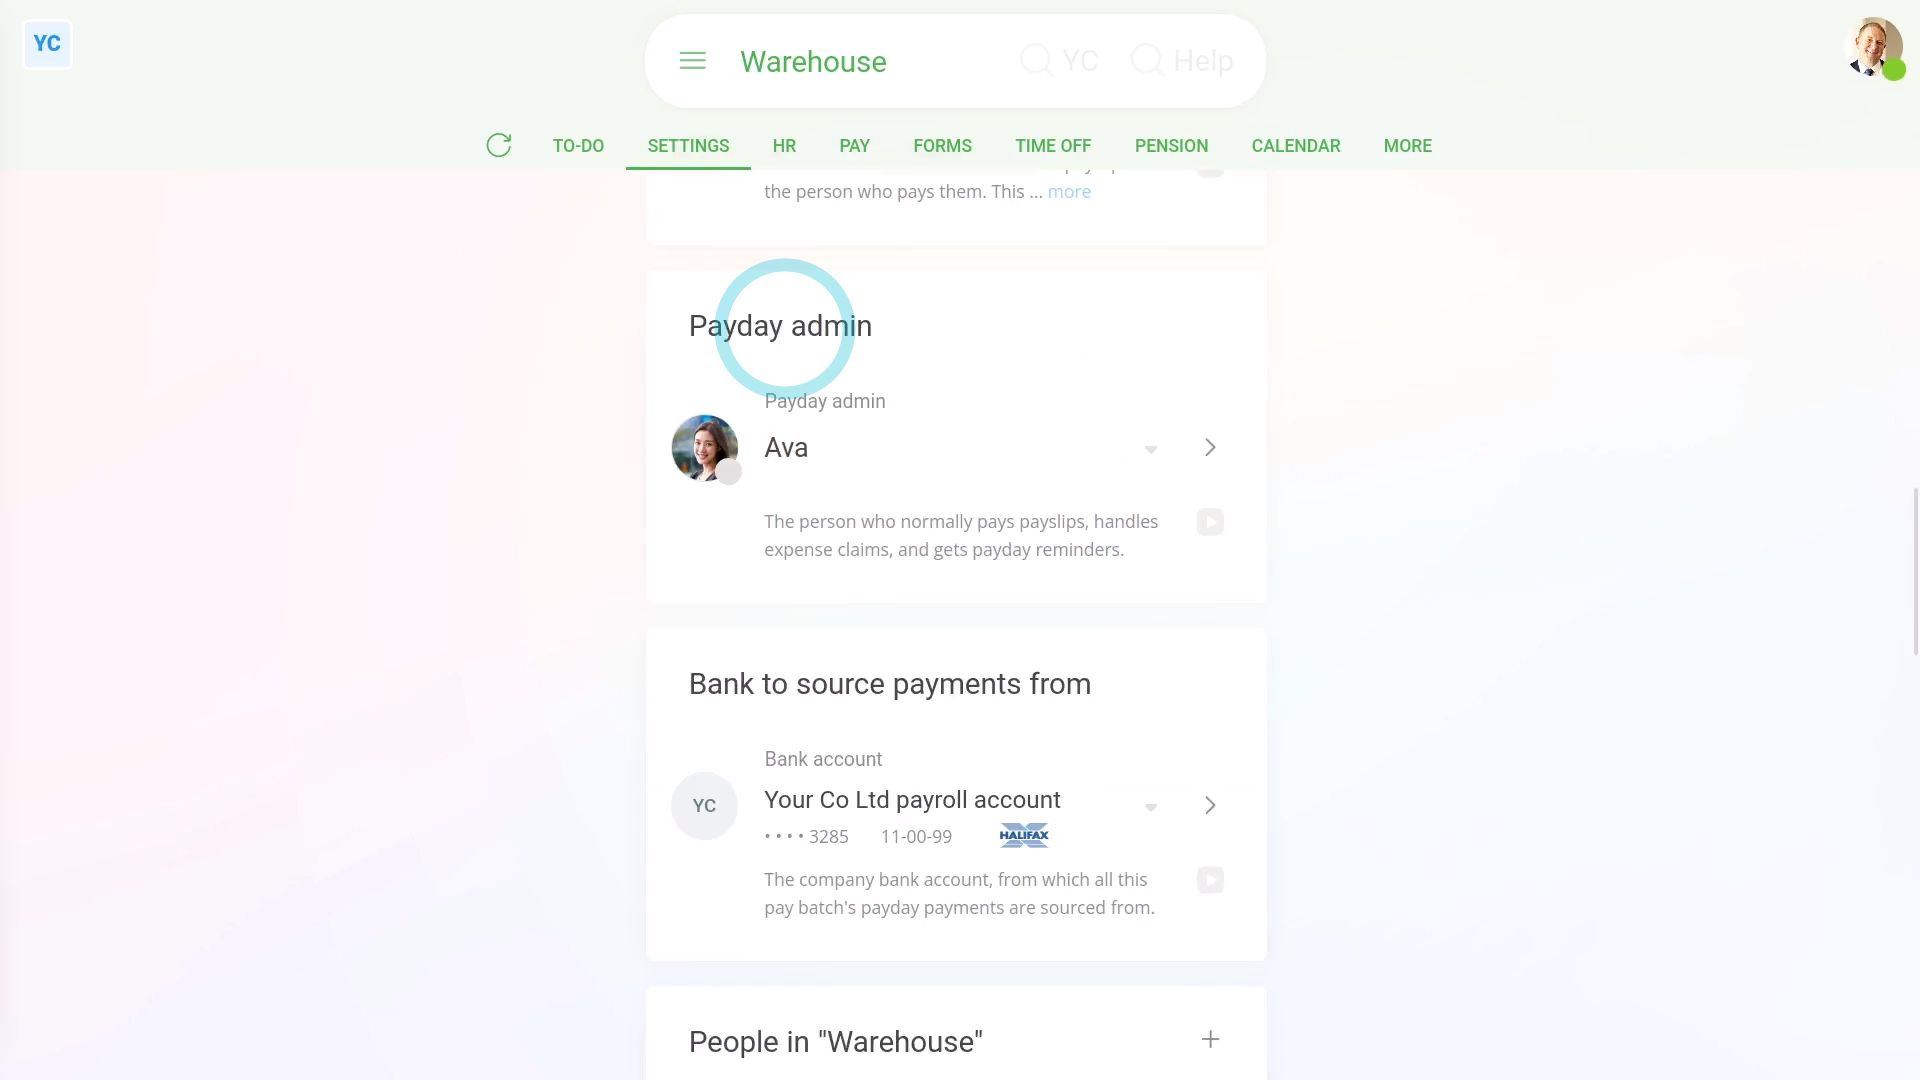
To set a pay batch's payday admin:
- First, select the pay batch on: MenuPay batches
- Then tap: SettingsPay batch settings
- Next, scroll down to the "Payday admin" heading.
- By default, the payday admin is set to the person who created the pay batch.
- Tap it, to select the person you'd like to set as the pay batch's new payday admin.
- It's possible that the person you'd like as the new payday admin isn't showing in the list.
- If the person's not showing in the list, it's probably because the person doesn't have full payroll admin permissions yet.
- To add a person to your org's list of payday admins, tap: Add (at the bottom)
- Then tap the person you want.
- Then change that person to: "Full ... payroll admin"
- And you'll now see the person listed, so you can now select them.
- Then tap: Save
- And finally, from now on, payday reminders, like expense claims and Tax Filing now all go to the new payday admin.
Keep in mind that:
- The only people who'll ever show in the list of payday admins, are people with full payroll admin permissions.
- However, other people, besides the payday admin can also pay payslips, or approve expenses, as long as the person's got full payroll admin permissions.
- The difference with the payday admin is that it's only the payday admin who receives the pay batch's reminders, or requests for approval, like expense claims.
- If your usual payday admin is away for a few days, it's recommended to switch the pay batch payday admin to another person.
- Even if you only switch it for a few days. You can later switch it back.
And that's it! That's everything you need to know about what payday admins do!
What happens when I'm late, and file payslips after their due date?
 2:46
2:46
"What happens when I'm late, and file payslips after their due date?"
Any time that a payslip's filed late to HMRC, you're required to state your late filing reason. The reason's then forwarded to HMRC.
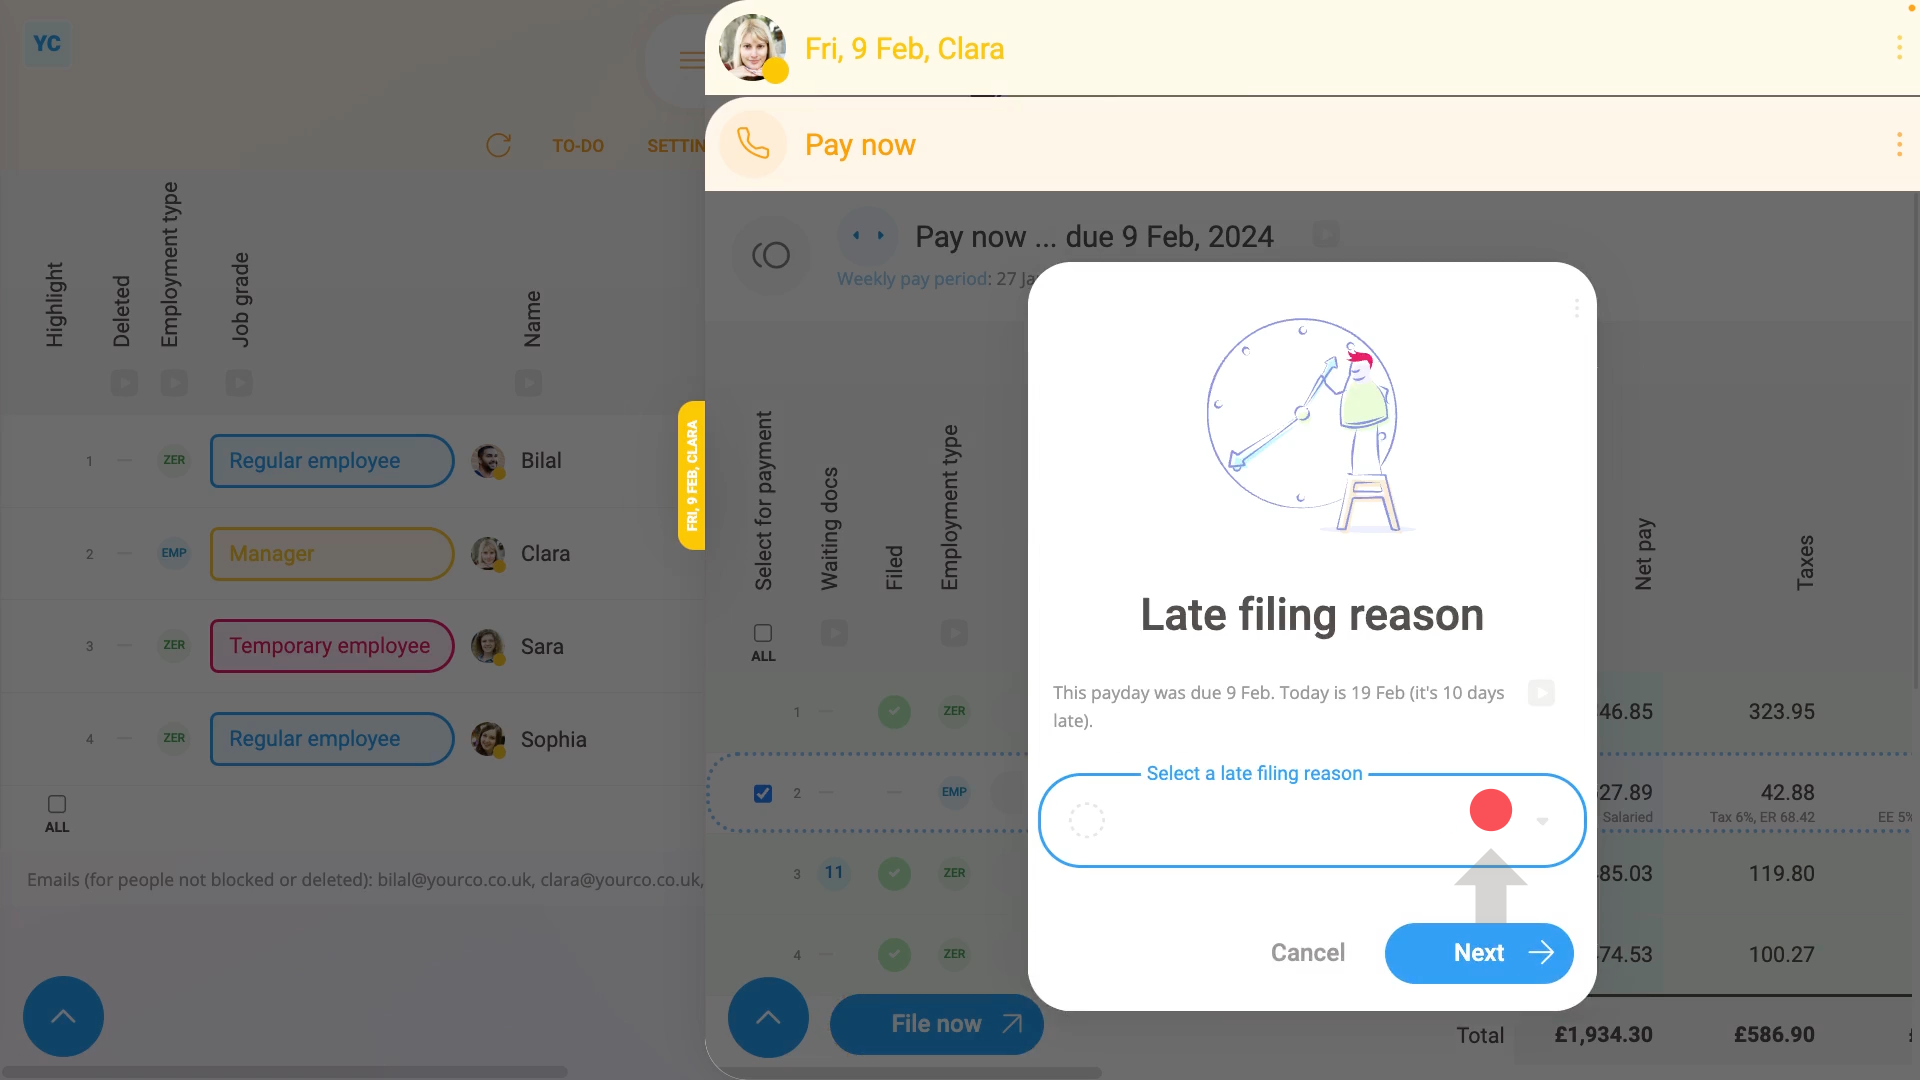
To see how late filing of payslips looks:
- First, select the pay batch on: MenuPay batches
- Then tap: PayPeople
- On the "People" report, each green circle represents a filed payslip.
- Where there's no green circle, then that pay period's payslip hasn't been filed yet.
- If you tap where a green circle's missing, you'll see that person's un-filed payslip for that date.
- And (at the top) you'll see a warning that it's late, and how late the payslip is.
- To file it now, scroll down and tap: Go to "Pay now" report
- The person's payslip is automatically selected, so to file it tap File now, and then: Yes ... file it
- Because the payslip's filing's late, you'll be asked to select the "Late filing reason", then tap: Next
- It usually takes 15 to 20 seconds for HMRC to finish processing the payslips and send back confirmation that it's been received.
- Once it's been filed successfully, you'll see a green tick beside the payslips that you've filed.
- However, because it's been filed late, it's also marked with a small red dot.
- Then back on the "People" report, tap the "Reload tab" button: (at the top), to update the newly filed green circles.
- And finally, you'll now see the recently filed payslips are now also marked with a green circle, meaning it's been filed and confirmed by HMRC.
Keep in mind that:
- A payslip's filing is only considered late if it's filed at any time after the day that it's due.
- Which means that if it's filed up to 11:59 at night, then it's not considered late.
- However, if it's filed at 12:00 at midnight, or after, then it's marked as a late payslip filing.
And that's it! That's everything you need to know about what happens when you file late payslips!