
Onboarding

 5:37
5:37 9:53
9:53 2:00
2:00 5:55
5:55 2:50
2:50 1:39
1:39 3:29
3:29 2:15
2:15 6:23
6:23 3:25
3:25 3:25
3:25 4:08
4:081. What do I do with the log in invite email, and what's onboarding?

 5:47
5:47
"What do I do with the log in invite email, and what's onboarding?"
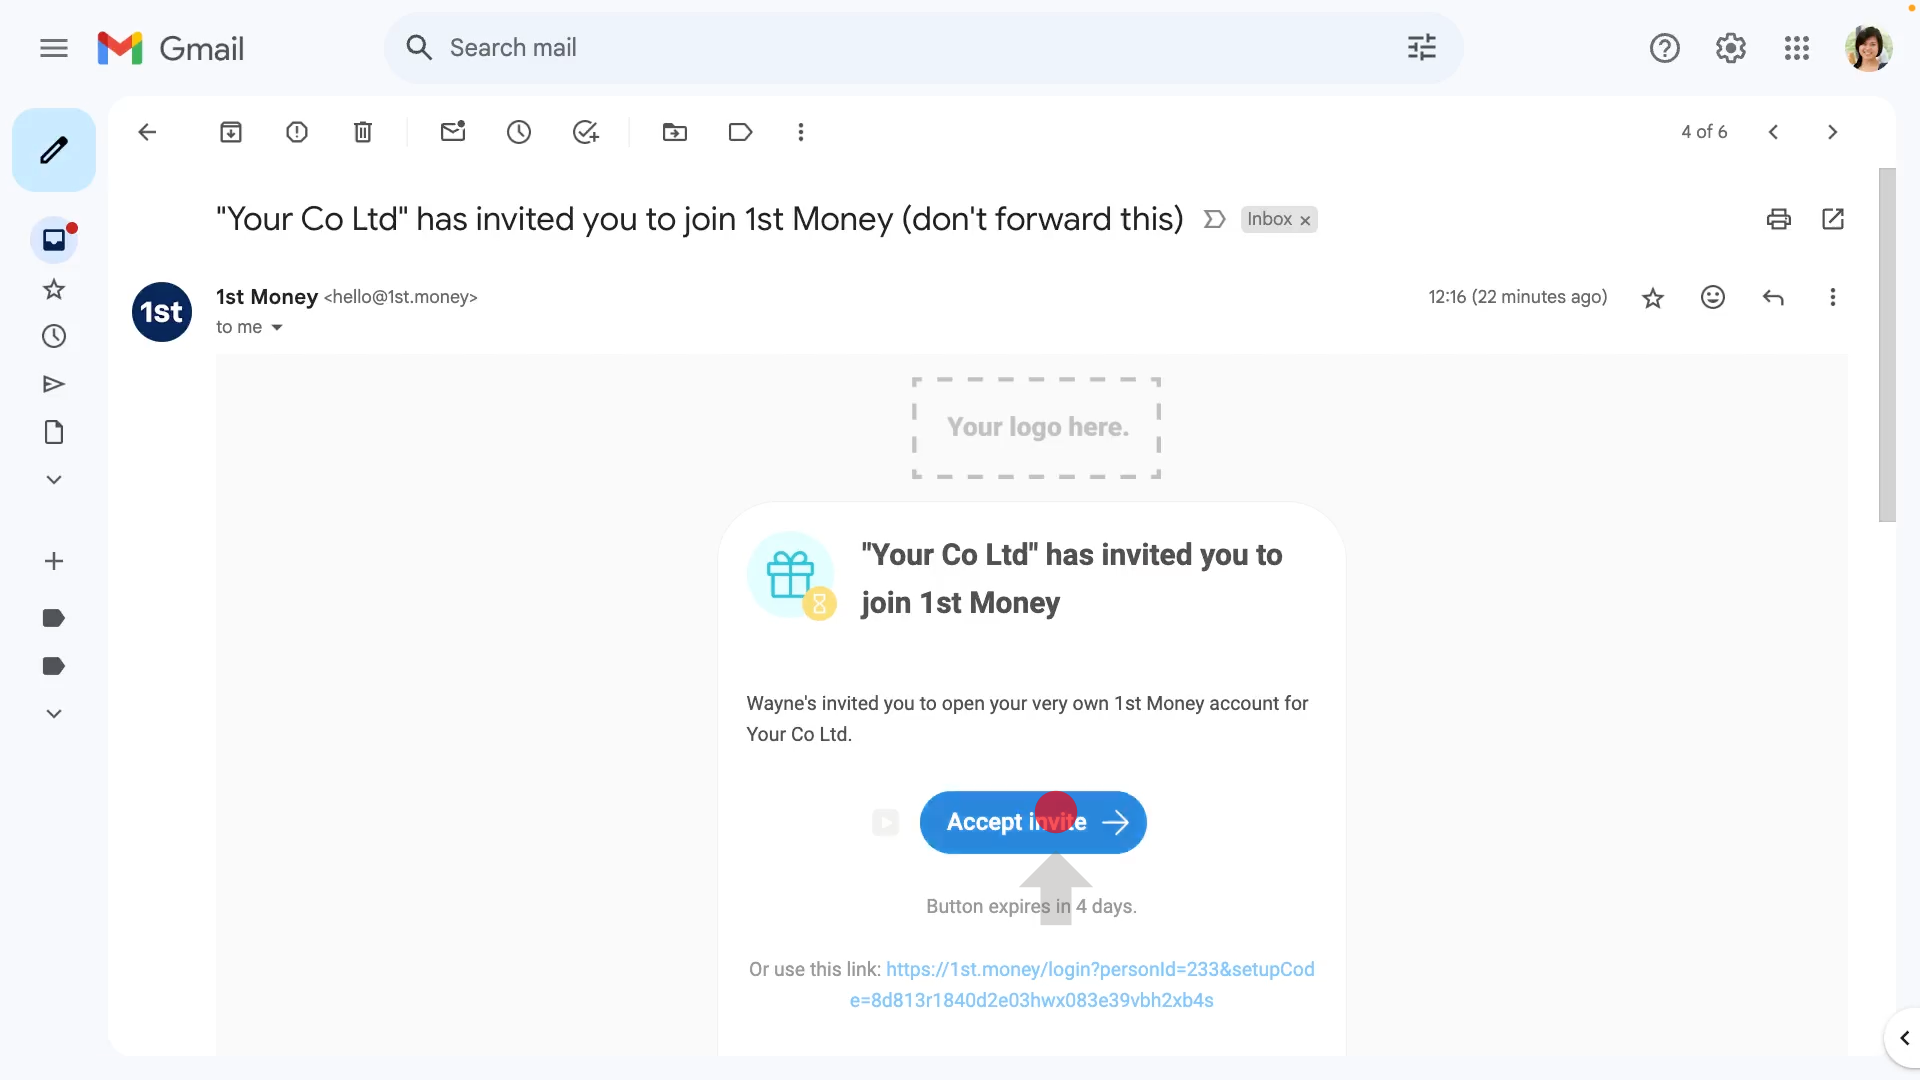
When you're invited to join a company as a new employee, you'll get an email inviting you to create an account on 1st Money.
To accept an invite to create an account on 1st Money, and to do your self onboarding:
- First, open the invite email and make sure it's from a company that you're expecting an invite from.
- Then when you're ready, tap: Accept invite
- If your org's prepared an employment agreement for you to sign, you'll be shown that first.
- Read through the agreement.
- Once you've scrolled to the bottom, Accept and Decline becomes active.
- If you don't want to accept the agreement, you can tap Decline, and type in your reason.
- If you then tap Continue with decline, the person who invited you gets an email with the reason you declined.
- Otherwise, if you accept the agreement, tap Accept, and then draw in your signature.
- And tap I accept & electronically sign, and you'll be emailed a copy of the agreement.
- You'll now be shown any other onboarding docs that've been prepared for you.
- There may be multiple onboarding docs that require a signature. If so, you may prefer to turn on: Turn on one-tap signing, before you tap: I accept & electronically sign
- Some onboarding docs don't require a signature, once you scroll to the bottom of the doc, Got it becomes active.
- Once you tap Got it, you'll again be emailed a copy.
- Once you've finished all the onboarding docs, you can now confirm your name's correct, and take a portrait photo.
- It's highly recommended to add a photo, as it helps other people in your org put a face to your name.
- When you're ready, tap Take photo, then tap: Next
- Tap Take again until you're happy with it.
- Once you're ready, tap: Next
- Then tap: Yes ... I'm happy
- You'll now see info about you that's been entered by the person who invited you.
- If you need to correct any of it, now's the time. Then tap: Next
- You'll now see your home address. If anything's wrong, correct it now. Then tap: Next
- Next, if your pay rate's been set, you'll be asked to enter your bank account for payday payments to be paid into. It's important you get it right.
- Type in the details of your bank account, then tap: Next
- You'll now see that you're almost at 100% for your self onboarding.
- All that's left is to tap: Set password
- Read the password instructions, type in your new password, and tap: Save new password
- You're now finished, and you'll see your self onboarding's at 100%.
- And if you tap it, you'll see a list of all your self onboarding that you've completed.
- To see a copy of the onboarding docs you're agreed to, scroll down, and tap on them.
- And finally, if you ever want to jump back to any step, tap any of the grey circles (at the top).

Keep in mind that:
- If you close your self onboarding, everything's still saved, and you can return and continue onboarding again at any time.
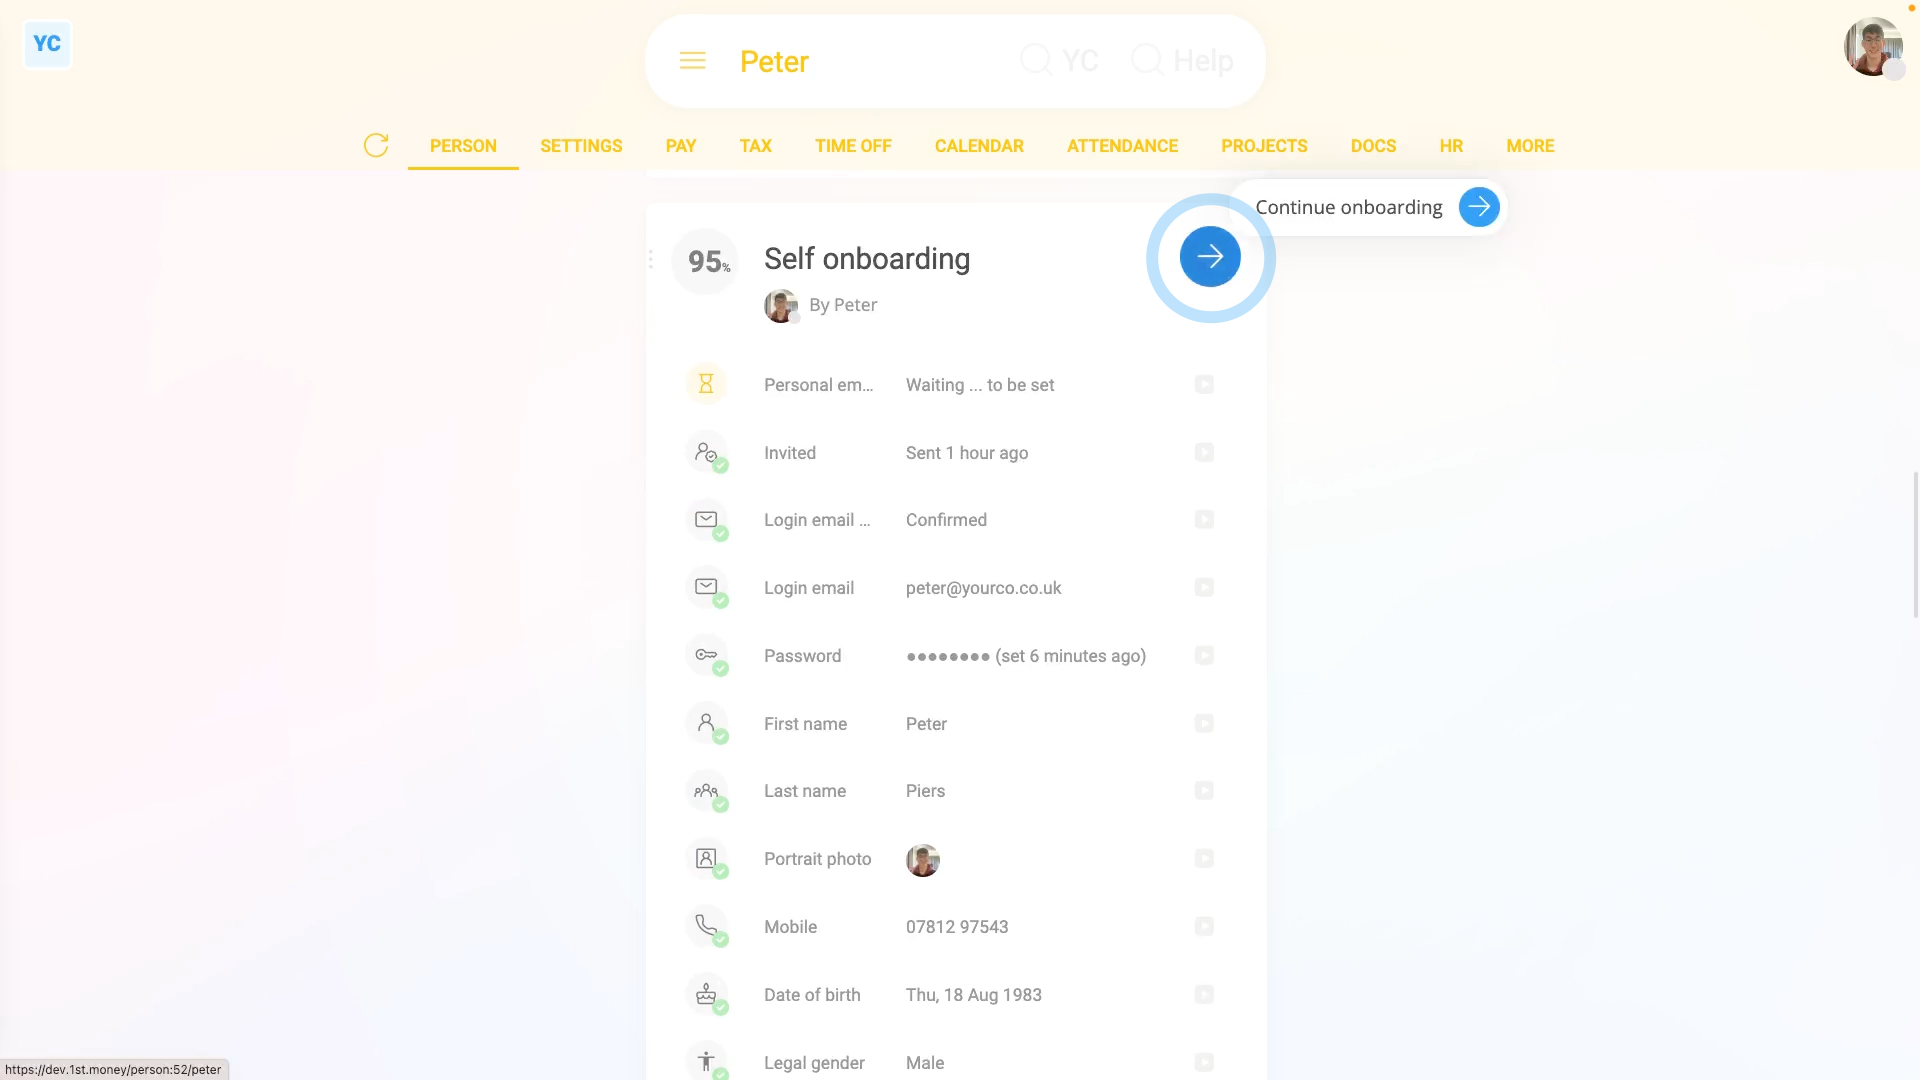
To see your "Self onboarding" list and continue onboarding:
- First, open yourself on: "Menu", then "Me"
- Then while on the default "Person" tab, scroll down to: "Self onboarding"
- The percentage (at the top) shows you how complete the onboarding is.
- To continue onboarding, tap the blue circle: (at the top)
- Or scroll down to the bottom of the onboarding list, and tap: Continue onboarding
- And the onboarding automatically works out what info's needed next, and takes you right there.
- Fill in the missing info.
- Tap Next again until everything's correct and 100%. Then tap: Close
- Once your onboarding's 100% complete, your "Self onboarding" row's automatically collapsed. Tap the row to expand it, and show your full self onboarding list.
- And finally, when you scroll below your "Self onboarding" list you'll see the "Admin onboarding" list. That list shows you all the onboarding steps that your admin's responsible for entering about your employment.
You may notice:
- That the onboarding list for some people is different to others.
- Different employment types, for example contractors, ask you for different kinds of info.
- Remember that your goal is to hit 100% onboarded.
To learn more:
- About how onboarding looks for an admin, watch the video on: Inviting a person & onboarding
 Inviting a person & onboarding
And that's it! That's everything you need to know about creating an account on 1st Money, and doing your self onboarding!
2. How do I add a person to my org and get them fully set up?
 10:03
10:03
"How do I add a person to my org and get them fully set up?"
To add a person to your org, an admin first needs to invite them, and then do their admin onboarding.
To invite a person to your org, and do their admin onboarding:
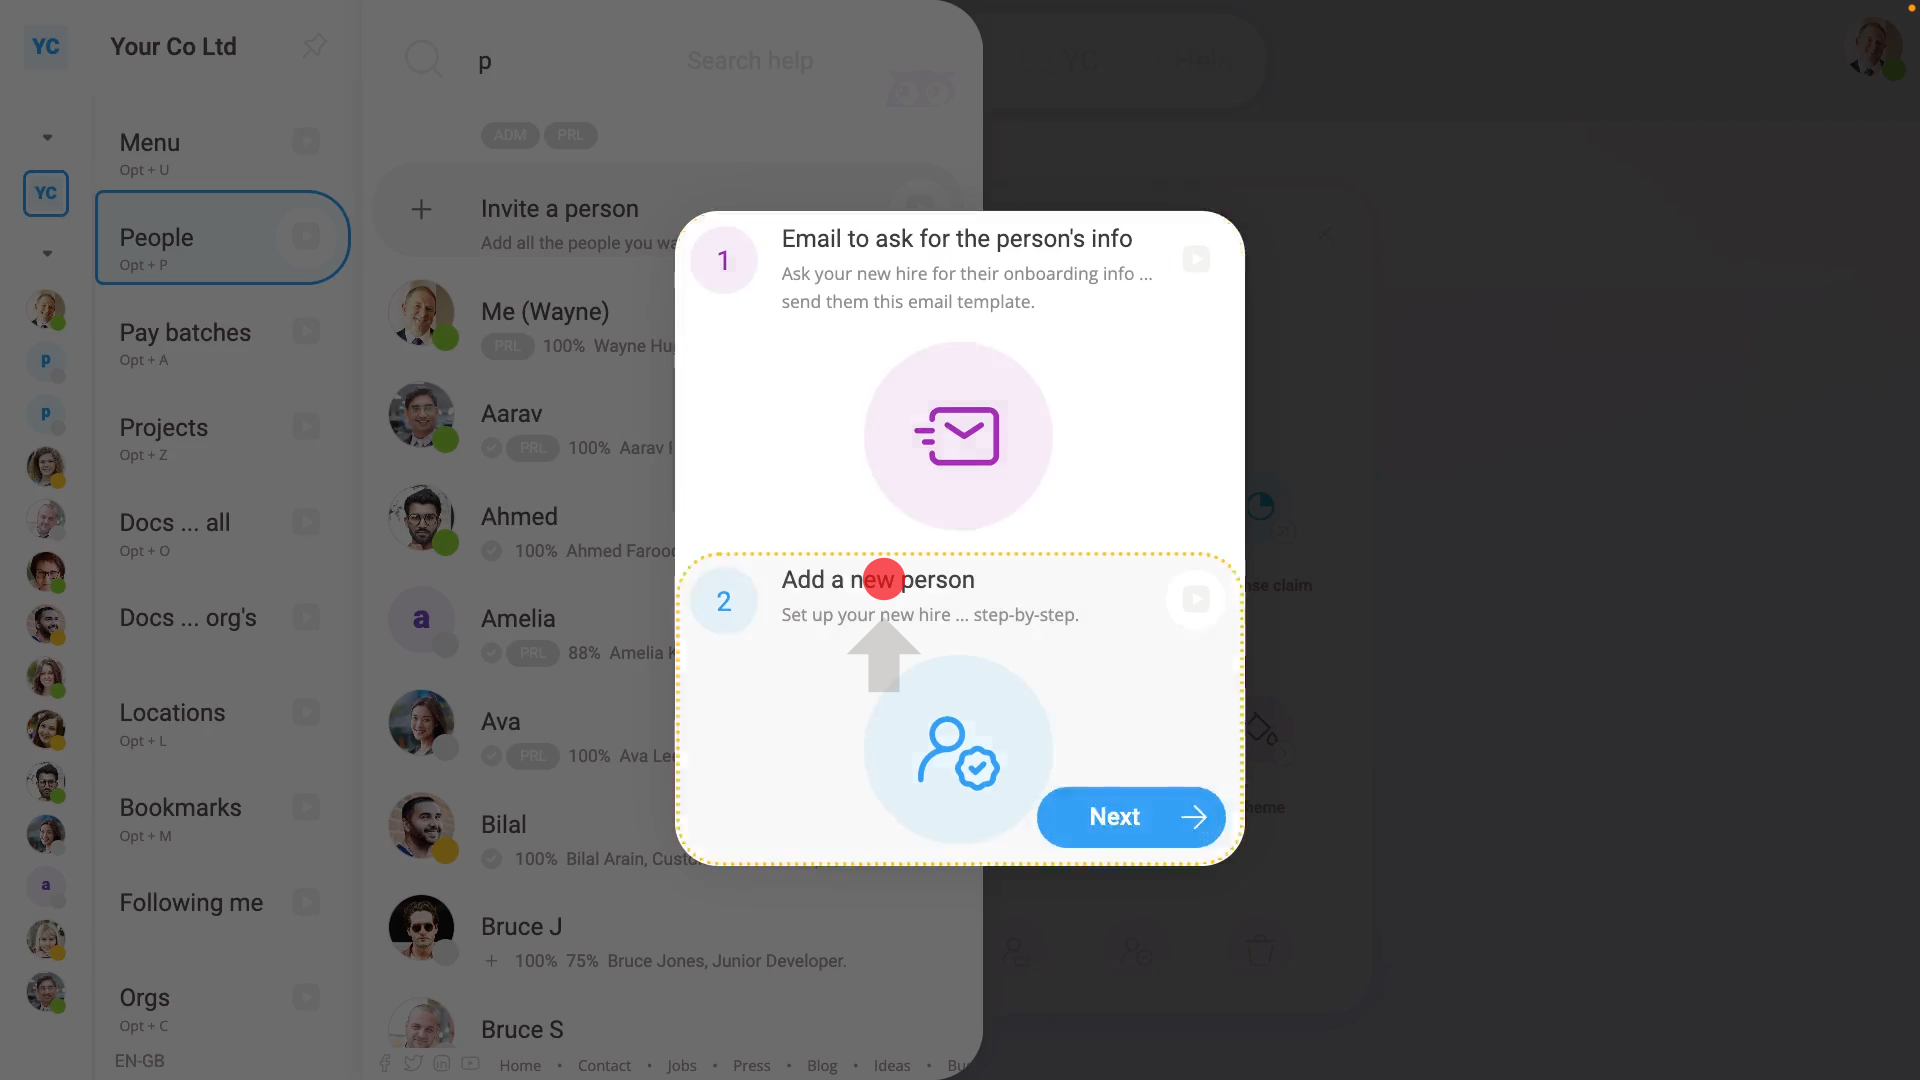
- First, tap: "Menu", "People", then "Invite a person"
- If you've not done so yet, you may want to tap: Email to ask for the person's info
- To learn more about emailing for the person's info, watch the video on: Onboarding info email
- Once you're ready to enter the person's info, tap Add a new person. Enter the person's email, then tap: Invite
- An invite email's immediately sent to the person. The person can now, or at any point in the future, accept your invitation, set their password, and log in.
- Next, fill in the person's name.
- Set their employment type.
- And set their pay batch, then tap: Next
- Then when asked about their P45, tap: Yes
- And enter, from their P45, their "Leaving date" from their previous job, and tap: Next
- Then also from their P45, enter the "Employee's National Insurance number", and tap: Next
- Now set their "Title" and "Middle name", and tap: Next
- Now, if the person's P45 says there's a student loan, then turn it on and fill in their student loan info.
- To learn more about adding student loans, watch the video on: Student loans
- Then tap: Next
- Now enter the person's tax code from their P45.
- To learn more about tax codes, watch the video on: Setting tax codes
- Then tap: Next
- Now, using the amounts printed on their P45, enter their: "Total pay to date ... in previous job"
- And then their: "Total tax to date ... in previous job"
- To learn more about previous pay and tax to date, watch the video on: Previous job
- Then tap: Next
- Normally, you'd continue by filling in the person's "Right to work" details.
- To learn more about "Right to work", watch the video on: Confirming "Right to work"
- In the example, to skip "Right to work", tap: Skip
- Next, enter the person's: "Job title"
- Set their: "Job grade"
- And set their: "Date joined"
- Then tap: Next
- Now, set the person's managers, supervisors, and work location, then tap: Next
- Now, set the person's contact details, then tap: Next
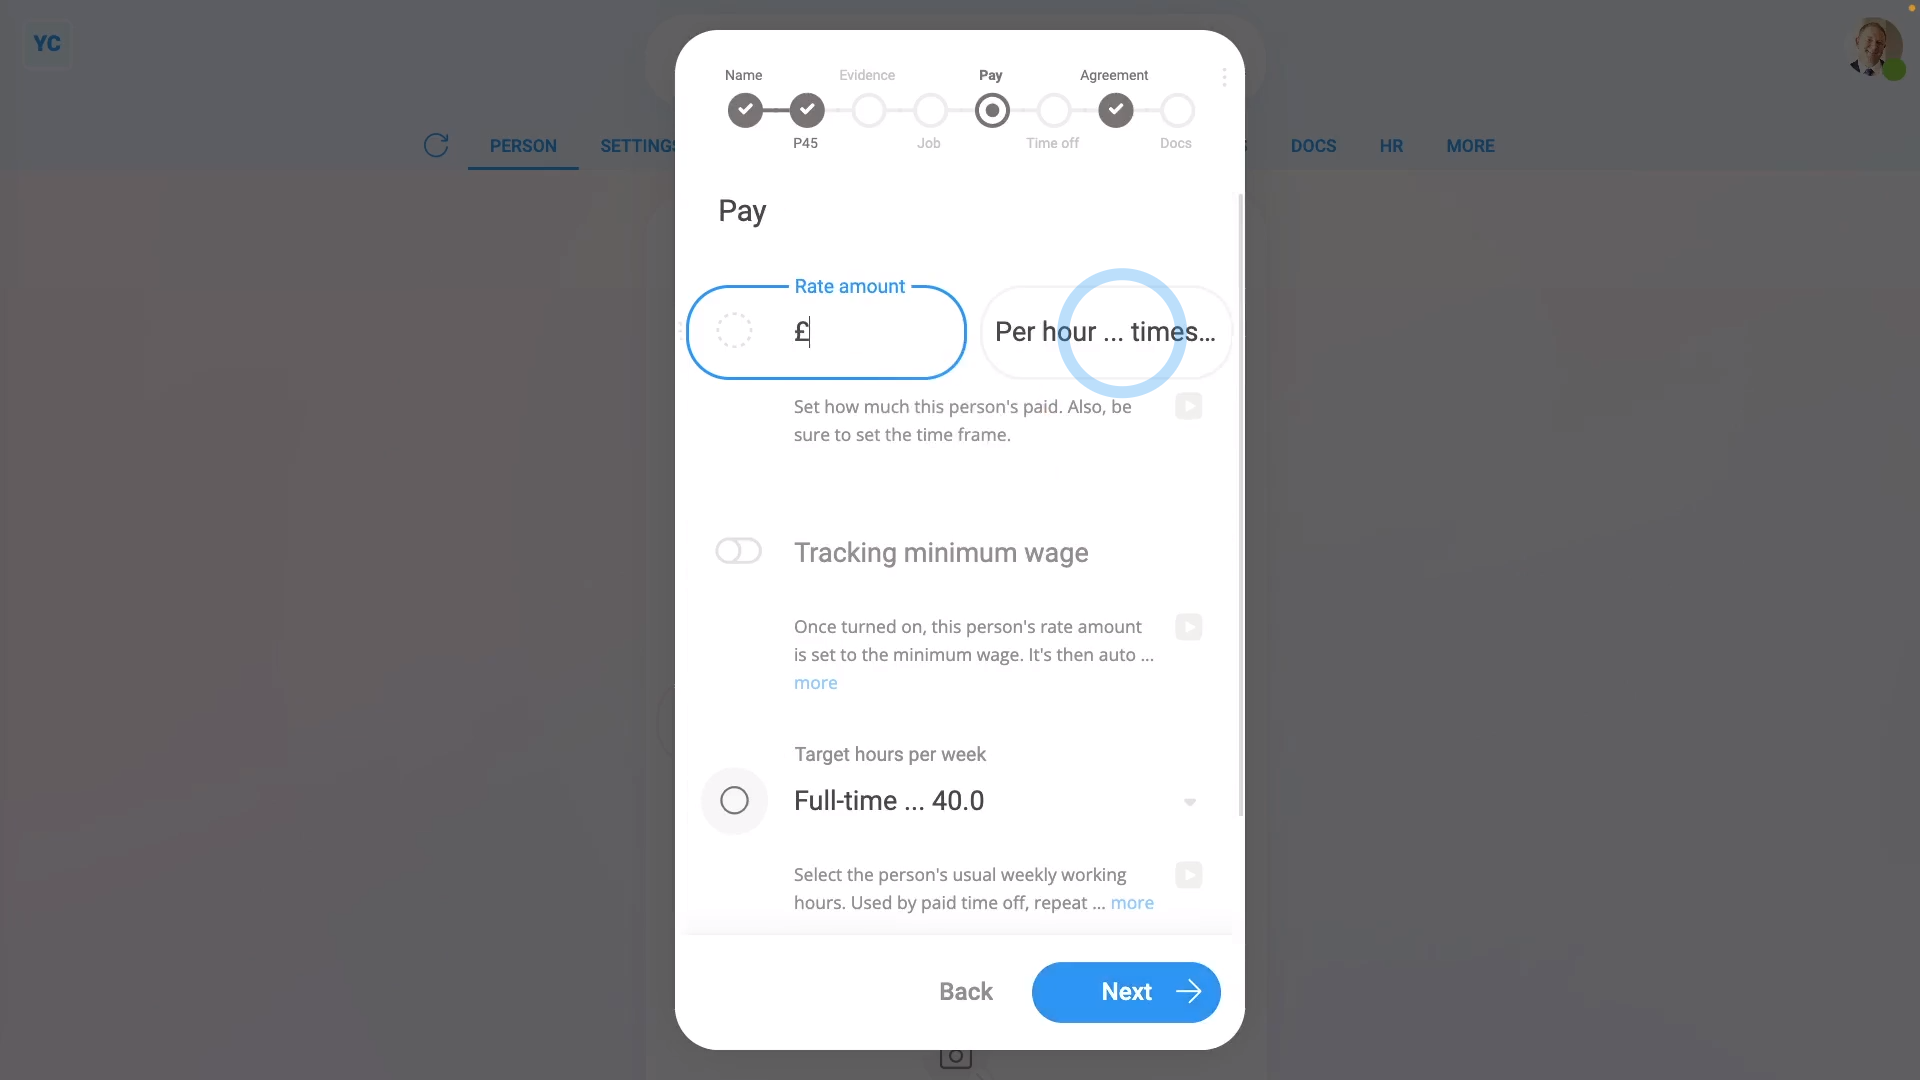
- Now, to set the person's pay rate, first decide if you're entering it yearly or hourly.
- Then enter the person's pay rate amount.
- And set their "Target hours per week", then tap: Next
- Now, in order to verify the person's National Insurance number, you'll need to enter the person's "Date of birth", "Legal gender", and home address.
- Then tap: Next
- Now set the person's "National Insurance ... category letter". You won't find it on their P45. Instead, it's up to the employer to select the best one.
- To learn more about NI category letters, watch the video on: The NI category letter
- Then tap: Next
- Now tap: Verify NI
- Their National Insurance number is now verified by HMRC.
- It usually takes 15 to 20 seconds for HMRC to finish processing your verification request.
- As part of the verification, the person's name, address, legal gender, date of birth, and payroll ID are all sent to HMRC.
- Once HMRC's finished verifying, you'll see the confirmation message, and the person's National Insurance number is now verified with a blue tick.
- Then tap: Next
- Now set the person's pension settings. To learn more about pensions, watch the video on pensions. Then tap: Next
- Now set the person's paid time off settings. To learn more about paid time off, watch the video on paid time off. Then tap: Next
- Now set the person's agreement settings. To learn more about agreements, watch the video on: Agreement doc. Then tap: Next
- You're now in the last part of onboarding, which is sending the onboarding docs.
- Each of the onboarding docs are listed with a blue switch , meaning it's queued to be sent.
- To start the sending process, tap Next, and then: Sign
- You may prefer to turn on: Turn on one-tap signing
- And then tap: I accept & electronically sign
- Because there's multiple new docs, you may also prefer to tap Turn on auto-send, and then: Start auto send
- And now, once all the onboarding docs are sent for the person, you'll see a summary of all the person's onboarding.
- Any steps that you skipped are marked in yellow.
- To go back and do any skipped steps, hover your mouse over it, and tap the blue arrow button:
- Alternatively, to go back to any step, at any time, tap any of the grey circles (at the top).
- And finally, to close the onboarding process at any time, tap off it.
Keep in mind that:
- If you close the admin onboarding, everything's still saved, and you can return and continue onboarding again at any time.
- Also, the "Admin onboarding" completion percent is tracked separately to the person's: "Self onboarding"
- "Admin onboarding" is all the onboarding steps that can only be done by an admin, like setting pay rate.
- "Self onboarding" is all the onboarding steps that can only be done by the new hire, like setting their personal bank account info.
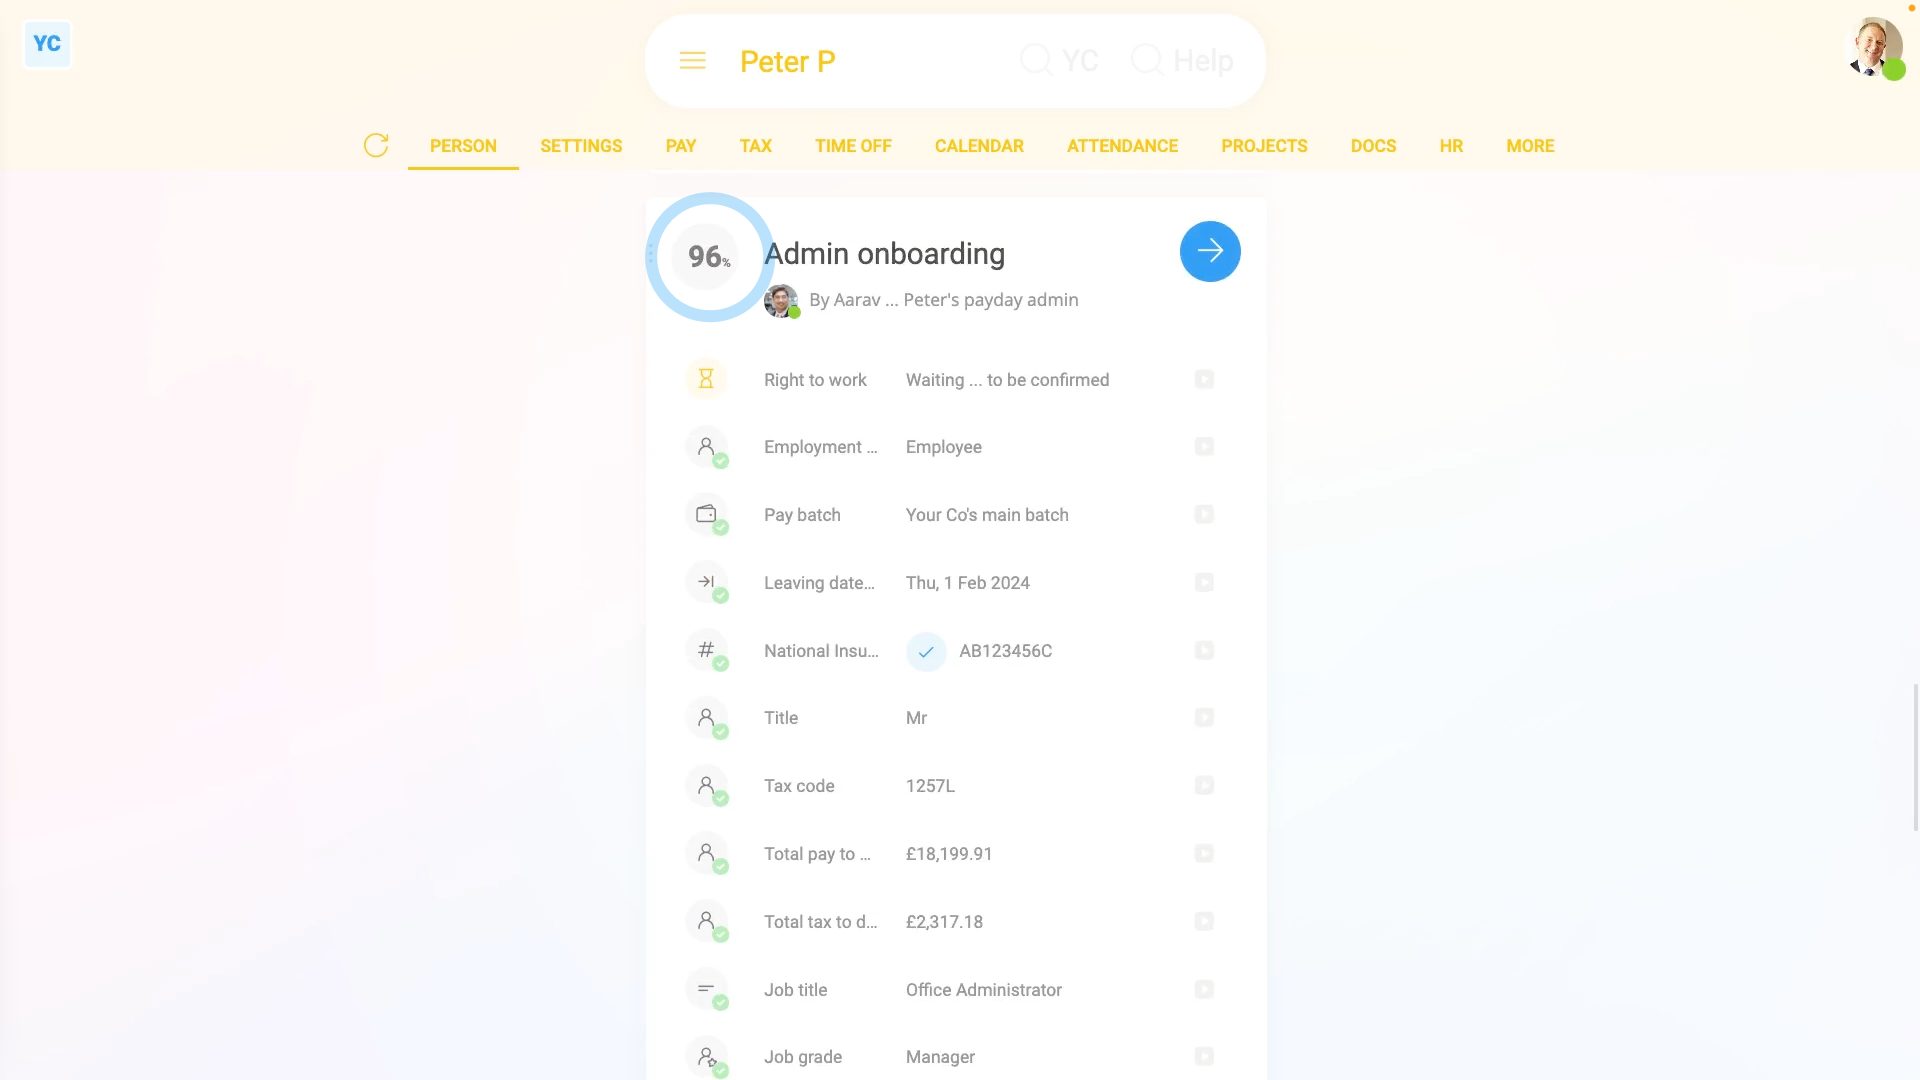
To see a person's "Admin onboarding" list and completion percent:
- First, select the person on: "Menu", then "People"
- Then while on the default "Person" tab, scroll down to: "Admin onboarding"
- The percentage (at the top) shows you how complete the onboarding is.
- To continue onboarding, tap the blue circle: (at the top)
- Or scroll down to the bottom of the onboarding list, and tap: Continue onboarding
- And finally, the onboarding automatically works out what info's needed next, and takes you right there.

To see onboarding completion percents for all your people:
- First, open the "People" menu on: "Menu", then "People"
- As long as you've got at least "View org admin" permissions, beneath each name you'll see each person's onboarding percentage.
- If both "Admin onboarding" and "Self onboarding" are 100%, you'll see only a single 100% number.
- When you hover your mouse over the onboarding percentage, you'll see a note explaining it.
- If their "Admin onboarding" and "Self onboarding" are at different percentages, you'll see both numbers.
- You can tap any of the percentages to jump to that person's onboarding.
- And you'll see the name of the person who's responsible for getting that person to 100%.
- Alternatively, to see the full onboarding list for your whole org, go to your org.
- Then tap: "HR", then "People"
- And you'll see two onboarding percent columns.
- And finally, when you tap any of the yellow onboarding percentages, it takes you directly to that person's next onboarding task. Making it the easiest place to complete your org's onboarding to 100%.
You may notice:
- That the onboarding list for some people is different to others.
- Different employment types, for example contractors, ask for different kinds of info.
- As you answer questions about each new hire, the onboarding software intelligently works out which other steps and info need to be added or collected.
- As long as you get each person to 100% onboarded, you'll likely have all the employment info that's required.
And that's it! That's everything you need to know about inviting a new hire, and doing their admin onboarding!
3. What's the best way to ask for a new hire's info, before joining?
 2:07
2:07
"What's the best way to ask for a new hire's info, before joining?"
Before setting up a new hire in 1st Money, you'll first need to ask for some employment info off them. Including info like tax numbers and contact info.
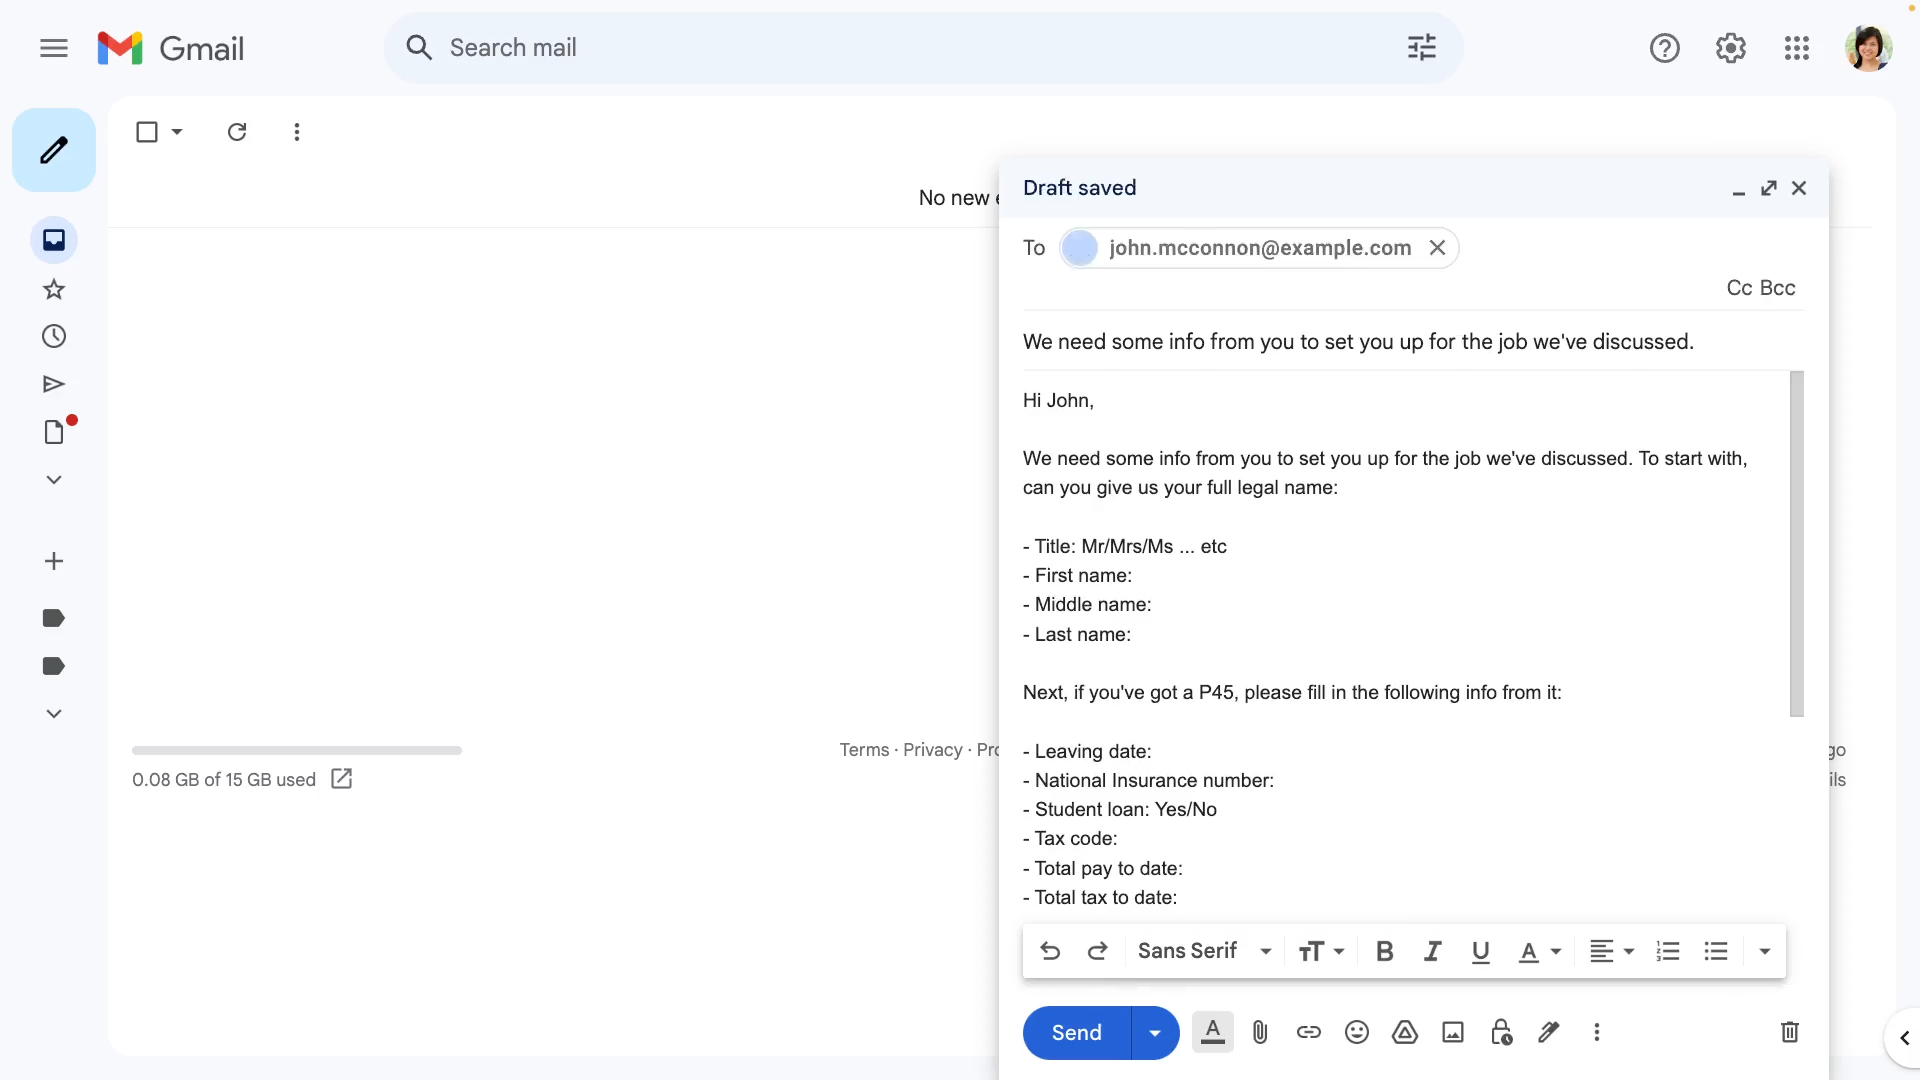
To email a new hire and get their employment info off them, before doing their set up:
- First, tap: "Menu", "People", then "Invite a person"
- Once it's open, tap: Email to ask for the person's info
- Next, by default, it shows you the info request template for the pay batch with the most people.
- If it's not the pay batch that you're planning to add the new hire to, tap the blue "change" link.
- And select the pay batch that you're planning to add them to.
- And now that you've got the right pay batch, tap: Copy text
- Next, go to your email inbox, and tap: Compose
- And paste in the text you copied earlier.
- Next, type in the new hire's name (at the top).
- And copy the first sentence from the email into the subject.
- All that's left is for you to type in the person's email, and tap: Send
- And finally, your new hire has an email that tells them exactly what info you need from them, to have them all set up.
Keep in mind that:
- It's important to select the correct pay batch before you tap: Copy text
- By selecting the correct pay batch, you make sure that your new hire's asked for exactly the right employment info.
For advanced usage:
- Feel free to type more into the email, including details about their job, or when the new hire's set to start, etc.
And that's it! That's everything you need to know about how to email a new hire to ask for their employment info!
4. How do I confirm a person's 'Right to work'?
 5:58
5:58
"How do I confirm a person's "Right to work"?"
Shortly after inviting a person to join, you may be asked to confirm that person's "Right to work" in the UK. Which can be done through either uploading their passport, their birth certificate, or by entering a "Right to work" share code.
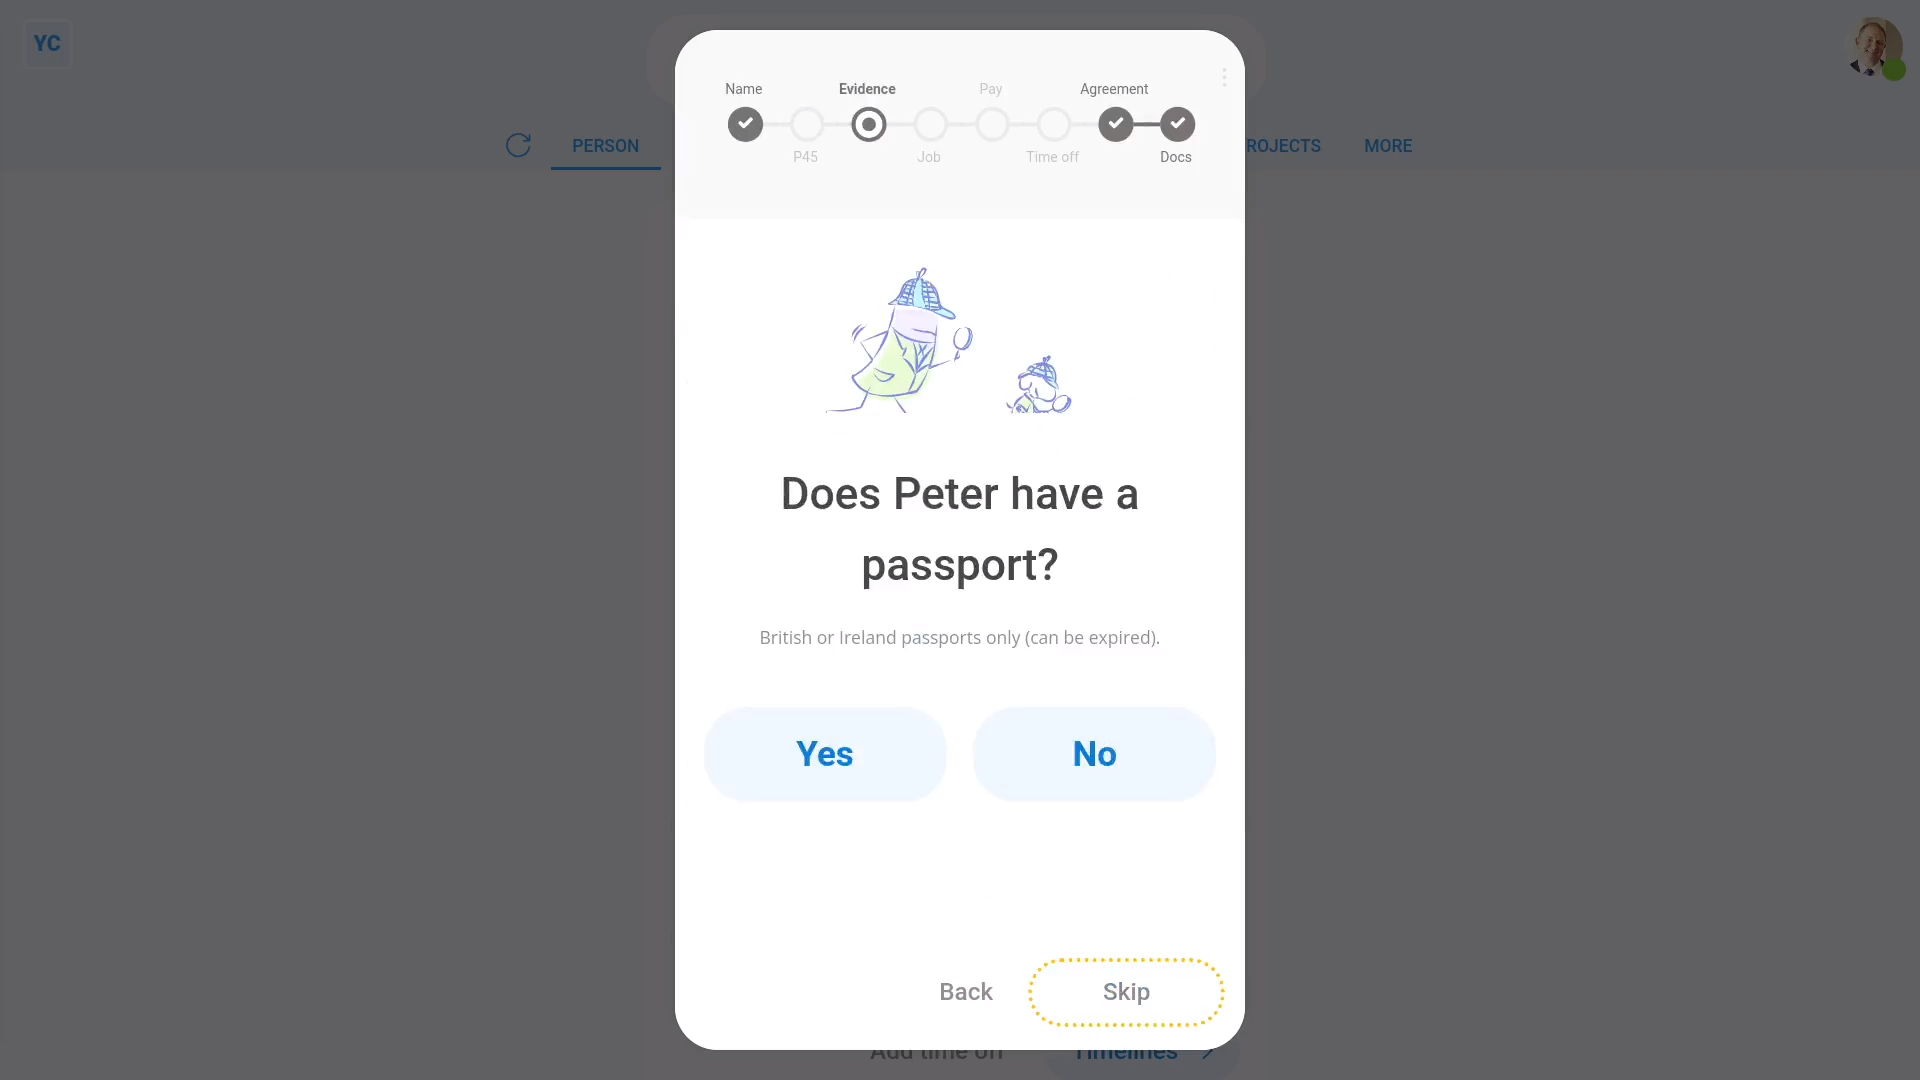
To confirm a person's "Right to work" through their passport:
- First, tap: "Menu", "People", then "Invite a person"
- Once it's open, tap Add a new person, and enter the person's email and tap: Invite
- Next, fill in the person's name, and tap: Next
- Because you're confirming "Right to work" through their passport, tap: Yes
- Type in their passport number.
- And take a photo, or upload an image of their passport's details page.
- Tap Next, then tap: Sign
- Then tap Next, and you're now all finished with confirming the person's: "Right to work"
- And finally, to see the person's "Right to work" confirmation using a passport, go to: "Settings", then "Right to work"
Keep in mind that:
- Only British or Ireland passports can be used for UK: "Right to work"
- However, there's no problem if you upload an expired passport.
To verify a person's "Right to work" through their birth certificate:
- First, tap: "Menu", "People", then "Invite a person"
- Once it's open, tap Add a new person, and enter the person's email and tap: Invite
- Next, fill in the person's name, and tap: Next
- Because you're confirming "Right to work" through their birth certificate, tap No, then: Yes
- Then take a photo, or upload an image of their birth certificate.
- Next, take a photo, or upload an image of their official letter.
- Tap Next, then tap: Sign
- Then tap Next, and you're now all finished with confirming the person's: "Right to work"
- And finally, to see the person's "Right to work" confirmation using a birth certificate, go to: "Settings", then "Right to work"
Bear in mind that:
- Only UK, Channel Islands, or the Isle of Man birth certificates can be used for UK: "Right to work"
- However, there's no problem if you upload an adoption certificate.
- The official letter can be any document from a government agency, or from the person's previous employer, that shows their name and National Insurance number.
To confirm a person's "Right to work" through a share code:
- First, tap: "Menu", "People", then "Invite a person"
- Once it's open, tap Add a new person, and enter the person's email and tap: Invite
- Next, fill in the person's name, and tap: Next
- Because you're confirming "Right to work" through a share code, tap No, then: No
- Type in the share code the person's sent to you by email.
- And enter their date of birth, then tap: Next
- Next, to go to the GOV.UK website and confirm their share code, tap: See "Right to work"
- The GOV.UK website asks you for the person's details. To copy and paste them, tap the copy buttons.
- Once you've logged in, find the person's share code "Reference number", and enter it.
- Next, look for the words "there's no limit", or the words "can work in the UK until", and enter those.
- Tap Next, then tap: Sign
- Then tap Next, and you're now all finished with confirming the person's: "Right to work"
- And finally, to see the person's "Right to work" confirmation using a share code, go to: "Settings", then "Right to work"
For advanced usage:
- To see everyone's confirmations in one place, look for the "Right to work" column in the pay batch's "People" report.
- From the "Right to work" column you can see, and update, anyone who's "Right to work" is missing or expired.
Also remember that:
- It's the employer's responsibility to physically see a suitable passport, birth certificate, or share code.
- And it's the employee's responsibility to have their "Right to work" share code sent to their employer, by email, when asked.
- If the person's lost their passport or birth certificate, the person needs to apply for a replacement. Applying for a share code, as a UK citizen, won't work.
- If the employee doesn't have a suitable passport or birth certificate, the employee must, themself, apply online for their share code.
- The employee can find the apply page by searching Google for: "prove your right to work"
You may notice:
- People who've got "Full org admin" permissions can confirm a person's "Right to work". Payroll permissions aren't required.
- However, although share codes expire after 90 days, the employer's required to keep "a secure copy" of the online "Right to work" check for two years.
- Look for the "Download PDF" link (at the bottom of the GOV.UK page) to download: "a secure copy"
And that's it! That's everything you need to know about confirming a person's "Right to work"!
How do I manage signing all the agreement docs for a pay batch?
 2:53
2:53
"How do I manage signing all the agreement docs for a pay batch?"
Every once in a while you may want to check that everyone in a pay batch's agreement docs are all signed and up-to-date.
To check that a pay batch's agreement docs are all signed and up-to-date:
- First, select the pay batch on: "Menu", then "Pay batches"
- Then to go to the "People" report, tap: "Pay", then "People"
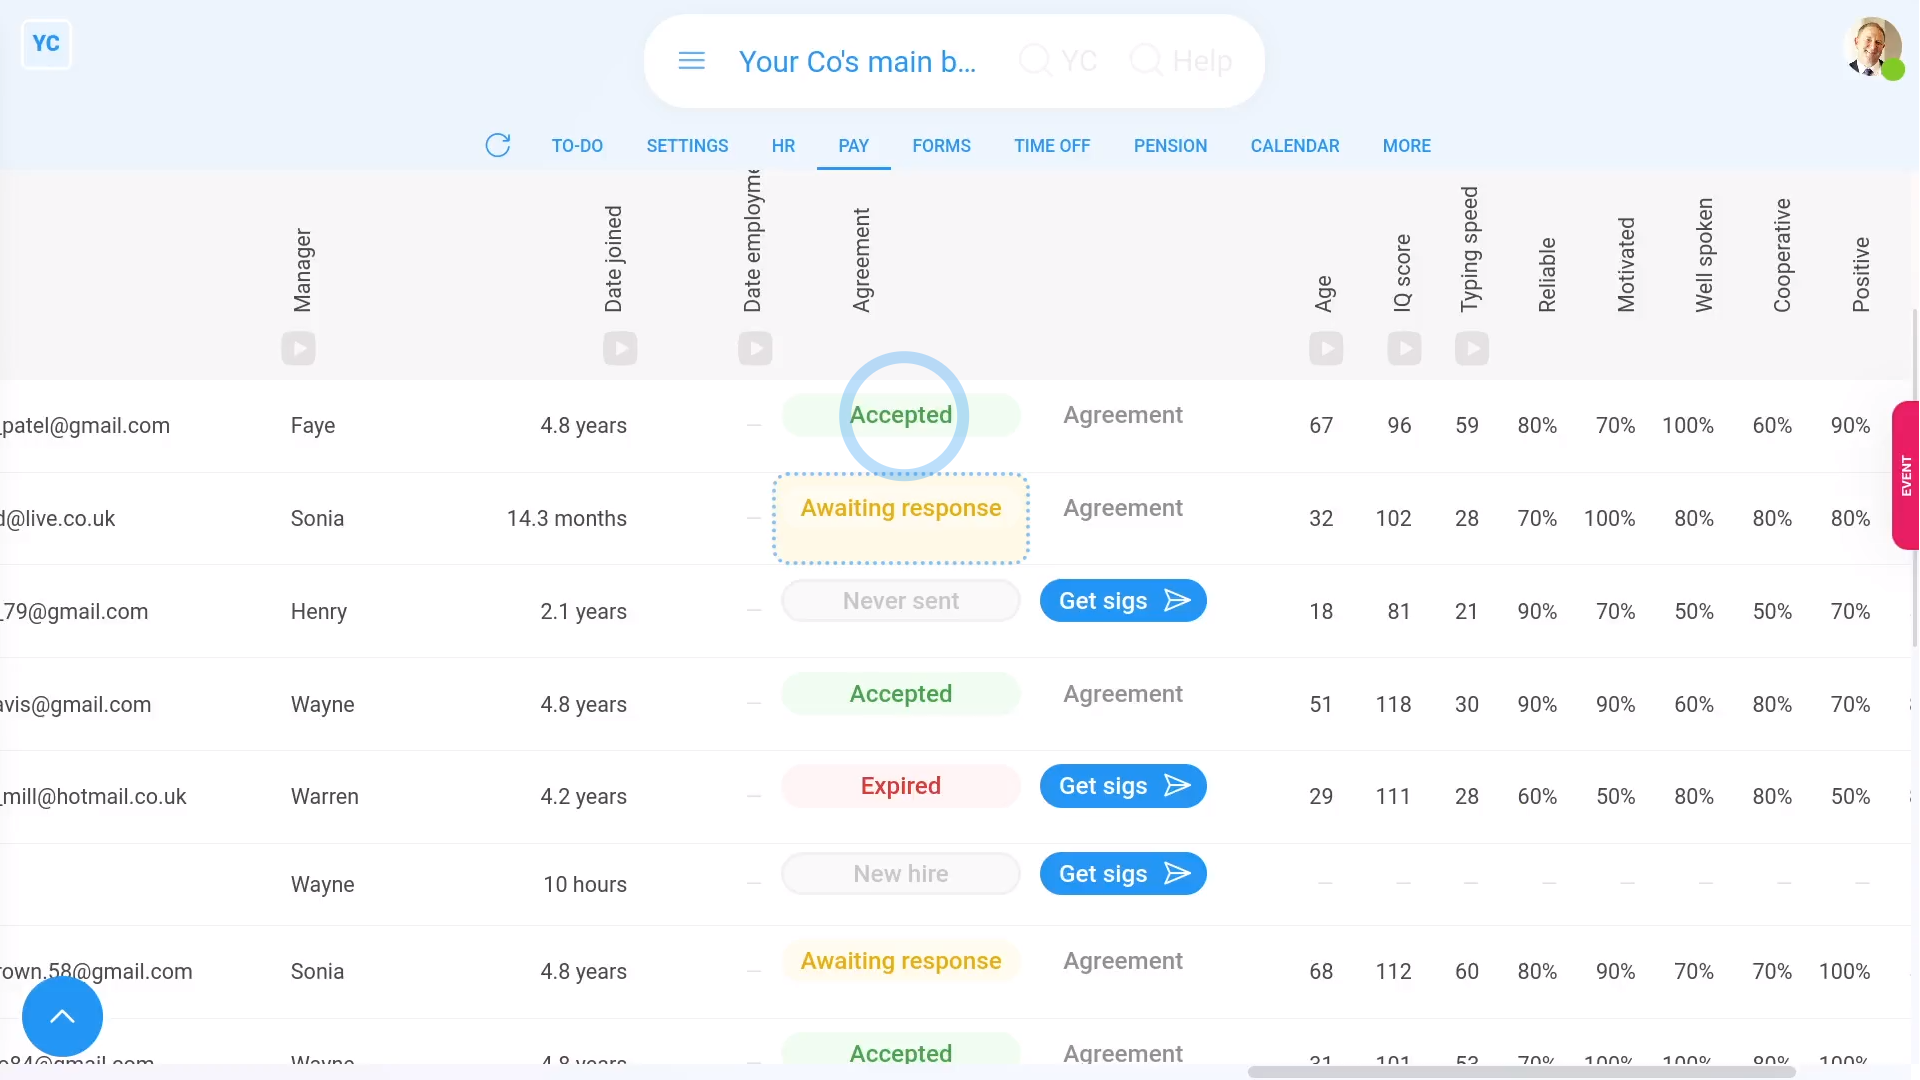
- The "People" report shows you a list of all the people in a pay batch.
- As you scroll across, you'll see the "Agreement" column which shows you the current agreement doc status for each of the pay batch's people.
- Understanding each agreement doc status:
The different agreement doc status includes: Declined, Never sent, Awaiting response, Expired, New hire, and Accepted. - When you tap any coloured status, you'll see even more details about that person's agreement doc.
- For example, if you tap the "Declined" status, you'll see the reason the person gave for declining.
- Getting everyone's agreements signed:
Ideally, you'd like to have every agreement doc on to the green "Accepted" status. - To change every agreement doc to the green "Accepted" status, tap your way through all the blue Get sigs buttons, one-by-one.
- And then on each one, tap Get agreement sigs, then Get signed, and then: I accept & electronically sign
- Then once you close it, you'll see the status of each person's agreement doc automatically update to: "Awaiting response"
- And if you tap that status, and scroll down, you'll see that your signature's been added to the doc.
- And that you're now waiting for the other person to add their signature.
- Continue to tap through all the blue Get sigs buttons until the agreement docs have all changed to: "Awaiting response"
- And finally, once you come back in a few days, you'll likely see all the rows change to the green "Accepted" status.
Keep in mind that:
- Agreement docs are optional. It's ok to not use the agreement docs feature. Everything else still works fine.
You may notice:
- That you can always change the selected agreement doc, and set the agreement start and end dates before sending any agreement doc.
To learn more:
- About how it looks for the person to receive and sign their agreement doc, watch the video on: Agreement doc setup
And that's it! That's everything you need to know about managing and signing all of a pay batch's agreement docs!
How do I remind a person to finish their onboarding?
 1:40
1:40
"How do I remind a person to finish their onboarding?"
Sometimes people need a gentle reminder to complete their onboarding to 100%.
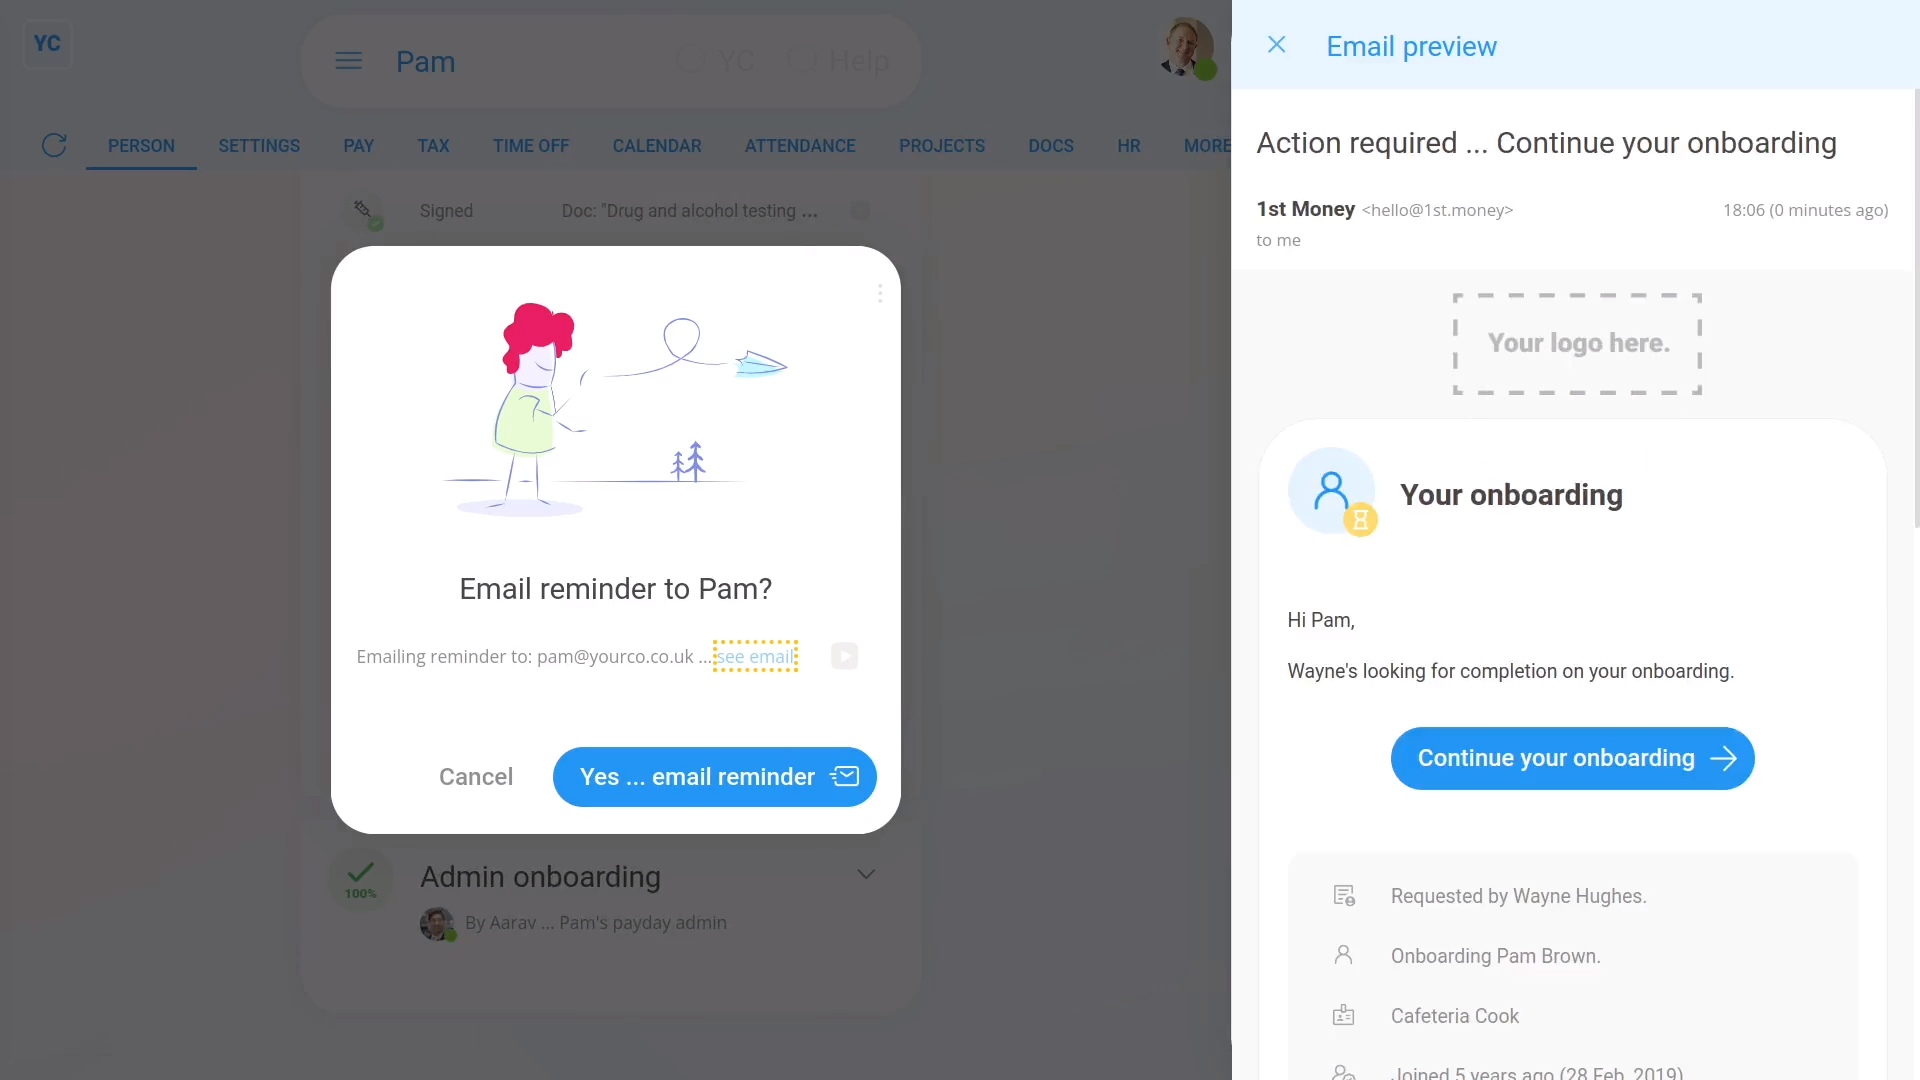
To send an email reminder to a person, asking them to complete their onboarding to 100%:
- First, select the person on: "Menu", then "People"
- Then while on the default "Person" tab, scroll down to: "Self onboarding"
- The percentage (at the top) shows you how complete the onboarding is.
- To send the person a reminder email, scroll down and tap: Remind
- To see what the reminder email looks like, tap the blue "see email" link.
- In the preview, you'll see a note explaining that if the person replies to the reminder email, the reply goes back to your email inbox.
- Then when you're ready to send it, tap: Yes ... send it
- And finally, you'll see a confirmation that your reminder email's been sent.
You may notice:
- That the onboarding reminder email works the same for both "Admin onboarding" and: "Self onboarding"
To learn more:
- About how onboarding looks for a new hire, watch the video on: Self onboarding
- Or to learn about how onboarding looks for an admin, watch the video on: Inviting a person & onboarding
And that's it! That's everything you need to know about sending an email reminder to a person, asking them to complete their onboarding to 100%!
How do I send a person's agreement doc?
 3:35
3:35
"How do I send a person's agreement doc?"
The agreement doc, while optional, helps you to record, in writing, the terms of work between the company and the person.
To send an agreement doc to a person for signing:
- First, select the person who you're sending the agreement doc to, on: "Menu", then "People"
- Then tap: "Docs", then "Agreement"
- Selecting the agreement doc:
Now select the agreement doc that you'd like the person to sign. - To see a full copy of each agreement doc, tap the "View" button: (on the side of each doc)
- The preview shows you exactly how the text is customised for the person.
- Once you've decided one, tap it, to set it as the person's agreement doc.
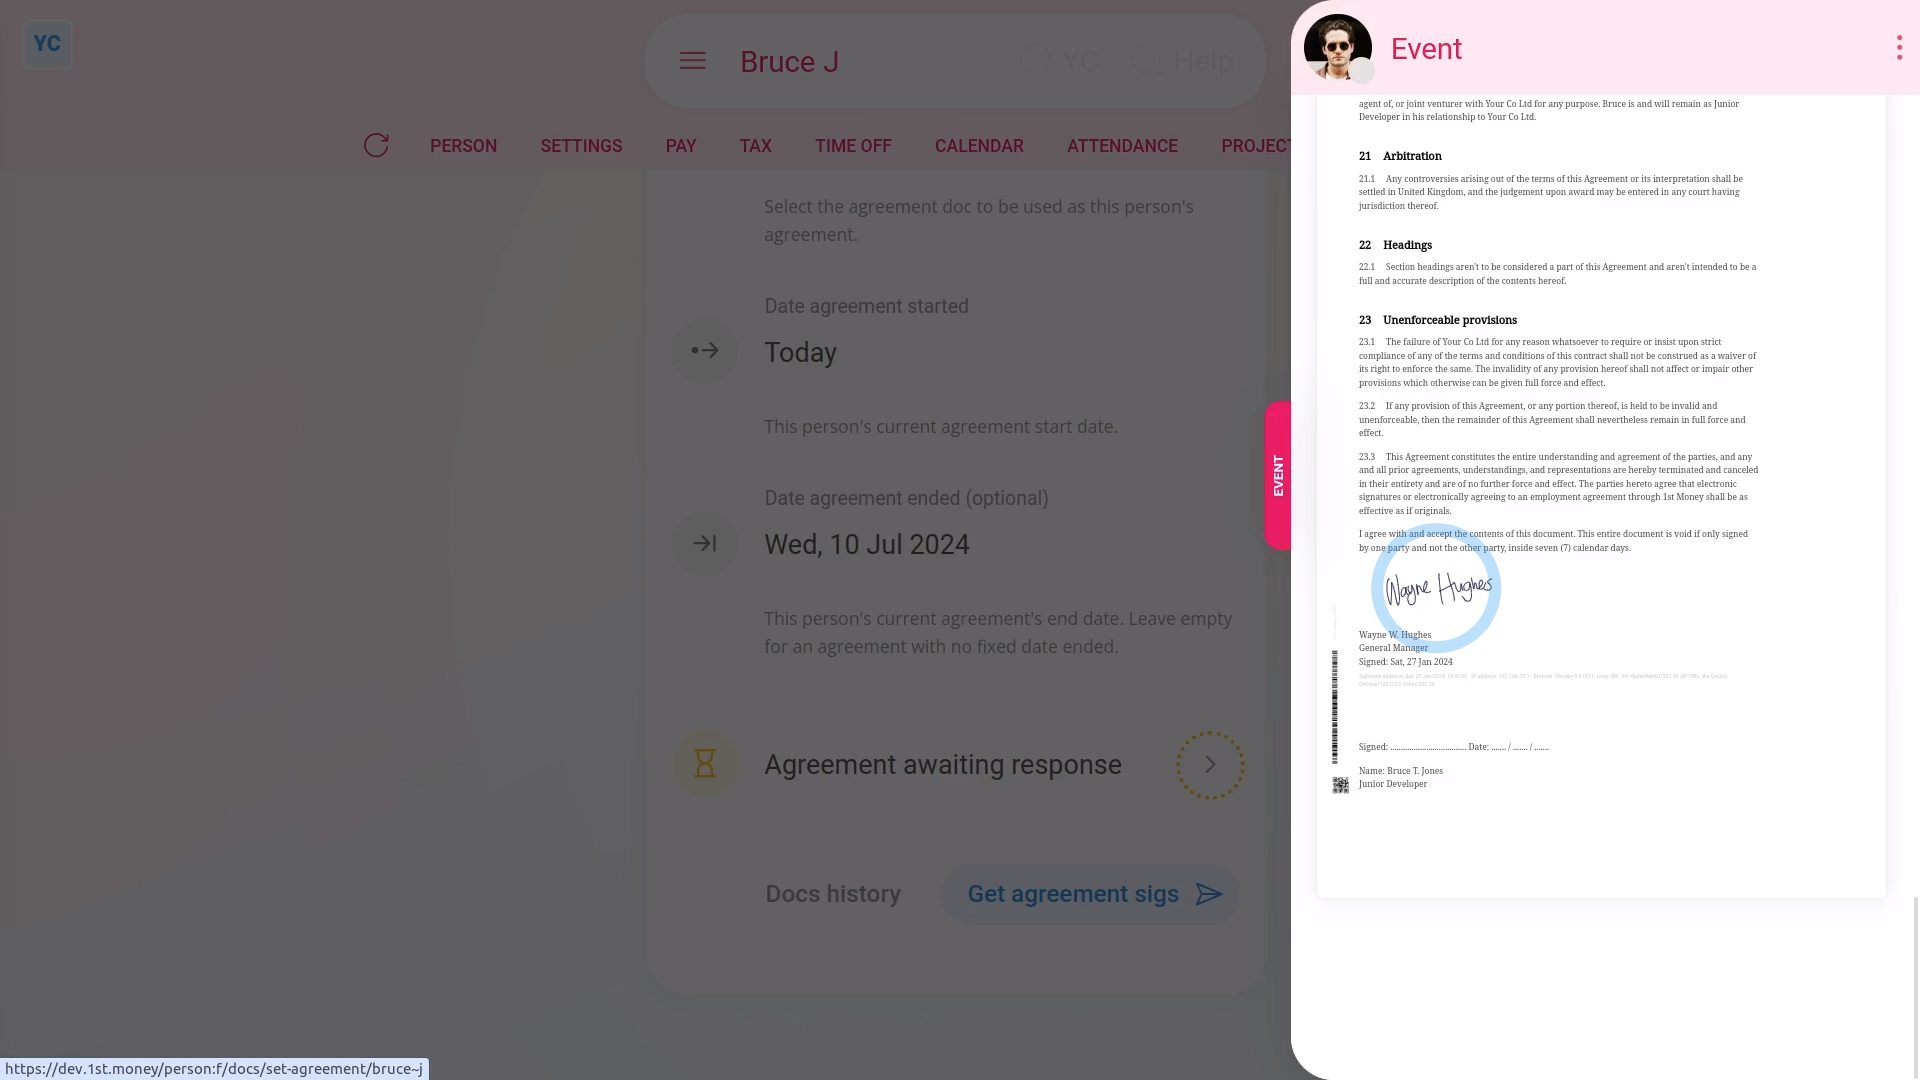
- Now that you've selected an agreement doc, you'll see the agreement start and end date boxes appear.
- Setting the start date's required. Set it to the date you intend the agreement to start from.
- In most cases, you can tap: Set to today
- The agreement end date's optional. In most cases, you can leave it empty if you intend for the work agreement to continue indefinitely.
- However, if it's a fixed length contract, set the end date now, and 1st Money helps you to manage the expiry, and possible renewal.
- For now, you can see the agreement doc status is set to: "Agreement never sent"
- Sending the agreement doc:
To send the agreement doc to the person, tap: Get agreement sigs - Once it slides out on the right, you'll see a final preview of the agreement doc.
- All agreement docs need to be signed by both an admin (or manager), and also by the person themself.
- As you'll be signing, on behalf of the company, you may want to read through the doc before continuing.
- And to make any changes, tap: Show editor
- Then once you're ready, tap Get signed by, and then: I accept & electronically sign
- And now that it's been sent to the person as an email, tap: Close
- Seeing the agreement doc's status:
You'll now see that the agreement doc's status has changed to: "Agreement awaiting response" - To see a copy of the sent agreement doc, tap the "View" button: (at the end of the row)
- And you'll later see the doc's status change, once the person gets their agreement doc email, and signs the doc.
- But, for now, if you scroll to the bottom of the doc, you'll see that your signature's been added to the doc.
- And finally, once the person's signed their agreement doc, you'll see their signature there as well.
Keep in mind that:
- Agreement docs are optional. It's OK to not use the feature. Everything else still works fine.
You may notice:
- That many of a person's terms of work are already stored in 1st Money. For example, their pay, work hours, job title, etc.
- Sending it out for signing, as an agreement doc, improves the chance that if anything's wrong with a person's terms of work, the errors are spotted.
To learn more:
- About how it looks for the person to receive and sign their agreement doc, watch the video on: Agreement doc setup
And that's it! That's everything you need to know about sending a person's agreement doc!
How do I set the default rate time frame when onboarding a new hire?
 2:16
2:16
"How do I set the default rate time frame when onboarding a new hire?"
Each time you onboard a new hire, you'll be asked what time frame to set the new hire's rate to. For example, per year, per hour, etc. However, you can instead set a default once, and then never have to set it again.
To set a new hire's default rate time frame for a pay batch:
- First, select the pay batch on: "Menu", then "Pay batches"
- Then tap: "HR", then "Docs ... pay batch onboarding"
- And scroll down to the "Onboarding defaults" heading.
- And select your preferred default rate time frame by changing: "Default "Rate amount" time frame"
- Then tap: Save
- Next, to see it in action by adding a new person, tap: "Menu", "People", then "Invite a person"
- Once it's open, tap Add a new person, enter the person's email, and tap: Invite
- Next, fill in the person's name, and then set the pay batch to the one you've set the default rate time frame for.
- Then tap: Next
- Normally, you'd fill in all the onboarding details, but for the example, skip your way through to the "Pay" settings page.
- And finally, you'll see it's correctly set the new hire's rate time frame for you. So now you only need to type in their rate.
Keep in mind that:
- You're still welcome to change each new hire to a different rate time frame, one-by-one, as you add them.
- Also, if you later change your mind, you can also change the default at any time.
- Plus, each pay batch can have a different default, to exactly match how you pay different people, in different locations.
To learn more:
- About the different rate time frames, watch the video on: Per year, per month, or per hour
And that's it! That's everything you need to know about setting a new hire's default rate time frame!
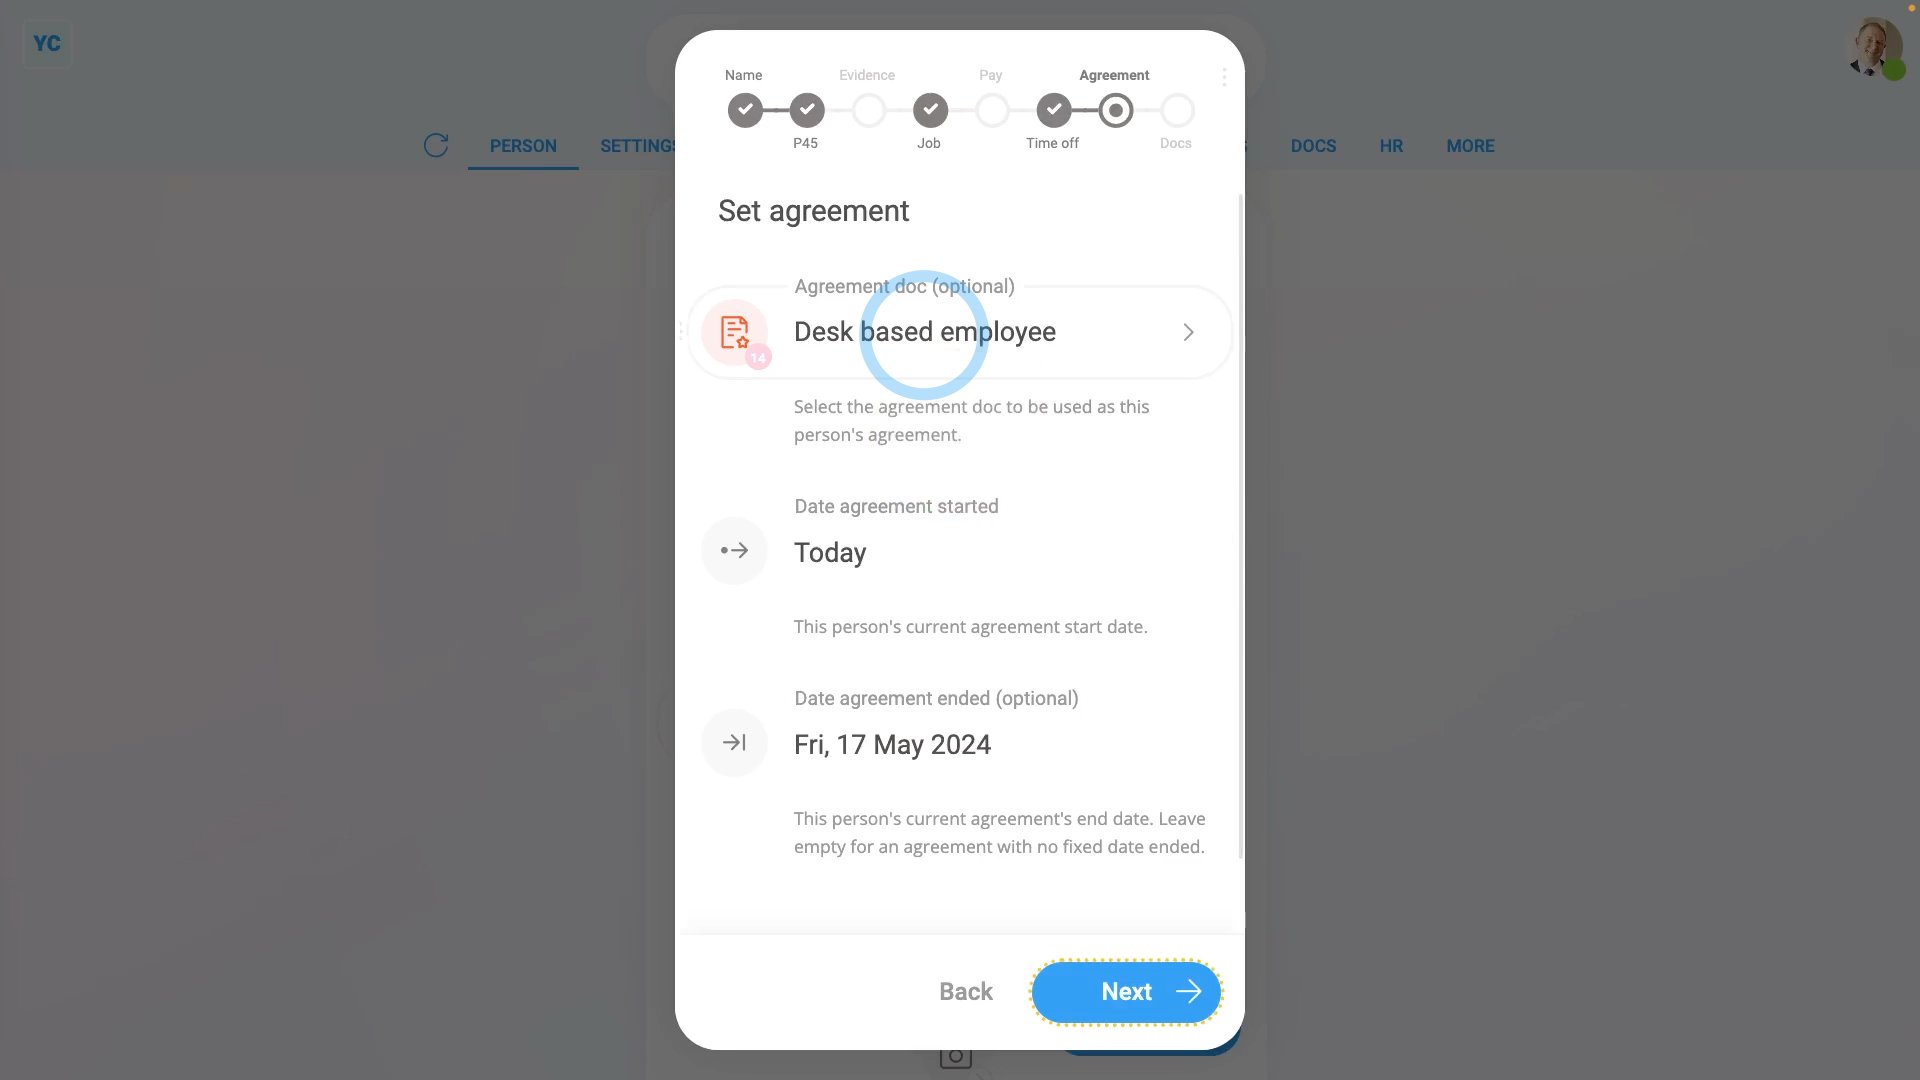
How do I setup an agreement doc?
 6:27
6:27
"How do I setup an agreement doc?"
An agreement doc establishes the employment agreement between an employer and an employee. The agreement doc can also be a contractor agreement, a freelancing agreement, a casual services agreement, and more.
Whenever a person joins your org, as part of their onboarding, the person can be automatically shown an agreement doc for them to read and sign.
To set a pay batch's default agreement doc, and have a person sign their agreement doc:
- First, to set the pay batch's default agreement doc:
Select the pay batch on: "Menu", then "Pay batches" - Then tap: "HR", then "Docs ... pay batch onboarding"
- And scroll down to the "Onboarding agreement" heading.
- And select which doc you'd like to be shown to all the people who join the pay batch, as their: "Default agreement doc"
- To see the contents of any doc, first select any doc, then tap the "View" button:
- You can also set a default number of months that the agreement doc automatically expires by.
- To have no expiry date, leave it as zero, and the agreement doc continues on indefinitely.
- Then once you've finished with the agreement doc settings, tap: Save
- To onboard a person, and see how the agreement doc looks:
First, tap: "Menu", "People", then "Invite a person" - Once it's open, tap Add a new person, and enter the person's email and tap: Invite
- Next, fill in the person's name, and then set the pay batch to the one you've set the default agreement doc for.
- Then tap: Next
- Normally, you'd fill in all the onboarding details, but for the example, skip your way through to the "Set agreement" page.
- You'll see that the onboarding settings has correctly set the: "Agreement doc"
- And it's defaulted the "Date agreement started" to today, and set the "Date agreement ended" to the number of expiry months you'd previously set.
- As the employer, you can still change any of the settings. For example, you could even tap Leave empty and there'd be no agreement doc for the person to sign.
- To send an agreement doc to the person:
Tap Next, you'll see the agreement doc queued as the first doc to send the person, with their other onboarding docs below. - To start the sending process, tap: Next
- Set the person's work location, then tap: Next
- Because there's multiple new docs, you may prefer to tap Turn on auto-send, and then: Start auto send
- And you may prefer to turn on: "Turn on one-tap signing"
- Sending an agreement doc to a person is a two part signing process. First, the employer signs the agreement. Then it's sent to the person for signing.
- Next, to sign on behalf of the employer, as the first part of the signing process, tap: I accept & electronically sign
- And now, once all the onboarding docs are sent for the person, tap: Close
- To see a copy of the sent agreement doc, scroll to the bottom of the "Admin onboarded" list.
- Then for the first of the "Sent" rows, tap the "View" button: (at the end of the row)
- And you'll later see the doc's status change, once the person gets their login invite email, and signs the doc.
- To see how it looks when the person receives the agreement doc:
If the person's new, the person gets a login invite email, for them to tap: Accept invite - The person's then shown their agreement doc, for them to read through carefully.
- And the person can't tap Accept until the document's scrolled all the way down.
- Near the bottom the person can see that you've already signed it.
- So all that's left is for them to tap Decline, or: Accept
- Then once the person's tapped Accept, because it's their first time to sign anything in 1st Money, their signature needs to be added.
- And then tap: I accept & electronically sign
- One-by-one, the person's taken through all their onboarding docs.
- The person may also prefer to turn on: Turn on one-tap signing
- Once the person's read all their onboarding docs, and tapped Accept (at the bottom of each), the person can now access 1st Money.
- And finally, once inside 1st Money, the person can finish the rest of their set up, like taking their portrait photo.
Keep in mind that:
- For every doc the person accepts and signs, an email's sent to them with a PDF attachment of their signed doc.
- A copy's also stored in: "Docs history"
To learn more:
- About tracking which of your people have an up-to-date and signed agreement doc, watch the video on: Managing agreement docs
- To learn more about seeing all of a person's signed agreement docs, watch the video on: Docs history
And that's it! That's everything you need to know about having a person sign their agreement doc!
What's the starting declaration for, and which one do I select?
 3:18
3:18
"What's the starting declaration for, and which one do I select?"
When you newly hire a new person who's not got a P45, HMRC requires that you make a "Starting declaration" about that person's situation.

To set a person's "Starting declaration" during onboarding, when a person doesn't have a P45:
- First, tap: "Menu", "People", then "Invite a person"
- Once it's open, tap Add a new person, and enter the person's email and tap: Invite
- Next, fill in the person's name, and then tap: Next
- Then when asked about their P45, tap: No
- Normally, you'd fill in all the onboarding details, but for the example, skip your way through to the "Pay" settings page.
- Then set the person's pay rate, and tap: Next
- Next, because you said "No" to the P45, you'll be asked to select the person's: "Starting declaration (if no P45)"
- In most cases, you'll select the first option.
- The first option is for when it's their first and only job so far in the tax year.
- The second option is for when the person's had another job in the tax year, but don't have their P45. For example, if the person's lost their P45.
- The third option is for when the person's working another job, or have a pension, and don't have their P45.
- Read through the notes and decide which is best.
- Then once you've selected one, you'll see the person's "Tax code" is automatically filled in. It's filled in with a "best guess" tax code, according to rules set by HMRC.
- And finally, once you're ready, tap Next and continue with onboarding, as usual.
Keep in mind that:
- In all cases where a person does have their tax code from their previous job, leave the "Starting declaration" empty. And type in the tax code directly.
- If the person was issued a P45 from their previous employer, and has since lost their P45, then it's fine to still set their "Starting declaration", and go from there.
- In some cases, including where the person never had a P45, or the person lost their P45, the "best guess" tax code may need changing. If so, HMRC automatically does the update.
- If HMRC's systems detect a more suitable tax code, an "HMRC notice" is automatically issued and the person's tax code is automatically updated.
- Both you, and the person, get an email if the tax code is ever updated through an: "HMRC notice"
And that's it! That's everything you need to know about setting a person's starting declaration during onboarding, when a person doesn't have a P45!
What are job grade onboarding docs, and how do I use them?
 3:30
3:30
"What are job grade onboarding docs, and how do I use them?"
Onboarding docs are shown, one-by-one, to every new hire, when the new hire joins your org. To hit 100% onboarded, new hires need to review each onboarding doc in their queue. Job grade onboarding docs is one way to add docs to their queue.
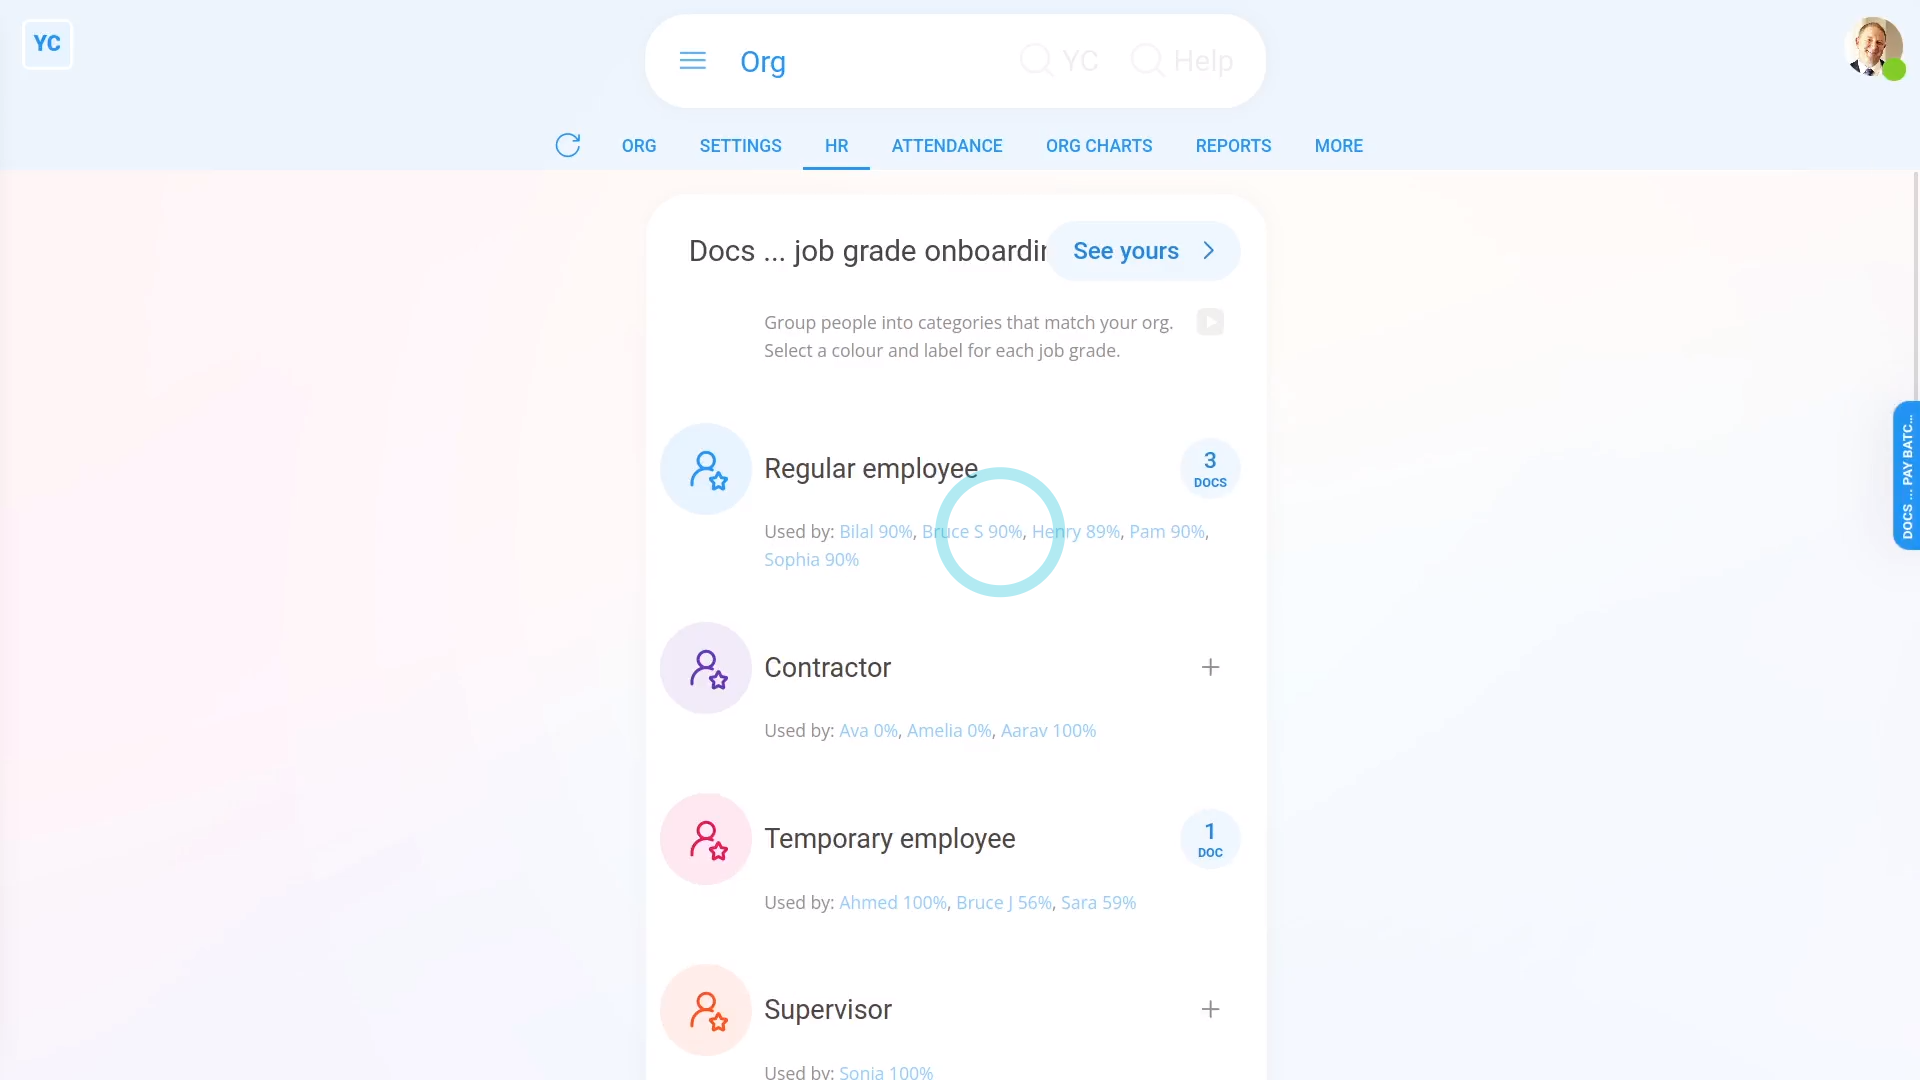
To queue and send job grade onboarding docs:
- First, open your org on: "Menu", then "Orgs"
- Then tap: "HR", then "Docs ... job grade onboarding"
- Below each job grade, you'll see the names of some of the people who've got that job grade.
- And beside each job grade, you'll see a plus button:
- To add onboarding docs to a job grade, tap its plus button , and you'll see a list of the docs slide out on the right.
- To see what's written in an onboarding doc, hover your mouse over the doc's circle.
- To see a full preview of a doc, tap the blue "View" button: (that shows when you hover)
- Then to add some, tap the onboarding docs on the left side.
- And once you're ready, tap: Save
- And you'll see a count of your added docs.
- And you'll notice that the updated admin onboarding percent of the job grade's people is no longer 100%.
- It's no longer 100% because you've added new onboarding docs to the job grade, but the people haven't had an admin send their new docs yet.
- To go to a person's onboarding list, and send their new onboarding docs now, tap the percentage.
- Then scroll to the bottom and tap: Continue onboarding
- Each of the new onboarding docs are listed with a blue switch , meaning it's queued to be sent.
- To start the sending process, tap Next, and then: Send
- However, because there's multiple new docs, you may prefer to tap Turn on auto-send, and then: Start auto send
- And now, once all the new onboarding docs are sent for the person, tap: Close
- And you'll see that the person's now 100% admin onboarded. Or, in other words, as an admin you've done all of that person's onboarding tasks.
- And when you tap and expand the onboarding percent, and scroll to the bottom, you'll see all the docs have been: "Sent"
- And then when you tap one, you'll see that the doc's status is still "Doc waiting for signing" by the person.
- And finally, the next time the person uses 1st Money, the person's automatically prompted to read and sign their new onboarding docs.
Keep in mind that:
- Some docs require the person to add their signature, while other docs require the person to read it, and then mark it as: "Got it"
- Also, as soon as you've added the job grade's onboarding docs, the docs are then queued to be seen.
- Including by every person that's already assigned the job grade.
- And also by any new person that's assigned the job grade at any time in the future.
To learn more:
- About the other kind of onboarding docs, watch the video on: Pay batch onboarding docs
- To learn more about job grades, watch the video on: Using job grades
And that's it! That's everything you need to know about setting and sending job grade onboarding docs!
What are pay batch onboarding docs, and how do I use them?
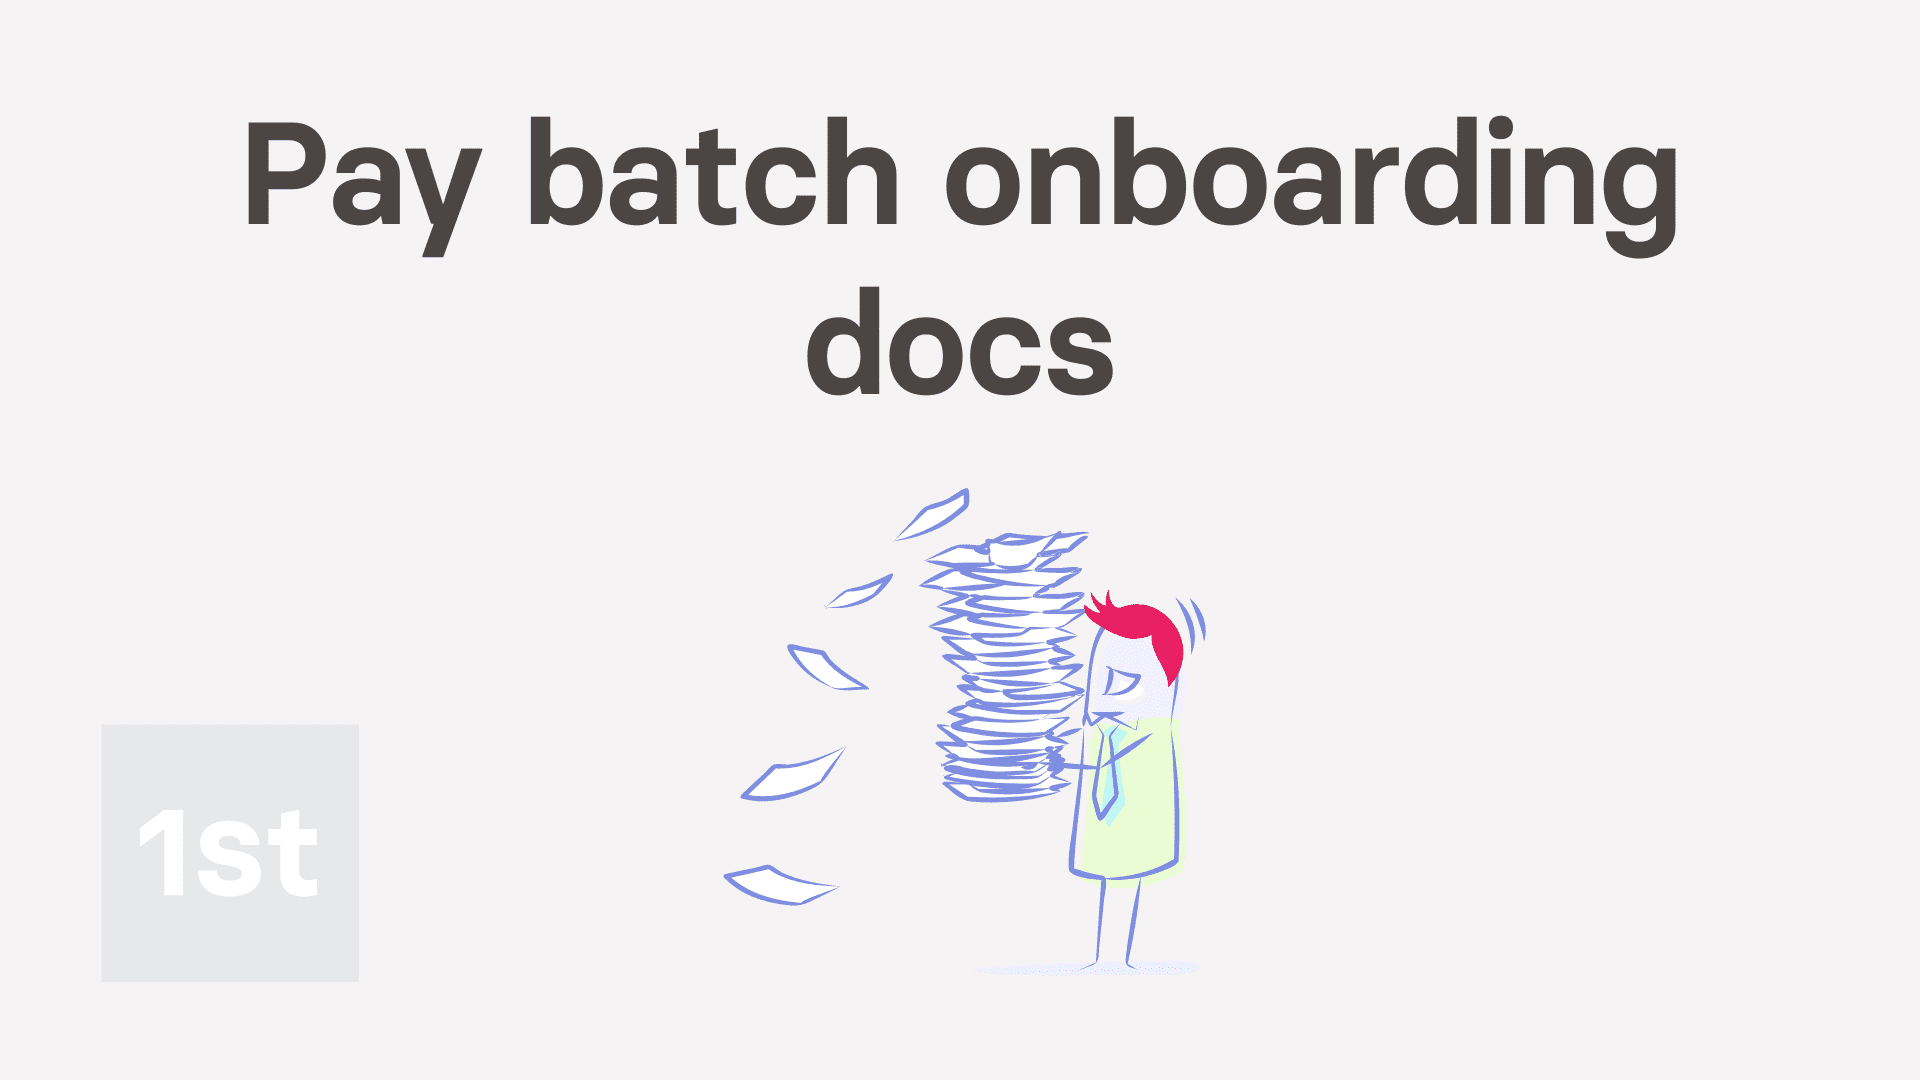 4:13
4:13
"What are pay batch onboarding docs, and how do I use them?"
Onboarding docs are shown, one-by-one, to every new hire, when the new hire joins your org. To hit 100% onboarded, new hires need to review each onboarding doc in their queue. Pay batch onboarding docs is one way to add docs to their queue.

To queue and send a pay batch's onboarding docs:
- First, select the pay batch on: "Menu", then "Pay batches"
- Then tap: "HR", then "Docs ... pay batch onboarding"
- By default, there's already some onboarding docs pre-selected for you.
- To add or remove some of the onboarding docs, tap Add docs and you'll see a list of the docs slide out on the right.
- To see what's written in an onboarding doc, hover your mouse over the doc's circle.
- To see a full preview of a doc, tap the blue "View" button: (that shows when you hover)
- To remove all the pre-selected onboarding docs, tap: Remove all
- Then to add some back, tap the onboarding docs on the left side.
- And once you're ready, tap: Save
- And you'll see a listing of your added docs.
- Now, to see the updated onboarding status of the pay batch's people, tap: "Settings", then "Pay batch settings"
- Then scroll down to the list of the pay batch's people.
- You'll notice that their admin onboarding percent is no longer 100%.
- It's no longer 100% because you've added new onboarding docs to the pay batch, but the people haven't had an admin send their new docs yet.
- To go to a person's onboarding list, and send their new onboarding docs now, tap the percentage.
- Then scroll to the bottom and tap: Continue onboarding
- Each of the new onboarding docs are listed with a blue switch , meaning it's queued to be sent.
- To start the sending process, tap Next, and then: Send
- However, because there's multiple new docs, you may prefer to tap Turn on auto-send, and then: Start auto send
- And now, once all the new onboarding docs are sent for the person, tap: Close
- And you'll see that the person's now 100% admin onboarded. Or, in other words, as an admin you've done all of that person's onboarding tasks.
- And when you tap and expand the onboarding percent, and scroll to the bottom, you'll see all the docs have been: "Sent"
- And then when you tap one, you'll see that the doc's status is still "Doc waiting for signing" by the person.
- And finally, the next time the person uses 1st Money, the person's automatically prompted to read and sign their new onboarding docs.
Keep in mind that:
- Some docs require the person to add their signature, while other docs require the person to read it, and then mark it as: "Got it"
- Also, as soon as you've added the pay batch's onboarding docs, the docs are then queued to be seen.
- Including by every person that's already in the pay batch.
- And also by any new person that's added to the pay batch at any time in the future.
You may notice:
- That the set of docs that's in your pay batch by default is 1st Money's recommended set of onboarding docs.
- The default onboarding docs could suit the onboarding needs of most employers.
For advanced usage:
- The other onboarding docs, that're listed as available, but you'd still need to turn on, depending on your needs, include.
- An: "Invention & IP disclosure agreement"
- A: "Non-competition agreement"
- And a: "Non-solicitation & non-dealing agreement"
To learn more:
- About the other kind of onboarding docs, watch the video on: Job grade onboarding docs
And that's it! That's everything you need to know about setting and sending a pay batch's onboarding docs!