
Payroll

 6:47
6:47 2:05
2:05 7:05
7:05 2:10
2:10 4:43
4:43 2:32
2:32 1:29
1:29 5:13
5:13 3:25
3:25 2:33
2:33 1:422:52
 1:43
1:43 1:38
1:38 2:28
2:28 2:55
2:55 1:55
1:55 1:58
1:58 2:01
2:01 1:34
1:34 2:44
2:44 2:37
2:37 3:08
3:081. How do I decide the right employment type?
 6:35
6:35
"How do I decide the right employment type?"
Setting "Employment type" tells you if a person's a contractor or an employee. It also tells you whether the person gets holiday pay or pensions, along with a few other things.

Not paid: To set a person's "Employment type" to "Not paid":
- First, select the person on: "Menu", then "People"
- Then tap: "Pay", then "Pay settings"
- And then: "Employment type"
- In the list that opens, select: "Not paid"
- "Not paid" is for people who are unpaid or paid elsewhere.
- And finally, selecting "Not paid" still lets you use all the HR features like timesheets and HR docs. But without the payroll features like payslips or taxes.
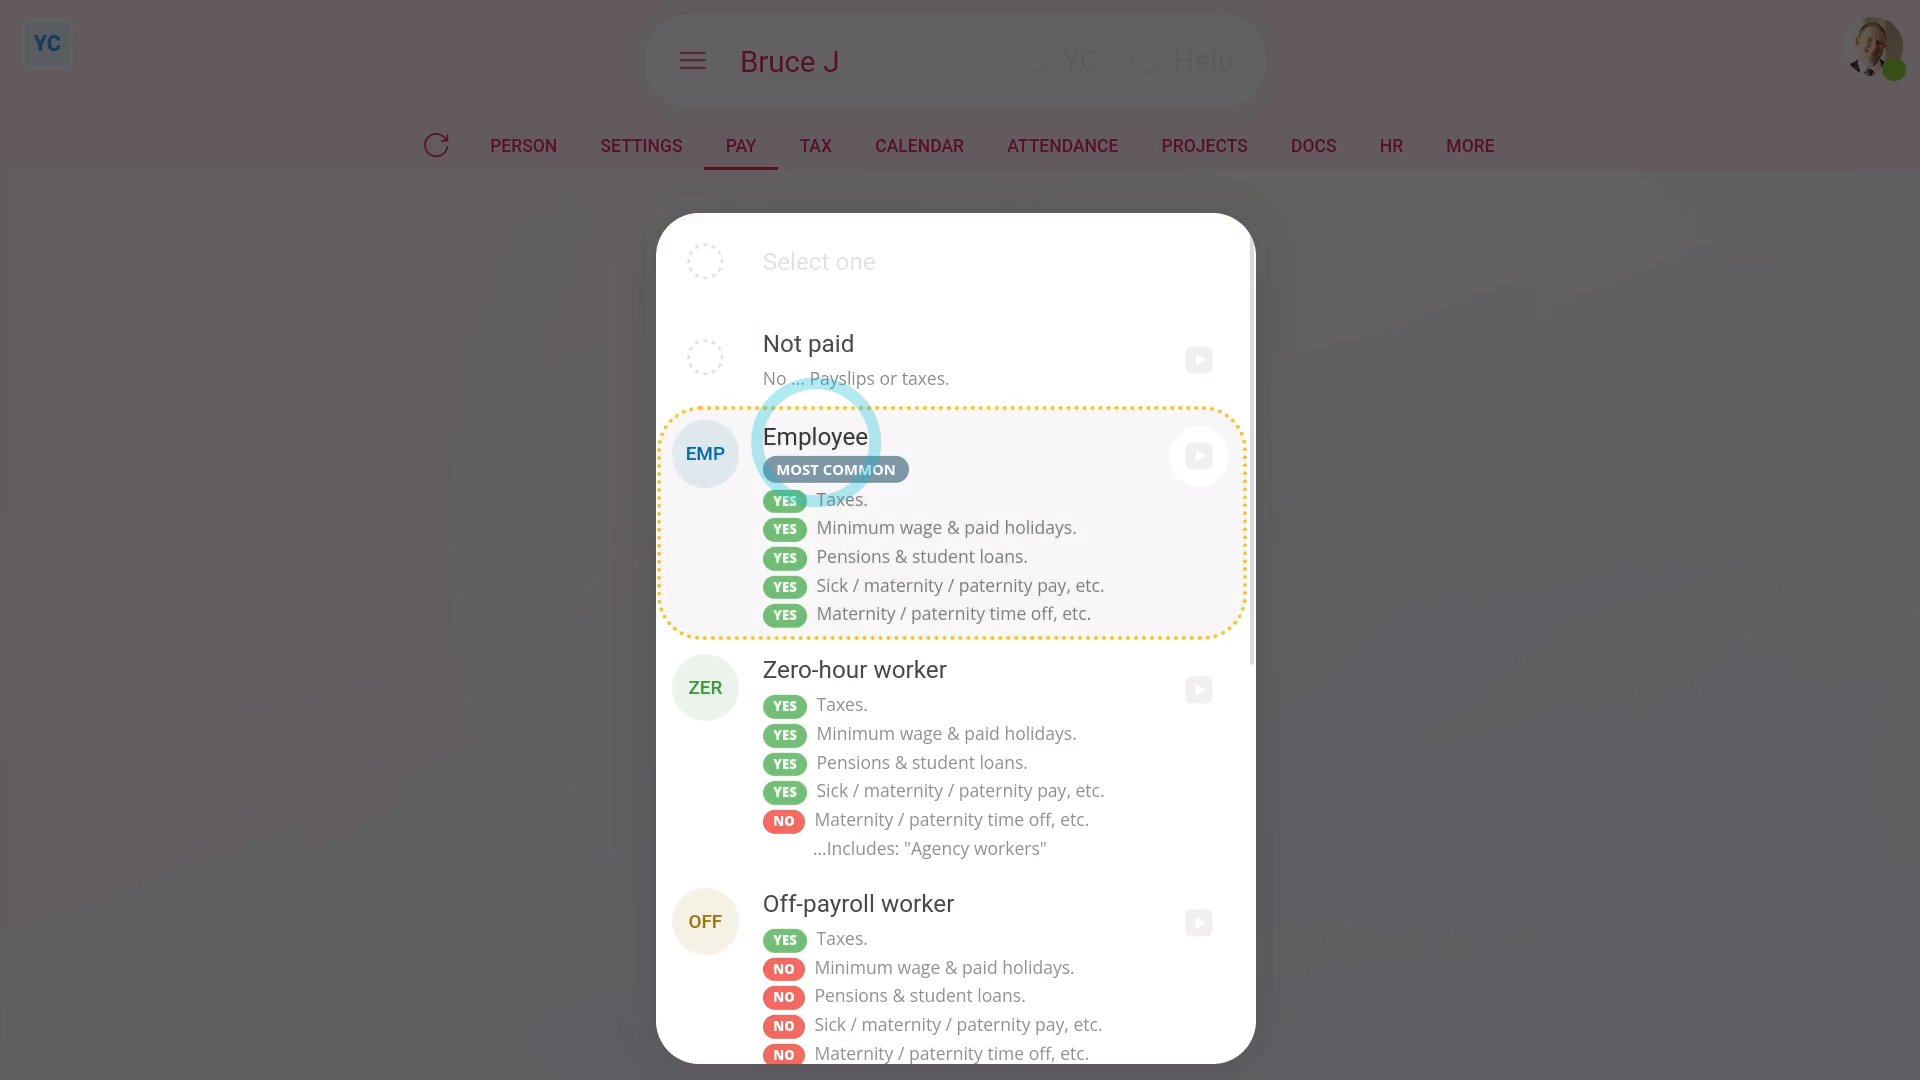
Employee: To set a person's "Employment type" to "Employee":
- First, select the person on: "Menu", then "People"
- Then tap: "Pay", then "Pay settings"
- And then: "Employment type"
- In the list that opens, select: "Employee"
- "Employee" is the most common employment type.
- Selecting "Employee" means the person's taxes get taken off their payslips.
- It also means the person gets all the normal benefits like paid holidays, pensions, and Statutory Leave.
- And finally, to learn more, see HMRC's page on: Employee employment status
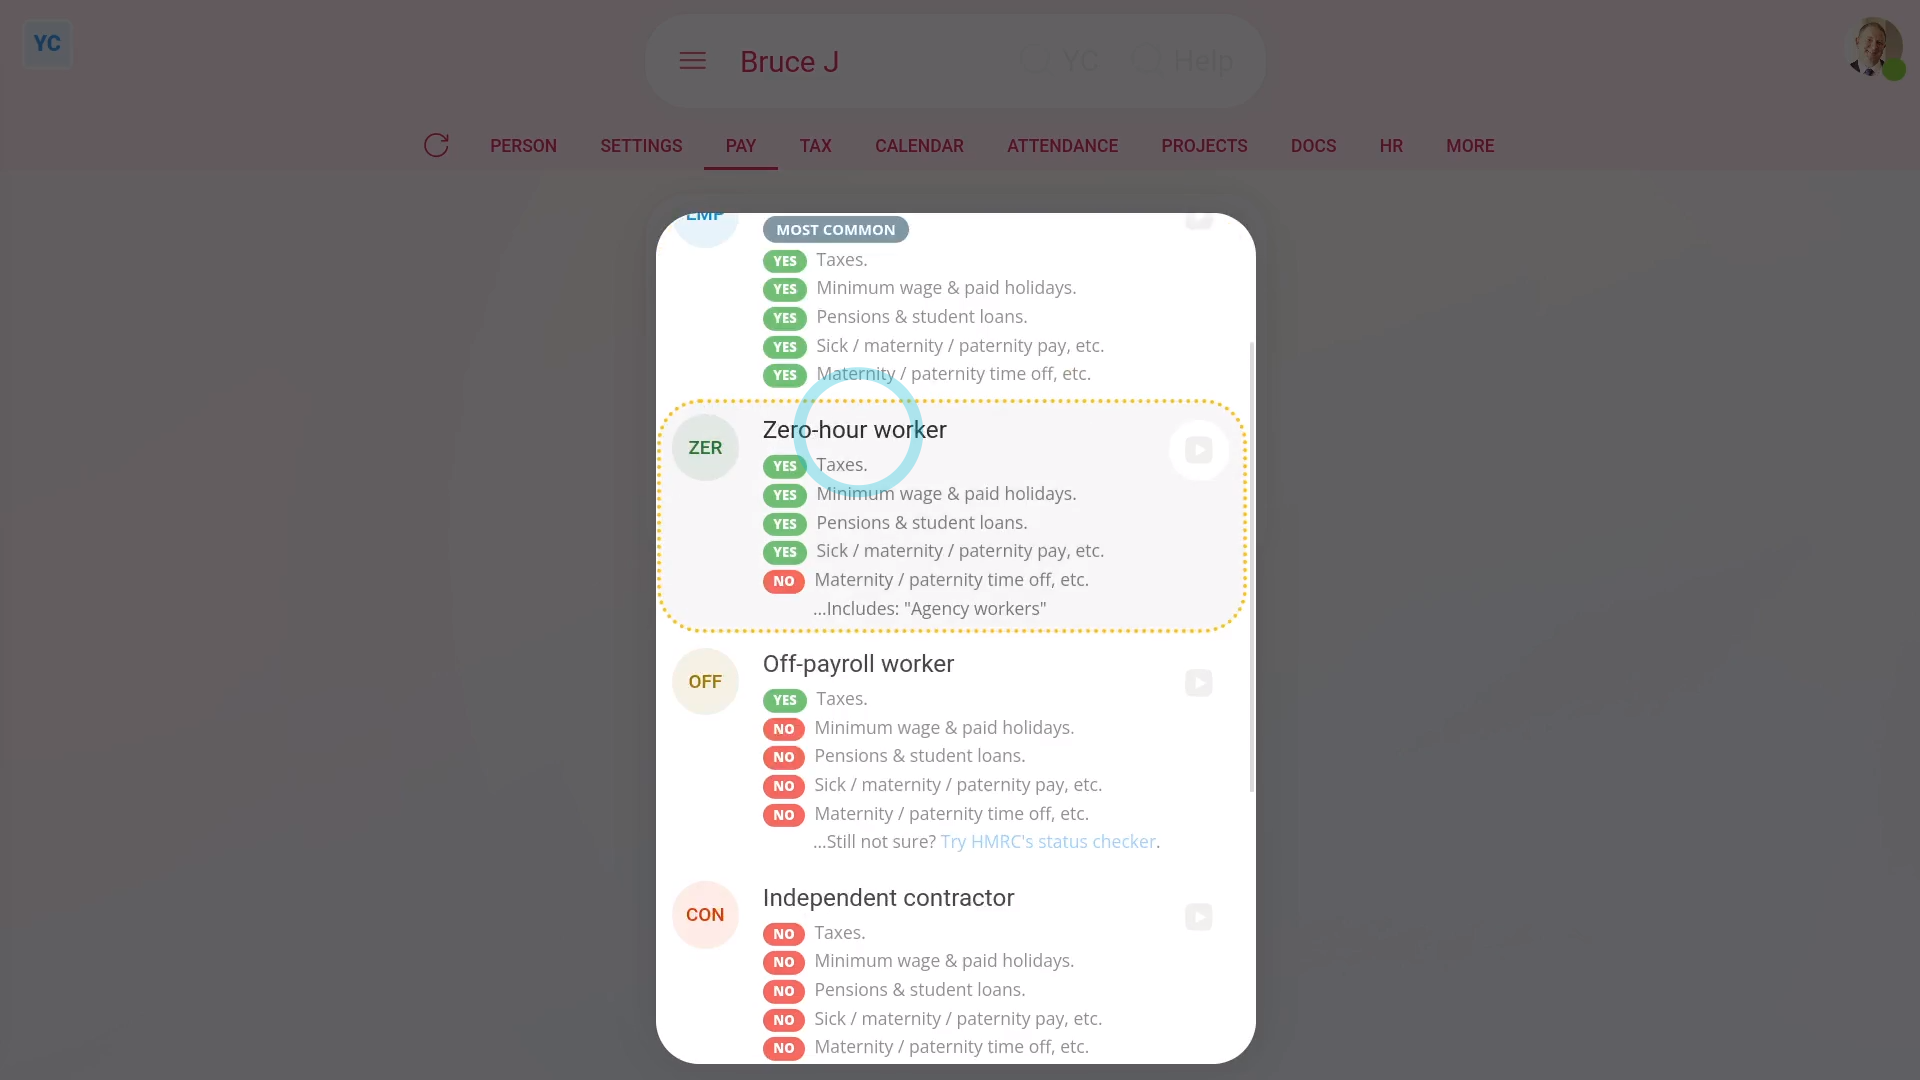
Zero-hour worker: To set a person's "Employment type" to "Zero-hour worker":
- First, select the person on: "Menu", then "People"
- Then tap: "Pay", then "Pay settings"
- And then: "Employment type"
- In the list that opens, select: "Zero-hour worker"
- Selecting "Zero-hour worker" means the person gets most of the same benefits as employees, like paid holidays and pensions, but doesn't get Statutory Leave.
- Examples of "Zero-hour worker" includes: agency workers, casual or short contract employees, and some freelancers.
- A person's usually a "Zero-hour worker" for either of the following. Either their shift changes with little notice. Or, the person sometimes does work for you, but can also decide to not work for you.
- And finally, to learn more, see HMRC's page on: Worker employment status
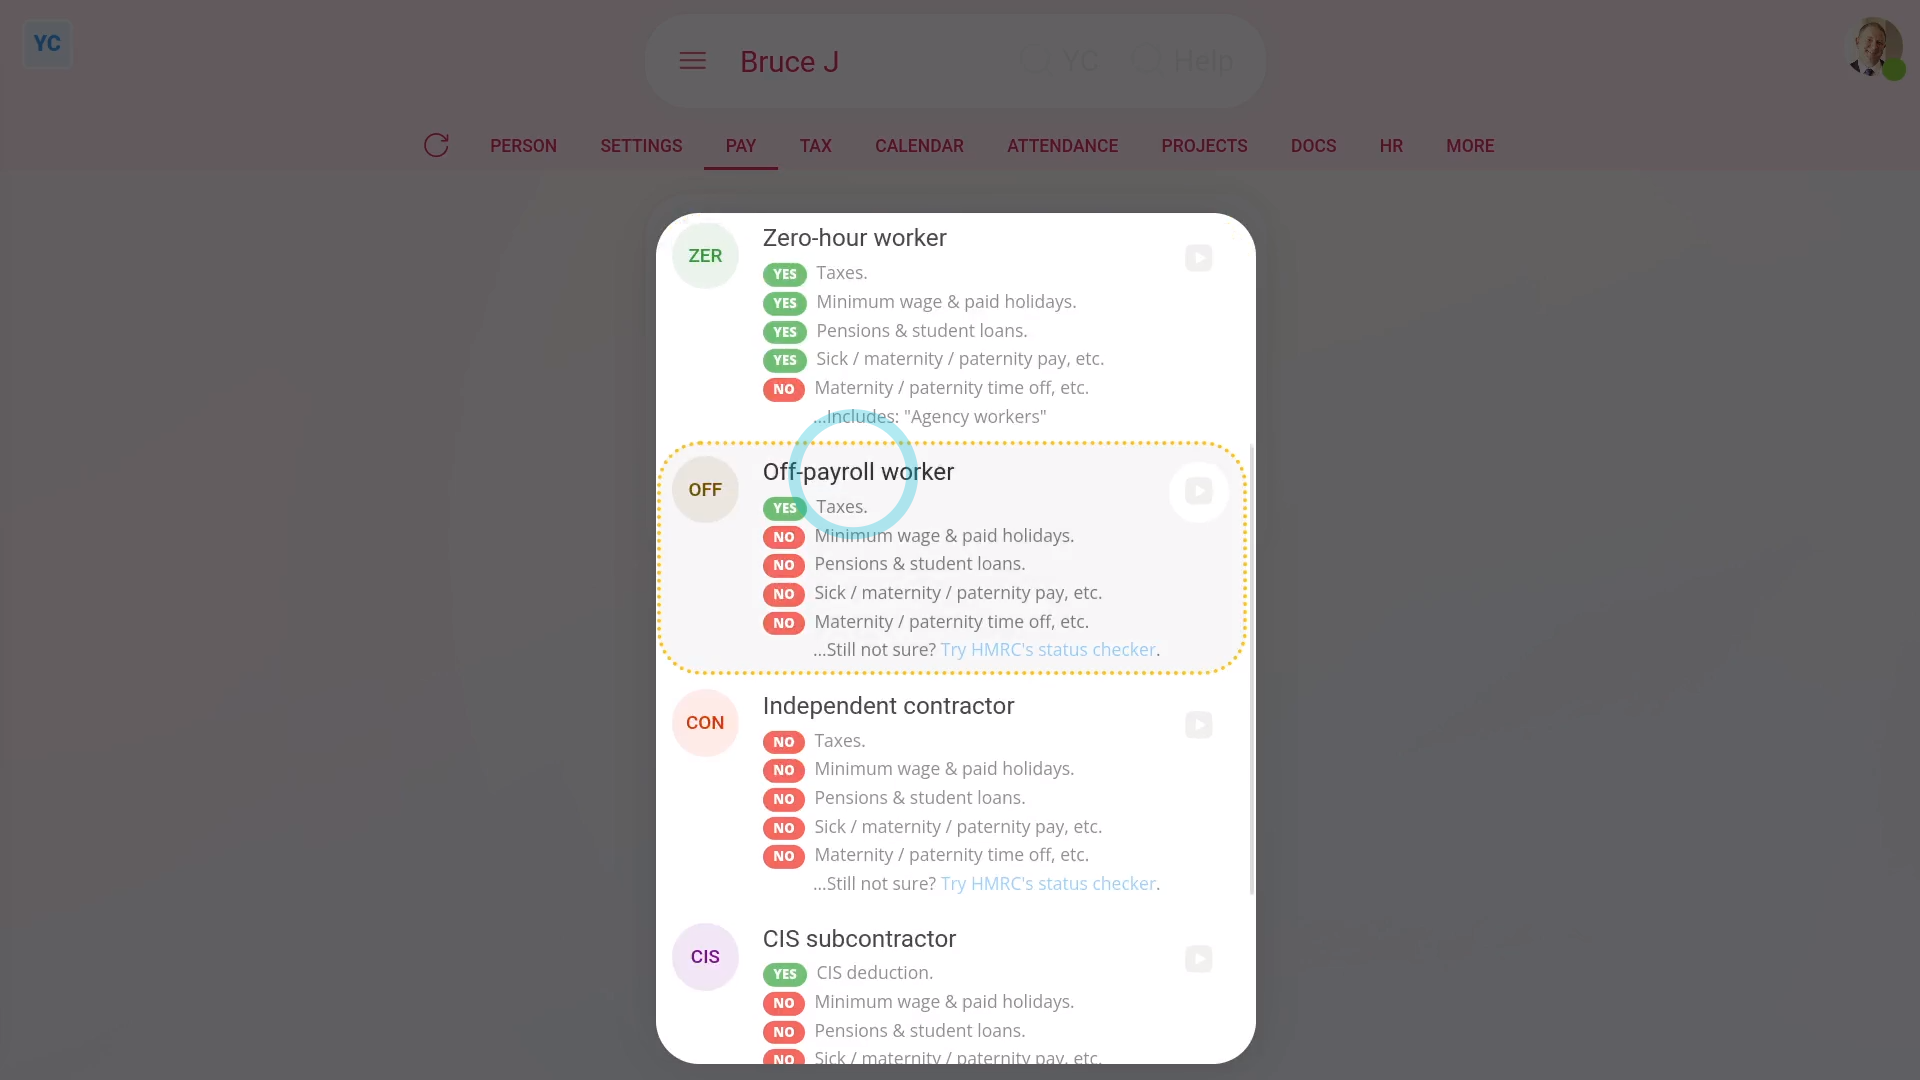
Off-payroll worker: To set a person's "Employment type" to "Off-payroll worker":
- First, select the person on: "Menu", then "People"
- Then tap: "Pay", then "Pay settings"
- And then: "Employment type"
- In the list that opens, select: "Off-payroll worker"
- Selecting "Off-payroll worker" means the person is a contractor that HMRC says is to be taxed like an employee.
- However, off-payroll workers don't get the benefits that employees get, like paid holidays, pensions, or Statutory Leave.
- Your off-payroll workers usually work for you through their own company.
- A person's an "Off-payroll worker" and not an "Independent contractor" if the person would be a regular employee if you hired them directly.
- Which can be common for IT contractors or contracts that relate to IR35.
- And finally, if you're not sure whether a person's an "Off-payroll worker", try HMRC's status checker.

Independent contractor: To set a person's "Employment type" to "Independent contractor":
- First, select the person on: "Menu", then "People"
- Then tap: "Pay", then "Pay settings"
- And then: "Employment type"
- In the list that opens, select: "Independent contractor"
- Selecting "Independent contractor" means the person doesn't have taxes taken off their payslips.
- Also, contractors don't get any of the benefits employees have, like paid holidays, pensions, and Statutory Leave.
- An independent contractor runs their own business and does their own taxes.
- Your independent contractors usually decide their own work hours, supply their own work tools, invoice you for the work done, and don't get paid for holidays.
- To learn more, see HMRC's page on: Self-employed and contractor employment status
- And finally, if you're not sure whether a person's an "Independent contractor", try HMRC's status checker.

CIS subcontractor: To set a person's "Employment type" to "CIS subcontractor":
- First, select the person on: "Menu", then "People"
- Then tap: "Pay", then "Pay settings"
- And then: "Employment type"
- In the list that opens, select: "CIS subcontractor"
- Selecting: "CIS subcontractor" means the person works in construction jobs. It also means a 20 to 30 percent amount is taken off their pay for what HMRC calls a: "CIS deduction"
- Your CIS subcontractors don't get any of the employee benefits like paid holidays, pensions, and Statutory Leave.
- To learn more about how to see how to set up a new "CIS subcontractor", watch the video on: Adding a pre-verified CIS subcontractor
- Also watch the video on: Adding an un-verified CIS subcontractor
- And finally, see HMRC's page on the: Construction Industry Scheme (CIS)
 Adding a pre-verified CIS subcontractor
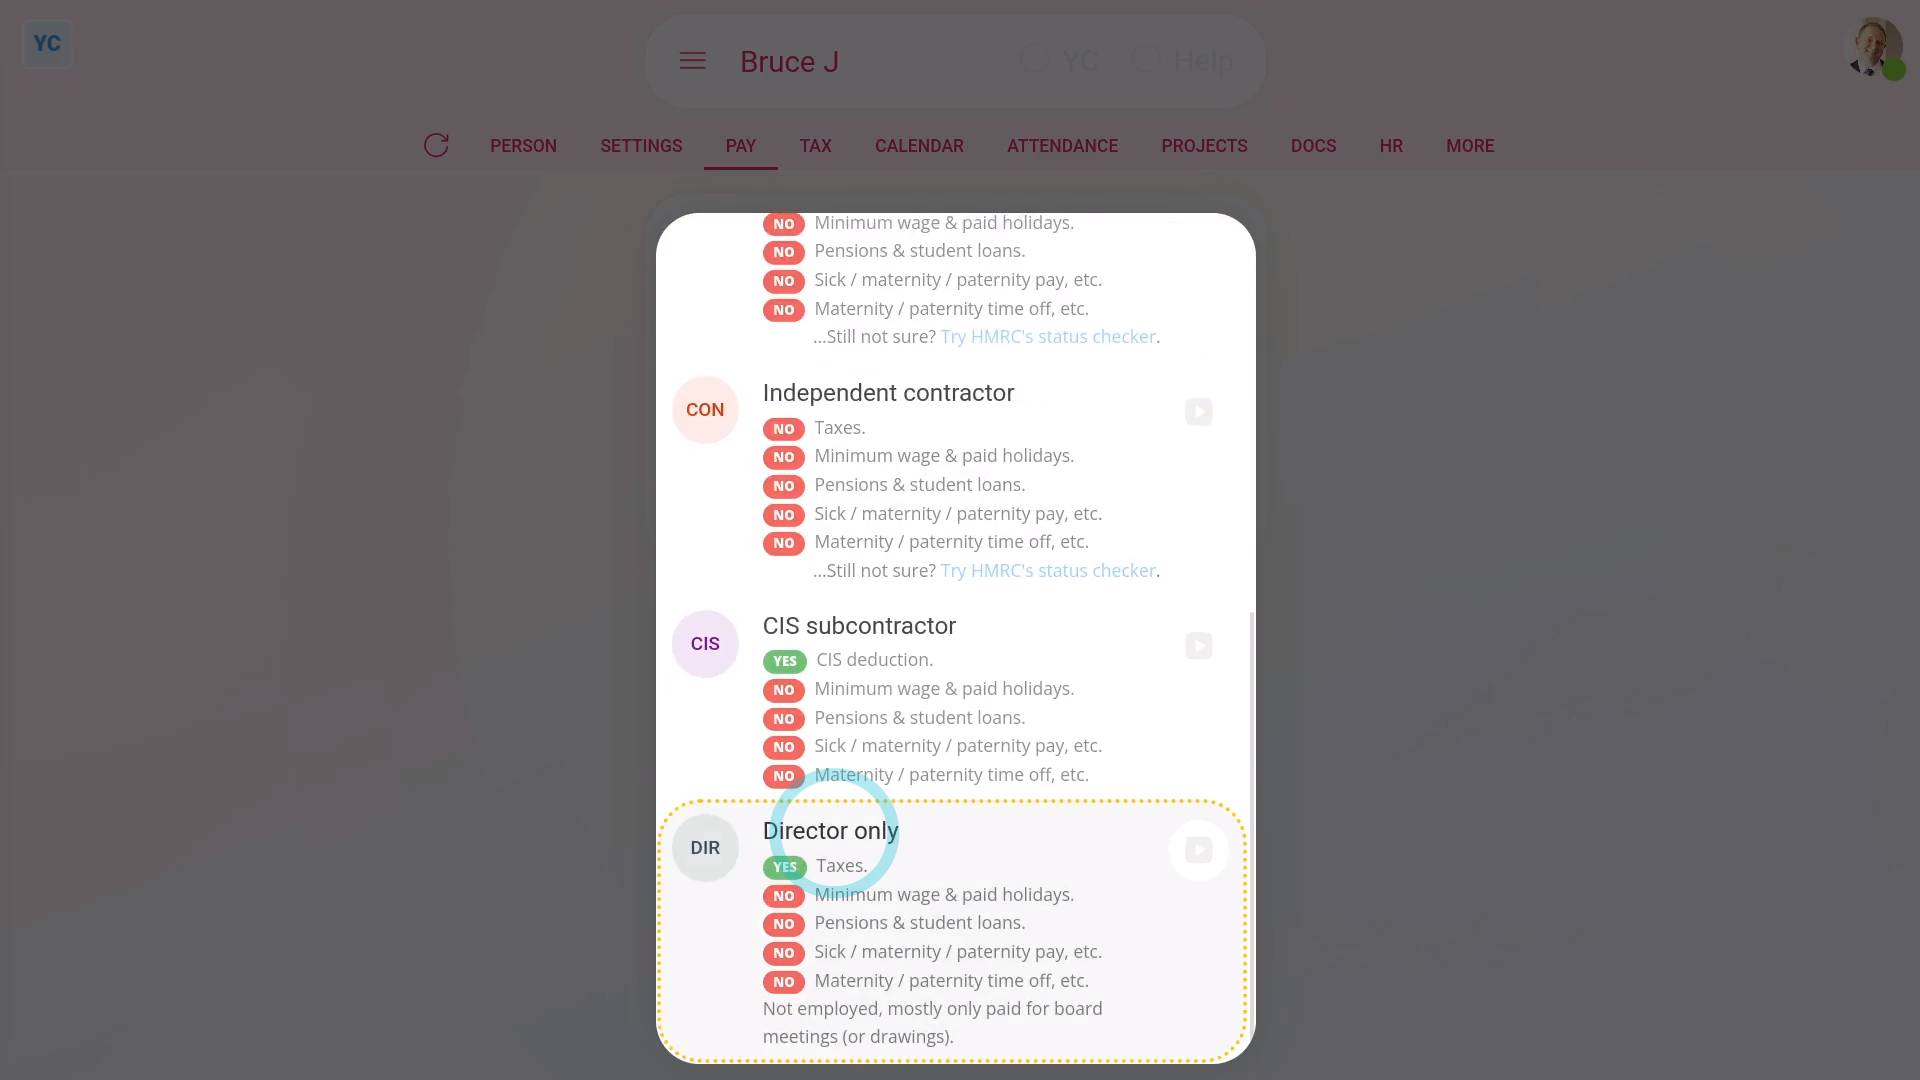
Director only: To set a person's "Employment type" to "Director only":
- First, select the person on: "Menu", then "People"
- Then tap: "Pay", then "Pay settings"
- And then: "Employment type"
- In the list that opens, select: "Director only"
- Selecting "Director only" means the person doesn't also have a job with the company.
- Director only usually means the director gets paid to attend board meetings, but isn't paid for their time worked.
- If the director also works for the company as an employee, set them as an: "Employee"
- To learn more about how to set a person as a director, watch the video on: Setting directorships
- And finally, also see HMRC's page on: Director employment status
And that's it! That's everything you need to know about choosing employment types for your people!
2. How do I set a person's tax code?
 2:04
2:04
"How do I set a person's tax code?"
Before a person can be paid, you first have to enter their tax code.
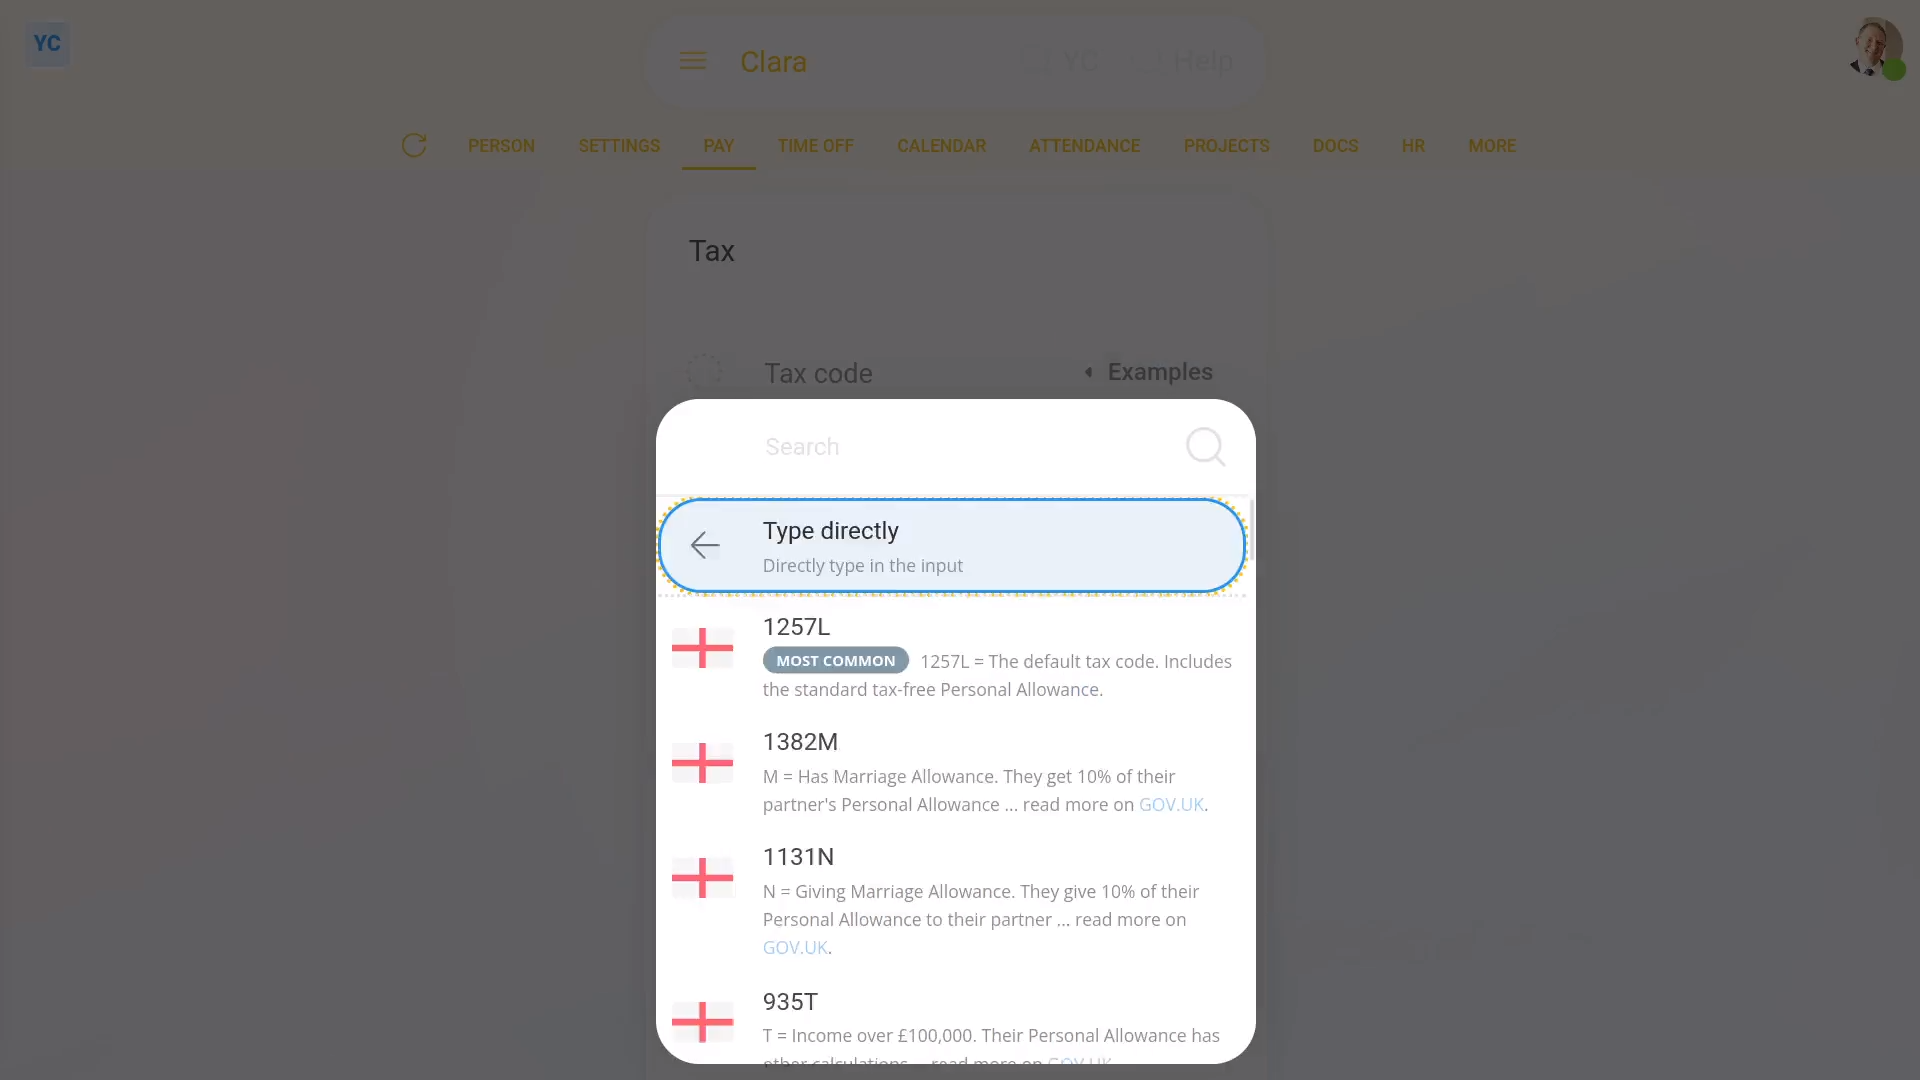
To set a person's tax code:
- First, select the person on: "Menu", then "People"
- Then tap: "Tax", then "Tax settings"
- If you already have the person's tax code from their P45, type it in the box.
- Or instead, tap Examples, and select a tax code from the list.
- For whatever tax code you enter, you'll see that the note explaining what the new tax code letters mean is automatically updated.
- And finally, tap: Save

Keep in mind that:
- All tax codes are two to seven characters long, and are set by HMRC.
- Tax codes affect how much income tax is taken off a person's pay.
- If the tax code's wrong, the amount taken off may be too much or too little tax.
For advanced usage:
- You can find a person's tax code on past payslips, tax forms, or letters from HMRC.
- If a person can't find their tax code, or their situation's changed, ask them to call HMRC on: 0300 200 3300
- Also, occasionally HMRC may send a change to a person's tax code, through an: "HMRC notice"
- If HMRC sends an "HMRC notice", the person's tax code is automatically updated. You won't have to do anything.
- Any time a person's tax code is automatically updated from an "HMRC notice", two emails are sent. One email to the person, and the other email to their pay batch's payday person.
And that's it! That's everything you need to know about setting a person's tax code!
3. What's the 'Per year', 'Per month' or 'Per hour' pay rate setting?
 7:12
7:12
"What's the "Per year", "Per month" or "Per hour" pay rate setting?"
The "Per year", "Per month", or "Per hour" pay rate, sets the person's "Rate amount" to a fixed amount for the year, month, or hour.
To set a person to a "Per year" or "Per month" fixed salary pay rate:
- First, select the person on: "Menu", then "People"
- Then tap: "Pay", then "Pay settings"
- Next, tap: Set rate
- And set it to "Per year" or: "Per month"
- Then set their "Rate amount" as a per year or per month amount.
- And tap: Save
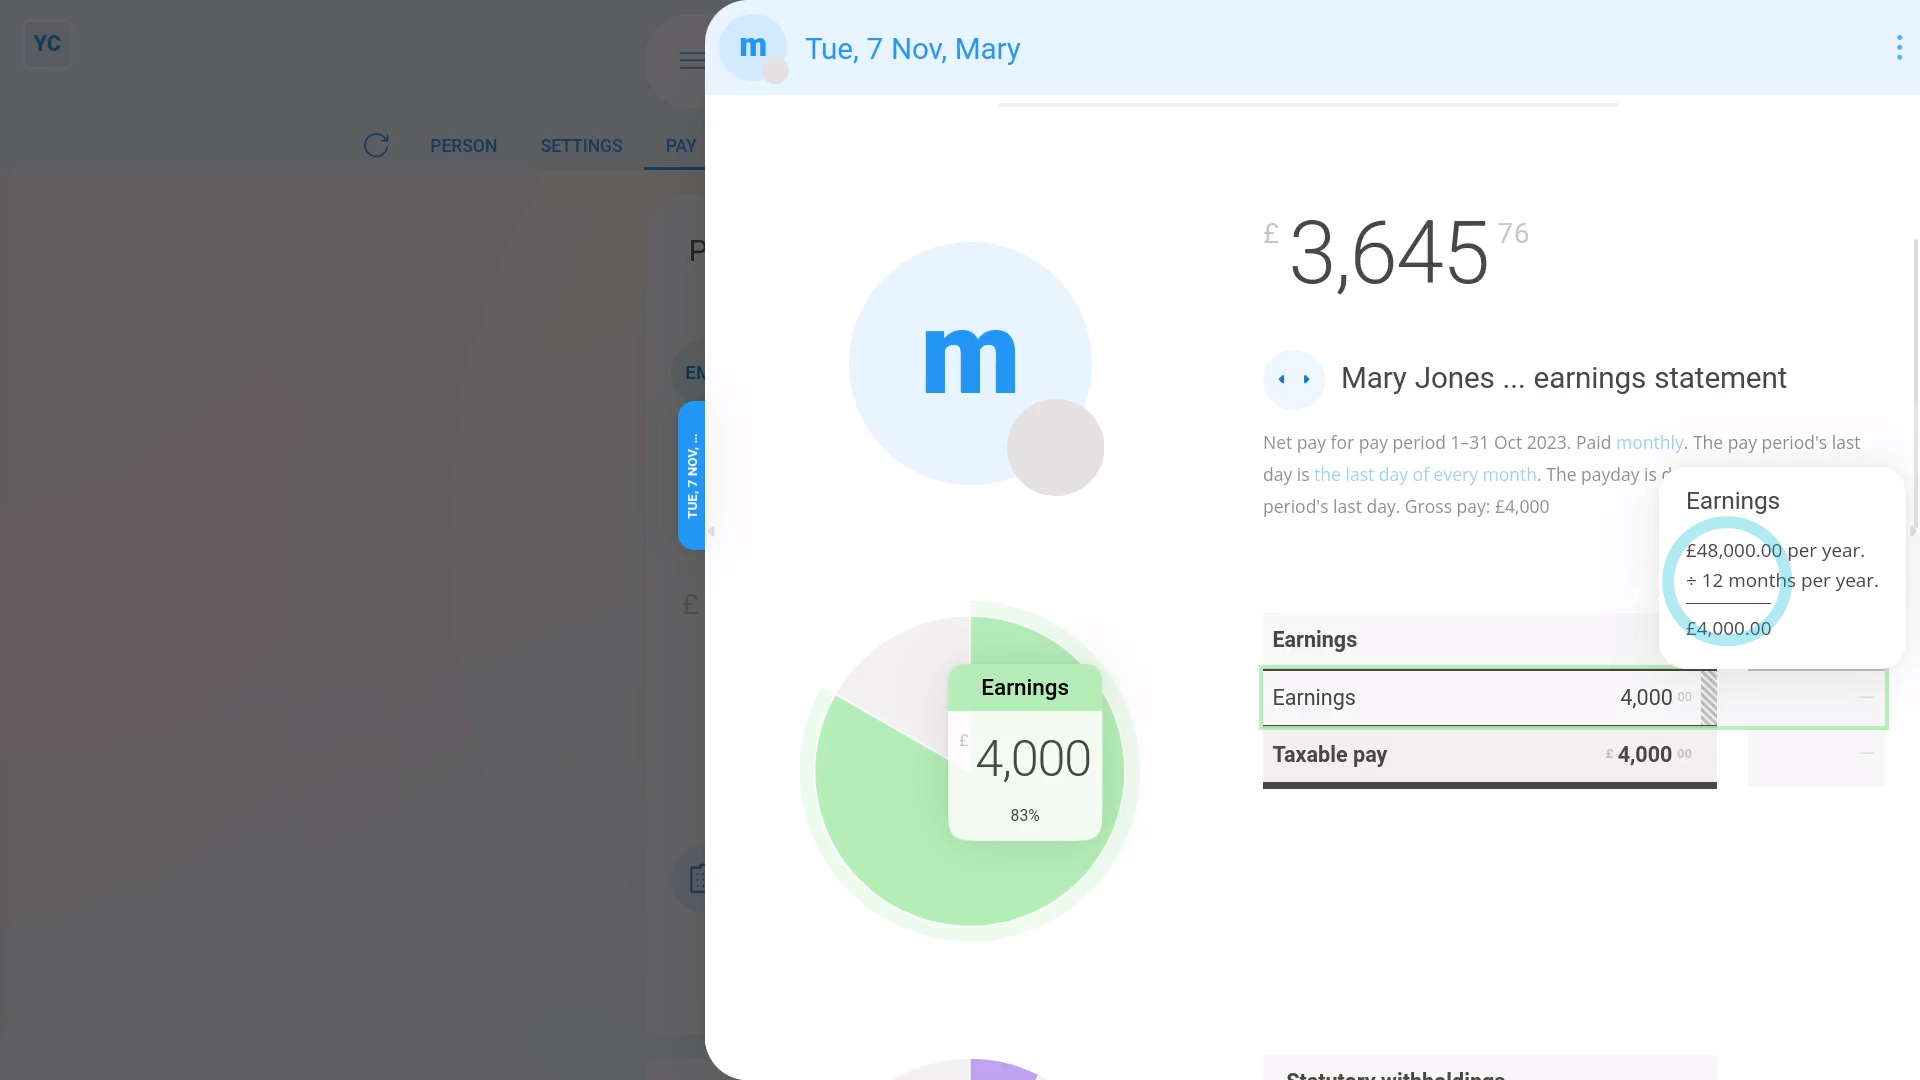
- Now, to see how it looks on their payslip, tap: "Pay", then "Payslip"
- Then once their payslip slides out on the right, you'll now see that their earnings are based on their yearly or monthly salary, as expected.
- And when you mouse over the "Earnings" number you'll see the calculation.
- Remember, you can make changes at any time, to the person's yearly or monthly salary, right up until before the payslip's filed.
- And finally, to see an overall summary of their pay, tap: "Pay", then "Pay summary"
Keep in mind that:
- In most cases, the person joined some time ago, and has worked the full pay period. So the person gets full pay for the full pay period.
- However, if the person joined recently, for example part way through the current month, their pay's reduced. It's "pro rata" reduced to the part of the month that was worked.
- To see how a "pro rata" reduction looks, tap your way to: "Settings", then "Job settings"
- And set their "Date joined" to part way through the month, and tap: Save
- Now, when you open the payslip again on: "Pay", then "Payslip"
- You'll see their earnings for the current month are correctly reduced to a smaller amount, because the person's joined part way through the month.
You may notice:
- That the "pro rata" reduction also works for when the person leaves.
- For example, if the person leaves part way through the month, their earnings are also correctly reduced to the part of the month that was worked.
"What's the "Per hour, timesheet hours" pay rate?"
The "Per hour, timesheet hours" pay rate automatically pays people an hourly rate based on the "Done time" in their timesheets. In other words, the people are paid for their hours actually worked.
To set a person to a "Per hour, timesheet hours" pay rate:
- First, select the person on: "Menu", then "People"
- Then tap: "Pay", then "Pay settings"
- Next, tap: Set rate
- And set it to: "Per hour, timesheet hours"
- Then set their "Rate amount" per hour.
- And tap: Save
- Now, to see how it looks on their payslip, tap: "Pay", then "Payslip"
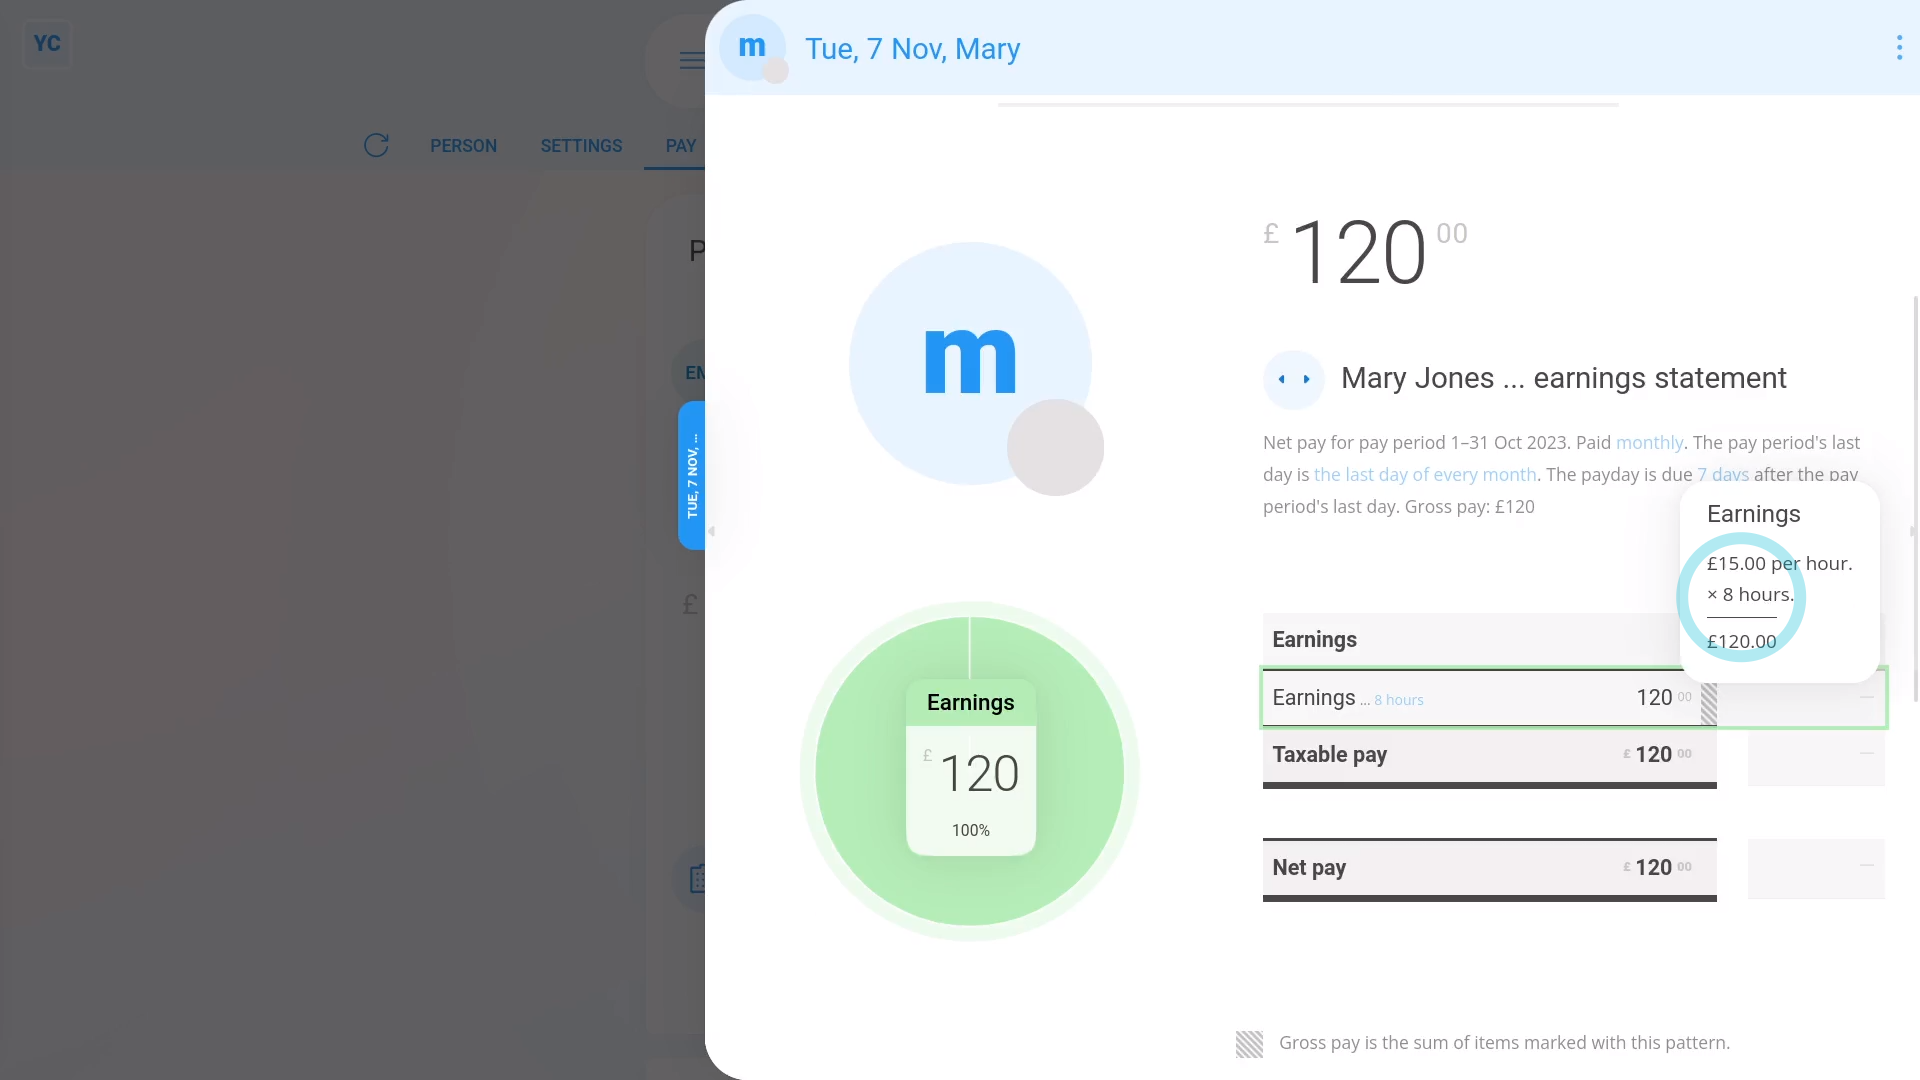
- Then once their payslip slides out on the right, you'll now see that their earnings are based on their timesheet hours, as expected.
- And when you mouse over the "Earnings" number you'll see the calculation.
- Then to see more detail on a payslip's hours worked, tap the "Hours worked" link (at the top).
- You'll now see the hours worked for each day in the pay period, with a total (at the bottom).
- To add more hours, tap one of the days, then tap, Add time, and select the hours that are to be paid for that day.
- And tap: Save
- Now back to the payslip.
- And you'll see the payslip instantly recalculates with the new timesheet hours.
- Remember, you can make timesheet changes at any time, right up until before the payslip's filed.
- And finally, to see an overall summary of their pay, tap: "Pay", then "Pay summary"
"What's the "Per hour, target hours" pay rate?"
The "Per hour, target hours" pay rate automatically pays people an hourly rate based on whatever their target hours have been set to.
To set a person to a "Per hour, target hours" pay rate:
- First, select the person on: "Menu", then "People"
- Then tap: "Pay", then "Pay settings"
- Next, tap: Set rate
- And set it to: "Per hour, target hours"
- Then set their "Rate amount" per hour.
- And tap: Save
- Now, to see how it looks on their payslip, tap: "Pay", then "Payslip"
- Then once their payslip slides out on the right, you'll now see that their earnings are based on their target hours, as expected.
- And when you mouse over the "Earnings" number you'll see the calculation.
- Then to see more detail on a payslip's hours worked, tap the "Hours worked" link (at the top).
- You'll now see the hours worked for each day in the pay period, with a total (at the bottom).
- Now back to the payslip.
- If you ever need to permanently adjust the person's target hours, tap the blue "target hrs" link.
- Then drag the sliders to the new target hours, and tap: Save
- And you'll see the payslip instantly recalculates with the new target hours.
- Remember, you can make target hour changes at any time, right up until before the payslip's filed.
- And finally, to see an overall summary of their pay, tap: "Pay", then "Pay summary"
Also remember that:
- A permanent adjustment to a person's target hours applies to future payslips as well.
To make a one-time manual adjustment to a person's hours, that doesn't apply to future payslips:
- First, select the person on: "Menu", then "People"
- Then tap: "Pay", then "Payslip"
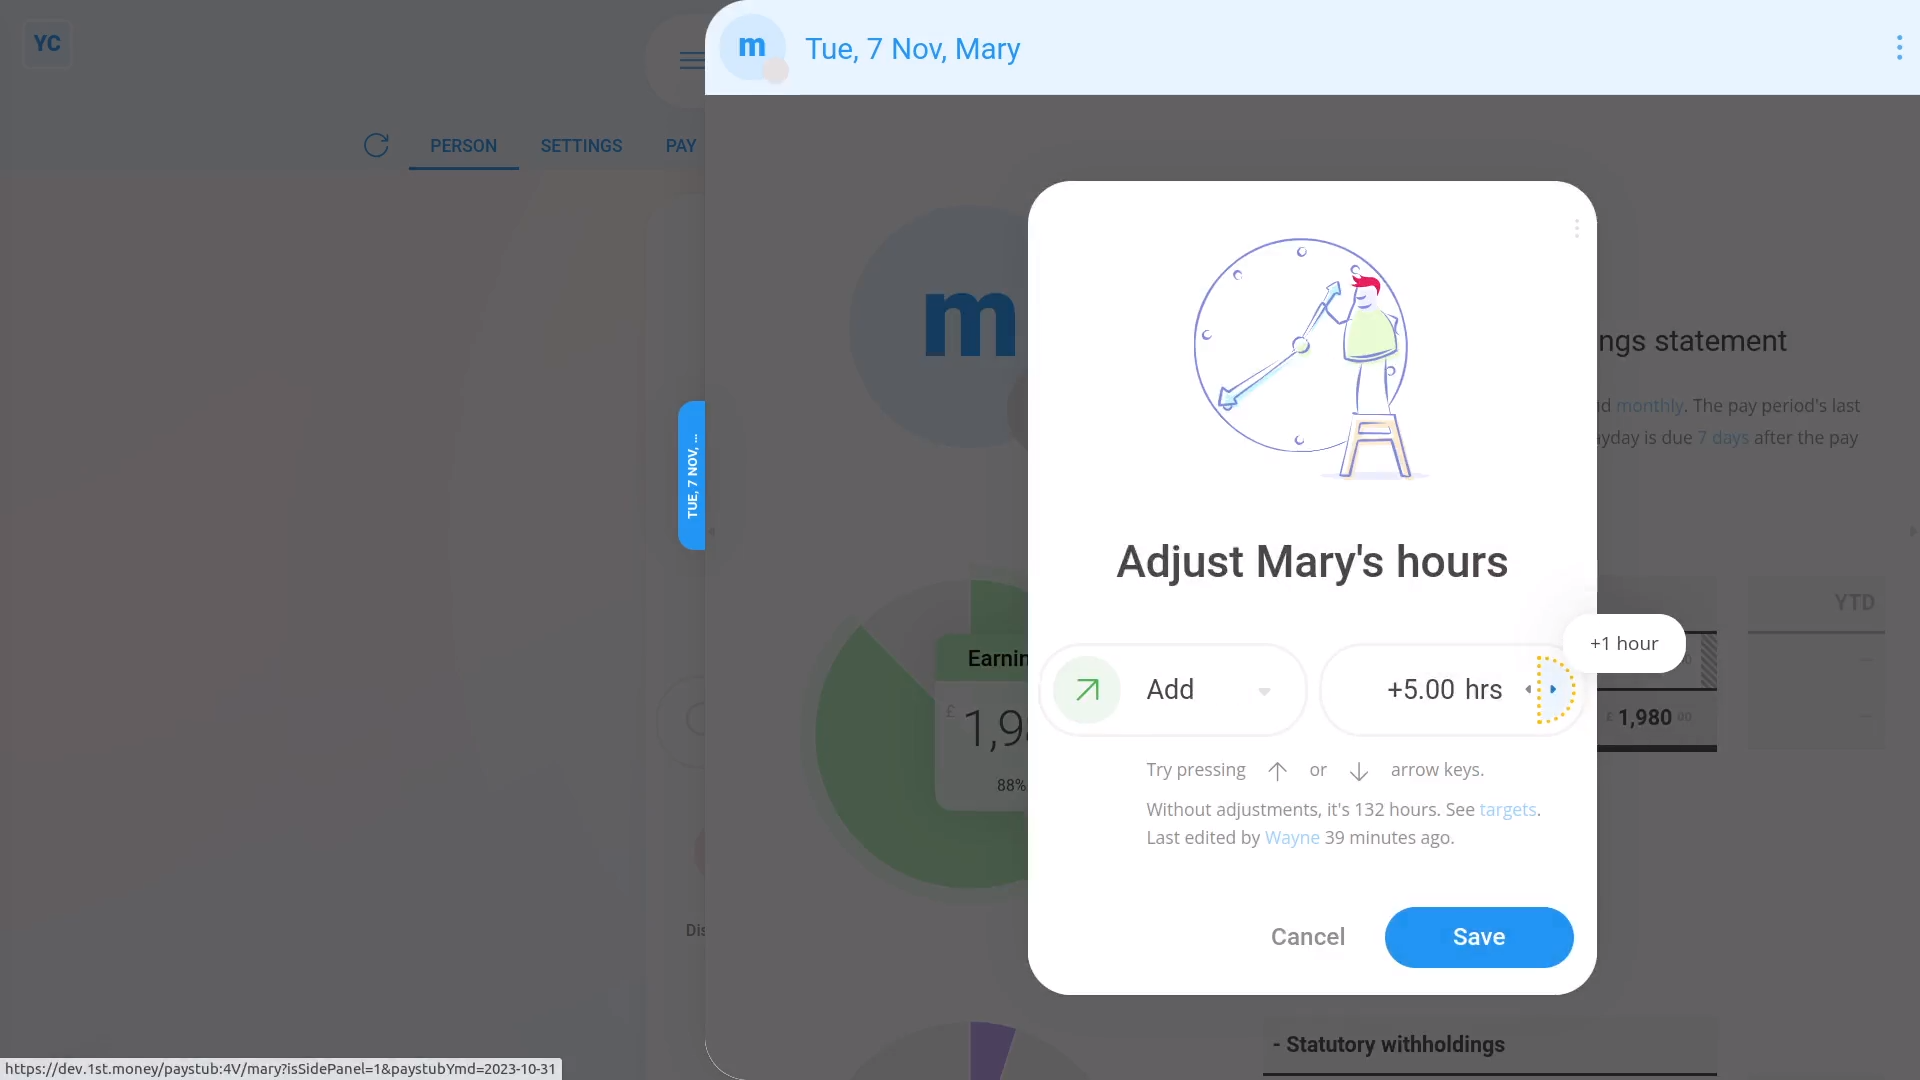
- And tap the blue "adj. hrs" link on their "Earnings" row.
- Next, press the up or down arrows to add or remove hours.
- Then tap: Save
- Now that it's saved, when you mouse over the "Earnings" number, you'll see that both the hours and the earnings calculation have changed.
- And finally, with one-time manual adjustments, the "Per hour, target hours" gives you the flexibility of paying by the hour, without doing timesheets.
You may also notice:
- That a one-time manual adjustment to a person's hours applies only to that one payslip.
- It won't affect any future payslips.
And that's it! That's everything you need to know about "Per year", "Per month", and "Per hour" pay rates!
4. How do I set a person's target hours?
 2:08
2:08
"How do I set a person's target hours?"
A person's target hours sets how many hours, each day, a person usually works.
To change a person's target hours:
- First, select the person on: "Menu", then "People"
- Next, go to their: "Pay", then "Pay settings"
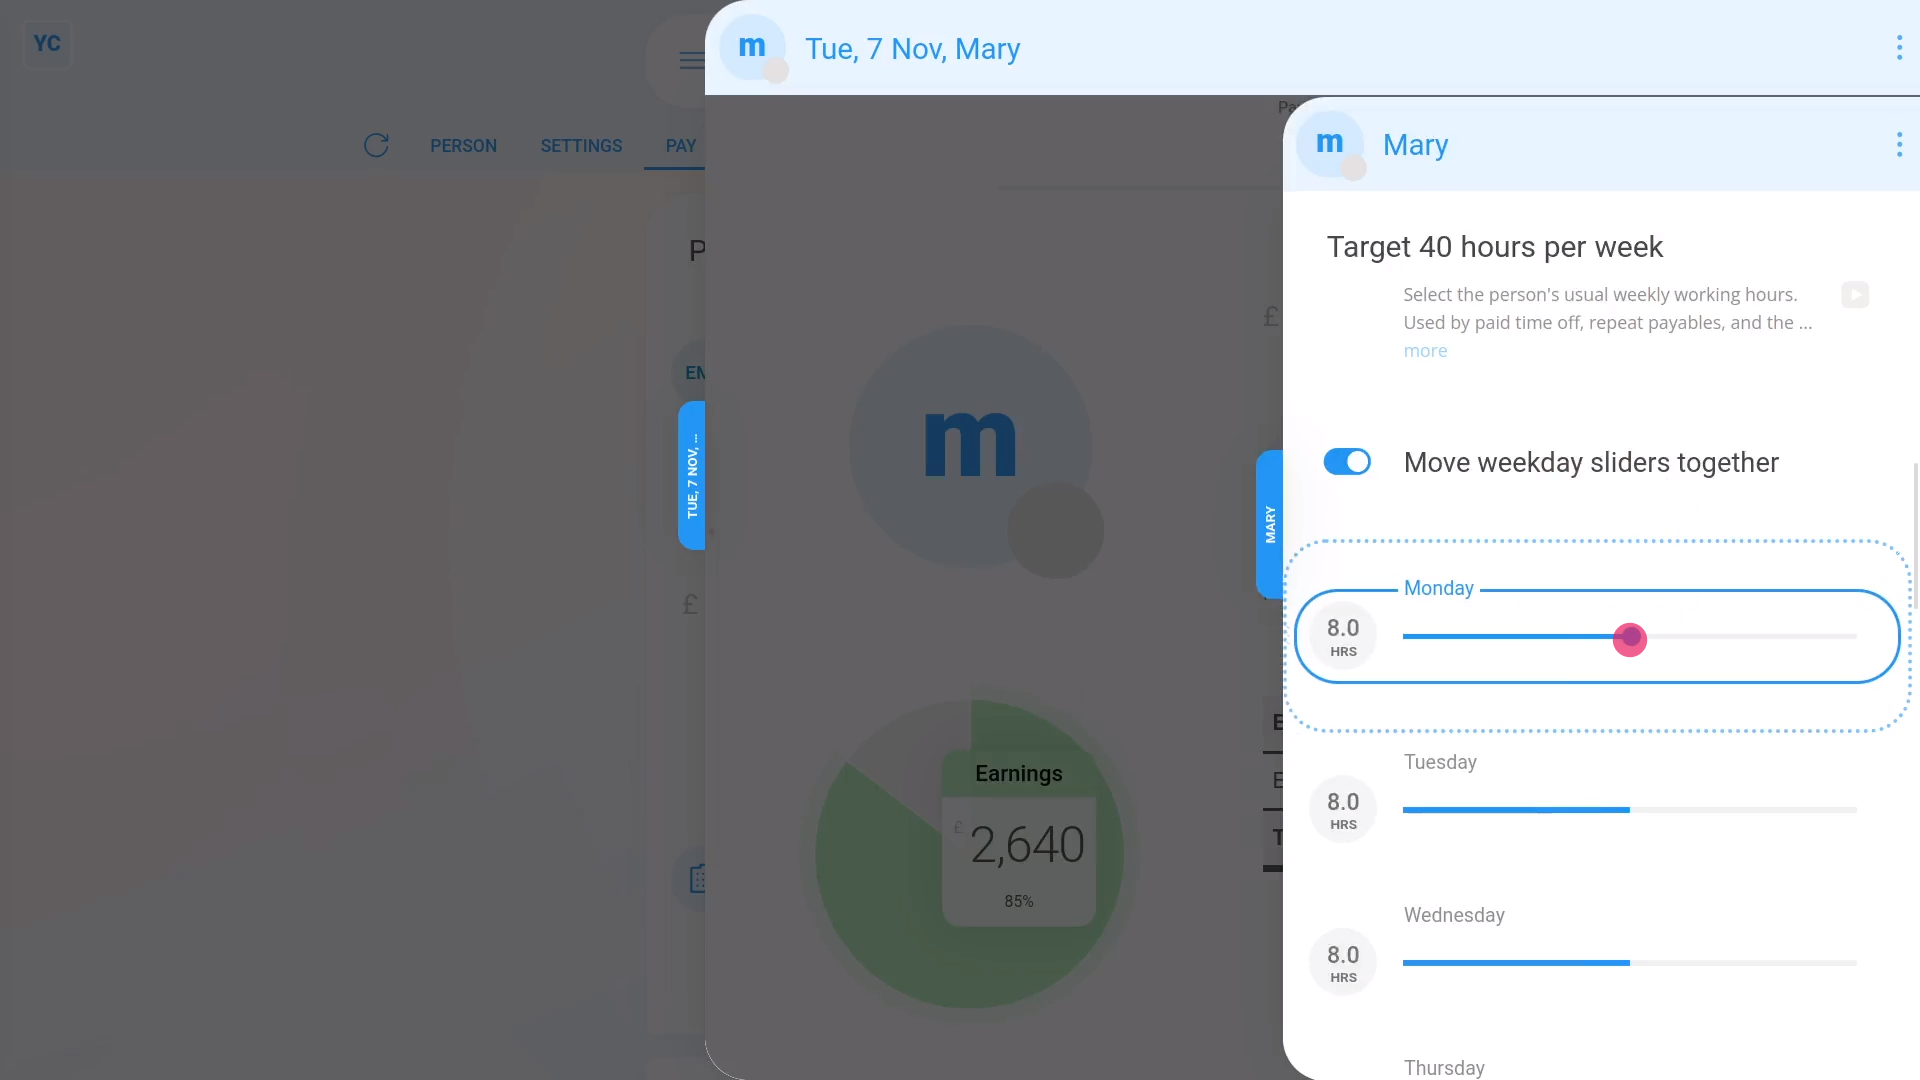
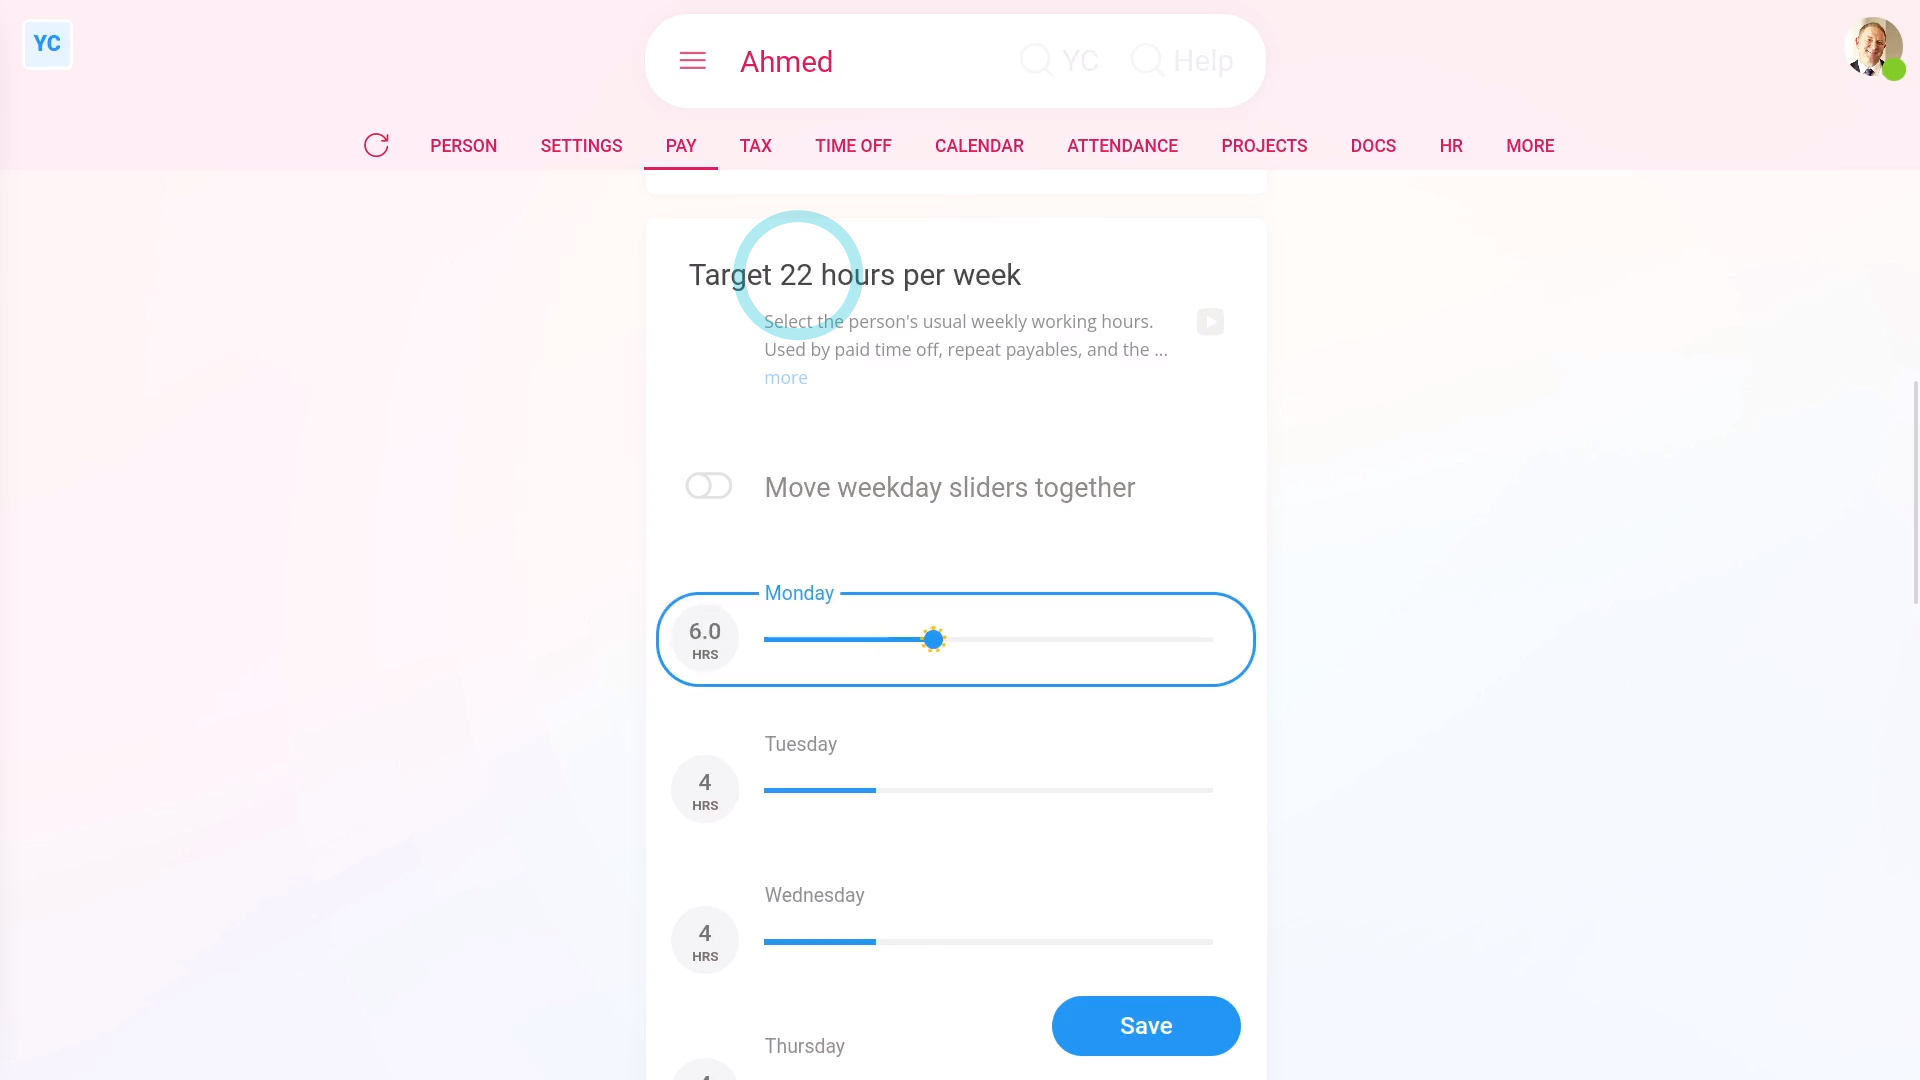
- Then scroll down to the "Target hours per week" heading.
- And you'll see the person's current target hours a day, and total hours a week.
- To change the person's target hours, drag one of the blue sliders.
- You'll see that all the Monday to Friday sliders have moved together, and that the total hours per week has updated.
- To change each day individually, turn off: Move weekday sliders together
- Now you can drag each slider individually.
- And again, the total hours per week has updated.
- And finally, once you tap Save, the person's target hours are ready to be applied to their next payday.
Keep in mind that:
- When you invite a new person, by default the new person's target hours are set. The target hours are set to 8 hours a day, Monday to Friday, or 40 hours a week.
- Target hours matter, for all employees, because target hours are used to calculate time off.
- If, for example, a person's target hours was 8 hours on Monday, and 4 hours on Tuesday.
- If the person took Monday off, the person would get 8 hours of time off.
- However, if the person took Tuesday off, the person would only get 4 hours of time off, because of their target hours.
Also remember that:
- Target hours are used for hourly paid people, when calculating estimates on pay and taxes.
- Also, target hours are occasionally used by a very small number of advanced repeat payables that're tied to an estimate of a person's weekly working hours.
And that's it! That's everything you need to know about setting a person's target hours!
How do I decide my payrolling benefits setting, and do my P11D?
 4:44
4:44
"How do I decide my payrolling benefits setting, and do my P11D?"
Payrolling benefits is HMRC's new, and recommended approach to simplifying the tax administration of benefits-in-kind.
To set a pay batch's "Payrolling benefits" option:
- First, select the pay batch on: "Menu", then "Pay batches"
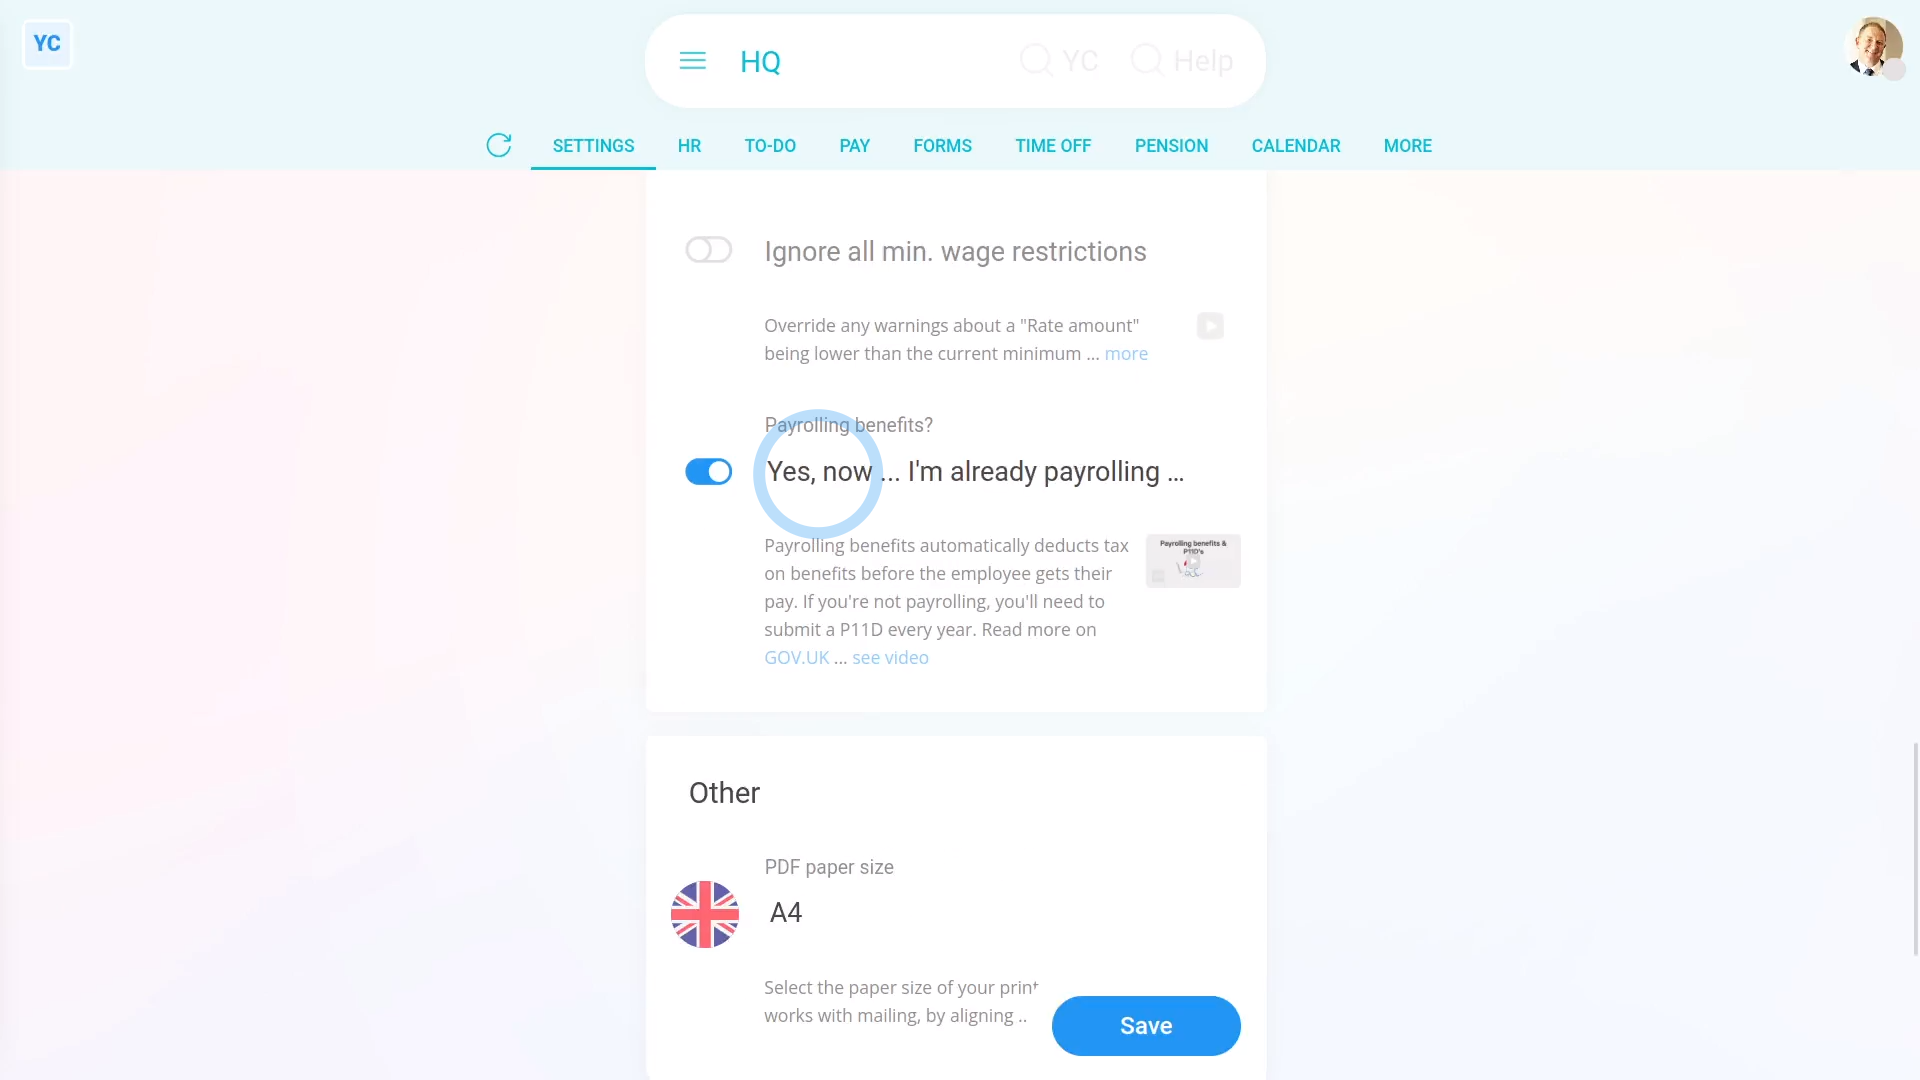
- Then tap: "Settings", then "Advanced"
- Then scroll down to the "Payroll" heading.
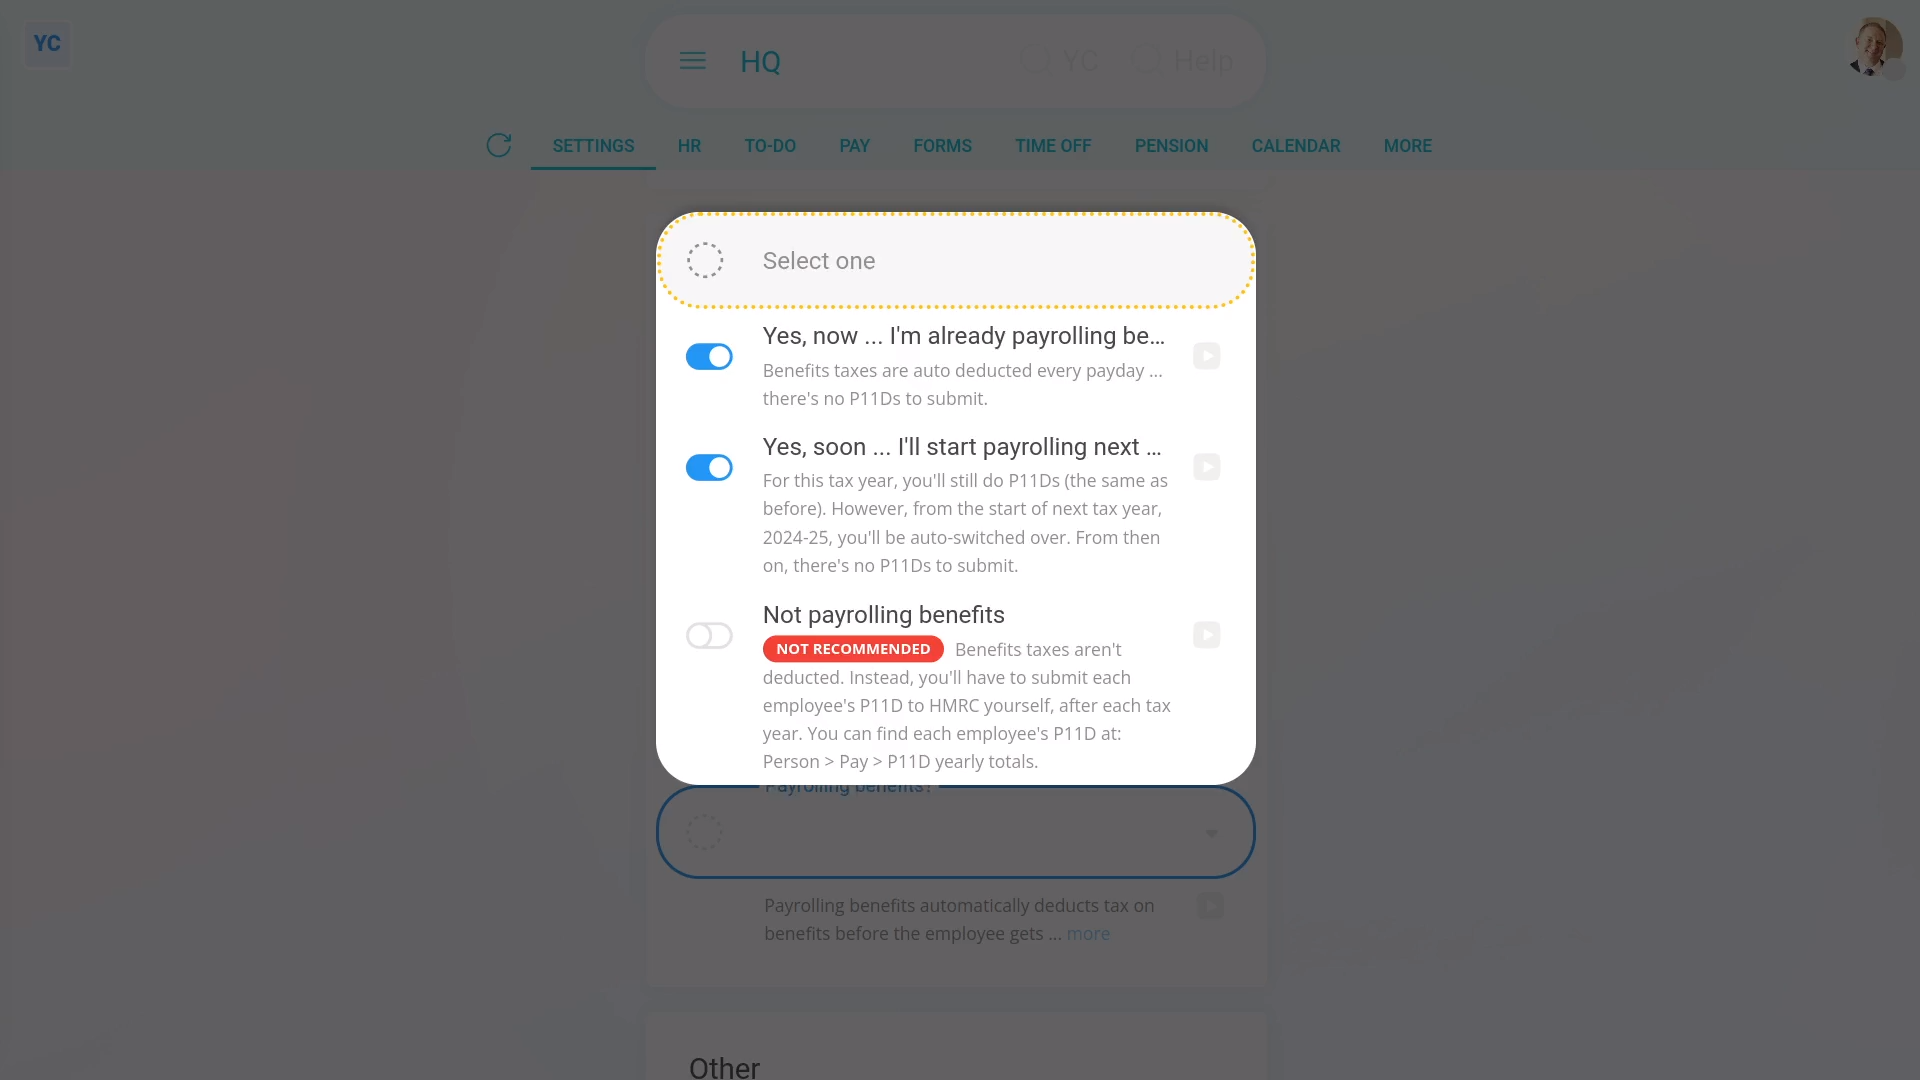
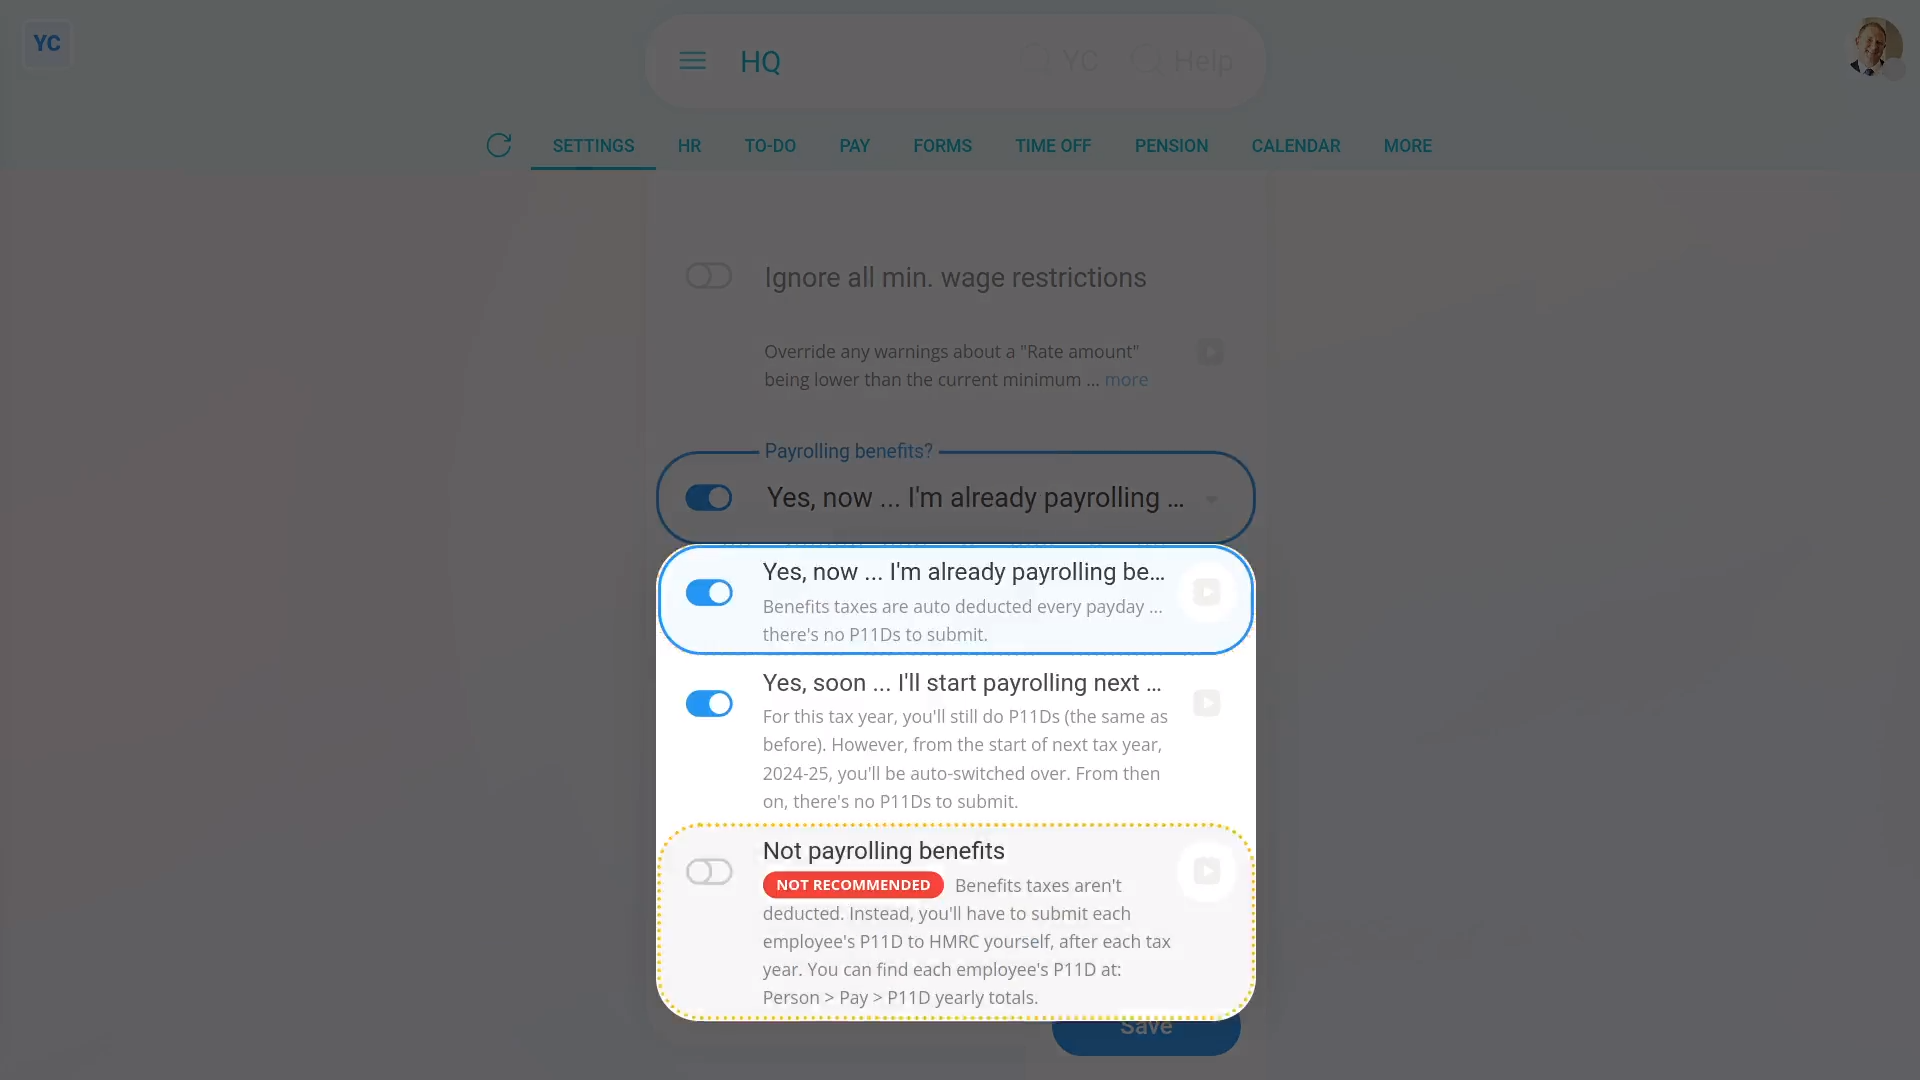
- And tap: "Payrolling benefits?"
- If you're a new company, or you've already switched to "Payrolling benefits", select the "Yes, now" option.
- Some established companies may've been doing P11D's the old way, but would like to be auto-switched to the new way.
- If you'd like to be auto-switched to the new way, when it reaches the end of the current tax year, select the "Yes, soon" option.
- Otherwise, if you want to keep doing it the old way forever, select the "Not payrolling benefits" option.
- In most cases, however, it's best to select the recommended "Yes, now" option.
- But if you're still not sure, tap the blue "more" link, and then the blue "GOV.UK" link to read more on HMRC's website.
- And finally, tap: Save
By saying "Yes" to payrolling benefits:
- All the pay batch's payslips automatically deduct taxes on benefits before the person gets their pay.
- The auto deductions mean you won't have to submit a P11D for each person, when you reach the end of each tax year.
- You'll still have to do a P11D(b), but more on that later.
By saying "No" to payrolling benefits:
- You'll still have to do a P11D(b), but more on that later.
- Also, when you reach the end of each tax year, you'll need to submit a P11D for each person. Alternatively, you could get your accountant to do it for you.
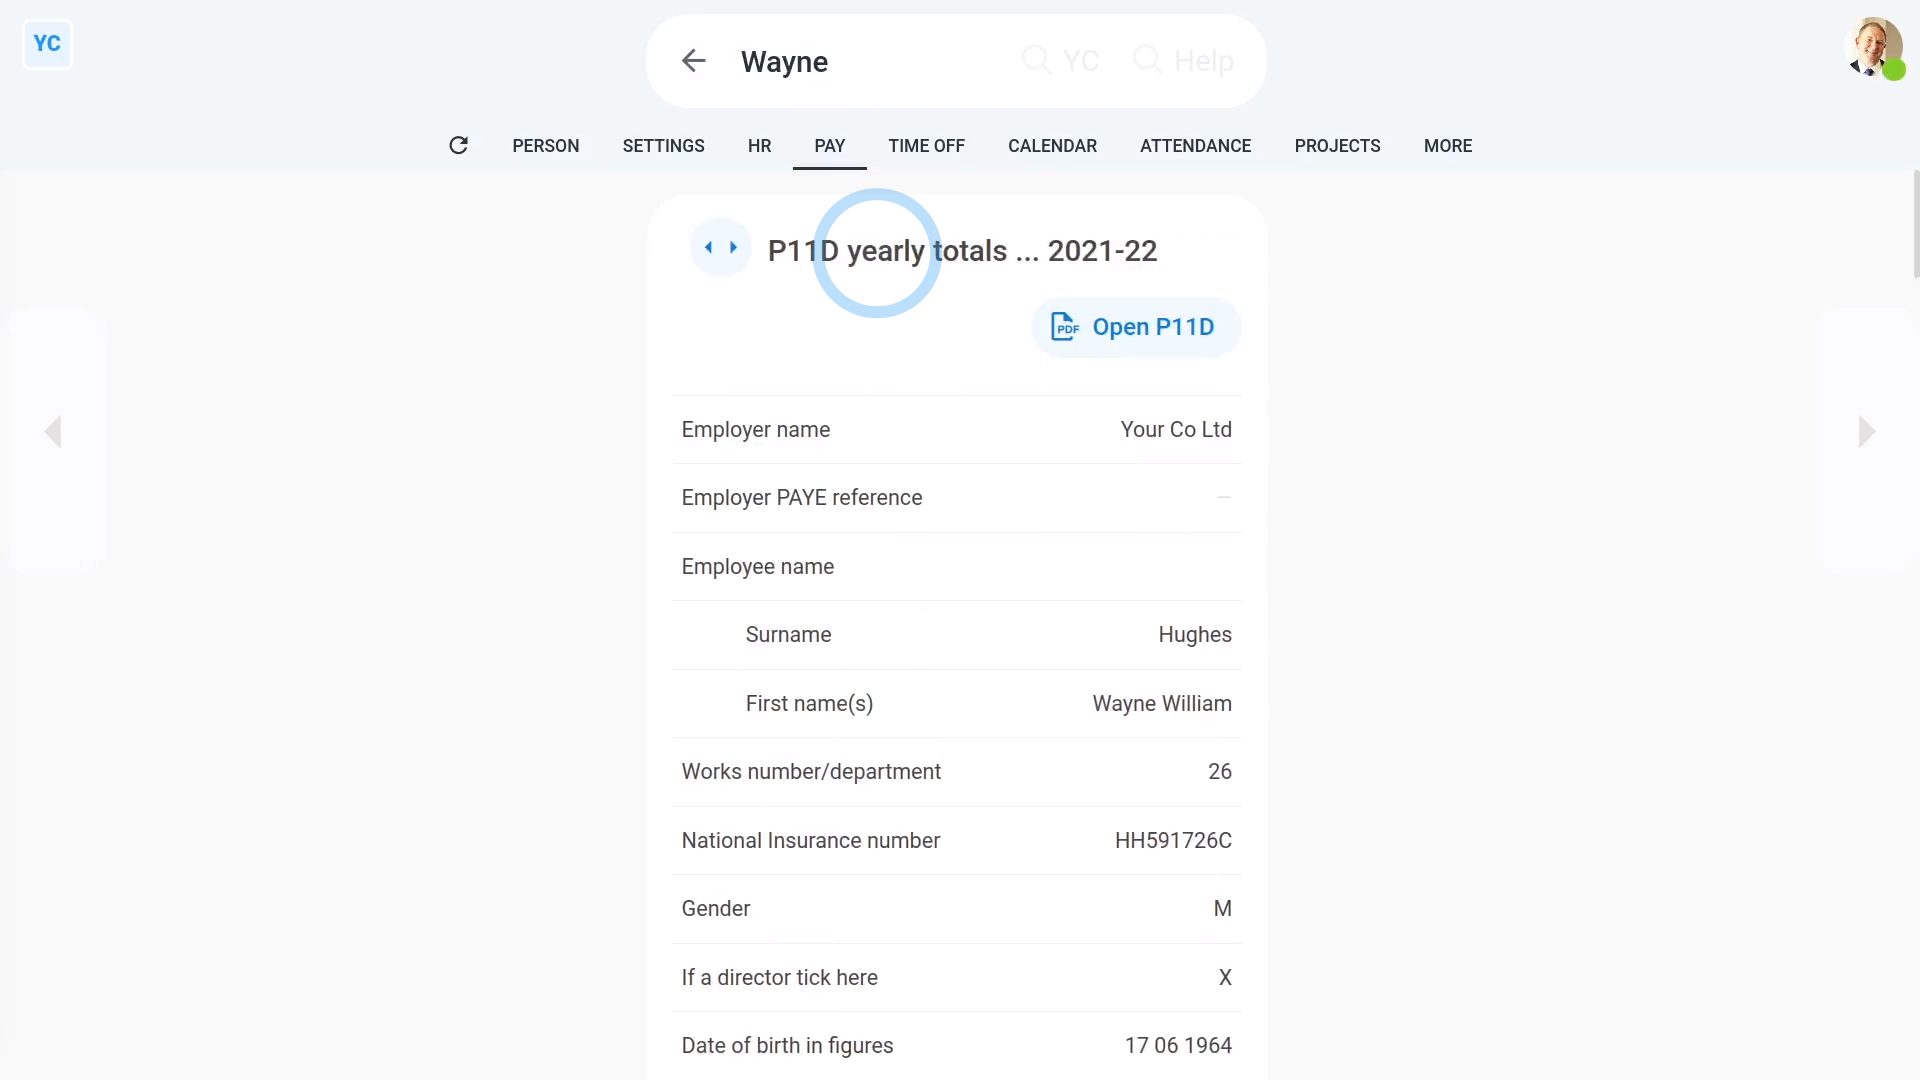
To see a person's end of year P11D numbers:
- First, select the person on: "Menu", then "People"
- Then tap: "Tax", then "P11D yearly totals"
- Keep in mind, the "P11D yearly totals" tab only shows for people who are in a pay batch that's set to: "Not payrolling benefits"
- The "P11D yearly totals" gives you all the numbers you'll need to fill in each person's P11D.
- Before you start copying numbers, be sure you've picked the correct tax year.
- You can tap the buttons to go forward, or back, a year.
- To submit your P11D's:
Tap: HMRC PAYE Online - You'll first need to log in with your HMRC Government Gateway account.
- Once you're logged in, you can send your "expenses and benefits returns" using HMRC's PAYE Online.
- And finally, if you need to know more, search on Google, or ask your accountant.
Whether you say "Yes" or "No" to "Payrolling benefits", you'll still have to submit one P11D(b) for each pay batch, when you reach the end of each tax year. To make it easier, you can use the prepared yearly totals.
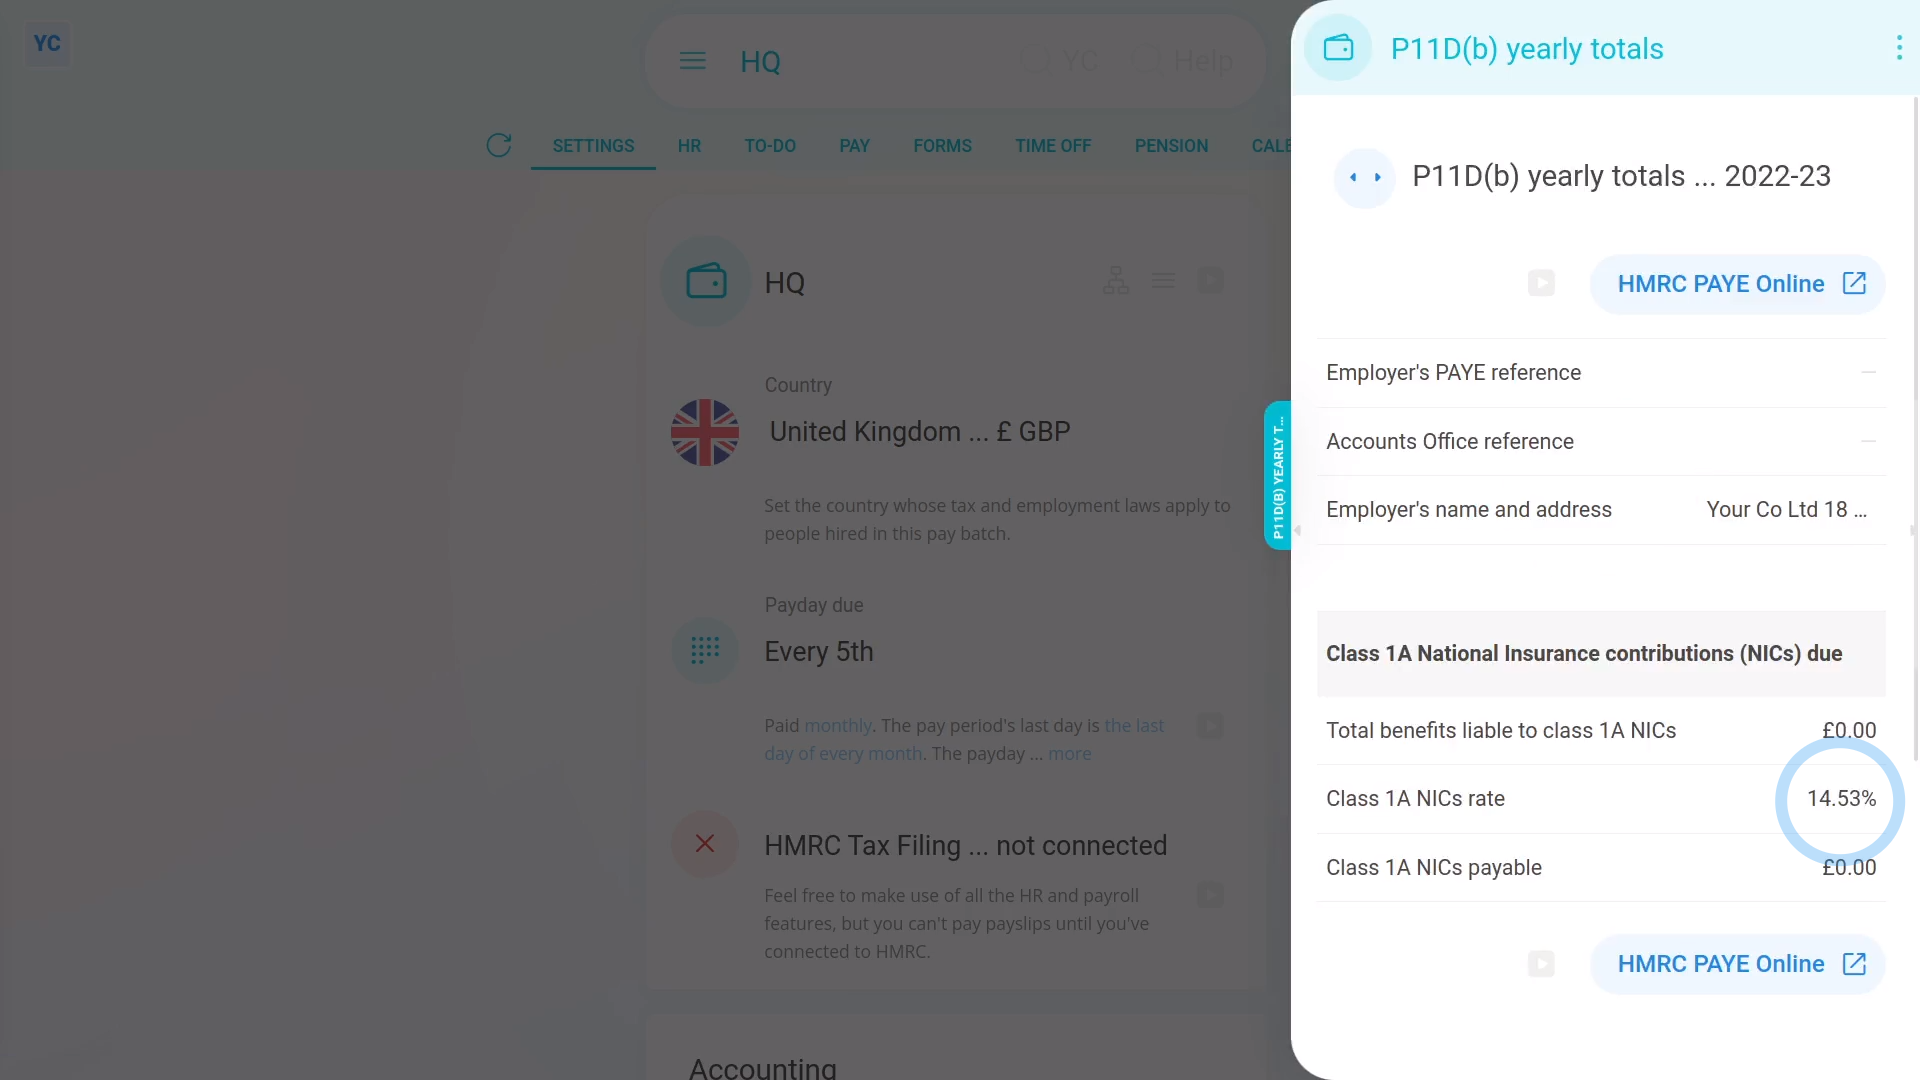
To see a pay batch's P11D(b) yearly totals:
- First, select the pay batch on: "Menu", then "Pay batches"
- Then tap: "Forms", then "P11D(b) yearly totals"
- The "P11D(b) yearly totals" gives you all the numbers you'll need to fill in each pay batch's P11D(b).
- Before you start copying numbers, be sure you've picked the correct tax year.
- You can tap the buttons to go forward, or back, a year.
- To submit your P11D(b):
Tap: HMRC PAYE Online - You'll first need to log in with your HMRC Government Gateway account.
- Once you're logged in, you can send your "expenses and benefits returns" using HMRC's PAYE Online.
- And finally, if you need to know more, search on Google, or ask your accountant.
Keep in mind that:
- Regardless of whether you say "Yes" or "No" to "Payrolling benefits", every pay batch needs to submit the P11D(b).
- It's an important choice because you can't change the "Payrolling benefits" setting once payslips are filed for the pay batch in the tax year.
And that's it! That's everything you need to know about choosing your payrolling benefits setting, and doing your P11D's!
How do I enter a National Insurance number and make sure it's valid?
 2:32
2:32
"How do I enter a National Insurance number and make sure it's valid?"
National Insurance numbers help HMRC keep track of the identity of each tax payer.
To enter a National Insurance number for a person:
- First, select the person on: "Menu", then "People"
- Then tap: "Tax", then "Tax settings"
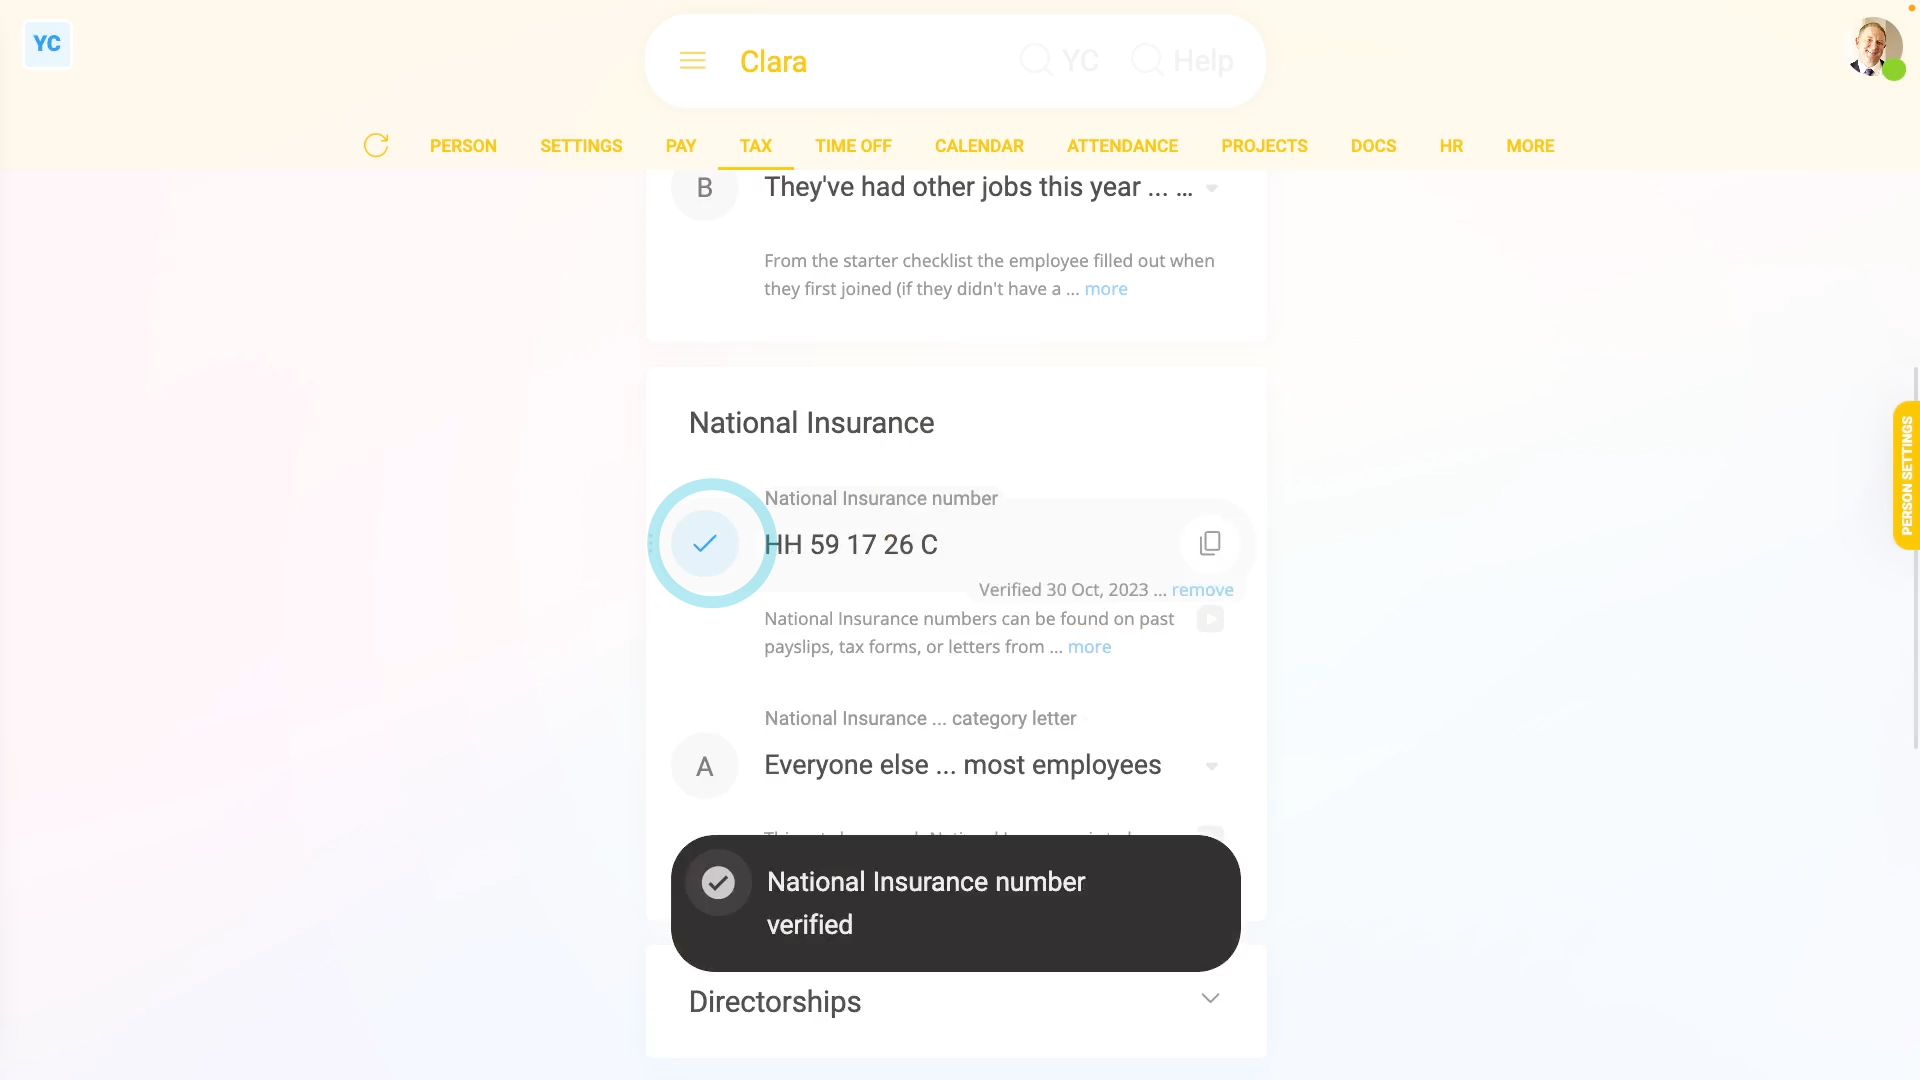
- Then enter their: "National Insurance number"
- Then once you tap Save, 1st Money first confirms that you've entered all HMRC's required info about the person.
- The required info includes: name, address, legal gender, date of birth, and payroll ID.
- If you're missing some of the required info, you'll get a warning that something's missing.
- To fix the warning, tap the item that's missing.
- Type in their missing info.
- Then tap: Save
- Now, to try again, tap: Verify NI
- Their National Insurance number is now verified by HMRC again.
- It usually takes 15 to 20 seconds for HMRC to finish processing your verification request.
- As part of the verification, the person's name, address, legal gender, date of birth, and payroll ID are all sent to HMRC.
- And finally, once HMRC's finished verifying, you'll see the confirmation message, and the person's National Insurance number is now verified with a blue tick.
Keep in mind that:
- The person's National Insurance number can be found on their past payslips, tax forms, or letters from HMRC.
- Also, a person's National Insurance number verification only has to be done once.
For advanced usage:
- It's possible to pay a person without a verified National Insurance number.
- However, on payday, the payroll admin sees a red warning saying that the National Insurance number hasn't been verified.
- Also, a warning email is sent to the person receiving the pay, for each payday that their National Insurance number hasn't been verified.
And that's it! That's all you need to do to verify a person's National Insurance number with HMRC!
How do I get a printable PDF of filed payslips?
 1:29
1:29
"How do I get a printable PDF of filed payslips?"
The two ways that people receive their payslip on payday is either by email, or if you print the printable PDF.
To download a printable PDF for a selection of filed payslips:
- First, select the pay batch on: "Menu", then "Pay batches"
- Then tap: "Pay", then "Payslips history"
- First, tick the payslips you'd like to print.
- However, to print all the payslips, you can instead tap: All
- Then tap:
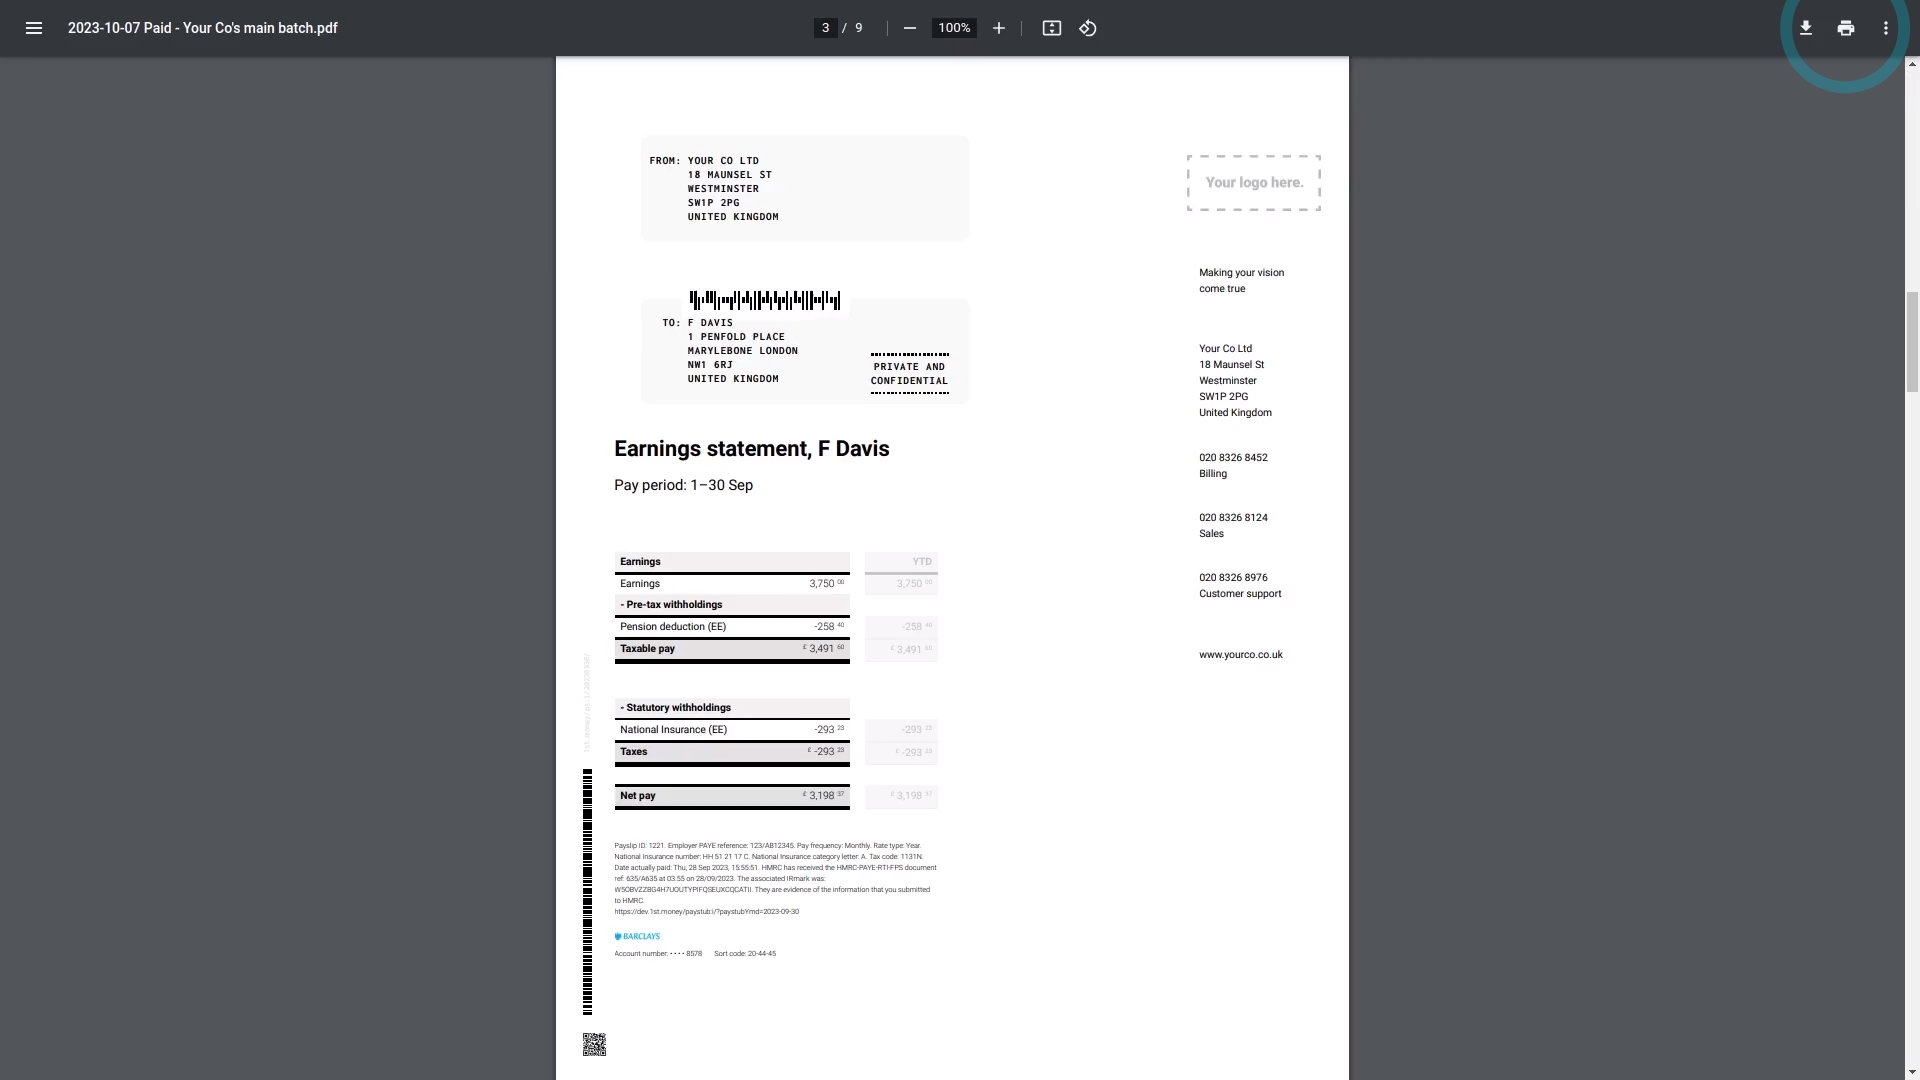
" Show settings", then "Get payslips for printing" - After a few seconds your PDF is automatically downloaded.
- When you open the PDF and scroll down, you'll see it's got all the payslips you ticked.
- Each payslip starts on its own printable page, as expected.
- And finally, when you're ready to print it, tap the "Print" button:
To learn more:
- About how to change the "PDF paper size", watch the video on: Changing PDF paper size
- If you'd like to see how to automatically get a printable PDF on each payday, watch the video on: Sending payslips
And that's it! That's all you need to do to download a printable PDF for a selection of filed payslips!
How do I pay a higher hourly rate to people who work overtime hours?
 5:10
5:10
"How do I pay a higher hourly rate to people who work overtime hours?"
Overtime pay allows your people to earn more, per hour, for their hours worked over a certain threshold, each day, or each week.
To set a pay batch's overtime pay settings, and see how overtime looks on a payslip:
- First, to set the pay batch's overtime pay settings:
Select the pay batch on: "Menu", then "Pay batches" - Then tap: "Settings", then "Advanced"
- And scroll down to the "Overtime" heading.
- By default, your pay batch's overtime settings are already set to the most common setting for your country, or location.
- If it's showing as "No overtime" it probably means that in your location, overtime pay isn't required by law.
- However, you can still offer your people overtime pay, if you prefer.
- Select your preferred overtime period by changing: "Overtime calculated"
- Daily overtime:
The "Daily" overtime option gives you two extra settings. - For the "Overtime starts after" threshold of when overtime pay starts to apply, you can drag the slider, or type in your daily hours threshold.
- And for the "Overtime pay" multiplier, you can also drag the slider, or type in your multiplier.
- With daily overtime, for any time a person's hours go over the threshold, the person gets the multiplier on their pay.
- And once you're finished with the overtime settings, tap: Save
- To check the person who's doing overtime is in the right pay batch:
Select the person who's doing overtime on: "Menu", then "People" - Then tap: "Pay", then "Pay settings"
- And then check which pay batch the person belongs to.
- To see the daily overtime hours on the person's payslip:
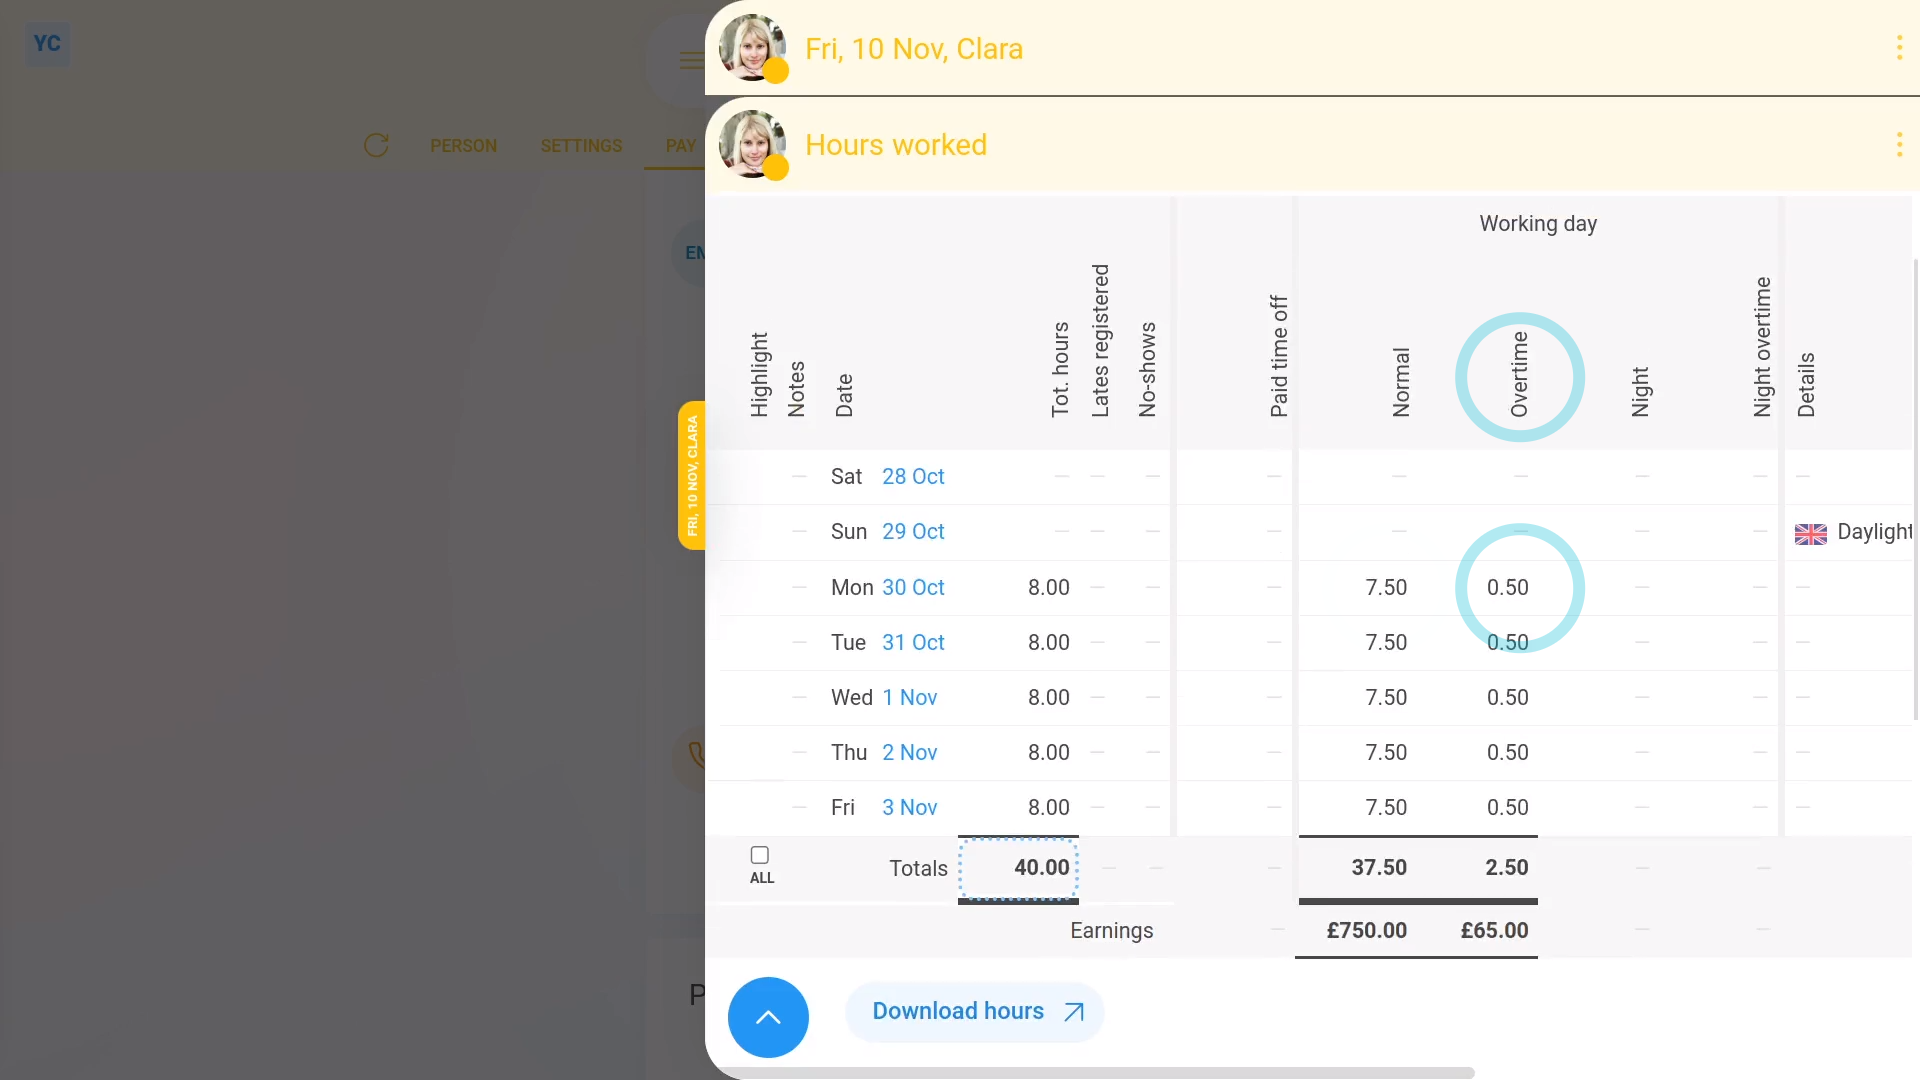
Tap: "Pay", then "Payslip" - Then tap: "Hours worked"
- In the "Total hours" column, you'll see the hours worked by the person for each day of the pay period.
- Then further across, for each day that the person's hours went over into overtime, you'll see the hours separated. Including the "Normal" hours and "Overtime" hours, separated into two columns.
- With their totals for the pay period (at the bottom).
- Now, back on their payslip, you'll see the "Earnings" and "Overtime" hours as separate numbers.
- And when you mouse over their numbers, you'll see their pay calculations.
- In addition, in the overtime calculation, you'll also see the "Overtime pay" multiplier that you set.
- Weekly overtime:
The "Weekly" overtime option gives you three extra settings. - For the "Overtime starts after" threshold of when overtime pay starts to apply, you can drag the slider, or type in your weekly hours threshold.
- Then for the "Overtime period ends" select the day of the week for the overtime hours counter to reset.
- And then also set the "Overtime pay" multiplier, like before.
- With weekly overtime, for any week a person's hours go over the threshold, the person gets the multiplier on their pay.
- And once you're finished with the overtime settings, tap: Save
- To see the weekly overtime hours on the person's payslip:
Select the person who's doing overtime on: "Menu", then "People" - Then tap: "Pay", then "Payslip"
- Then tap: "Hours worked"
- Now the overtime hours only appear near the end of the week, once the hours have gone over the weekly overtime threshold.
- And finally, even though the counting of overtime hours is different between daily and weekly, their appearance on the person's payslip is similar.
Keep in mind that:
- Selecting weekly overtime may be better for employers who've got people who work variable hours. For example, very long hours on some days of the week, and very short hours on other days.
- However, daily overtime may be better for employers who've got people who sometimes work six days a week.
You may notice:
- That salaried employees won't see any effect of any of the overtime settings on their pay.
- Overtime only applies to people whose pay is set to "Per hour ... timesheet hours", or: "Per hour ... target hours"
- Which means that it's fine to have both salaried and hourly people in the same pay batch, as the overtime settings won't affect your salaried people.
To learn more:
- About how to set a person's pay to: "Per hour ... timesheet hours", or "Per hour ... target hours", watch the video on: Per year, per month, or per hour
And that's it! That's everything you need to know about how overtime looks on a payslip!
How do I pay a higher hourly rate when people work through the night?
 3:30
3:30
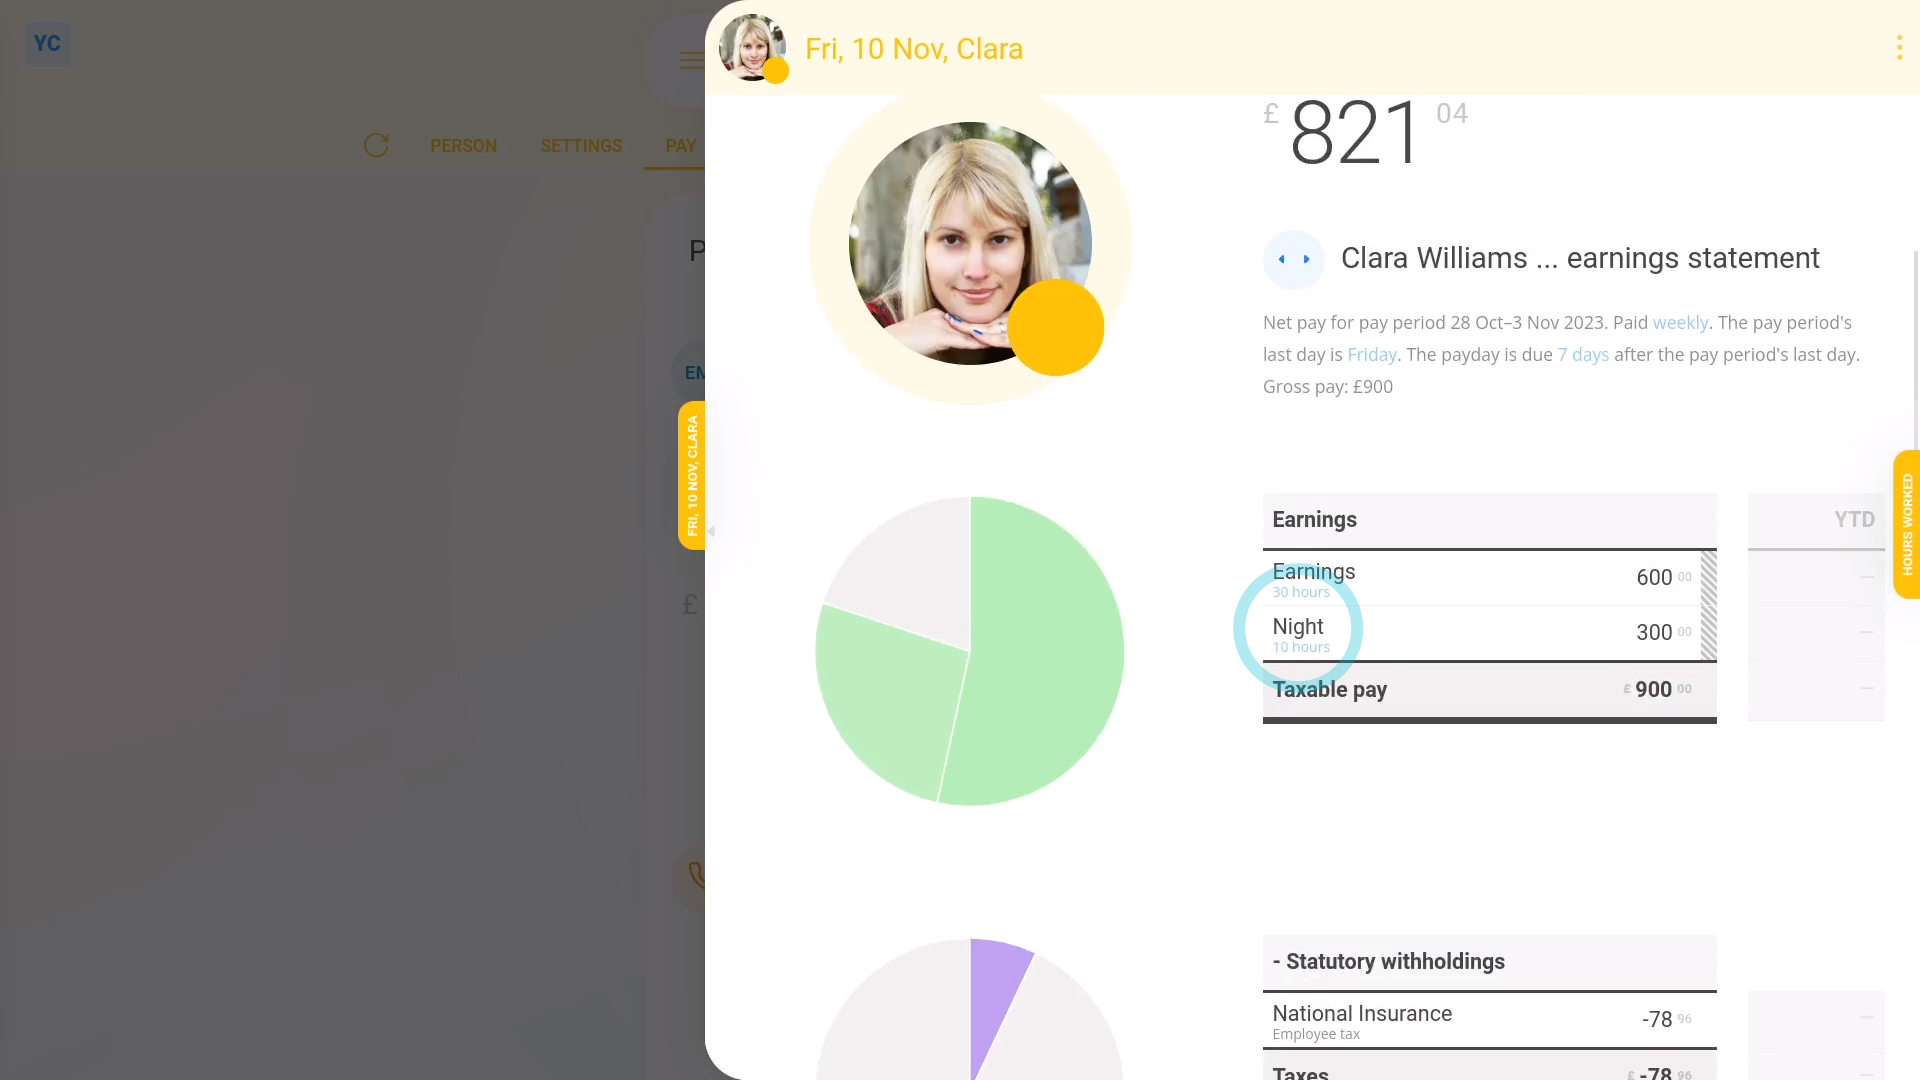
"How do I pay a higher hourly rate when people work through the night?"
The night pay settings allow your people to earn more, per hour, for their hours worked very early in the morning, or very late at night.
To set a pay batch's night pay settings, and see how night pay looks on a payslip:
- First, to set the pay batch's night pay settings:
Select the pay batch on: "Menu", then "Pay batches" - Then tap: "Settings", then "Advanced"
- And scroll down to the "Night pay" heading.
- By default, your pay batch's night pay settings are already set to the most common setting for your country, or location.
- If it's showing the "Night pay" multiplier as "1.00" it probably means that in your location, night pay isn't required by law.
- However, you can still offer your people night pay, if you prefer.
- Select your preferred night pay multiplier by changing: "Night pay"
- You can drag the slider, or type in your multiplier.
- Setting the "Night pay" multiplier reveals two extra settings.
- The time "Night pay starts at" in the evening.
- And the time "Night pay ends at" in the morning.
- And once you're finished with the night pay settings, tap: Save
- To check the person who's getting night pay is in the right pay batch:
Select the person who's getting night pay on: "Menu", then "People" - Then tap: "Pay", then "Pay settings"
- And then check which pay batch the person belongs to.
- To see the night pay hours on the person's payslip:
Tap: "Pay", then "Payslip" - Then tap: "Hours worked"
- In the "Total hours" column, you'll see the hours worked by the person for each day of the pay period.
- Then further across, for each day that the person's hours went over into the night pay hours, you'll see the hours separated. Including "Normal" hours and "Night" hours, separated into two columns.
- With their totals for the pay period (at the bottom).
- Now, back on their payslip, you'll see the "Earnings" and "Night" hours as separate numbers.
- And when you mouse over their numbers, you'll see their pay calculations.
- And finally, in the night pay calculation, you'll also see the "Night pay" multiplier that you set.
You may notice:
- That salaried employees won't see any effect of any of the night pay settings on their pay.
- Night pay only applies to people whose pay is calculated hourly.
- Which means that it's fine to have both salaried and hourly people in the same pay batch. The night pay settings won't affect your salaried employees.
Keep in mind that:
- The night pay calculations also work perfectly with shifts that go past midnight.
- Also keep in mind that a person using "Per hour ... timesheet hours" has their night pay tracked from the start and stop times on their timesheet.
- However, for a person using "Per hour ... target hours", night pay is applied to some of their target hours based on their: "% Night pay hours estimate"
And that's it! That's everything you need to know about how night pay looks on a payslip!
How do I schedule a person's pay rate to change on a future date?
 2:39
2:39
"How do I schedule a person's pay rate to change on a future date?"
Scheduling a person's future pay rate keeps their current pay rate unchanged, until the future date that you've picked for the pay change to happen.
To schedule a person's pay rate to change on a future date:
- First, select the person on: "Menu", then "People"
- Then go to: "Pay", then "Pay settings"
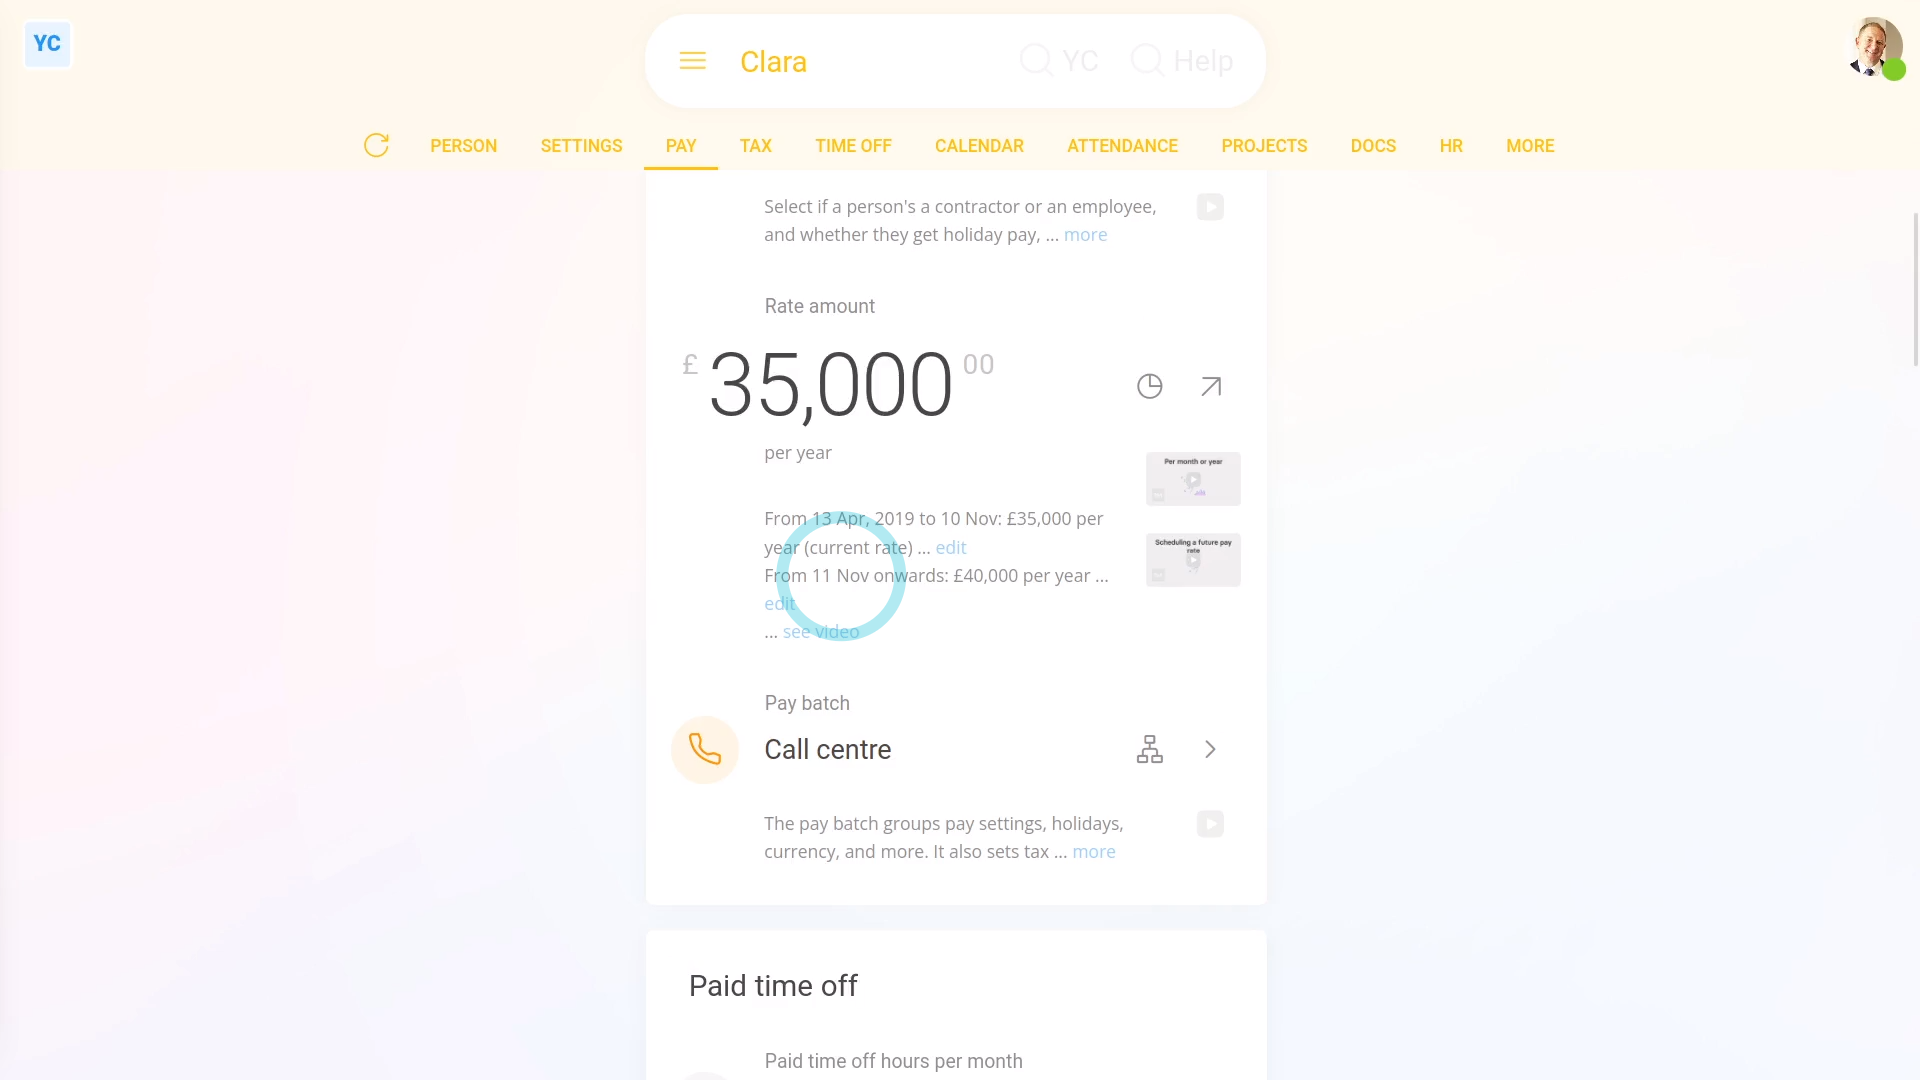
- The normal way to change a person's pay rate is to tap the big numbers, and set the new rate.
- However, changing the pay rate the normal way means that the change applies immediately.
- In other words, for the next upcoming payday, the entire pay period is paid with the new rate.
- If, instead, you want the pay rate to apply from a future date, tap the "more" link, and then tap the blue "Schedule future rate" link.
- Pick the pay period you'd like the future pay rate to start from.
- You can select any pay period start date in the next 12 months.
- Next, enter the new future pay rate.
- You could also change the rate type.
- Then tap: Save
- Now that it's saved, you'll notice that the person's current rate hasn't changed, as expected.
- However, when you read the description, you'll see the pay period start date, and the new future pay rate amount that you've scheduled.
- And now the pay rate for the person is set to automatically change on that future date.
- Also, if things change, you can always tap "Edit" and change their future pay rate to a different amount.
- Alternatively, to delete a future pay rate, tap: Delete
- And finally, because the future pay rate's been deleted, the person now has no scheduled changes to their pay.
Keep in mind that:
- Whatever you set a person's future pay rate to, it can always be seen by the person.
- So, if the person ever wanted confirmation that their pay change was scheduled, you could always send them a link to the page.
- Then the person could see it for themselves.
You may notice:
- That while only one future pay rate change can be scheduled, you can always update it to whatever you want it to be.
- Also, a person's future pay rate change can't be scheduled to apply from the middle of a pay period.
- Rather, it can only ever apply from the start of a pay period.
And that's it! That's everything you need to know about scheduling a person's pay rate to change on a future date!
How do I set a person's hourly pay rate to track minimum wage?
![]() 2:54
2:54
"How do I set a person's hourly pay rate to track minimum wage?"
Setting a person to "Tracking minimum wage" auto-updates the person's hourly pay rate. The updates happen automatically, from year-to-year, whenever the government releases new minimum wage rules.
![]()
To set a person's hourly pay rate to track minimum wage:
- First, select the person on: "Menu", then "People"
- Then tap: "Pay", then "Pay settings"
- Then tap the person's rate amount, or if no rate amount is set yet, tap: Set rate
- Next, select a "Per hour" rate. You can select whichever of "timesheet hours" or "target hours" you prefer.
- And then turn on: Tracking minimum wage
- Minimum wage tracking requires the person's "Date of birth" to be set.
- If it's not set, you'll get a warning.
- To set their "Date of birth", tap the blue link and set it.
- Then tap: Save
- Now that their "Date of birth" is set, tap Set rate again.
- Set it to "Per hour" again.
- Then turn on: Tracking minimum wage
- Additionally, if you need it, you can also turn on tracking for the apprentice minimum wage.
- When you're ready, tap: Save
- And you'll now see their rate amount shows the letters: "(mw)"
- The "(mw)" indicates that their rate amount is now locked to the minimum wage, and is set to auto-update from year-to-year, from now on.
- To understand how their minimum wage rate was calculated, tap it open again, and read the notes and links.
- If you later decide to pay them higher than minimum wage, you can turn off "Tracking minimum wage" anytime.
- And finally, you're now free, again, to set them to whatever higher pay rate you want.
Keep in mind that:
- Turning on "Tracking minimum wage" doesn't only auto-update the person's hourly pay rate, from year-to-year.
- It also checks the person's age every payday. For example, the person may turn 18 part way through the year, and fall into the adult age bracket which has a different minimum wage.
- Once "Tracking minimum wage" is turned on, 1st Money automatically updates the person's pay rate for you.
- It's updated both when the government releases new minimum wage rules, and whenever the person's age changes.
- It's set and forget!
And that's it! That's all you need to do to set a person's pay rate to track minimum wage!
How do I set a person's National Insurance category letter?
 1:44
1:44
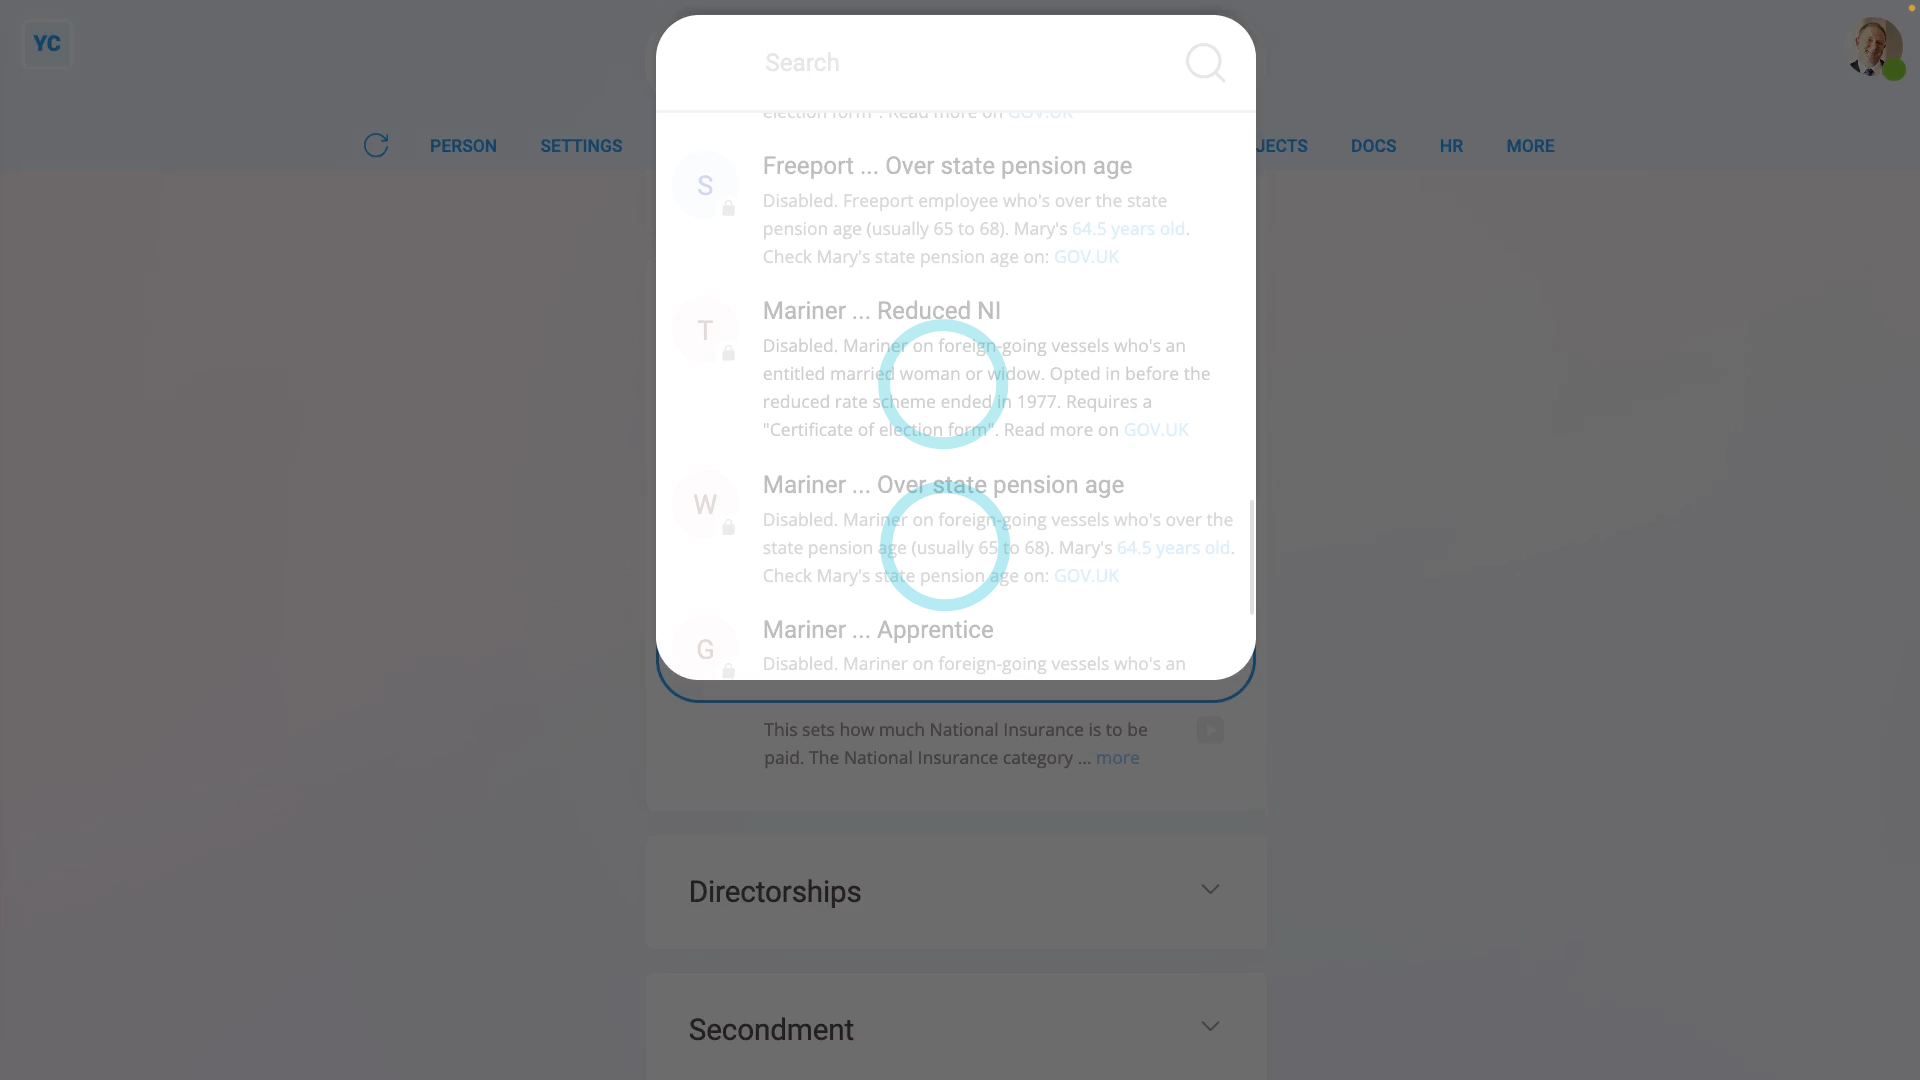
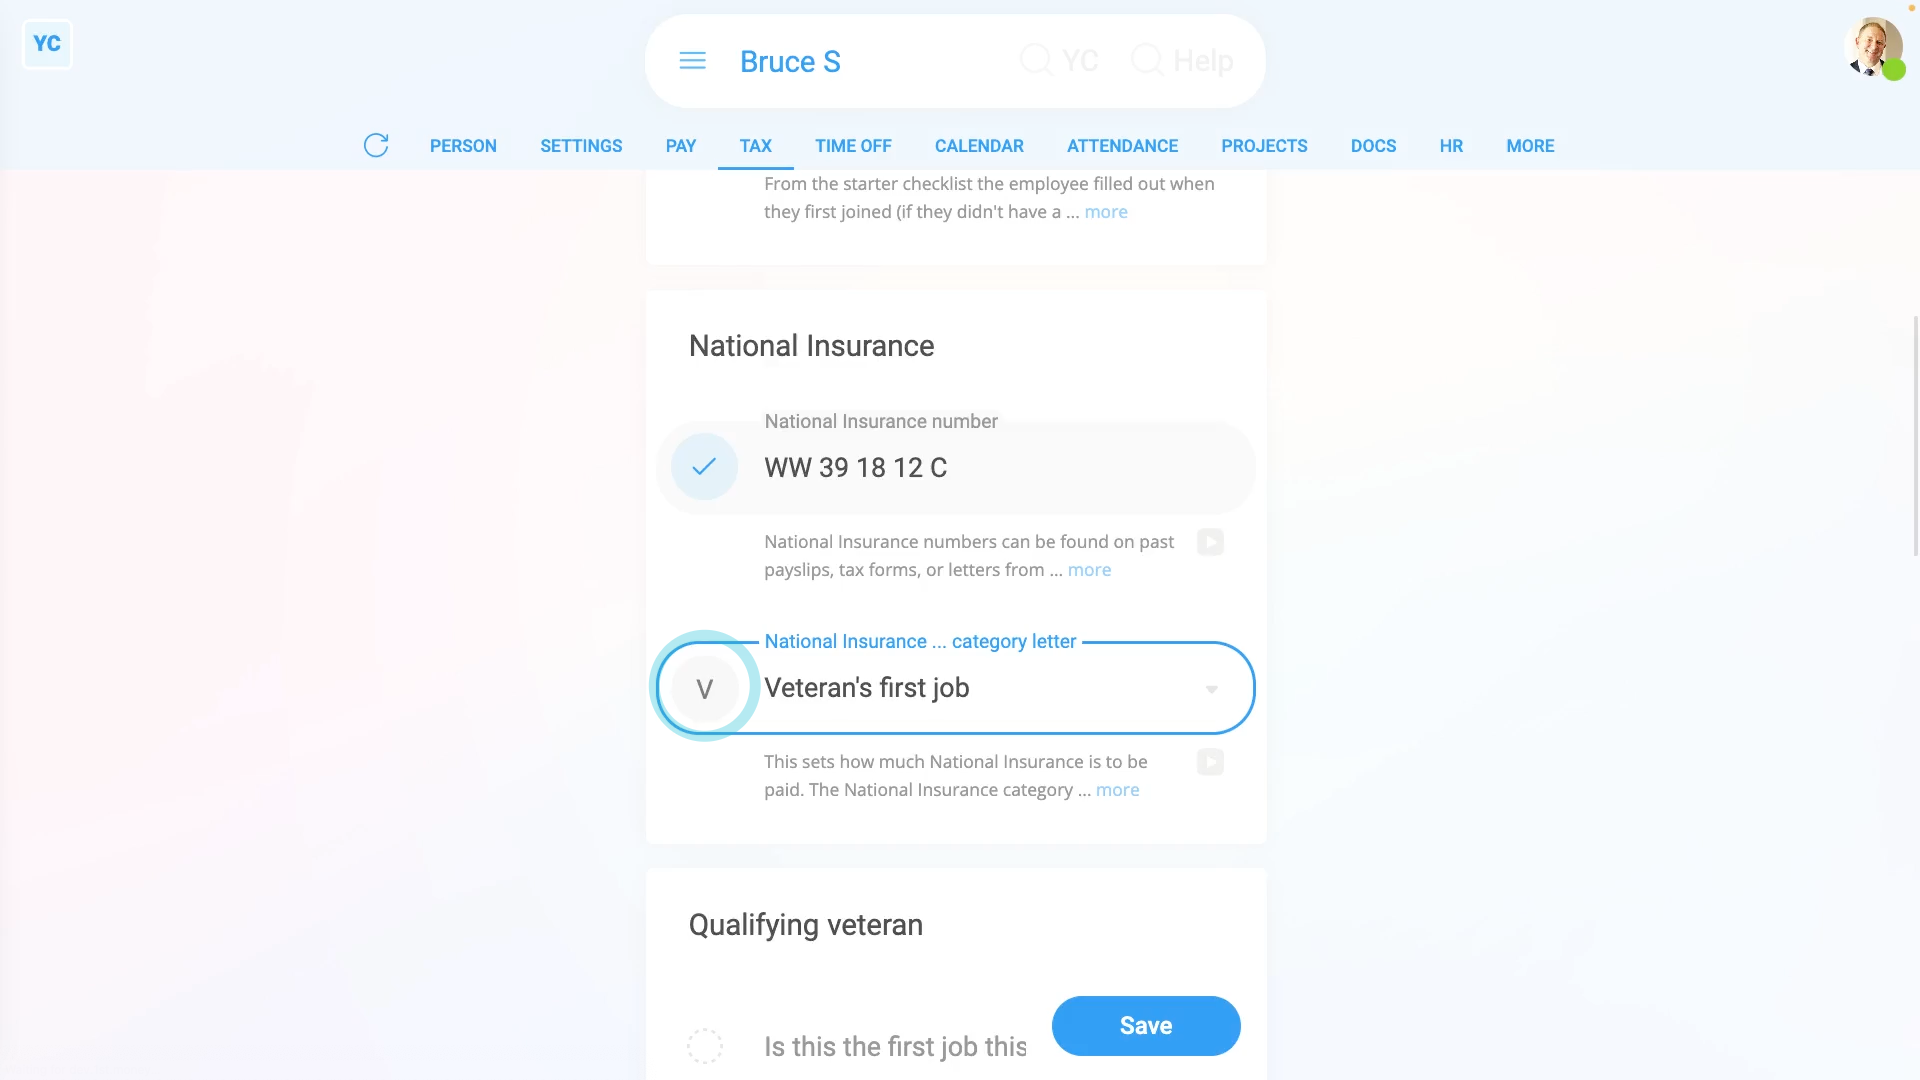
"How do I set a person's National Insurance category letter?"
The National Insurance category letter turns on discounts to the person's National Insurance contributions.
To set a person's National Insurance category letter:
- First, select the person on: "Menu", then "People"
- Then tap: "Tax", then "Tax settings"
- Then scroll down to the "National Insurance" heading.
- And tap: "National Insurance ... category letter"
- Currently, HMRC's published about 20 different NI category letters, each with their own discounts.
- If you're interested, you can read more about each by reading their notes.
- You could also tap the links to read more on HMRC's website.
- You'll see some category letters are greyed out (at the bottom), and can't be selected.
- Greyed out category letters aren't available for the person, based on their gender, age, or other info.
- For most people, the letter to select is "A", which has no National Insurance discount.
- And finally, tap Save, and you're done.
Keep in mind that:
- If you're ever not sure which letter to select, set it to letter: "A"
- Sometimes, when you look through the list, you may find more than one category letter that matches the person.
- When more than one category letter matches a person, it's up to the employer to pick only one.
And that's it! That's everything you need to know about setting a person's National Insurance category letter!
How do I set a person's secondment?
 1:46
1:46
"How do I set a person's secondment?"
Secondment is where a person's temporarily sent to work in an overseas branch of their company.
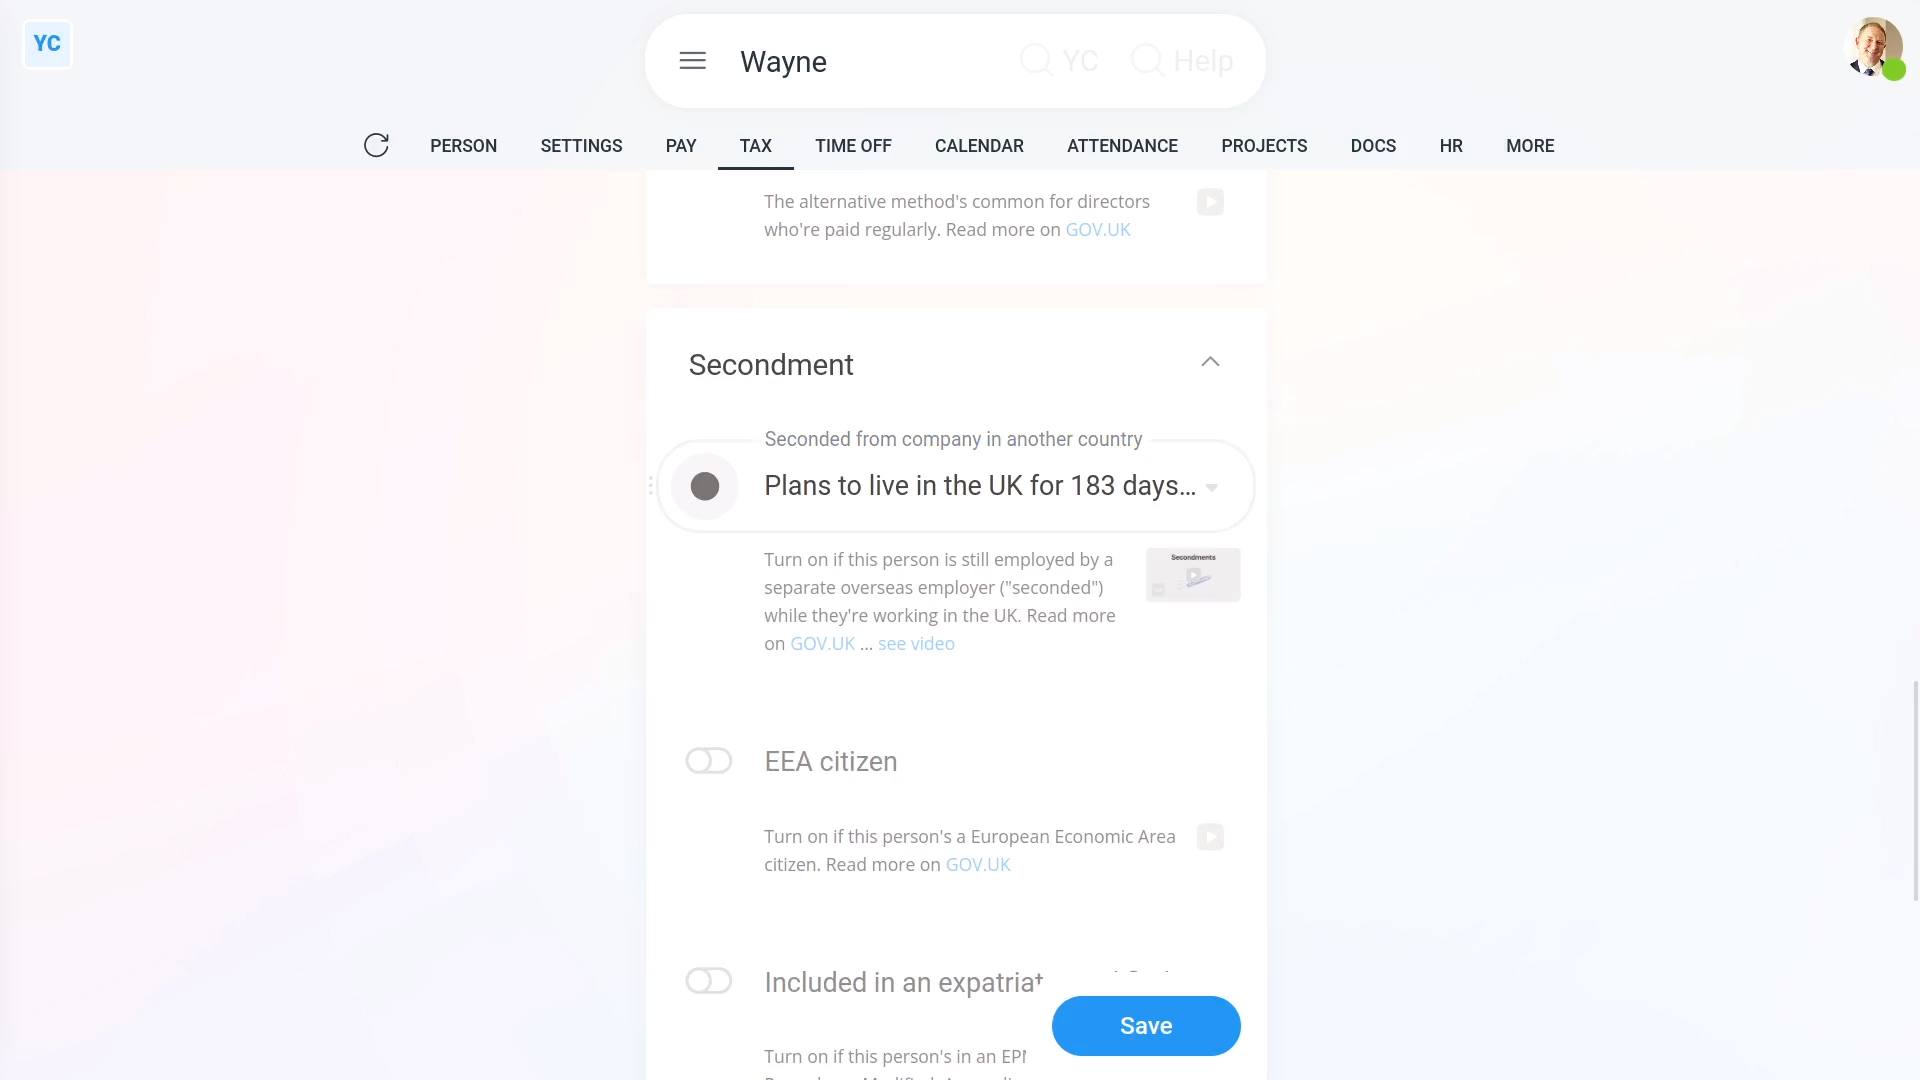
To set a person's secondment settings:
- First, select the person on: "Menu", then "People"
- Then tap: "Tax", then "Tax settings"
- Next, scroll down and tap the "Secondment" heading, to see its three settings.
- Select the option that best fits the person's situation for: "Seconded from company in another country"
- If you're not sure which option to select, tap the GOV.UK link, to read more.
- If the person's a European Economic Area citizen, and can show you their passport, turn on: "EEA citizen"
- Again, if you're not sure, read more on the GOV.UK link.
- Where the person's in an EPM6 (Employment Procedures Modified, Appendix 6) scheme, turn on: "Included in an expatriate modified scheme"
- Like before, if you're not sure, read more on the GOV.UK link.
- And finally, tap: Save
Keep in mind that:
- Secondments are usually for a person to exchange experience and skills, or to replace other workers.
- Secondments are usually done by large companies with branches in more than one country.
- Secondment means the person pays UK income tax on their UK earnings.
And that's it! That's everything you need to know about entering a person's secondment settings!
How do I set a person as a director?
 1:41
1:41
"How do I set a person as a director?"
A director is a person who's legally responsible for running a company and making sure company accounts are properly prepared.
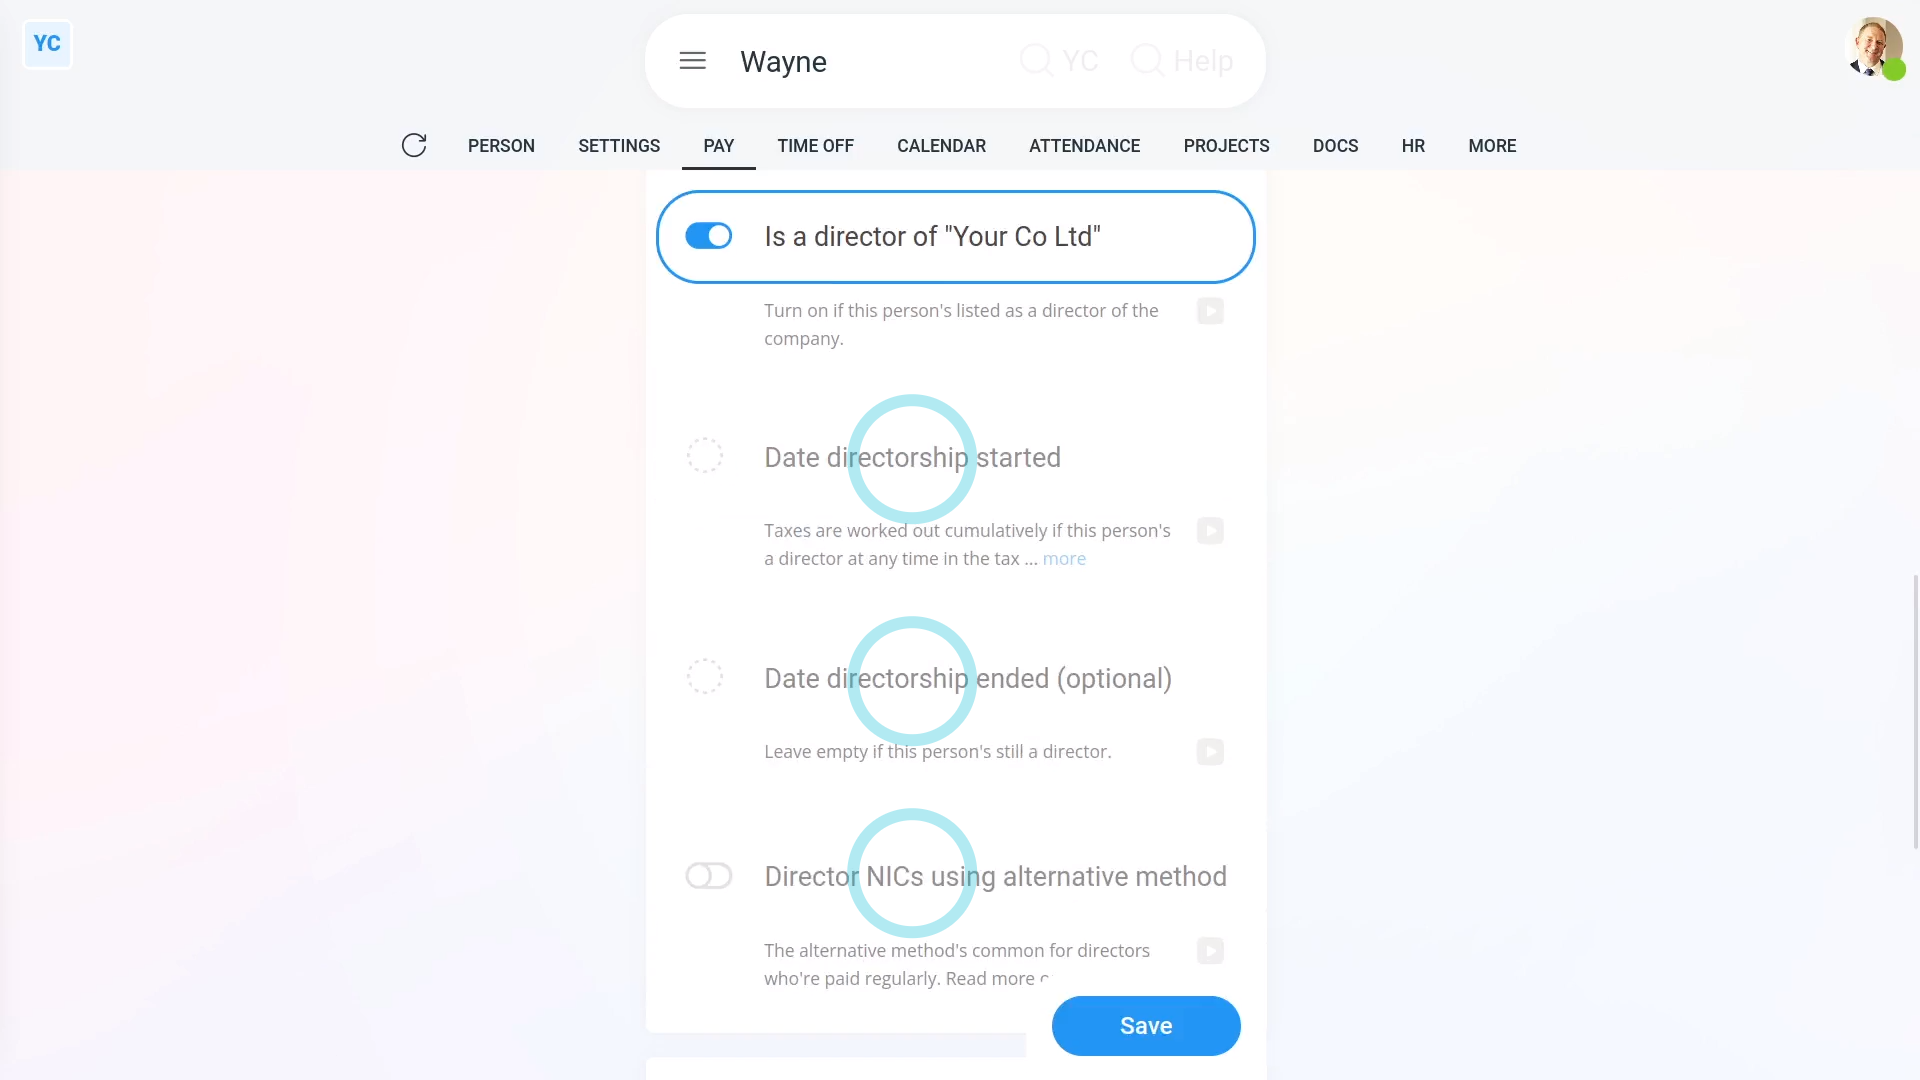
To set a person as a director:
- First, select the person on: "Menu", then "People"
- Then tap: "Tax", then "Tax settings"
- Next, scroll down to the "Directorships" heading and expand it.
- Once you turn on Is a director..., you'll see three additional options.
- You can enter the date that the person started being a director. The start date is required.
- The end date is optional and can be kept empty in most cases. Come back and fill it in, one day, when the person's directorship comes to an end.
- In addition, if the person gets regular pay from the company, like a salary or wage, turn on: "Director NICs using alternative method"
- And finally, tap: Save
Keep in mind that:
- There can be more than one director in a company.
- In some cases, you may be the director of your own company, even if you're the only person in the company.
- Even if you're the sole director, you still have to set yourself as a director.
For advanced usage:
- Setting a person as a director doesn't increase their taxes paid.
- The only effect it's got is a small change to how National Insurance is calculated.
And that's it! That's everything you need to know about setting a person as a director!
How do I set up a HMRC Tax Filing company connection?
 2:27
2:27
"How do I set up a HMRC Tax Filing company connection?"
Before sending filed payslips to HMRC, you first need an "HMRC Tax Filing" connection. There's two ways to connect. A external tax agent connection, or a company connection.
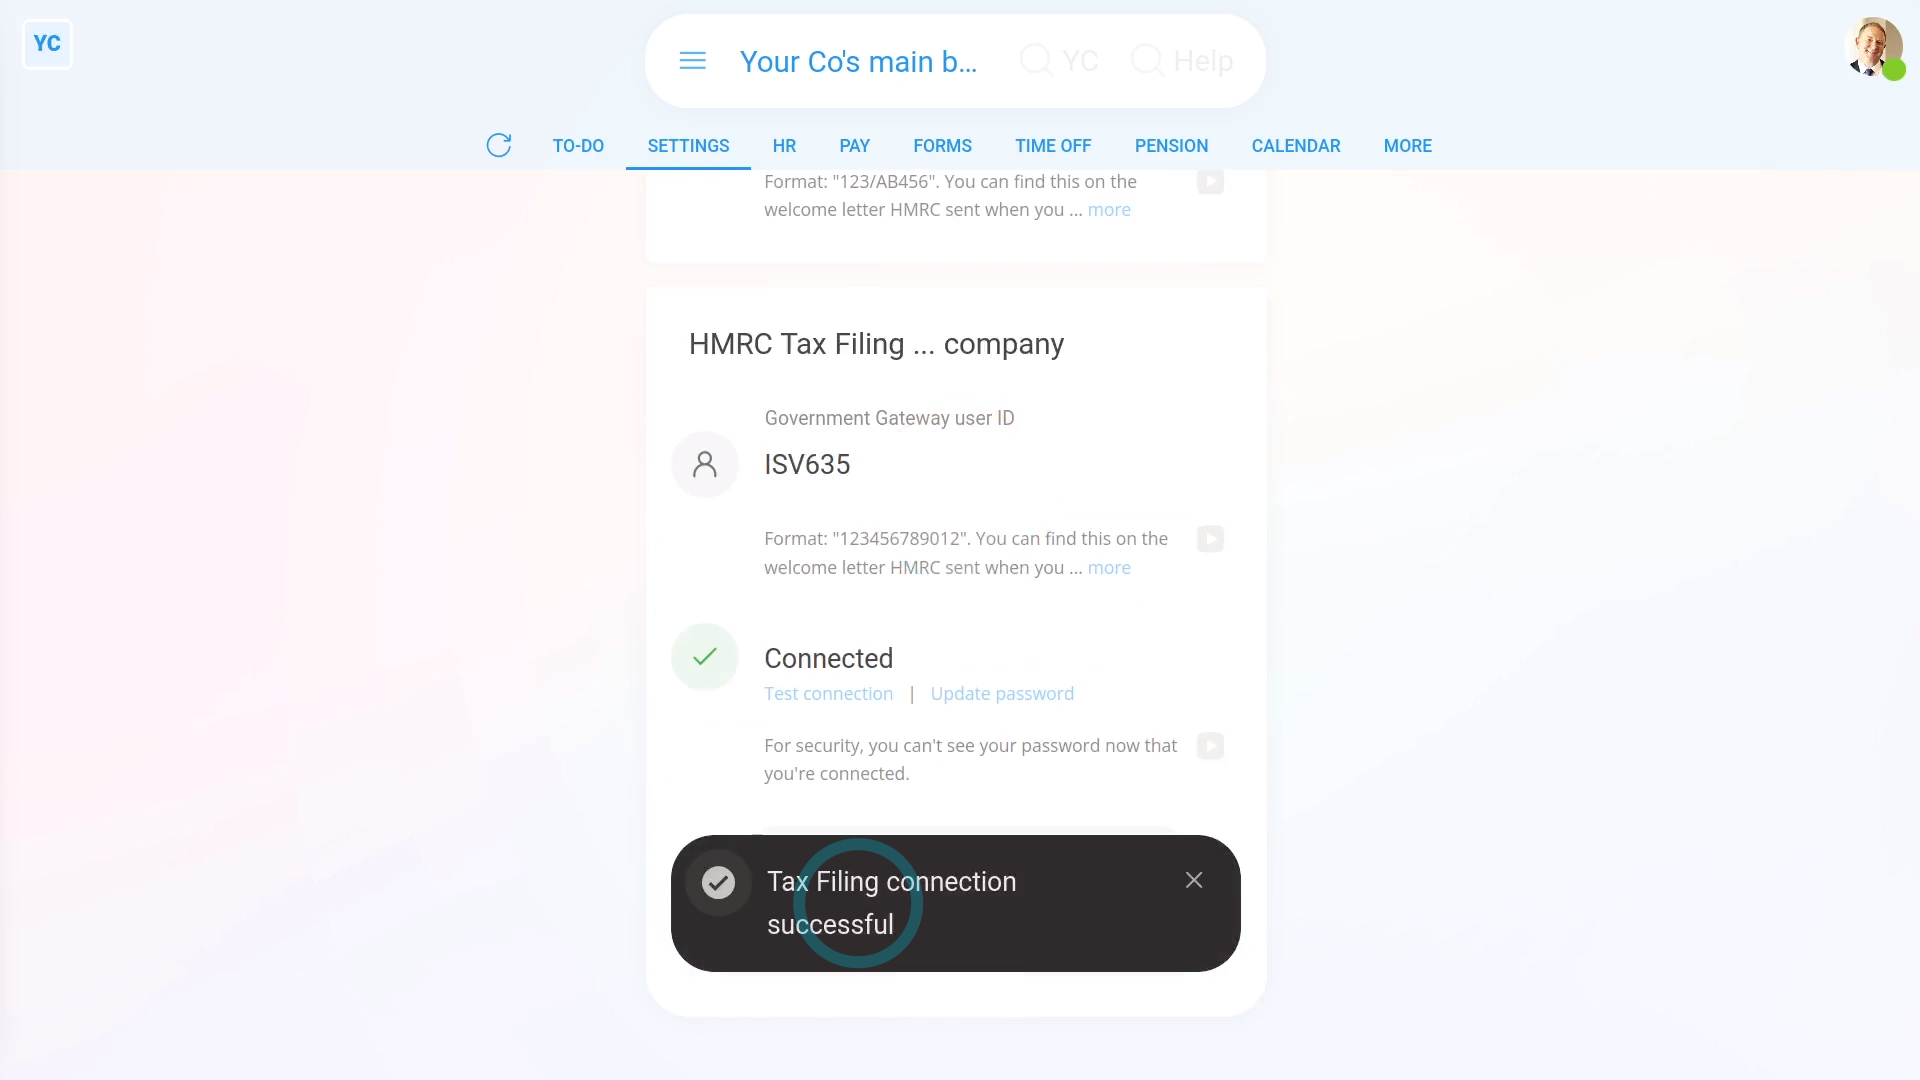
To set up your company connection to HMRC:
- First, select the pay batch on: "Menu", then "Pay batches"
- Then tap: "Settings", then "HMRC Tax Filing"
- Now type in your: "Accounts Office reference"
- You can find it on the welcome letter HMRC sent when you first registered as an employer.
- Also type in your: "Employer PAYE reference"
- It's also found on the welcome letter, in your Government Gateway account, or on other letters and emails from HMRC.
- Next, type in your company's: "Government Gateway user ID"
- And then your company's: "Government Gateway password"
- Tap: Save
- All your details are now being checked by HMRC. In a few seconds you'll see the confirmation message.
- Once you get the confirmation message, your pay batch's all connected to HMRC.
- And finally, you're now ready to submit payroll each payday. You won't have to set your connection details again.
Keep in mind that:
- Your "HMRC Tax Filing" connection is used for FPS and EPS submissions. It's also used for verifying National Insurance numbers.
- If you've got more than one pay batch, you'll need to do the connection steps again, for each of your other pay batches as well.
- If multiple pay batches all belong to the same company, reuse the exact same ID and password for each pay batch.
- Also, if you're choosing between a company connection, or a external tax agent connection, it's recommended to pick the company connection.
- The advantage with a company connection is if the external tax agent's off sick, other people can fill in and do HMRC submissions.
To learn more:
- About setting up your HMRC external tax agent connection, watch the video on: HMRC Tax Filing external tax agent connection
And that's it! That's everything you need to know about setting up an HMRC Tax Filing company connection!
How do I set up my HMRC Tax Filing external tax agent connection?
 2:55
2:55
"How do I set up my HMRC Tax Filing external tax agent connection?"
Before sending filed payslips to HMRC, you first need an "HMRC Tax Filing" connection. There's two ways to connect. A company connection, or a external tax agent connection.
To set up your external tax agent connection to HMRC:
- First, open yourself on: "Menu", then "Me"
- Then tap: "Tax", then "External tax agent"
- And turn on: "Are you an external tax agent, accountant, or bookkeeper?"
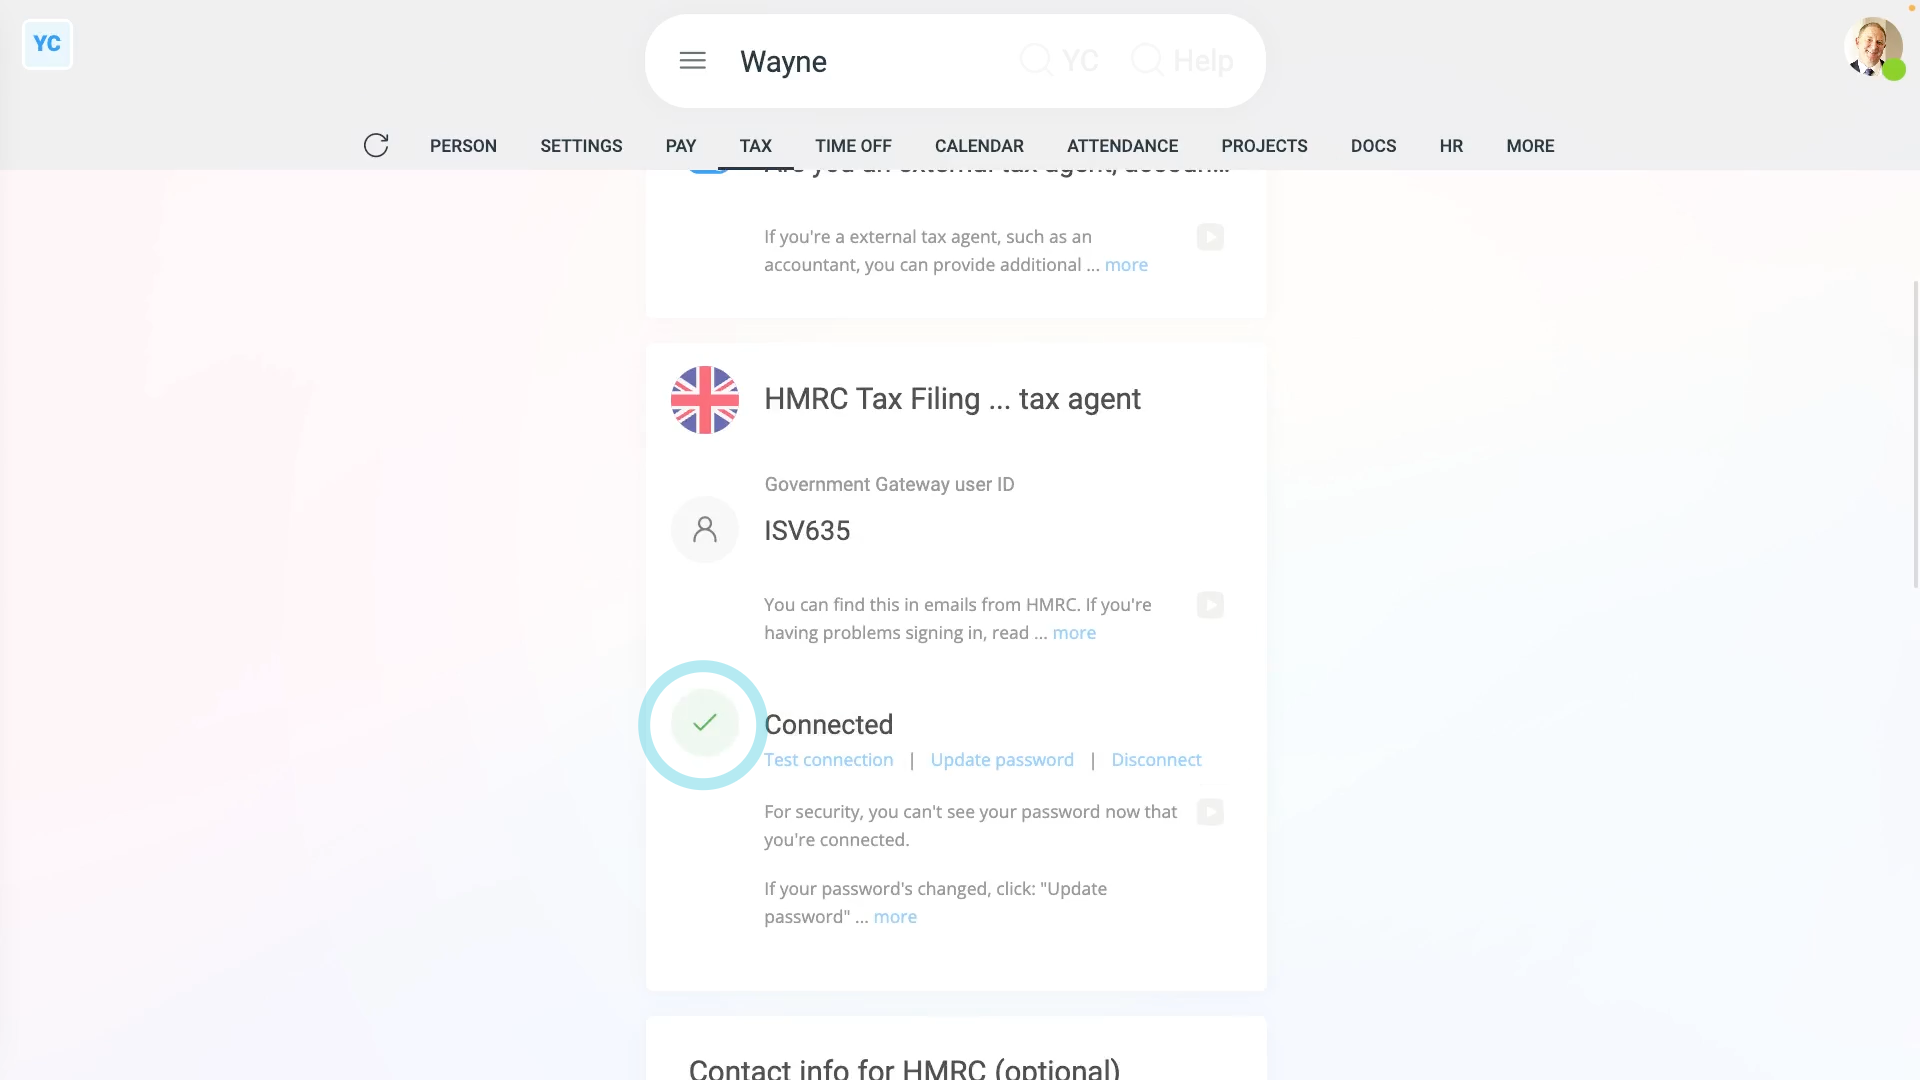
- Next, scroll down to the "HMRC Tax Filing ... tax agent" heading.
- To learn how to set up the required logins, see the "GOV.UK" links.
- Then type in your: "Government Gateway user ID"
- And then your external tax agent: "Government Gateway password"
- And tap: Save
- All your details are then checked by HMRC.
- And in a few seconds you'll get a confirmation message.
- Once you get the confirmation message, you'll see a green check confirming that you're all connected to HMRC.
- And you're now ready to submit payroll for your client companies each payday. You won't have to set your connection details again.
- If you ever need to check the connection, you can tap the blue "Test connection" link.
- If you ever need to update your password, you can tap the blue "Update password" link.
- And if you want to delete your connection, you can tap the blue "Disconnect" link.
- Optionally, you can also store your contact details to be sent with HMRC submissions.
- The contact details help HMRC know who to go to if HMRC has questions.
- And finally, as an external tax agent, you're now ready to send filed payslips to HMRC on behalf of any of your client companies.
Keep in mind that:
- Only the person, themselves, can set up their own external tax agent connection to HMRC.
- Other users, including admins, can't see the external tax agent page, on behalf of another person.
- Also, if you're choosing between a company connection, or an external tax agent connection, it's recommended to pick the company connection.
- The advantage with a company connection is if the external tax agent's off sick, other people can fill in and do HMRC submissions.
To learn more:
- About setting up your HMRC company connection, watch the video on: HMRC Tax Filing company connection
And that's it! That's all you need to do to set up your HMRC Tax Filing external tax agent connection!
How do I temporarily halt a person's pay?
 2:00
2:00
"How do I temporarily halt a person's pay?"
Sometimes, you may have a reason to temporarily halt a person's pay.
To turn on "Temporarily halt pay" for a person, and to see how it looks when paying payslips:
- First, select the person on: "Menu", then "People"
- Then tap: "Settings", then "Permissions"
- And turn on: "Temporarily halt pay"
- Then tap: Save
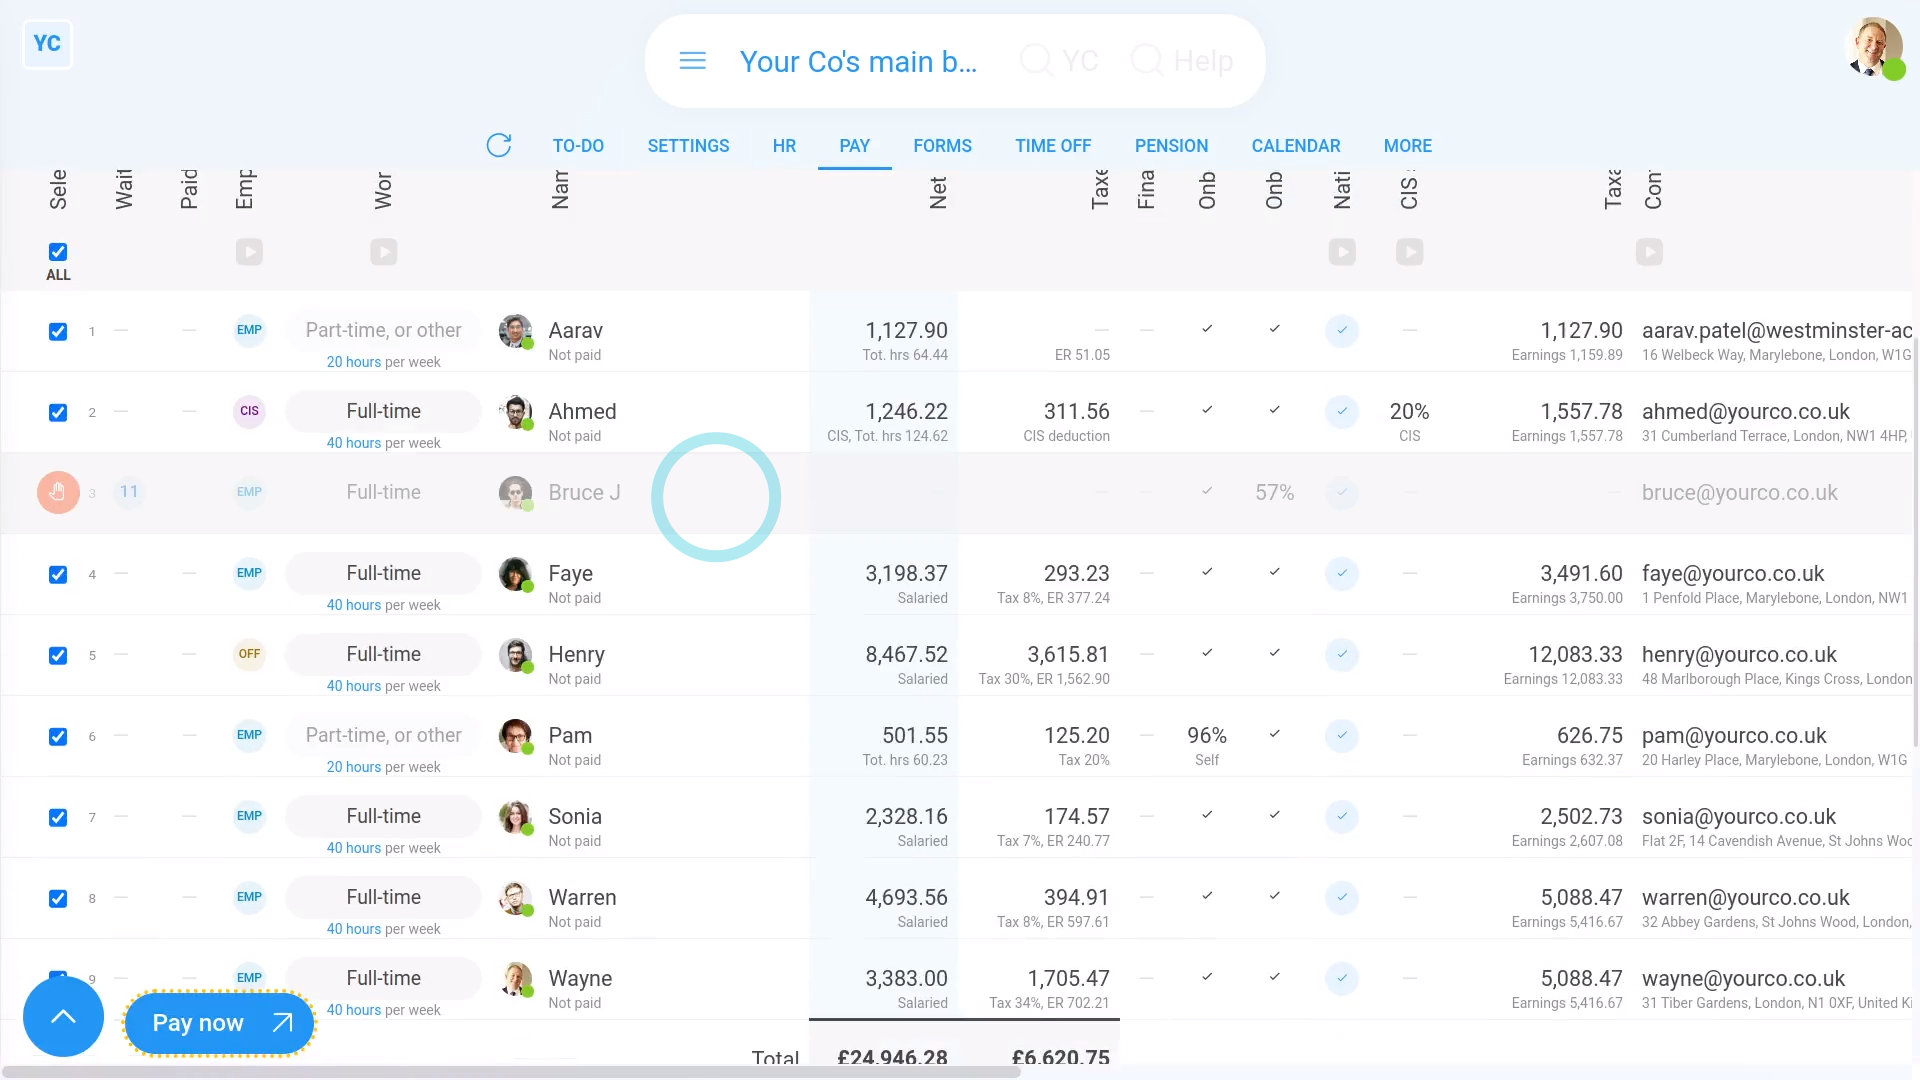
- Now that you've halted their pay, to see how it looks, select the pay batch on: "Menu", then "Pay batches"
- Then go to: "Pay", then "Pay now"
- You'll now see that the payslip row for the halted person is greyed out.
- You can still pay everyone else, but not the halted person.
- To remove the "Temporarily halt pay" restriction, tap the orange warning and turn it off.
- And finally, once you've turned it off, the orange warning goes away, and you can now include their payslip in: "Pay now"
Keep in mind that:
- Temporarily halting a person's pay can be useful if you're investigating a person's behaviour for serious misconduct, like fraud.
- Temporarily halting a person's pay doesn't block them in any other way. The person can still login, do timesheets, and everything else.
- Also keep in mind, that it may be illegal to not pay a person by the date their pay is due.
- You'll need to do your own research to decide whether it's legal for you to not pay a person by the date their pay is due.
To learn more:
- About how to block a person from logging in, watch the video on: Temporarily blocking access
And that's it! That's everything you need to know about temporarily halting a person's pay!
What's the pay summary for?
 2:01
2:01
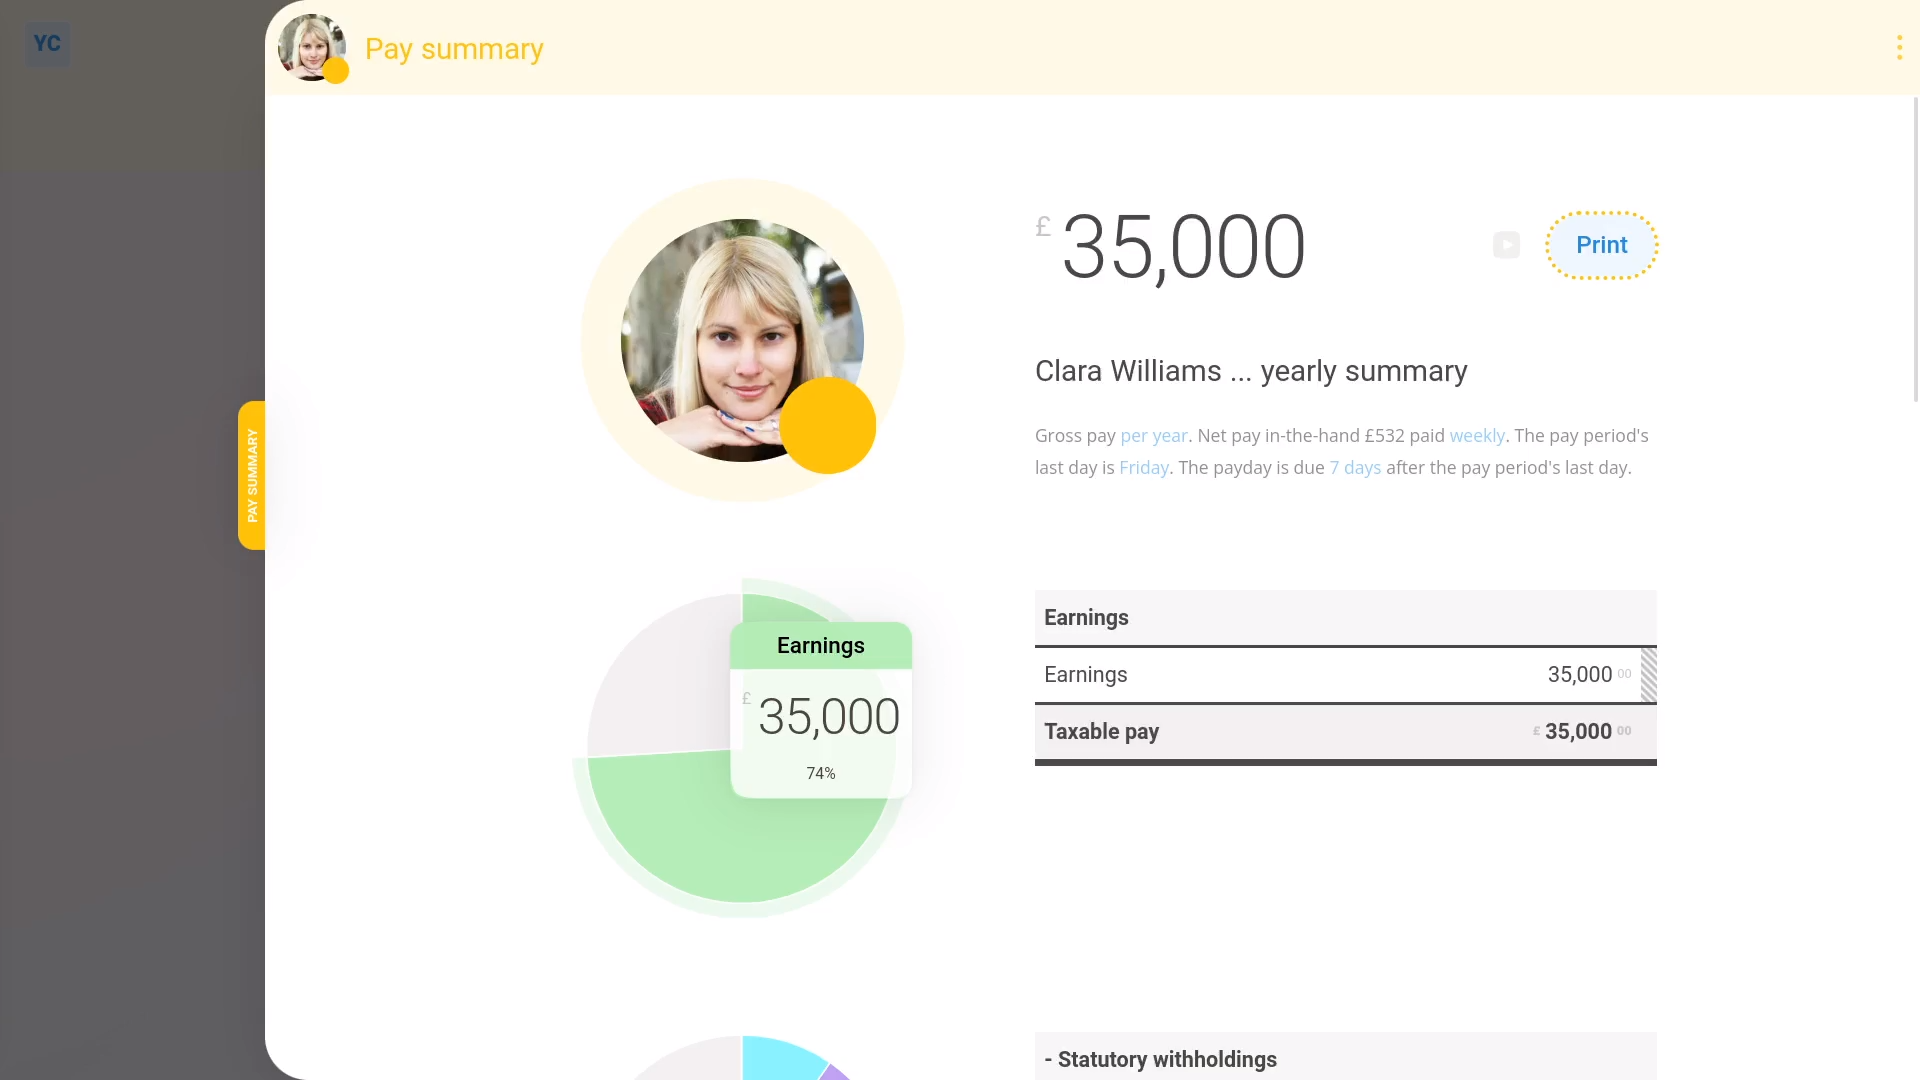
"What's the pay summary for?"
The pay summary gives you a one page snapshot of a person's pay.
To see a person's pay summary:
- First, select the person on: "Menu", then "People"
- Then tap: "Pay", then "Pay summary"
- And you'll see a one page summary that estimates all the main numbers of a person's pay.
- The first thing to understand about the pay summary is printing.
- Printing the pay summary gives you a nicely formatted, single page summary, of a person's pay.
- Sometimes a pay summary page can be useful, as an estimate of a person's pay, when you're offering them a job.
- Next down from the top, the big number is the person's gross pay.
- It's shown as a yearly amount, but if you want to see it monthly, tap the "per year" link.
- Next is the short explanation on how the person's paid. Again, tap any of the links if you want to change some of the settings.
- The main area of the page is the pay numbers.
- When you hover your mouse over some of the numbers, you'll see the segments of the pie charts light up.
- You'll also see explanations of how some of the numbers were calculated.
- And finally, the "Employer taxes" (at the bottom of the page) shows you your additional employer costs, like employer taxes and pensions. The "Employer taxes" section doesn't show for people who don't have at least "View payroll admin" permissions. It also doesn't show on the print version.
Keep in mind that:
- A person's pay summary can be a useful tool in helping people understand an estimate of their pay. However, it's an estimate only.
- Some pay numbers may work out differently in the day-to-day running of real life payroll.
And that's it! That's everything you need to know about a person's pay summary!
What are the advanced tax settings?
 2:04
2:04
"What are the advanced tax settings?"
There's four advanced tax settings that occasionally you may need to set.
To set a person's advanced tax settings:
- First, select the person on: "Menu", then "People"
- Then tap: "Tax", then "Tax settings"
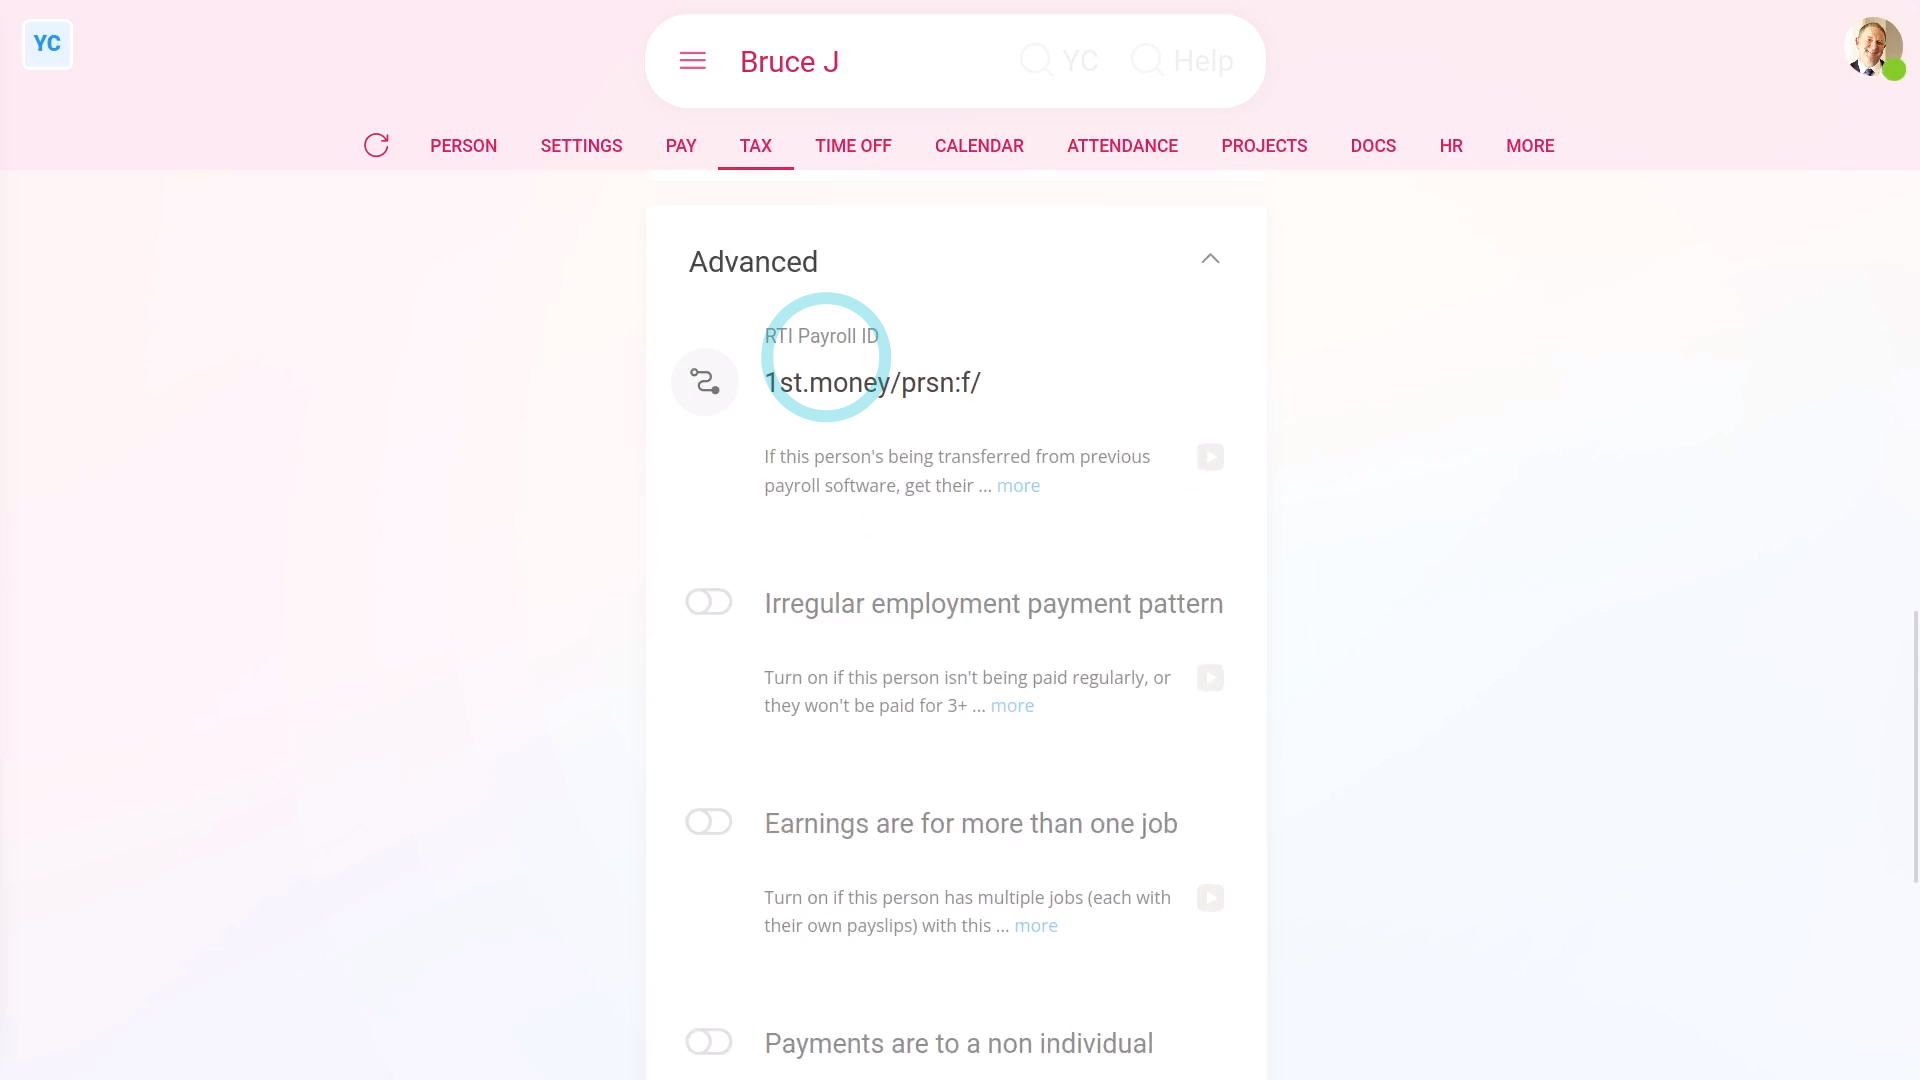
- Then scroll down and tap the heading "Advanced", to show its contents.
- The first advanced tax setting is: "RTI Payroll ID"
- It must always have something in it, and must never be empty.
- If you've migrated the person over from another payroll platform, HMRC requires you to enter the "RTI Payroll ID" used on the other platform.
- Maintaining the same "RTI Payroll ID" allows HMRC to match up their records, throughout the tax year, from both platforms.
- Next, is "Irregular employment payment pattern" which is for when the person isn't being paid regularly.
- Including when you won't be paying them for 3 months, or more. Like, for casual employees, or when on long-term sick leave.
- Check out the HMRC link, to learn more.
- Next, is "Earnings are for more than one job" which is for when the person's got multiple jobs.
- But only for when those multiple jobs are each inside a single company, or with associated businesses.
- See the HMRC link, to learn more.
- Last is "Payments are to a non individual" which is for when payday payments aren't made to the person.
- Instead, payday payments are made in the name of: "a personal representative, trustee or corporate organisation"
- And finally, tap the HMRC link, to learn more.
Keep in mind that:
- It's rare that you'll ever have to set any of the advanced tax settings, but the settings are there if you need them.
And that's it! That's everything you need to know about advanced tax settings!
What does the 'Show pay as' setting do?
 1:35
1:35
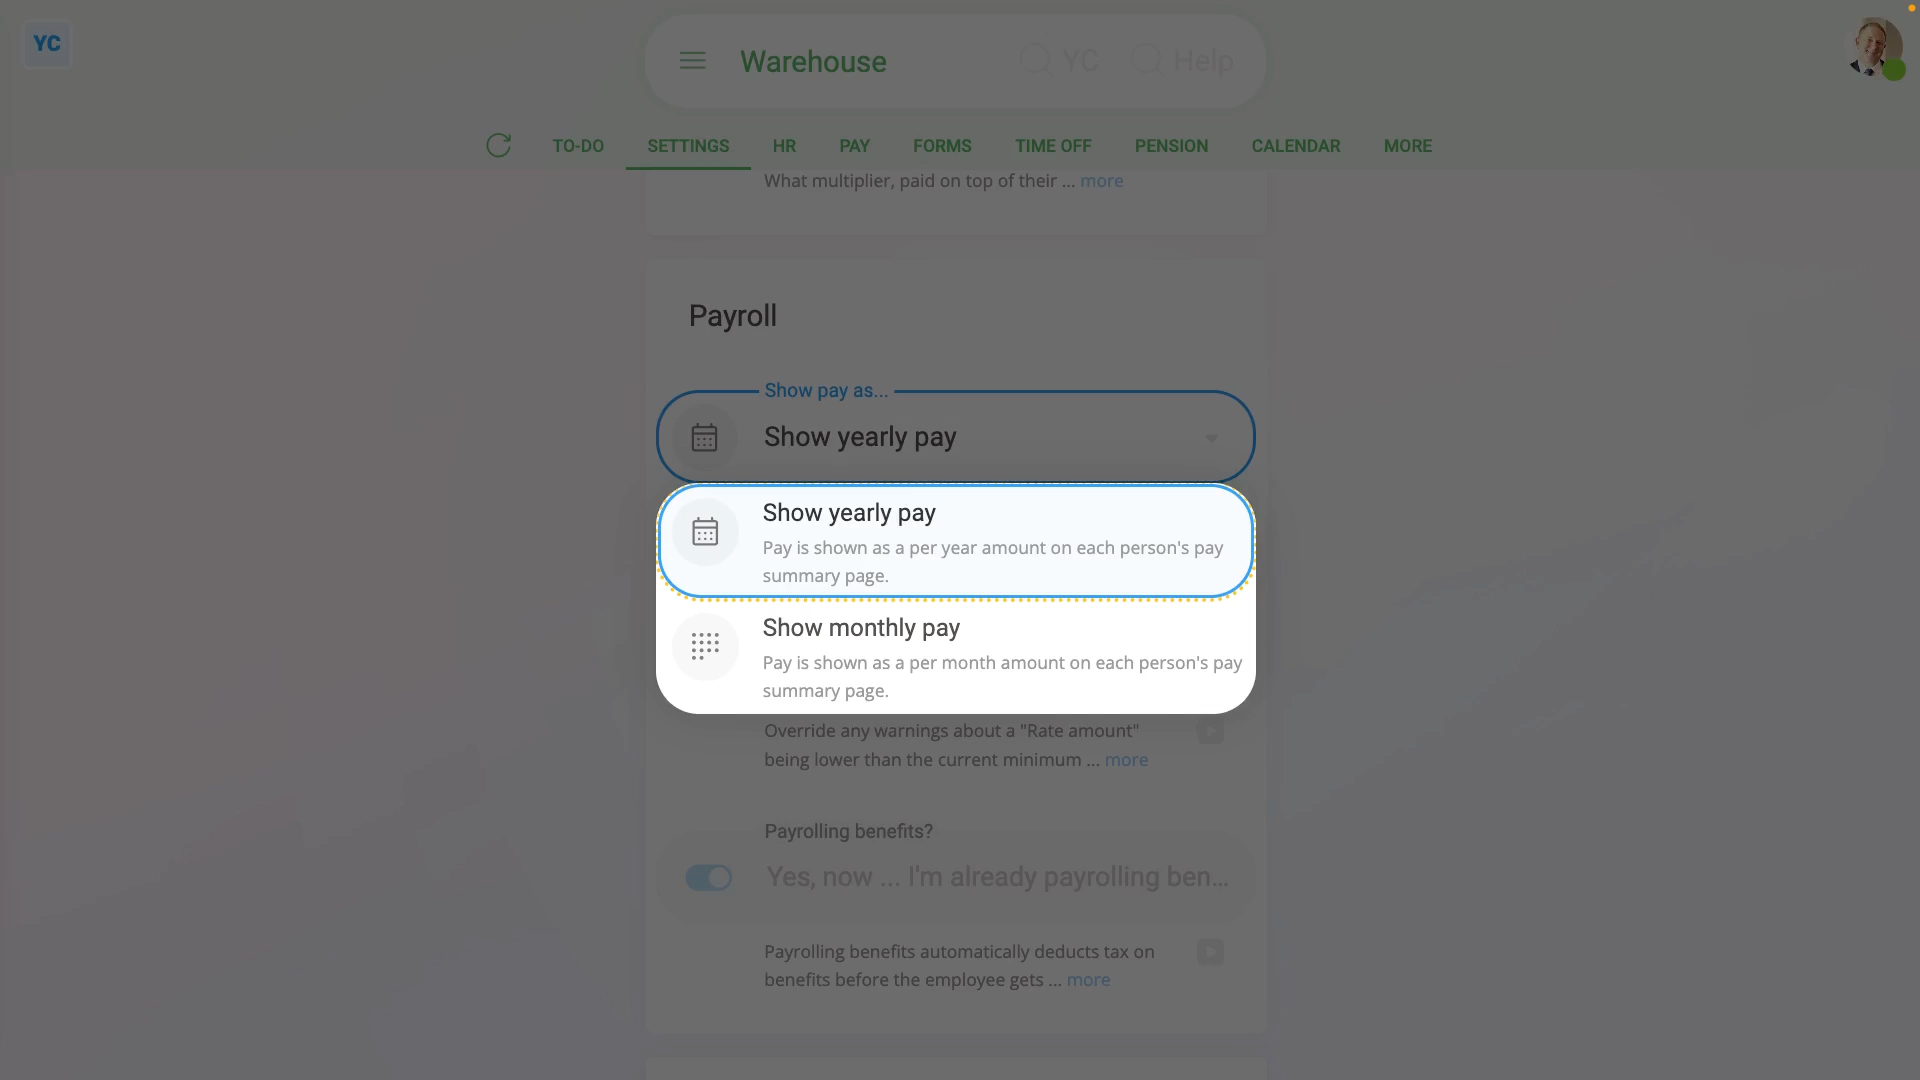
"What does the "Show pay as" setting do?"
The "Show pay as" setting allows you to show pay estimates, like each person's salary, as either a yearly or monthly amount.
To set "Show pay as" to either a yearly or monthly amount for all people in a pay batch:
- First, select the pay batch on: "Menu", then "Pay batches"
- Then tap: "Settings", then "Advanced"
- Then scroll down to the "Payroll" heading.
- And tap: "Show pay as..."
- And change it to yearly or monthly, depending on what you want all the pay batch's people to see on their pay estimates.
- Then tap: Save
- To see how a "Show pay as" change looks, open a person who's in the pay batch.
- And go to their: "Pay", then "Pay summary"
- And you'll see that the person's pay is now shown as yearly or monthly, depending on what you set.
- And finally, to change it again, tap the blue "per month" or "per year" link.
Keep in mind that:
- The "Show pay as" setting can be changed whenever you like, and has no effect on payday, taxes, or other calculations.
- However, any change to "Show pay as" does apply to every person in the pay batch.
And that's it! That's everything you need to know about a pay batch's "Show pay as" setting!
What tax settings do I need to set for a veteran?
 2:51
2:51
"What tax settings do I need to set for a veteran?"
If you employ a veteran, you may get tax relief from the government for the first 12 months after the veteran starts their first job.
To set a person's veteran tax settings:
- First, select the veteran on: "Menu", then "People"
- Then tap: "Tax", then "Tax settings"
- Then scroll down to the "National Insurance" heading.
- Next, to decide if the veteran qualifies.
- Find out if it's their first job since leaving the armed forces.
- If "Yes", then set their "National Insurance category letter" to: "V"
- Otherwise, find out when, after leaving the armed forces, their "first job start date" was.
- If it's not yet been 12 months since their "first job start date", then also set their "National Insurance category letter" to: "V"
- In all other cases, if it's been over 12 months since their "first job start date", set their "National Insurance category letter" to something else.
- If you've set their "National Insurance category letter" to: "V"
- You'll see a new heading appear, called: "Qualifying veteran"
- Next, select if it's their "first job as a veteran", or if the veteran's: "had another job"
- Then if the veteran's "had another job", enter their: "Date of first civilian employment"
- Next, upload, or take a photo of a document that shows their armed forces employment.
- And finally, after you've uploaded the document, your changes are now auto-saved.
Examples of an approved document to upload, include:
- Their discharge papers.
- Their identification card, which shows their time in the armed forces.
- Their letter of employment, or contract with the armed forces.
- Or their P45, from leaving the armed forces.
Keep in mind that:
- A UK veteran includes any person that's ever served in any regular branch of the British Armed Forces.
- Including: the Royal Navy, the British Army, and the Royal Air Force.
- And that the qualifying period begins on the first day of the veteran's first civilian employment, since leaving the armed forces.
- The qualifying period ends 12 months later.
- Their tax relief could mean that the employer doesn't have to pay any employer National Insurance for the veteran's first 12 months.
And that's it! That's everything you need to know about tax settings for a UK veteran!
When can a person's pay be lower than the standard minimum wage?
 2:42
2:42
"When can a person's pay be lower than the standard minimum wage?"
If you tried to set a person's pay rate to lower than the standard minimum wage, you'll get a warning.
To turn off a pay batch's pay rate warning, and set a person's pay to lower than your country's standard minimum wage:
- First, select the person on: "Menu", then "People"
- Then tap: "Pay", then "Pay settings"
- On their: "Rate amount", tap the "Edit" button:
- Then set their "Rate amount" to an amount that's deliberately lower than the standard minimum wage.
- Next, tap: Save
- You'll now see the minimum wage warning that stops a person's pay rate from being too low.
- The warning also includes the minimum amount you'd normally need to pay the person.
- Sometimes, but rarely, there's a few situations where you need to pay a person lower than the standard minimum wage.
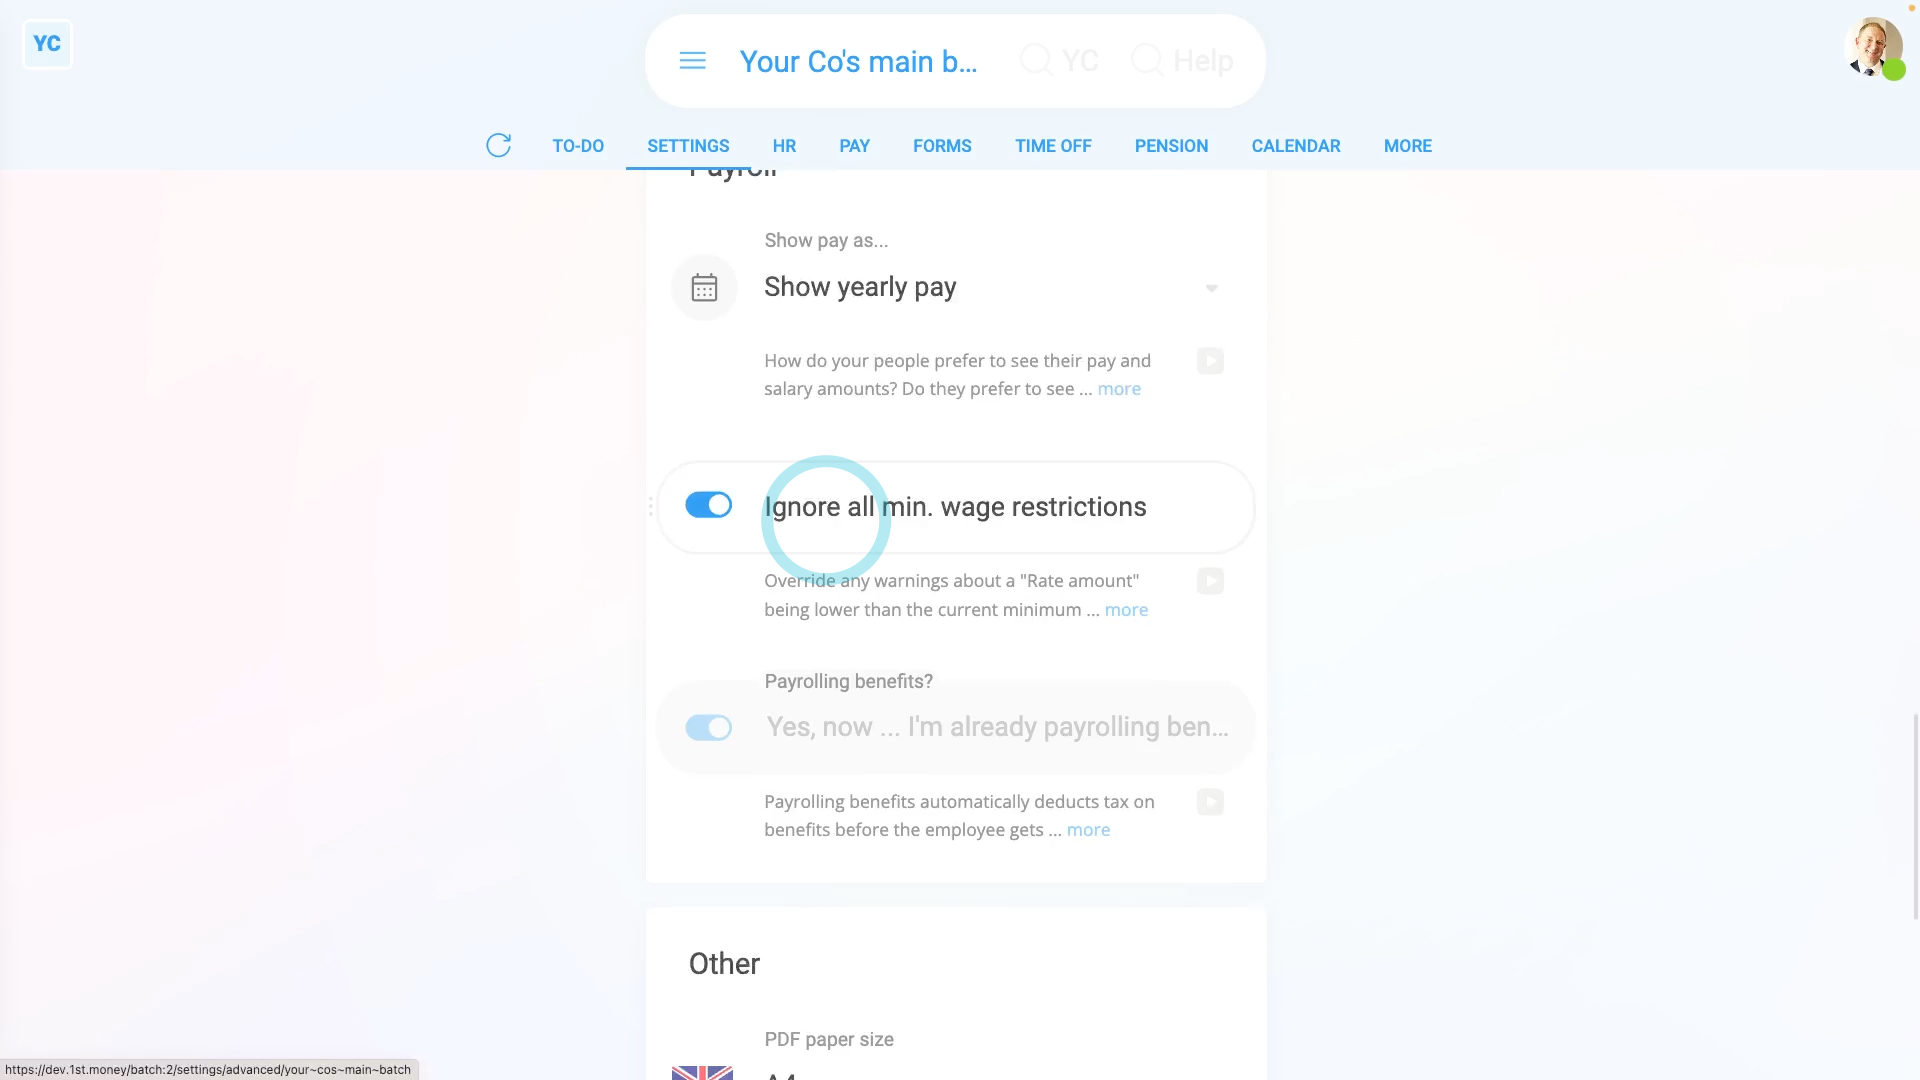
- To pay a person lower than your country's standard minimum wage, tap the blue link (at the bottom of the warning).
- And turn on: "Ignore all min. wage restrictions"
- Once you turn it on, it auto-saves.
- Now, back on their: "Rate amount", tap the "Edit" button:
- And you can now set their pay to a rate that's lower than the standard minimum wage.
- Now, when you tap Save, there's no warning any more, even though it's lower than minimum wage.
- Alternatively, the other way to go to the "ignore minimum wage" setting is to select the pay batch the person belongs to, on: "Menu", then "Pay batches"
- Then tap: "Settings", then "Advanced"
- Then scroll down and turn on: "Ignore all min. wage restrictions"
- And finally, with it turned on, you can now set a lower than minimum wage rate for anyone in the pay batch.
Keep in mind that:
- When setting a low wage, always confirm that you're legally allowed to pay lower than minimum wage.
- There's only a few specific cases where it may be allowed, including...
- Self-employed people,
- Company directors,
- Volunteers,
- And a few more.
And that's it! That's everything you need to know about minimum wage restrictions!
Where do I put the leaving date, pay, and tax from a previous job?
 3:09
3:09
"Where do I put the leaving date, pay, and tax from a previous job?"
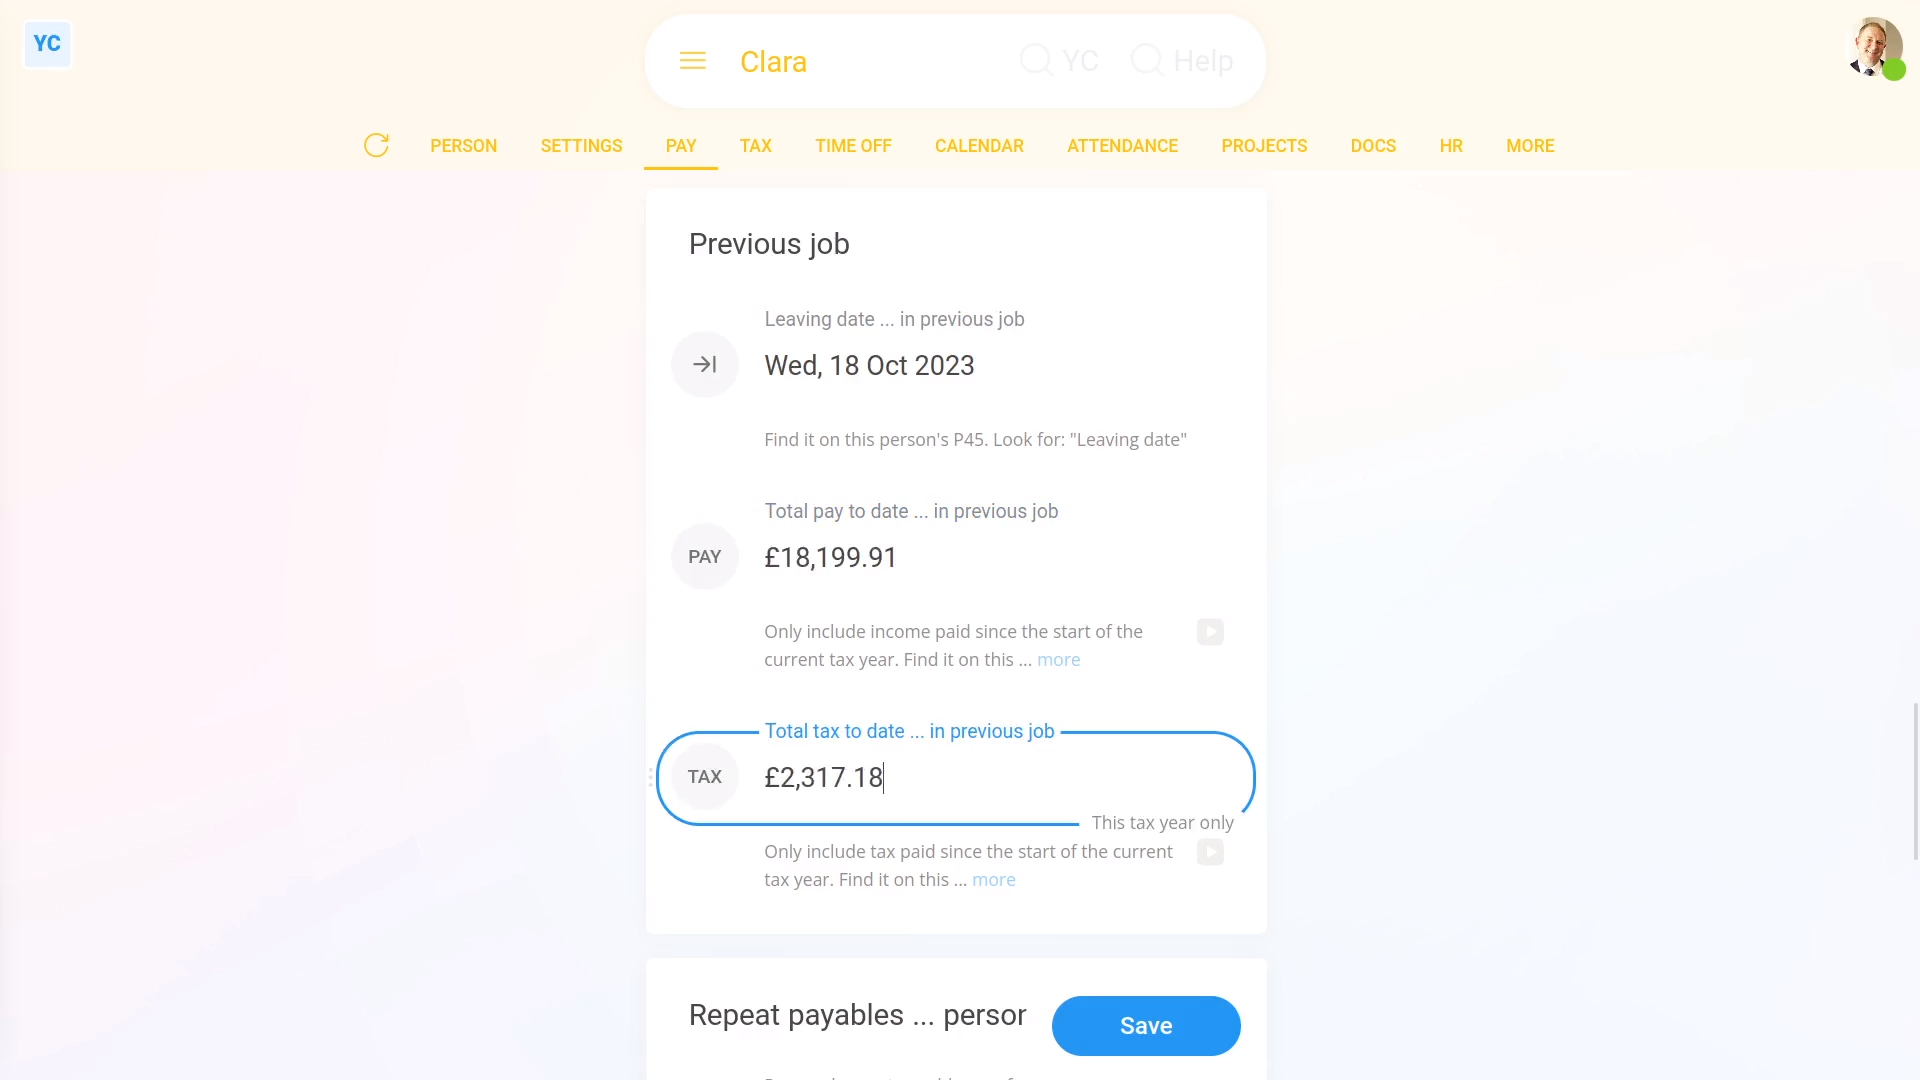
When setting the pay for a new person, there's three things from their previous job that you may need to enter. Their previous leaving date, their previous pay, and their previous tax, but for the current tax year only. All three come from the person's P45.
To set a person's leaving date, pay, and tax from their previous job:
- First, select the person on: "Menu", then "People"
- Then tap: "Pay", then "Pay settings"
- Then scroll down to the "Previous job" heading.
- Now, look on the paper P45 form you've been given by the person.
- And look for the "Leaving date", the "Total pay to date", and also the: "Total tax to date"
- Once you've found them on their P45, enter them one-by-one, starting with: "Leaving date ... in previous job"
- Then enter their: "Total pay to date ... in previous job"
- And then their: "Total tax to date ... in previous job"
- And finally, tap: Save
Keep in mind that:
- HMRC expects you to include their leaving date, pay, and tax amounts from any previous job the person's worked at before joining your company.
- But only for the current tax year, starting 6th of April, until now.
- HMRC expects you to ignore any leaving date, pay, and tax amounts from previous tax years.
- Also ignore gaps of unemployment, and ignore their P45's from all previous tax years.
- In other words, if today's the 6th of April, and the person's joining today, leave their previous pay and tax amounts empty.
Also remember that:
- If a person didn't ever have any previous job, also leave the person's leaving date, pay, and tax empty.
- Also, occasionally HMRC may send a correction, through an: "HMRC notice"
- If HMRC sends an "HMRC notice" correction, the person's details are automatically updated. You won't have to do anything.
- Any time a leaving date, pay, or tax amount is automatically updated, two emails are sent.
- One email to the person, and also one email to their pay batch's payday person. So you'll always know what's happening.
You may notice:
- Eventually today's date rolls around to the new tax year, on the 6th of April. On the beginning of the new tax year, any pay and tax amounts that were previously entered, are automatically wiped.
- Again, you won't have to do anything. But don't be concerned if one day the amounts show up empty.
And that's it! That's everything you need to know about entering a person's leaving date, pay, and tax from their previous job!
EPS Employer Payment Summary
1. How do I open the EPS monthly?
 2:52
2:52
"How do I open the EPS monthly?"
Sending the EPS monthly to HMRC is your way of letting HMRC know about any changes that've happened in your business over the last month.
To open your pay batch's EPS monthly:
- First, select one of the three ways to open your pay batch's EPS monthly.
- The first way:
Is when you get an email reminder, on the 17th of the month, to send your EPS monthly. - The email is automatically sent to the pay batch's payday person if it's detected that your business has changes to send to HMRC.
- Then from the email, tap: See "EPS monthly"
- The second way:
Is to select the pay batch on: "Menu", then "Pay batches" - And then from the To-do tab, scroll down, and tap: "EPS monthly"
- However, you'll only see "EPS monthly" if it's detected that your business has changes to send to HMRC.
- The third way:
Is useful when the changes you're sending to HMRC haven't been detected. - To open "EPS monthly" when your changes haven't been detected, select the pay batch on: "Menu", then "Pay batches"
- Then tap: "Forms", then "EPS monthly"
- Once the EPS monthly is open, you'll see that it contains seven headings.
- Every time you open the EPS monthly, it automatically scans all your settings and ticks any headings that are due to be sent to HMRC.
- In some cases, none of the seven headings are ticked.
- If none are ticked, you probably don't need to send the EPS monthly to HMRC for that month.
- Sometimes, however, when it first opens, you'll find some sections have been automatically ticked.
- Only the sections that you allow to remain ticked are sent to HMRC.
- To force a section to be sent, or to not be sent, you can always tap that section's heading to close or open that section.
- If there's any section you don't want sent to HMRC, be sure to tap it closed, so it switches back to the square:
- And finally, if you're all ready to send it to HMRC, tap: File with HMRC (at the bottom)
Keep in mind that:
- The EPS doesn't need to be sent each month. If your business doesn't have any changes for that tax month, there's no need to send it.
- The tax month is always the 6th of the month to the 5th of the next month.
- However, if your business does have changes, the pay batch's payday person gets an email reminder on the 17th of the month. Your EPS is then due by the 19th of the month.
And that's it! That's all you need to do to open your pay batch's EPS monthly!
2. How do I tell HMRC there's no payroll payments for a few months?
 1:49
1:49
"How do I tell HMRC there's no payroll payments for a few months?"
Letting HMRC know that you've got no payroll payments for a few months helps you avoid penalties or owing extra taxes.
To tell HMRC that you don't expect to have any payroll payments for a few months:
- First, select the pay batch on: "Menu", then "Pay batches"
- Then tap: "Forms", then "EPS monthly"
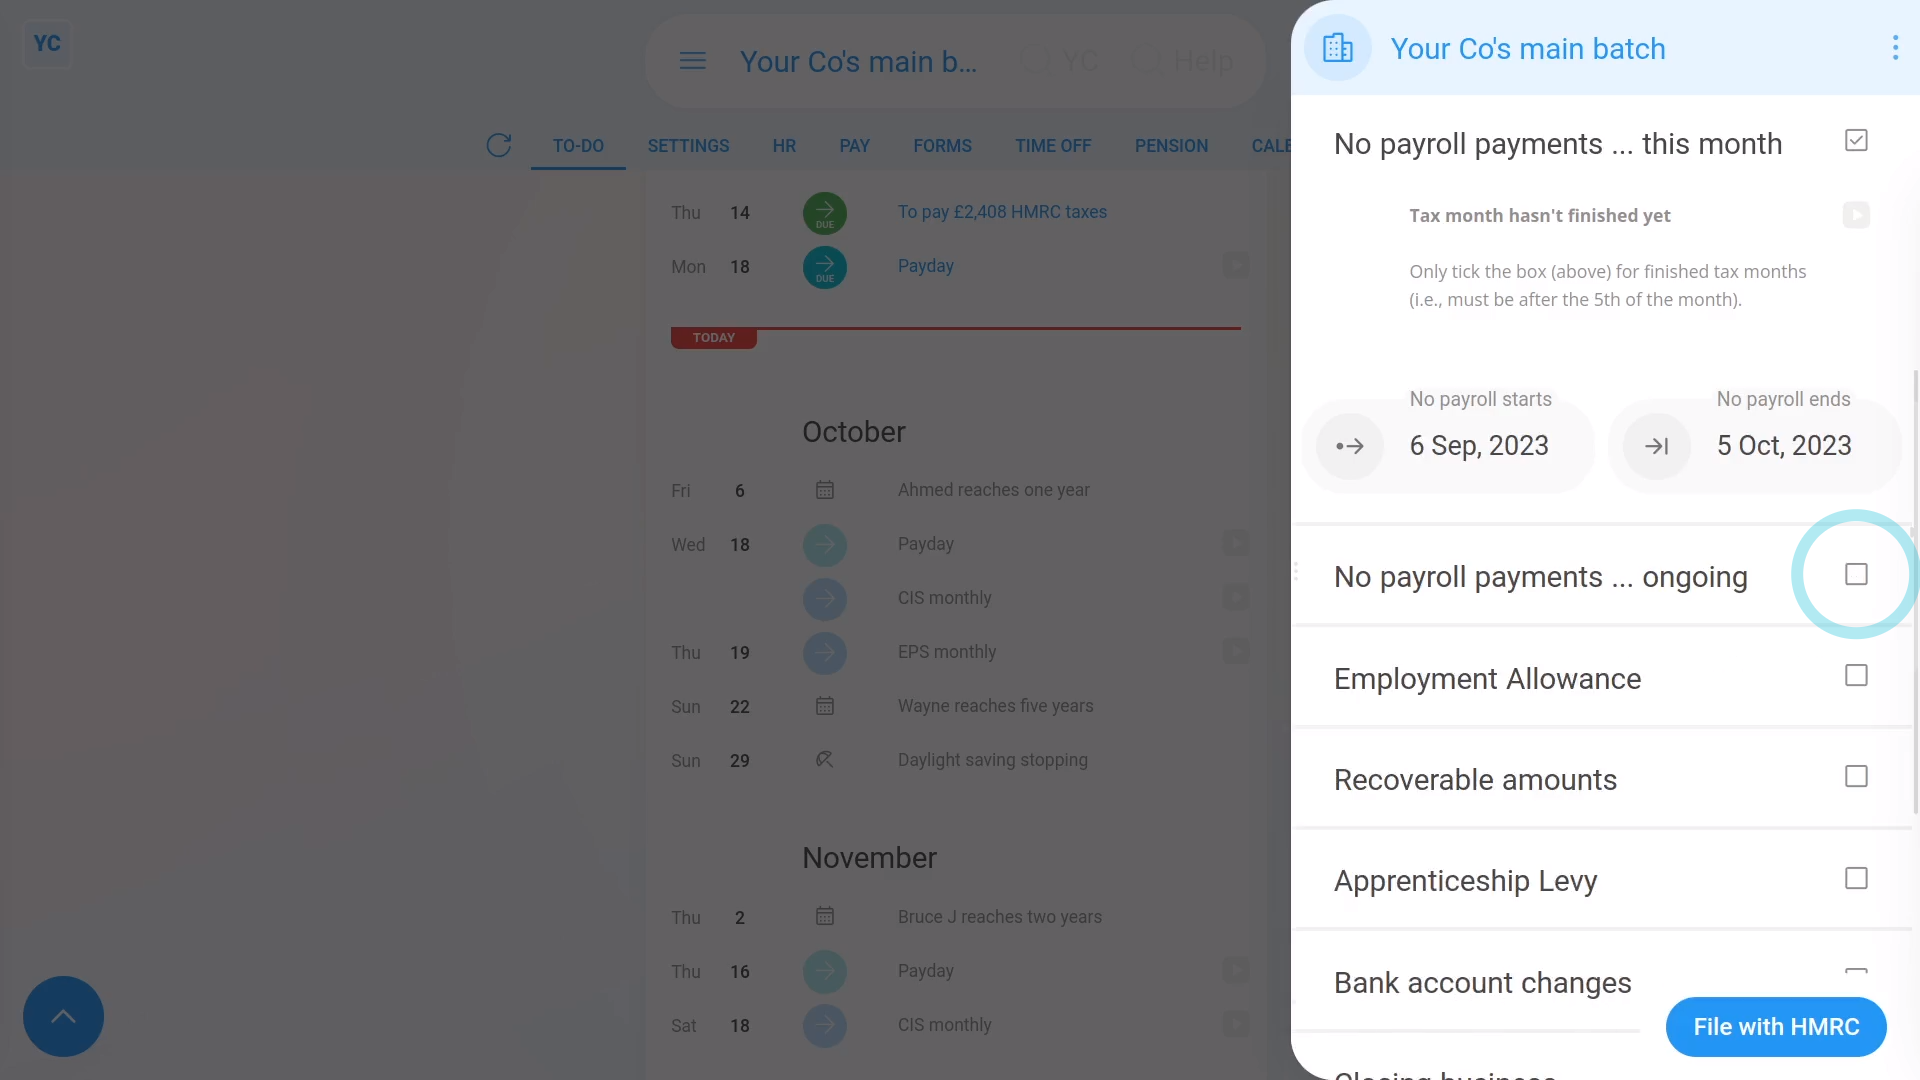
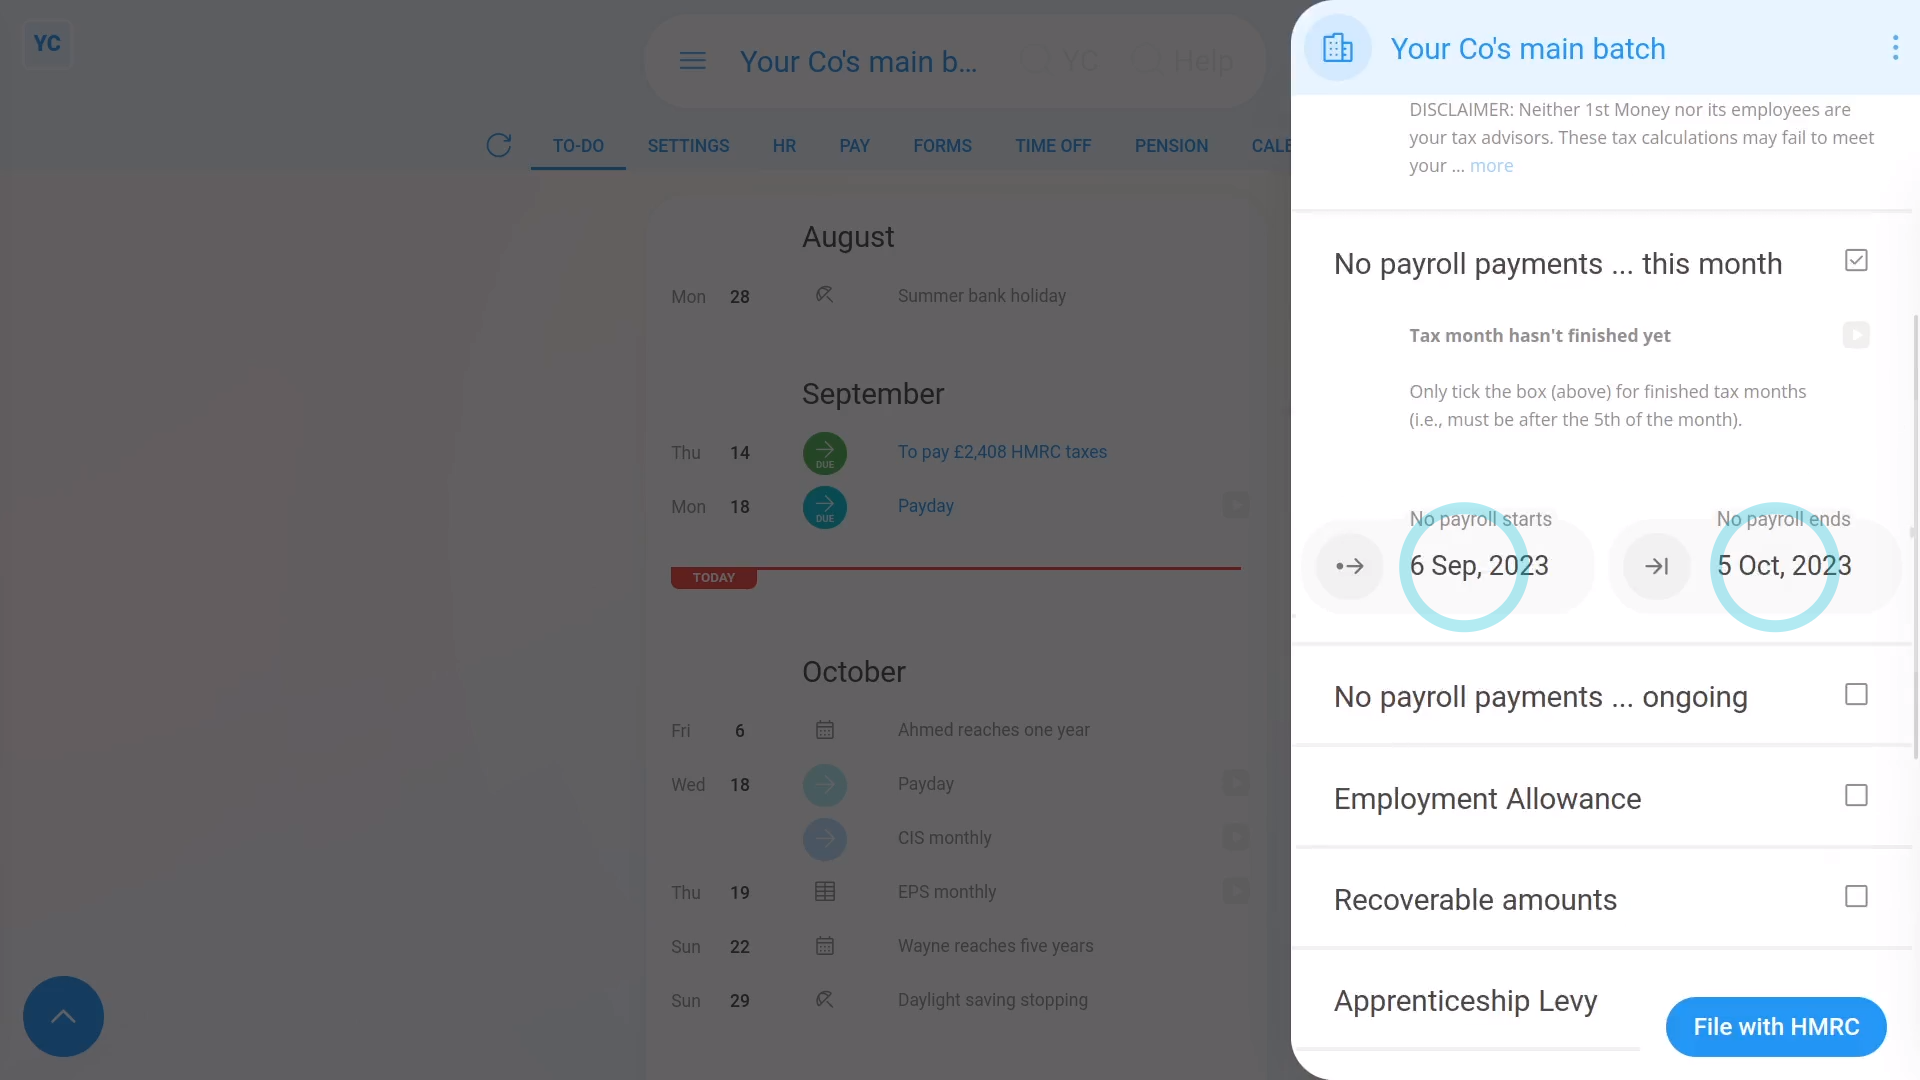
- Once the EPS monthly is open, tick: "No payroll payments ... current month"
- Check that the dates match the period that you don't expect to have any payroll payments.
- If you expect to not have any payroll payments for even longer than one month, also tick: "No payroll payments ... ongoing"
- Then select the month that matches the last date you don't expect to pay payroll until.
- And finally, if you're all ready to send it to HMRC, tap: File with HMRC (at the bottom)
You may notice:
- Sometimes you may open the EPS monthly and find some sections are already ticked.
- The sections are ticked because 1st Money automatically detects that you didn't have any payroll payments, and ticks the boxes for you.
- Sometimes it may be wrong. For example, if you actually did have payroll payments, but paid them elsewhere, not in 1st Money.
- If it's wrong, untick that section back to the square and that section won't be sent to HMRC.
- If unticking that section means that every section is now unticked, then the EPS doesn't need to be sent for that tax month.
And that's it! That's everything you need to know about telling HMRC when you've got no payroll payments!
3. How do I tell HMRC when I've got Employment Allowance changes?
 1:55
1:55
"How do I tell HMRC when I've got Employment Allowance changes?"
Letting HMRC know about changes in your eligibility for Employment Allowance helps you pay the correct amount of National Insurance.
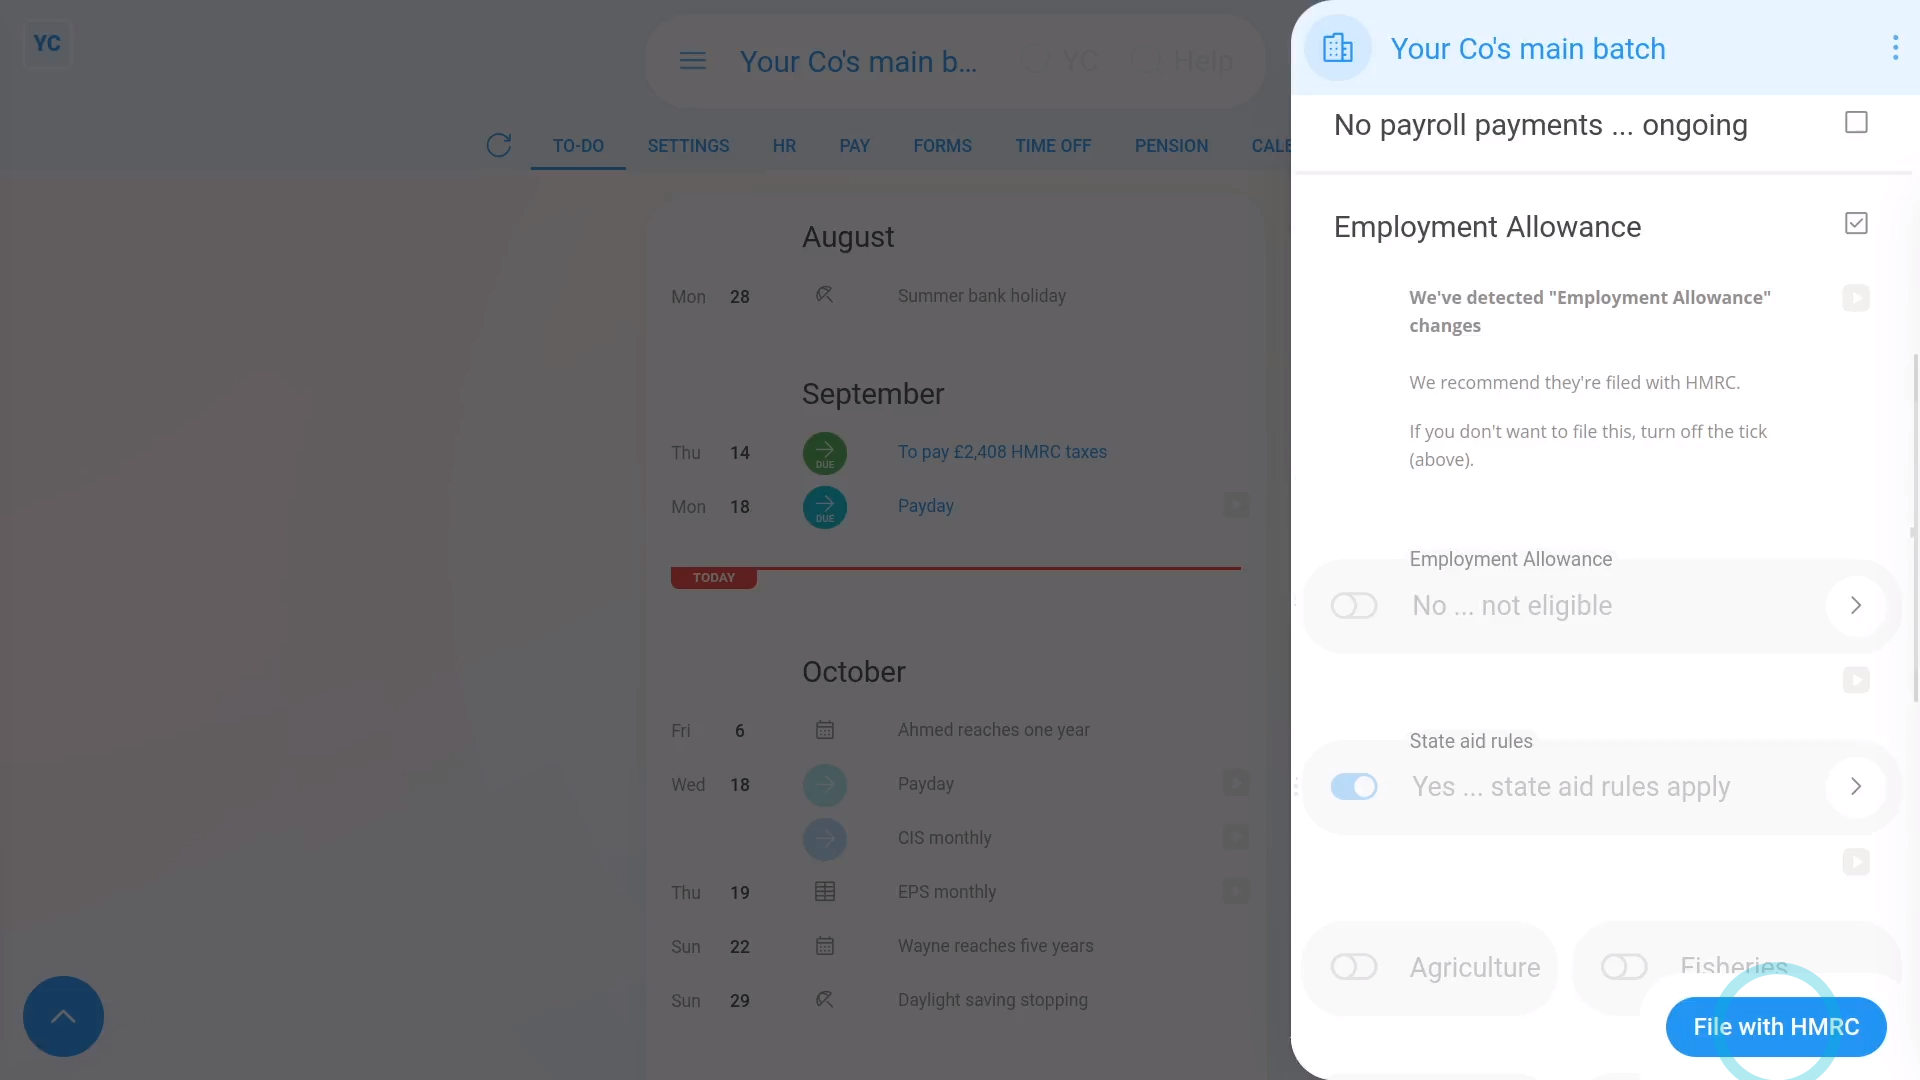
To tell HMRC about changes to your Employment Allowance:
- First, select the pay batch on: "Menu", then "Pay batches"
- Then tap: "Forms", then "EPS monthly"
- Once the EPS monthly is open, tick the "Employment Allowance" heading.
- If it says that there's "no changes detected", then tap the blue "Employment Allowance" settings link.
- Make any changes you want to, your changes are now auto-saved.
- You'll now see a preview of all your pay batch's "Employment Allowance" settings that are ready to be sent through to HMRC.
- And finally, if you're all ready to send it to HMRC, tap: File with HMRC (at the bottom)
Keep in mind that:
- If you're eligible for Employment Allowance, 1st Money automatically ticks "Employment Allowance" on the first EPS of the tax year or whenever there's a change.
- Once you've claimed Employment Allowance, HMRC remembers your claim for the rest of the tax year.
- You probably can't claim Employment Allowance if your "de minimis state aid" over the last 3 years is above a certain threshold.
- Your exact threshold depends on your company's business sector.
- If your Employment Allowance claim is rejected by HMRC, you'll get the rejection message from HMRC forwarded to you, letting you know why.
And that's it! That's everything you need to know about telling HMRC about changes to your Employment Allowance!
4. How do I tell HMRC I've got recoverable amounts?
 1:49
1:49
"How do I tell HMRC I've got recoverable amounts?"
Letting HMRC know about your "Recoverable amounts" from Statutory Pay helps you pay less National Insurance. In particular, it applies when your people claim statutory pay, like maternity pay, etc.

To tell HMRC about your Recoverable amounts for a tax month:
- First, select the pay batch on: "Menu", then "Pay batches"
- Then tap: "Forms", then "EPS monthly"
- Once the EPS monthly is open, if there's "Recoverable amounts" to claim, the heading is already ticked and expanded.
- You'll then see the calculation of the tax month's recoverable amounts, based on how much Statutory Pay you've paid your people.
- Check the amounts that've been automatically detected.
- And finally, if you're all ready to send it to HMRC, tap: File with HMRC (at the bottom)
Keep in mind that:
- Whenever your people get Statutory Pay, you can usually reclaim at least 92% back from HMRC.
- You can sometimes even reclaim 103% back if your business qualifies for: "Small Employers' Relief"
- If you know you've received CIS payments, you can also manually reclaim your CIS deductions.
- 1st Money can't do it for you automatically. You'll have to enter the "CIS deductions YTD" yourself, every month.
And that's it! That's everything you need to know about telling HMRC about your recoverable amounts!
5. How do I tell HMRC that I'm turning on the Apprenticeship Levy?
 3:17
3:17
"How do I tell HMRC that I'm turning on the Apprenticeship Levy?"
The Apprenticeship Levy setting is something you need to turn on once your "annual wage bill" reaches £3 million per year for all your pay batches, or connected companies.
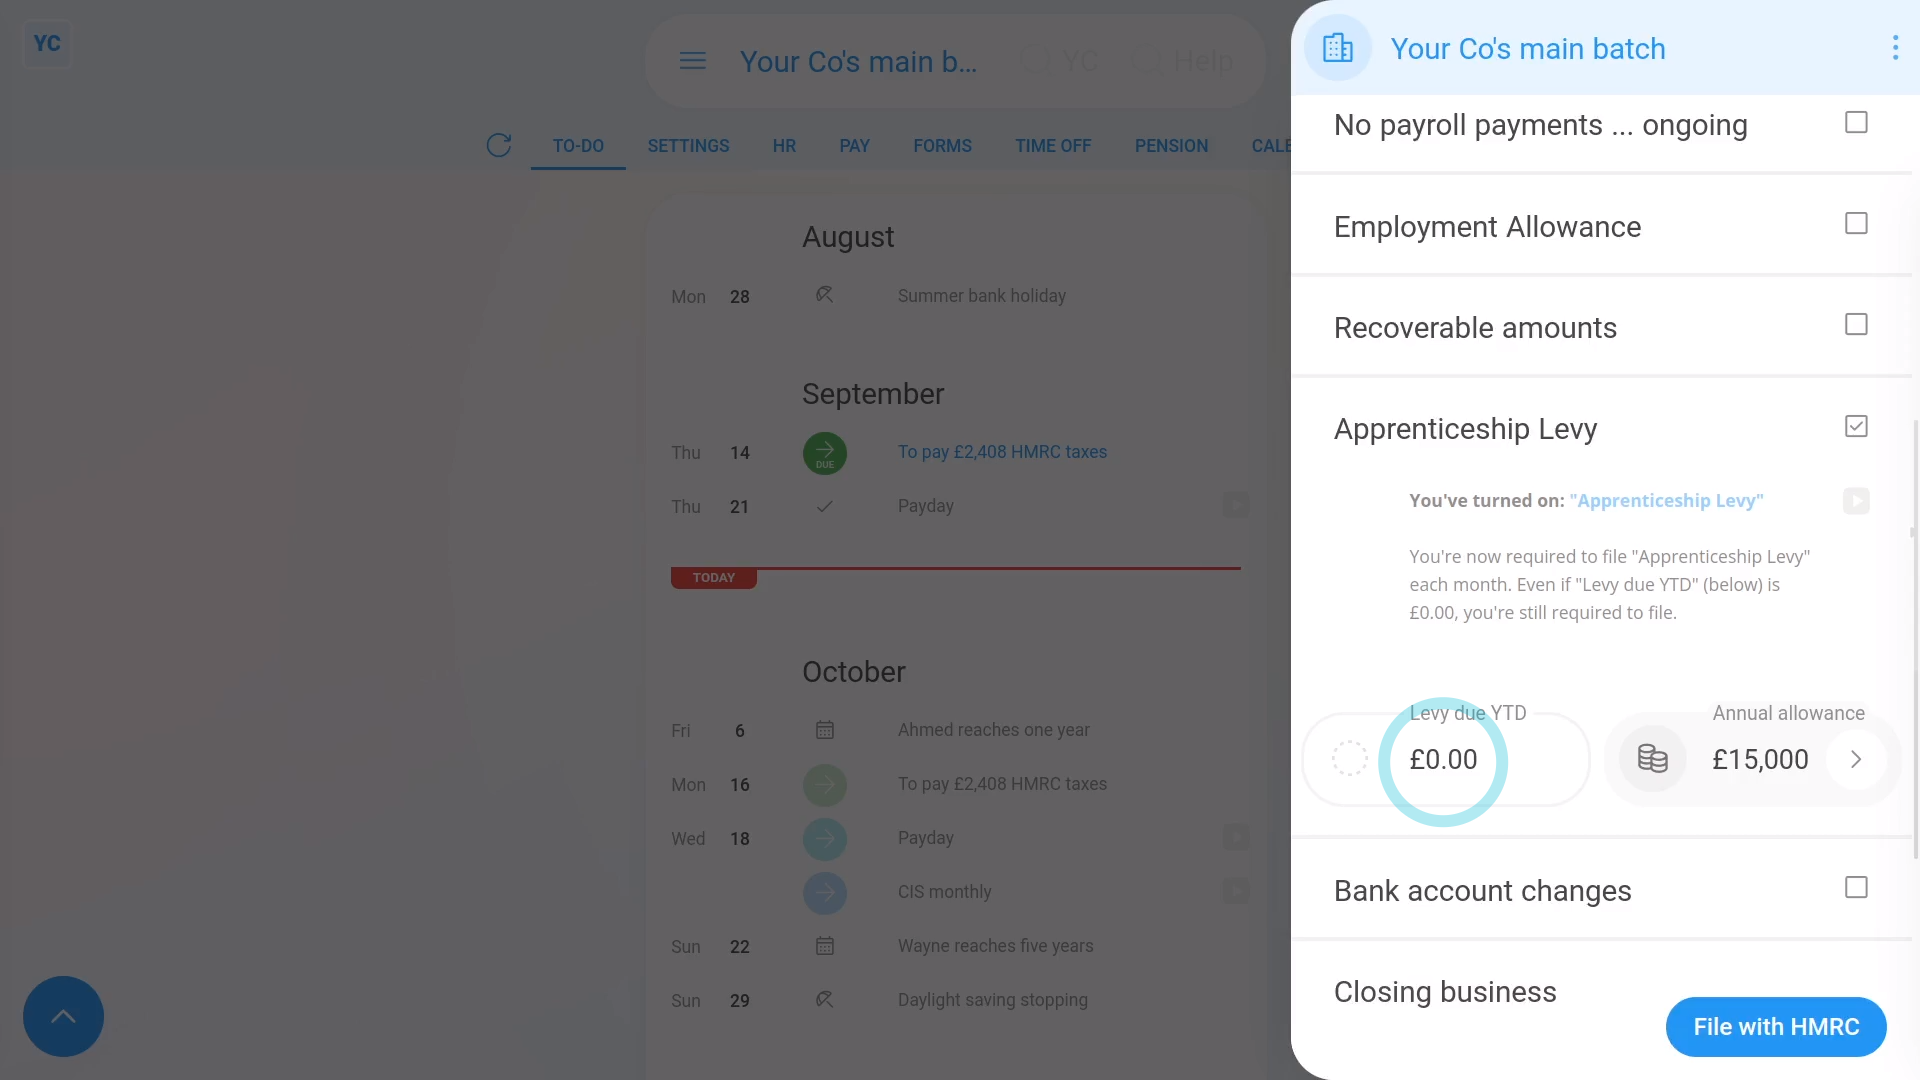
To tell HMRC that you've turned on a pay batch's Apprenticeship Levy:
- First, select the pay batch on: "Menu", then "Pay batches"
- Then tap: "Forms", then "EPS monthly"
- Once the EPS monthly is open, tick Apprenticeship Levy.
- If it says that it's "currently turned off", tap the blue Apprenticeship Levy settings link.
- And set Apprenticeship Levy to: "Yes ... paying Apprenticeship Levy"
- You only need to turn it on if your "annual wage bill" is more than £3 million per year for all your pay batches, or connected companies.
- From now on 1st Money automatically calculates your: "Levy due YTD"
- Also, if you want to change the default £15,000 "Annual allowance" tap the "Edit" button:
- Then drag the slider, and tap: Save
- And finally, if you're all ready to send it to HMRC, tap: File with HMRC (at the bottom)
For advanced usage:
- Apprenticeship Levies are a tax that employers pay direct to HMRC once their "annual wage bill" reaches £3 million per year.
- The amount of levy you pay is half a percent of the part of your company's "annual wage bill" that's over £3 million per year.
- Which means that the half a percent of the part that's under £3 million per year, is the allowance.
- In other words, you get a maximum allowance of £15,000, which you can decide to split between your pay batches, or connected companies.
- HMRC's definition of a connected company includes any entity that's using the same: "Employer PAYE reference"
- In most cases, if it's your only pay batch, apply the full £15,000 "Apprenticeship Levy allowance" to the current pay batch.
- Then each month when your Apprenticeship Levy amount is calculated, the following happens.
- First, half a percent of the value of the month's "wage bill" is calculated.
- Then one month's worth (1/12th) of your "Apprenticeship Levy allowance" to is taken off.
- The remaining amount becomes that month's Apprenticeship Levy, to be paid to HMRC.
Keep in mind that:
- Once you turn on Apprenticeship Levy, you'll have to file Apprenticeship Levy every month, even if the "Levy due YTD" is £0.00.
- Also, if you're using the entire "Apprenticeship Levy allowance" of £15,000 in one of your other pay batches, or connected companies, drag the slider to set it to £0.
- If you overpay, or underpay, when you reach the end of the tax year, HMRC balances out your final calculation with a refund or payment request.
And that's it! That's everything you need to know about telling HMRC that you've turned on a pay batch's Apprenticeship Levy!
6. How do I tell HMRC about changes to my company's bank account?
 1:49
1:49
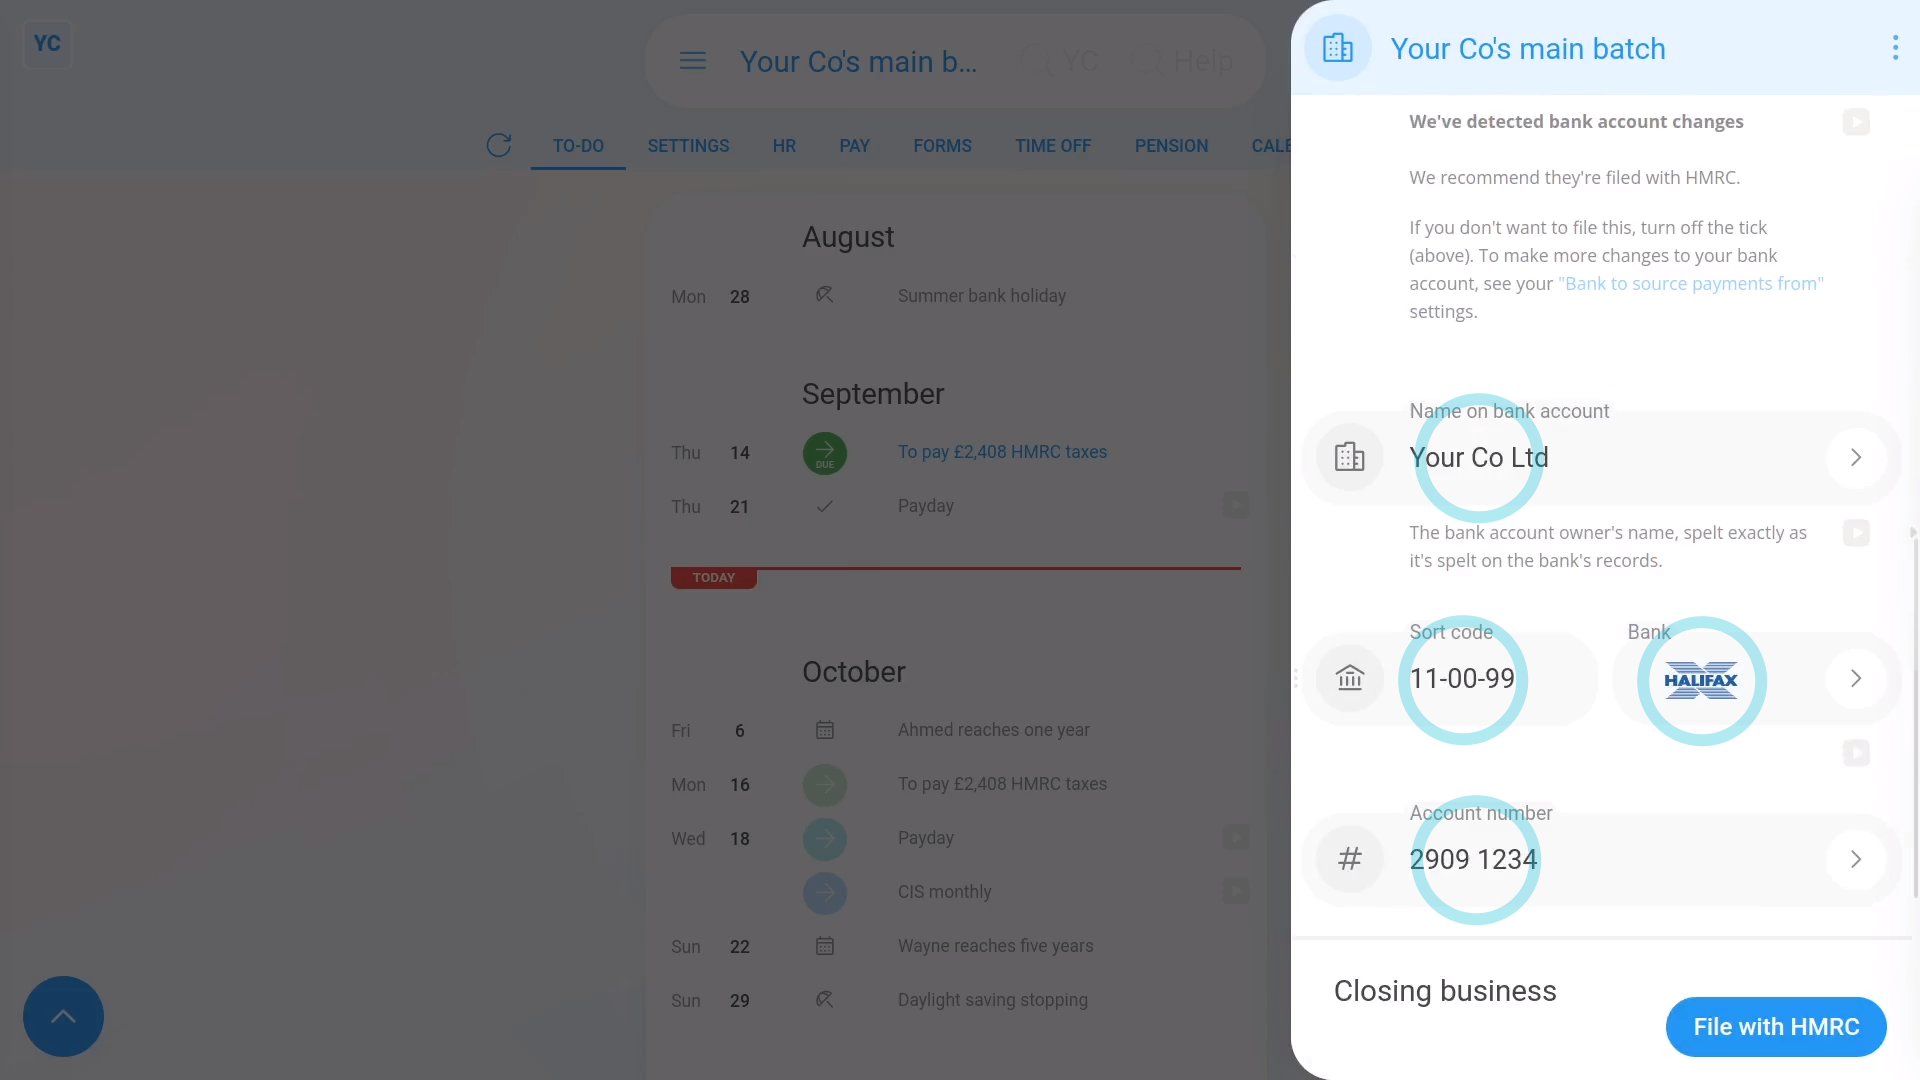
"How do I tell HMRC about changes to my company's bank account?"
Keeping HMRC updated with changes to your company's bank account details allows them to always have the correct account to send any tax refunds to.
To tell HMRC about changes to your company's bank account details:
- First, select the pay batch on: "Menu", then "Pay batches"
- Then tap: "Forms", then "EPS monthly"
- Once the EPS monthly is open, if there's already "Bank account changes" to send, the heading is already ticked and expanded.
- However, in some cases, you may not have updated the pay batch's bank account details yet.
- To update the pay batch's bank account details, tap the "Bank account changes" heading to expand it.
- If it says that there's "no changes detected", then tap the blue "Bank to source payments from" link.
- Make your changes to the banking details, and tap: Save
- Check the new banking details that've been automatically detected.
- If there's any further changes to make, you can tap any "Edit" button:
- And finally, if you're all ready to send it to HMRC, tap: File with HMRC (at the bottom)
Keep in mind that:
- Changes to the details of your "Bank to source payments from" are automatically detected, including when you set them for the first time.
- Anytime there's a change detected, you'll be prompted to re-send them to HMRC on the next EPS.
- HMRC uses the pay batch's details to know where to pay tax refunds.
And that's it! That's everything you need to know about telling HMRC about changes to your bank details!
7. How do I let HMRC know I've stopped being an employer?
 2:50
2:50
"How do I let HMRC know I've stopped being an employer?"
When you've stopped being an employer, HMRC needs to know that it's your final EPS submission and that you won't be paying any more payroll.
To tell HMRC that you've stopped being an employer:
- First, select the pay batch on: "Menu", then "Pay batches"
- Then tap: "Forms", then "EPS monthly"
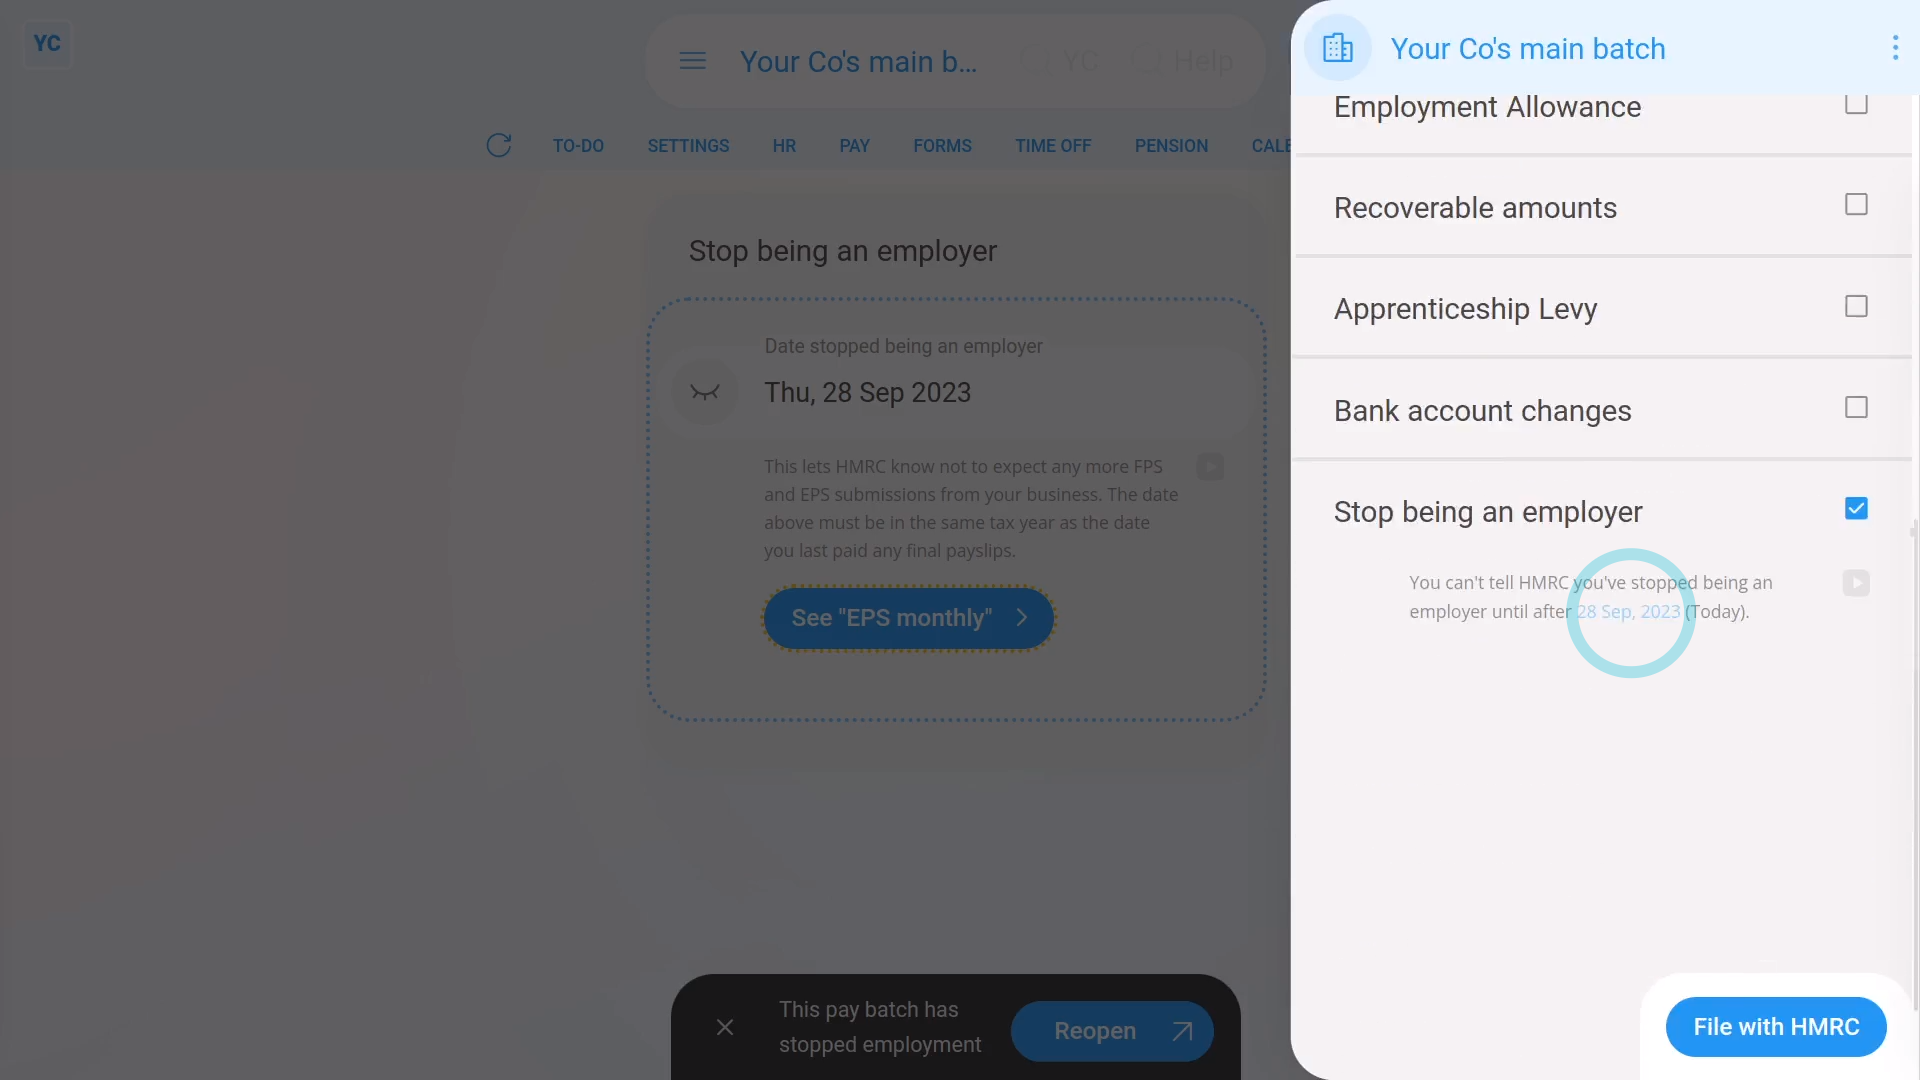
- Once the EPS monthly is open, tick: "Stop being an employer"
- Then tap: Stop being an employer
- The EPS is now temporarily hidden, and you'll be taken to the "Stop being an employer" page.
- Pick the date you expect to pay payroll for the last time, and tap: Save
- You may still have employees who haven't had their employment ended. If so, you'll now be taken through a number of steps to end their employment.
- The steps include sending all your current employees their final payslips and P45s.
- As soon as the final payslips are filed, you'll see the pay batch automatically get marked as: "stopped employment"
- And when you tap back to the main page, you'll see the "Date stopped being an employer" has been saved.
- Next, when you tap See "EPS monthly" and scroll down, you'll see that "Stop being an employer" is now ticked automatically, with the "stopped employment" date you entered.
- And finally, if you're all ready to send it to HMRC, tap: File with HMRC (at the bottom)
Keep in mind that:
- Any time that you want to become an employer again, all you need to do is to start paying payslips again.
- As soon as HMRC receives a submission of payslips from you, HMRC automatically marks you as an active employer again.
- Until that time comes, you can remain dormant, as an employer, for as long as you want.
For advanced usage:
- If you ever want to remove the pay batch from the list, you can always delete it. You can find "Delete" in the "More" menu.
- If you later need it back, you can then undelete it from the: "Deleted bin"
- All your data, like paydays, and payments made are still stored.
And that's it! That's everything you need to know about stopping being an employer!
8. How do I send the EPS monthly to HMRC?
 2:05
2:05
"How do I send the EPS monthly to HMRC?"
Once you've reviewed all the sections of the EPS monthly, you'll be ready to send it to HMRC.
To send an EPS monthly to HMRC:
- First, select the pay batch on: "Menu", then "Pay batches"
- Then tap: "Forms", then "EPS monthly"
- Once the EPS monthly is open, make all your changes.
- Then once you're all ready to send it to HMRC, tap: File with HMRC (at the bottom)
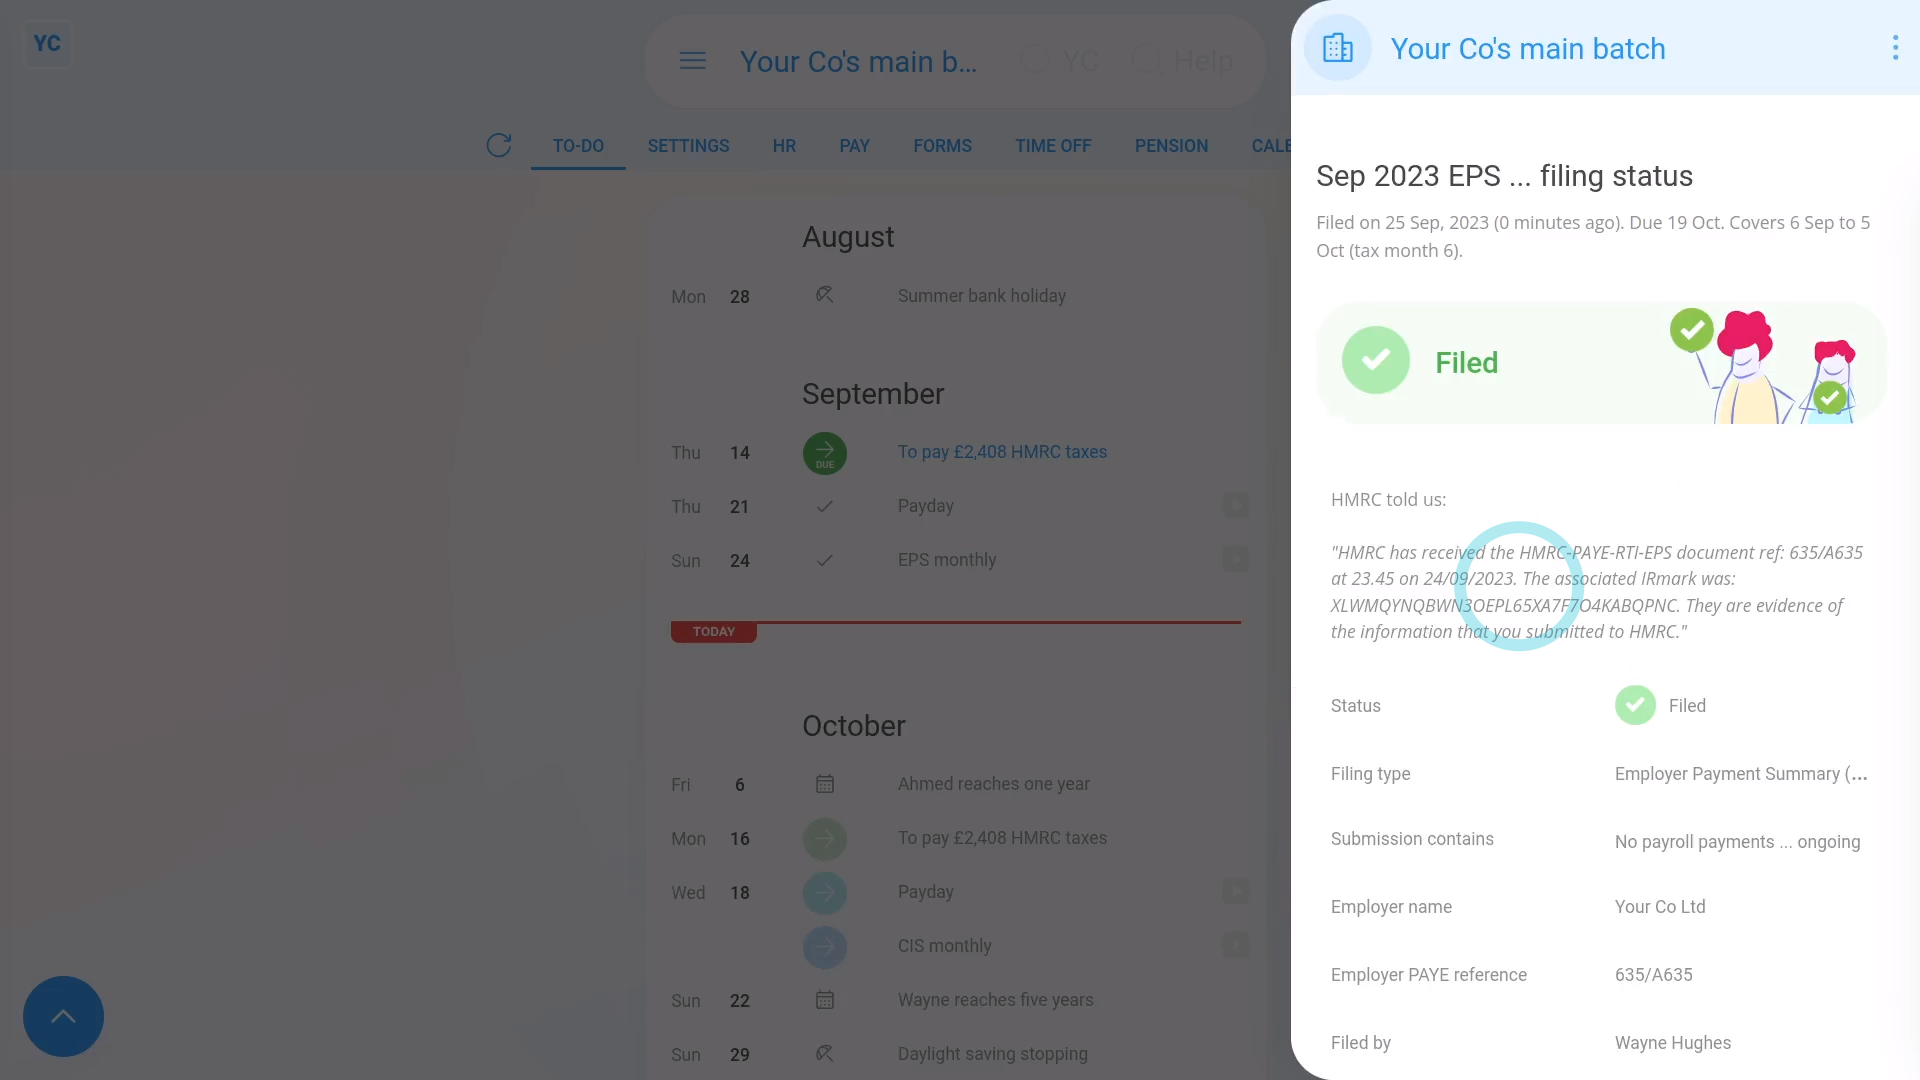
- It usually takes 15 to 20 seconds for HMRC to finish processing your EPS and send back your confirmation receipt.
- The confirmation receipt can be used at any time if you ever need to prove to HMRC that you did send the EPS.
- Once it's finished, you'll see your confirmation receipt.
- Then back on your To-do list, you'll also see the tick that confirms that the EPS was filed successfully.
- Also, if ever, in the future, you need to see the confirmation receipt again, you can tap the tick.
- And finally, you'll see the stored confirmation receipt details again.
Keep in mind that:
- The EPS doesn't need to be sent each month. If your business doesn't have any changes for that tax month, there's no need to send it.
- The tax month is always the 6th of the month to the 5th of the next month.
- However, if your business does have changes, the pay batch's payday person gets an email reminder on the 17th of the month. Your EPS is then due by the 19th of the month.
To learn more:
- About making further changes to an EPS that's already been sent to HMRC, watch the video on: EPS: Changing a sent EPS
And that's it! That's everything you need to know about sending an EPS monthly to HMRC!
How do I change an EPS after it's already been sent to HMRC?
 2:35
2:35
"How do I change an EPS after it's already been sent to HMRC?"
Sometimes you may want to send changes or updates to an EPS that's already been sent to HMRC.

To change or update an EPS that's already been sent to HMRC:
- First, select the pay batch on: "Menu", then "Pay batches"
- Once it's open, check you're on the To-do tab.
- Then tap the tick by the submitted EPS that you'd like to change.
- Once it slides out on the right, scroll down and tap: Change & refile EPS
- It takes you to the EPS monthly page where you can set your additional changes.
- Then once you're all ready to send it to HMRC, tap: File with HMRC (at the bottom)
- As usual, it takes 15 to 20 seconds for HMRC to finish processing your EPS and send back a confirmation receipt.
- Once it's finished, you'll see your confirmation receipt.
- Then back on your To-do list, you'll also see an additional "EPS monthly" row with a tick.
- And finally, the additional row confirms that the EPS was again sent successfully.
Keep in mind that:
- You don't have to re-enter every section.
- Suppose you originally sent both banking and other changes. Then say, you later wanted to further update only the banking. In which case, resend the banking section only. The other changes are still kept by HMRC, and not overwritten.
- Also, you can't change an EPS after the 19th of the month. In other words, an EPS for the tax month ending on the 5th, has a 14-day change window.
- You're free to resend as many EPS changes as you want during the 14 day change window. Once it's the 19th of the month, however, the EPS is locked by HMRC.
- Also keep in mind, some changes, like changing bank account details, can instead be sent in next month's EPS.
For advanced usage:
- The exception to the 14-day change window is the "March EPS", which is the last EPS of the tax year.
- The "March EPS" doesn't get locked for 12 months, so you can make more changes during those months.
And that's it! That's everything you need to know about changing an EPS that's already been sent to HMRC!
Payees
1. How do I add my bank account for my payday payments?
 2:26
2:26
"How do I add my bank account for my payday payments?"
To receive your wages or salary, you'll need to set the bank account details that you want your payday payments to be paid in to.
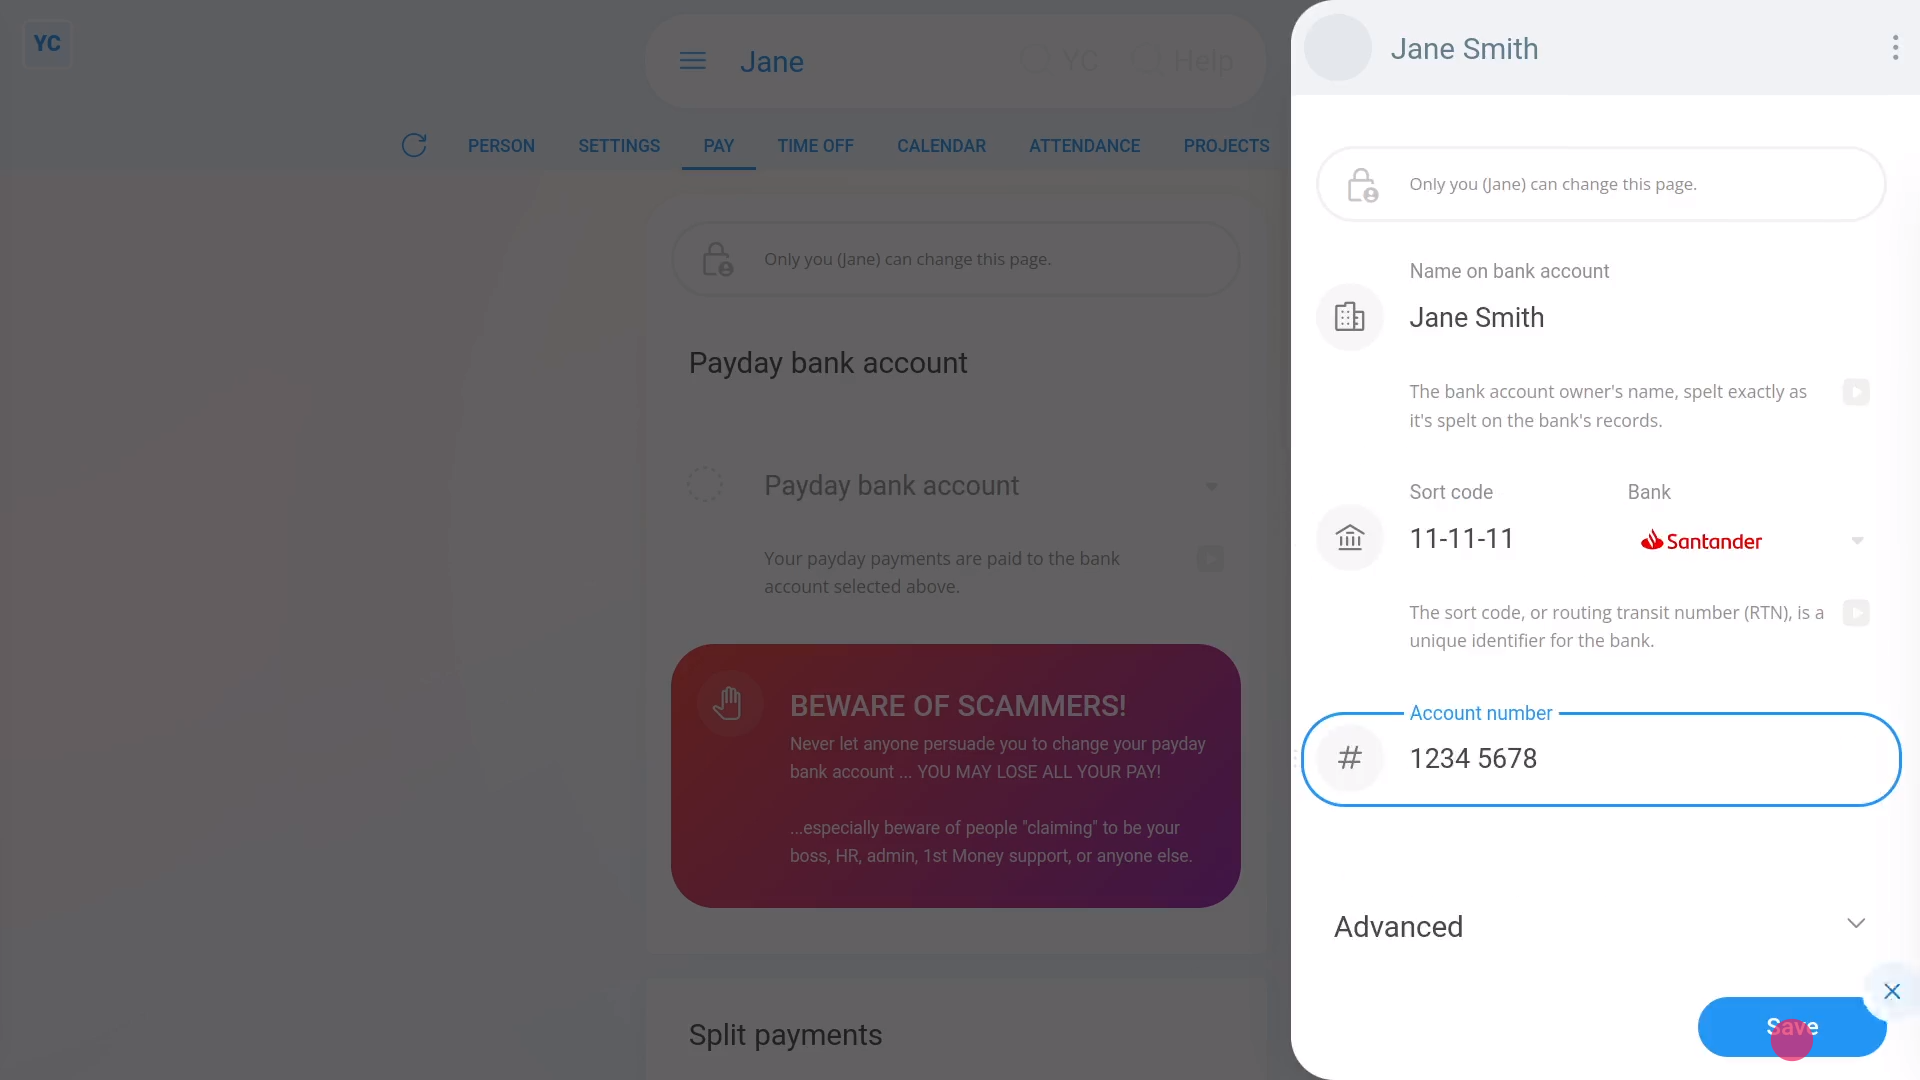
To set your bank account details:
- First, open yourself on: "Menu", then "Me"
- Then tap: "Pay", then "Payday bank account"
- Next, tap: "Payday bank account"
- Then tap: New
- Once it slides out on the right, you'll see that it's already entered your first and last names.
- You're welcome to change any of the details, but mostly you only need to type in your: "Sort code"
- In most cases it correctly sets your bank logo.
- If the bank logo's wrong, instead select the correct bank yourself.
- Then type in your: "Account number"
- Then tap: Save
- And finally, from now on, all your payday payments are now paid to the newly added bank account.
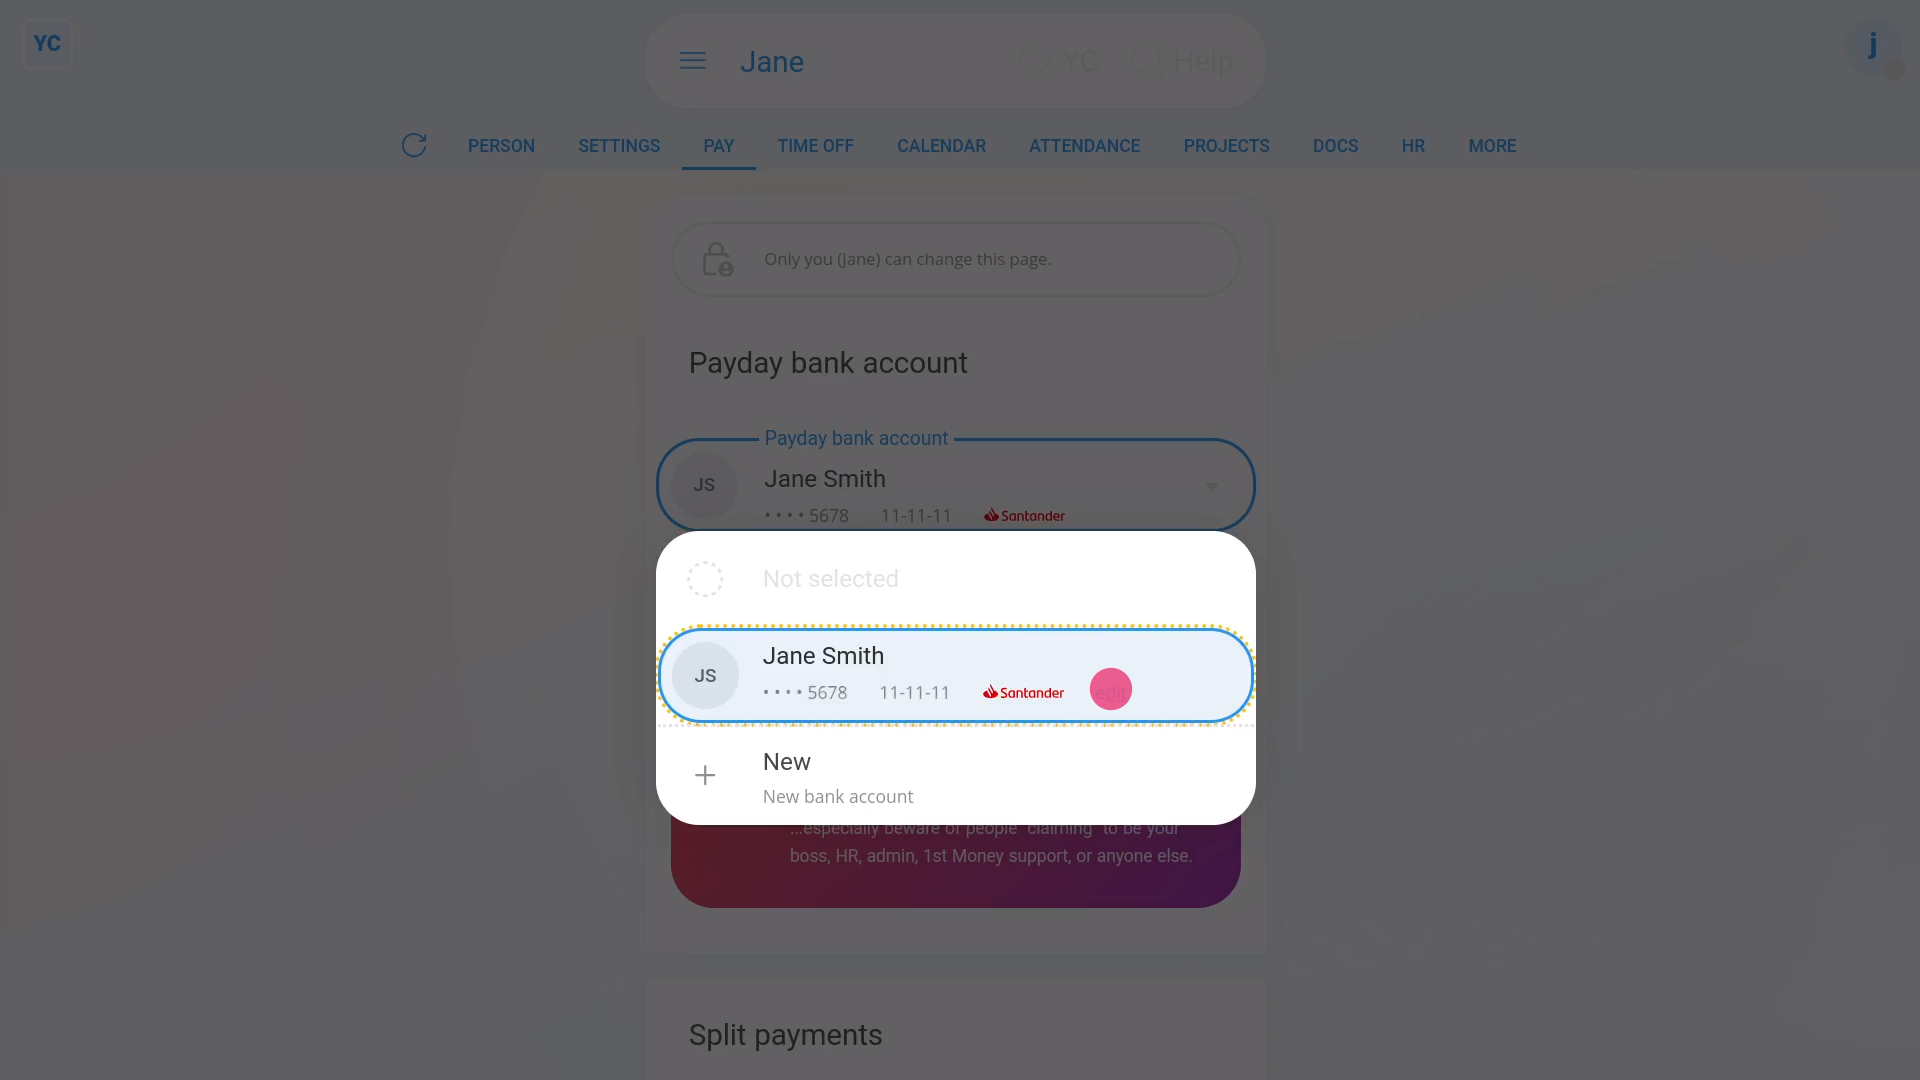
To change your bank account details:
- First, open yourself on: "Menu", then "Me"
- Then tap: "Pay", then "Payday bank account"
- Next, tap: "Payday bank account"
- Then tap: Edit
- A common change is to set the: "Display name"
- Or to change the appearance and colour.
- Once you're happy with your changes, tap: Save
- And finally, you'll instantly see your changes show up.
Keep in mind that:
- You can add as many bank accounts as you want.
- And you can always switch your selected "Payday bank account" to any one of your other bank accounts at any time.
- From the moment you tap Save, all future payday payments, from then on, are paid into your newly selected bank account.
You may notice:
- That setting and changing your bank accounts is something only you can do.
- Even your admins can't change it.
- You'll have the security of knowing that your money always gets paid to exactly where you decide for it to be paid.
And that's it! That's all you need to do to add or change your bank account for your payday payments!
2. How do I add my company's bank account to pay payroll from?
 1:48
1:48
"How do I add my company's bank account to pay payroll from?"
In most cases, when you submit your payroll taxes to HMRC, details about the company's bank account also needs to be submitted.
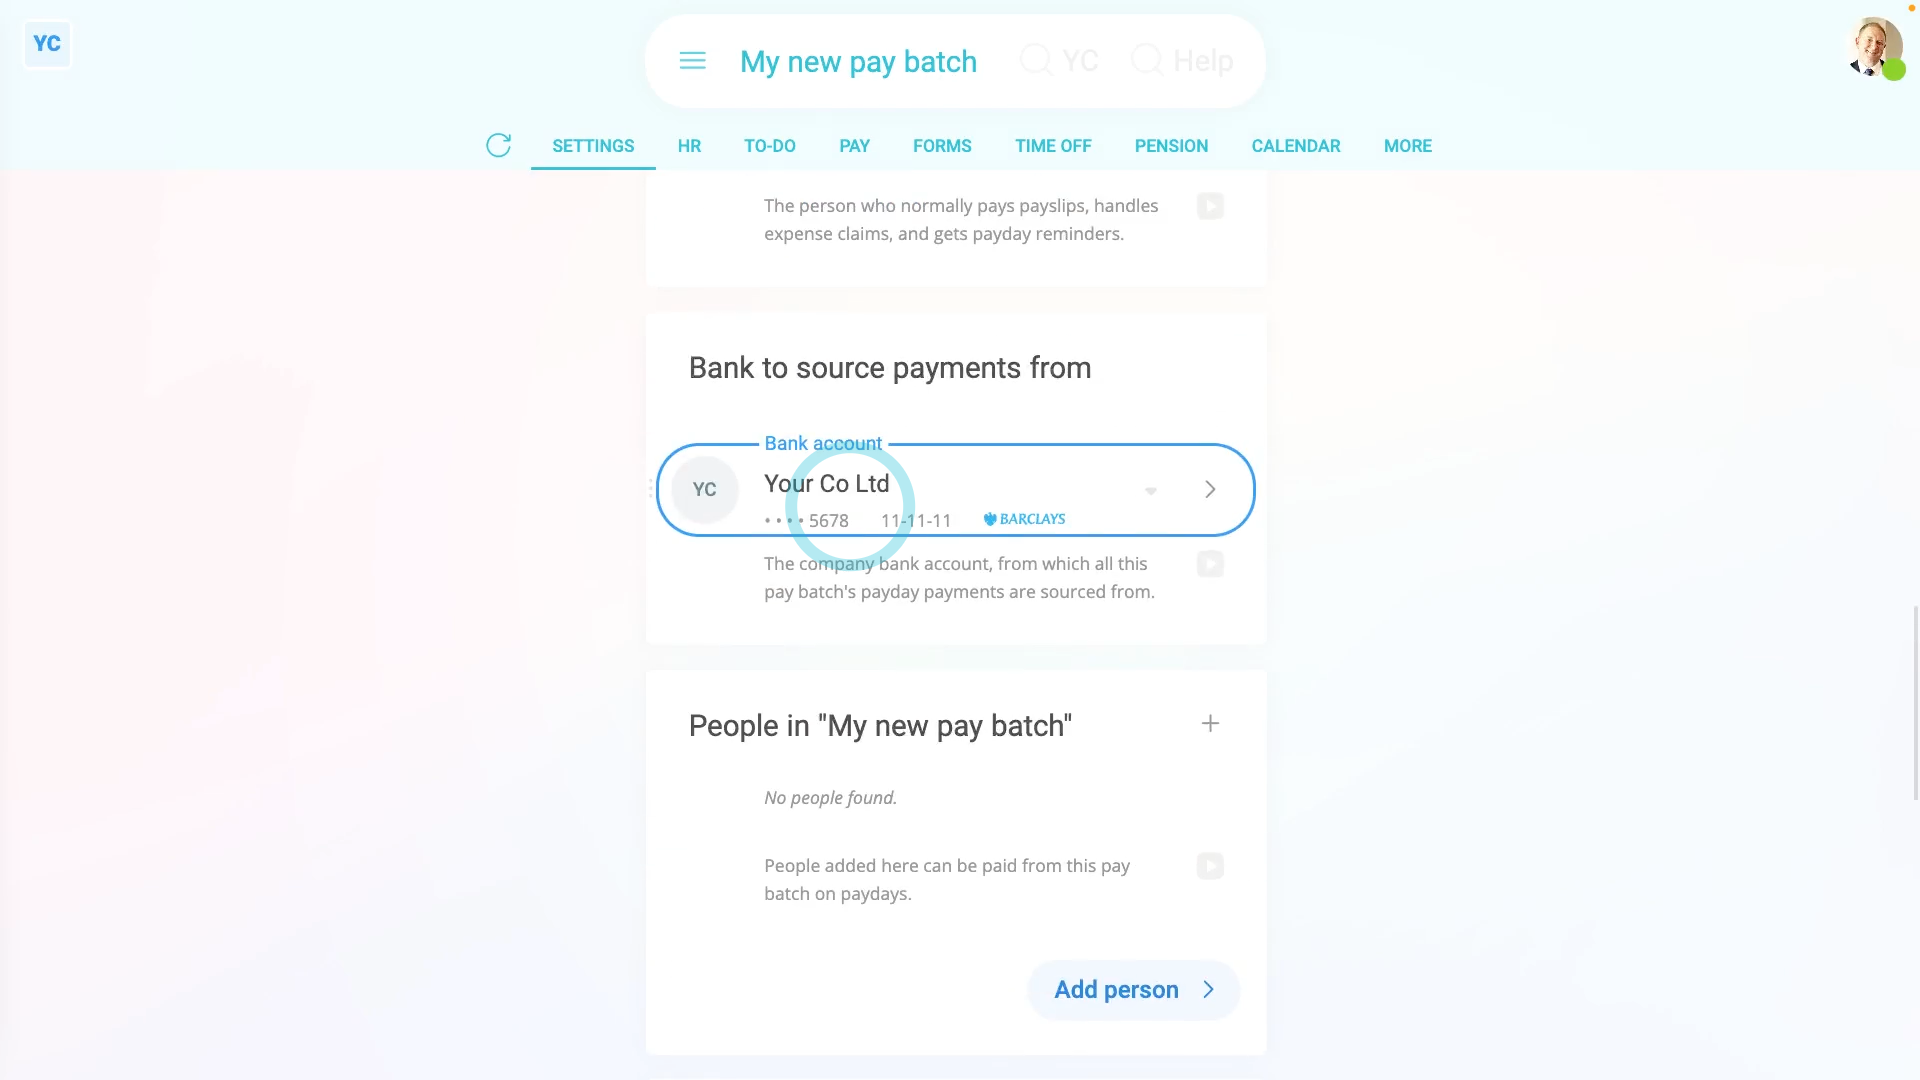
To store a new pay batch and set your company's bank account:
- First, tap: "Menu", "Pay batches", then "New pay batch"
- And type in the pay batch's name.
- Next, scroll down to "Bank to source payments from" and tap: "Payday bank account"
- Then tap New to store a new bank account.
- Once it slides out on the right, you'll see that it's already entered your business name.
- Next, type in your: "Sort code"
- In most cases it correctly sets your bank logo.
- If the bank logo's wrong, instead select the correct bank yourself.
- Then type in your: "Account number"
- And tap: Save
- You'll now see your new bank account is set as your new pay batch's: "Bank to source payments from"
- And finally, from now on, all your payroll tax submissions to HMRC send the selected bank account as the pay batch's bank account.
Keep in mind that:
- Setting the "Bank to source payments from" doesn't have to be done as soon as you make a new pay batch.
- However, you'll be required to enter a bank account before making your first payday payments.
And that's it! That's all you need to do to add your company's bank account to pay payroll from!
How do I delete or undelete a payday bank account?
 2:48
2:48
"How do I delete or undelete a payday bank account?"
If you no longer need a bank account, you're welcome to delete it whenever you like.

To delete a bank account:
- First, open yourself on: "Menu", then "Me"
- Then tap: "Pay", then "Payday bank account"
- Next, tap: "Payday bank account"
- Then tap the "Edit" link on the bank account you'd like to delete.
- Once it slides out on the right, to open it in a new tab, tap the three dots: (in the top-right corner)
- Then tap: Open in new tab
- Next, tap: More
- Then: Delete
- Then: Yes ... delete
- Sometimes, the bank account that you're deleting is currently used to receive payday payments.
- If so, you'll get a warning asking you to move your payday payments to a different bank account.
- The warning is to make sure that you always have at least one bank account set to receive payday payments in to.
- Next, tap Move, and select your replacement bank account.
- If there's no other bank accounts to select from, tap New, to make a new bank account.
- Type in the details of your new bank account, then tap: Save
- Your original bank account is now deleted, and you can close the tab.
- Then to reload the page, tap the "Reload tab" button: (at the top)
- And finally, you'll see that your payday payments are now set to be paid to your replacement bank account.

To undelete a bank account from your "deleted bin":
- First, tap: "Menu", then "Deleted bin"
- Next, you'll see a category for most of the kinds of items that can be deleted. Tap: Payees
- And then tap the bank account you'd like to undelete.
- Next, tap: Undelete (at the bottom)
- The previously deleted bank account is immediately undeleted.
- Now tap: Back to...
- And you're now back at your: "Payday bank account"
- Now you can now re-select the newly undeleted bank account back to being your selected on: "Payday bank account"
- And finally, tap: Save
Keep in mind that:
- Any changes that you make, apply immediately to your: "Payday bank account"
- That means that as long as your payday person hasn't processed your pay yet, you'll receive your next pay into the currently selected bank account.
And that's it! That's all you need to do to delete a payday bank account!
How do I split my payday payments between two bank accounts?
 2:44
2:44
"How do I split my payday payments between two bank accounts?"
Sometimes you may want to have your payday payments, each payday, split across two different bank accounts.
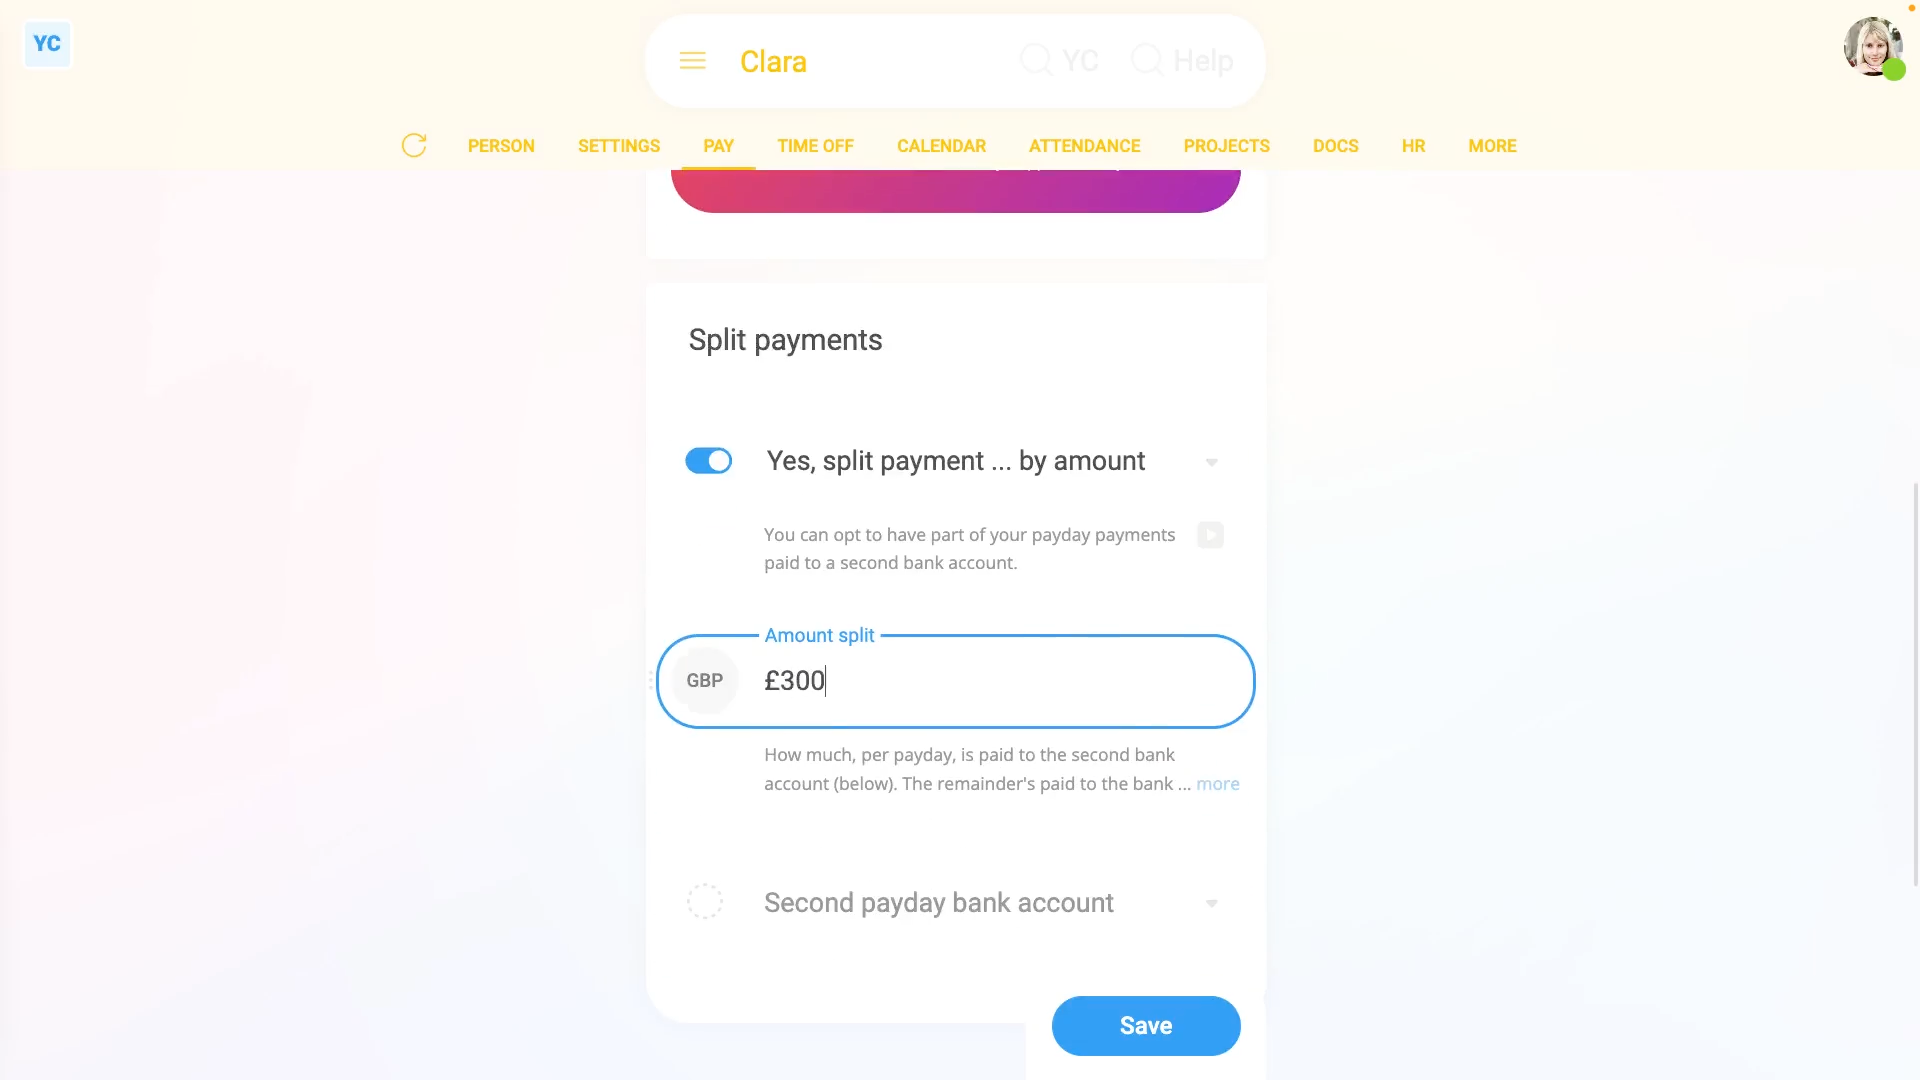
To split your payday payments by a fixed amount each payday:
- First, open yourself on: "Menu", then "Me"
- Then tap: "Pay", then "Payday bank account"
- Next, tap: "No split payments"
- Then select: "Yes, split payment ... by amount"
- Next, type the amount you want paid to your second bank account each payday.
- Then select the additional bank account that your split amount is to be paid to each payday.
- Then tap: Save
- And finally, your split payment's all set up, and from now on, your selected split amount gets deposited into your additional bank account each payday.

To split your payday payments by a percentage amount each payday:
- First, open yourself on: "Menu", then "Me"
- Then tap: "Pay", then "Payday bank account"
- Next, tap: "No split payments"
- Then select: "Yes, split payment ... by percent"
- Next, drag the slider to the percentage that you want.
- Then select the additional bank account that your split amount is to be paid to each payday.
- Then tap: Save
- And finally, your split payment's all set up, and from now on, your selected percentage of pay gets deposited into your additional bank account each payday.
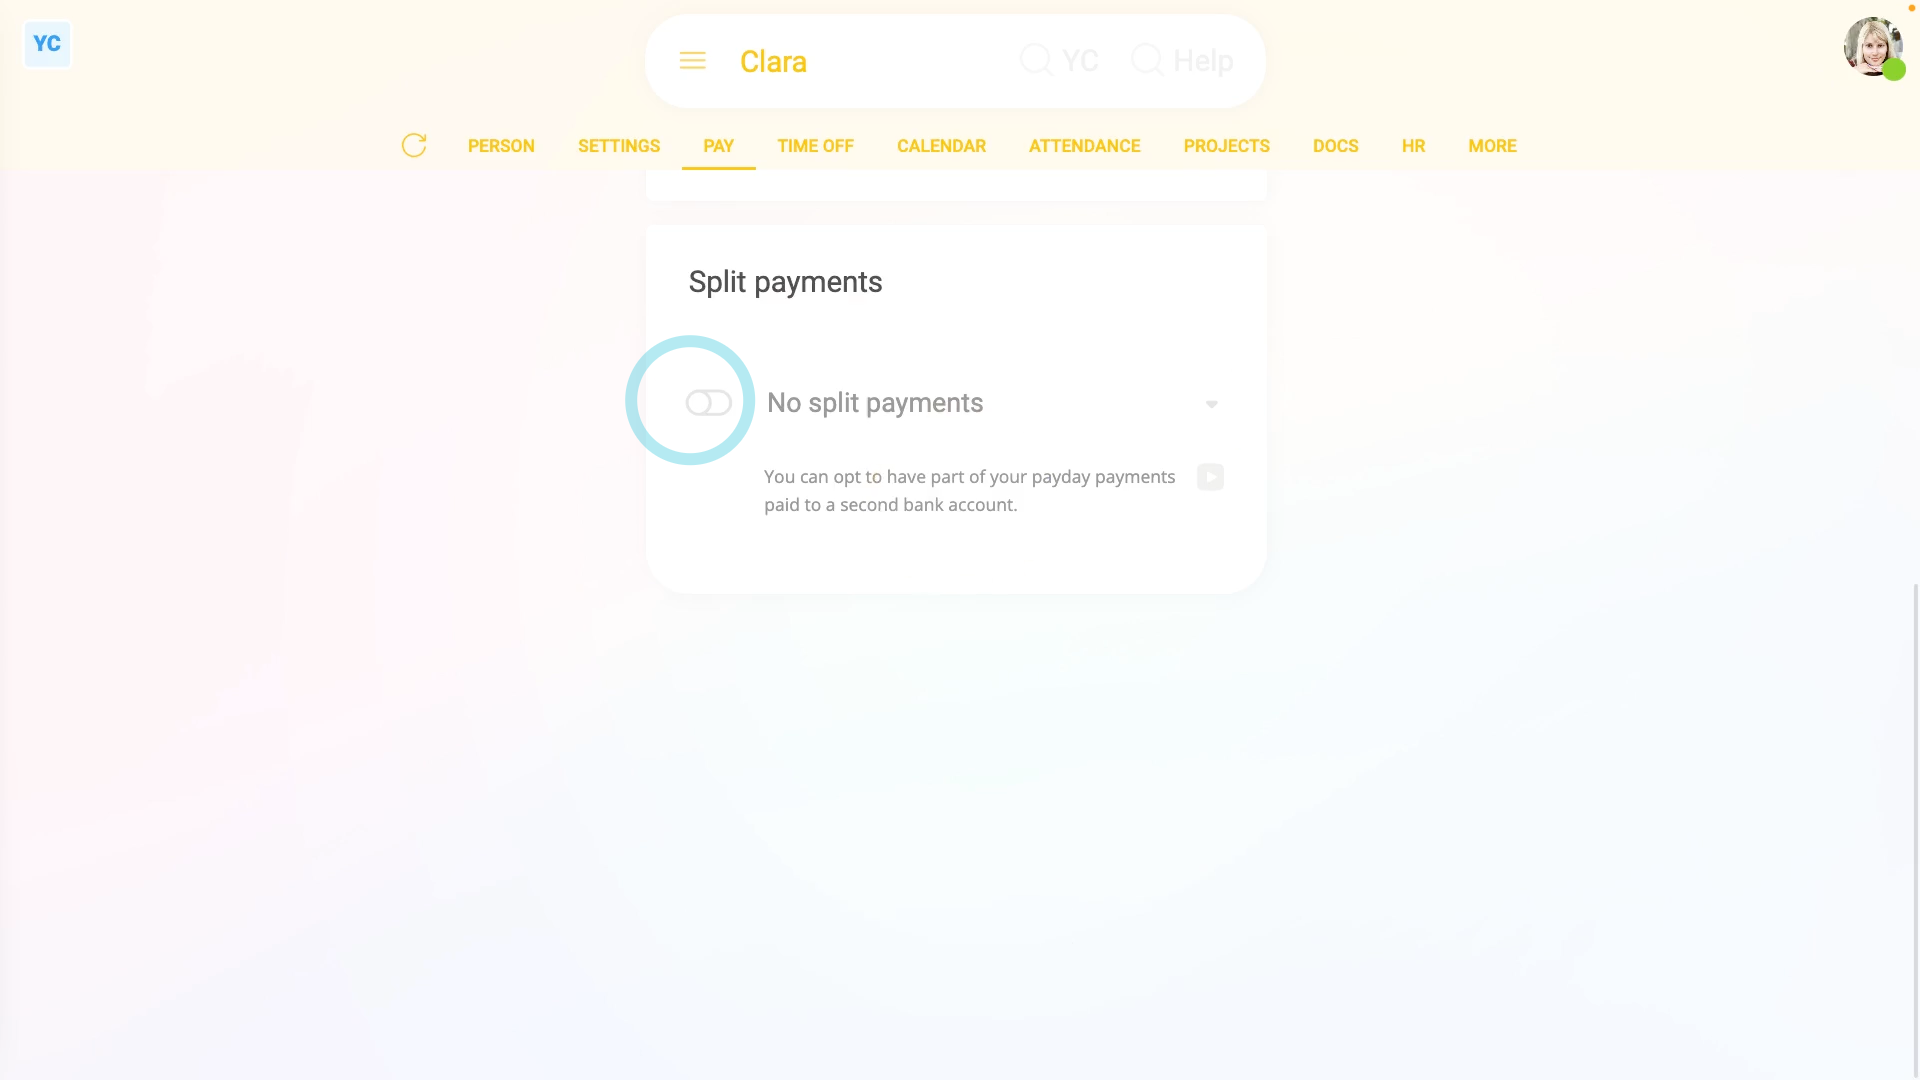
To turn off split payments:
- First, open yourself on: "Menu", then "Me"
- Then tap: "Pay", then "Payday bank account"
- Then for "Split payments", change it to: "No split payments"
- Next, tap: Save
- And your split payments are now turned off, and from now on, no payments are paid to any additional bank account.
- And finally, your full pay is once again paid into your single main bank account.
Keep in mind that:
- Setting split payments is something only you can do for yourself.
- Even admins can't set or change it for you.
- You'll get the security of knowing that your money always gets paid to exactly where you decide for it to be paid.
And that's it! That's everything you need to know about doing split payday payments!
Payslips
1. How do I check payslips before paying payroll on payday?
 3:53
3:53
"How do I check payslips before paying payroll on payday?"
If your team's payslips frequently include timesheets and expenses, on payday, you may want to check each payslip before you tap: File & pay

To open a payslip and check its hours worked:
- First, select the pay batch on: "Menu", then "Pay batches"
- Then tap: "Pay", then "Pay now"
- Next, hover your mouse over the row of the first payslip you want to check.
- And tap the blue "See payslip" button: (at the start of any row)
- Once their payslip slides out on the right, you can now begin checking.
- The first thing to check is the big number (at the top).
- Which is their "Net pay", or, in other words, how much is paid to their bank account.
- Make sure that it "feels" like the number you're expecting to pay.
- Then if the person does timesheets, tap Hours worked, and a list of their timesheet times slides out on the right.
- If you need to change one of the day's times done, tap it to make changes.
- Now, tap the shift on that day that you want to change, drag the slider to make your change, and tap: Save
- Once it's reloaded, you'll see that the payslip's "Earnings" number has changed.
- And finally, when you hover your mouse over the "Earnings" number, the hours to be paid has also changed.
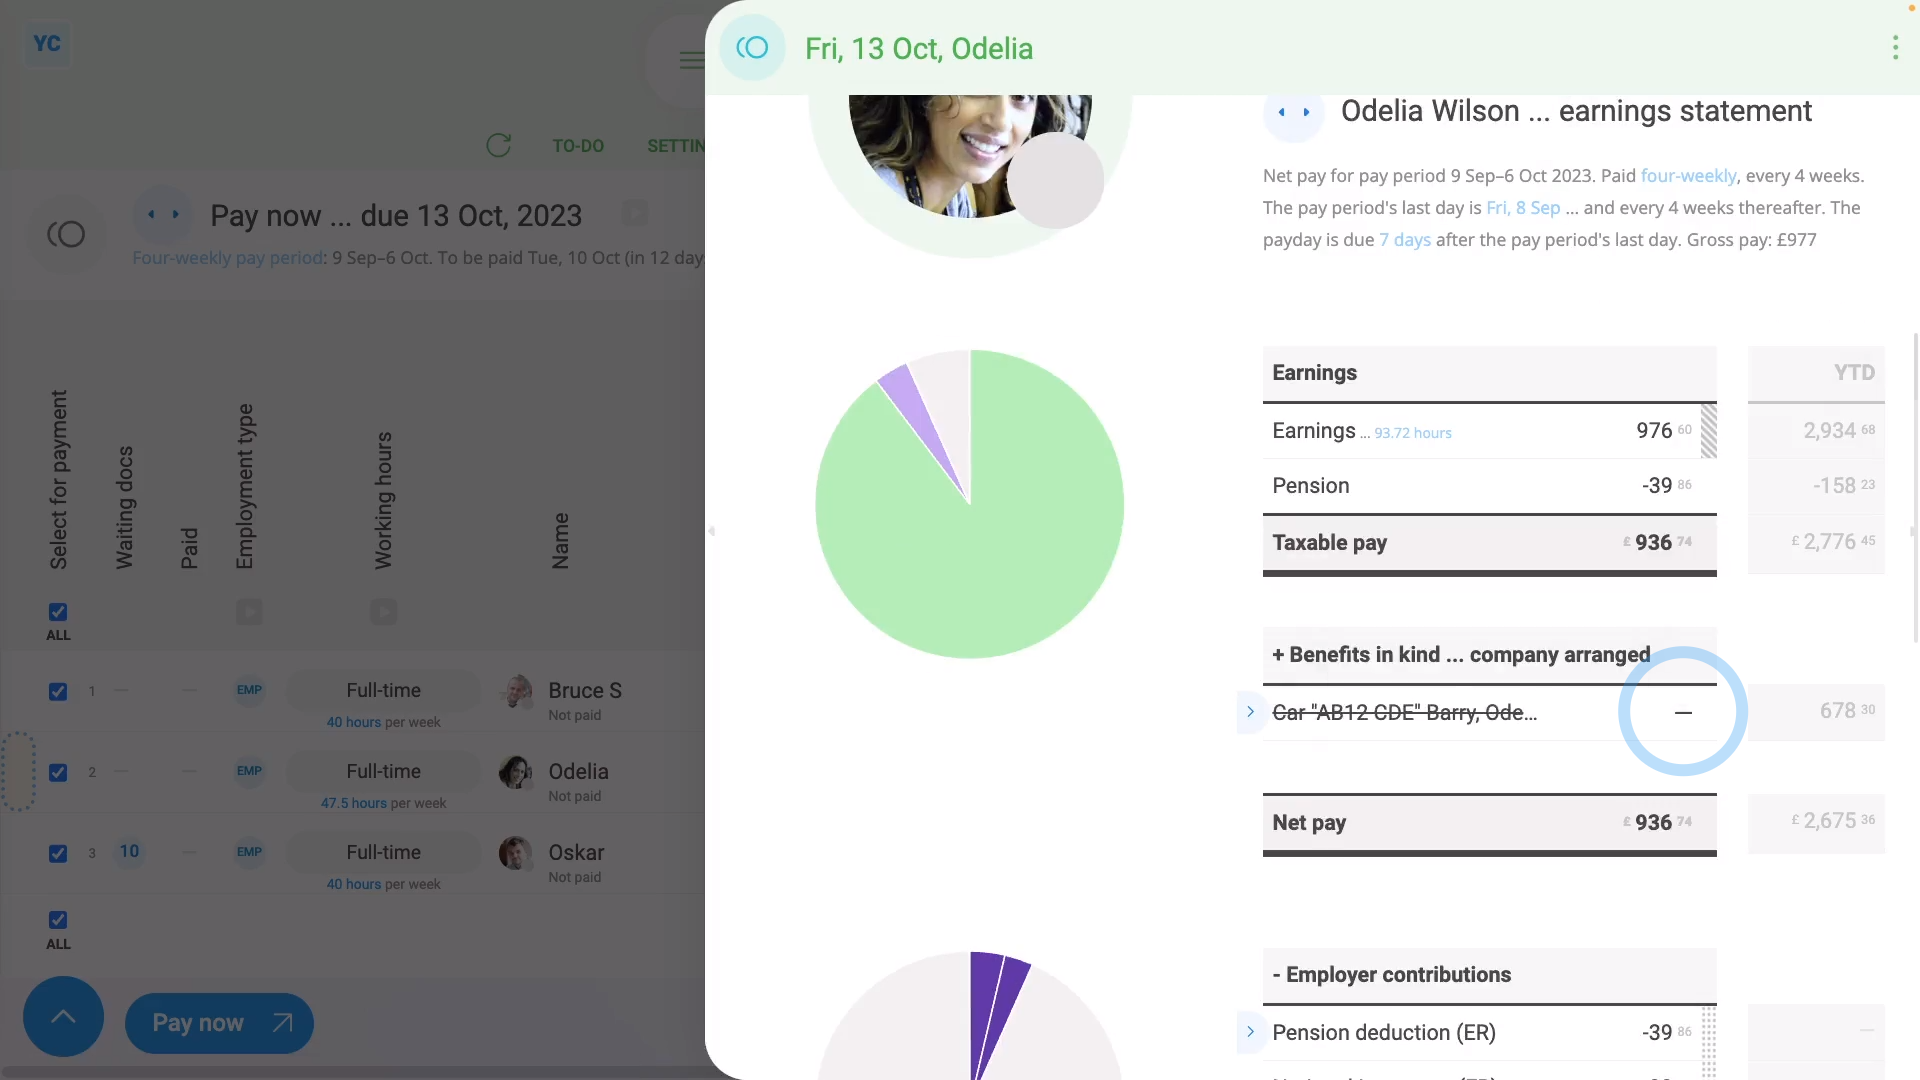
To open a payslip and check for any repeat payables to be removed, like a benefit-in-kind:
- First, select the pay batch on: "Menu", then "Pay batches"
- Then tap: "Pay", then "Pay now"
- Next, hover your mouse over the row of the payslip you want to open.
- And tap the blue "See payslip" button: (at the start of any row)
- Next, on the payslip, find the repeat payable that you'd like to remove.
- One-time removal:
To remove a repeat payable from only a single payslip, but have it still show up on all future payslips, untick the repeat payable. - Once you've unticked the repeat payable, it's removed from the current payslip as a one-time removal.
- However, it still shows up in all future payslips, as expected.
- Permanent removal:
To permanently remove a repeat payable, tap the light blue "Edit" button: (at the front of the repeat payable) - Then scroll down to "People getting it", and tap the person you'd like removed.
- Then in the person's pay settings, tap the blue "remove" link, and then tap: Yes ... remove
- Now that the repeat payable's reloaded, you can see that it no longer has the person listed.
- Then back on the payslip, tap the three dots: (in the top-right corner), and tap: Reload
- Now, on the reloaded payslip, the repeat payable's money value is set to nothing.
- The reason the row's still showing is because it's been filed on previous payslips in the tax year.
- Because it's been previously filed, the "year to date" amount still needs to be listed.
- And finally, once you get to the next tax year, the "year to date" amount gets reset, and the repeat payable row permanently disappears.
For advanced usage:
- If you're paying lots of people, you may want to plan your payday payslip checking job out in advance.
- You could share your "checking" job with others on your payroll team.
- Checking payslips can be done by multiple people, all during the same time.
- All it takes is to set up each person in your payroll team with their own login.
- And then give each of them "Full payroll admin" permissions.
And that's it! That's everything you need to know about checking payslips!
2. How do I see the hours worked on a payslip?
 1:17
1:17
"How do I see the hours worked on a payslip?"
For anyone who's paid hourly, the number of hours worked during the pay period is an important part of their pay calculation.
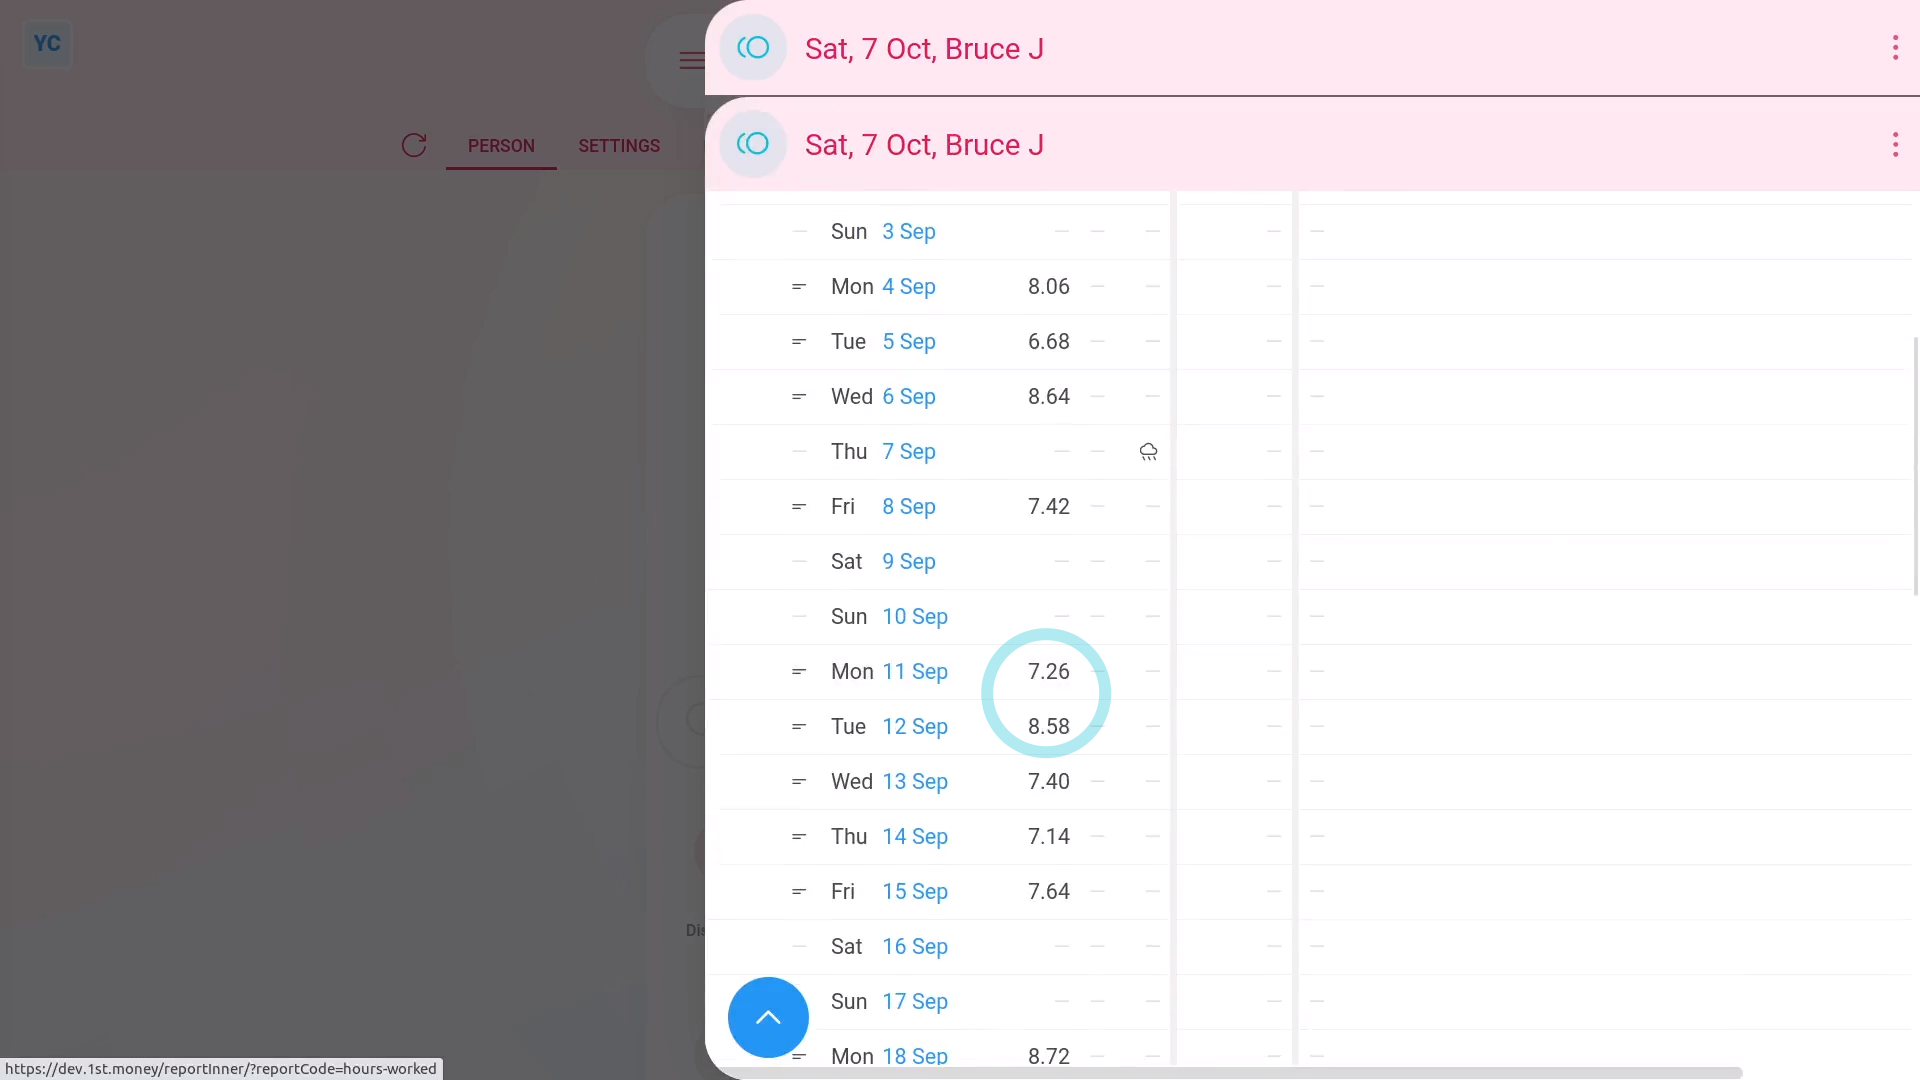
To see a payslip's list of "Hours worked":
- First, select the person on: "Menu", then "People"
- Then tap: "Pay", then "Payslip"
- Now tap "Hours worked", and a list of their timesheet times slides out on the right.
- On the payslip's "Hours worked", you can see a detailed breakdown of each days hours.
- For each row, you can tap the link to see the timesheet for that day.
- And for days where there's timesheet notes, to see that day's notes, you can hover your mouse over the "Notes" image:
- When you scroll down, you'll see the total of hours worked (at the bottom).
- All the numbers are in decimal format to make them also work when downloaded as a spreadsheet.
- To download a payslip's hours worked as a spreadsheet, tap: Download hours
- And finally, you'll now have a spreadsheet file that you can use for your own calculations.
And that's it! That's everything you need to know about seeing hours worked on a payslip!
3. How do I check a payslip's confirmation status?
 1:30
1:30
"How do I check a payslip's confirmation status?"
Sometimes, you may want to be sure that your pay and taxes have been correctly filed with HMRC.
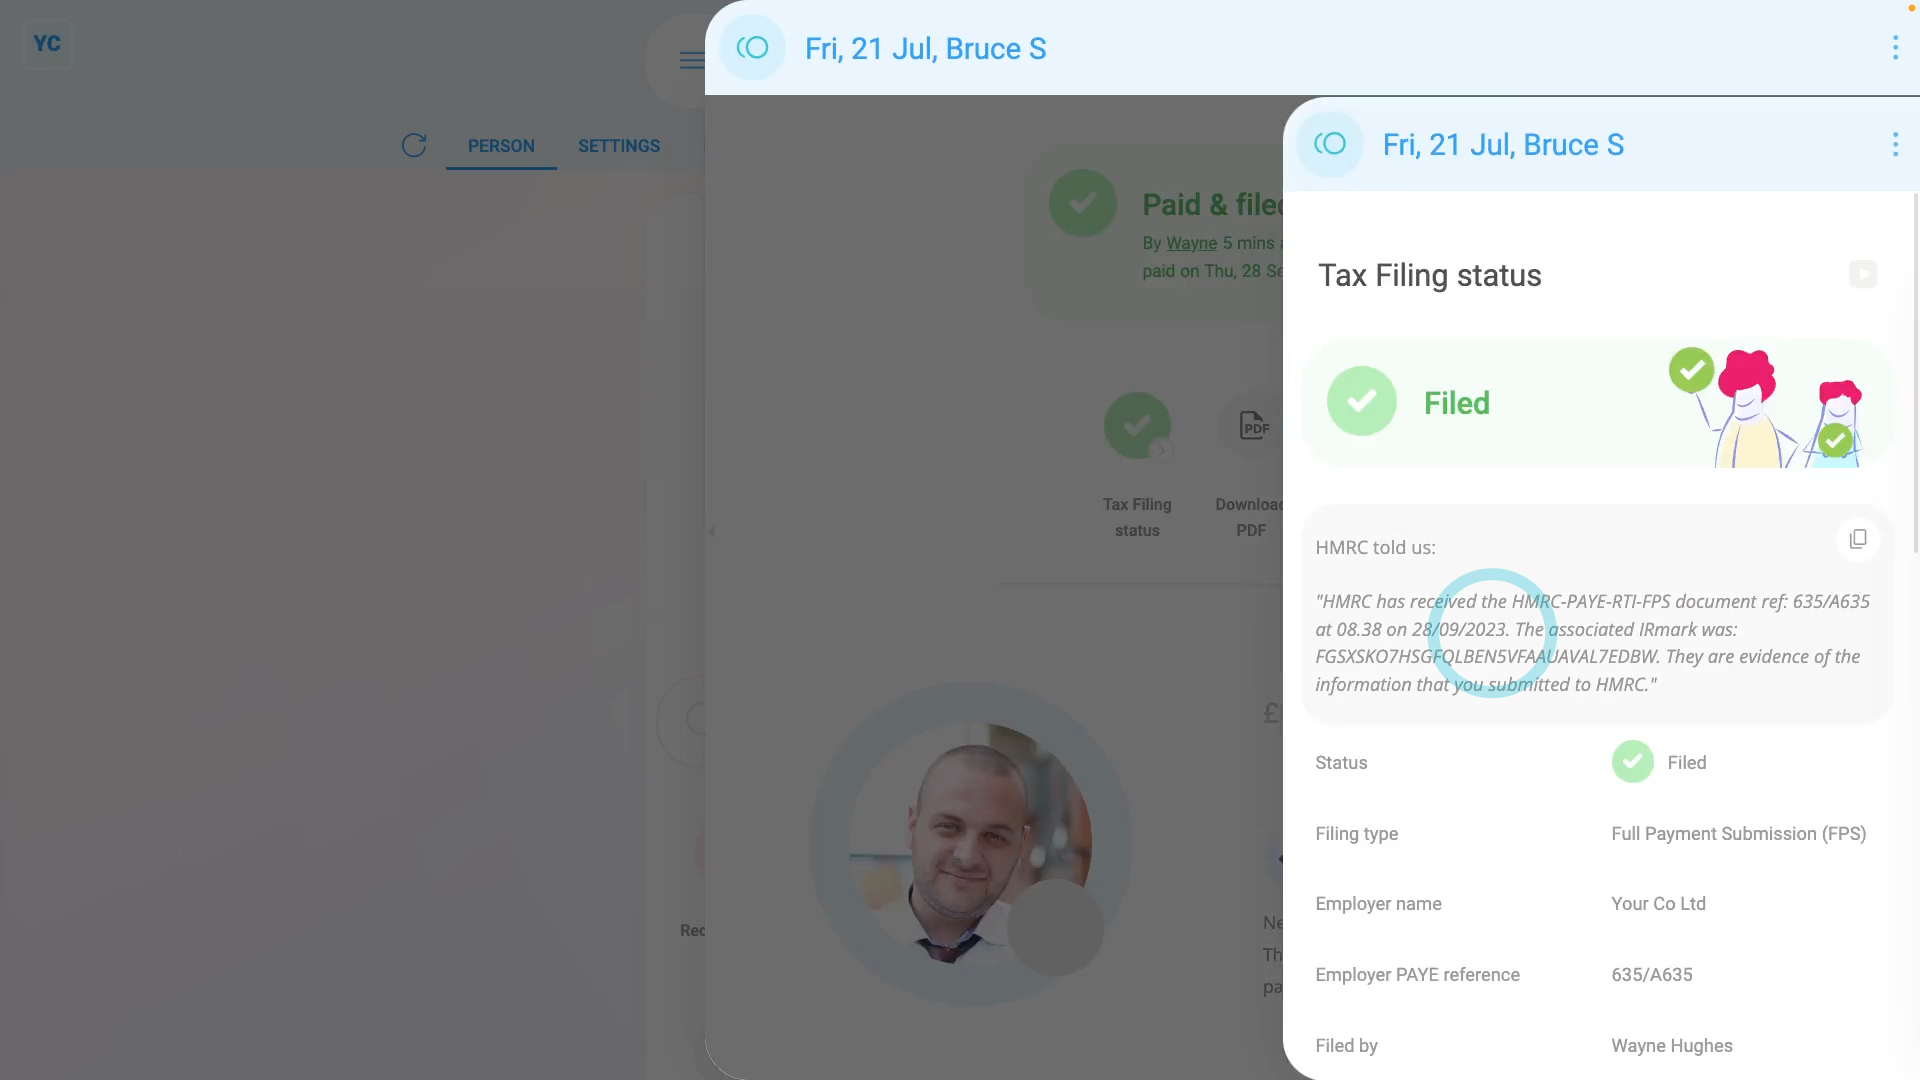
To check a payslip's confirmation status:
- First, open yourself on: "Menu", then "Me"
- Then go to your: Calendar
- Tap back through the months and look for the blue circle that matches the payday date of the payslip that you're looking for.
- Once you find the payslip you're looking for, tap the blue circle, and then tap: Payslip
- Once your payslip slides out on the right, scroll down to the bottom of your payslip.
- Near the bottom, you'll see the short confirmation of your: "HMRC receipt"
- The short confirmation of your "HMRC receipt" is always included on every one of your payslip PDFs.
- Alternatively, if you scroll to the top and tap: Filing status
- Once it slides out on the right, you'll see the full confirmation of your: "HMRC receipt"
- And finally, you can be confident that your pay and taxes have been correctly filed with HMRC.
Keep in mind that:
- Any person can check their own payslip confirmation.
- There's no special permissions required to see your own confirmation status.
And that's it! That's everything you need to know about checking your payslip's confirmation status!
4. How do I download and print my past payslips?
 3:03
3:03
"How do I download and print my past payslips?"
Sometimes, you may need to download a copy of your past payslips for printing. There's two different ways to download payslips.
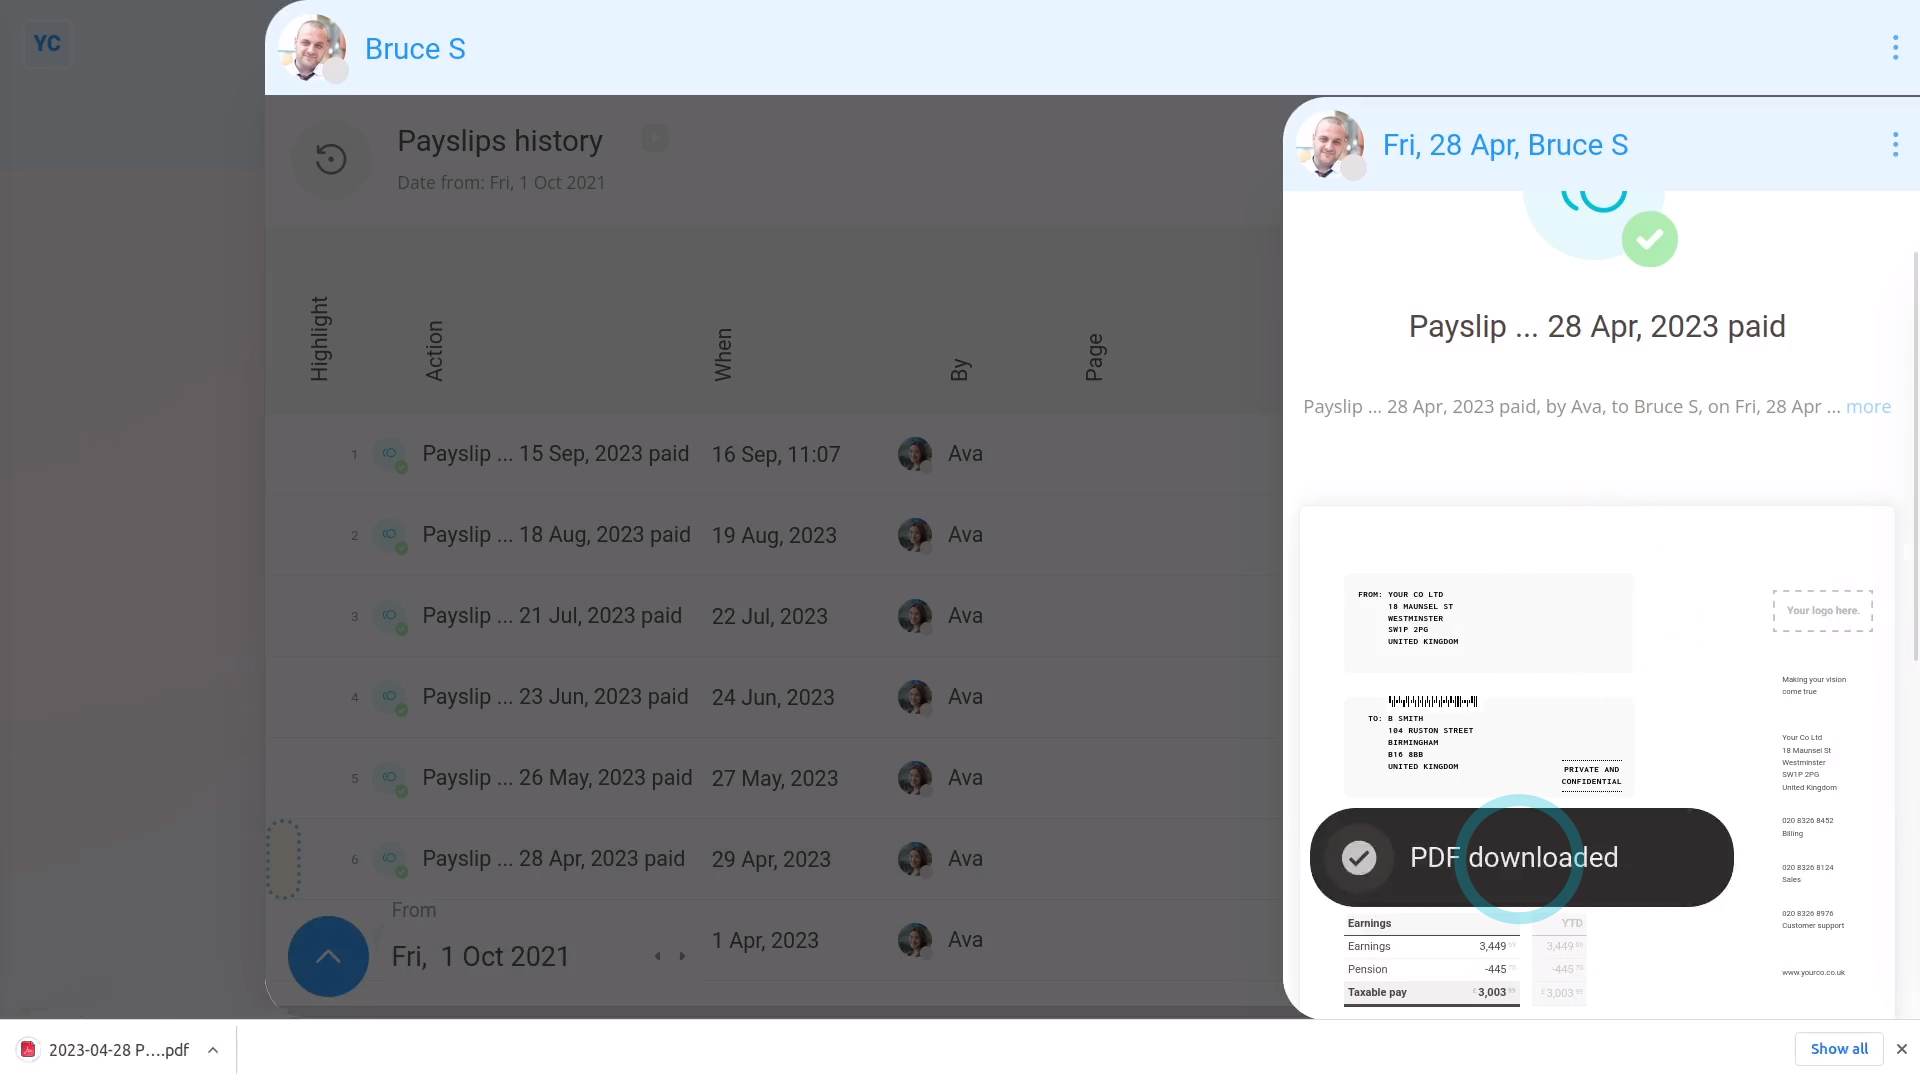
To download your payslips from a list:
- First, open yourself on: "Menu", then "Me"
- Then tap: "Pay", then "Payslips history"
- When you hover your mouse over each row, it shows how long it's been since the payslip was filed.
- Once you've found the payslip you want, to download a PDF of it, tap the blue "See event" button: (at the start of the row)
- Once the payslip slides out on the right, to download the payslip, tap the "PDF" button.
- After a few seconds, your payslip PDF is downloaded.
- To open the downloaded PDF, tap it, and you're all ready to print.
- And finally, if you're downloading more than one payslip PDF, continue to open and download each one, until you've got all the PDFs you need.
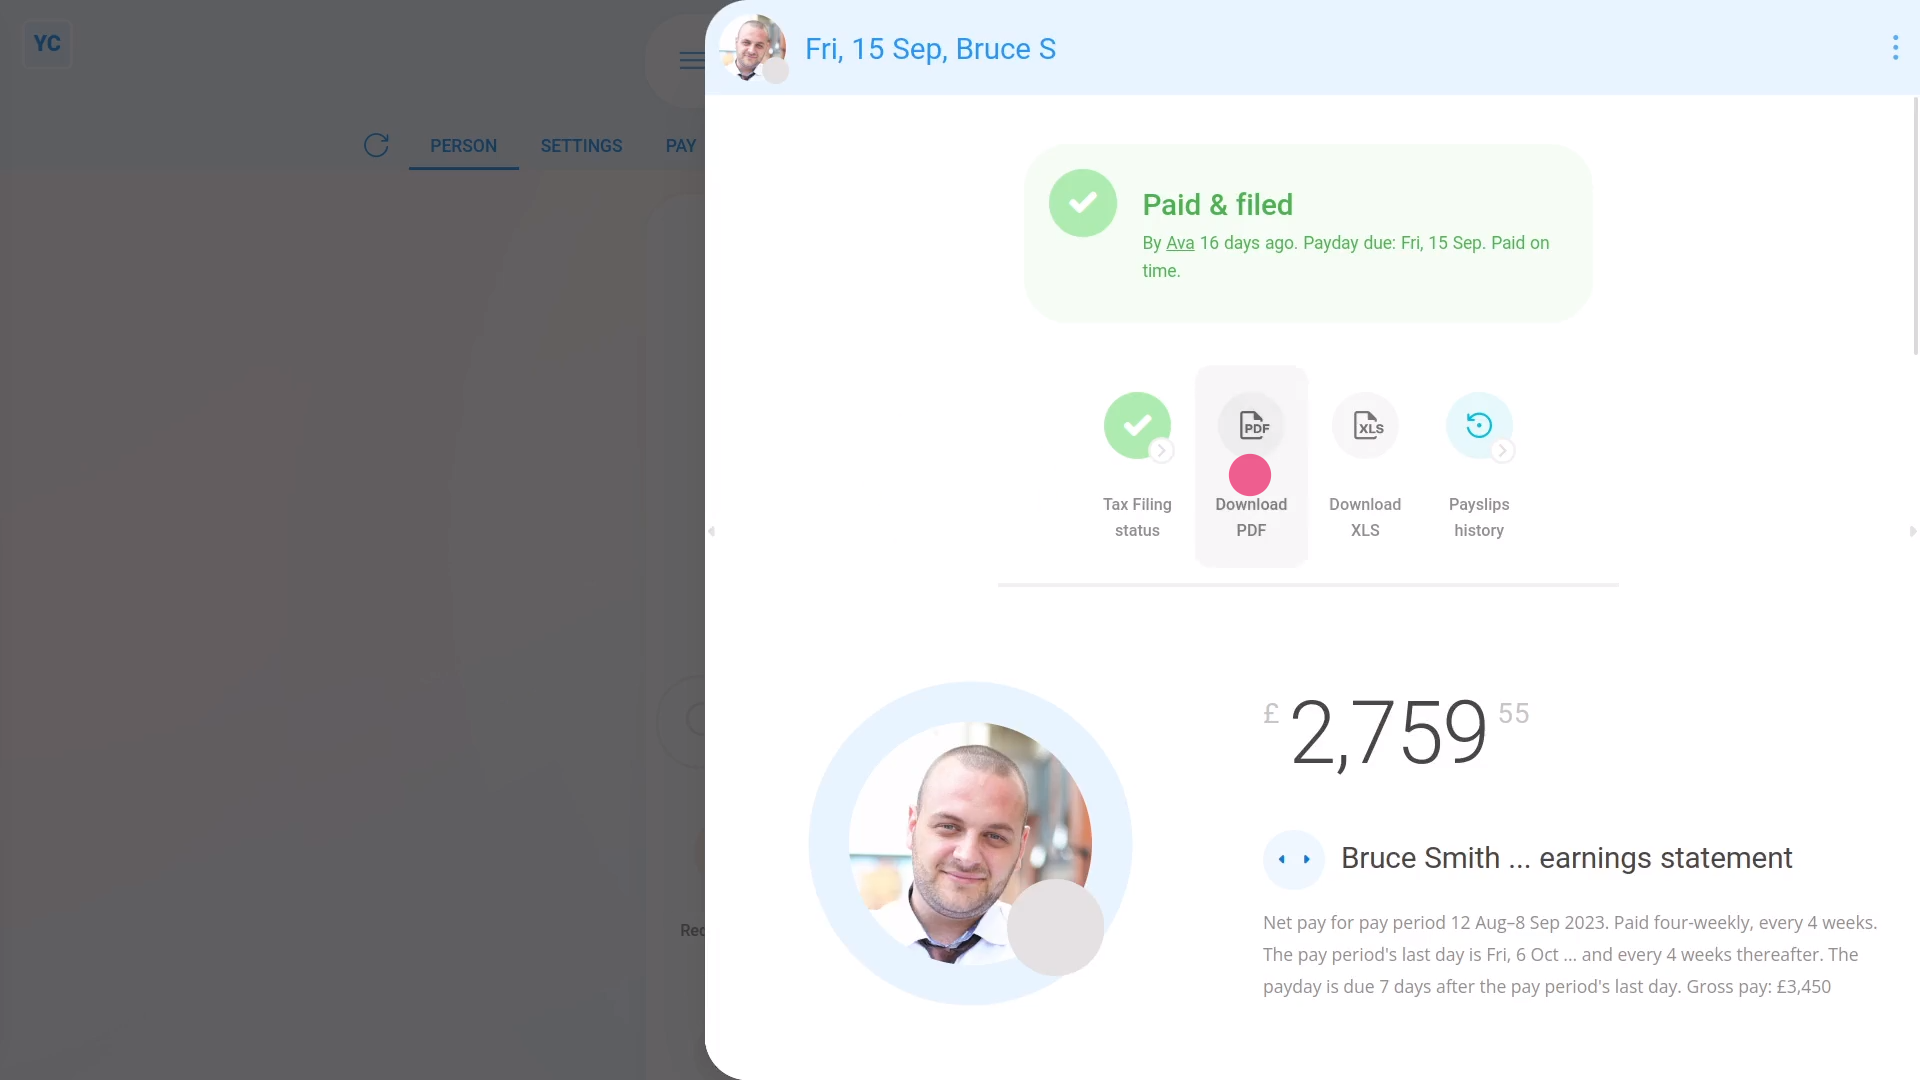
To download your payslips from your calendar:
- First, open yourself on: "Menu", then "Me"
- Then go to your: Calendar
- Tap back through the months and look for the blue circle that matches the payday of the payslip you're looking for.
- Once you find the payslip you're looking for, tap the blue circle, and then tap: Payslip
- The payslip you selected now slides out on the right.
- If you need to go to the next, or previous payslip, tap the triangles, and it jumps you to that payslip.
- Once you've found the payslip you want, tap: Download PDF
- After a few seconds, your payslip PDF is downloaded.
- To open the downloaded PDF, tap it, and you're all ready to print.
- And finally, if you're downloading more than one payslip PDF, continue using the calendar to download each one, until you've got all the PDFs you need.
Keep in mind that:
- You may need to download your past payslips to prove your earnings, for example, if you're applying for a loan.
For advanced usage:
- Sometimes, instead, you may be after only the numbers from your payslip, perhaps so you can do your own calculations.
- If so, to download the spreadsheet version of your payslip, tap: Download XLS
To learn more:
- About how to download all the payslip PDFs of a single payday, in one go, if you've got at least "View payroll admin" permissions, watch the video on: Multi-payslip PDF
And that's it! That's everything you need to know about downloading payslips!
How do I delete a payslip?
 2:54
2:54
"How do I delete a payslip?"
Occasionally, you may have filed a payslip, and later realise there's been a mistake. Some mistakes can be fixed by first, deleting the payslip, and then re-running: "Pay now"
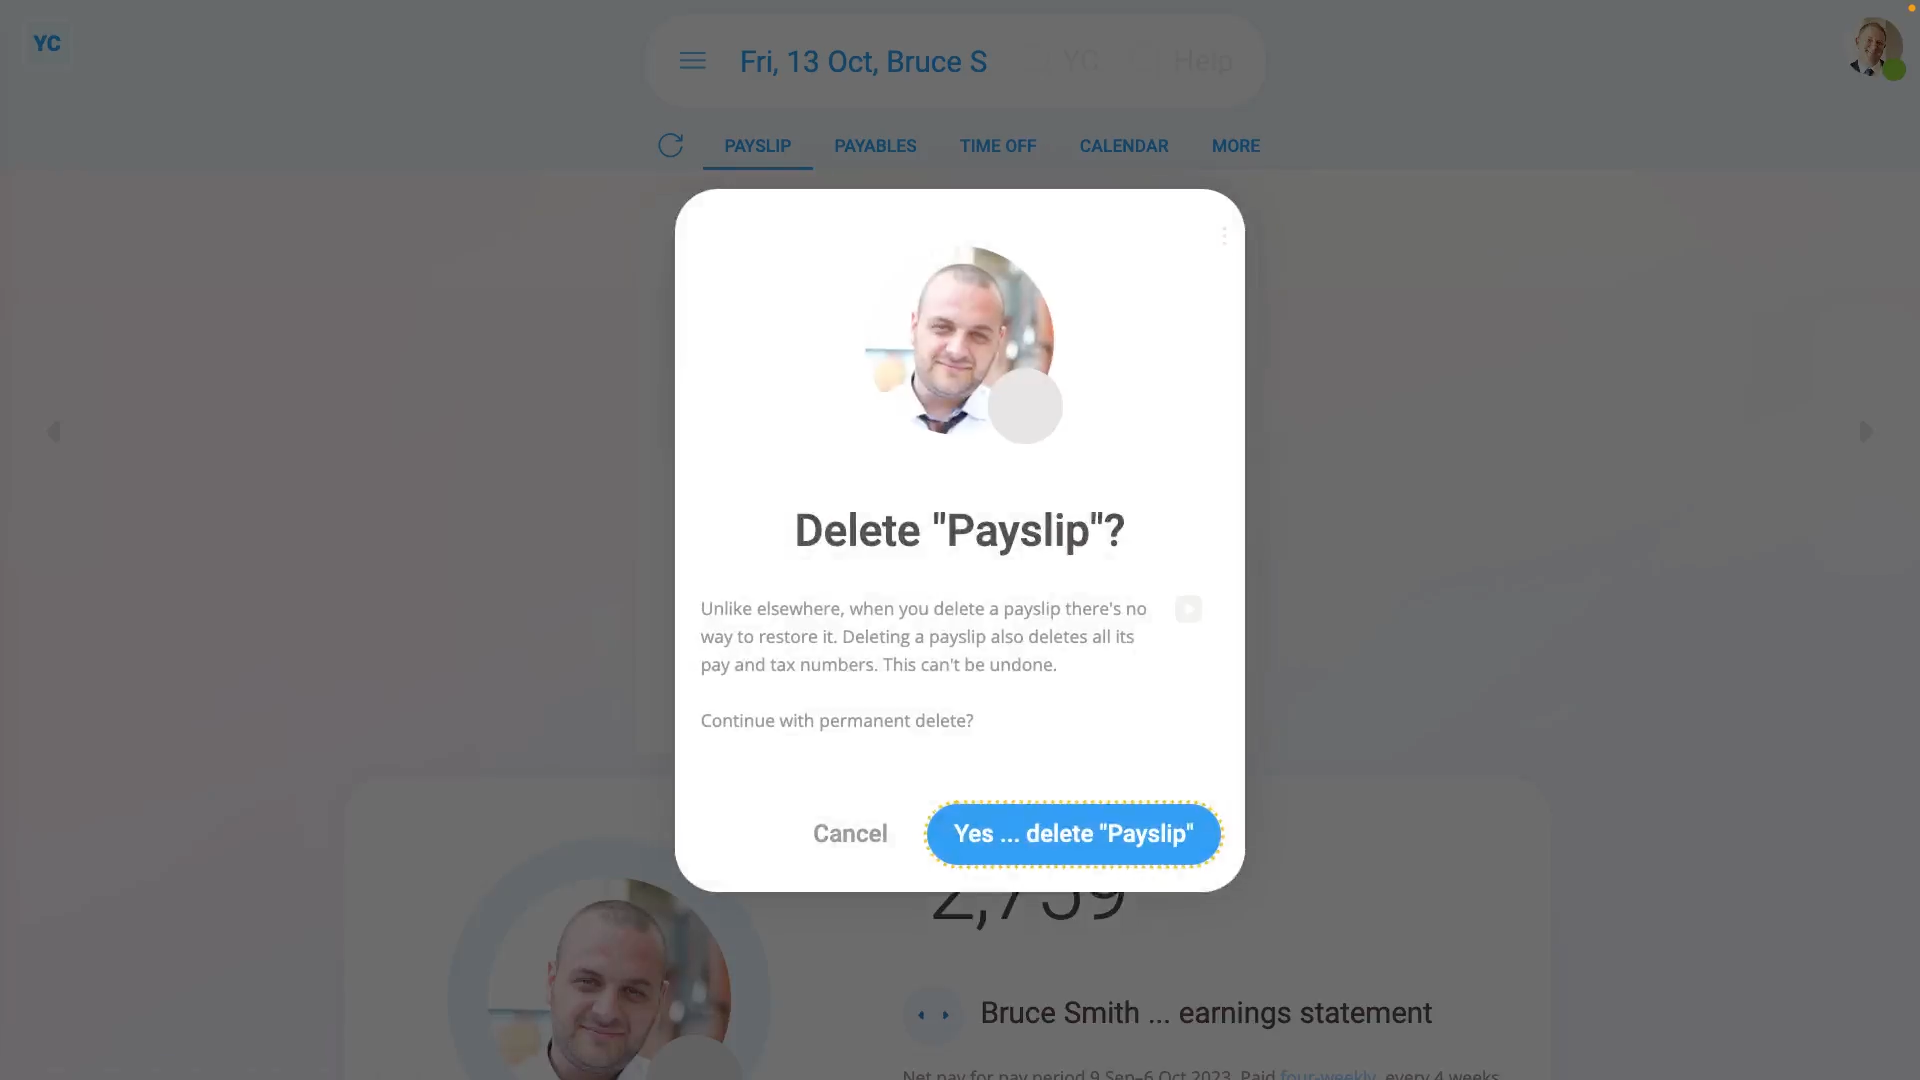
To delete a payslip:
- First, select the pay batch on: "Menu", then "Pay batches"
- Then tap: "Pay", then "Pay now"
- Once "Pay now" opens, hover your mouse over the row of the payslip you want to delete.
- Then tap the blue "See payslip" button: (at the start of any row)
- Once the payslip slides out on the right, to open it in a new tab, tap the three dots: (in the top-right corner)
- And then tap: Open in new tab
- Now that the payslip's open in its own tab, tap: "More", then "Delete"
- And then tap: Yes ... delete
- You'll now see that because the payslip's been deleted, it's back to being: "Not filed & paid yet"
- Next, close that tab and go back to: "Pay now"
- To update the "Pay now", tap the "Reload tab" button: (at the top)
- You'll now see that the row for the person's payslip no longer has the green "Filed" tick.
- And finally, the person's now un-filed payslip is automatically ticked and ready to be filed again.
Keep in mind that:
- Unlike elsewhere, once a payslip's been deleted, there's no way to restore it back to what was saved before.
- Whenever you pay a payslip, everything that's connected to it's calculations gets locked.
- Including locking connected timesheets, expense claims, repeat payables, and time off.
- The locking is intended to freeze everything in place, as of the time of payslip payment, so your records remain reliable.
- Making a change to a locked timesheet, or expense claim is the most common reason for wanting to delete a payslip.
For advanced usage:
- Deleting a payslip is never recommended. Making an adjustment is highly recommended.
- Instead of deleting a payslip, you could alternatively make an adjustment to the person's next payslip.
- To make an adjustment, go to the person's next payslip, and tap: Payables (at the top)
- Alternatively, if you still decide to delete a payslip, it's important that you pay that payslip again as soon as possible.
- Deleting a payslip only deletes it in your copy of the payroll.
- HMRC's copy remains as is, and becomes out-of-date, until you re-run: "Pay now"
- However, once you re-run "Pay now" for the payslip you deleted, HMRC gets all your new payslip numbers, and everything's all synced up again.
And that's it! That's everything you need to know about deleting a payslip!
Who can see my payslips and how do I open them?
 3:30
3:30
"Who can see my payslips and how do I open them?"
Because of the sensitivity of pay info, there's strict control over who can see your payslips.
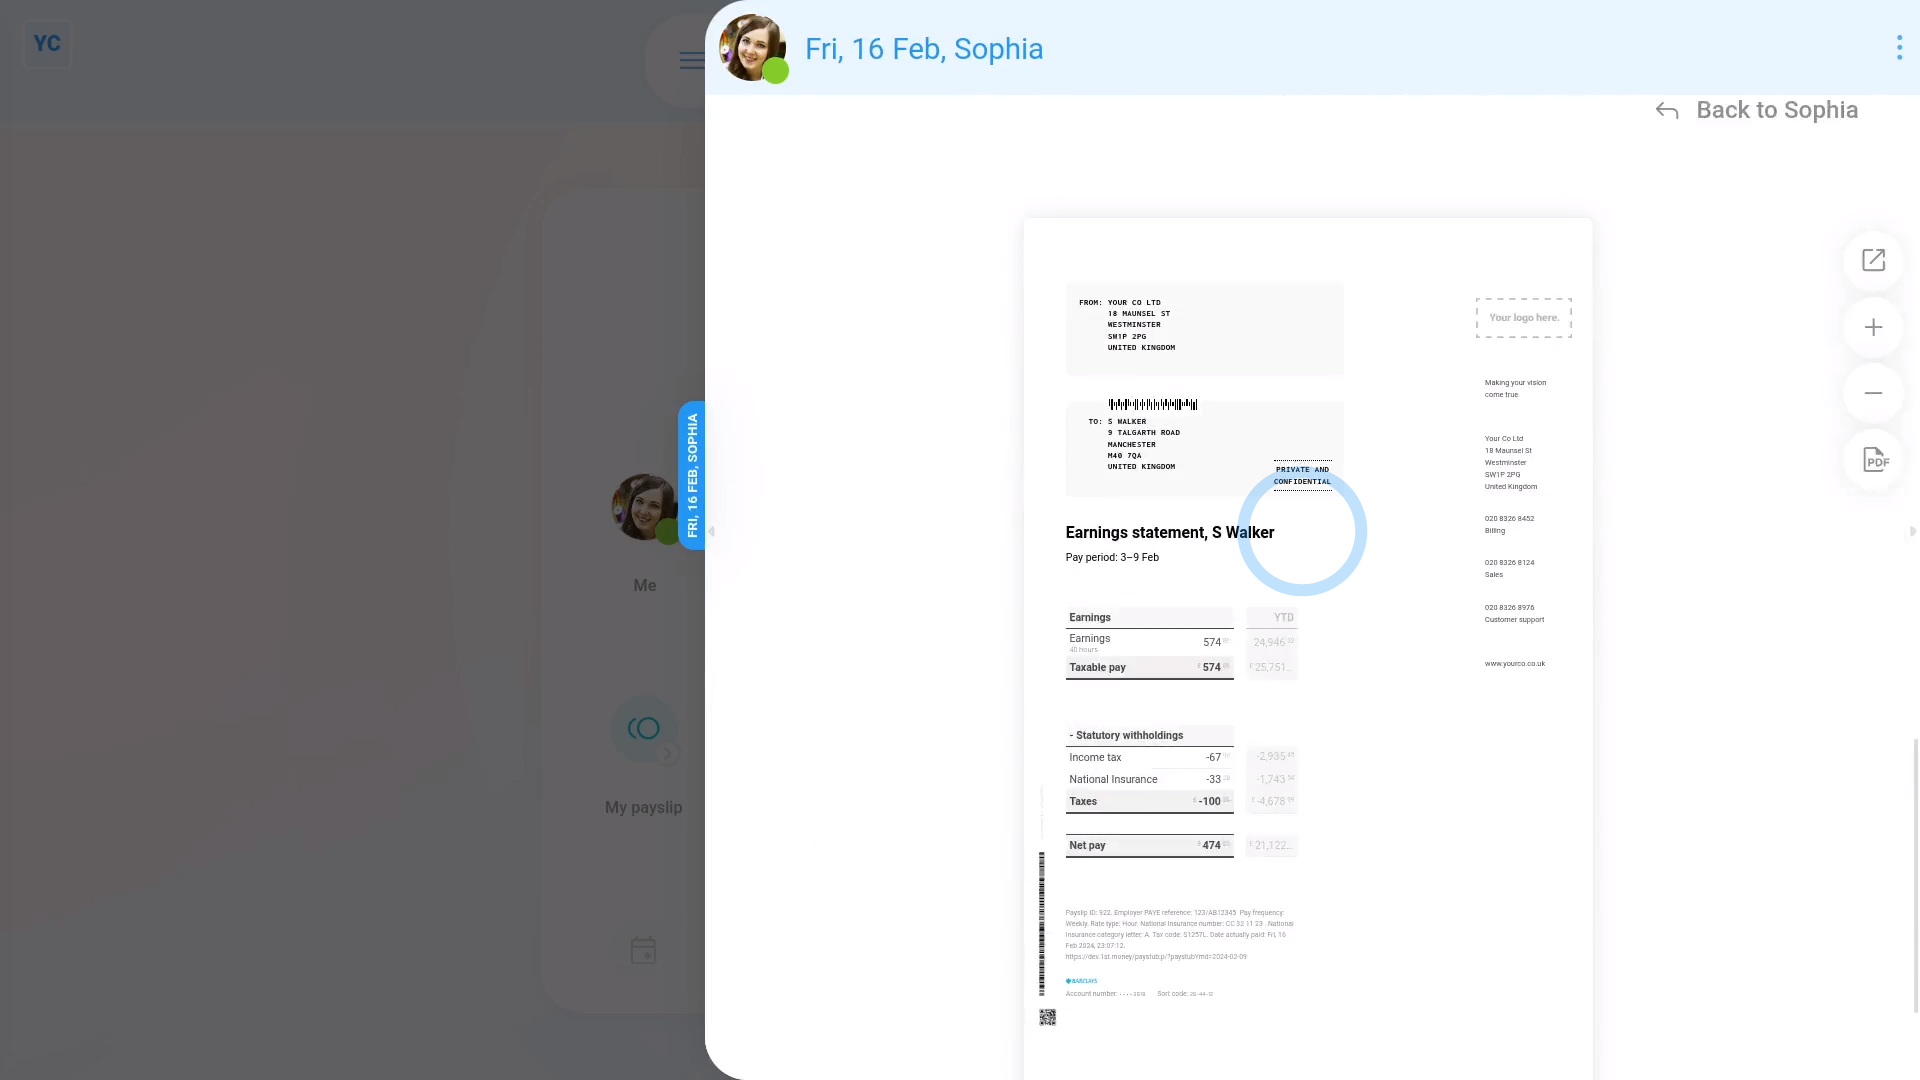
As a regular person, without any special permissions, to see your own payslips:
- First, from your home screen, tap: My payslip
- In many cases, your current payslip may not be due to be filed yet.
- If it's not filed, you'll see the "Not filed & paid yet" message.
- To skip back a payslip to the one that's been previously filed, tap: Previous payslip
- And when you scroll to the bottom, you'll see a preview of your payslip PDF.
- And back to the top of the page, you'll see Download PDF, which you can tap to download a PDF of your payslip.
- To see a list of all your filed payslips:
Go back on your home screen, and tap: Me - Then tap: "Pay", then "Payslips history"
- And finally, tap any of the payslips to see it.
You're now seeing the login of a person with "Full payroll admin" permissions.
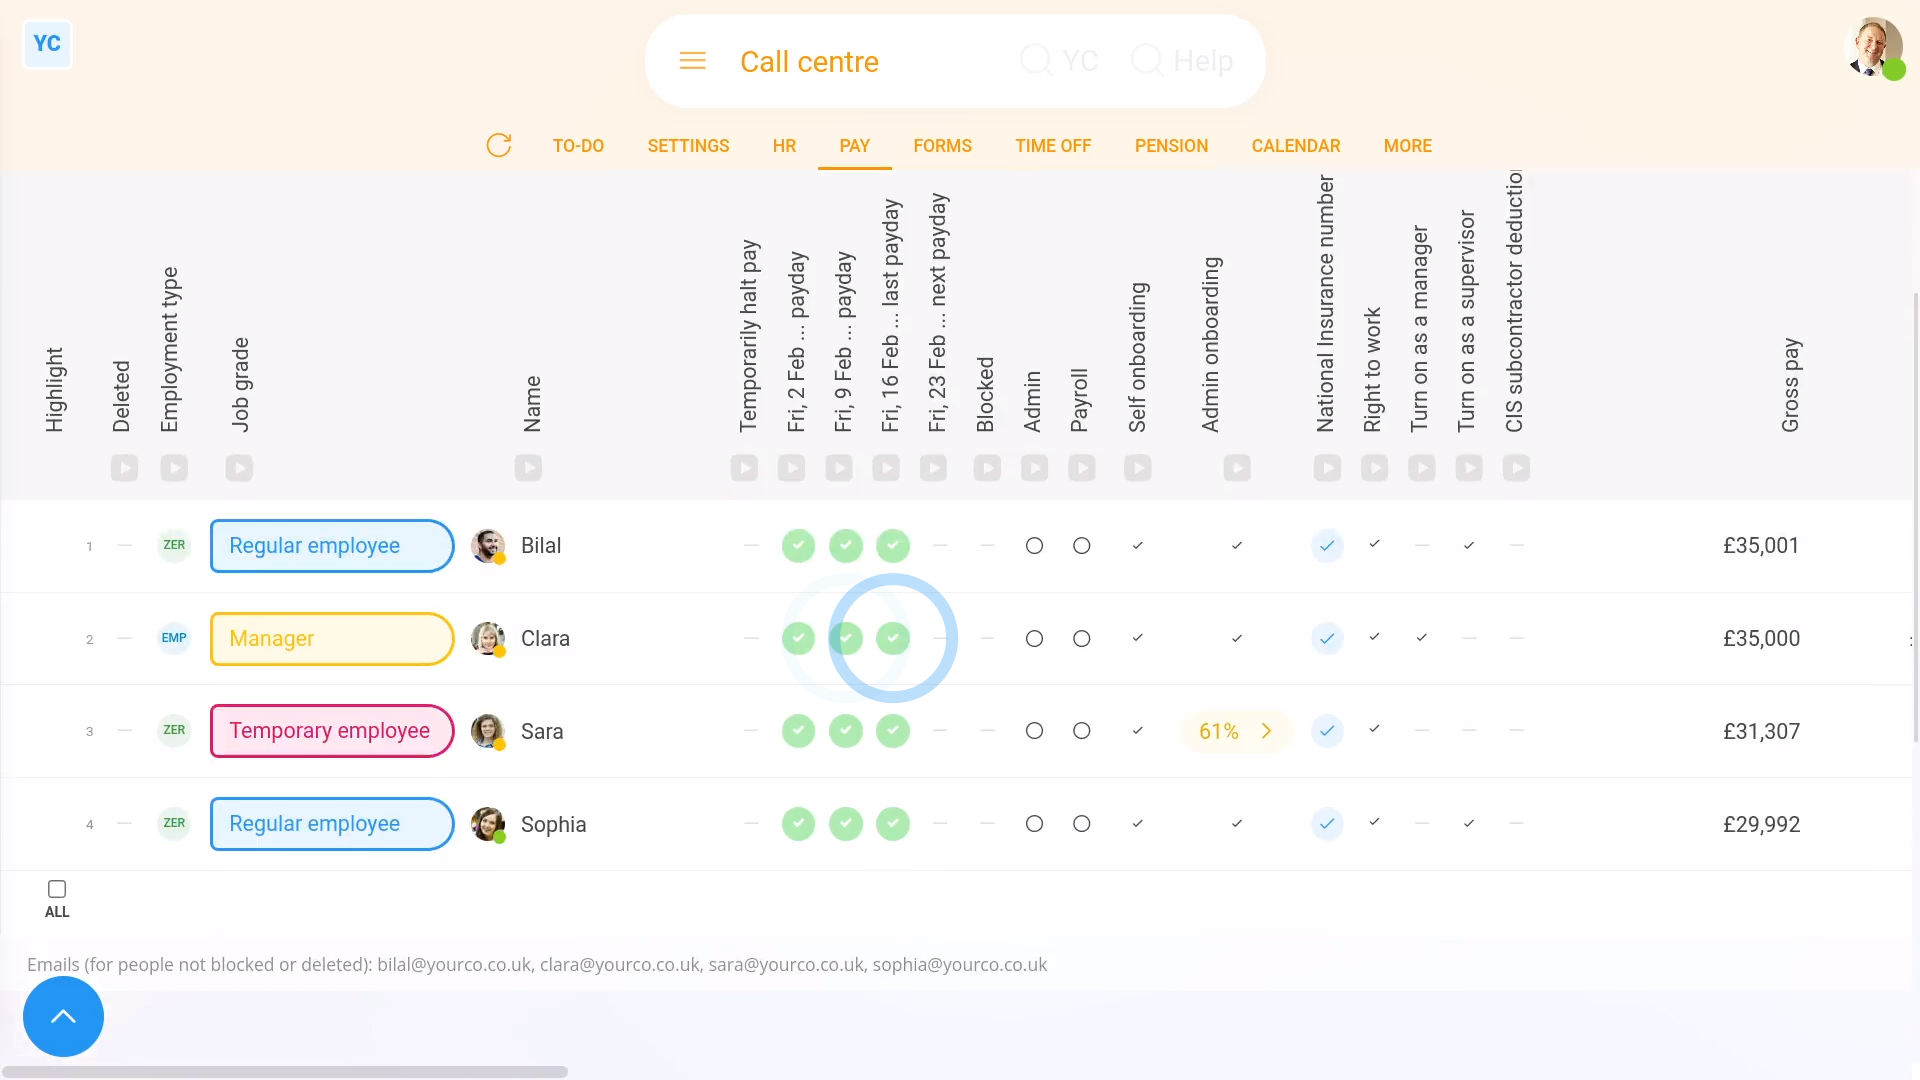
To see other people's payslips, if you've got "Full payroll admin" permissions:
- First, select the pay batch on: "Menu", then "Pay batches"
- Then tap: "Pay", then "People"
- On the "People" report, each green circle represents a filed payslip.
- Tap on them to see that person's filed payslip for that date.
- Where there's no green circle, then that pay period's payslip hasn't been filed yet.
- If you tap where a green circle's missing, you'll see that person's un-filed payslip for that date.
- If there's a warning that's blocking the payslip from being filed, you'll see any warnings near the top.
- If there's no warnings, then to file it now, scroll down and tap: Go to "Pay now" report
- The person's payslip is automatically selected, so to file it tap File & pay, and then: Yes ... file it
- It usually takes 15 to 20 seconds for HMRC to finish processing the payslips and send back confirmation that it's been received.
- Once it's been filed successfully, you'll see a green tick beside the payslips that you've filed.
- Then back on the "People" report, tap the "Reload tab" button: (at the top), to update the newly filed green circles.
- And finally, you'll now see the recently filed payslips are now also marked with a green circle, meaning it's been filed and confirmed by HMRC.
Keep in mind that:
- All regular people, including those without any special permissions, can always see their own filed payslips.
- However, only people with at least "View payroll admin" permissions can see the payslips of other people.
- To see the people in your org who've got "Full payroll admin" permissions, tap: "Menu", then "List payroll admins"
And that's it! That's everything you need to know about who can see your payslips and how to open them!
Schedules
1. What types of pay schedules are there?
 3:07
3:07
"What types of pay schedules are there?"
Pay schedules set when, and how often your pay gets paid.
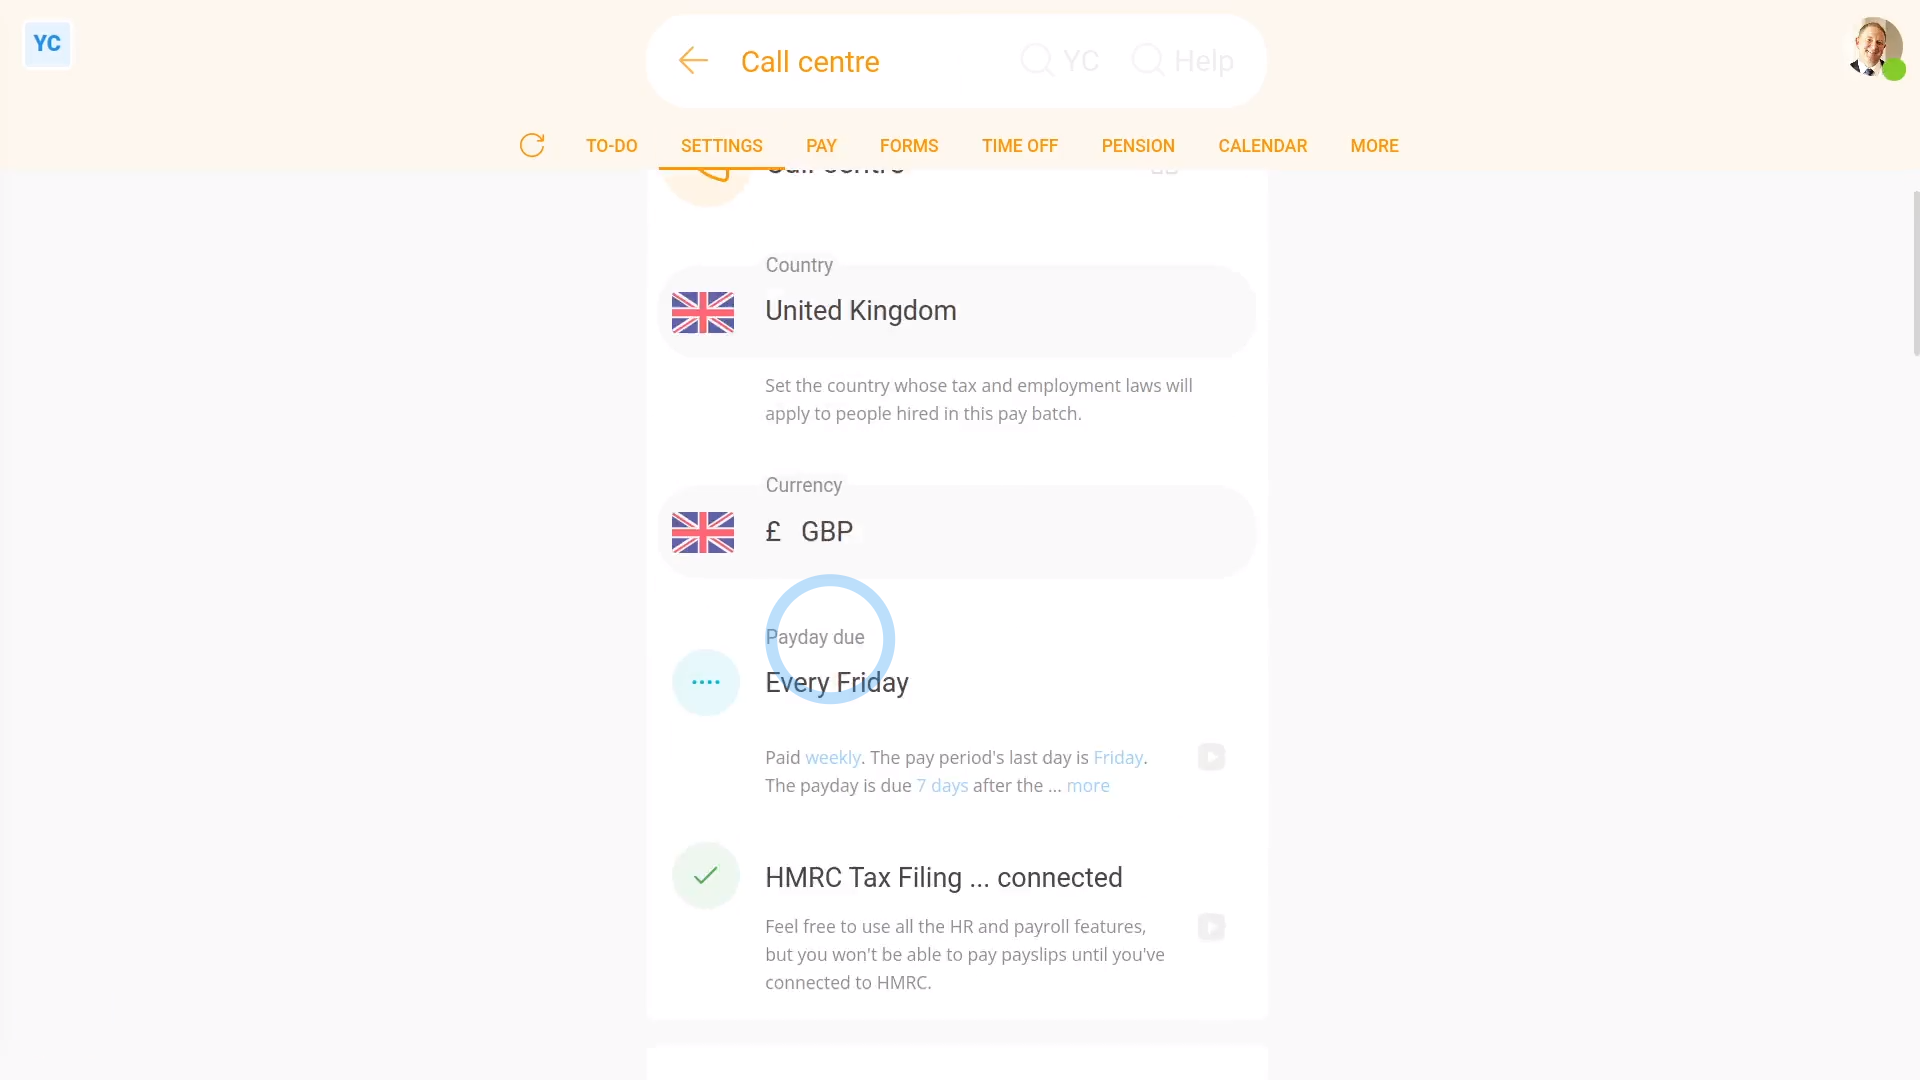
To see a pay batch's types of pay schedules:
- First, select the pay batch on: "Menu", then "Pay batches"
- Then tap: "Settings", then "Pay batch settings"
- Then beside "Payday due", tap the "Edit" button:
- And finally, tap: "Pay period recurs"
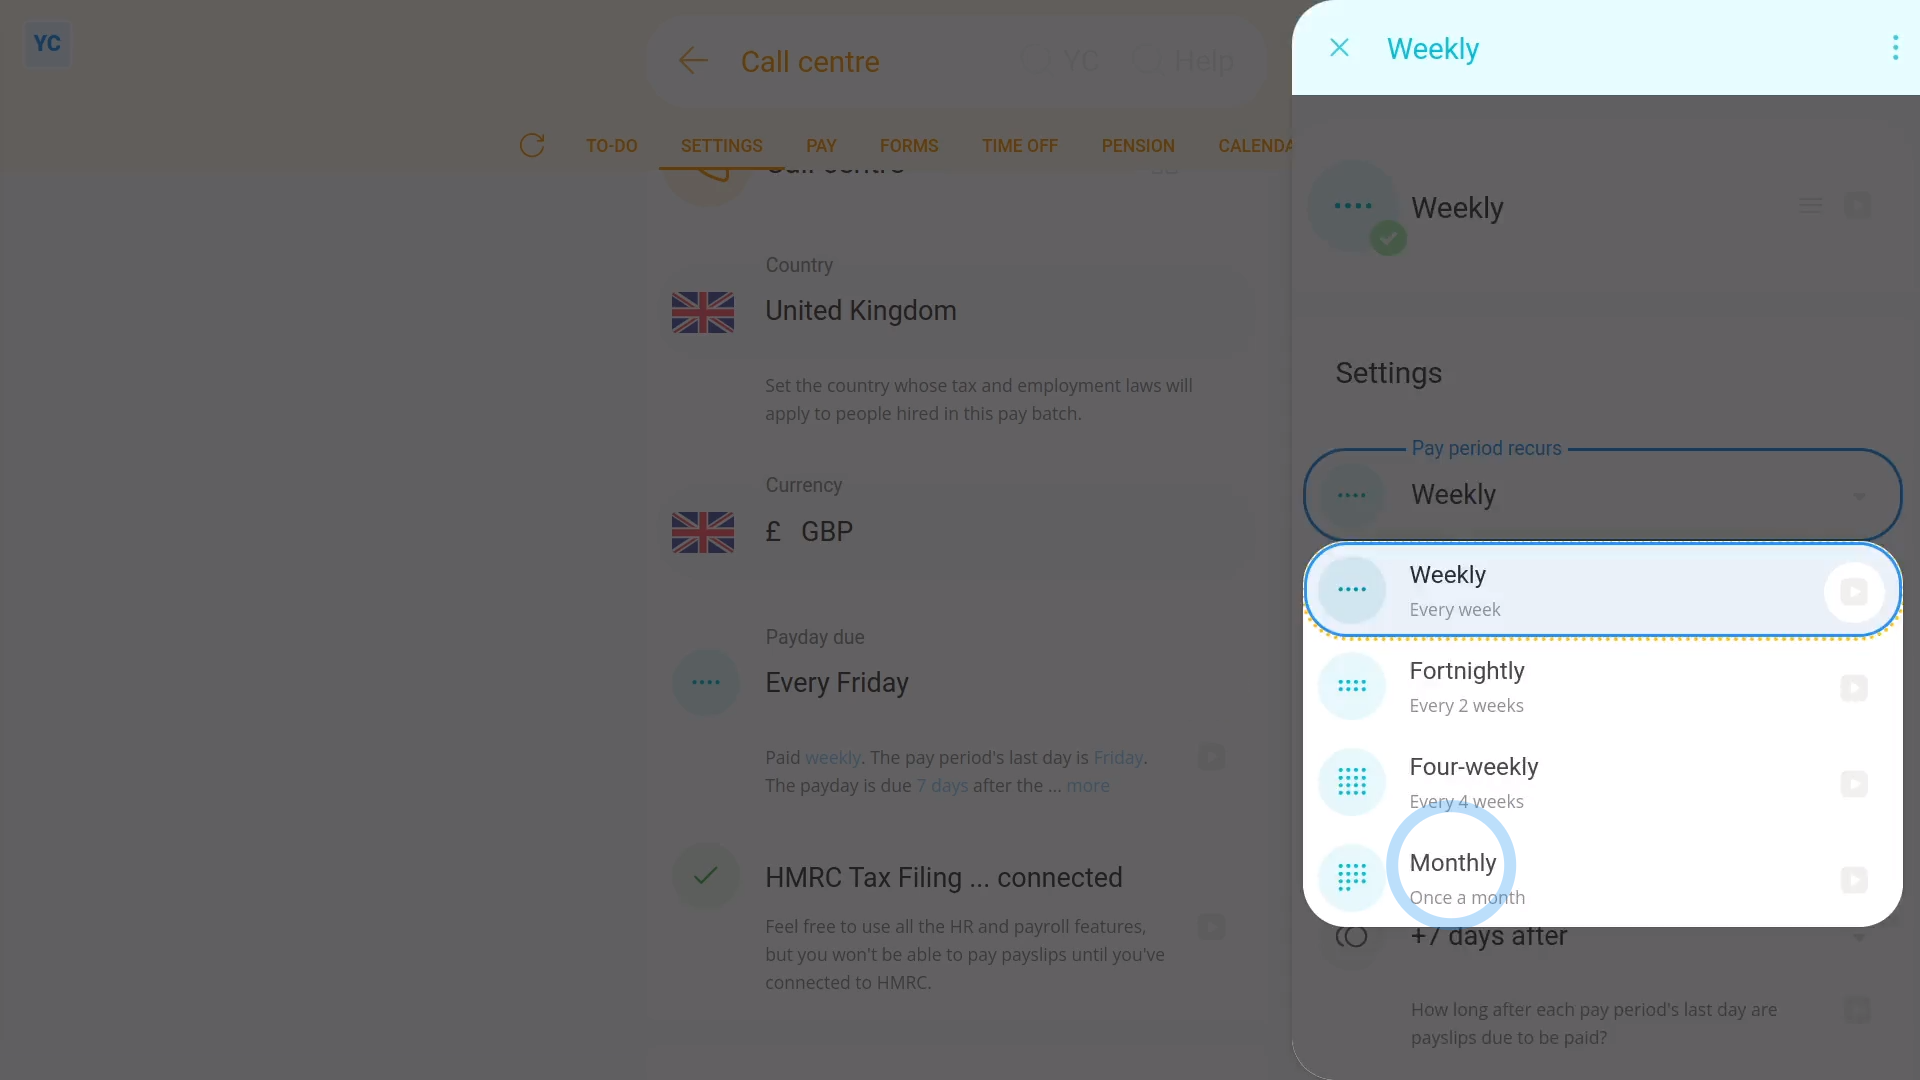
There's five types of pay schedules:
- Weekly.
- Fortnightly.
- Semi-monthly.
- Monthly.
- And once only.
Weekly

Weekly pay schedules:
- Is when your people are paid on the same day of every week.
- For example, payday could be: "every Friday"
- You're free to select any day of the week as your payday.
- Weekly is popular because people remember day-of-week payday routines.
Fortnightly

Fortnightly pay schedules:
- Is when each pay period lasts exactly two weeks.
- For example, payday could be: "every second Friday"
- Fortnightly is popular because you still get a day-of-week payday routine, but with half the effort of weekly.
Four-weekly

Four-weekly pay schedules:
- Is when each pay period lasts exactly four weeks.
- For example, payday could be: "every fourth Friday"
- Four-weekly is popular because you also get a day-of-week payday routine, but with four times less effort, compared to weekly.
Semi-monthly

Semi-monthly pay schedules:
- Is when you've got two pay periods a month, each ending on the days of your choice.
- For example, payday could be: "the first and 15th of every month"
- You can pick any two ending days.
- Semi-monthly is popular because you've got the assurance of exactly two paydays a month.
Monthly

Monthly pay schedules:
- Is when payday is on the same day of each month.
- For example, payday could be: "the 1st of every month"
- You're free to pick any day in the month that you'd like as your payday.
- Monthly is popular because many people's bills, like rent, gas, and electricity, are also monthly.
Once only

Once only pay schedules:
- Are only useful when your org is switching from one pay period type to another.
- For example, switching from "Monthly" to "Weekly", and you need to pay your people for the few days gap in-between.
- "Once only" pay periods are very rarely used.
To learn more:
- About "Once only" pay schedules, watch the video on: Bridging from one pay schedule to another
You may notice:
- That sometimes, some of the pay schedules may not show in the list, for your country.
- If ever a pay schedule isn't available for your country, it's usually because it's not recommended, based on local tax rules.
And that's it! That's everything you need to know about pay schedule types you can pick from!
2. How do I change how often my people get paid?
 1:35
1:35
"How do I change how often my people get paid?"
Changing how often people get paid, means changing an existing pay batch's pay schedule.
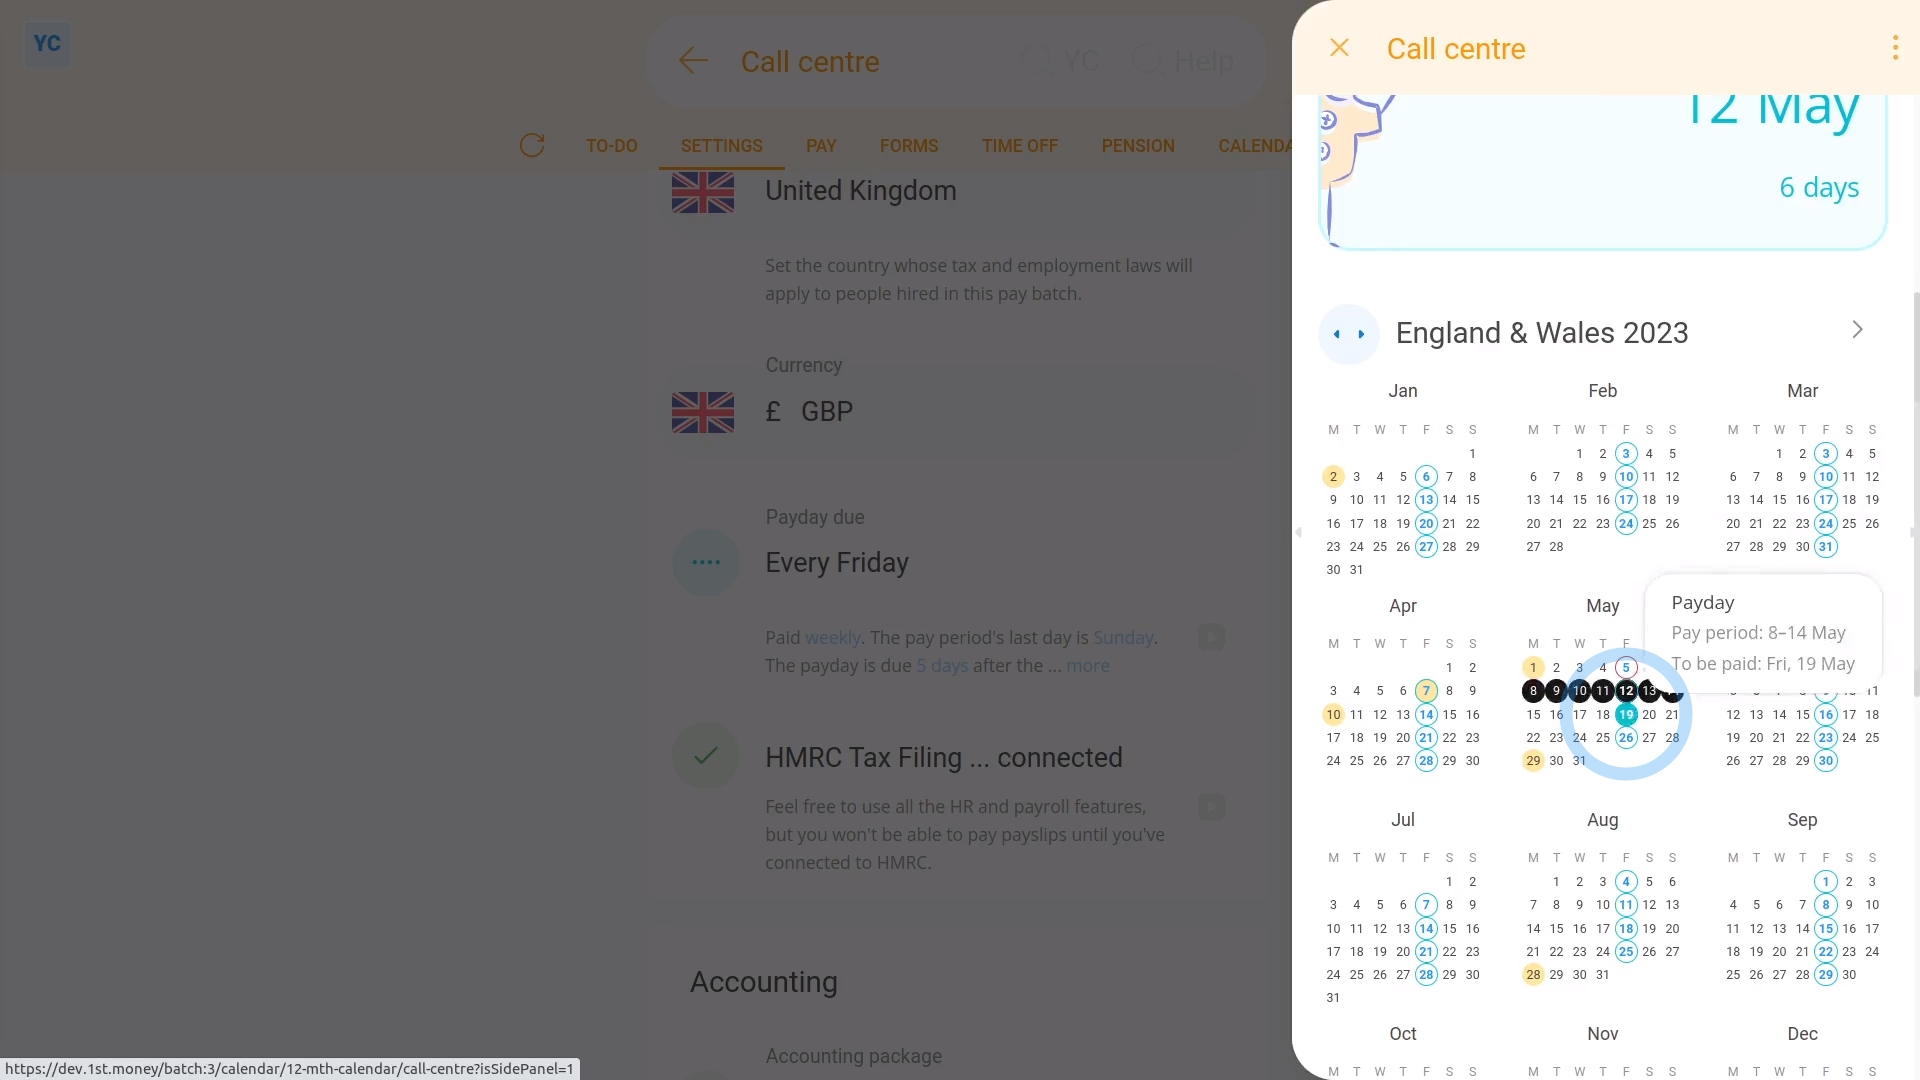
To change an existing pay batch's pay schedule:
- First, select the pay batch on: "Menu", then "Pay batches"
- Then tap: "Settings", then "Pay batch settings"
- Then beside "Payday due", tap the "Edit" button:
- And tap: "Pay period recurs"
- Next, change it to how often you want your people to be paid.
- And set the day of the week, or date of the month.
- Next, set: "Payday due"
- Then tap: Save
- To see your pay schedule changes, tap: "Calendar", then "12-month calendar"
- And finally, when you hover your mouse over a blue payday circle, you'll see black circles marking the days covered by that payday's pay period.
Keep in mind that:
- Once the pay schedule has some payslips that've been filed, a "Schedule locked" message shows, and it can't be changed anymore.
- However, up until payslips are filed, you can come back and make changes as many times as you want.
To learn more:
- About changing payday settings, when you've got a "Schedule locked" message, watch the video on: Bridging from one pay schedule to another
And that's it! That's all you need to do to change an existing pay batch's pay schedule!
3. How do I set which dates each pay period starts and ends on?
 5:21
5:21
"How do I set which dates each pay period starts and ends on?"
Regardless of how often you pay your people, you'll need to set which day the pay period is to end on. Including for pay periods that're: weekly, fortnightly, semi-monthly, four-weekly, and monthly.
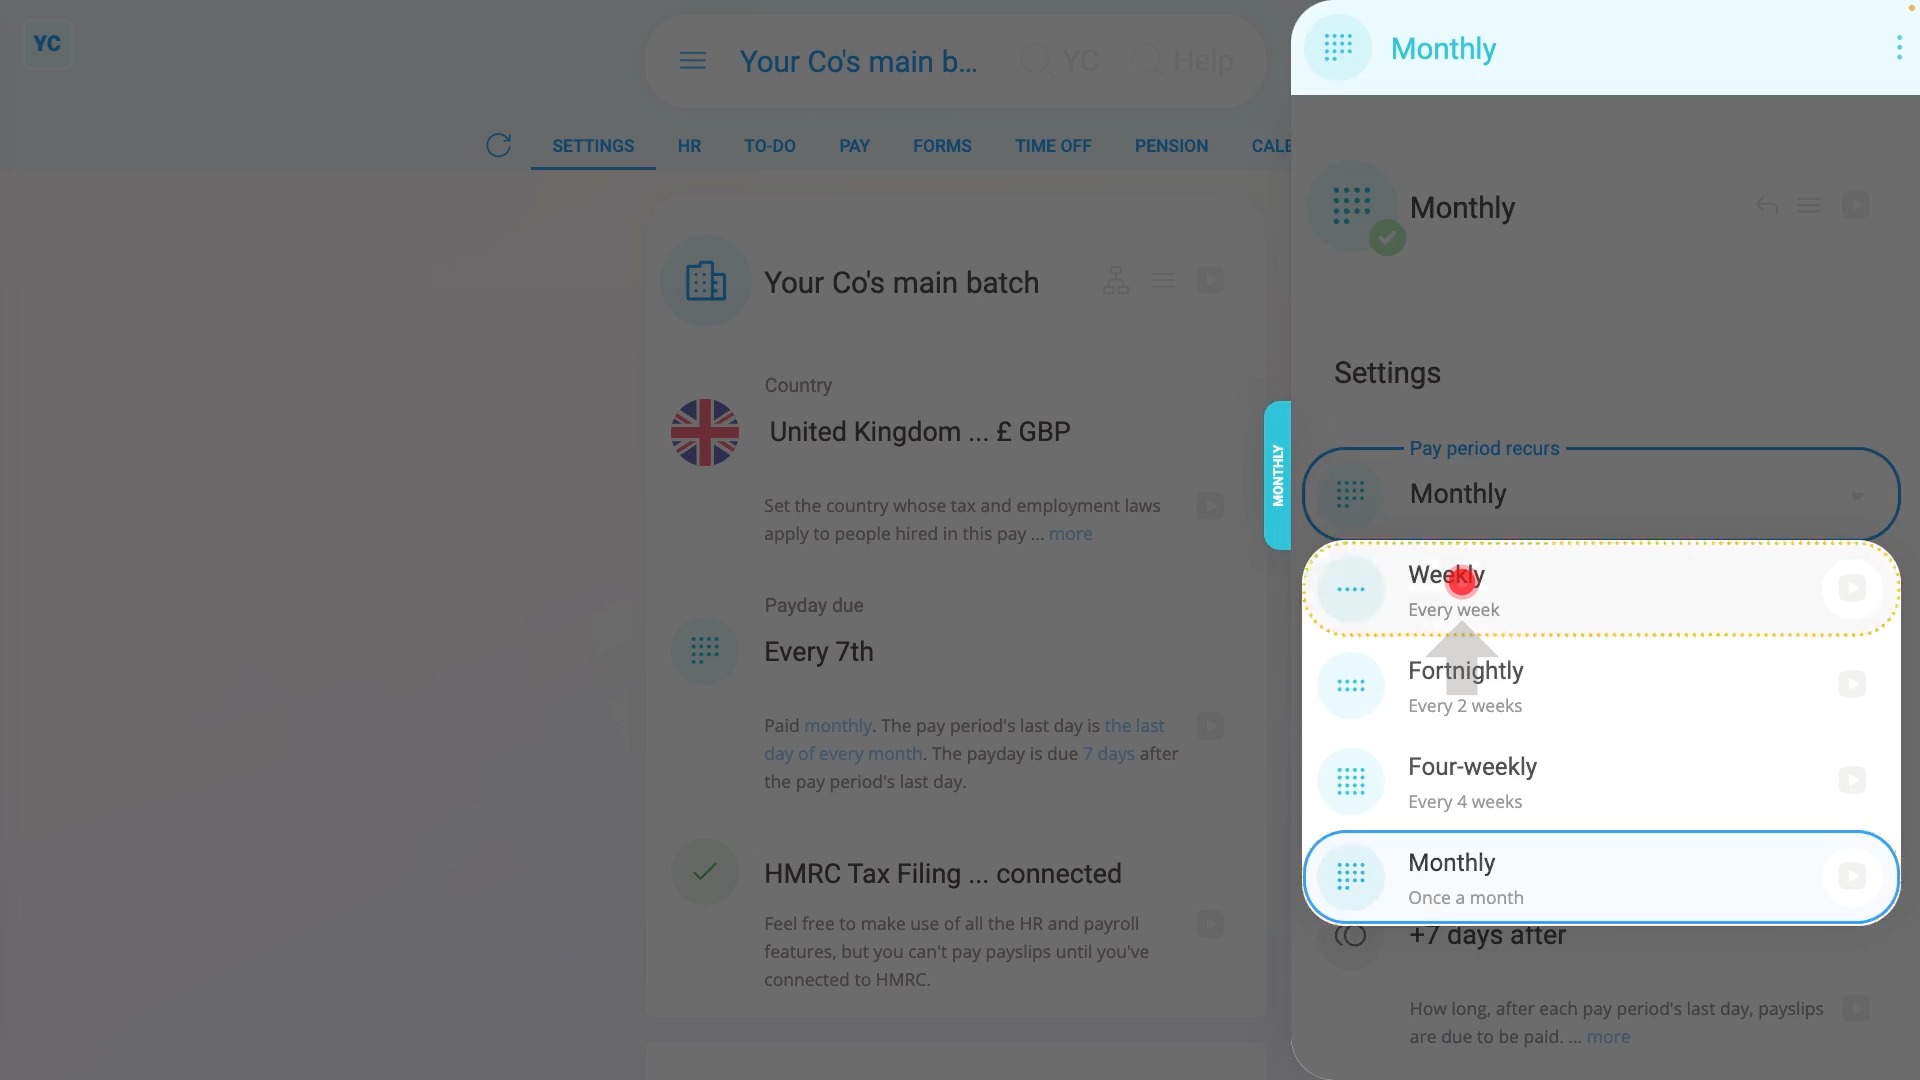
To set which day a weekly pay period is to end:
- First, select the pay batch on: "Menu", then "Pay batches"
- Then on the "Settings" tab, tap: "Payday due"
- Once it slides out on the right, tap: "Pay period recurs"
- And select: "Weekly"
- By default, the "Weekly" pay period is set with "Every Friday" as the: "Pay period's last day"
- Tap "Pay period's last day" and set it to the day of the week you'd like your weekly pay periods to end on.
- Then tap: Save
- And finally, you'll see that the pay periods are now weekly, and end on the day you selected.
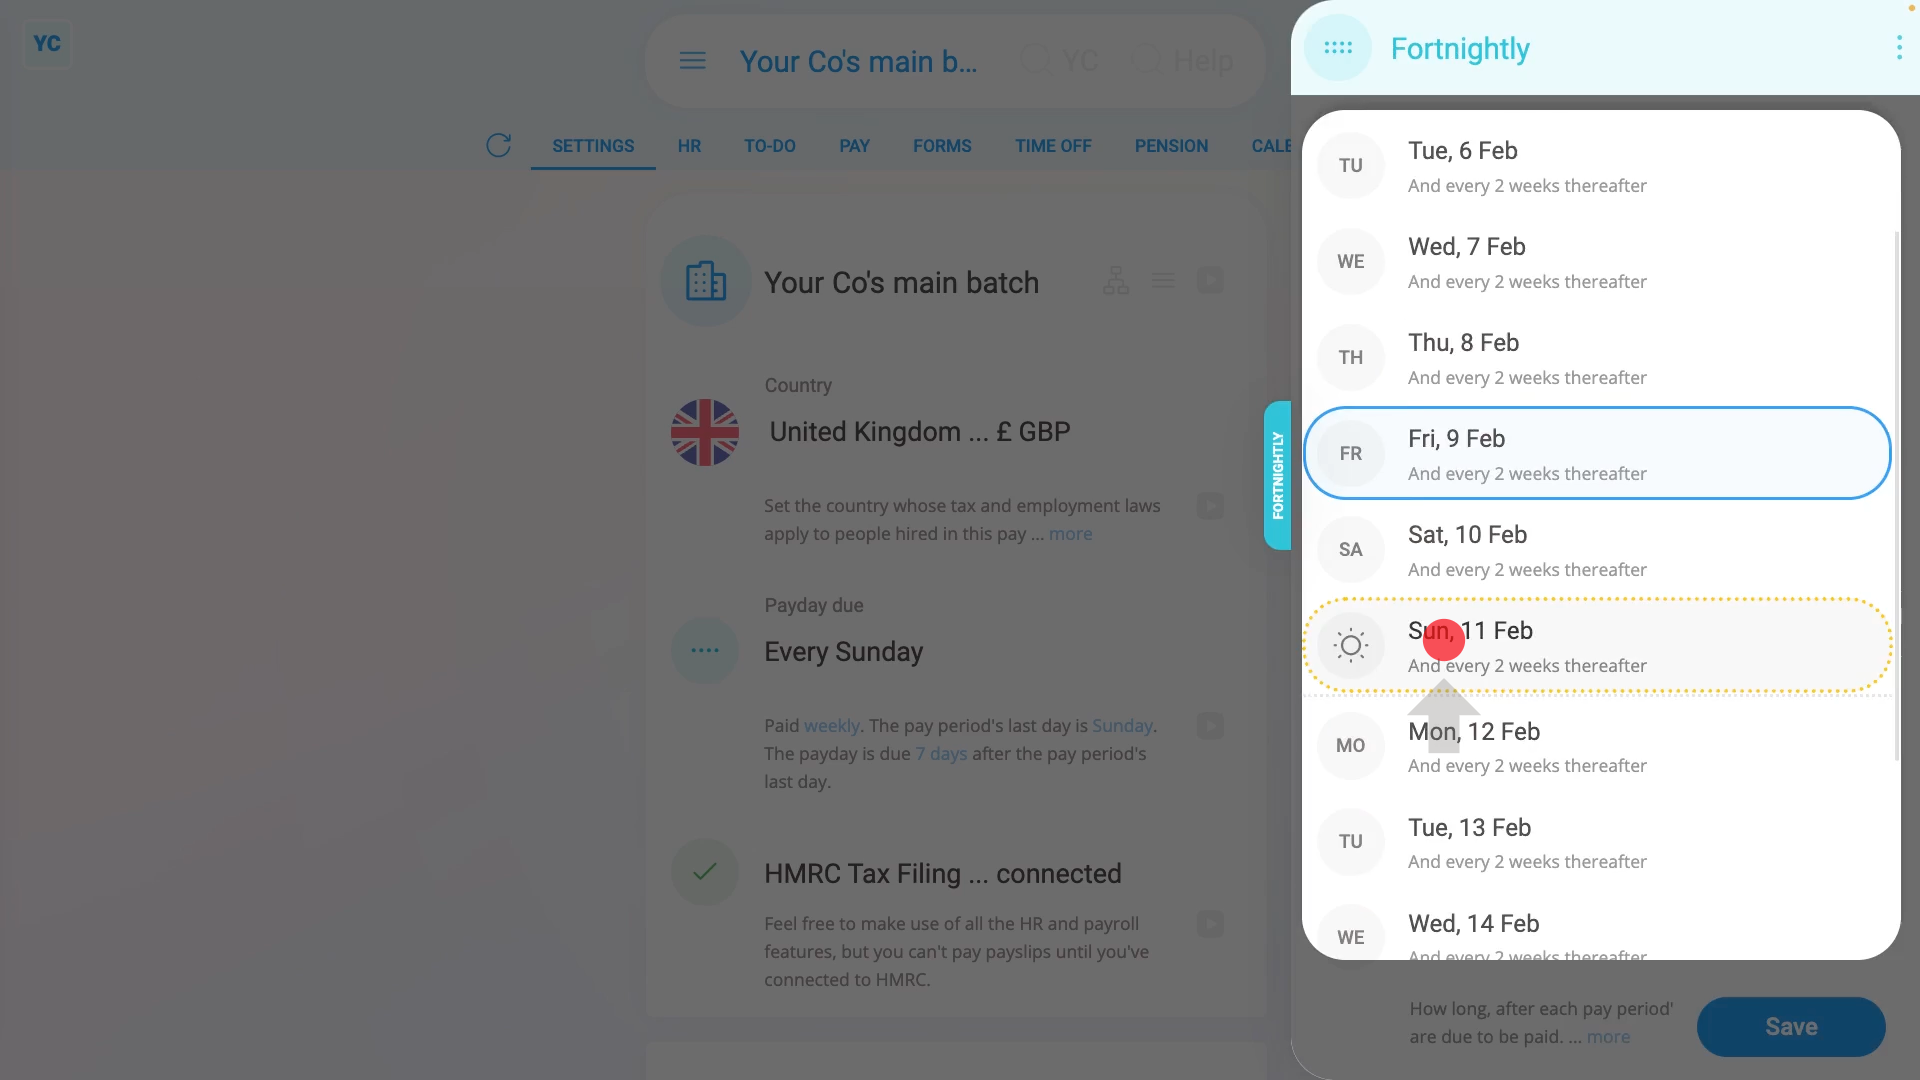
To set which day a fortnightly pay period is to end:
- First, select the pay batch on: "Menu", then "Pay batches"
- Then on the "Settings" tab, tap: "Payday due"
- Once it slides out on the right, tap: "Pay period recurs"
- And select: "Fortnightly"
- By default, the "Fortnightly" pay period is set with a "Friday" as the: "Pay period's last day"
- Tap "Pay period's last day" and set it to the day you'd like your next fortnightly pay period to end on, repeating every two weeks thereafter.
- Then tap: Save
- And finally, you'll see that the pay periods are now fortnightly, and repeat every two weeks from the day you selected.
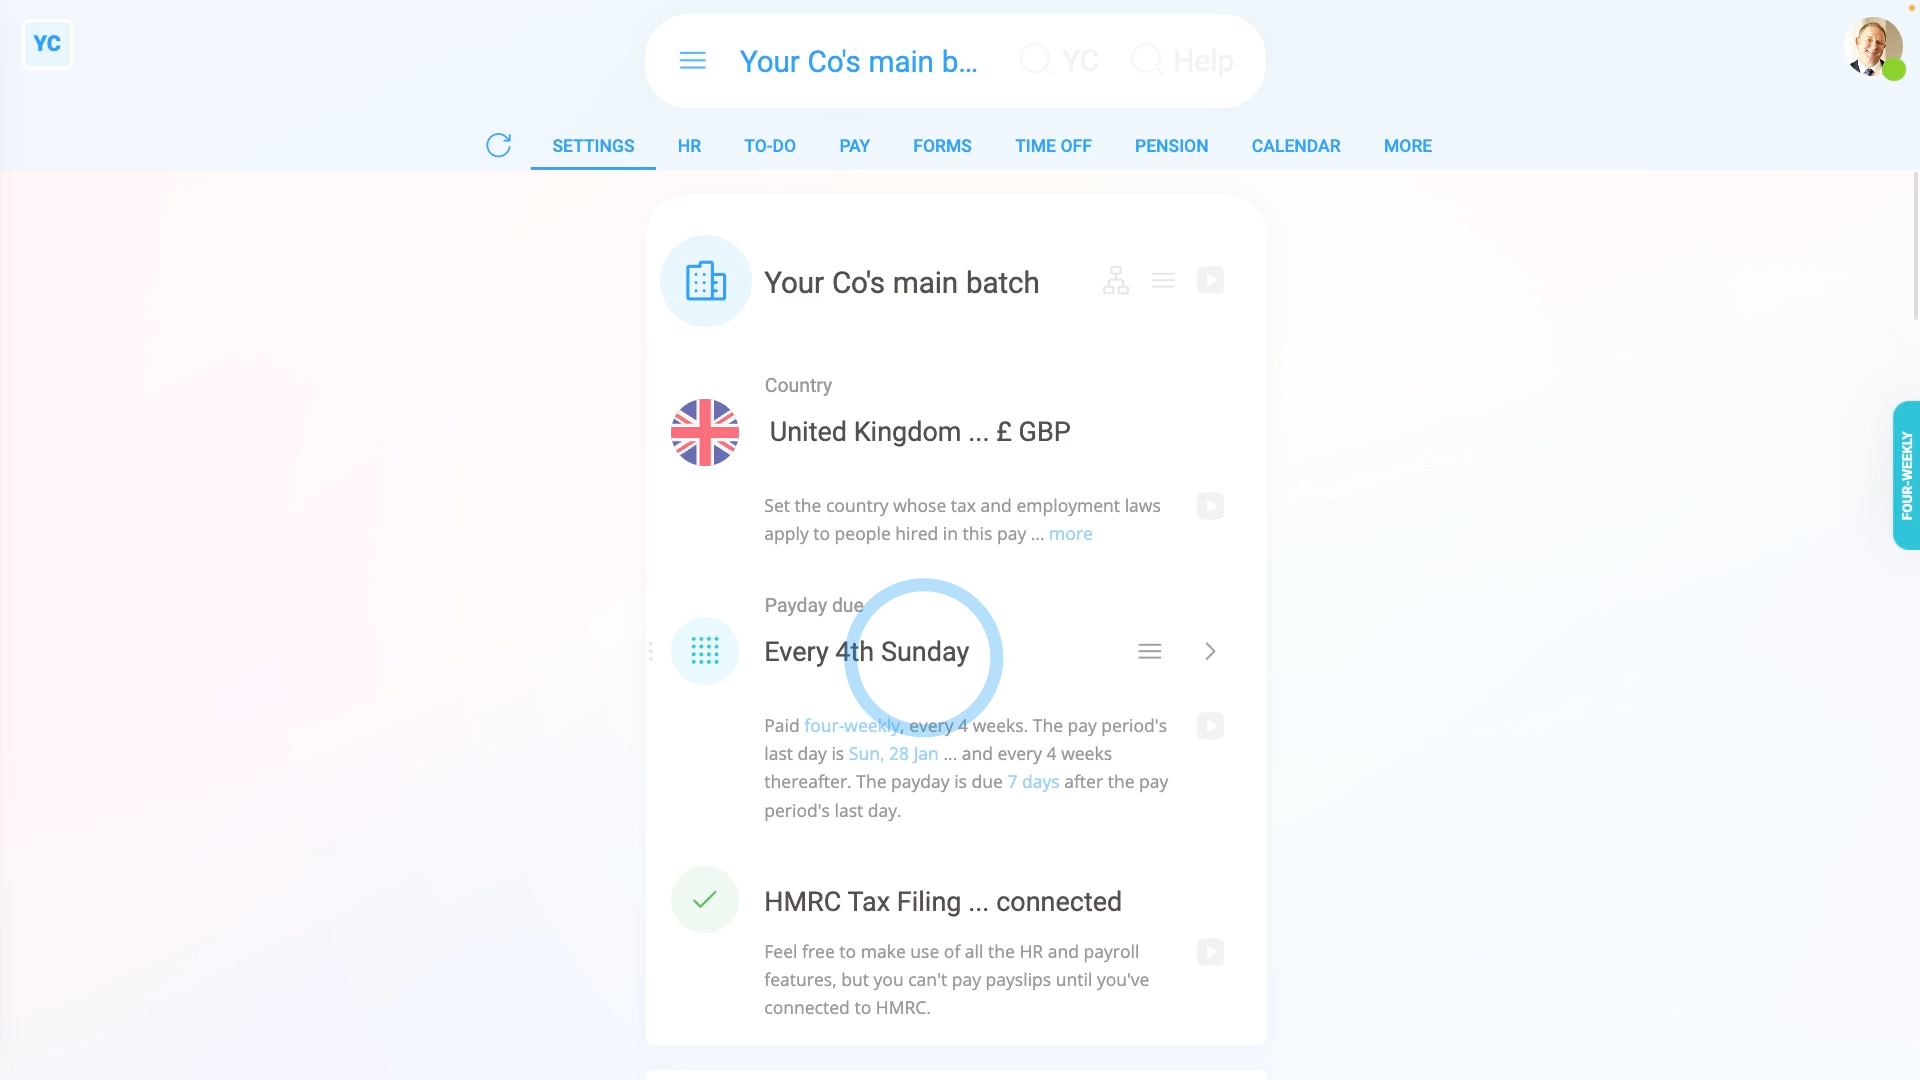
To set which day a four-weekly pay period is to end:
- First, select the pay batch on: "Menu", then "Pay batches"
- Then on the "Settings" tab, tap: "Payday due"
- Once it slides out on the right, tap: "Pay period recurs"
- And select: "Four-weekly"
- By default, the "Four-weekly" pay period is set with a "Friday" as the: "Pay period's last day"
- Tap "Pay period's last day" and set it to the day of the week you'd like your next four-weekly pay period to end on, repeating every four weeks thereafter.
- Then tap: Save
- And finally, you'll see that the pay periods are now four-weekly, and end on the day you selected.
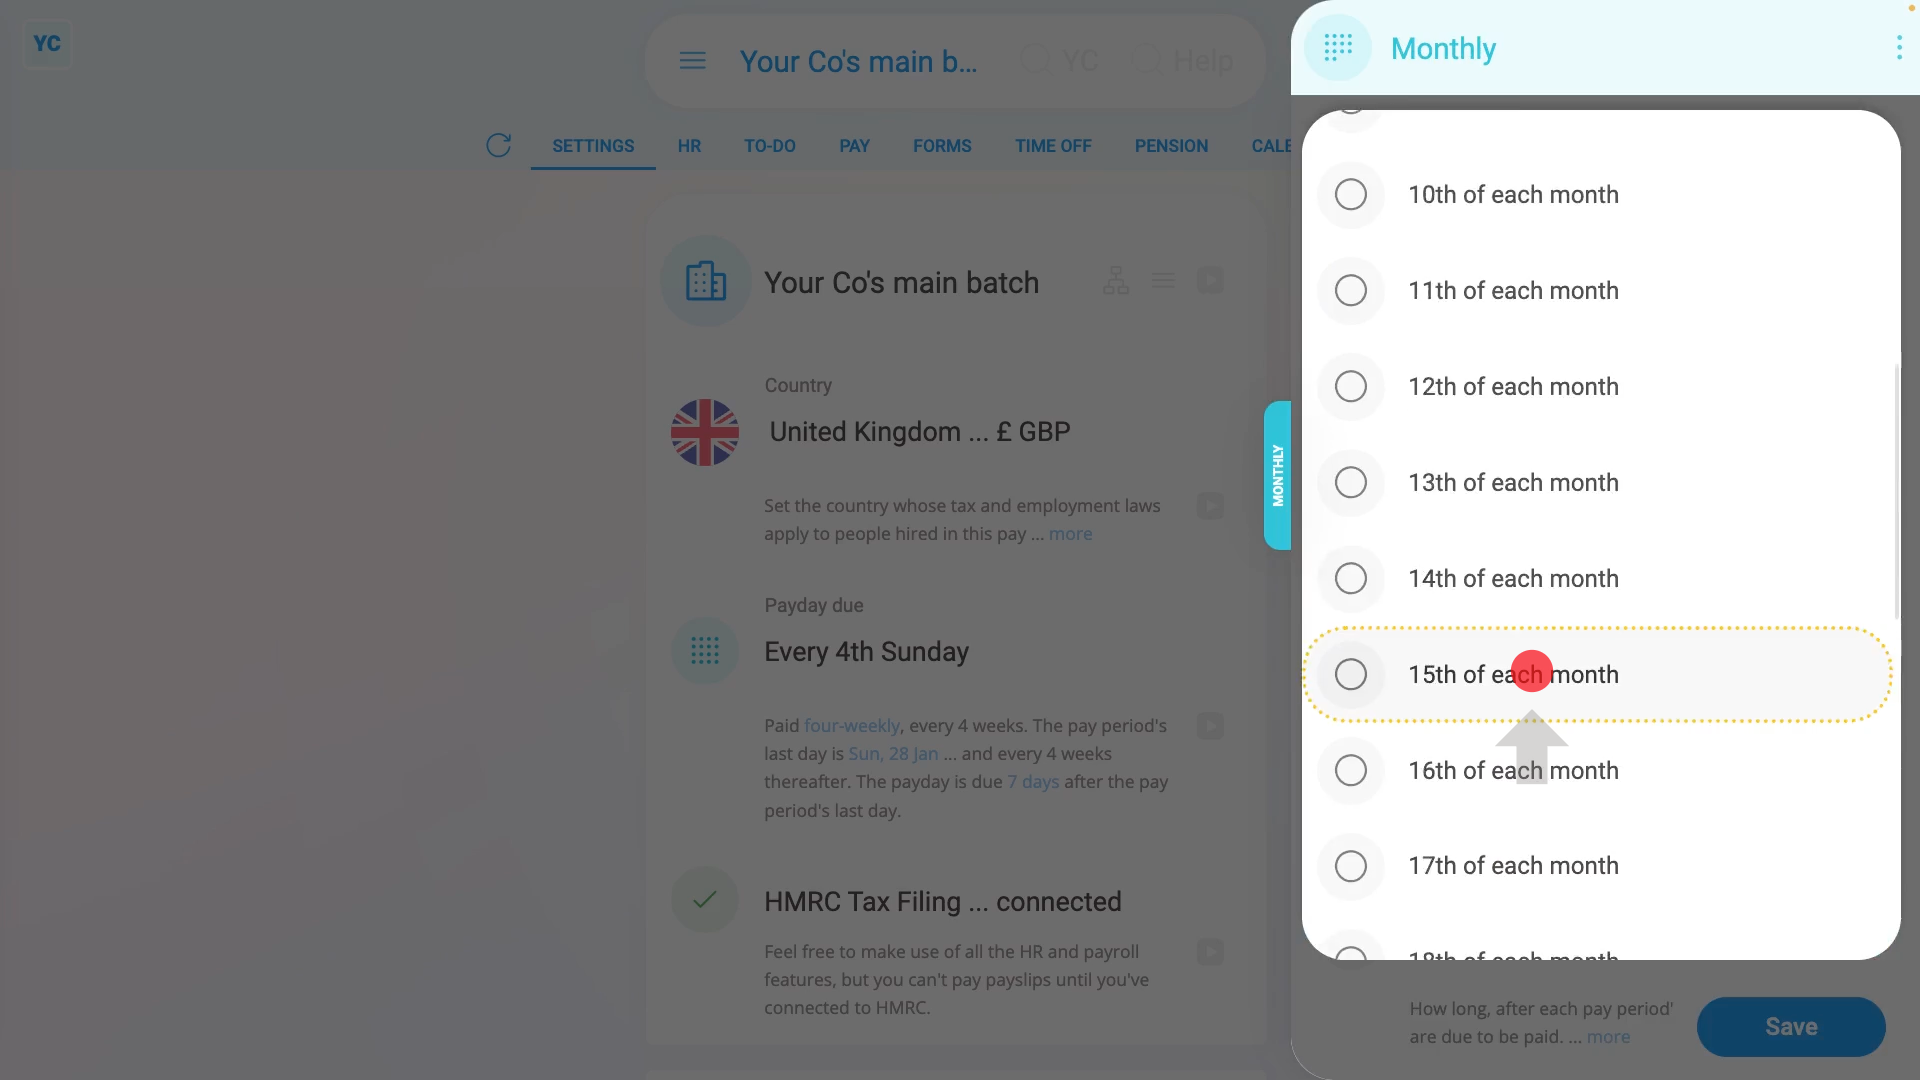
To set which date a monthly pay period is to end:
- First, select the pay batch on: "Menu", then "Pay batches"
- Then on the "Settings" tab, tap: "Payday due"
- Once it slides out on the right, tap: "Pay period recurs"
- And select: "Monthly"
- By default, the "Monthly" pay period is set with the "Last day of each month" as the: "Pay period's last day"
- Tap "Pay period's last day" and set it to the date of the month you'd like your next monthly pay period to end on.
- Then tap: Save
- And finally, you'll see that the pay periods are now monthly, and end on the date you selected.
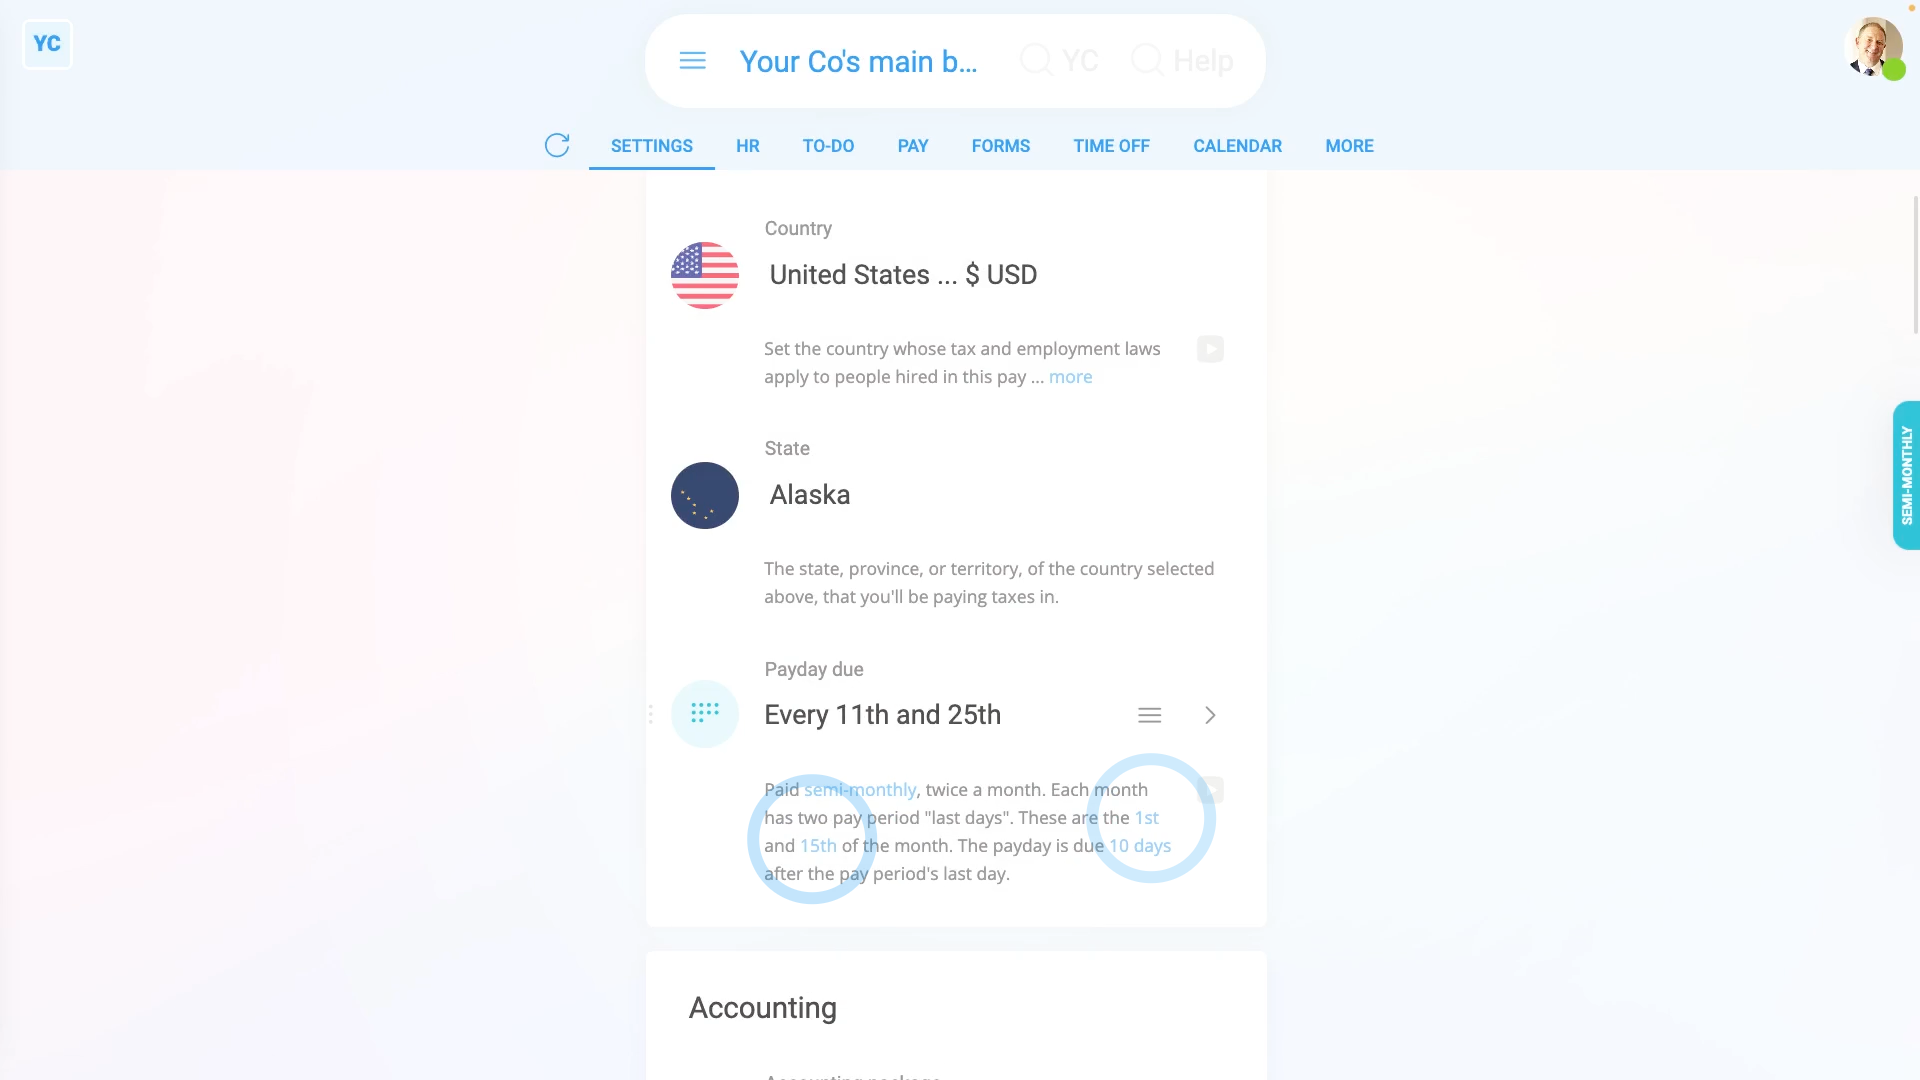
To set which days a semi-monthly pay period is to end:
- First, select the pay batch on: "Menu", then "Pay batches"
- Then on the "Settings" tab, change the country to "United States", and tap: "Payday due"
- Once it slides out on the right, tap: "Pay period recurs"
- And select: "Semi-monthly"
- By default, the "Semi-monthly" pay period is set with the "15th" and "Last" days of the month as the: "Pay period's last day"
- Tap and set the "Pay period's last day" to the two dates you'd like your semi-monthly pay periods to end on.
- Then tap: Save
- And finally, you'll see that the pay periods are now semi-monthly, and with the two dates you selected set as the pay period end dates.
You may notice:
- That sometimes, some of the pay schedules may not show in the list, for your country.
- For example, the "Four-weekly" pay period option only shows for the UK, and the "Semi-monthly" option shows for all countries except the UK.
- If ever a pay schedule isn't available for your country, it's usually because it's not recommended, based on local tax rules.
Keep in mind that:
- You can keep changing the pay period settings right up until the day you first pay people in the pay batch.
- Once you start paying people, the pay batch's schedule becomes locked and can't be changed.
- However you can still create new pay schedules, and bridge your pay batch over to the new pay period settings.
To learn more:
- About bridging your pay batch's pay period settings, watch the video on: Bridging from one pay schedule to another
And that's it! That's everything you need to know about setting which day a pay batch's pay period is to end on!
4. How do I set the delay for a pay period's last day to its payday?
 1:34
1:34
"How do I set the delay for a pay period's last day to its payday?"
The pay period is the days that people work. Payday is when the people are paid. Often, your payroll admins need a few days delay between the two.
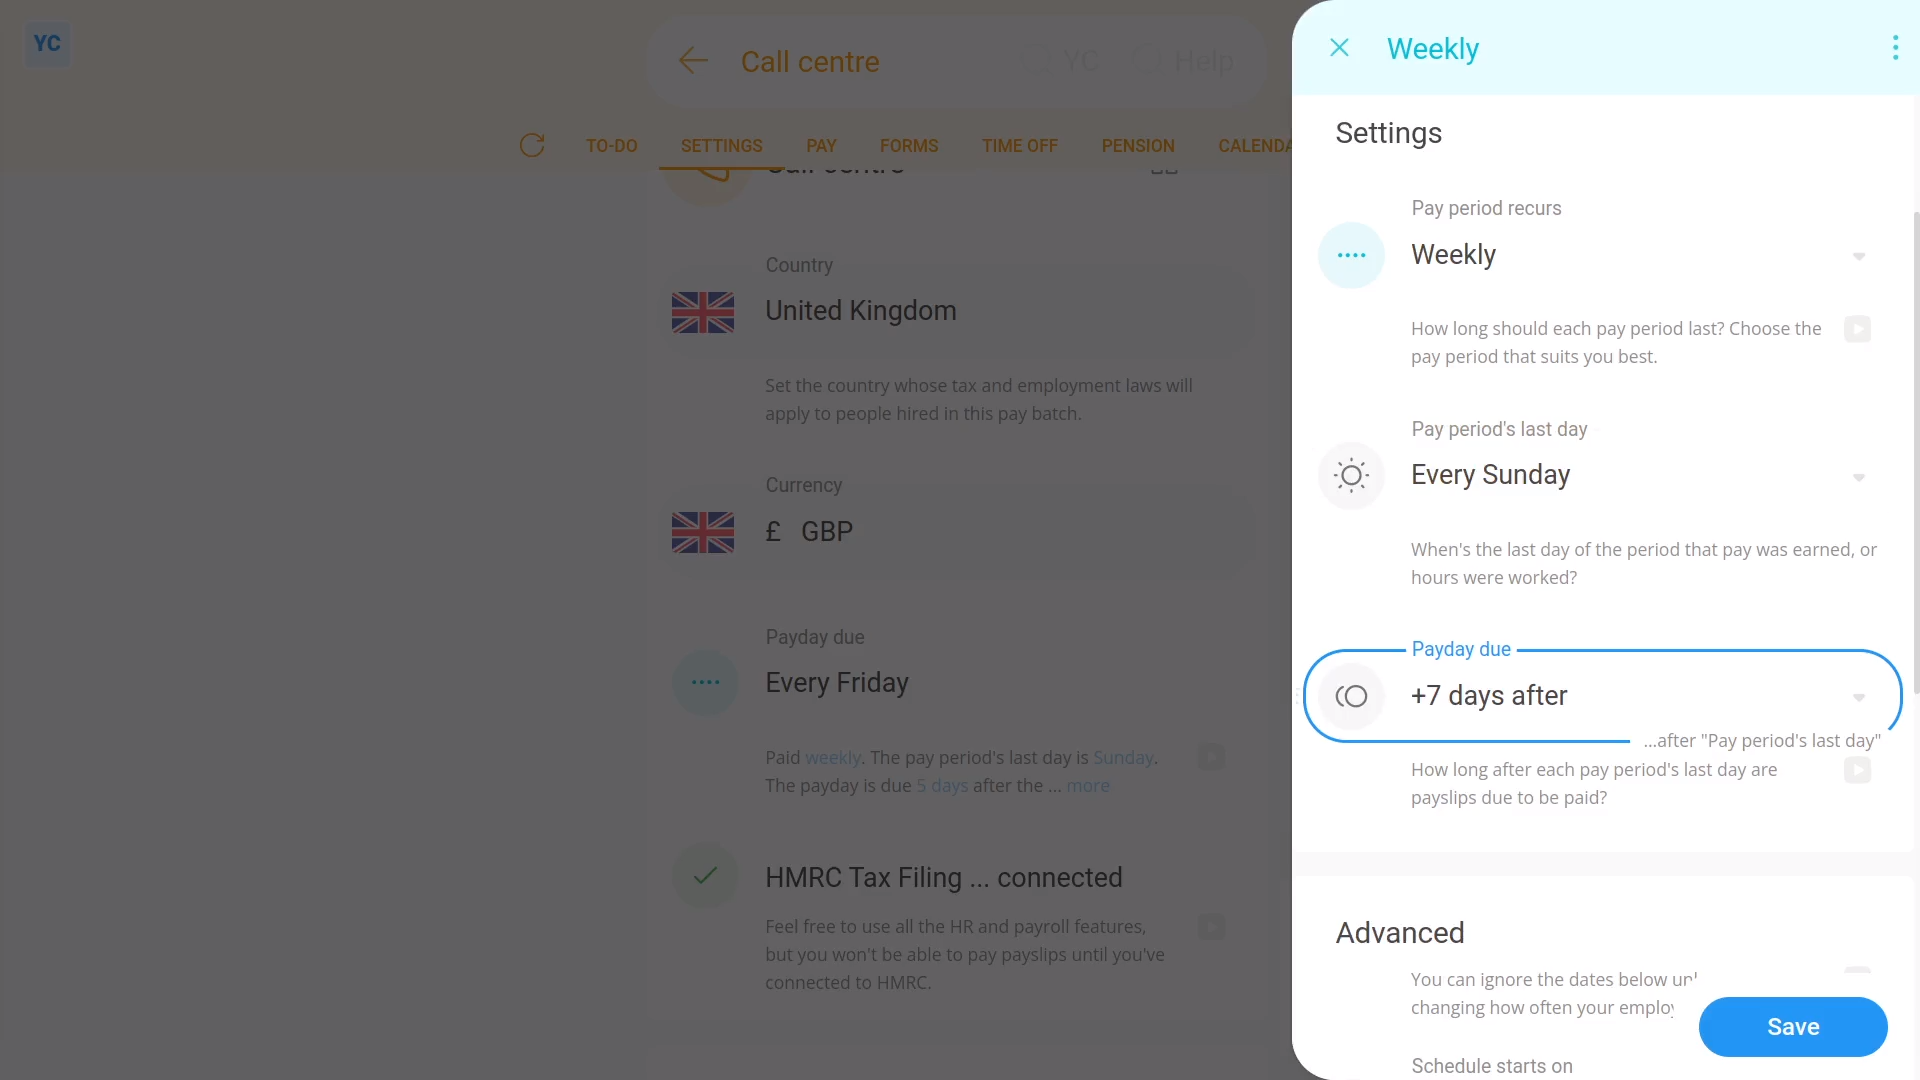
To set a delay between a pay period's last working day, and its payday:
- First, select the pay batch on: "Menu", then "Pay batches"
- Then tap: "Settings", then "Pay batch settings"
- Then beside "Payday due", tap the "Edit" button:
- And look for: "Payday due"
- Now, select how many days (after the pay period ends) until your people get paid.
- Then tap: Save
- To see your pay schedule changes, tap: "Calendar", then "12-month calendar"
- And finally, when you hover your mouse over a blue payday circle, you'll see black circles marking the days covered by that payday's pay period.
Keep in mind that:
- Payroll admins usually need at least a few days delay, to look at timesheets, and approve expense claims.
- However, in some countries, there's rules to limit the maximum number of days delay.
- Also, once the pay schedule has some payslips that've been filed, a "Schedule locked" message shows, and it can't be changed anymore.
And that's it! That's all you need to do to set a delay between a pay period's last working day, and its payday!
How do I bridge from one type of pay schedule to another?
 2:35
2:35
"How do I bridge from one type of pay schedule to another?"
Bridging closes the pay period gap that's sometimes formed when your org's switching from one pay period type to another. For example, switching from "Monthly" to: "Weekly"
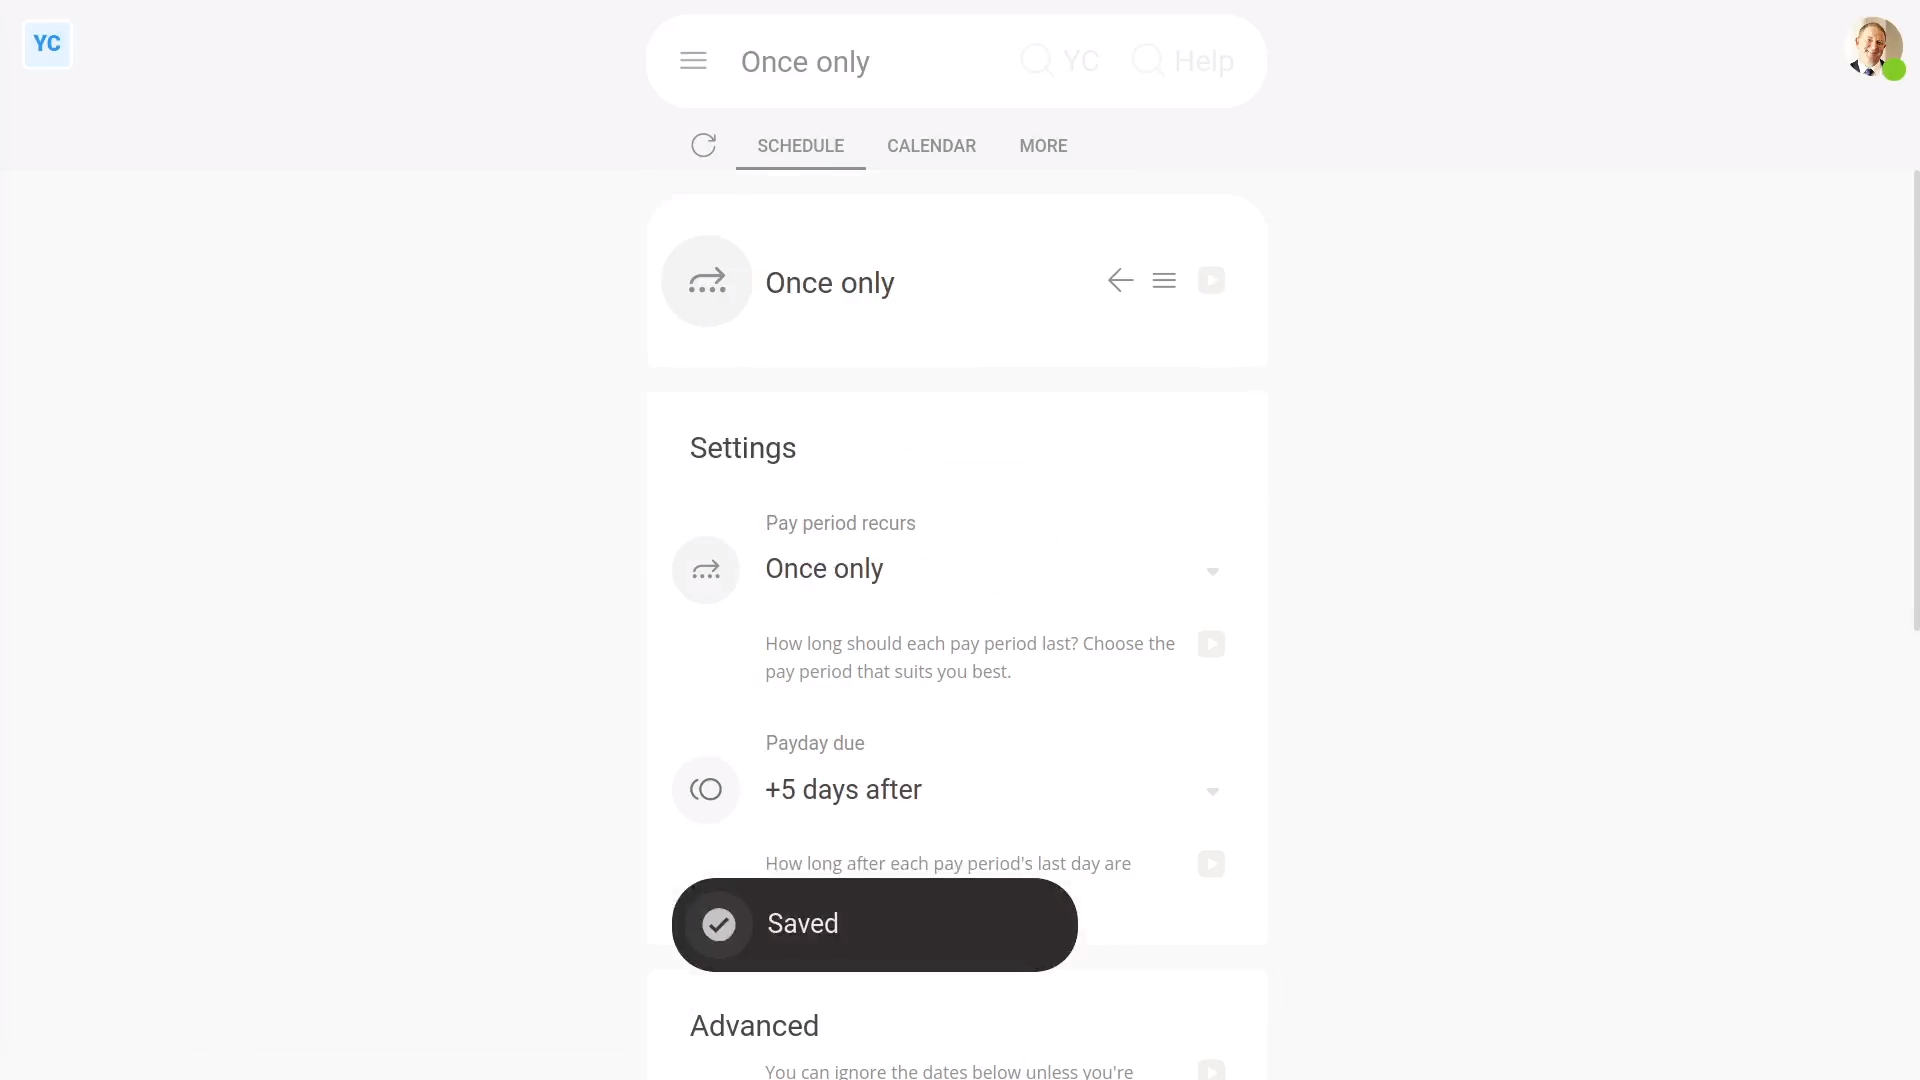
To bridge from one pay schedule to another:
- First, select the pay batch on: "Menu", then "Pay batches"
- Then tap: "Settings", then "Pay batch settings"
- Then beside "Payday due", tap the "List schedules" button:
- The first step:
Is to set an end date for the "currently active" pay schedule. - Select the pay schedule that says: "currently active"
- Scroll down to "Schedule ends on", and select an end date.
- Then tap: Save
- The second step:
Is to create the new pay schedule that you'll be moving everyone to. - Tap More, then List schedules, then: "New schedule"
- Then set "Pay period recurs" to your new pay schedule.
- Now, before setting when the new pay schedule starts, first find out when the previous one's ending. Tap the "List schedules" button.
- Then set "Schedule starts on" to be as soon as possible after that.
- Then tap: Save
- The third step:
Is to create the new pay schedule to bridge the gap between the two pay schedules. - Tap More, then List schedules, then: "New schedule"
- Set "Pay period recurs" to: "Once only"
- Now, scroll down and set "Schedule starts on" and: "Schedule ends on"
- It automatically suggests the recommended start and end dates.
- Then tap: Save
- Now, to see all your pay schedule changes, tap the "List schedules" button.
- And finally, you can now see all the start and end dates connecting without any gaps, so no one misses out on their pay.
Keep in mind that:
- It's very rare that you'll ever have to bridge pay schedules.
- Also, be sure to communicate all the payday date changes to your people.
- And don't forget to pay them on every one of the newly created paydays.
For advanced usage:
- You can also use the calendar (at the top) to see a preview of your newly created paydays.
And that's it! That's all you need to do to bridge pay schedules!
How do I delete a pay schedule?
 2:23
2:23
"How do I delete a pay schedule?"
If you no longer need a pay schedule, under limited circumstances, you can delete it.
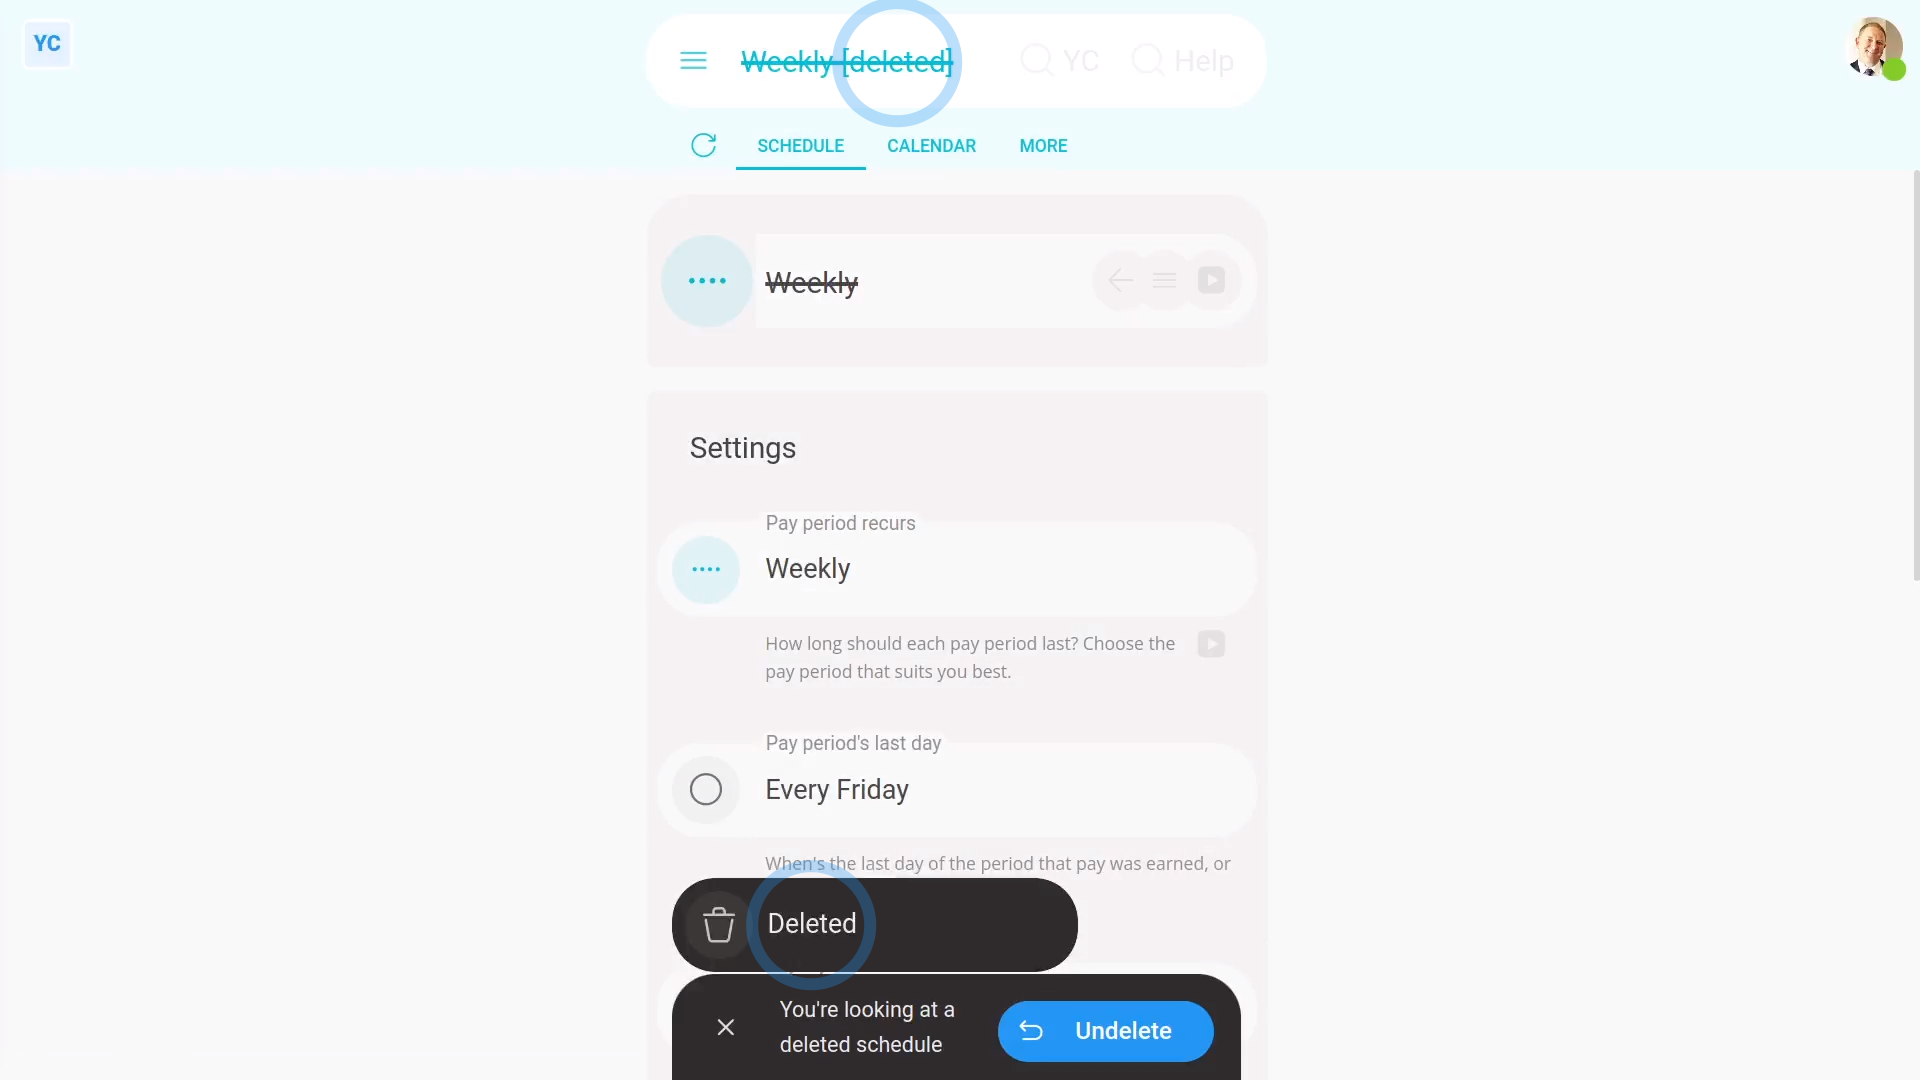
To delete a pay schedule:
- First, select the pay batch on: "Menu", then "Pay batches"
- Then tap: "Settings", then "Pay batch settings"
- Then beside "Payday due", tap the "List schedules" button:
- And select the pay schedule you'd like to delete.
- And tap More, then: Delete
- And then tap: Yes ... delete
- Now, the pay schedule's deleted.
- The pay schedule's also locked, so it can't be changed anymore.
- And finally, if you change your mind and want the pay schedule back again, tap Undelete, and it's immediately undeleted.
If it's been a while since you deleted a pay schedule, and you want to undelete it, you'll first need to find it in the: "deleted bin"

To undelete a pay schedule from your "deleted bin":
- First, tap: "Menu", then "Deleted bin"
- Next, you'll see a category for most of the kinds of items that can be deleted. Tap: Schedules
- And then tap the pay schedule you'd like to undelete.
- Next, tap: Undelete (at the bottom)
- And finally, the previously deleted pay schedule is immediately undeleted.
You may notice:
- Once the schedule's got filed payslips, a "Schedule locked" message shows, and it can't be deleted anymore.
- Also, you can't delete the schedule that's currently "active" for today's date.
- And you can't delete a schedule if it's the last remaining schedule in the pay batch.
- In reality, it's rare that you'd ever need to delete a schedule.
Keep in mind that:
- Only people who've got "Full payroll admin" permissions can delete or undelete pay schedules.
- And remember that all deletes and undeletes are always permanently recorded in: "History"
- That means any admin can always look back in time, and see who did any delete, and when the delete was done.
And that's it! That's everything you need to know about deleting or undeleting a pay schedule!
Tax forms
1. How do I see a historical list of all my old tax forms?
 2:28
2:28
"How do I see a historical list of all my old tax forms?"
The "Tax forms history" shows you a list of all the tax forms that've ever been prepared in your name.

To see all your old tax forms in a list:
- First, open yourself on: "Menu", then "Me"
- Then tap: "Tax", then "Tax forms history"
- You'll now see a list of all your old tax forms, including what the form was, when it was prepared, and by who.
- Next, to see a single tax form, tap the blue "See event" button: (at the start of the row)
- Now that the tax form's opened, if you tap the blue "more" link, you can see more details. Including which email the tax form was originally sent to.
- And you can tap the "PDF" button to re-download a copy of your original tax form.
- By default, you'll see a cover page, which has some notes you may find useful.
- If you don't want the cover page, tap the blue switch to turn it off:
- And you'll now see the cover page disappear.
- The cover page now remembers to also stay off all your other tax forms, from now on, until you turn it back on.
- Examples of tax forms that you may see in the list include.
- P45: Details of an employee leaving work.
- P60: End of year certificate.
- CIS-PDS: The construction industry scheme payments and deduction statement.
- SMP: Statutory maternity pay.
- And finally, as you remain employed for longer, your list of tax forms also gets longer.
Keep in mind that:
- Any person can get to their own: "Tax forms history"
- There's no special permissions required to see your own tax forms.
- Also, even if a person's been deleted, you can always re-download their tax forms, even years later.
- You don't need to undelete the person to download their tax forms.
And that's it! That's everything you need to know about seeing a historical list of all your old tax forms!
P45. How does a person's P45 get sent when the person leaves?
 3:44
3:44
"P45. How does a person's P45 get sent when the person leaves?"
The P45 is the form a leaving person uses to hand their tax info to their next employer. A person's P45 is automatically emailed out to each leaving person when their final payslip's filed.
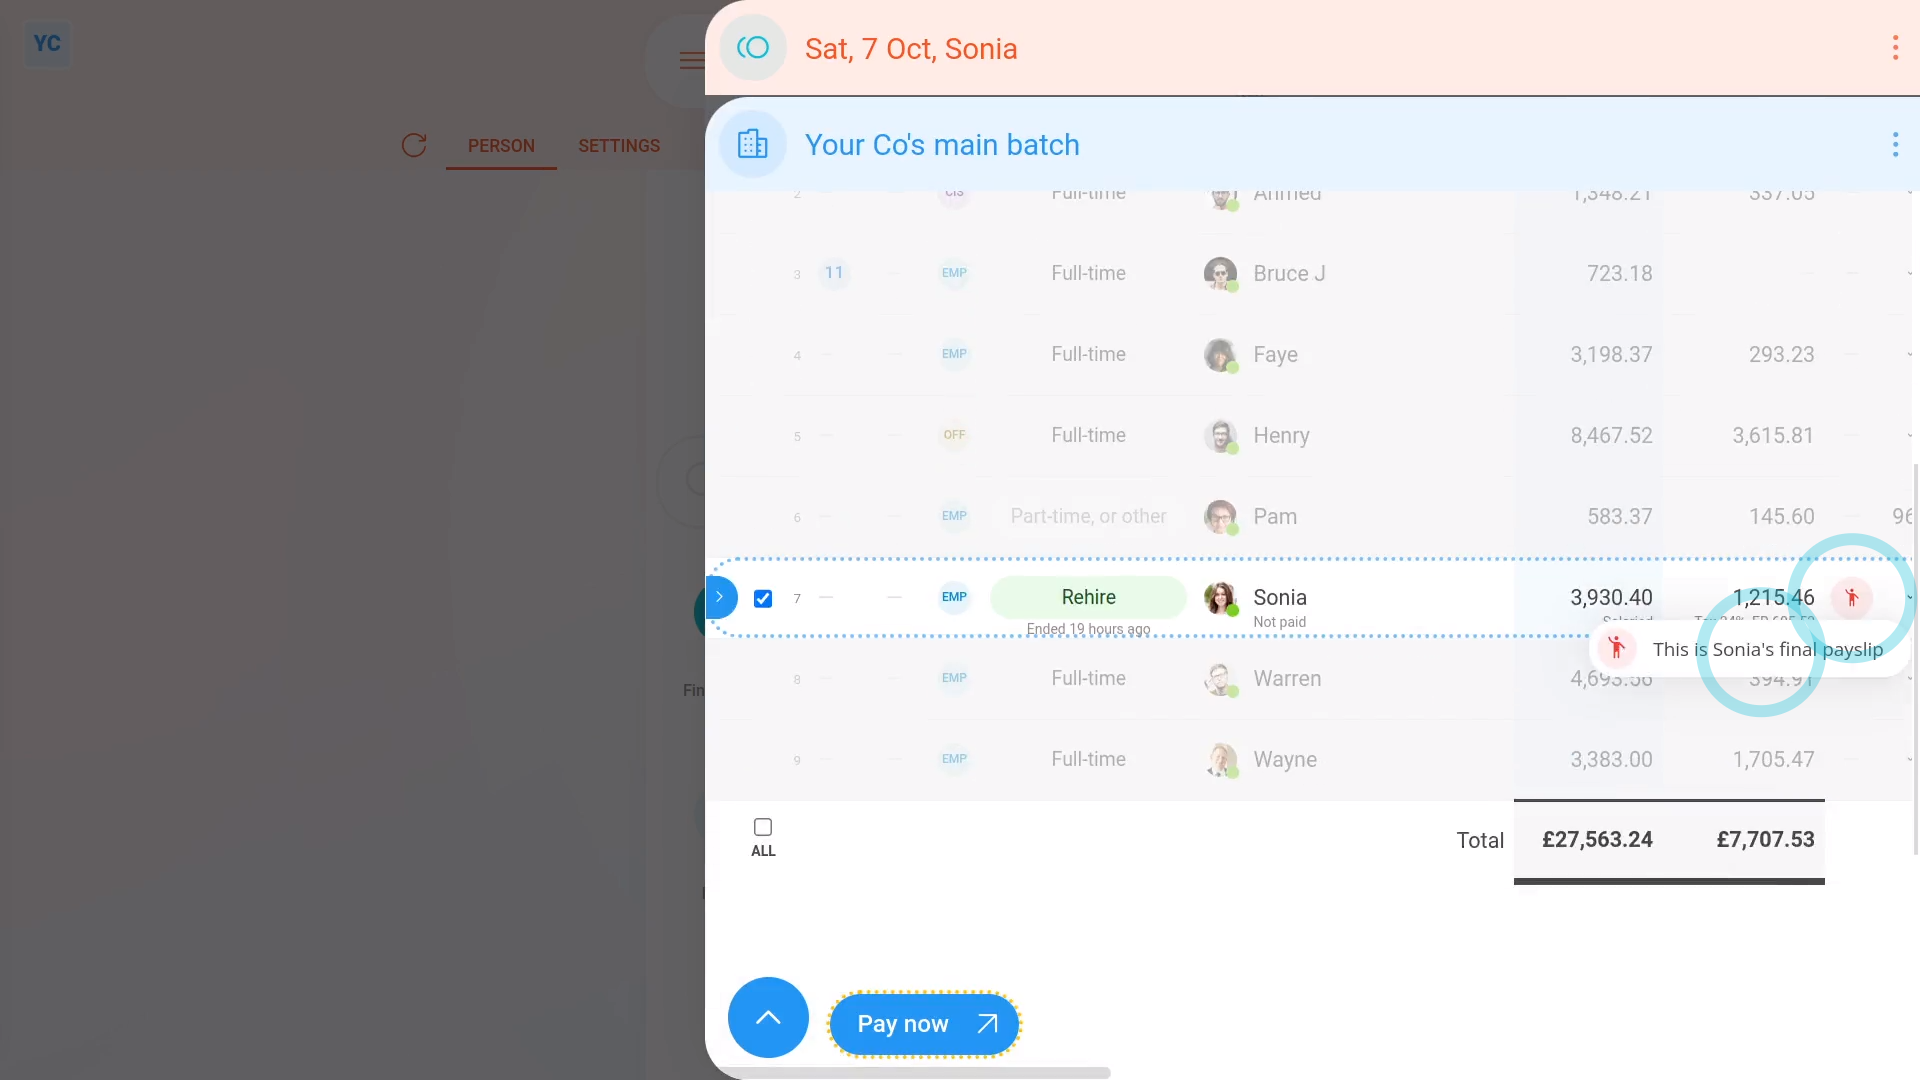
To pay a person's final payslip and send them their P45:
- First, select the person who's leaving on: "Menu", then "People"
- Now, go to: "HR"
- And tap "Dismiss" or "Resign", whichever best matches why the person's leaving.
- Then select the "dismiss" or "resign" reason which best matches why the person's leaving.
- Carefully go through all the steps until you reach the end, where their end employment doc is sent.
- Next, go to the Person tab (at the top), and to reload the page, tap the "Reload tab" button: (at the top)
- Then tap: Final payslip
- Once it slides out on the right, to pay the person's final pay, scroll down and tap: Go to "Pay now" report
- On the same row as the leaving person's name, you'll see a red circle showing that it's their final payslip.
- Then once everything's checked, tap File now, and then: Yes ... file it
- It usually takes 15 to 20 seconds for HMRC to finish processing the payslips and send back confirmation that it's been received.
- Also, because it's their final payslip, the person's P45 is also being emailed.
- The emailing happens automatically, in the background. The P45s are emailed to each persons' personal email as a PDF attachment.
- Once it's been filed successfully, and the P45s are emailed, you'll see a green tick beside the payslips that you've filed.
- On most paydays, each person normally only gets one email which contains their payslip PDF.
- On a final payday, however, each person also gets their P45, as a PDF, which is sent in a second email.
- Scroll to the bottom of the email to see the P45 attached as a PDF, and tap it to open it.
- The P45 includes the person's: "Total pay in the employment"
- And includes the person's: "Total tax in the employment"
- And finally, it records the person's: "Tax code at leaving date"
Keep in mind that:
- If a person hasn't entered a personal email, their P45 is sent to their work email instead.
- Also, when a person starts their next job, the person needs their P45 to tell their new employer their tax code and other employment details.
- Once a person's P45 is sent, it can't be changed or updated. HMRC requires that there's only one P45 per employment.
To learn more:
- About how to prove a person's P45 was sent, or how to re-download a copy of it, watch the video on: Finding a sent P45
And that's it! That's everything you need to know about how a person's P45's are automatically sent!
P45. How do I find a person's P45, or prove one's been sent?
 2:00
2:00
"P45. How do I find a person's P45, or prove one's been sent?"
Sometimes a person who's left months ago may come back to you asking for another copy of their P45. If so, you'll need to re-download their P45.

To download a P45 of a deleted person:
- First, tap: "Menu", then "Deleted bin"
- Then tap: People
- And then tap the deleted person you're looking for, to open them.
- To see their P45, scroll down and tap: See P45
- Alternatively, the other way to find a person's P45 is to tap: "Tax", then "Tax forms history"
- Then tap the row that says: "P45 sent"
- To re-download a copy of the person's original P45, tap the "PDF" button.
- While you're waiting for it to download, to see more details about when it was sent, tap the blue "more" link.
- You'll also see the address that was used when the person's P45 was originally emailed.
- And finally, once the P45's downloaded, you can open it as a PDF, or send it on to the person who's requesting it.
Keep in mind that:
- Even if a person's been deleted, you can always re-download their P45, even years later.
- You don't need to undelete the person to download their P45.
- Also, if you don't want the cover pages included in the P45 PDF download, tap the blue switch to turn it off:
To learn more:
- About what to do if the person's P45 isn't listed, and may never have been sent, watch the video on: Sending a P45
And that's it! That's everything you need to know about finding a person's P45, and proving it's been sent!
P60. How does a person's P60 get sent each year?
 2:44
2:44
"P60. How does a person's P60 get sent each year?"
The P60 shows how much tax a person's paid during the tax year. It's automatically emailed when their last payslip is filed for the end of the tax year.
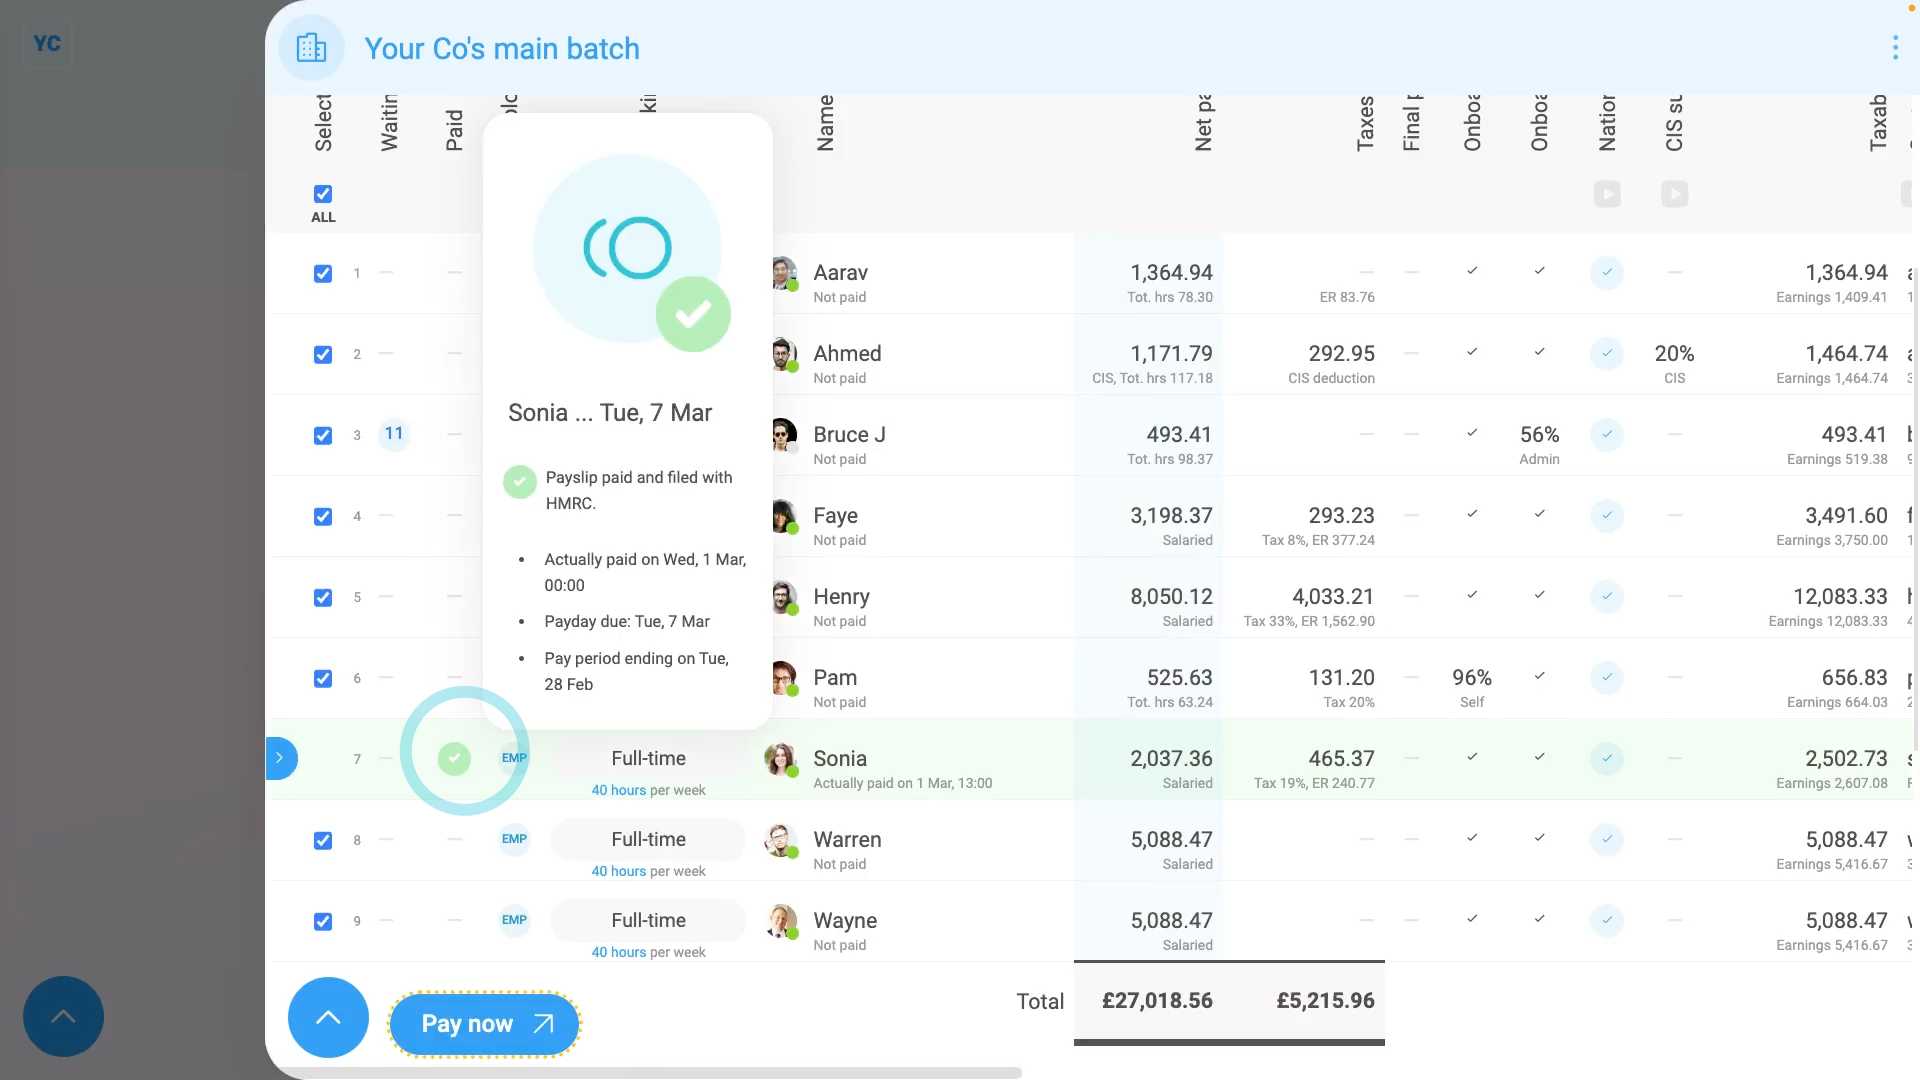
To pay a person's last payslip in a tax year and send their P60:
- First, during the month of March, select the person's pay batch on: "Menu", then "Pay batches"
- Now, on the "To-do" tab, look for: "Payday ... P60s are sent"
- That payday is the last payslip to be filed before the end of the tax year, ending on April the 5th.
- Next, tap the payday, so it slides out on the right.
- Normally you'd pay everyone. But for now, you can untick everyone, and then tick the people you're ready to pay.
- Then tap File now, and then: Yes ... file it
- It usually takes 15 to 20 seconds for HMRC to finish processing the payslips and send back confirmation that it's been received.
- Also, because it's the last payslip before the end of the tax year, each person's P60 is also being emailed.
- The emailing happens automatically, in the background. The P60s are emailed to each person's personal email as a PDF attachment.
- Once it's been filed successfully, and the P60s are emailed, you'll see a green tick beside the people that you've paid.
- On most paydays, each person normally only gets one email which contains their payslip PDF.
- On the P60 payday, however, each person also gets their P60, as a PDF, which is sent in a second email.
- Scroll to the bottom of the email to see the P60 attached as a PDF, and tap it to open it.
- The P60 includes the person's total pay for the year.
- And finally, it also includes the person's total tax deducted for the year.
Keep in mind that:
- If a person hasn't entered a personal email, their P60 is sent to their work email instead.
- Also, check that your P60 is stored somewhere safe.
- You could later need your P60 to do your tax return, claim tax credits, or claim Universal Credit.
To learn more:
- About how to prove a person's P60 was sent, or how to re-download a copy of it, watch the video on: Finding a sent P60
And that's it! That's everything you need to know about how P60s are automatically sent!
P60. How do I find a previously sent P60, or prove it's been sent?
 1:58
1:58
"P60. How do I find a previously sent P60, or prove it's been sent?"
Sometimes a person may ask you for another copy of their P60. If so, you'll need to re-download their P60.
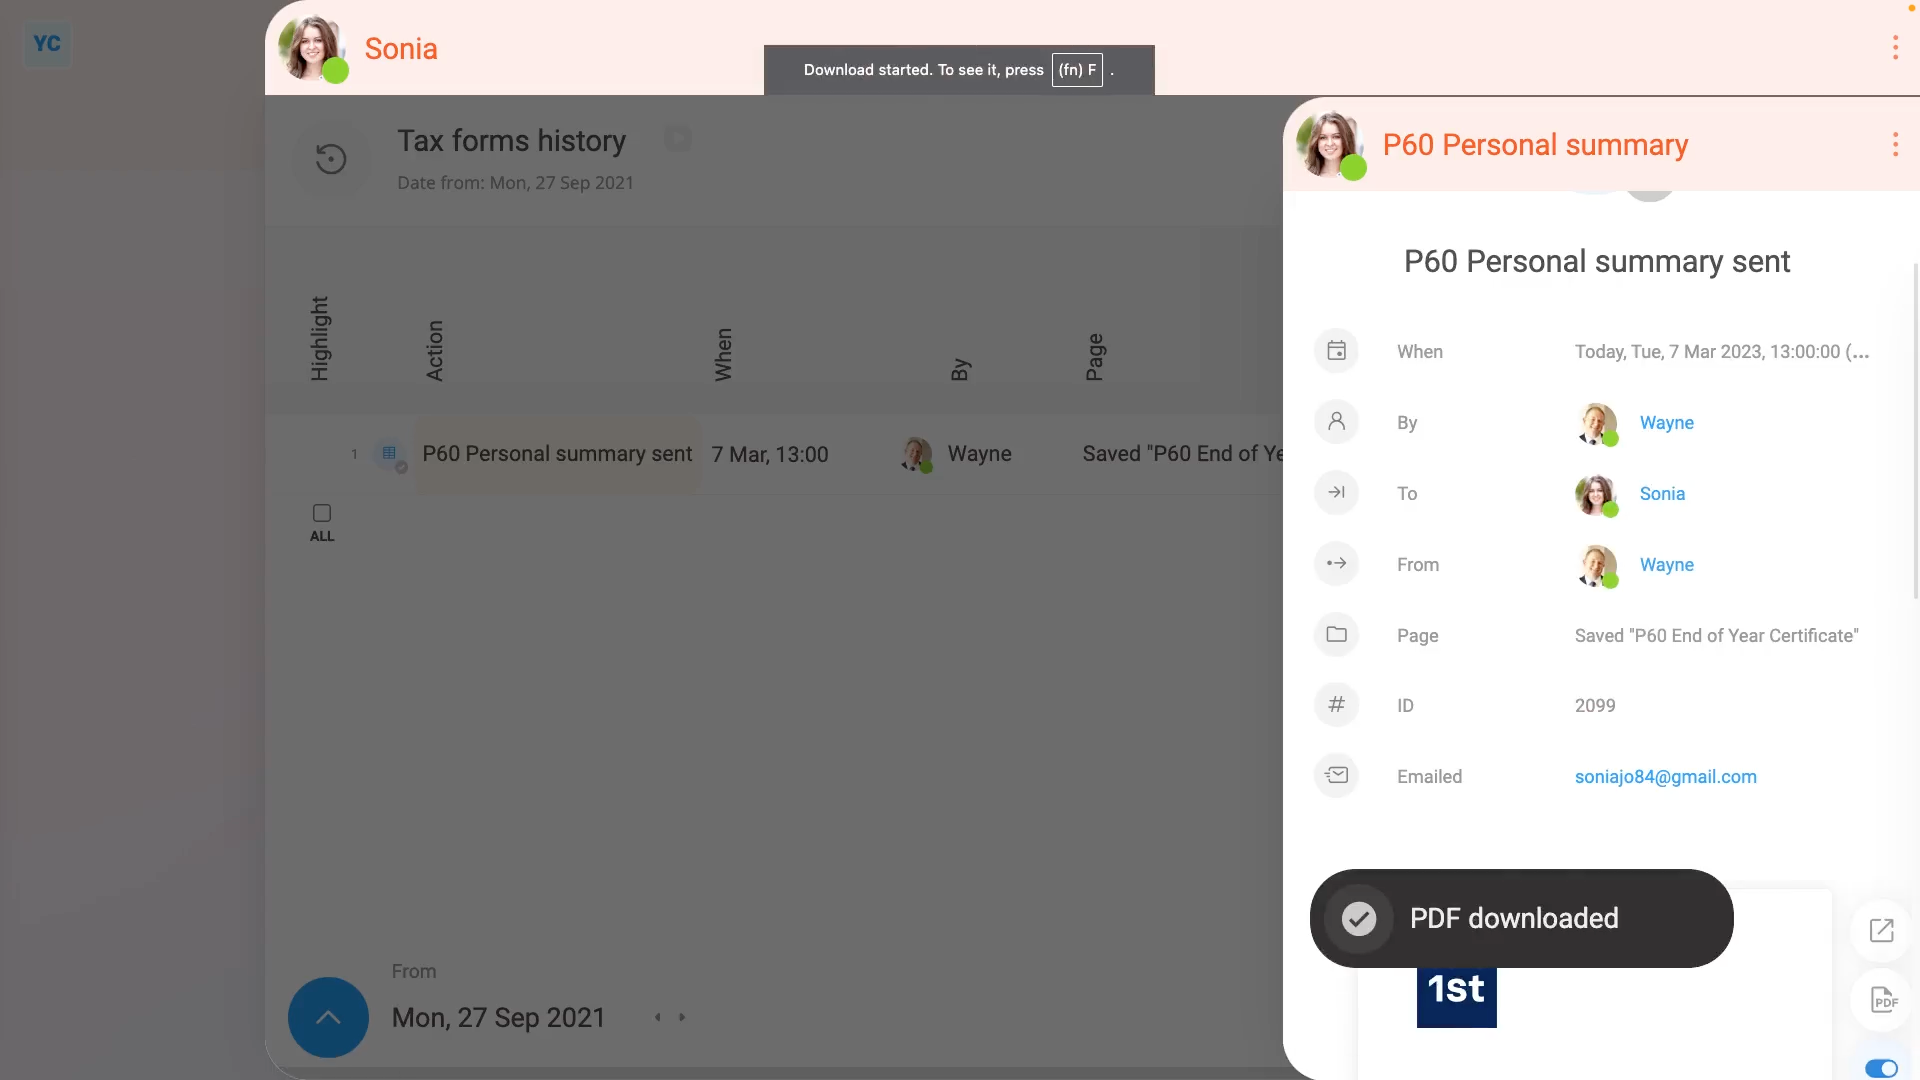
To re-download a person's P60:
- First, select the person on: "Menu", then "People"
- To see their P60, tap: "Tax", then "Tax forms history"
- Then tap the row that says: "P60 Personal summary sent"
- To re-download a copy of the person's original P60, tap the "PDF" button.
- While you're waiting for it to download, to see more details about when it was sent, tap the blue "more" link.
- You'll also see the address that was used when the person's P60 was originally emailed.
- And finally, once the P60's downloaded, you can open it as a PDF, or send it on to the person who's requesting it.
You may notice:
- Re-downloading a P60 can be done by the person themselves.
- Even people with no special permissions can see and download any of their own tax forms.
Keep in mind that:
- Even if a person's been deleted, you can always re-download their P60, even years later.
- You don't need to undelete the person to download their P60.
- Also, if you don't want the cover pages included in the P60 PDF download, tap the blue switch to turn it off:
To learn more:
- About what to do if the person's P60 isn't listed, and may never have been sent, watch the video on: Sending a P60
And that's it! That's everything you need to know about finding a person's P60, and proving it's been sent!