
Time and Attendance
 2:42
2:42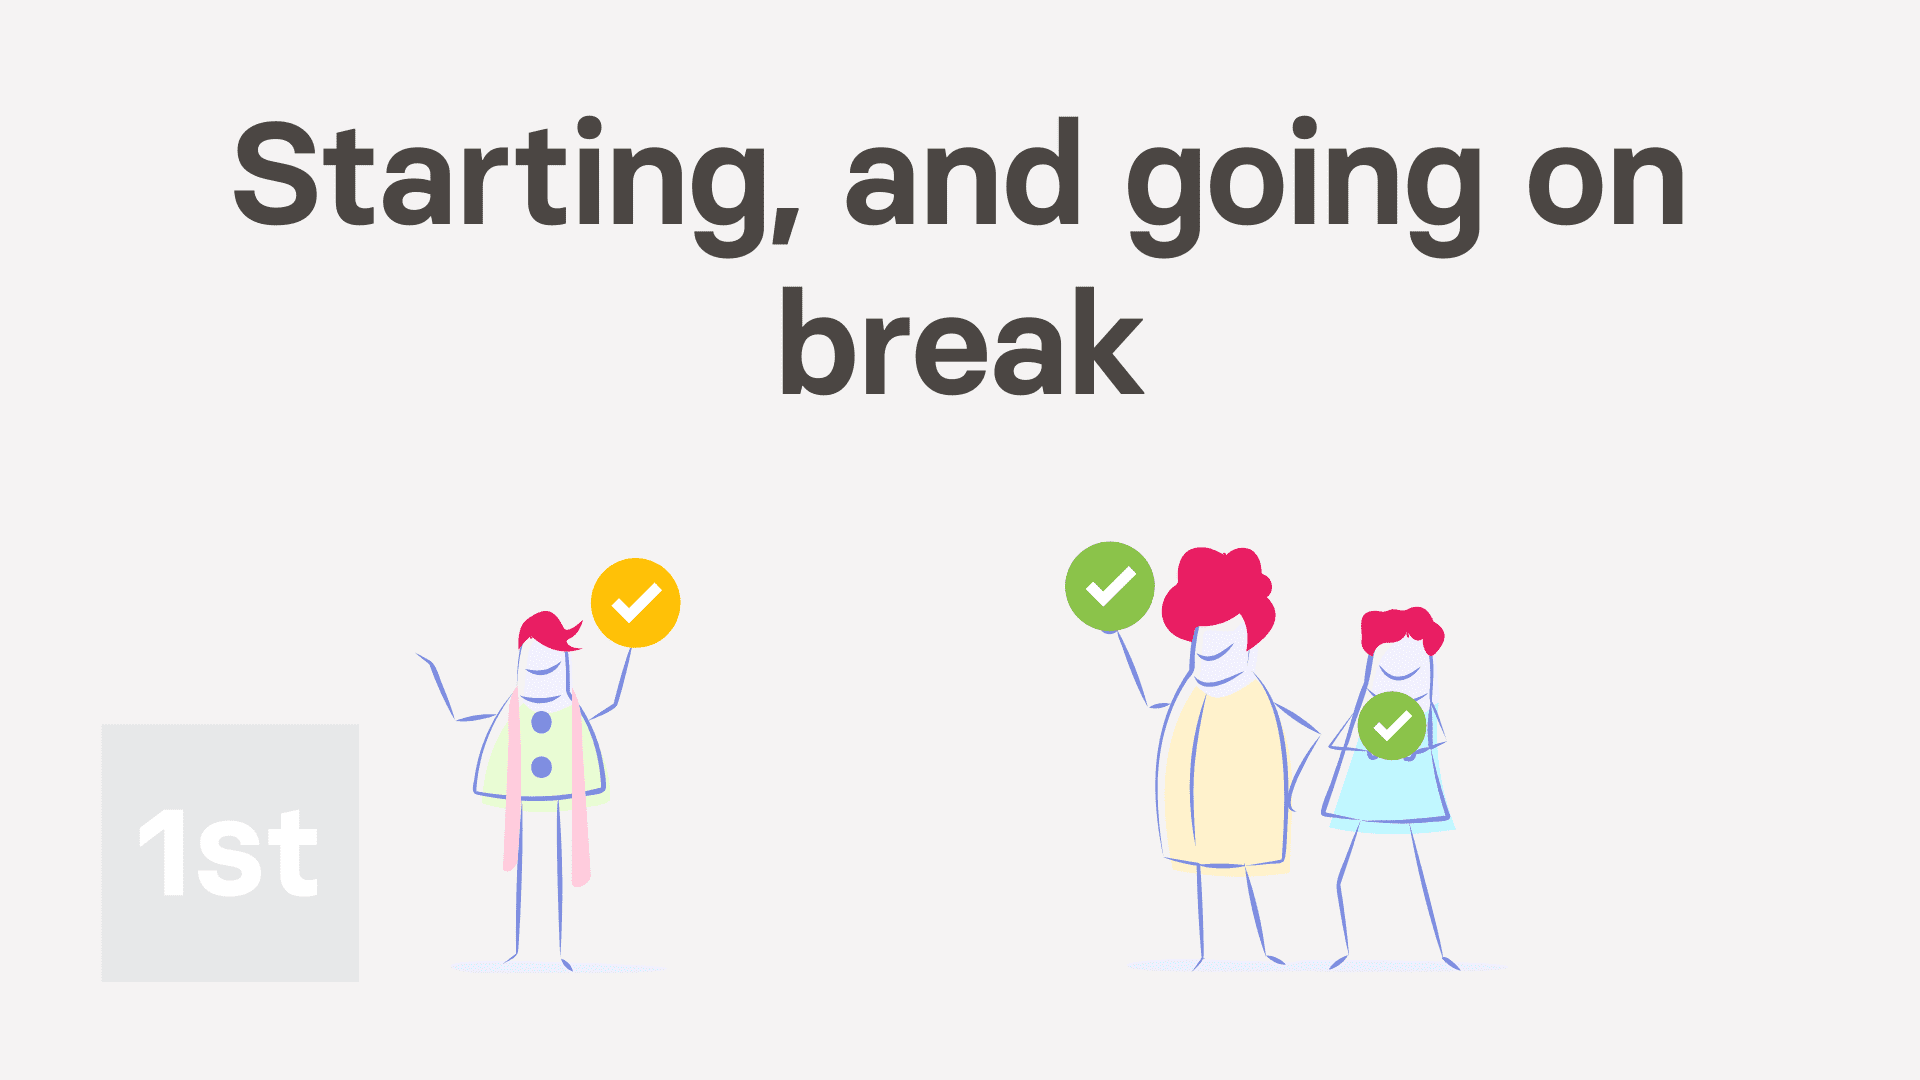 2:31
2:31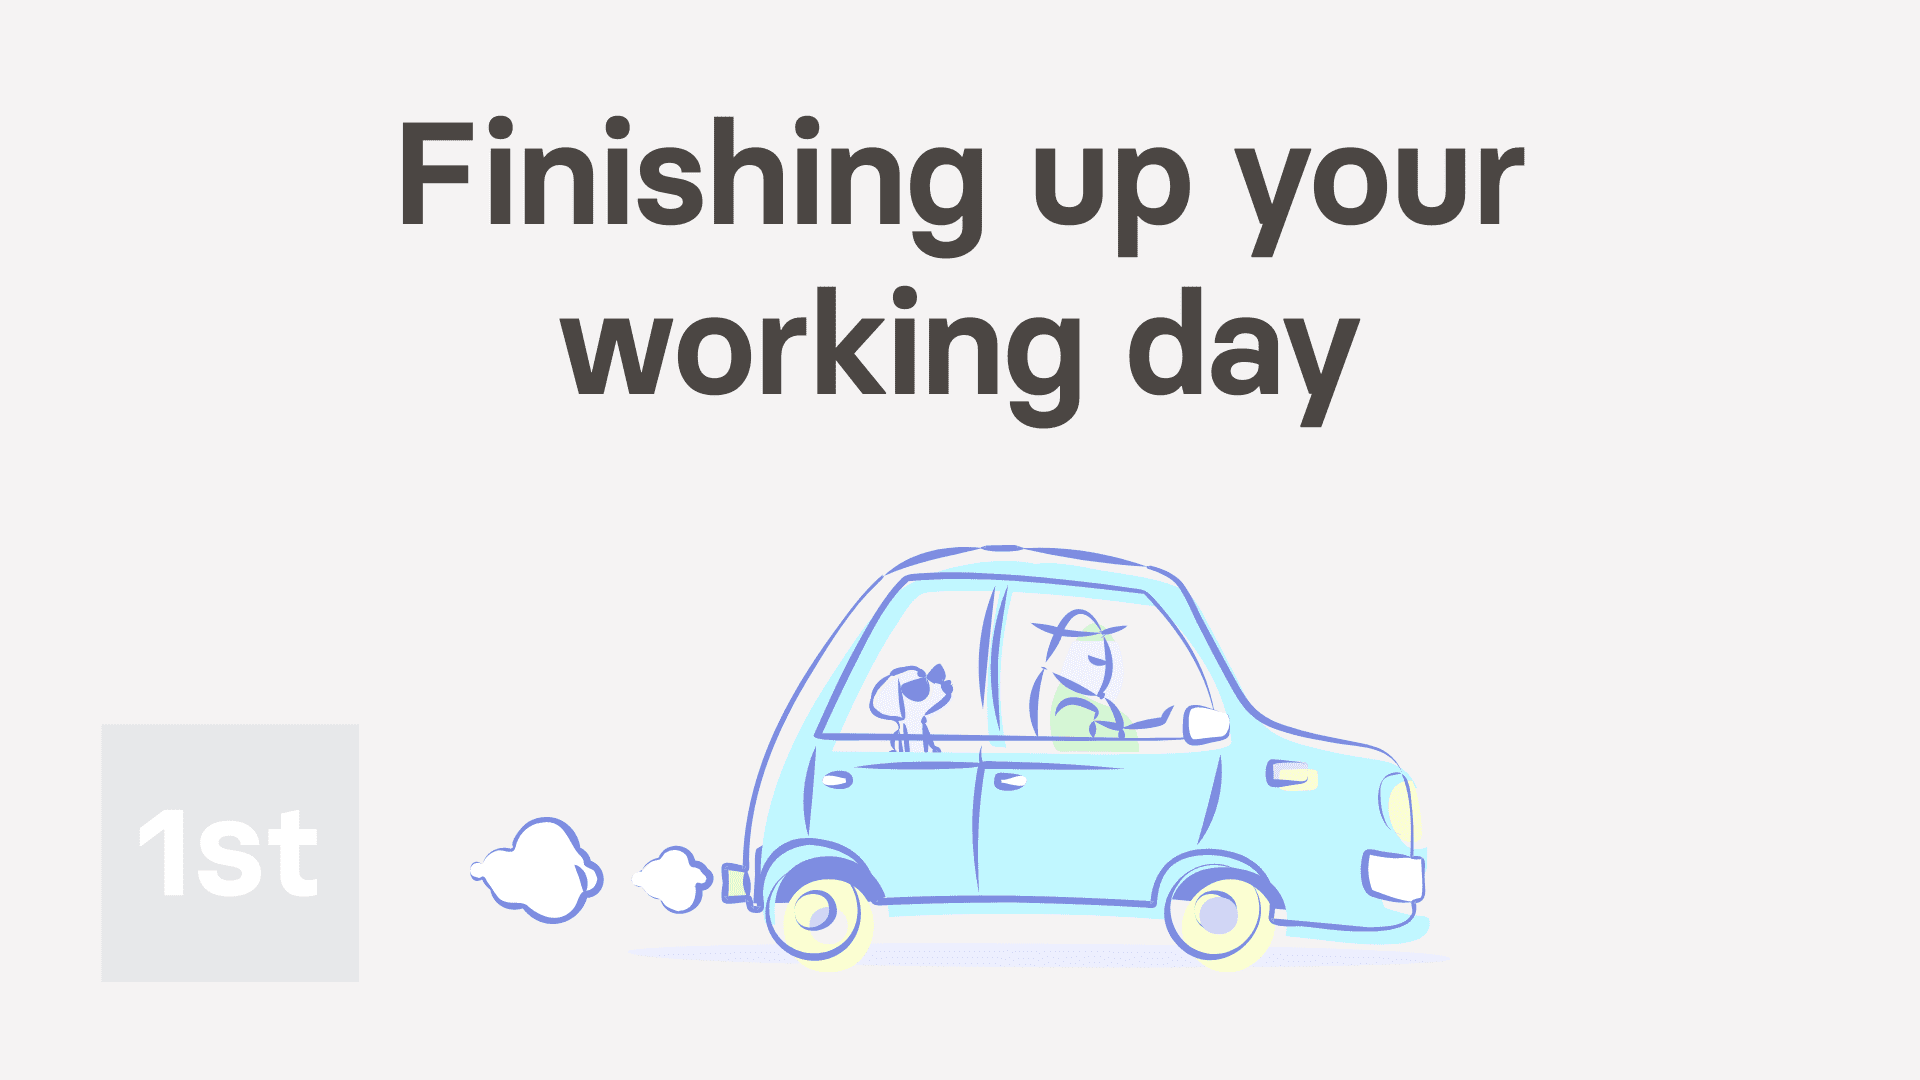 1:29
1:29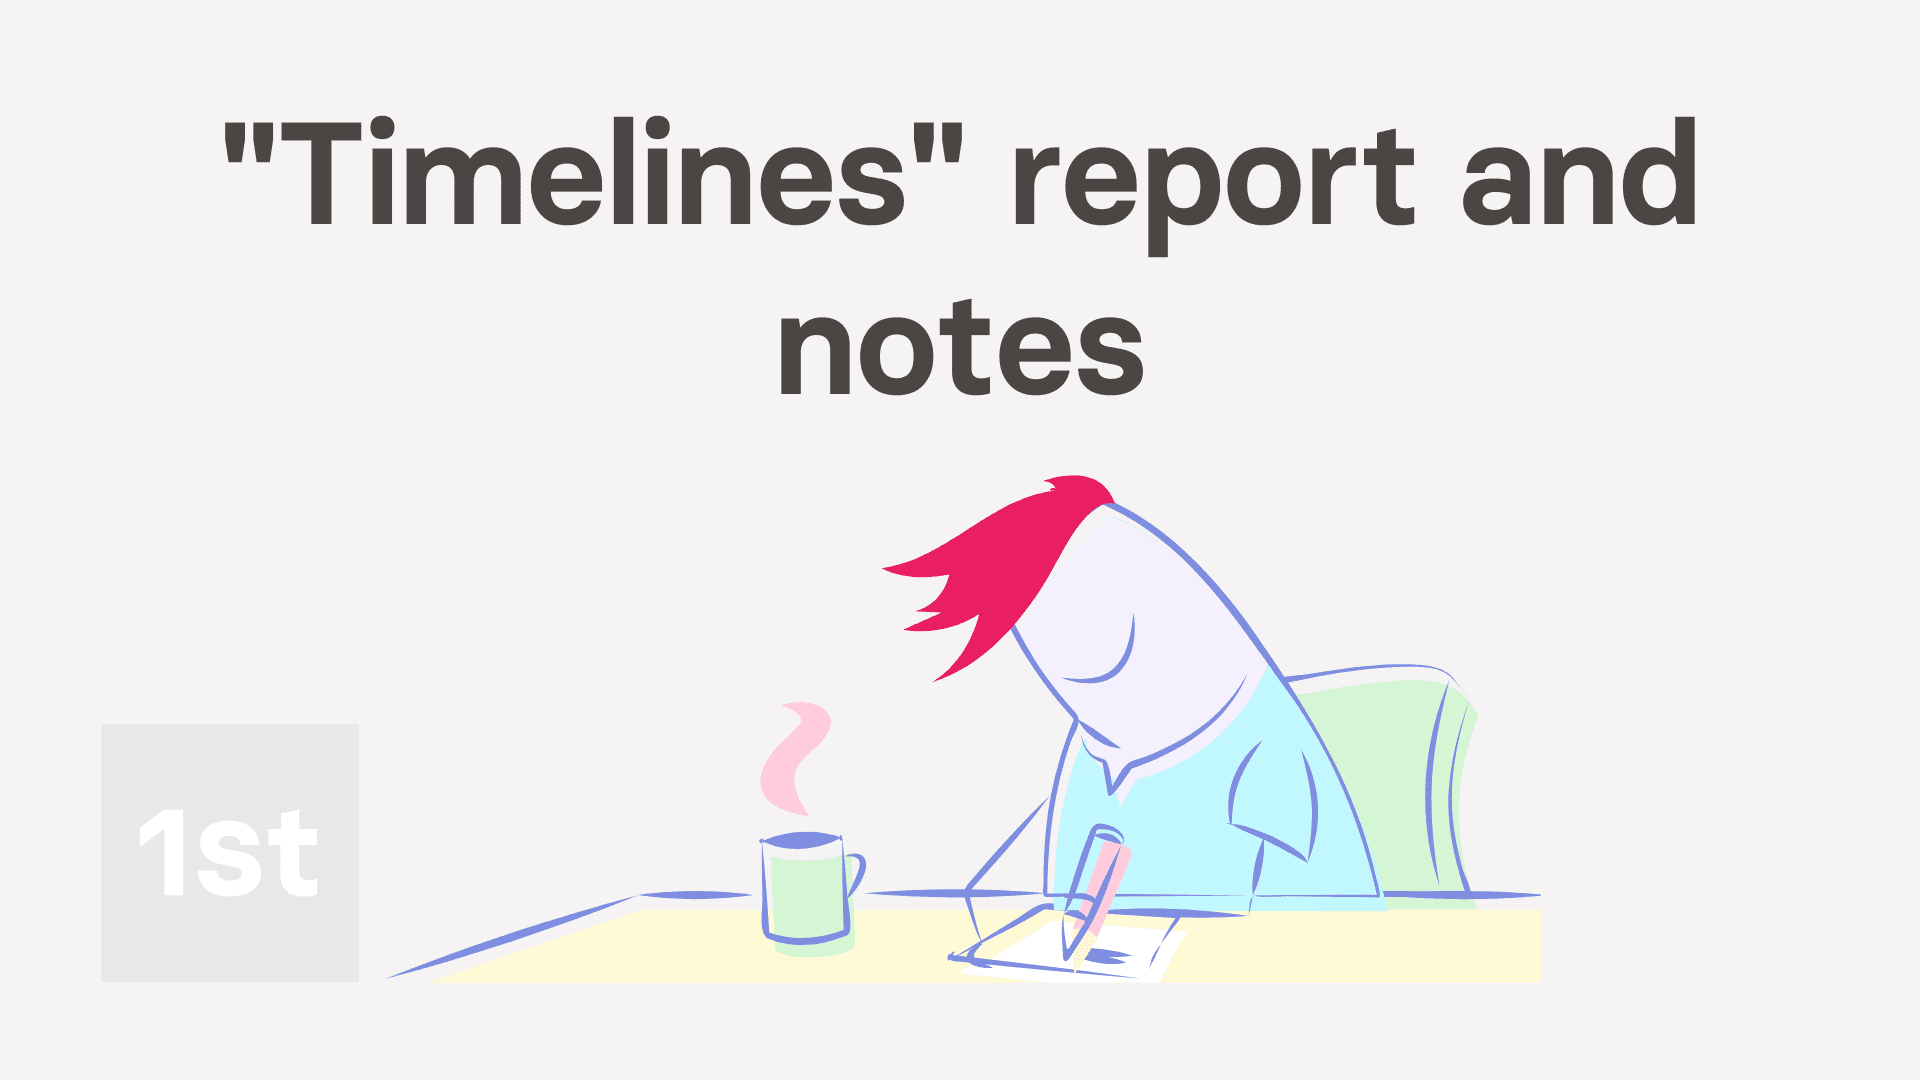 1:36
1:36 2:52
2:52 3:04
3:04 1:44
1:44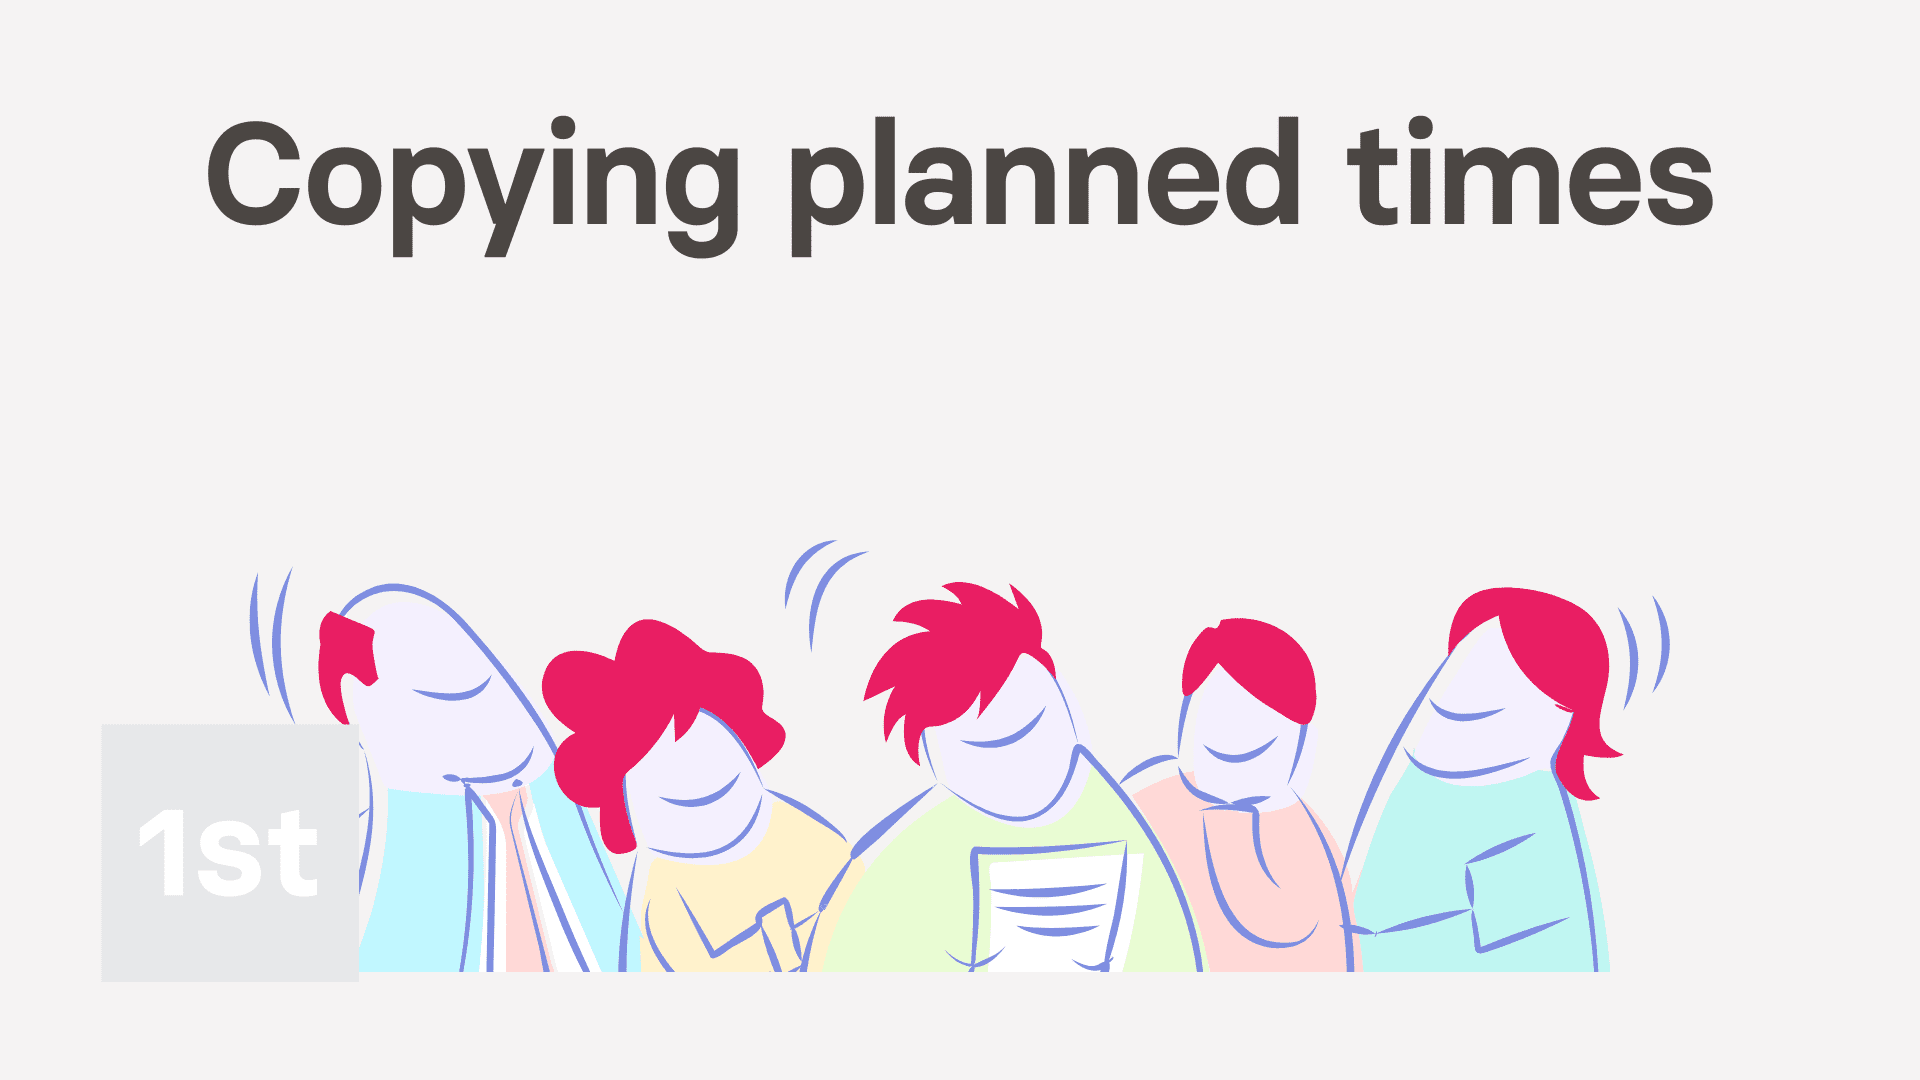 4:11
4:11 3:08
3:08 2:33
2:33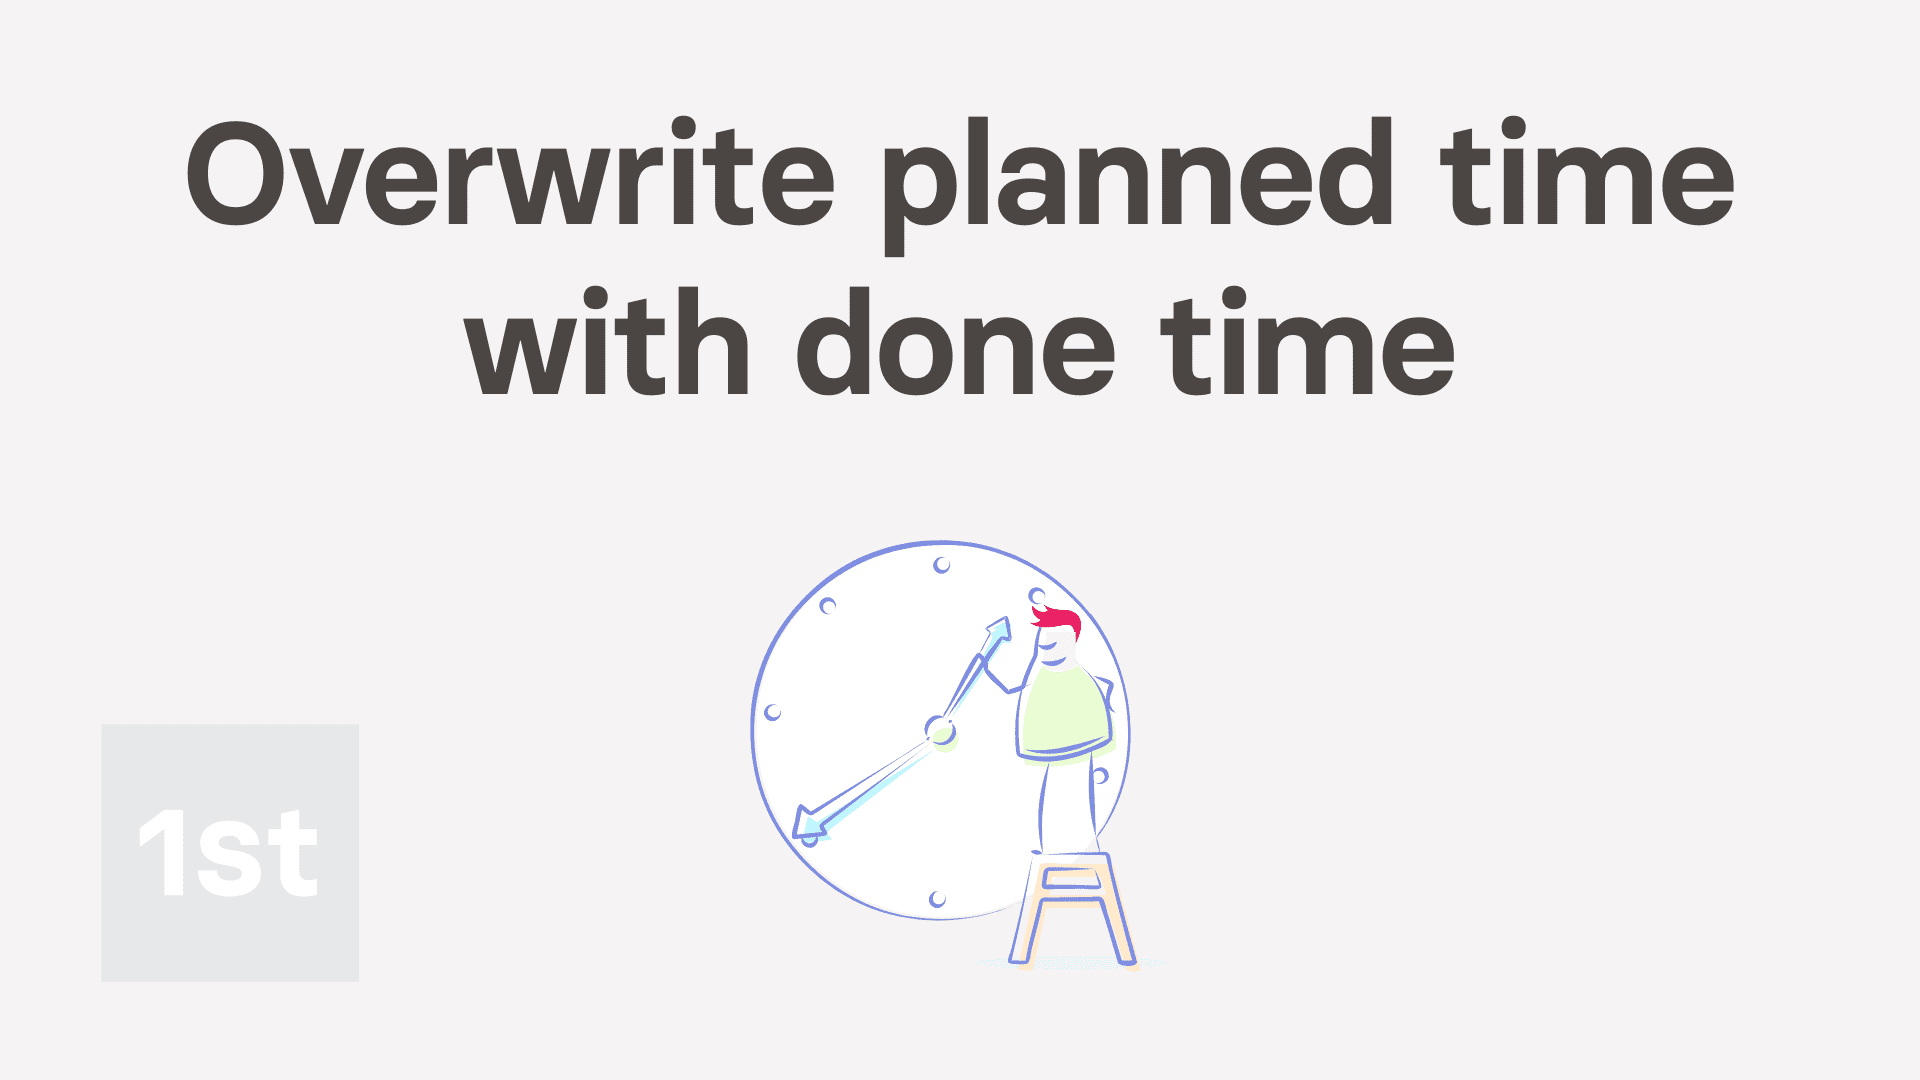 2:00
2:00 2:40
2:40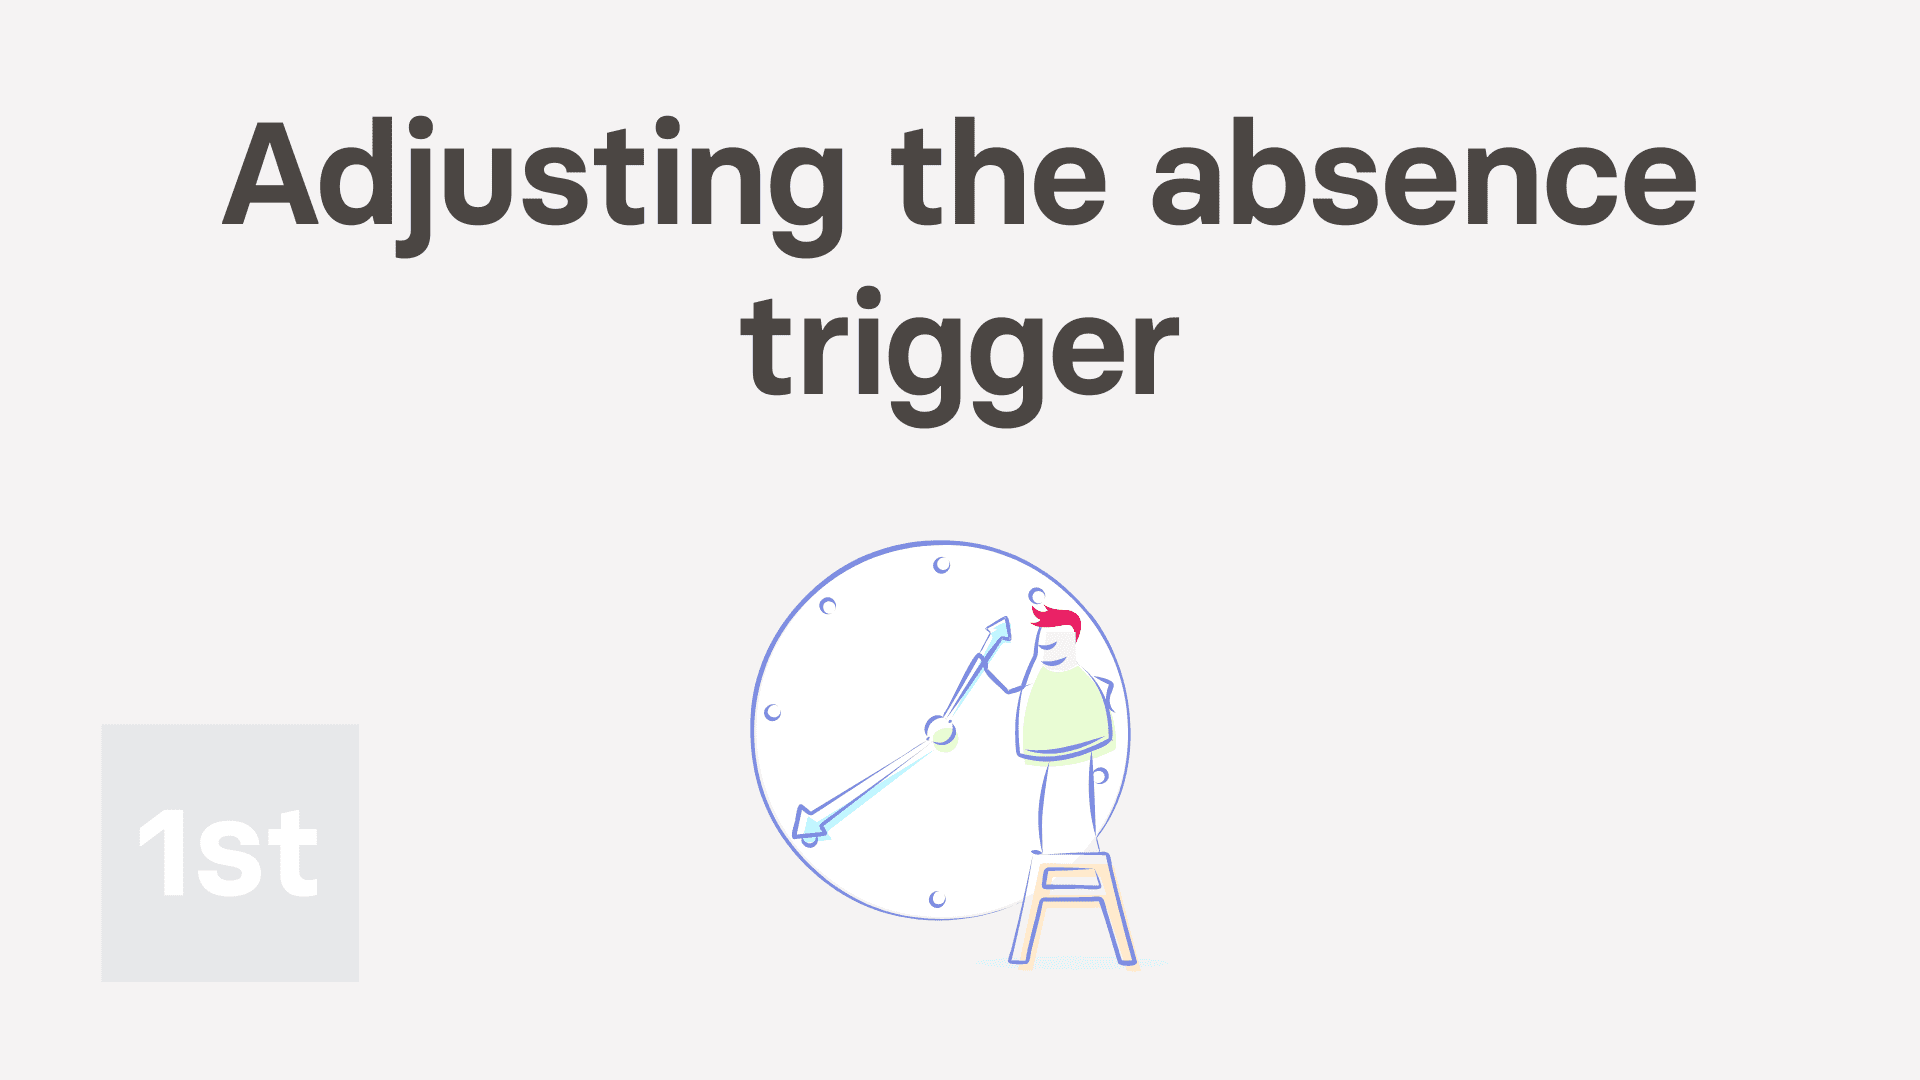 2:11
2:11 2:21
2:21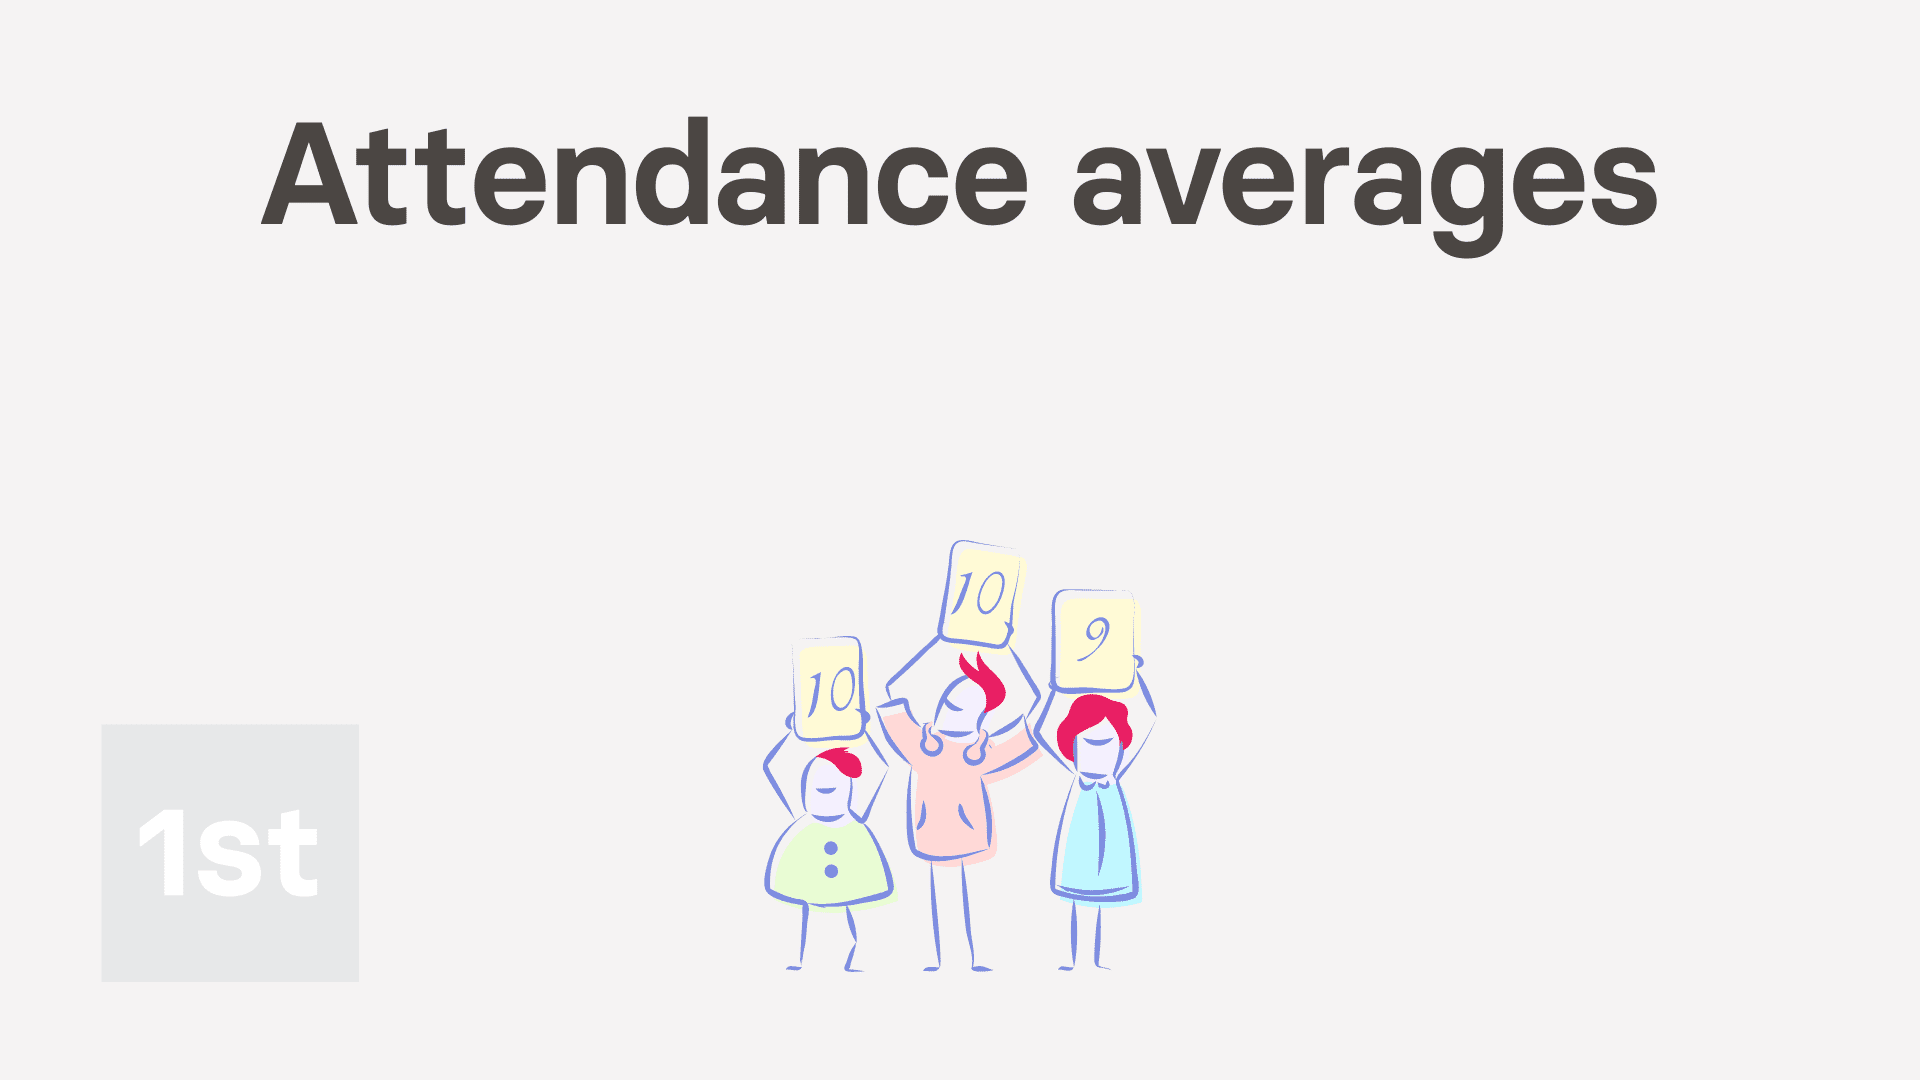 2:35
2:35 2:24
2:24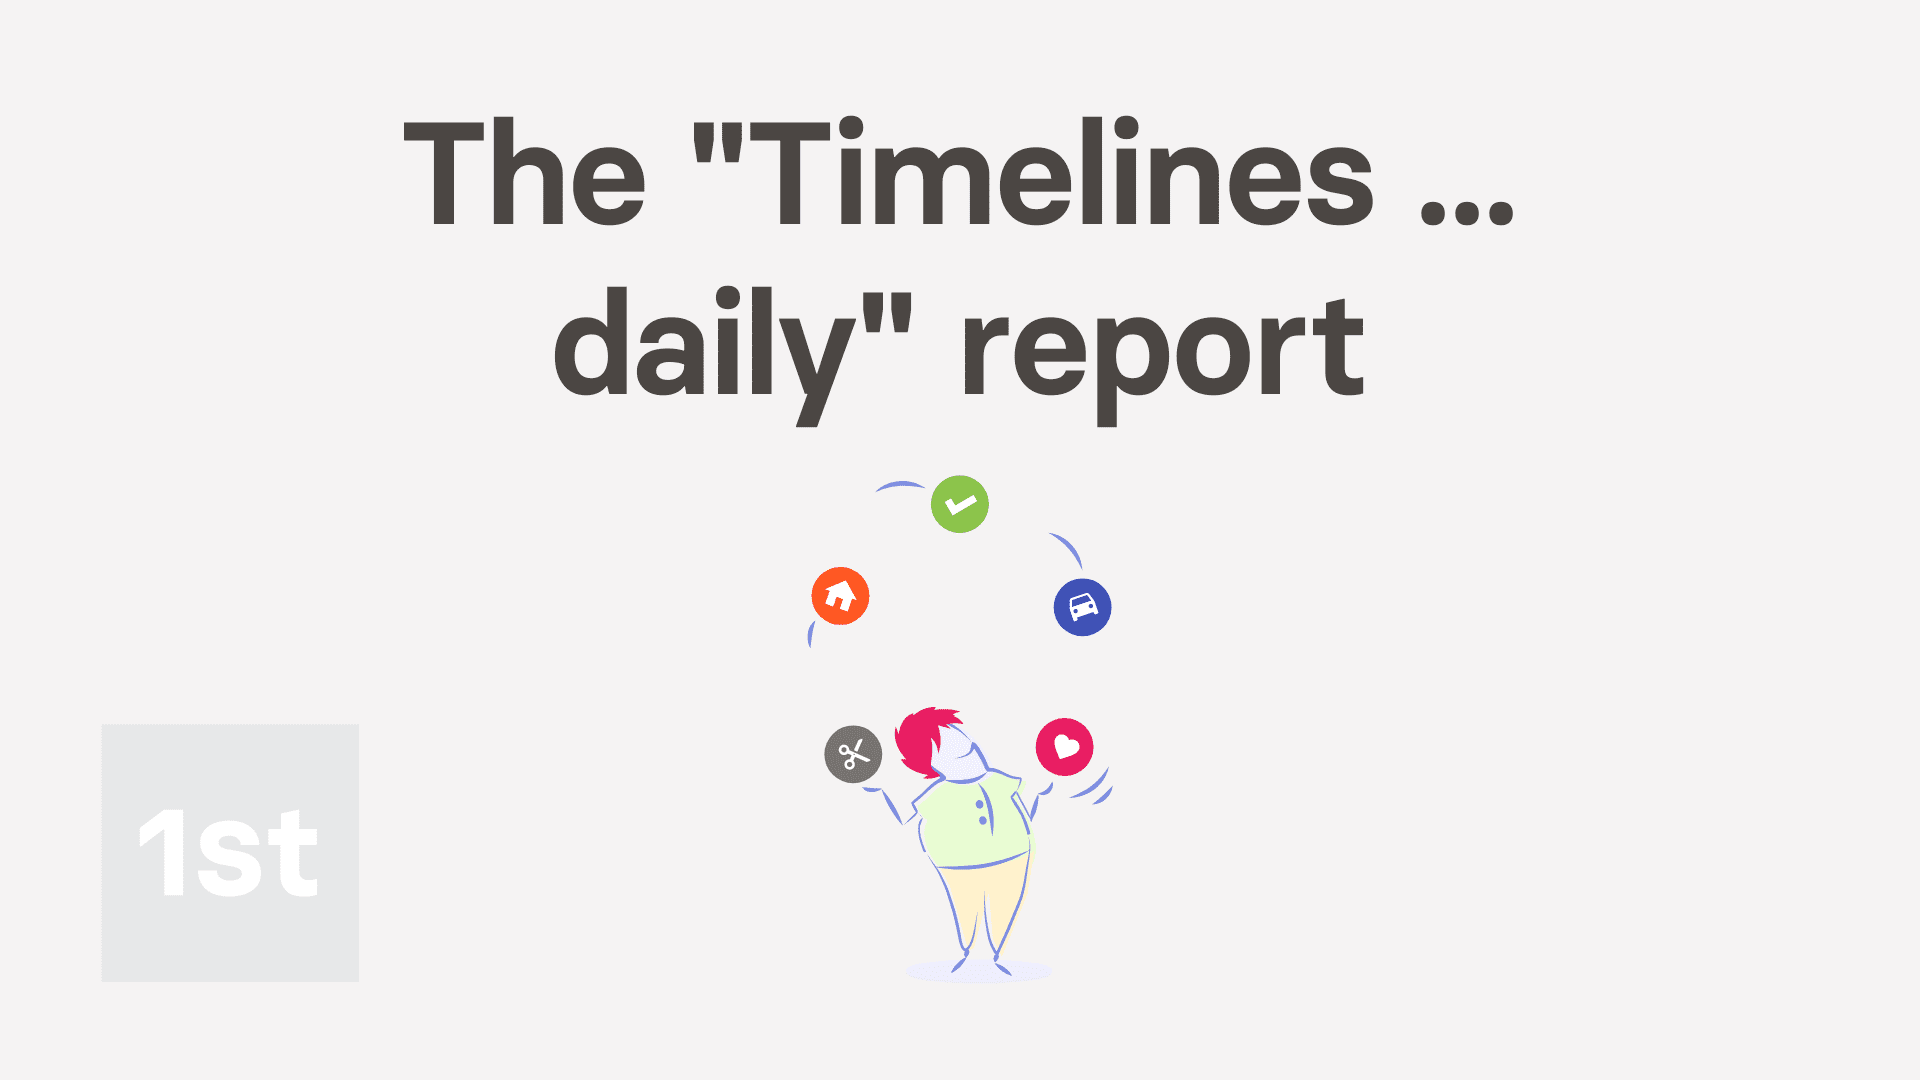 2:17
2:17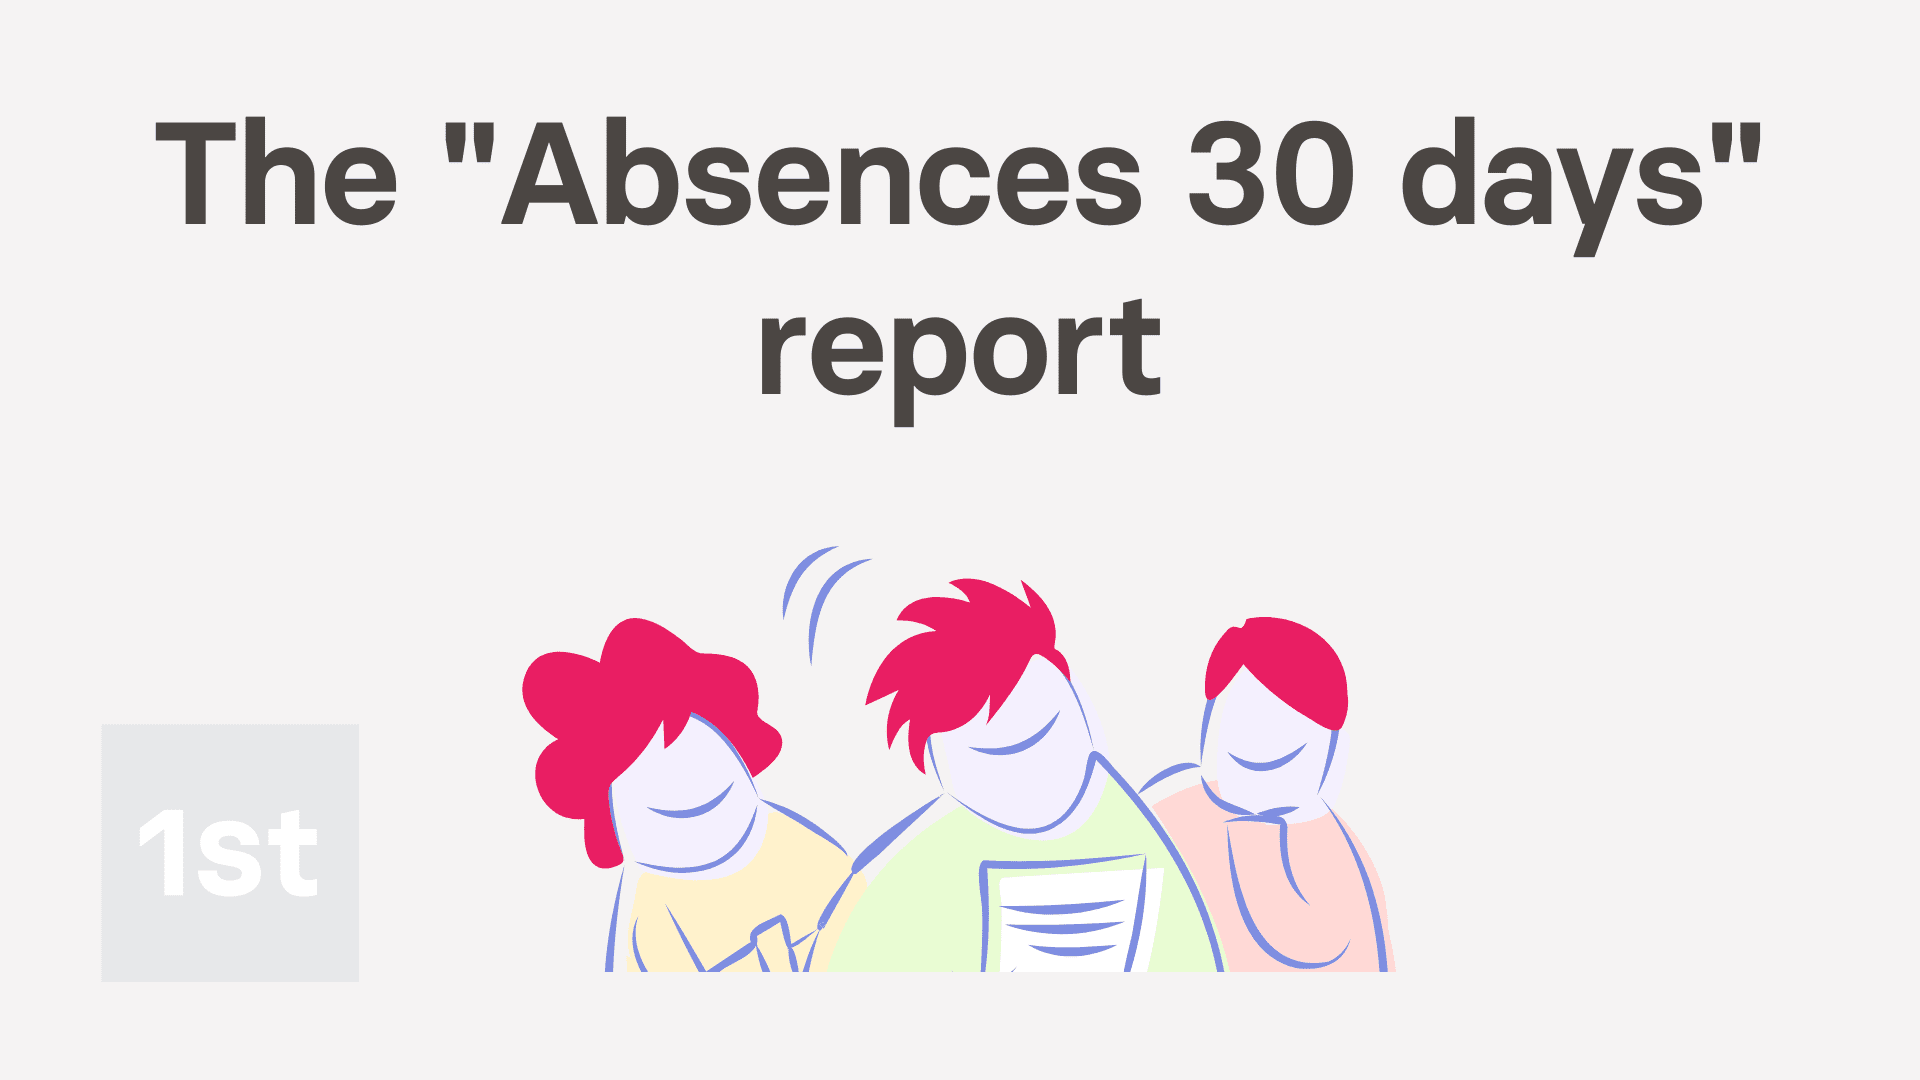 3:30
3:30 3:24
3:24 4:40
4:40 2:48
2:48 3:01
3:01 2:47
2:47 2:50
2:50 1:20
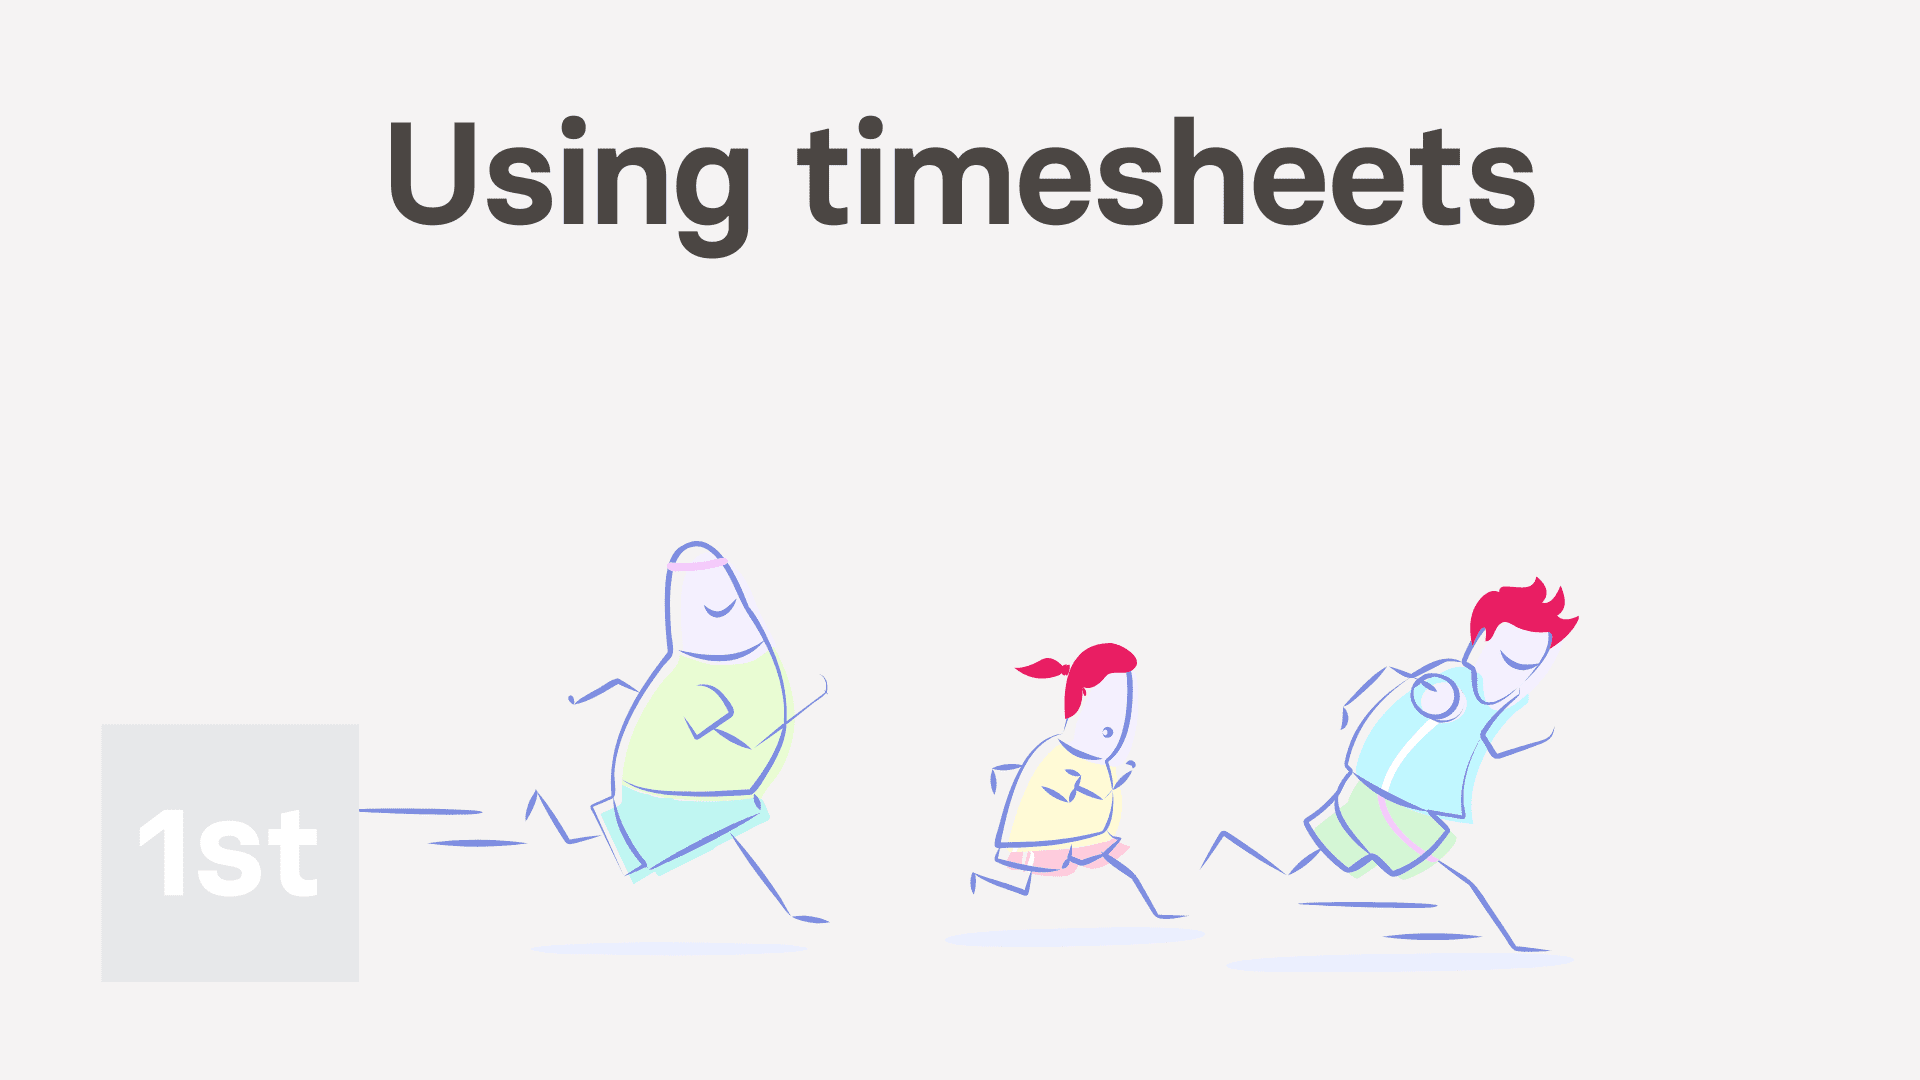
1:201. How do I use timesheets?

 2:38
2:38
"How do I use timesheets?"
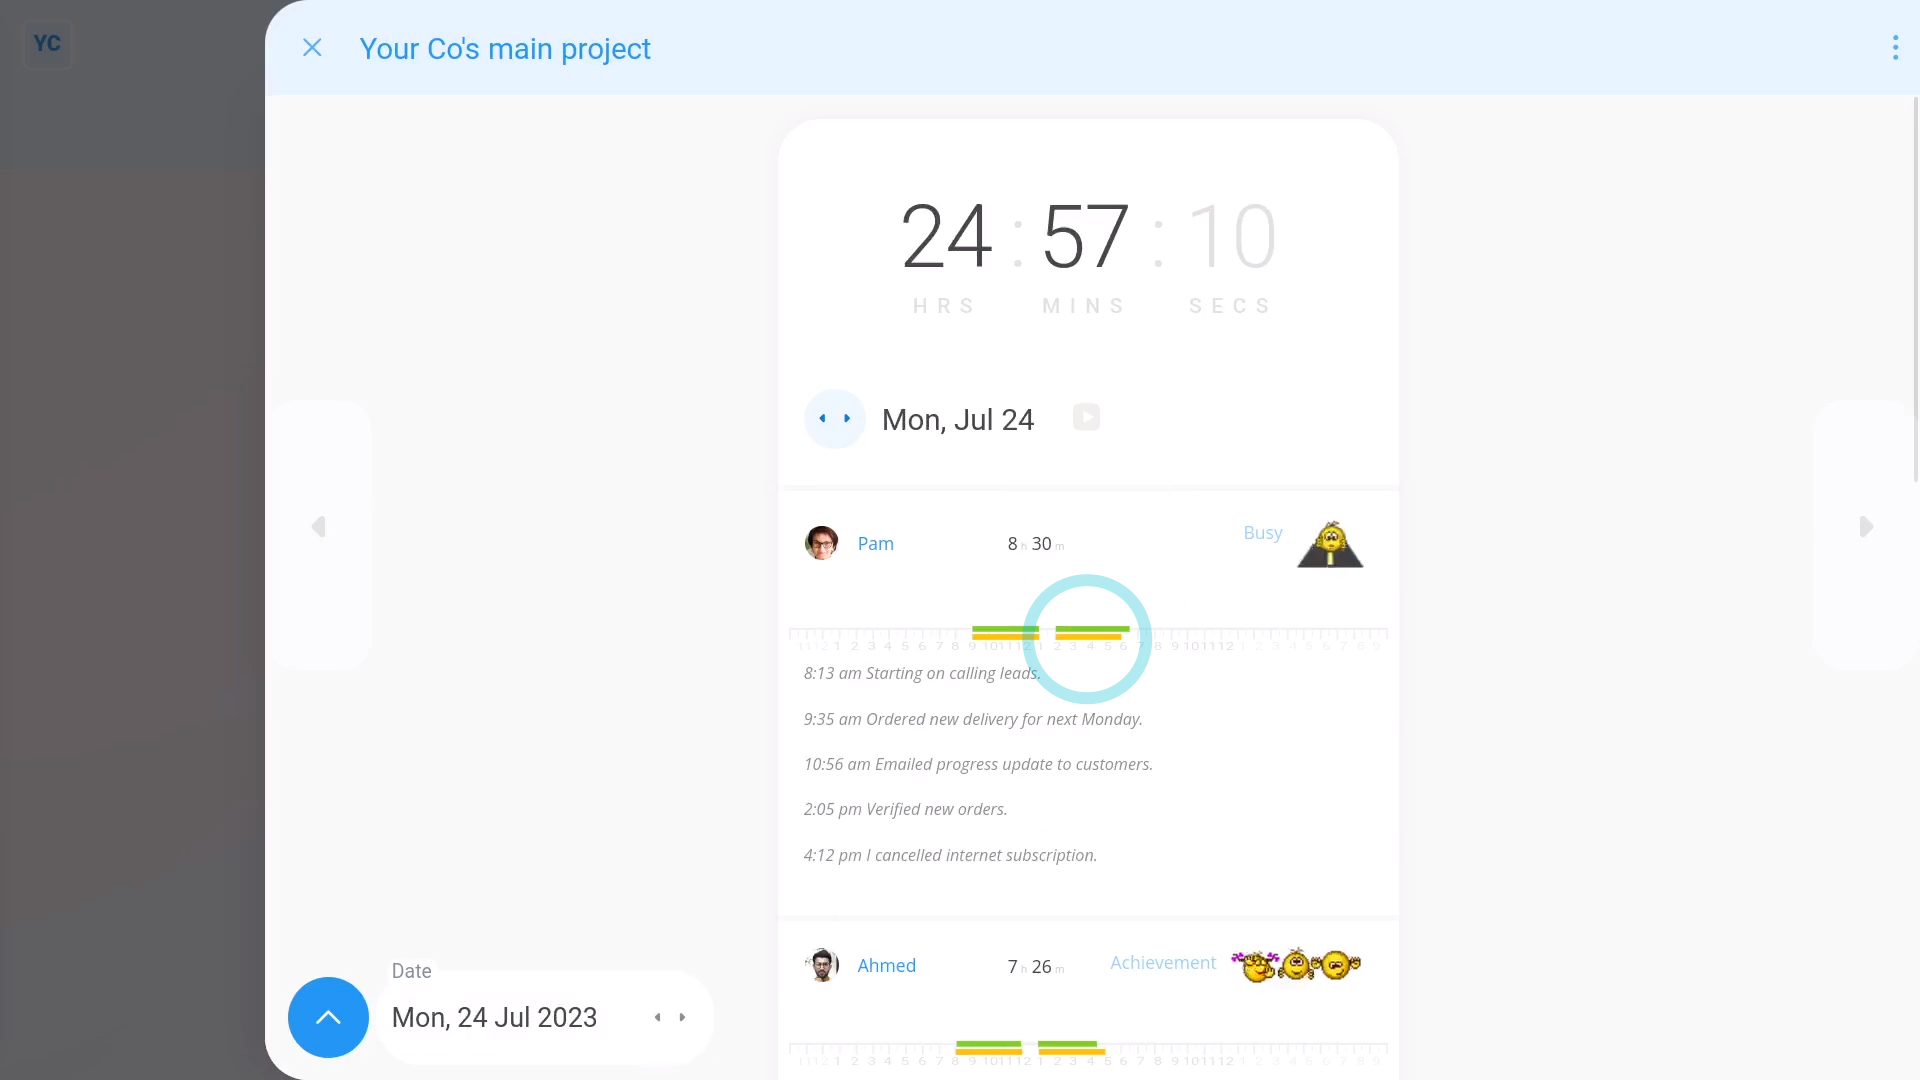
Timesheets track the number of hours that a person works:
- If you're paid hourly, timesheets set how much pay you're paid on payday.
- For everyone else, timesheets are still a good way to track your hours worked, even if it's not linked to your pay.
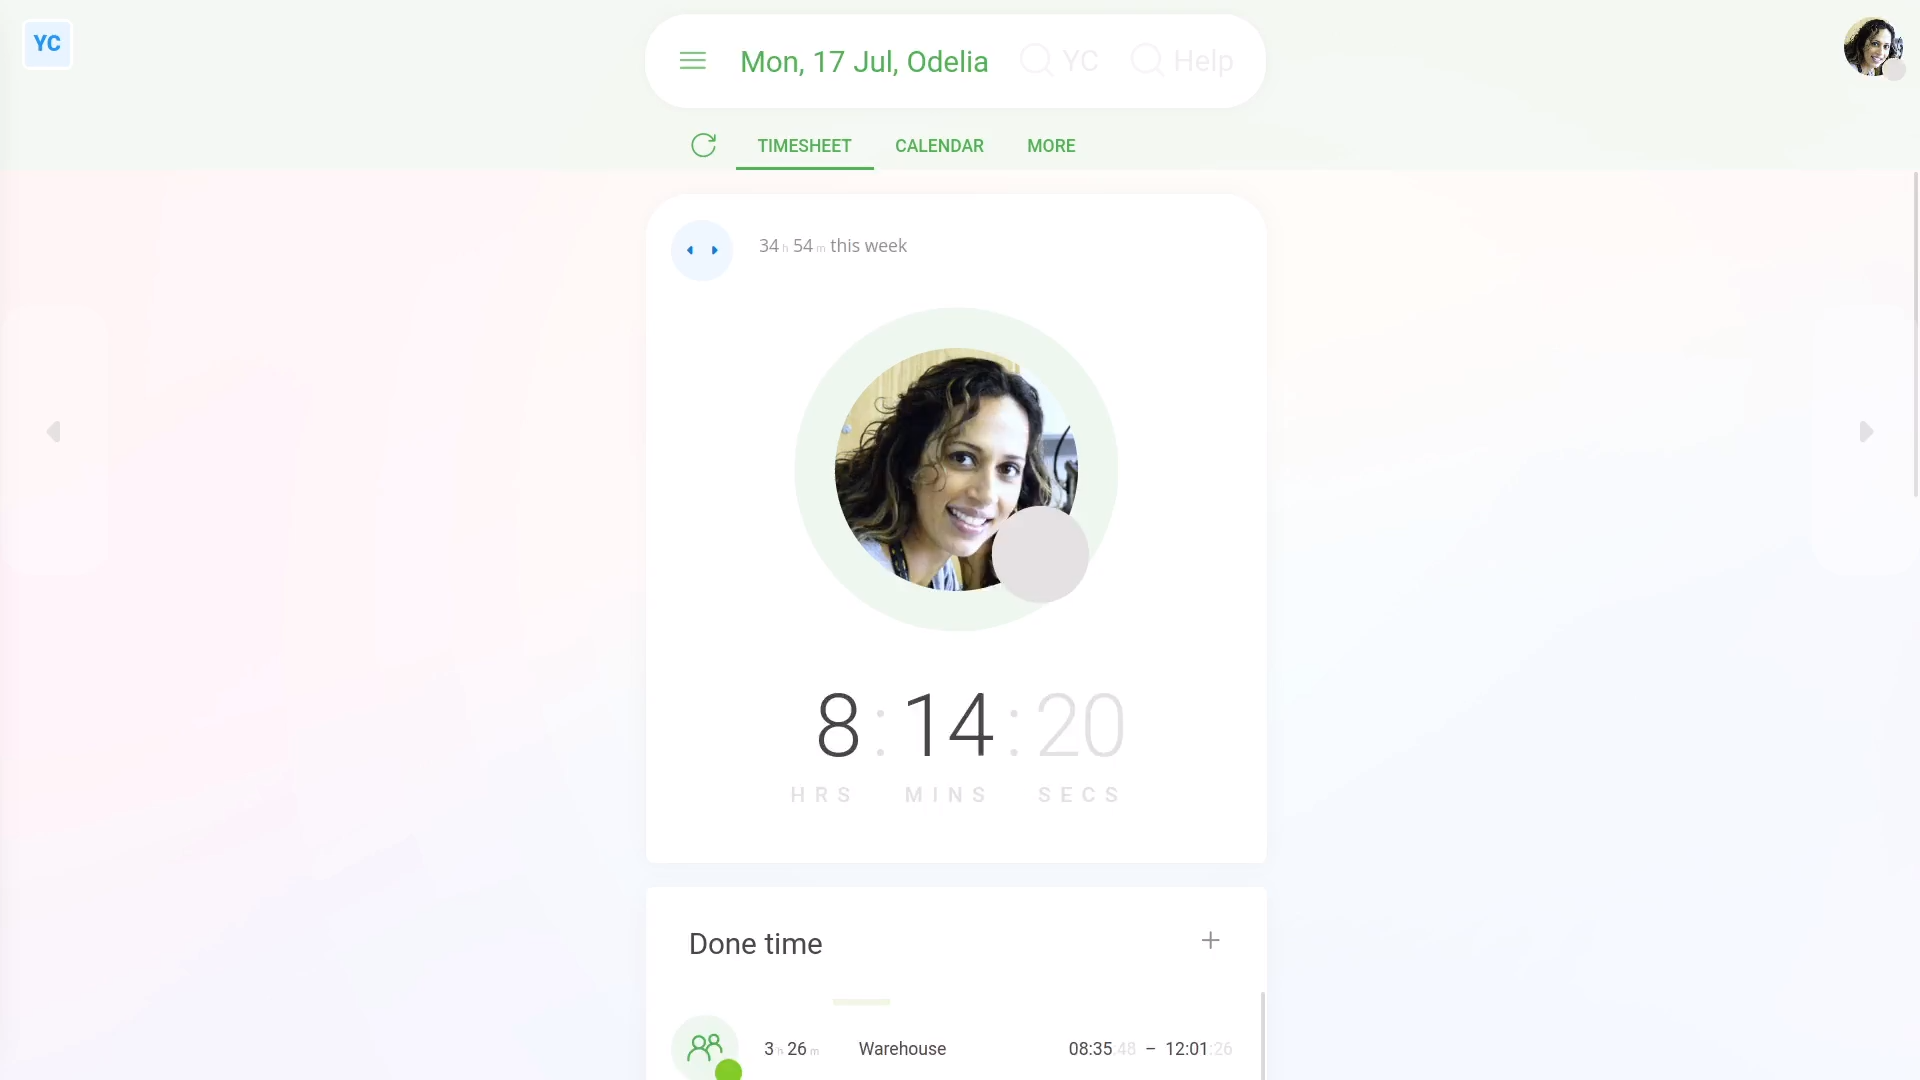
To open your timesheet:
- First, tap: "Work-time menu", then "Timesheet"
- Or tap: "Menu", then "My timesheet"
- For another way to open your timesheet, open your person page.
- Then tap: Calendar
- You can now tap the grey week number circles (at the start of each week), to show you that week's timesheets.
- And finally, if you go back and tap any date on the calendar you'll see the timesheet for that day.
To go backwards or forwards, a day at a time, through your timesheets:
- First, tap the side triangles on the left and right edges of the timesheet.
- And finally, you can tap the heading triangles (at the top).
To open your full timesheet, if your timesheet's side loaded:
- First, tap the three dots: (in the top-right corner)
- Then tap: Open in new tab
- And finally, you'll see the timesheet in the main window, and you'll have access to all of the timesheet's menus.
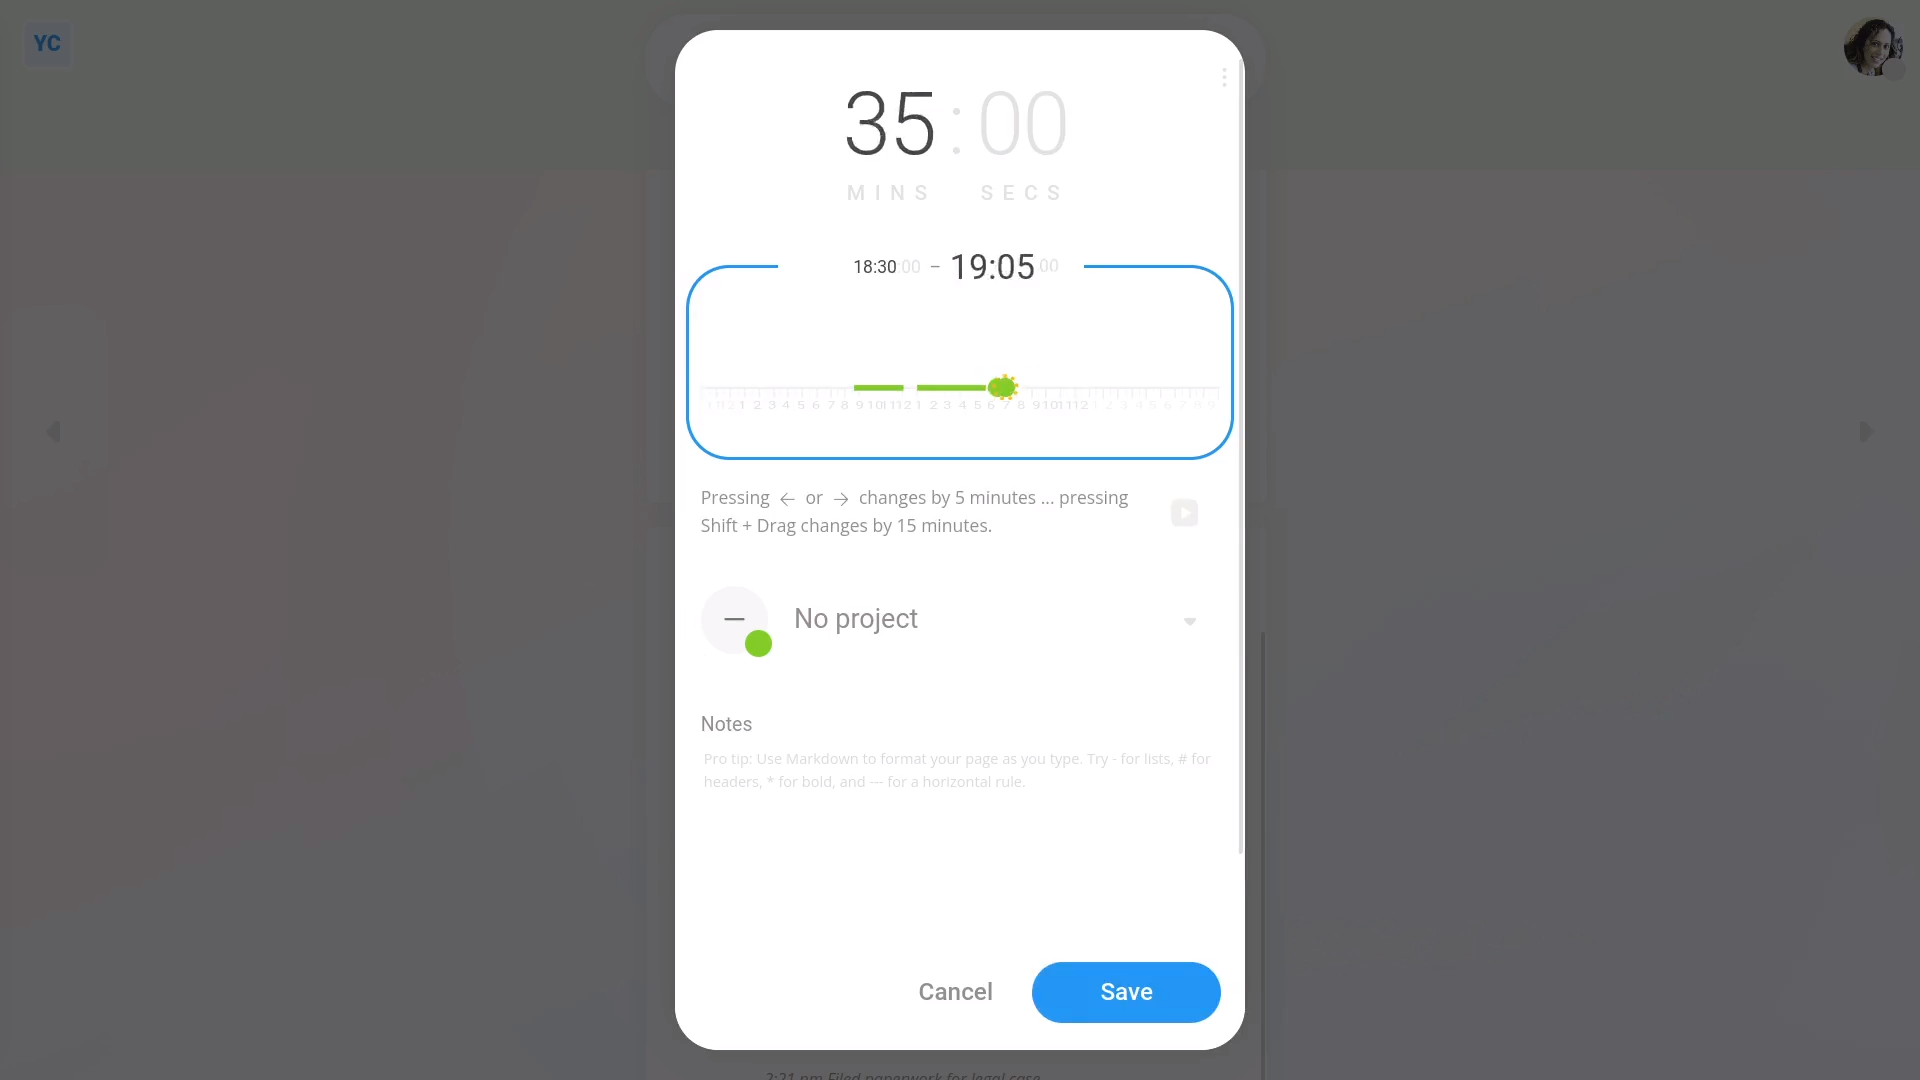
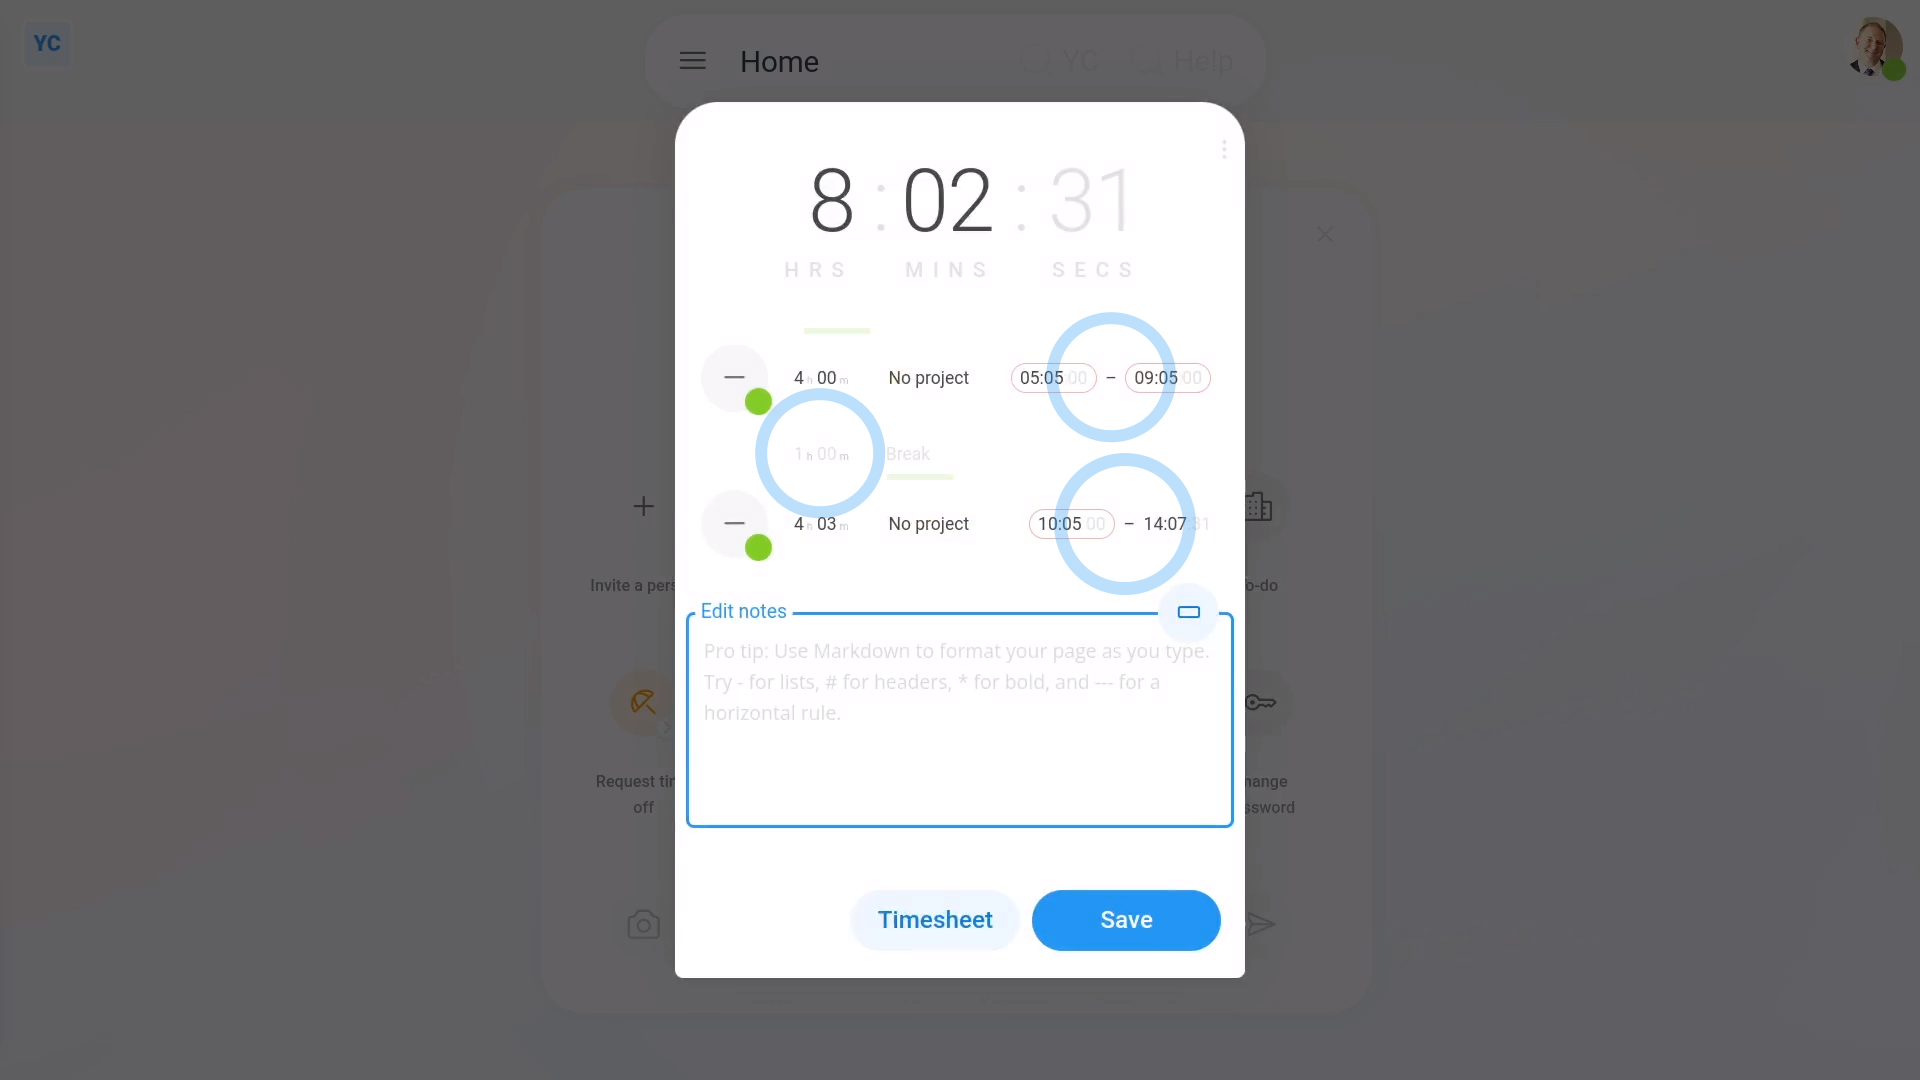
To add a timesheet time:
- First, normally you'd tap Start and Finish on the work-time menu, as you set starts and stops throughout your working day.
- Alternatively, if you're an admin, you can tap the "Add" button:
- Which lets you enter a time manually, by dragging the green sliders.
- Then tap: Save
- And finally, you'll now see the time you've entered, as well as the updated total done time for your working day.

You may notice:
- When you manually change a time by dragging the sliders, once it's saved it's got a red outline.
- The red outline represents a: "Manually adjusted time"
- The red outlines help you see when times were adjusted by hand, making it easier to spot timesheet fraud.
- The recommended way to enter done time is by using Start and Finish in: "Work-time menu" (top-right)
And that's it! That's everything you need to know about how to start using timesheets!
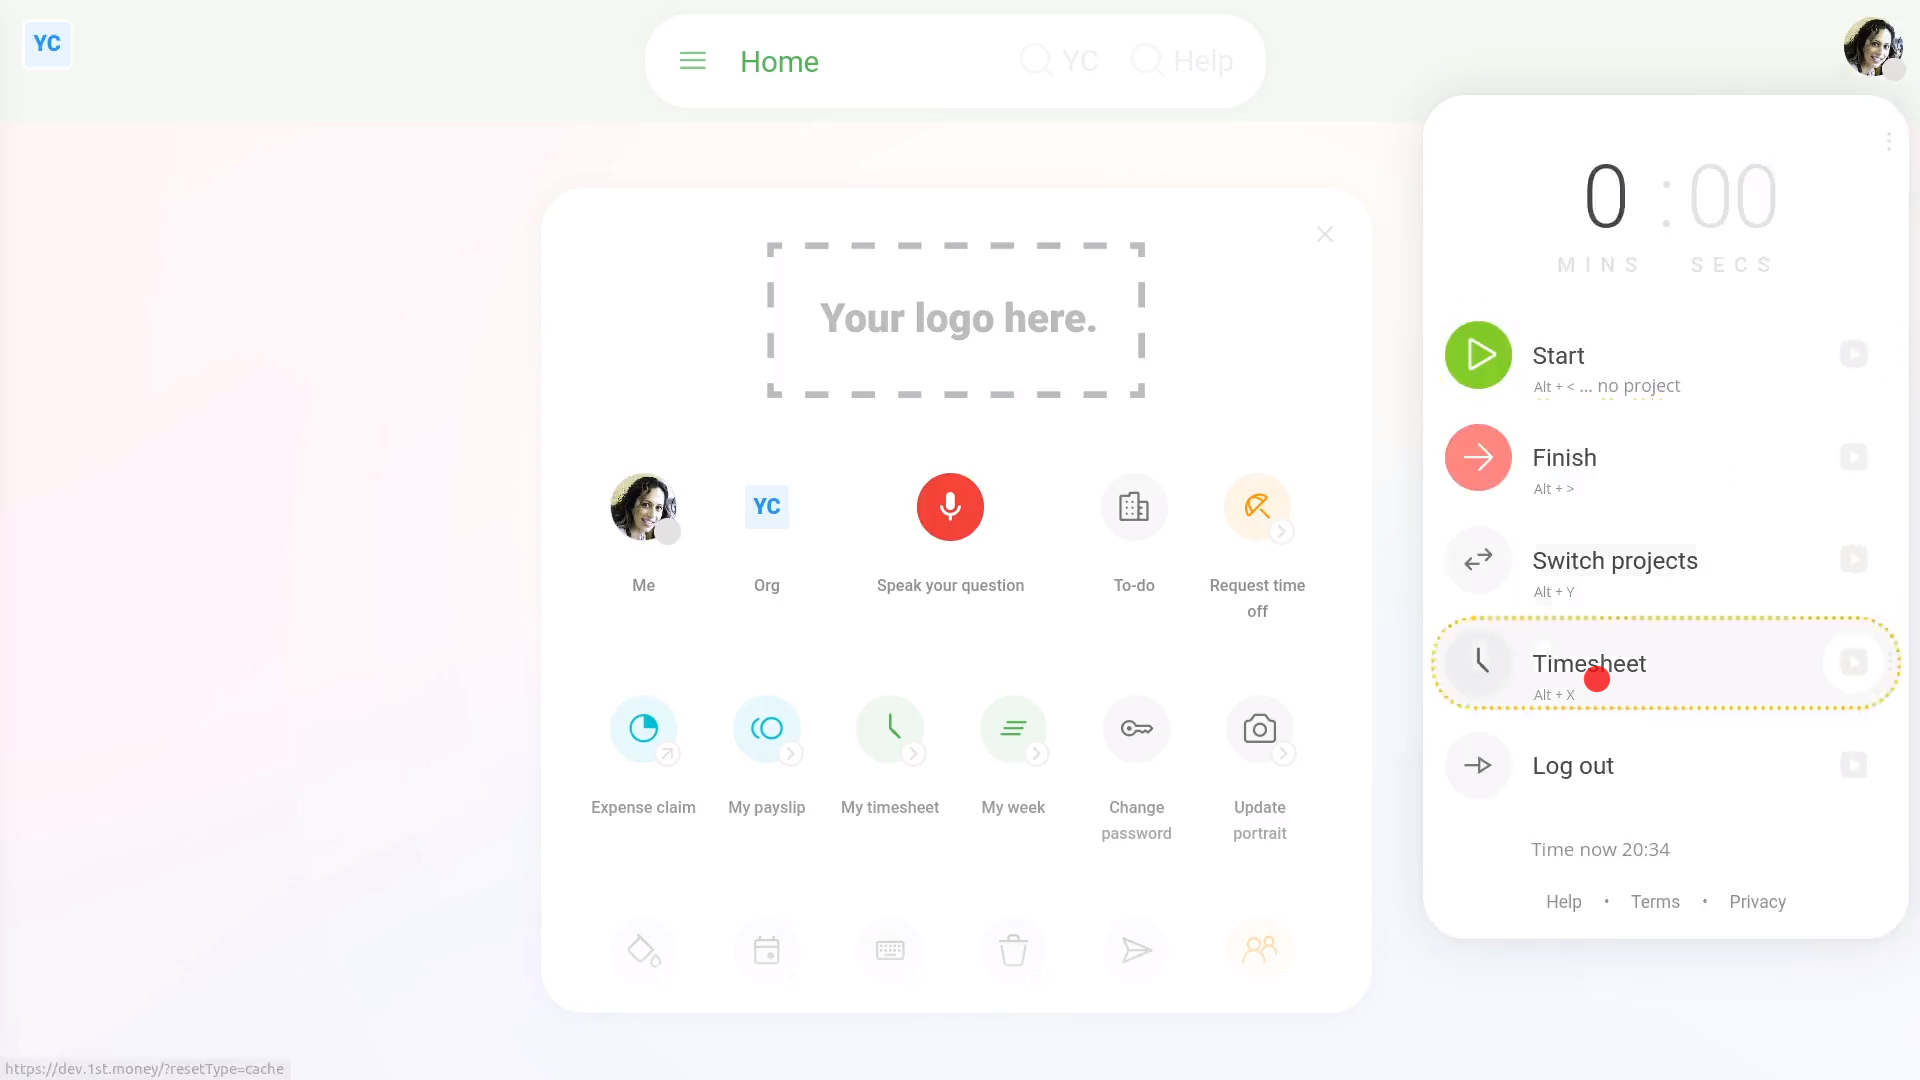
2. How do I start my clocked-in timesheet time, or pause for a break?
 2:31
2:31
"How do I start my clocked-in timesheet time, or pause for a break?"
If you're paid using "Per hour ... timesheet hours", you'll need to start your clocked-in timesheet time each day, when you start your work.

To start your clocked-in timesheet time:
- First, open and tap: "Work-time menu", then "Start"
- And finally, you've now started your clocked-in timesheet time, and your work-time status goes green.
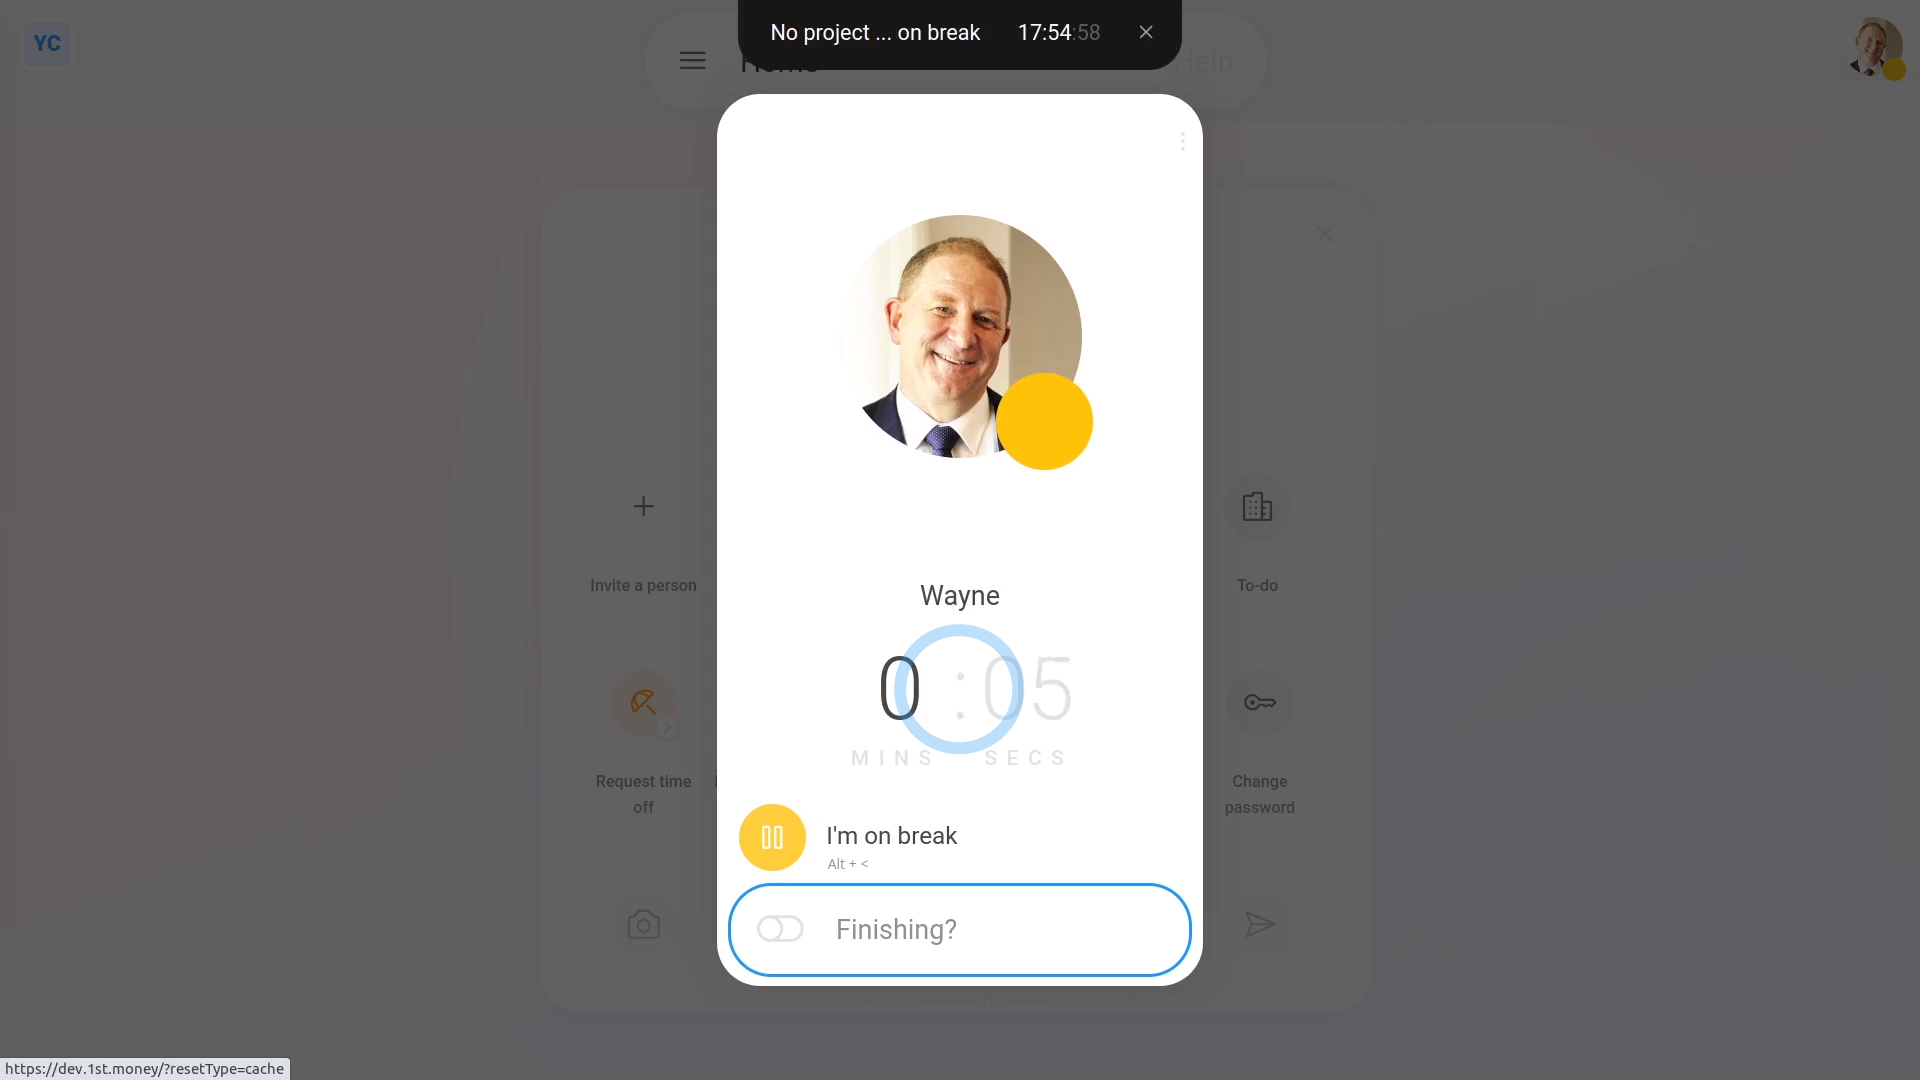
To pause your clocked-in timesheet time, once you're ready to go on break:
- First, tap: "Work-time menu", then "Go on break"
- You'll now see the "On break" screen, counting how long you've been on break.
- It's a good idea to keep it open, as a reminder to go "off break" once you return.
- Then once you're ready to continue working.
- Hover your mouse over: I'm on break
- And tap: I'm back
- And finally, (at the top) you'll see a confirmation that you've re-started your clocked-in timesheet time.
Sometimes, after being on break, you may want to finish up your working day.
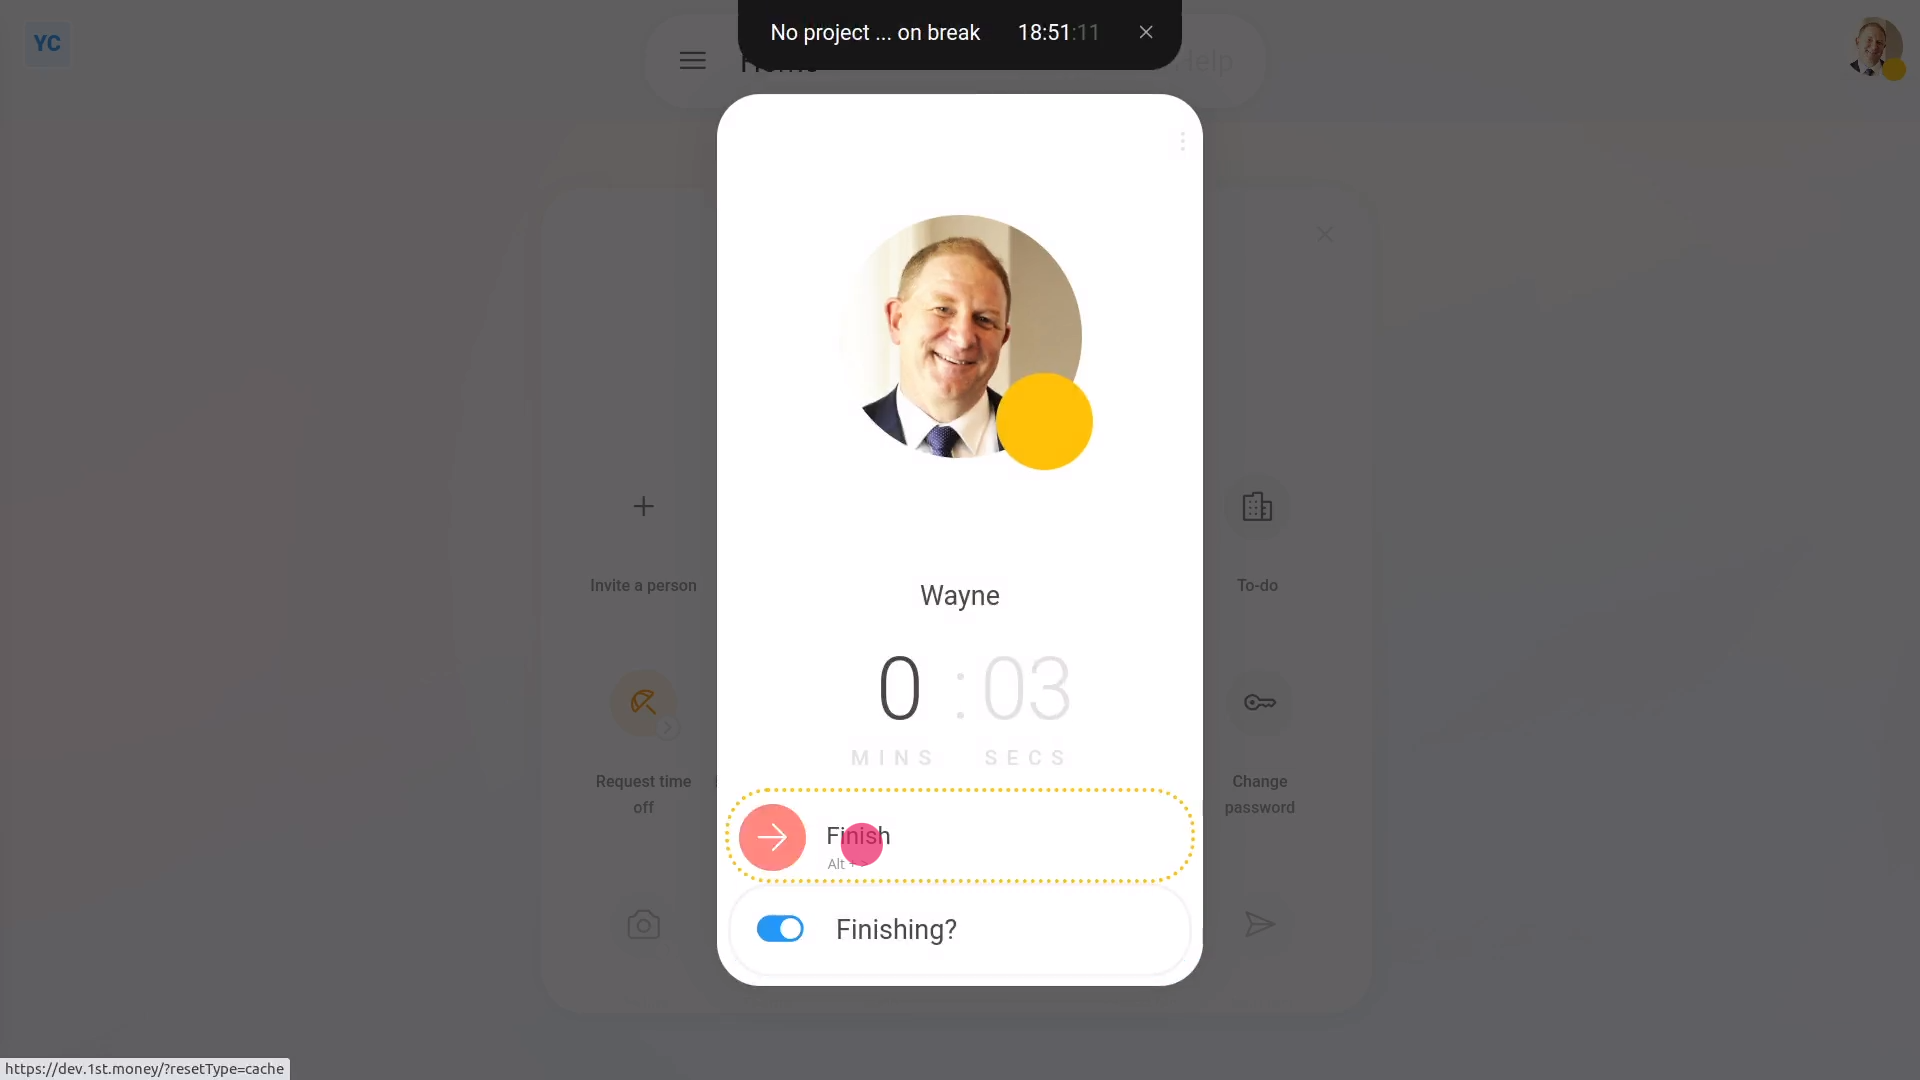
To finish up, while still on break:
- First, check that you're still on break.
- Then turn on: Finishing?
- Then tap: Finish
- You'll now be shown the "Finish" options, and you can finish-up your working day.
- And finally, while showing the "On break" screen, it loops through your wallpapers.
To set your wallpaper:
- First, right-click anywhere, and tap: Theme
- Then scroll down, and tap a wallpaper.
- Then tap: Save
- Now go back on break.
- And finally, while you're on break, you'll now see beautiful images from your wallpaper that change every 30 seconds.

To bypass your break screen, whilst staying on break, and get back into 1st Money:
- First, tap the three dots: (in the top-right corner)
- Then tap: Close
- And finally, you can now tap around 1st Money, whilst your work-time status stays set to: "On break"
And that's it! That's everything you need to know about pausing your clocked-in timesheet time when you go on break!
3. How do I stop my clocked-in timesheet time on the end of my day?
 1:29
1:29
"How do I stop my clocked-in timesheet time on the end of my day?"
While you're working, your work-time status is normally green, throughout your working day.
To end your clocked-in timesheet time, once you're ready to finish your working day:
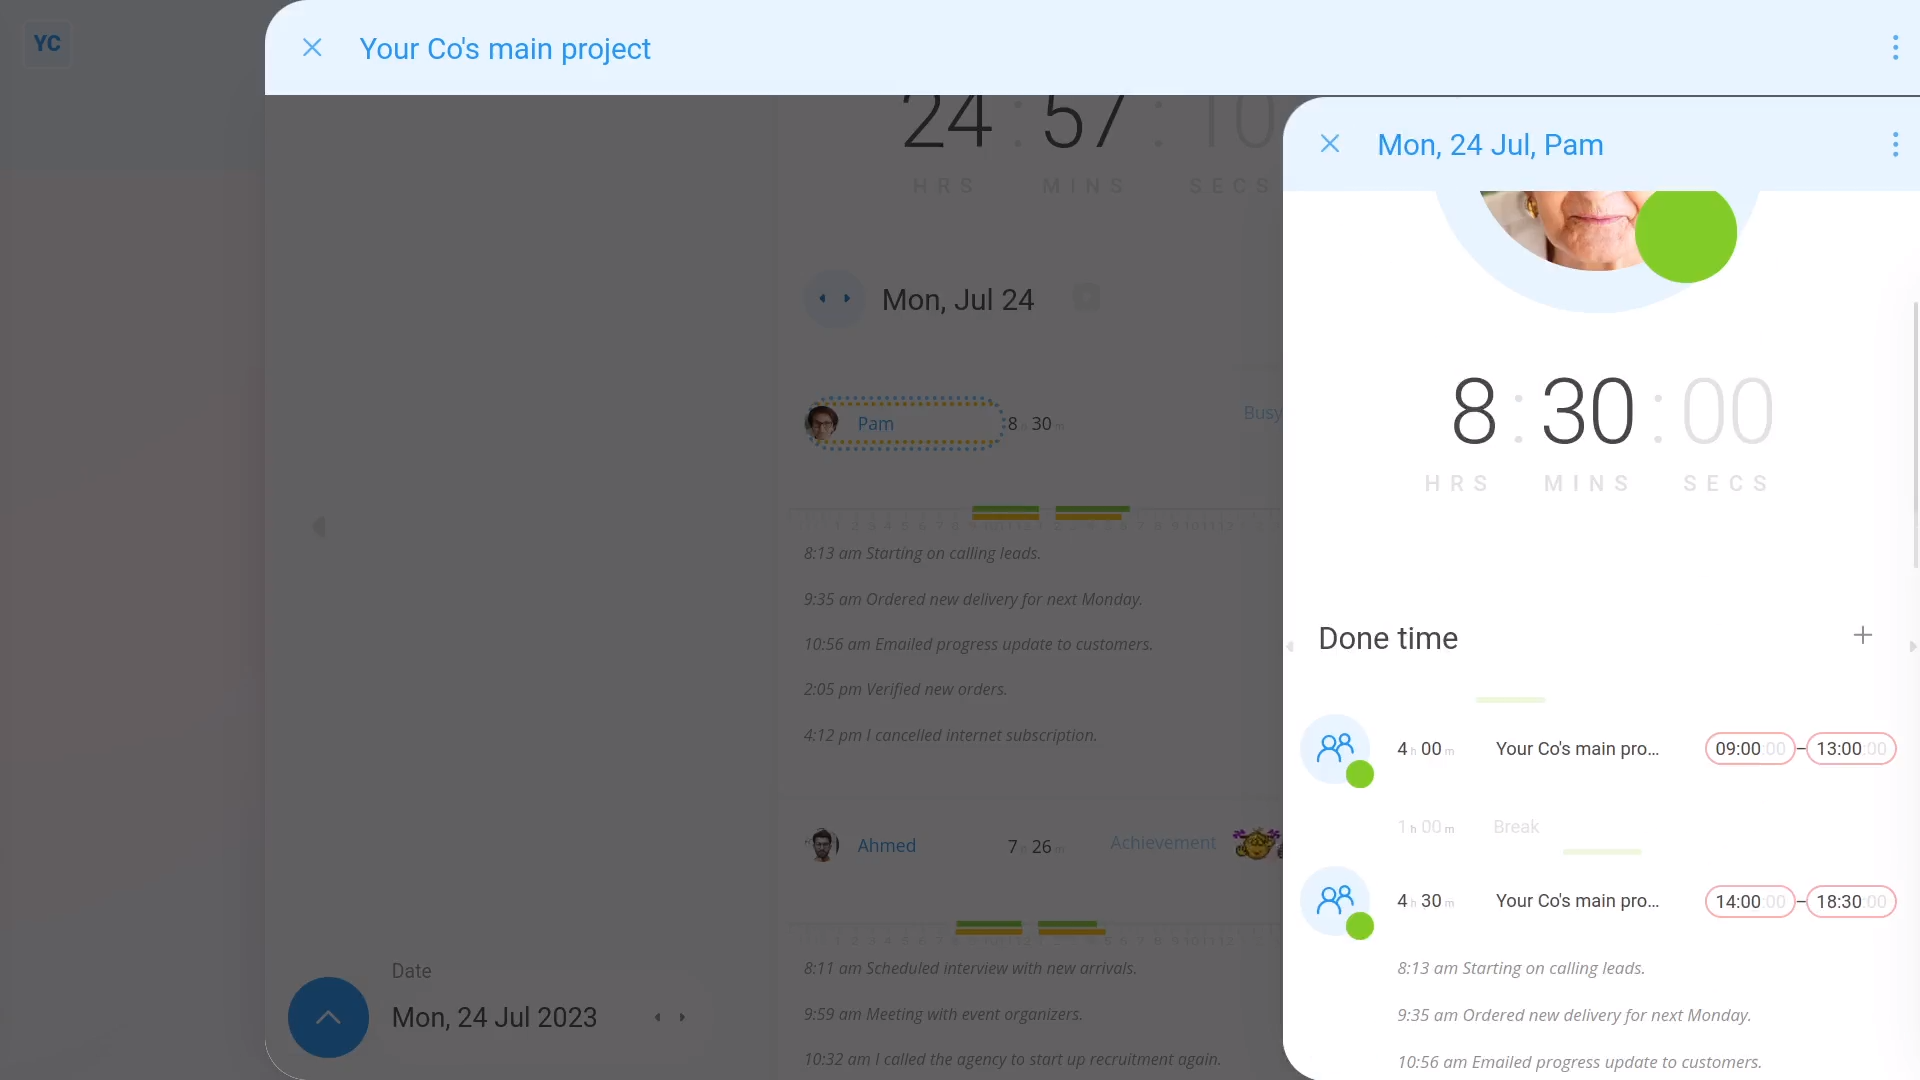
- First, tap: "Work-time menu", then "Finish"
- You'll now see the "Finish" options, which shows.
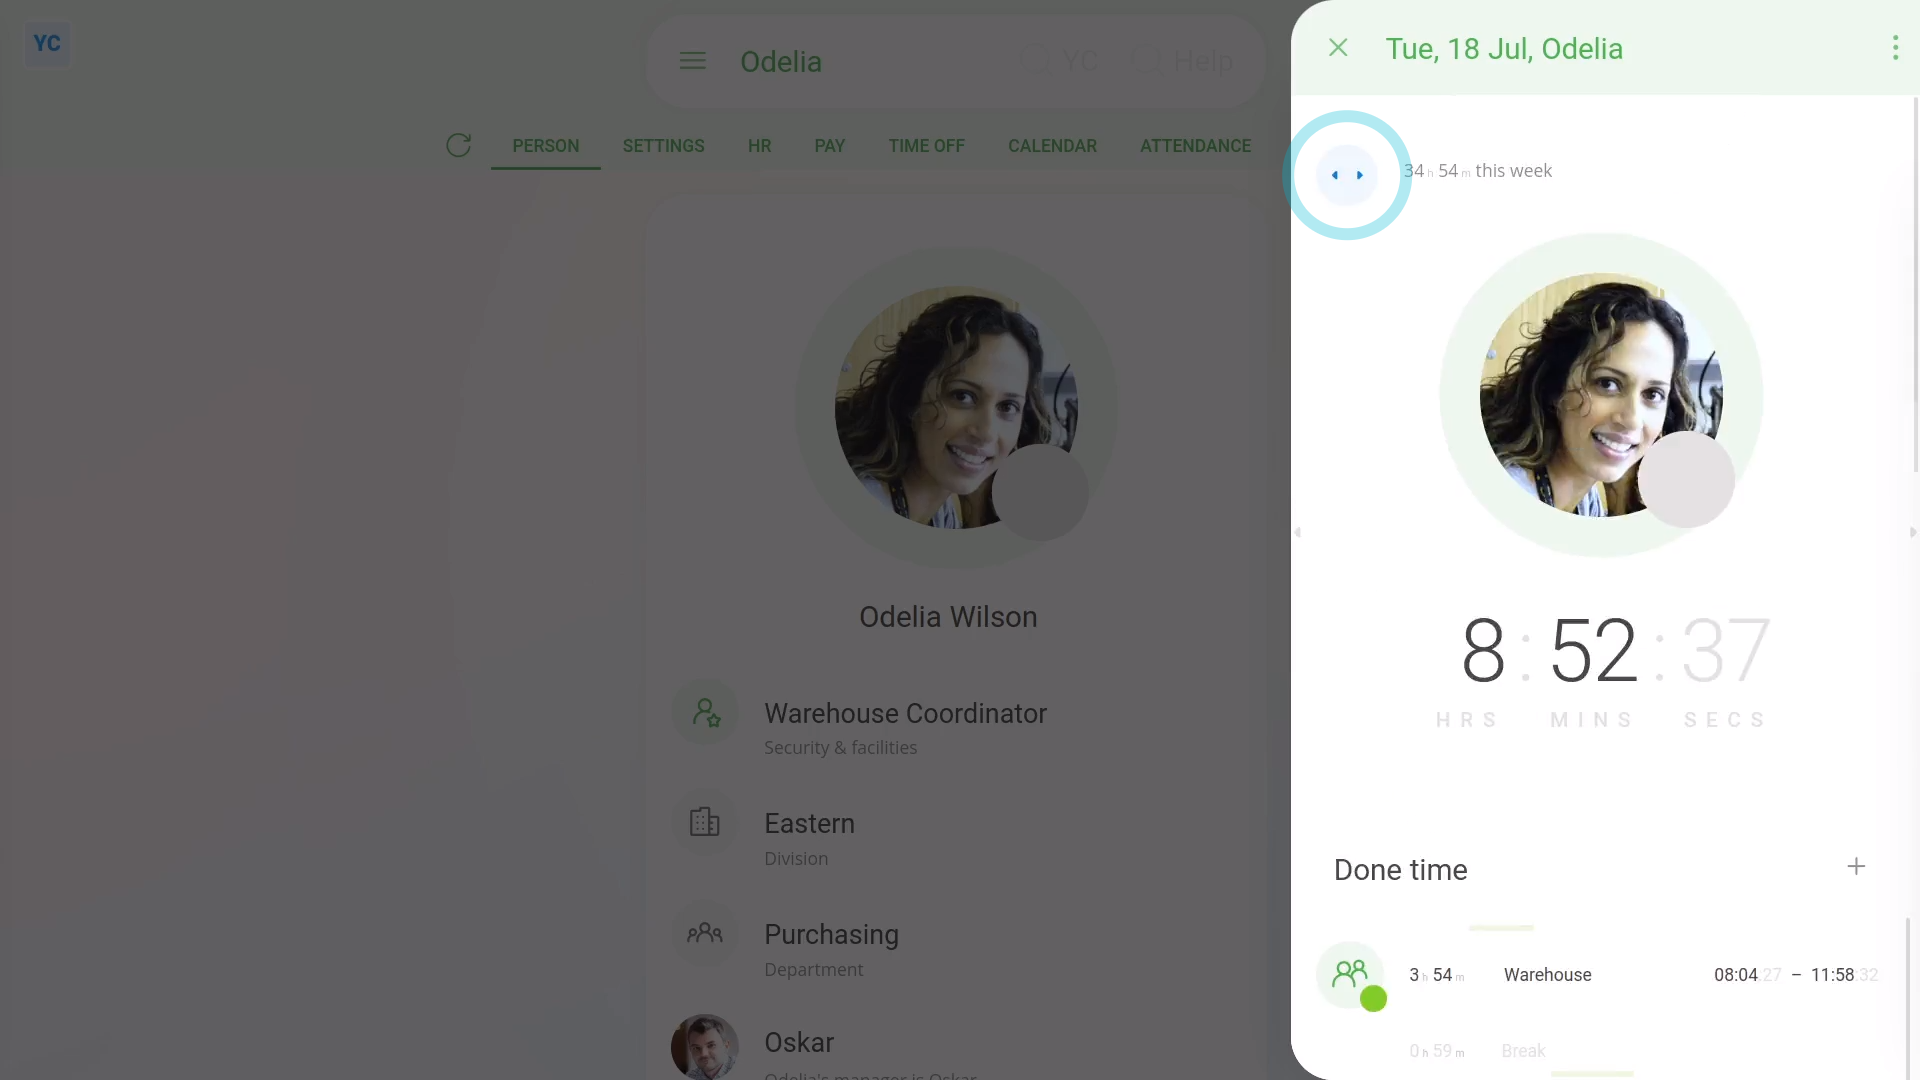
- Your total done time for your working day.
- And then a list of individual done times.
- And then you'll see a box to type in your notes for your timesheet.
- Next, tap: Save
- Next select how you're feeling as you end your working day.
- And finally, tap Close, and you're all finished for the day.
You may notice:
- It's only when you tap Save that your work-time status goes grey, and your clocked-in timesheet time is finally stopped.
- During all the steps before you tap Save, your work-time status is still set to started.
Keep in mind that:
- When reassigning a project, that your done time was set to, you can only change the project.
- The times done remain unchanged.
- Also remember that any notes you enter also show on the "Timelines" report.
And that's it! That's everything you need to know about finishing up, when you end your working day!
4. How do I add timesheet notes, and what are the timesheet colours?
 1:36
1:36
"How do I add timesheet notes, and what are the timesheet colours?"
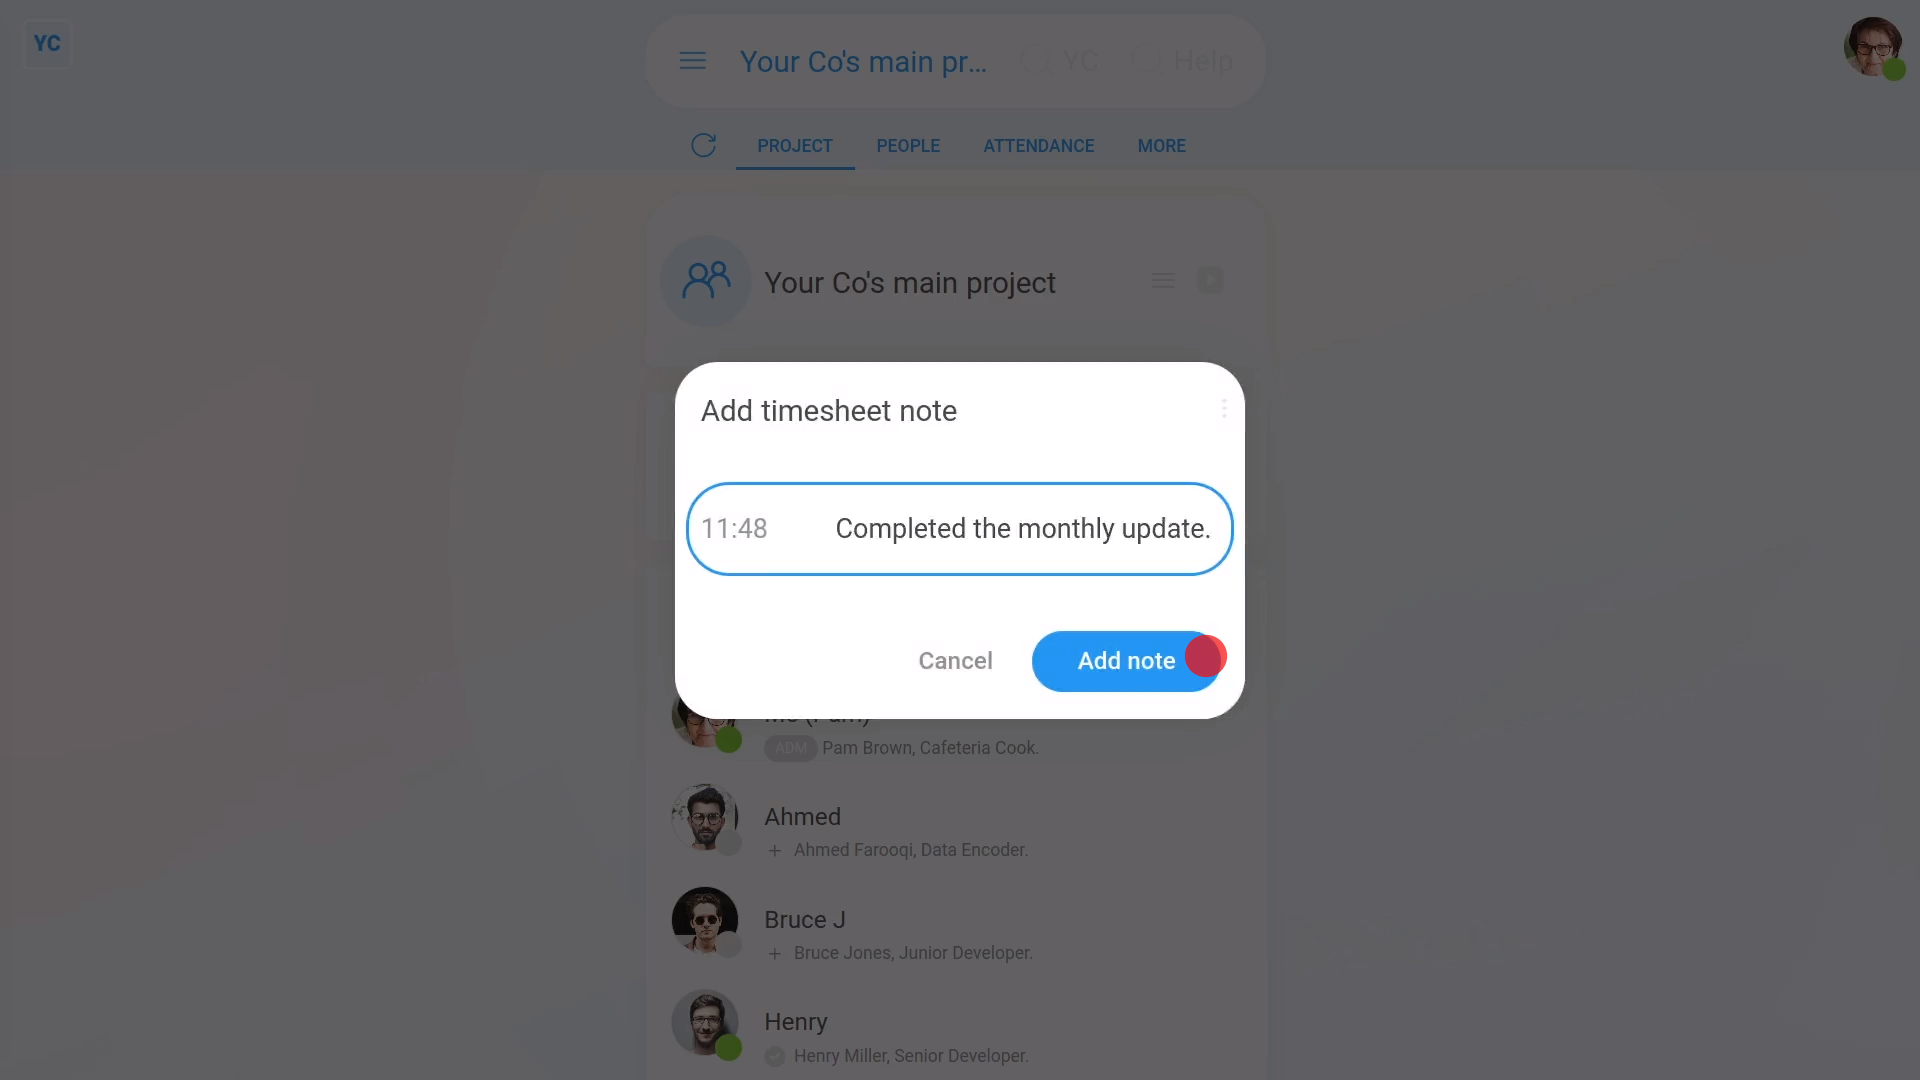
To add notes to your own timesheet:
- First, tap: "Work-time menu", then "Add timesheet note"
- Now type your note, and tap: Add note
- And finally, the time of day is added automatically to the front of your note.
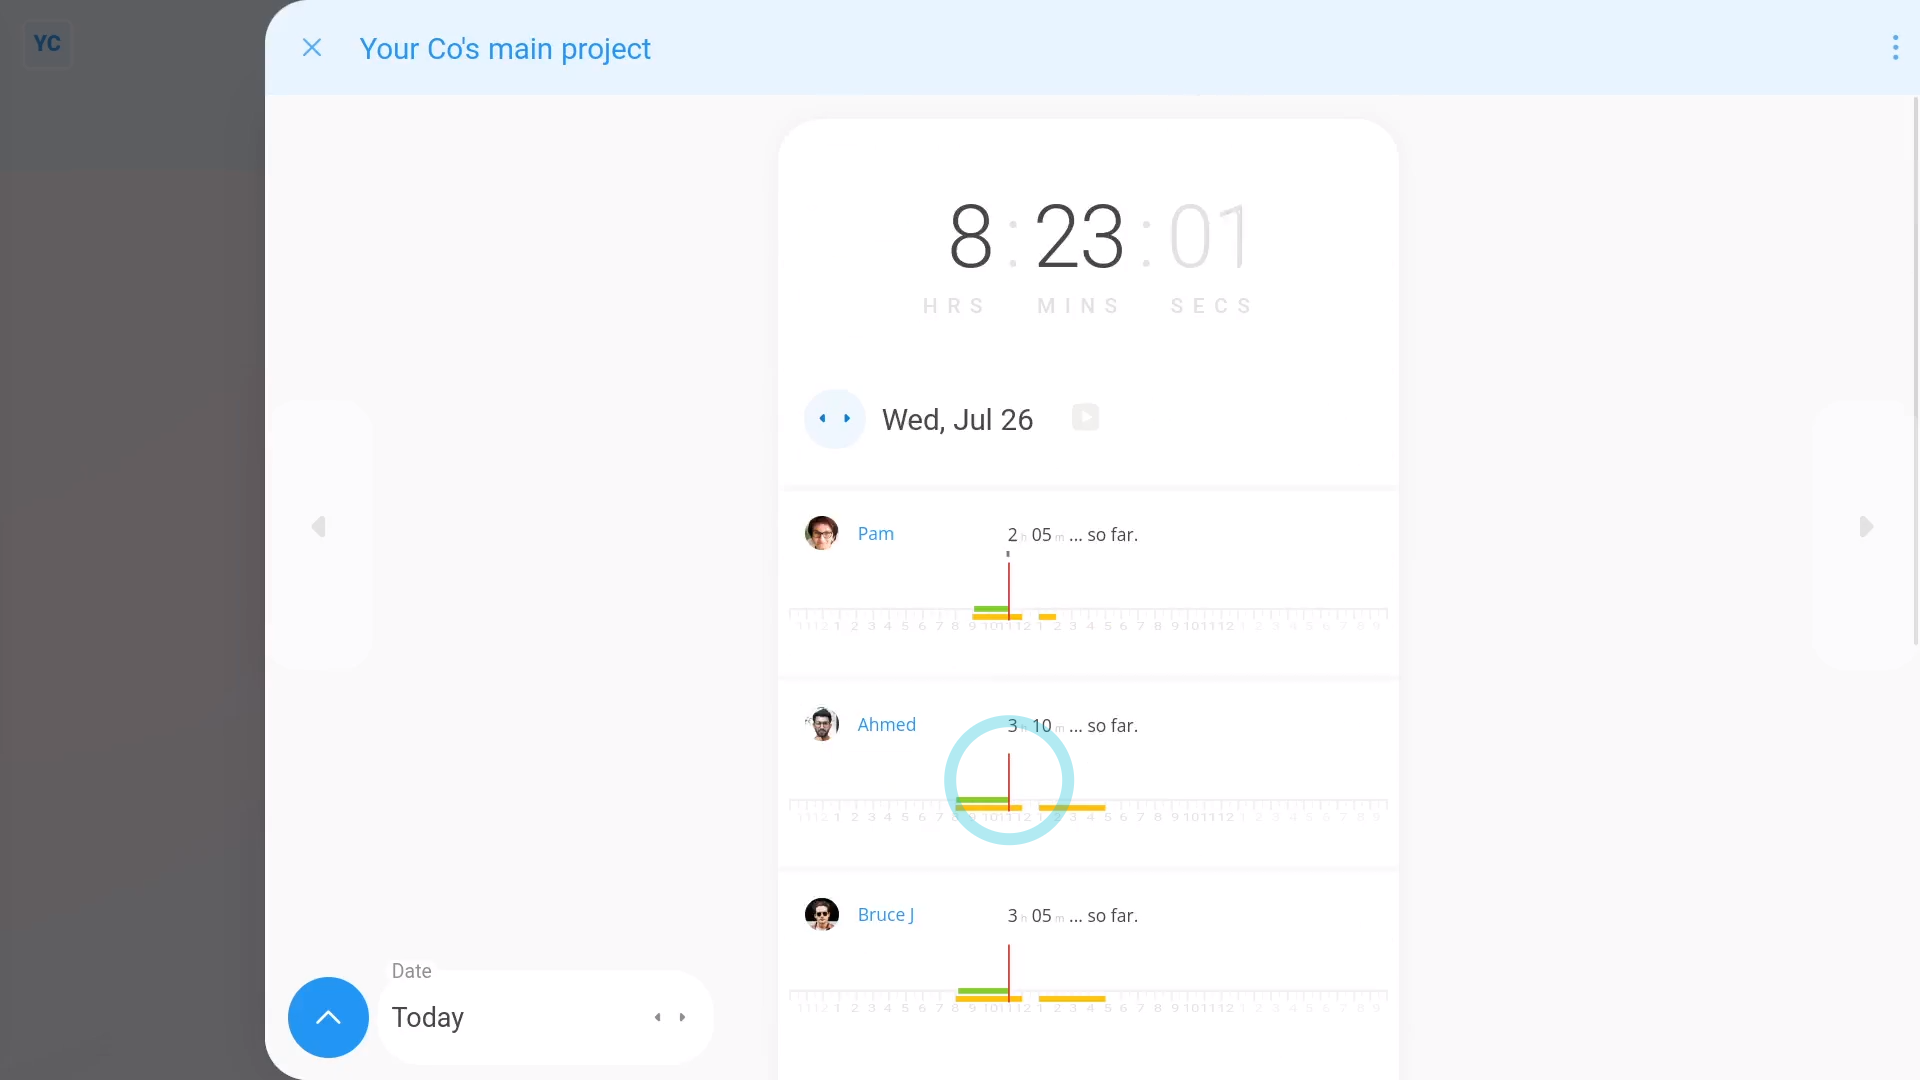
To understand both colours of timesheet lines:
- First, the green line represents done time.
- The yellow line represents planned time.
- And finally, sometimes the green done time line may be longer, or shorter, than the yellow planned time line. If so, it means that the person's finished after, or before, than their planned stop time.
To see a person's full timesheet from a "Timelines" report:
- First, tap the blue link.
- And finally, you'll see the person's full timesheet open on the right.
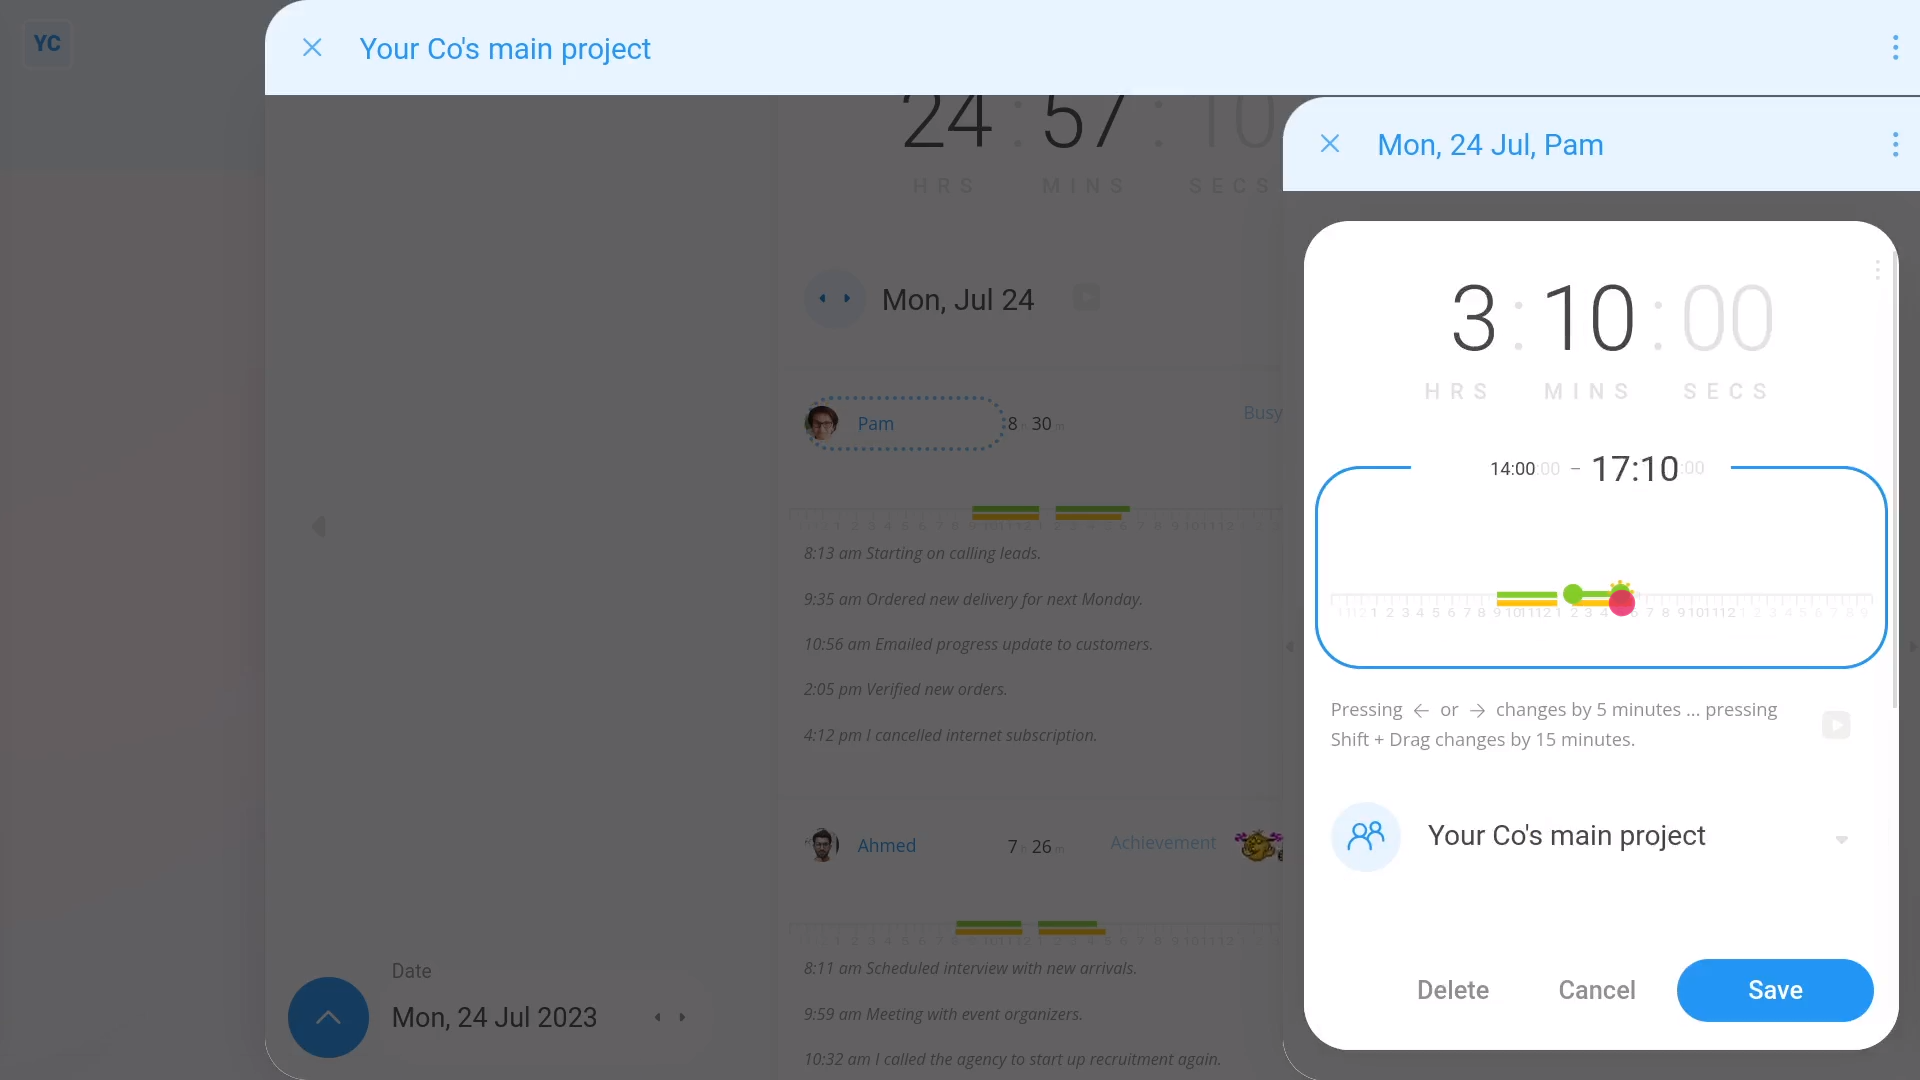
To change a person's timesheet times:
- First, tap a row.
- Then change their timesheet times by dragging the green circles with your mouse.
- Alternatively, you can select a green circle and then press the arrow keys on your keyboard.
- Once the time's right, tap: Save
- To see the "Timelines" report update, close the timesheet, then tap the three dots: (in the top-right corner)
- And finally, once you tap Reload, you'll see the "Timelines" report update.
5. How do I switch projects?
 2:55
2:55
"How do I switch projects?"
When people start their clocked-in timesheet time, there's the option of assigning their time worked to a project. You can then use the project's "Attendance" reports to see how everyone's time on that project has been spent.
But before you can assign your time worked to a project, you first have to be added as a worker on the project.

To see a list of all projects you're already a worker on, and to switch projects:
- First, to start your clocked-in timesheet time, tap: "Work-time menu", then "Start"
- Now that it's started, you can now tap: "Work-time menu", then "Switch projects"
- You'll now see a list of all the projects you're already a worker on.
- Tap the project you'll be working on next.
- Add any notes about work done on the project you're switching away from.
- Then tap: Switch
- And finally, you'll see a confirmation (at the top). The message confirms you that from the second you tapped Switch, your clocked-in timesheet time is now recorded against the newly selected project.
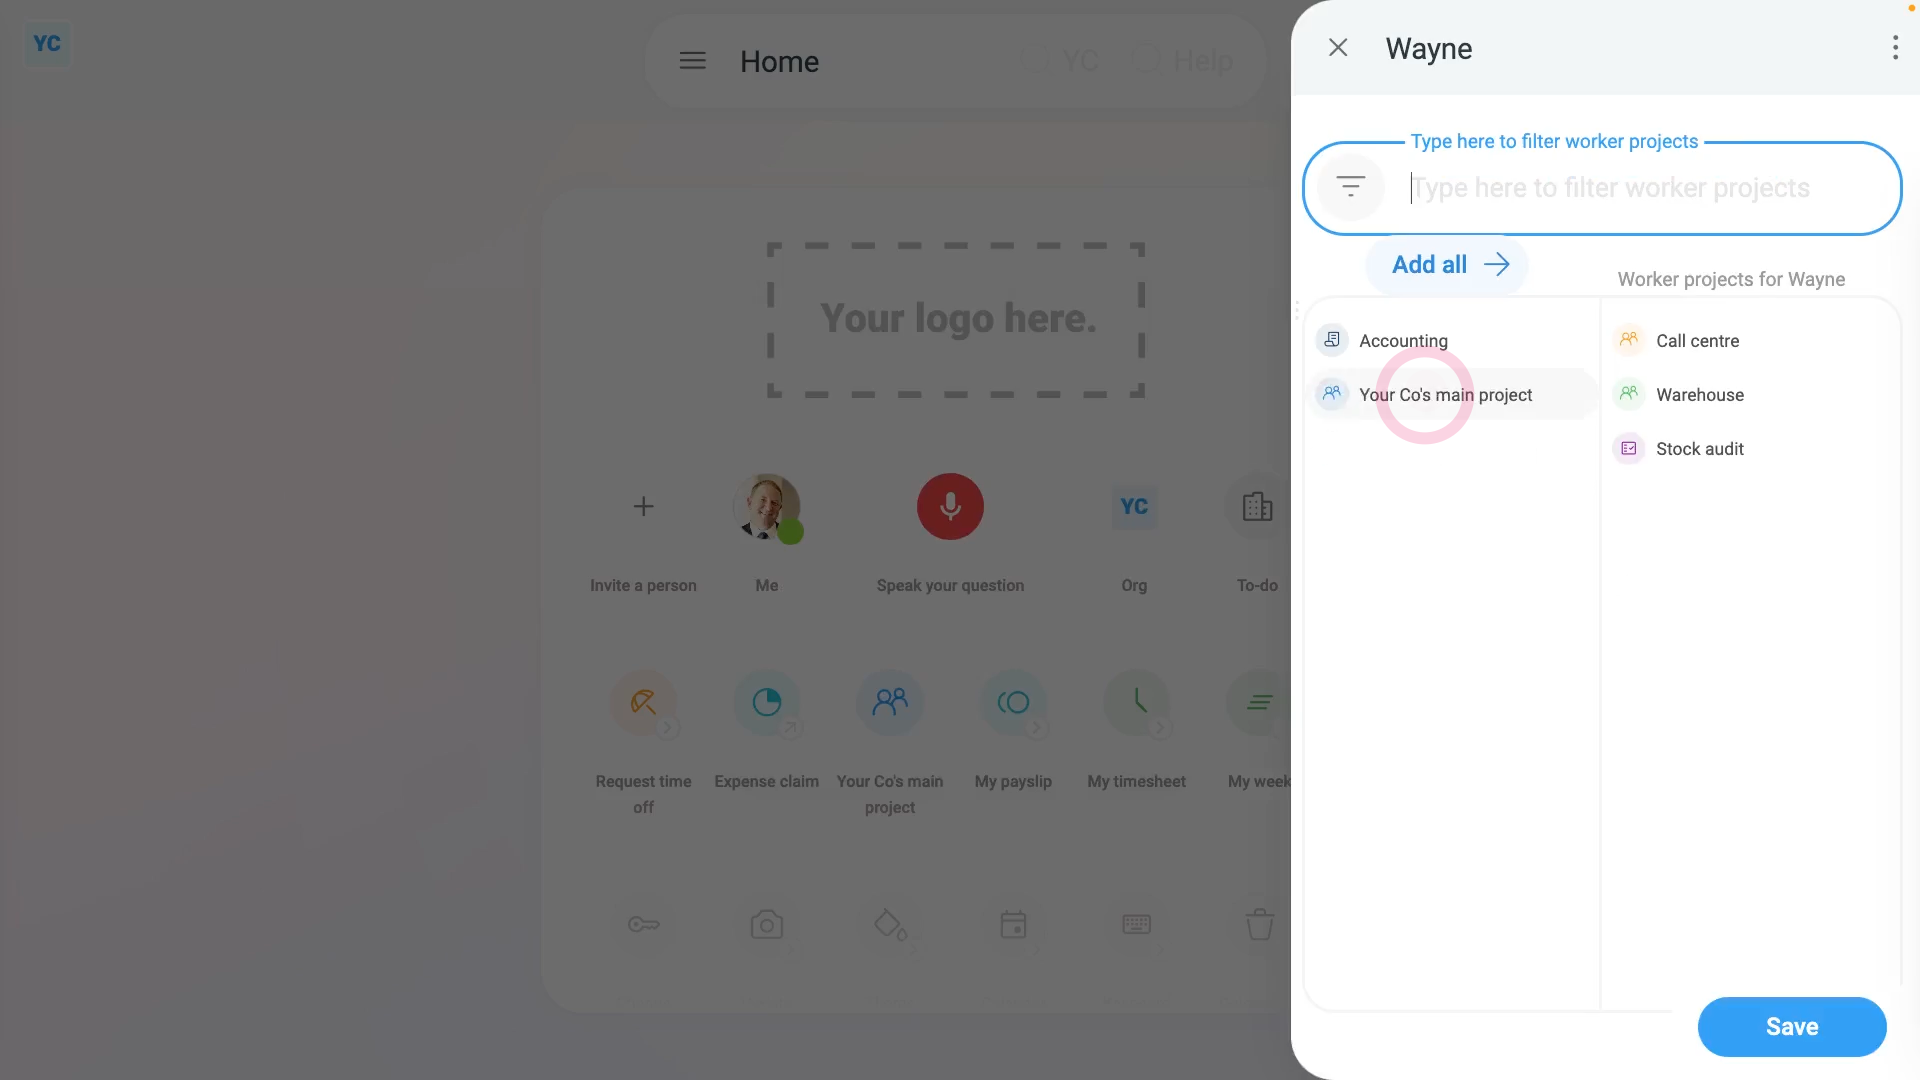
To add more worker projects for yourself:
- First, with your clocked-in timesheet time already started, tap: "Work-time menu", then "Switch projects"
- If you're an admin, you'll see an option to Add yourself as a worker on more projects (at the bottom of the list).
- Tap Add, and then tap the projects you'd like to add yourself as a worker on.
- Then tap Save, and you're now a worker on your newly added projects.
- And finally, when you tap: "Work-time menu", then "Switch projects", you can switch to one of your new projects.

To add more worker projects for another person:
- First, select the person on: "Menu", then "People"
- Then tap: "Projects", then "Summary"
- Under the "Worker" column, tap the Add button that shows when you hover.
- Tap the projects you'd like to add the person as a worker on.
- Then tap: Save
- And finally, you'll see ticks showing that the person is now a worker for the selected projects.
Keep in mind that:
- Only admins and project owners can add workers to a project.
- If you want more projects in your "Switch projects" list and you're not an admin, you'll need to ask an admin to do it for you.
For advanced usage:
- It's safe to later remove a person as a worker on a project.
- All their existing clocked-in timesheet time is still safely stored.
- However, the person can't add any new time to that project.
And that's it! That's all you need to do to switch projects!
How can workers adjust their own timesheet times?
 3:00
3:00
"How can workers adjust their own timesheet times?"
Sometimes timesheet times are entered wrong and need to be adjusted.

There's two ways to set timesheet done times:
- The first is where people clock-in timesheet time starts and stops throughout their working day. Each clocked-in timesheet time stores exact start or stop times to the second.
- The other is "manual adjustments", set directly on the timesheet, usually by admins or managers. Manual adjustments are always highlighted with a red warning border, and only store their start or stop times to the nearest minute.
To reduce false hours and timesheet fraud, 1st Money defaults to only allowing admins and managers to do: "manual adjustments"
Some orgs, however, prefer that every person can manually adjust their own timesheet times directly.
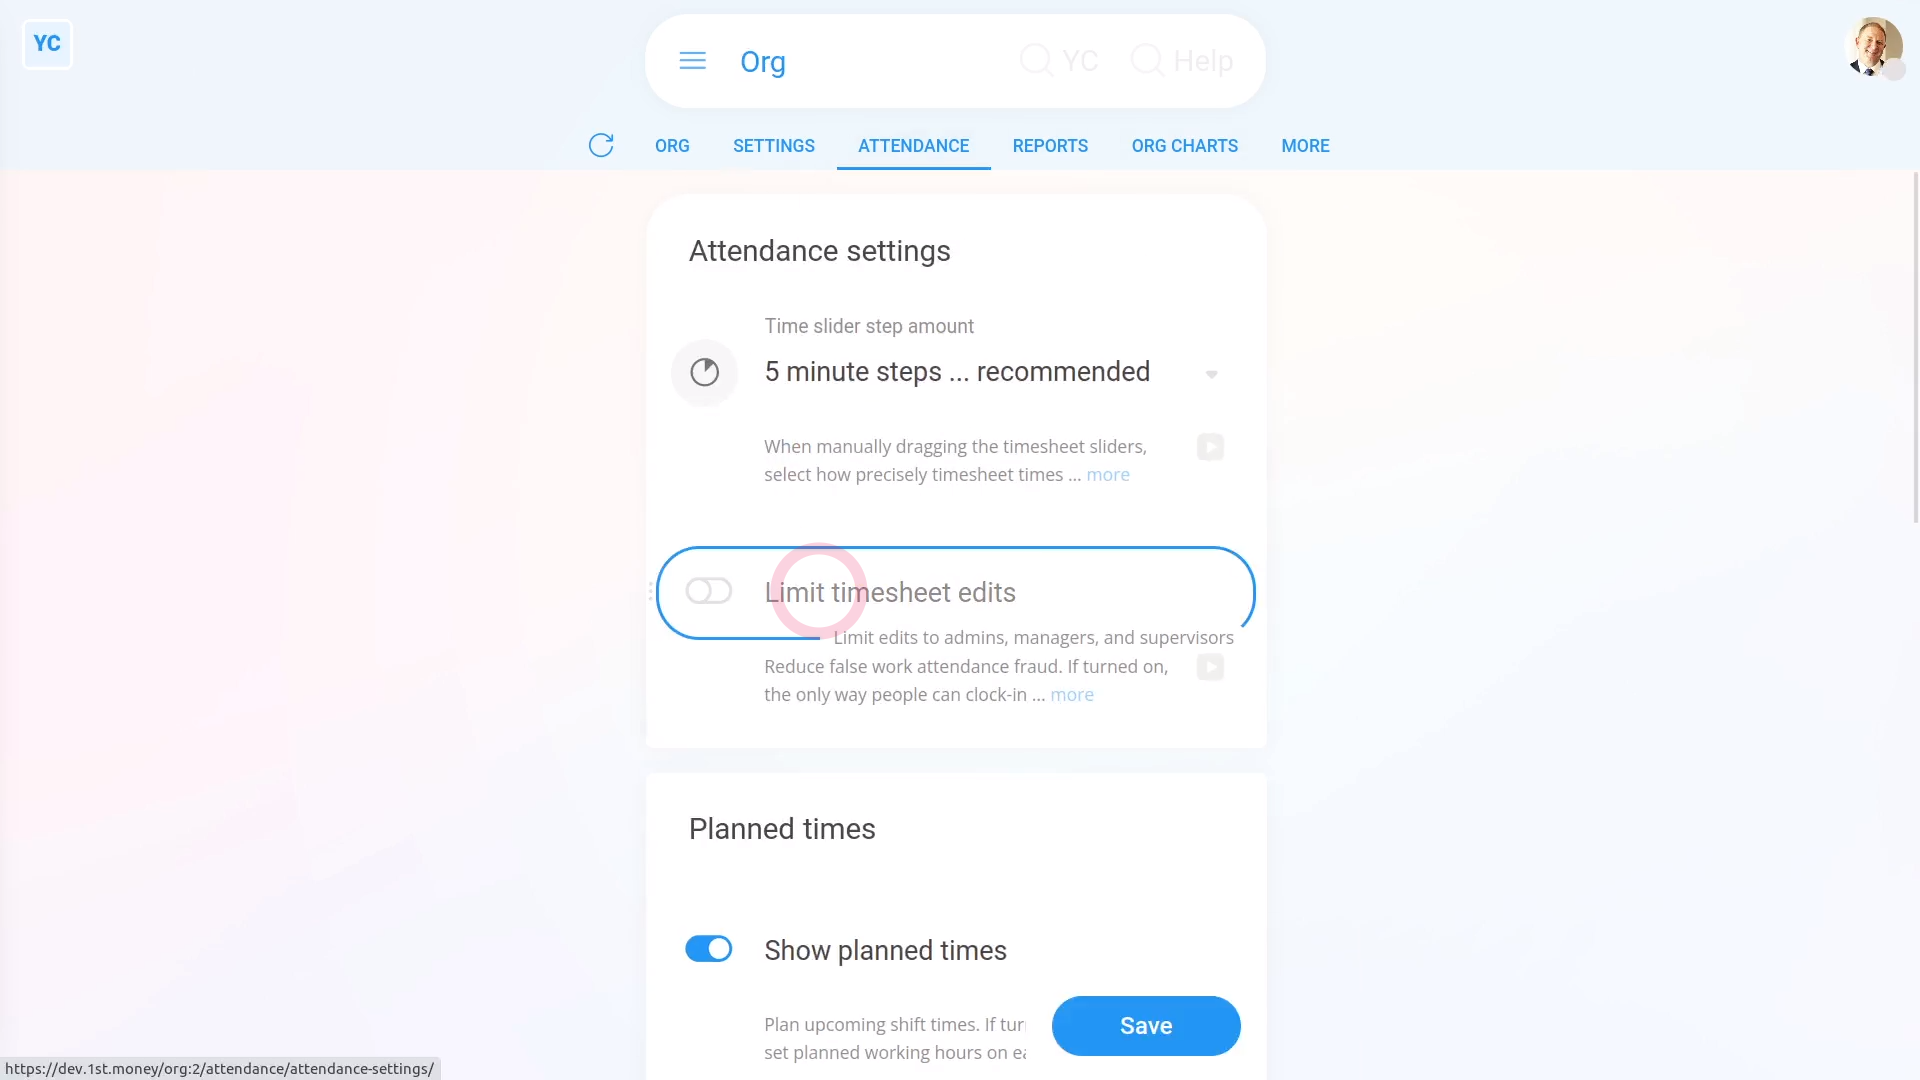
To allow everyone to manually adjust their own timesheet times:
- First, open your org on: "Menu", then "Orgs"
- Then tap: "Attendance", then "Attendance settings"
- Next, turn off: "Limit timesheet edits"
- Then tap: Save
- And finally, now everyone in your org can change their own timesheets.
When "Limit timesheet edits" is set to "Off":
- Each person is free to manually adjust their own done time for up to 5 days after the date of the timesheet.
- Each person can change their timesheet themself.
- Each person doesn't need to go to an admin or manager to change their timesheet.
- "Manual adjustments" are always highlighted with a red warning border.
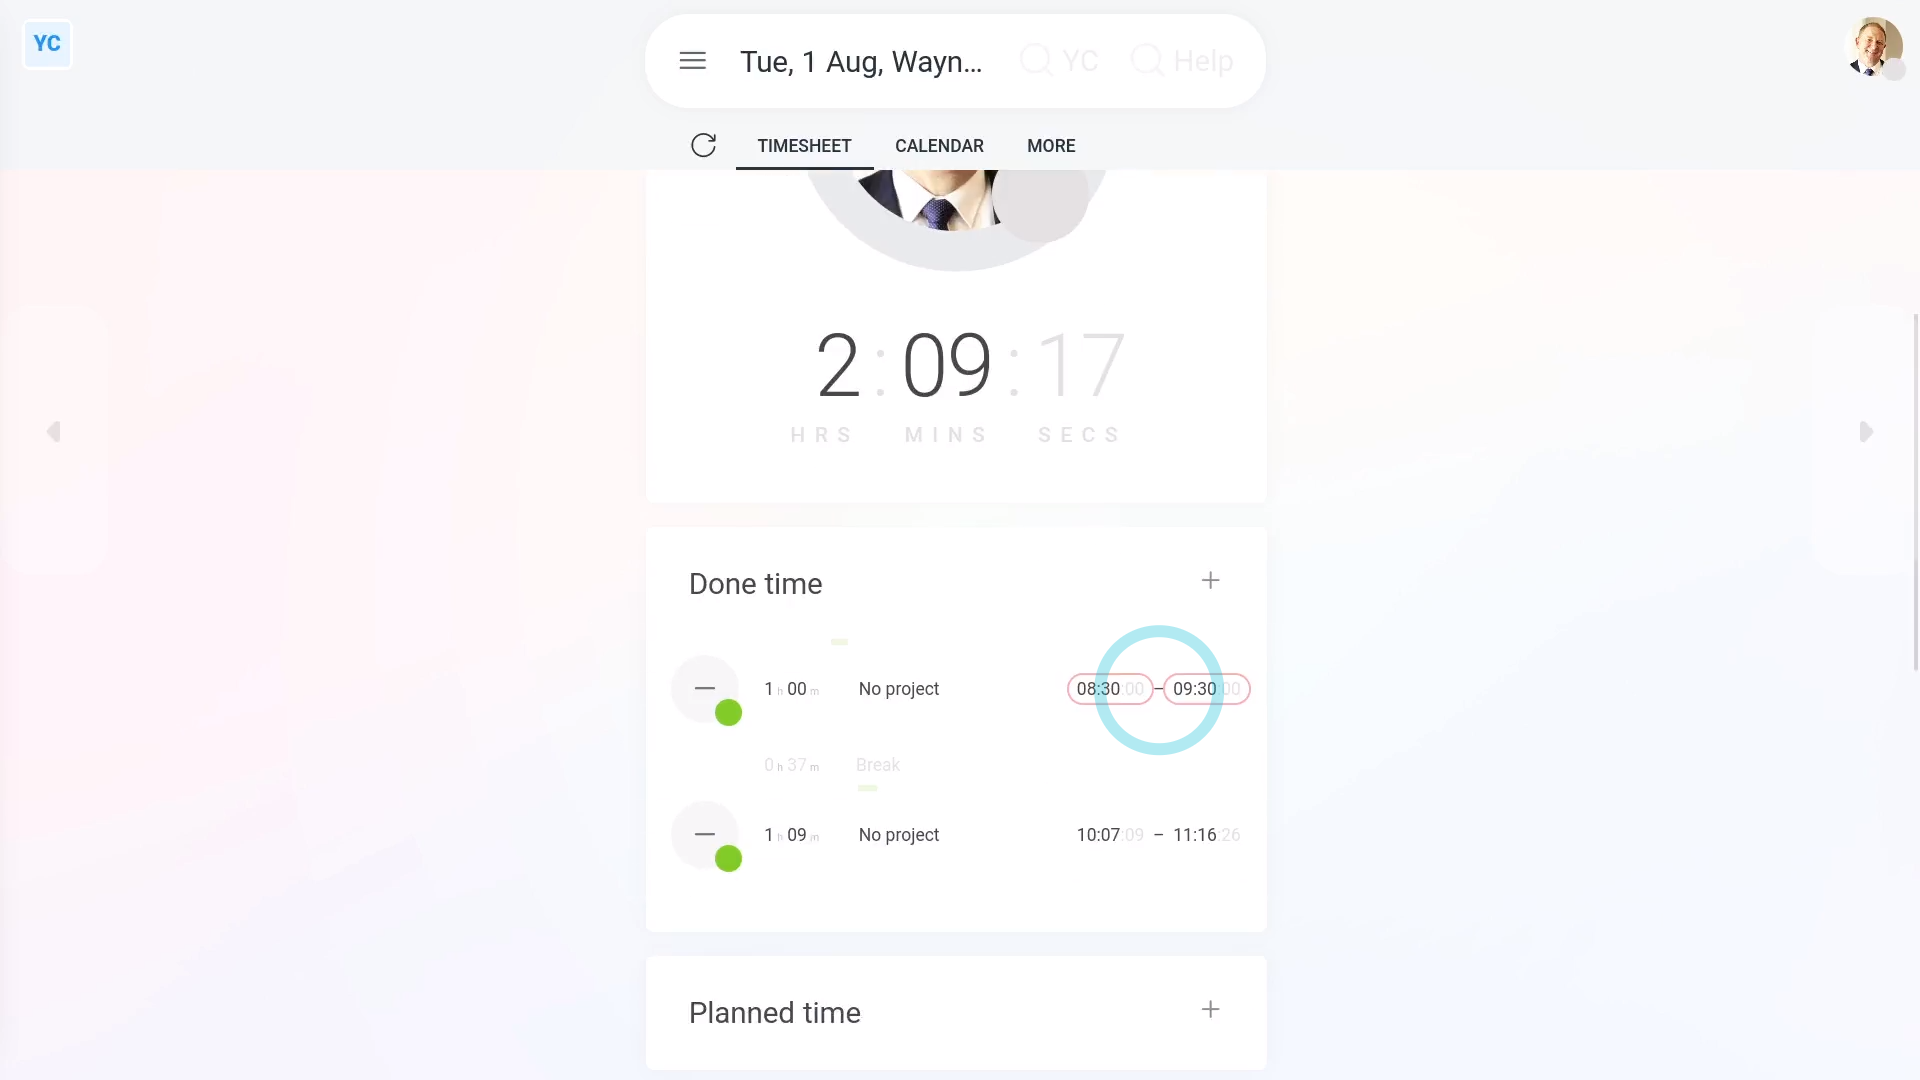
To see if a timesheet time's been set by "manual adjustment":
- First, to go to your timesheet, tap: "Work-time menu", then "Timesheet"
- Next, to open it in a new tab, tap the three dots: (in the top-right corner)
- Then tap: Open in new tab
- Look for the red warning border indicating a: "manual adjustment"
- And finally, if you spot one, tap "More", then "History" to see further details, like who set the: "manual adjustment"
Keep in mind that:
- Setting planned times is unaffected by the "Limit timesheet edits" setting.
- Only admins or managers can ever change any planned time on any timesheet.
- And only admins or managers can change the "Limit timesheet edits" setting.
You may notice:
- The "Limit timesheet edits" setting applies to every person in your org.
- If you want only a selected group of people, but not everyone, to change their timesheets, you could instead set those selected people as org admins.
And that's it! That's everything you need to know about allowing workers to adjust their own timesheets!
How do I adjust the time slider steps?
 1:43
1:43
"How do I adjust the time slider steps?"
The time slider step amount allows you to control how much, in minutes, the timesheet sliders move by.

To adjust how much your org's timesheet sliders move by:
- First, open your org on: "Menu", then "Orgs"
- Then tap: "Attendance", then "Attendance settings"
- Then select the number of minutes for the: "Time slider step amount"
- Then tap: Save
- Now that it's saved, to see how your org's slider step amount setting works, tap: "See on timesheet"
- And finally, when you drag the slider, you'll now see that the slider now moves in the step setting that you selected.
Keep in mind that:
- The "Time slider step amount" setting only affects times set by manually dragging the slider.
- Starts and stops set from the work-time menu continue to always be saved to the second.
- Also keep in mind that only admins or managers can change the "Time slider step amount" setting.
For advanced usage:
- If you're on a laptop, once you've selected the slider with your mouse, you can use the keyboard to move the sliders.
- Try pressing your keyboard arrow keys to move sliders forwards and backwards.
You may notice:
- The "Time slider step amount" setting applies to your entire org.
- You can't have different slider step amounts set per person, or per pay batch.
And that's it! That's everything you need to know about adjusting your org's time slider steps!
How do I copy planned times to other days, or other people?
 4:06
4:06
"How do I copy planned times to other days, or other people?"
Copying planned times is the fastest way to set up shift schedules for everyone in your team.
Once you've created a perfect set of planned times on one person, you can then copy them over to others.
- You can copy planned times over to other dates for that same person.
- And you can copy planned times over to the timesheets of other people.
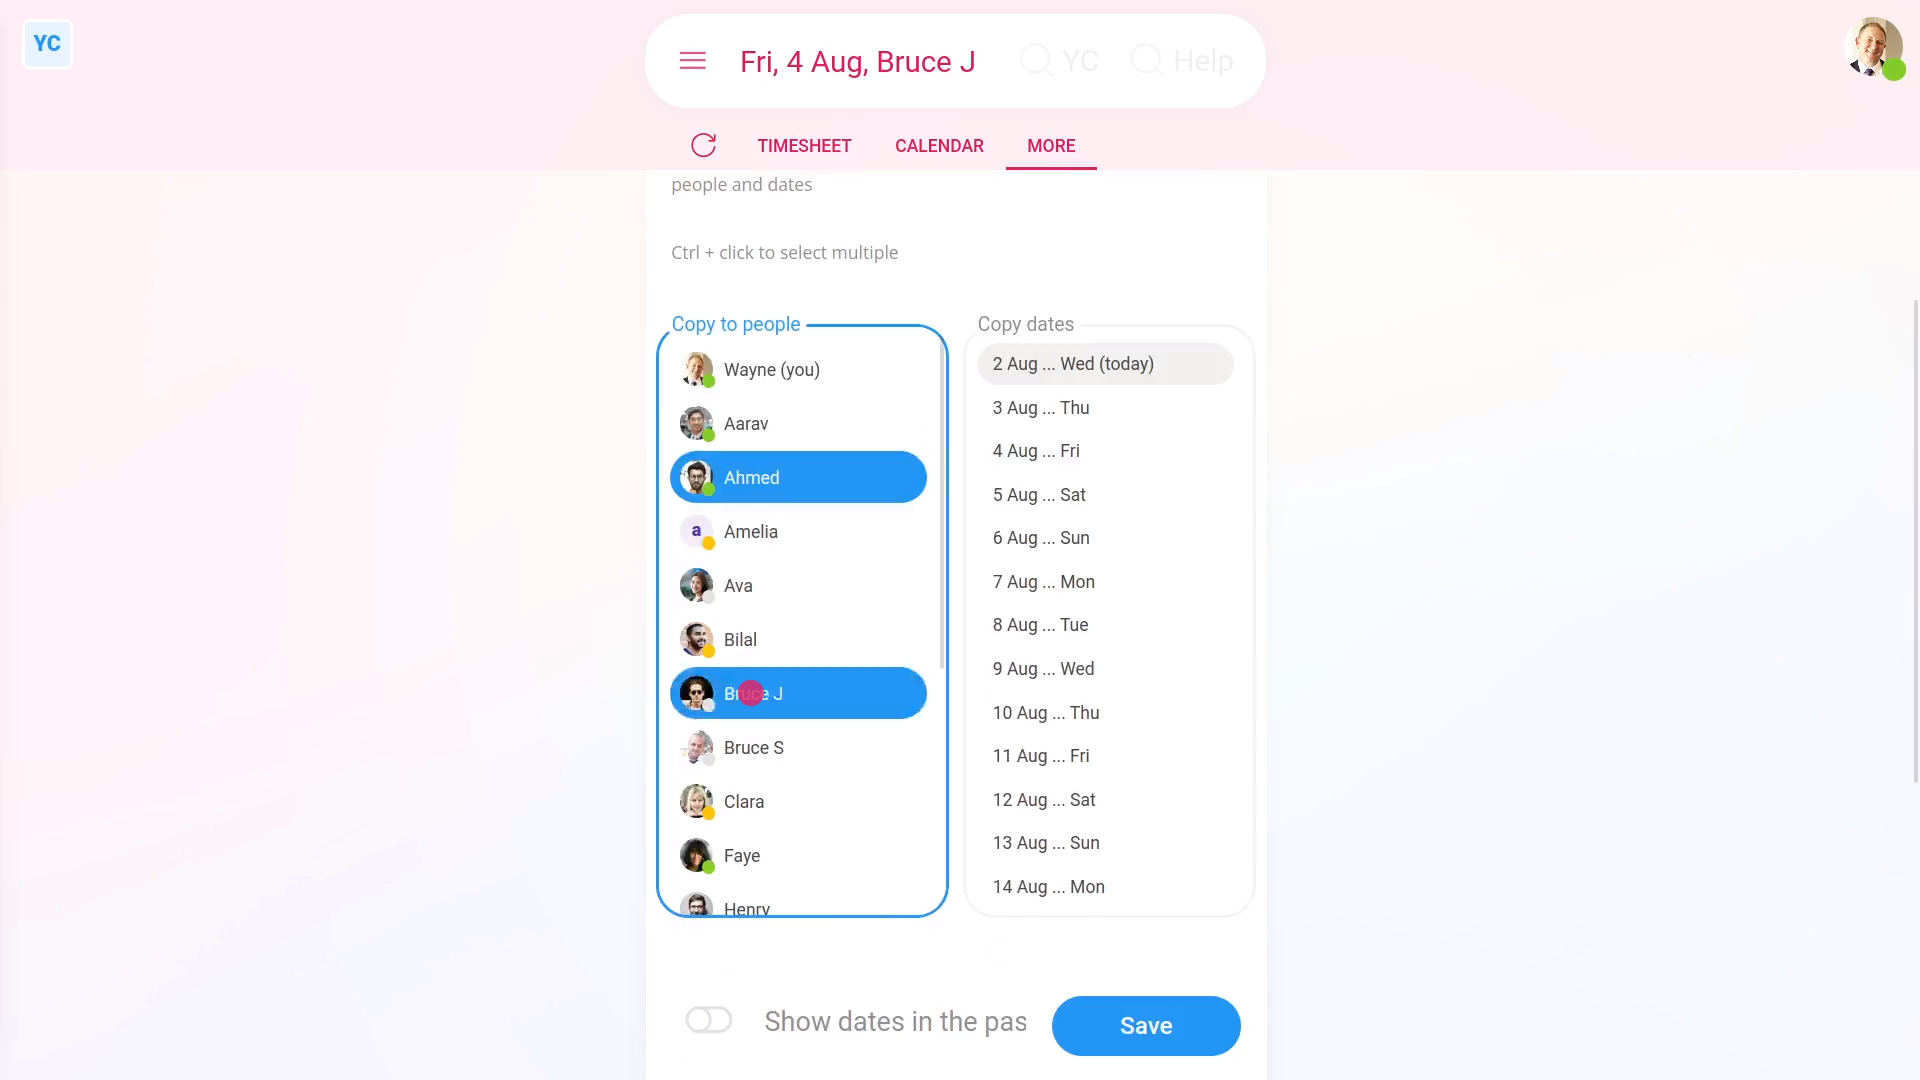
To copy planned times:
- First, to open the timesheet that's got the original master copy of planned times that you'd like to copy over.
- Start by selecting the person on: "Menu", then "People"
- Then tap: Calendar
- Next, tap the date on the calendar you'd like to copy the planned times over from.
- Once it slides out on the right, to open it in a new tab, tap the three dots: (in the top-right corner)
- Then tap: Open in new tab
- Now that the timesheet's open in its own window, make sure that all the planned times in the timesheet are exactly right.
- If you need to add or change planned times, do that now.
- Now that the planned times on the timesheet are perfect, tap: "More", then "Copy planned"
- You can see a preview of the planned times you're about to copy (at the top).
- Now control + tap multiple people to copy the times over to. You can control + tap as many people as you want.
- Next control + tap the days to copy the times over to.
- Then tap: Save
- You'll now see a confirmation message with links to all the timesheets that you've copied over to.
- And finally, if you want to see the newly copied times, tap one of the links.
Now, switching person. You're now logged in as a person you've set planned times for.
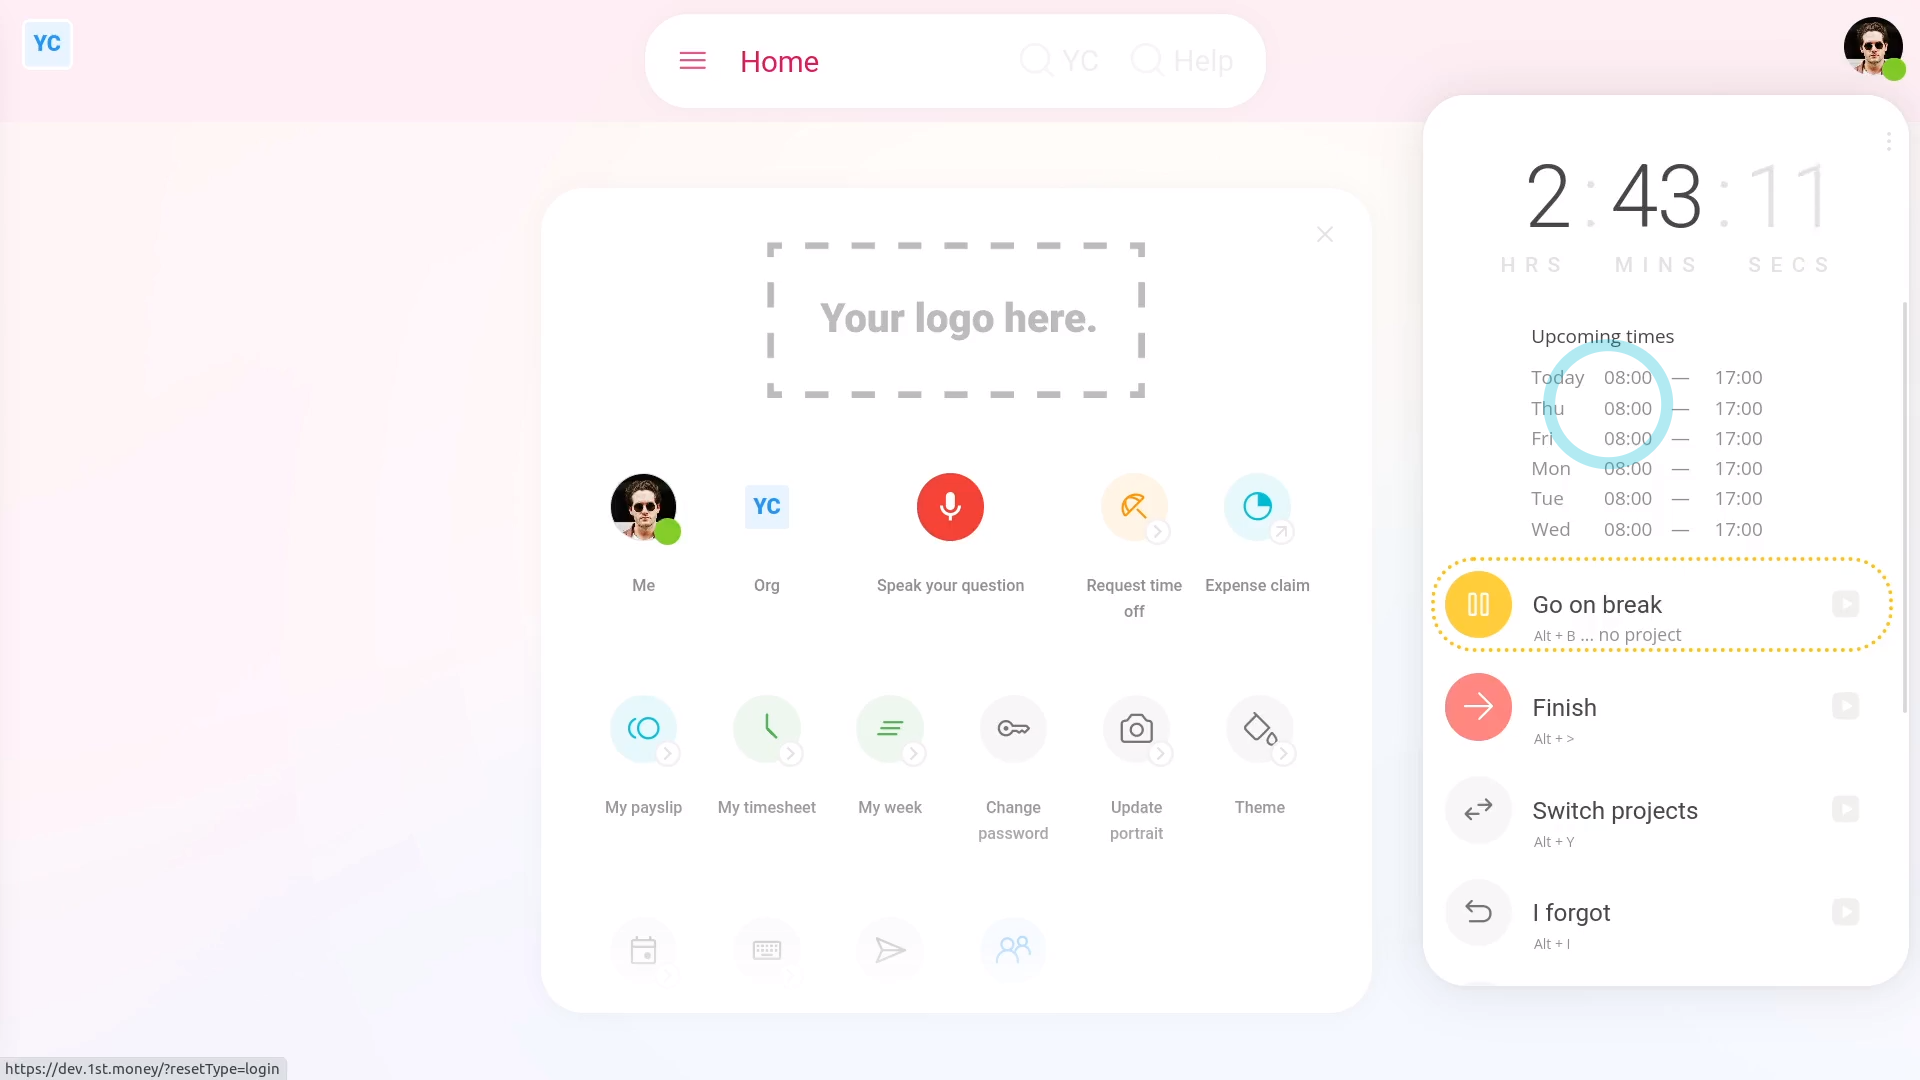
To see your "Upcoming times":
- First, tap: "Work-time menu" (top-right)
- On the work-time menu, every person can now see a summary of their "Upcoming times" for the next week.
- If you want more detail, tap: "Menu", then "My week"
- And finally, you'll see each day's exact planned times in yellow.
Keep in mind that:
- Only admins or managers can ever change any planned time on any timesheet.
- Also, if "Copy planned" isn't showing under the "More" menu, it means your org hasn't turned on "Show planned times" yet.
To learn more:
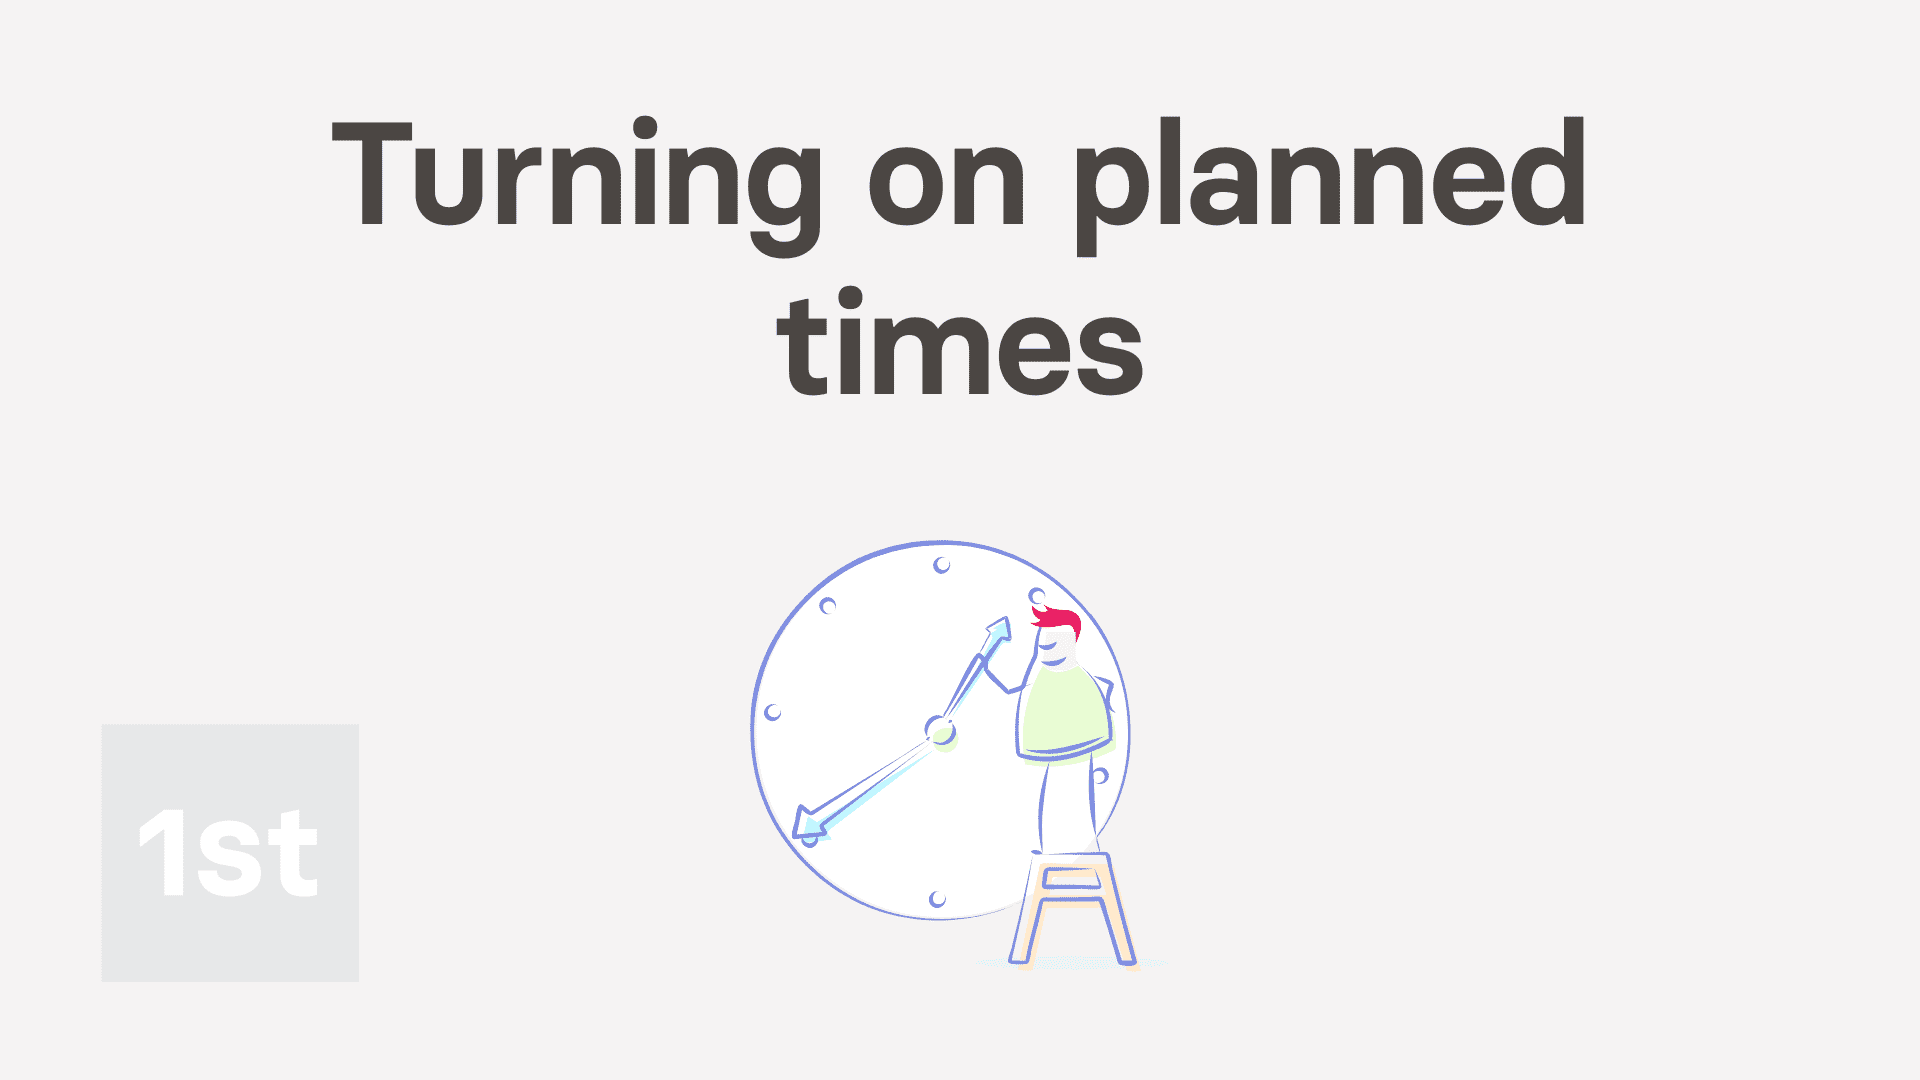
- About how to turn on "Show planned times", watch the video on: Turning on planned times
 Turning on planned times
You may notice:
- Copying planned times always copies over whatever each row's project has been set to, in the original master copy timesheet.
- But it never copies over the timesheet's done times or notes.
- Even if the timesheets contain done times or notes, "Copy planned" still only copies over the planned time info.
- Which is useful if your shifts are the same from week-to-week, and you want to copy all of last weeks times.
For advanced usage:
- When copying planned times, you can control + tap all the dates you want.
- However, when copying large spans of shifts, you may find it faster to shift + tap from the first date, to the last date.
- And then to subtract the dates you don't want copied (like weekends), using: control + tap
- Keep in mind that the control + tap and shift + tap shortcuts aren't available on tablets and phones.
And that's it! That's everything you need to know about copying planned times over to other dates and other people!
How do I delete a timesheet?
 3:03
3:03
"How do I delete a timesheet?"
Occasionally you may want to delete some of the timesheet rows, or even delete the entire timesheet.
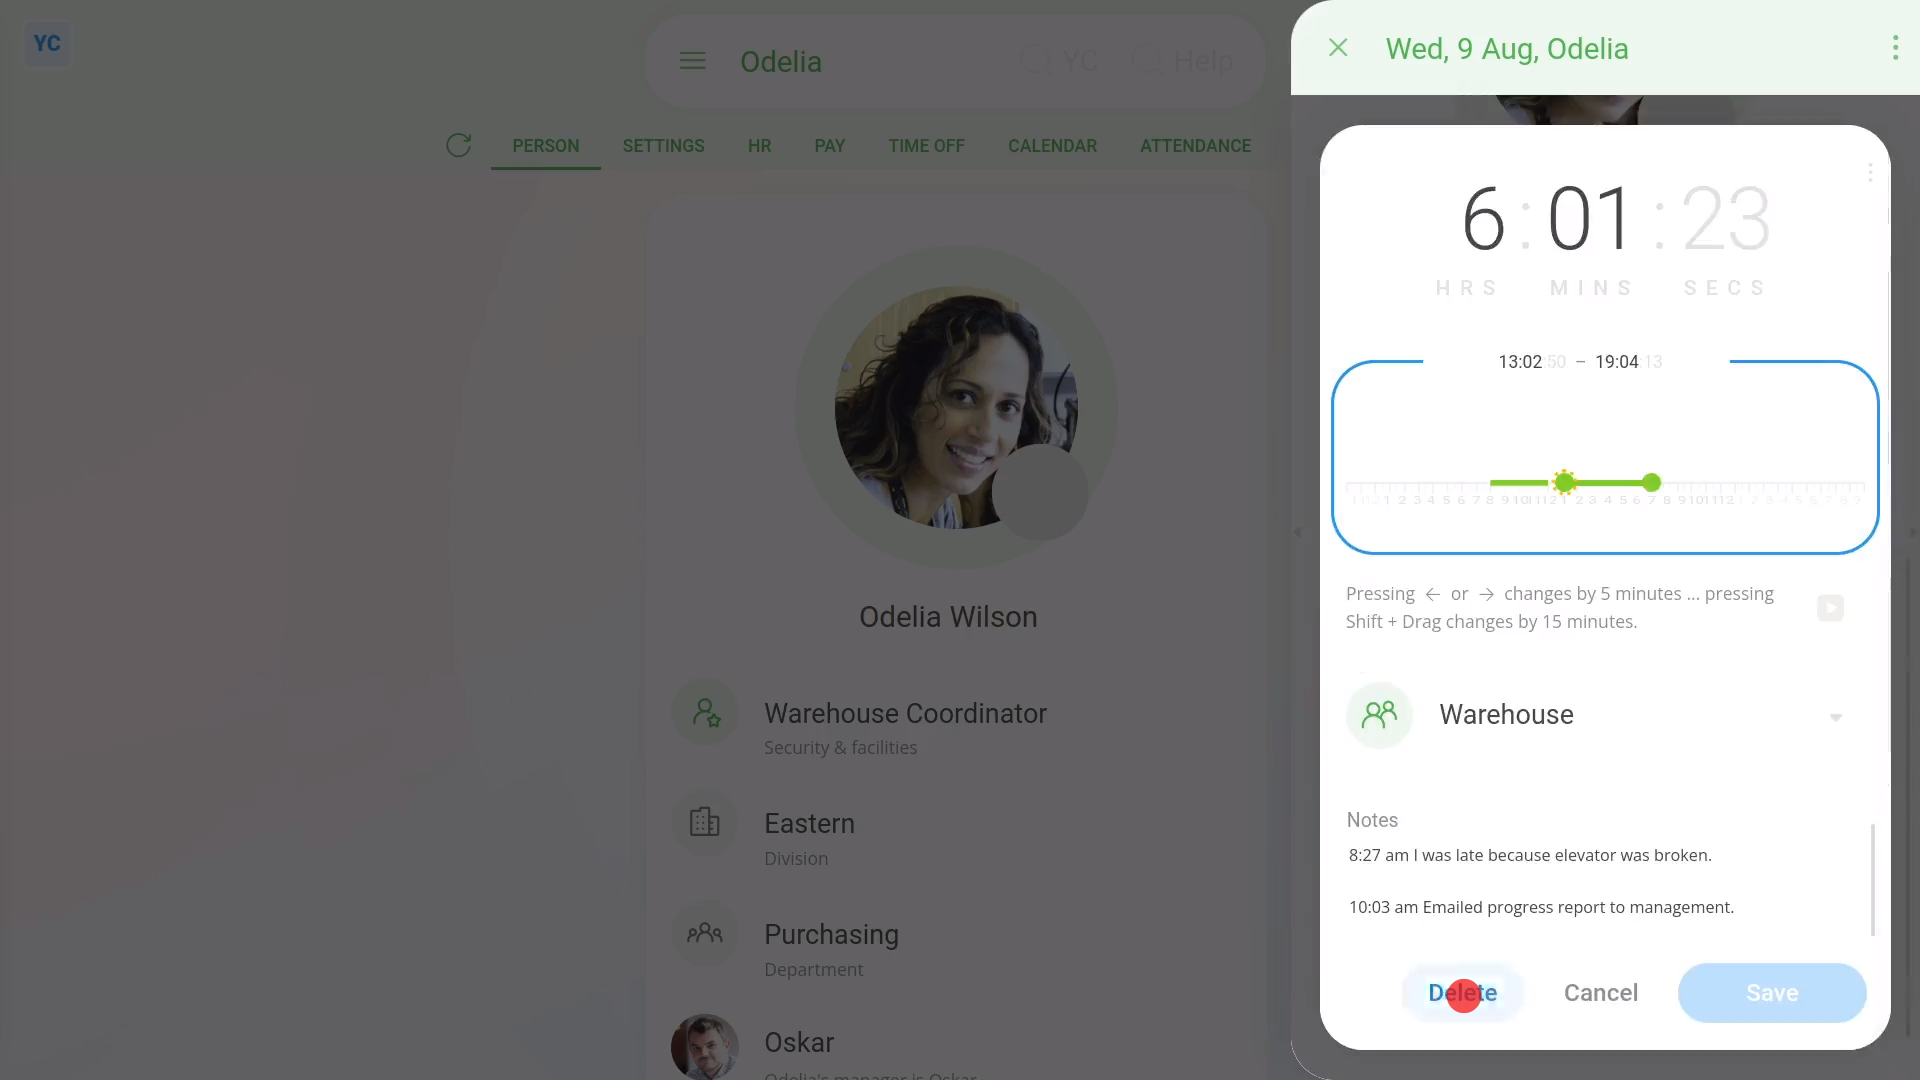
To delete only one timesheet row from a person's timesheet:
- First, select the person on: "Menu", then "People"
- Then tap: Calendar
- Next, tap the date on the calendar for the timesheet you'd like to delete a row from.
- Then scroll down and tap the timesheet row you'd like to delete.
- Then tap: Delete
- And finally, when you go back to the timesheet, you'll now see the row's been deleted, and the "Done time" total's been reduced.
Keep in mind that:
- When deleting a timesheet row from a person's timesheet, it deletes that timesheet row's: "Done time"
- In addition, it also deletes any notes on that timesheet row too.
To delete an entire timesheet:
- First, select the person on: "Menu", then "People"
- Then tap: Calendar
- Next, tap the date on the calendar for the timesheet you'd like to delete.
- Then to open it in a new tab, tap the three dots: (in the top-right corner)
- Then tap: Open in new tab
- Now that the timesheet's open in its own window...
- Tap: "More", then "Delete"
- You'll be warned that deleting a timesheet can't be un-done.
- Then tap: Yes ... delete
- Now all of the timesheet's rows, both done and planned, and timesheet notes have been permanently deleted.
- And finally, a completely empty timesheet is now loaded in its place.
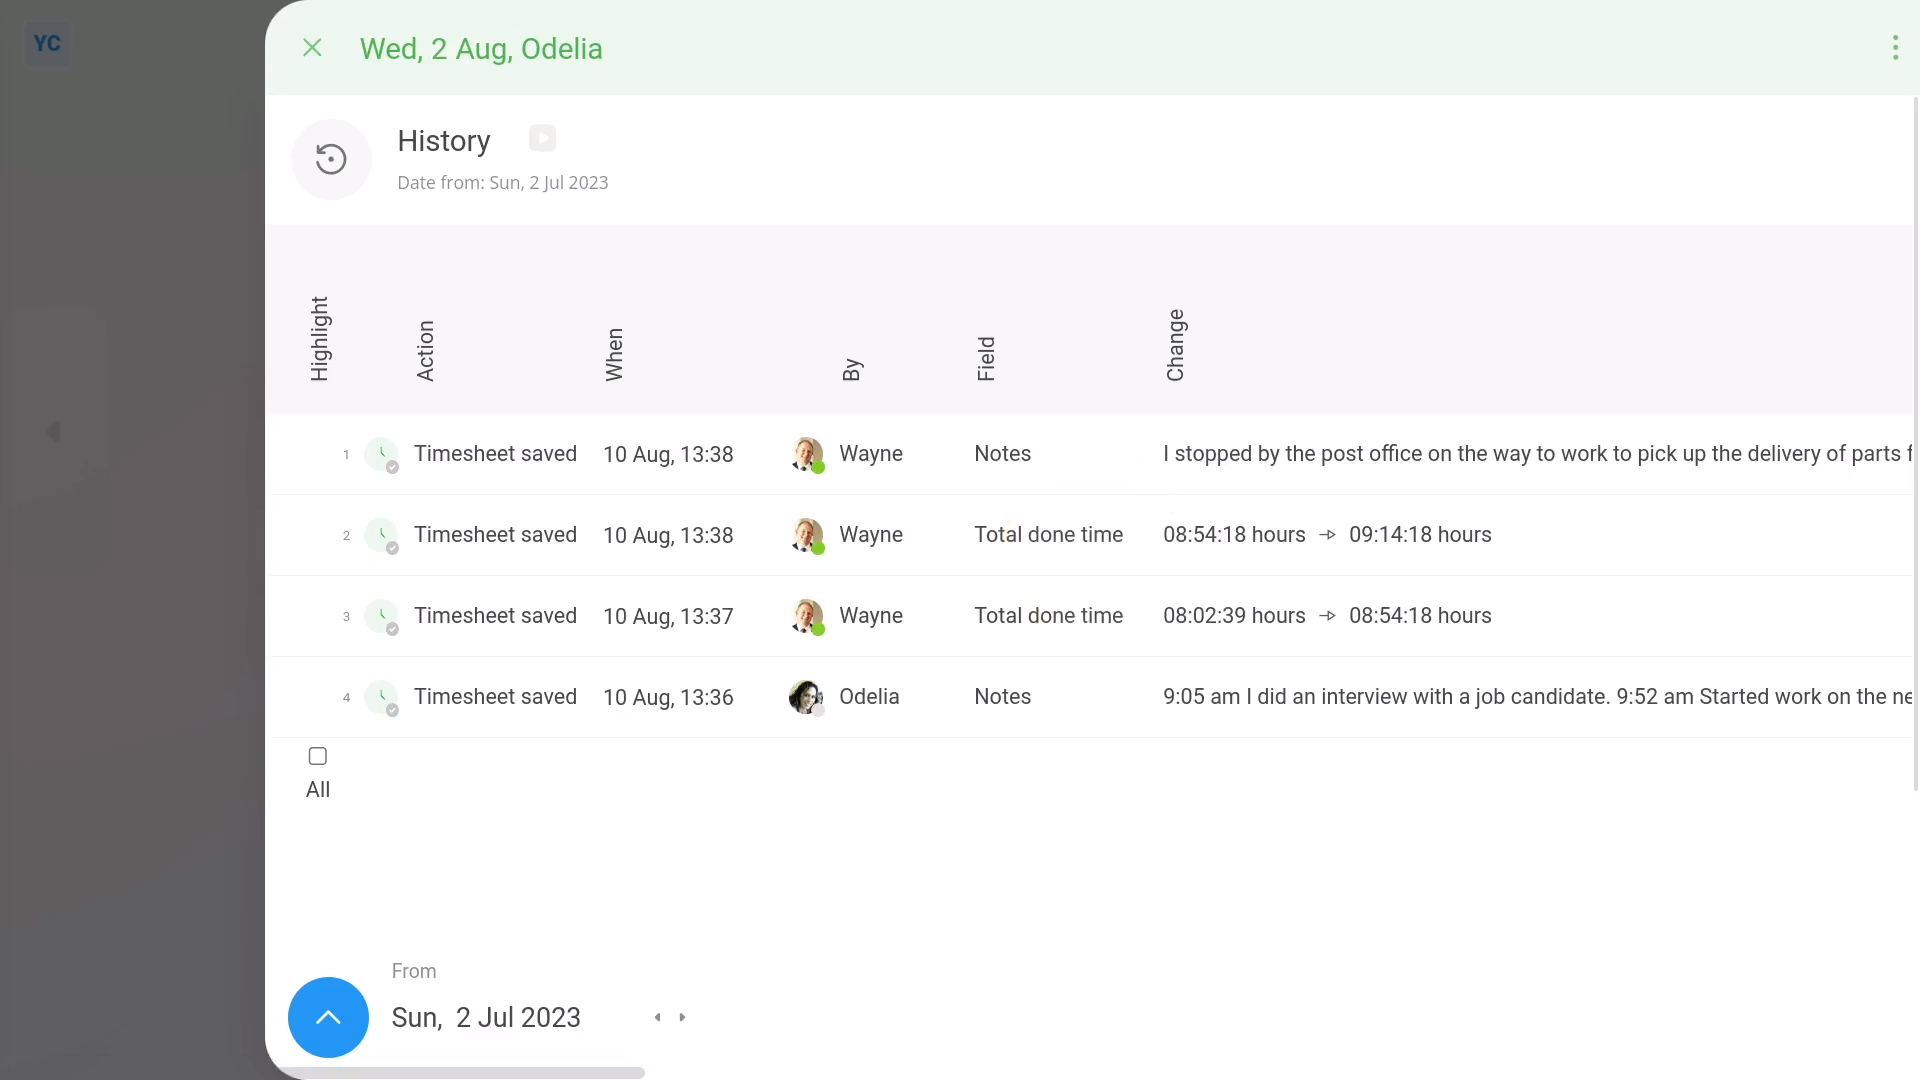
To see a timesheet's change history:
- First, select the person on: "Menu", then "People"
- Then tap: Calendar
- Next, tap the date on the calendar for the timesheet you'd like to see the change history of.
- Then to open it in a new tab, tap the three dots: (in the top-right corner)
- Then tap: Open in new tab
- Now that the timesheet's open in its own window...
- Next, tap: "More", then "History"
- And finally, you'll see a list of all the changes ever done to the timesheet.
Also remember that:
- All timesheet changes are stored in history, and the history itself can't be deleted.
- Even if the timesheet's deleted, its change history is all still there, including a record of who deleted it.
You may notice:
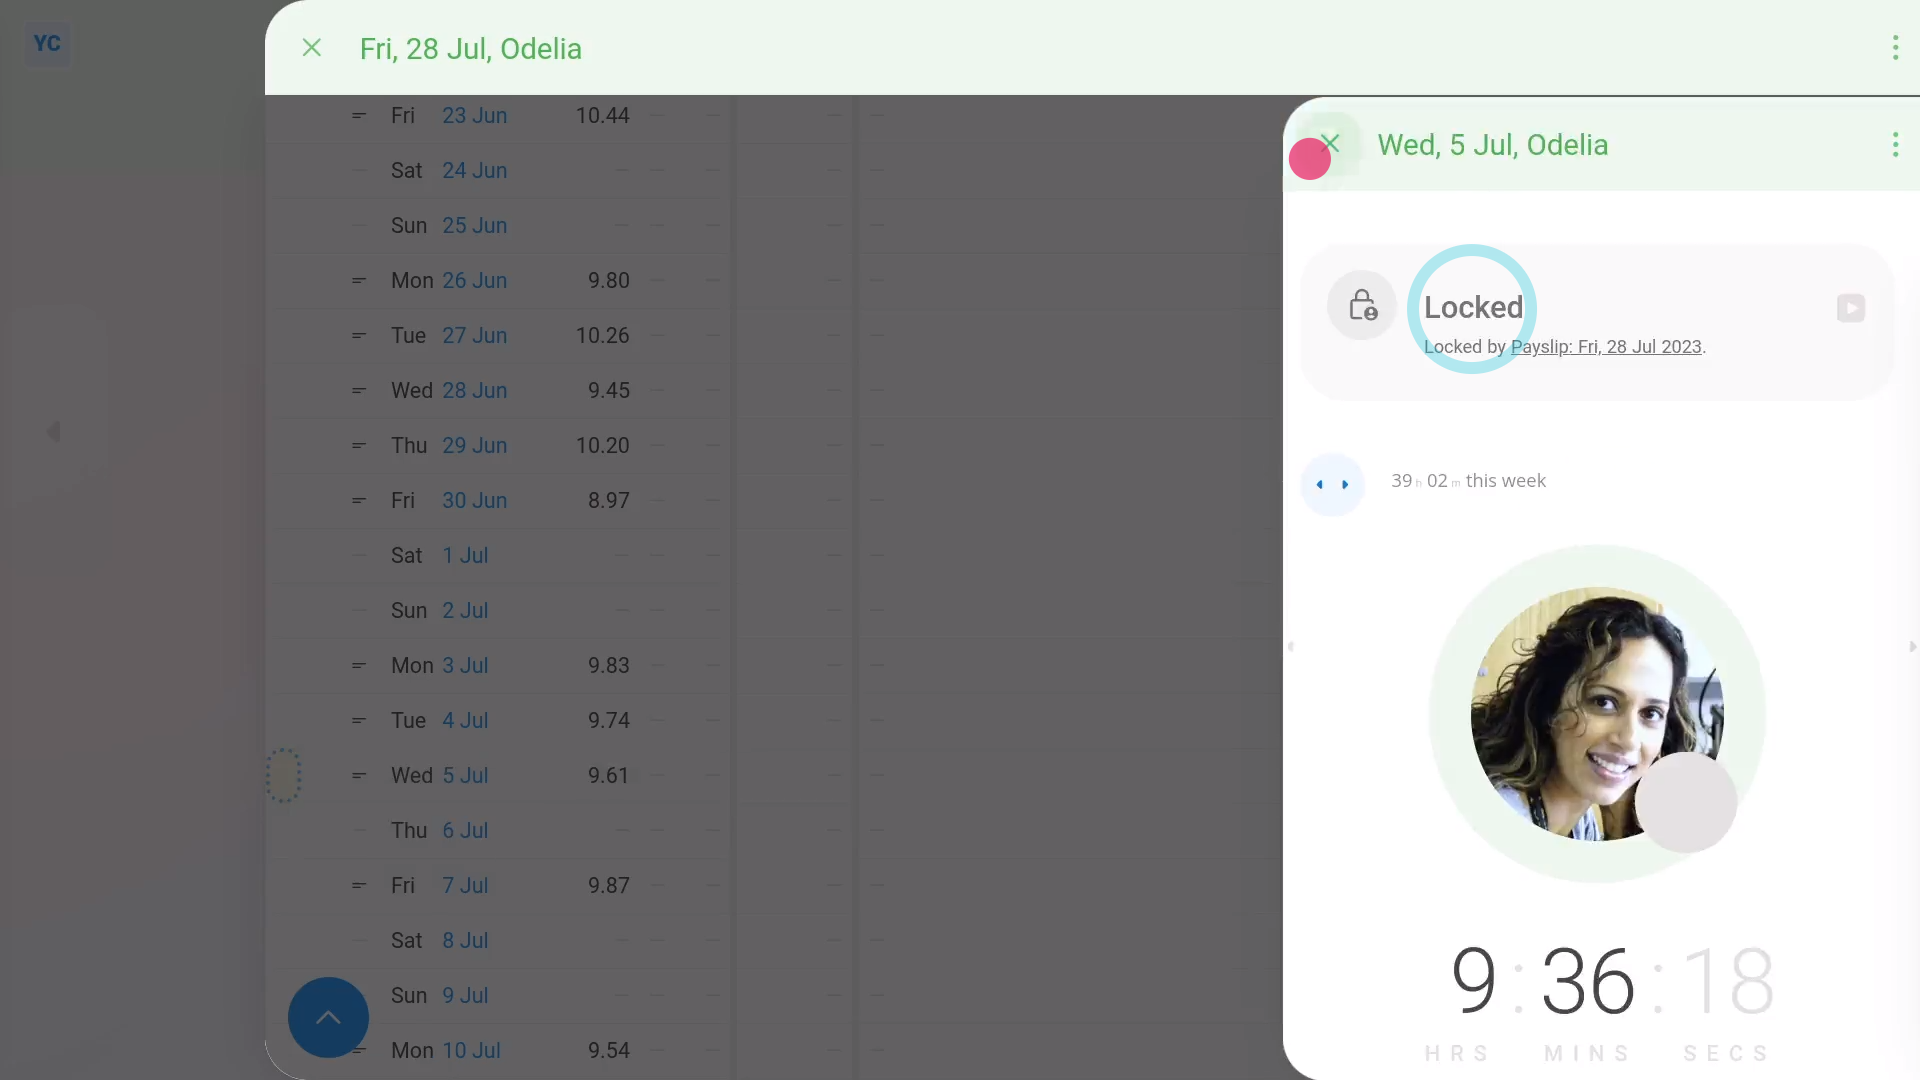
- If the timesheet says that it's locked, that means that the payslip that it belongs to has been paid and no more changes can be made.
And that's it! That's everything you need to know about deleting a timesheet!
How do I excuse an absence?
 2:29
2:29
"How do I excuse an absence?"
Excusing an absence means the manager's been given an acceptable reason for the absence, and has decided the absence can be removed.
Once excused, an absence is greyed out and doesn't count towards the person's total absences.
To excuse a timesheet absence, like a no-show, late start, or early finish:
- First, select the person on: "Menu", then "People"
- Then tap: Calendar
- Next, tap the date on the calendar you'd like to excuse an absence for.
- Near the top of the page, you'll see the number of minutes that need to be excused.
- Then when you scroll down to the bottom of the timesheet, you'll see the "Absences" heading.
- To excuse the absences in the timesheet, turn on: "Excuse day's absences"
- Next, select the best matching absence reason from the list that pops up.
- The text of your selected reason automatically appears in the "Reason excused" box. Feel free to change it, or add to it.
- Then tap: Save
- To see that the absence's been excused in the person's "Absences list" report, tap: "Attendance", then "Absences ... list"
- In the "Absences list" report, you'll see a greyed out row for the absence you excused.
- And finally, when you hover your mouse over the row, you'll see the absence reason you typed in.
You may notice:
- Once a person's absence has been excused, it no longer counts towards that person's total absences.
- However, the absence still shows in the "Absences list" report so you can read the absence reason, change the reason, or remove the absence approval.
Keep in mind that:
- Approving absences is "all or nothing" for that timesheet day.
- There's no option to excuse only some of the absences that happened that day.
- Also, if the "Planned time" heading or features aren't showing on the page, it means your org hasn't turned on "Show planned times" yet.
To learn more:
- About how to turn on "Show planned times", watch the video on: Turning on planned times
And that's it! That's everything you need to know about approving an absence!
How do I overwrite planned times with done times?
 1:55
1:55
"How do I overwrite planned times with done times?"
Sometimes done times don't match planned times.
In most cases, the mismatch is because of an employee absence. If so, watch the video on: Excusing absences
However, sometimes there's a business reason for the mismatch, like a power-cut, or a change in plans. If so, a useful way to have planned times matching done times is to try: "Overwrite planned with done"
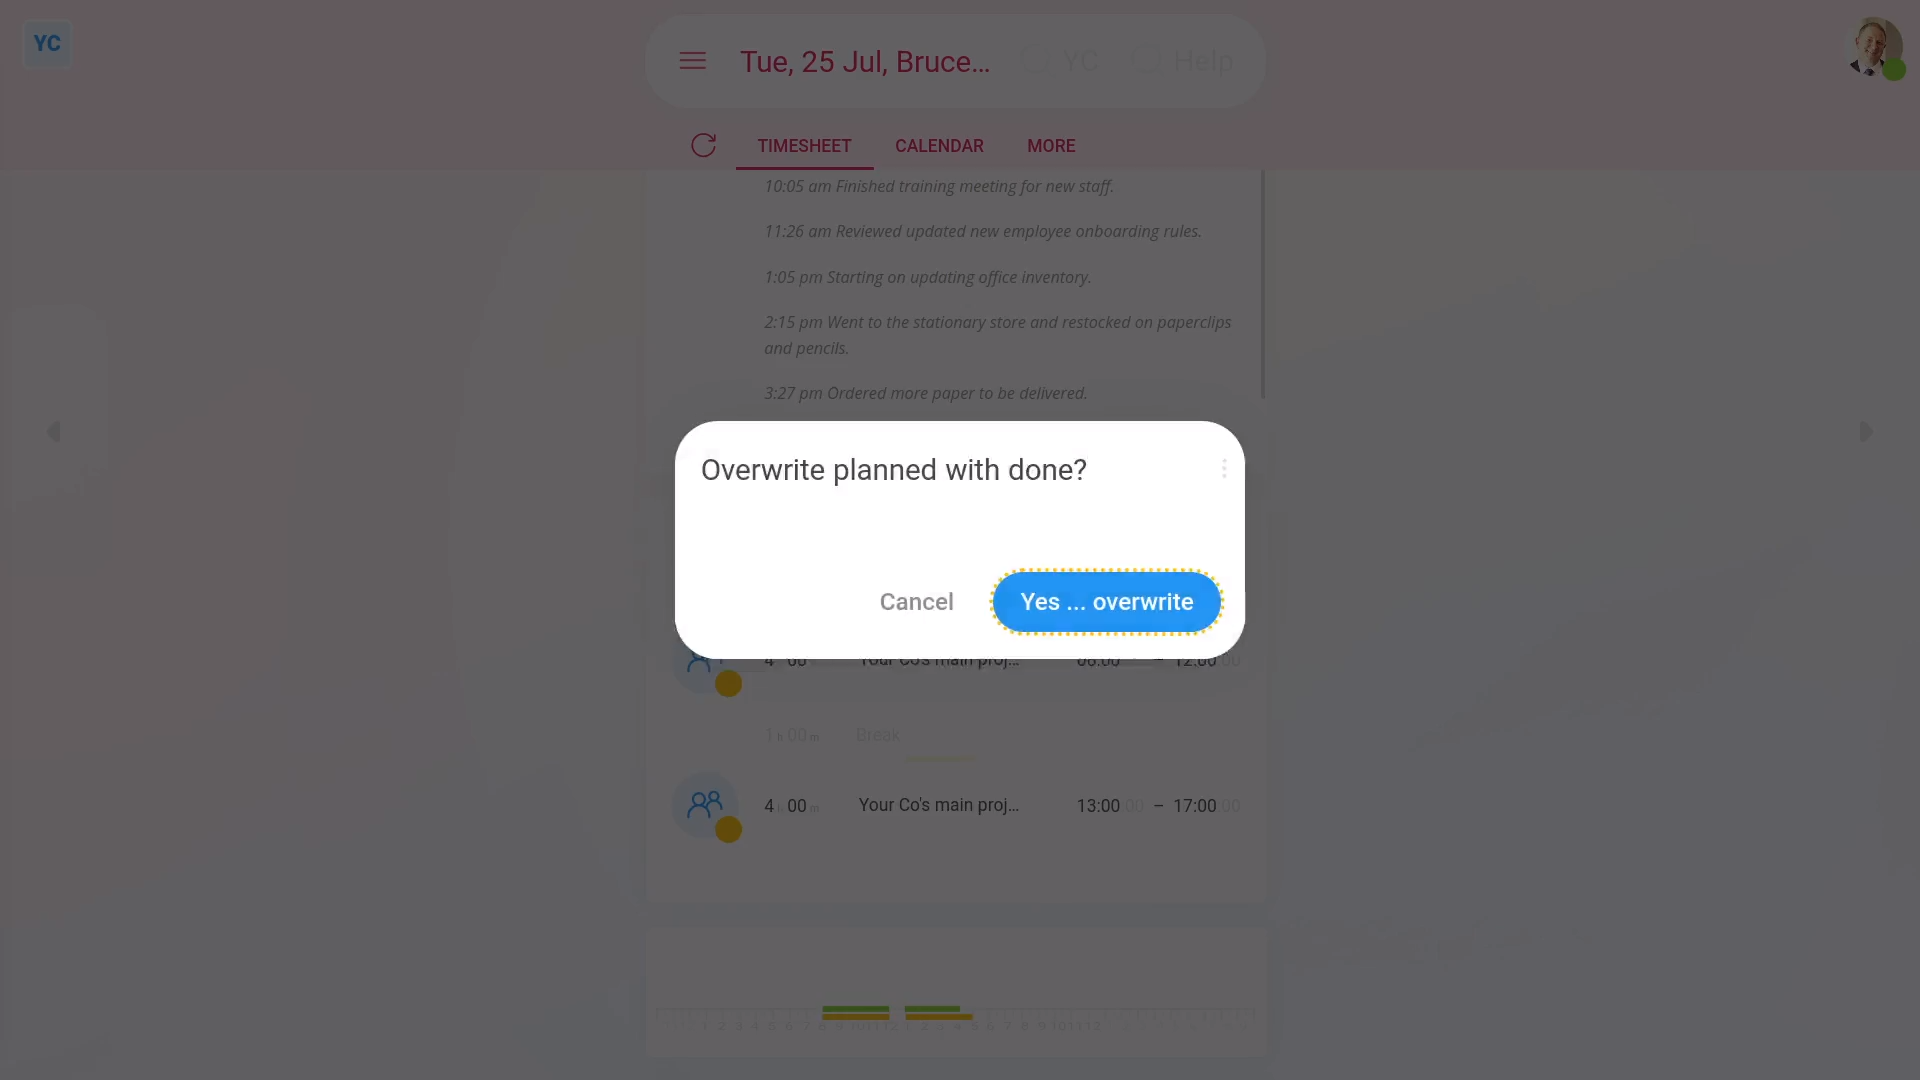
To overwrite planned times with done times:
- First, select the person on: "Menu", then "People"
- Then tap: Calendar
- Next, tap the date on the calendar you'd like to "Overwrite planned with done" for.
- Once it slides out on the right, to open it in a new tab, tap the three dots: (in the top-right corner)
- Then tap: Open in new tab
- Now that the timesheet's open in its own window, tap: "More", then "Overwrite planned with done"
- Next, tap: Yes ... overwrite
- And finally, the planned times have now instantly changed to match the done time, and the absence warning's disappeared.
Keep in mind that:
- Only admins or managers can ever change any planned time on any timesheet.
- Also, if you ever need them, the original times that were overwritten, are still stored in history.
- Also, if "Overwrite planned with done" isn't showing under the "More" menu, it means your org hasn't turned on "Show planned times" yet.
To learn more:
- About how to turn on "Show planned times", watch the video on: Turning on planned times
And that's it! That's everything you need to know about overwriting planned times with done times!
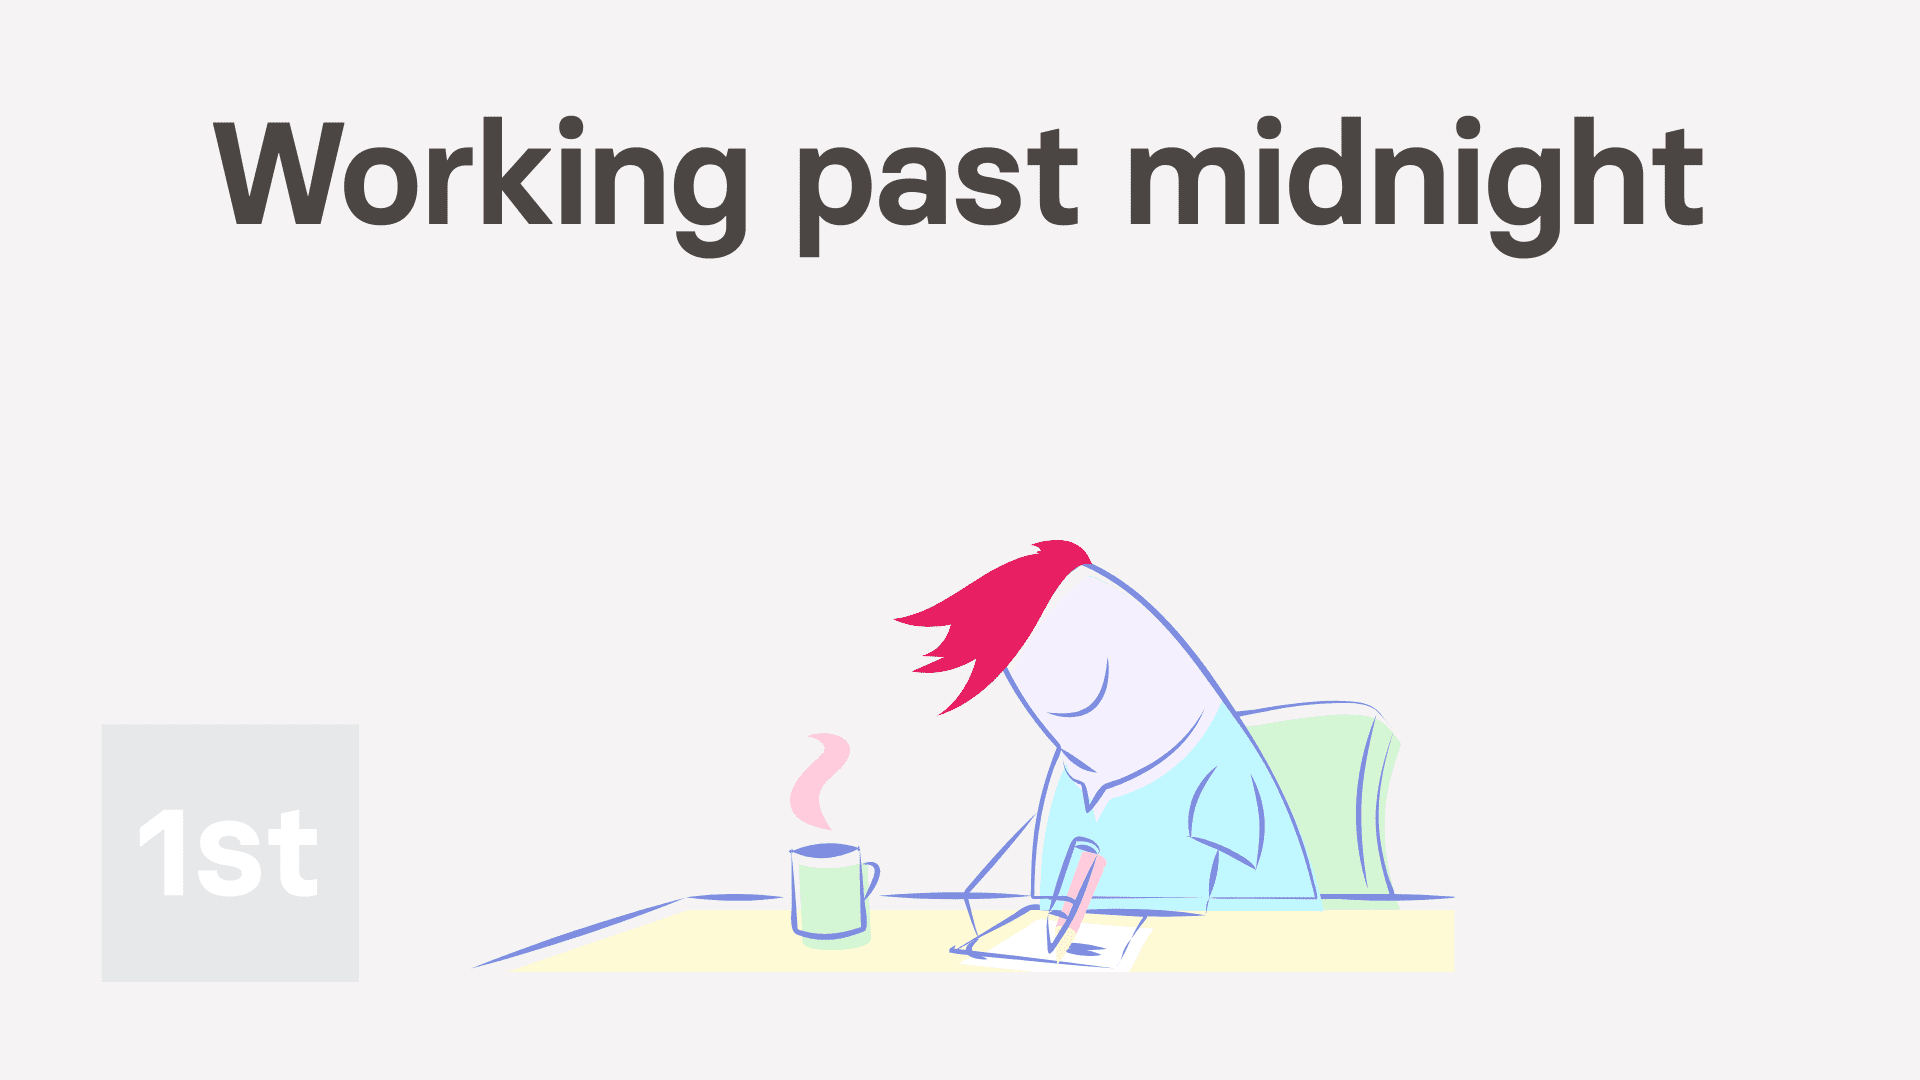
How do I set my timesheet when I work past midnight?
 2:34
2:34
"How do I set my timesheet when I work past midnight?"
The timesheets can store both the working time before midnight, or in other words, the late evening before the timesheet's date. And also it can store working time after midnight, or in other words, the early morning after the timesheet's date.

To set a timesheet time that's earlier than midnight:
- First, tap: "Menu", then "My timesheet"
- Next, tap: Add time
- Then drag the start slider to the very left most edge.
- You'll see that the start time shows as minus 10 pm.
- The minus symbol means the day before, so the example means 10 pm on the late evening before the timesheet's date.
- Next, drag the end slider to 2 am.
- You now have a four hour shift that started on the previous evening and goes through to 2 am of the current day.
- And finally, tap: Save
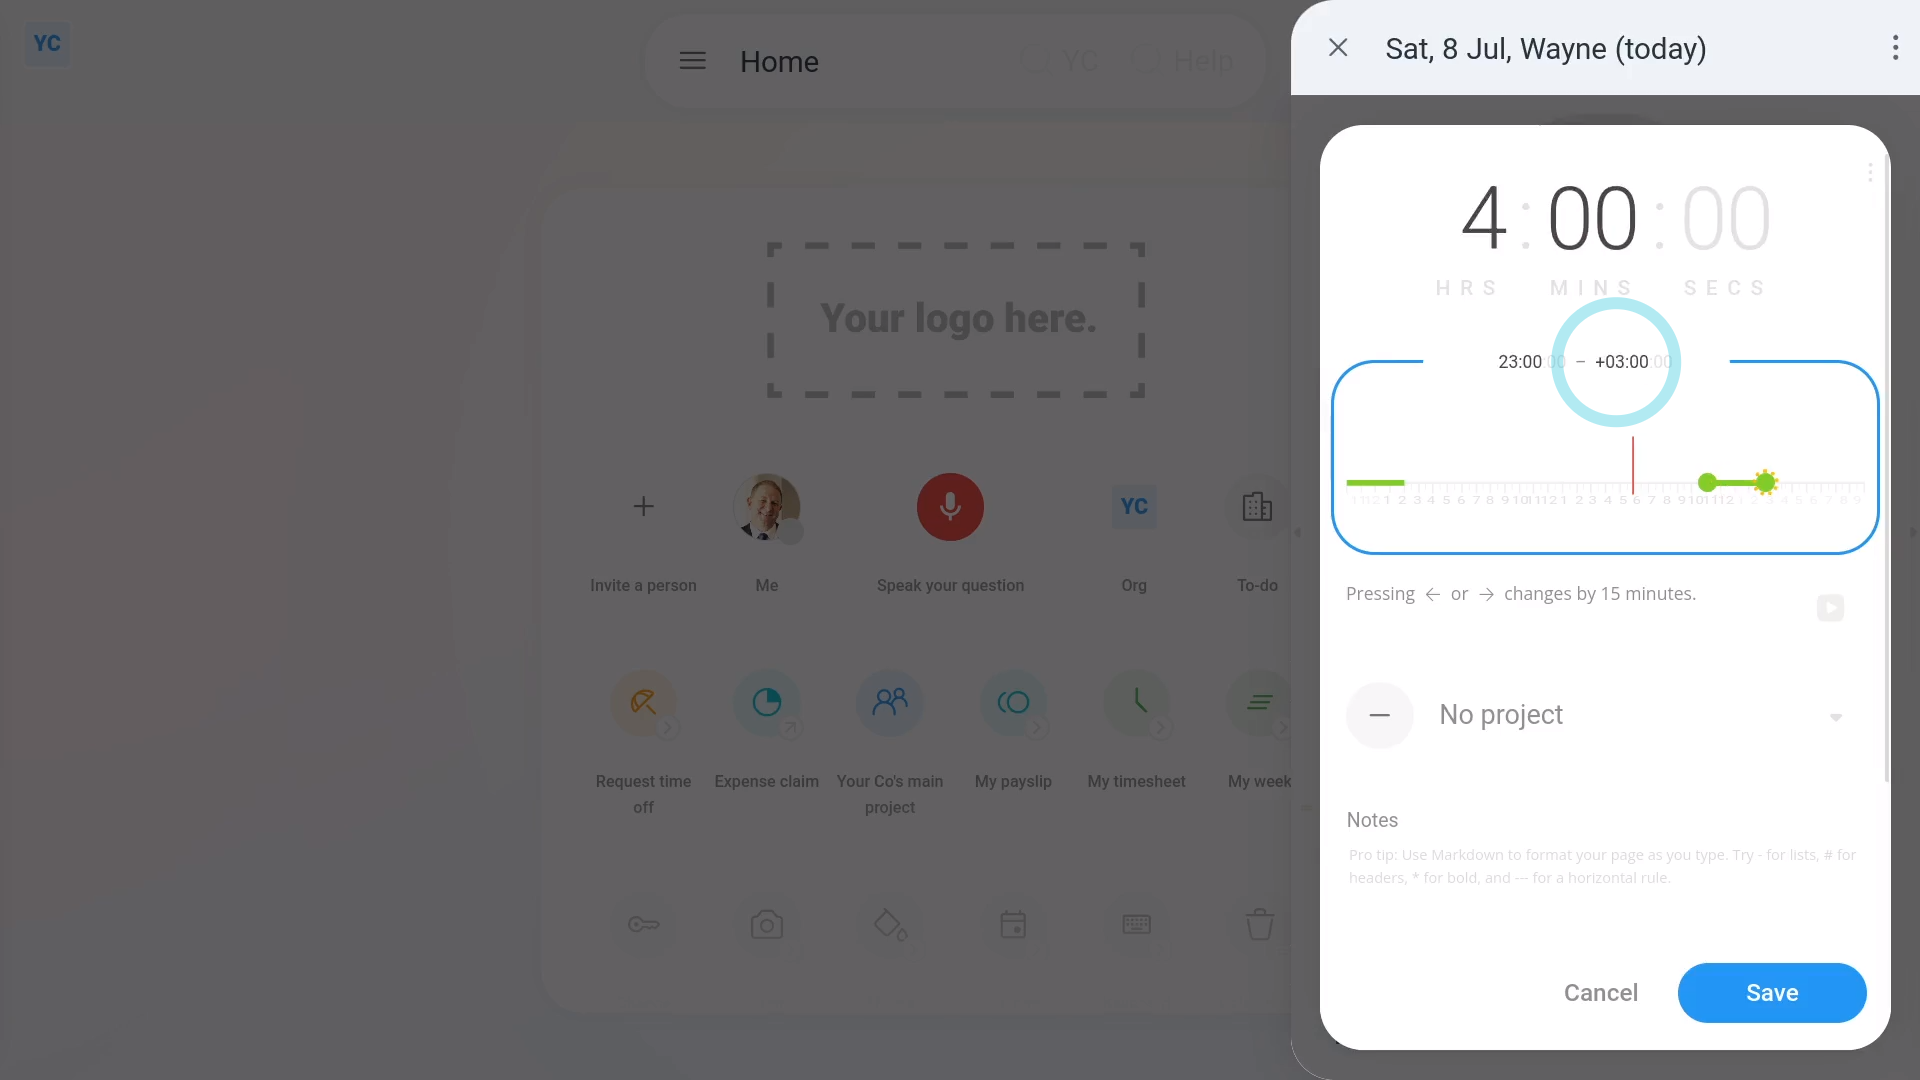
To set a timesheet time that's after midnight:
- First, tap: "Menu", then "My timesheet"
- Next, tap: Add time
- Then drag the start slider all the way across to 11 pm.
- Next, drag its end slider past midnight and across to 3 am.
- Now you'll see that the end time shows as plus 3 am. The plus symbol means the day after, so the example means 3 am on the early morning after the timesheet's date.
- And finally, after you tap Save, you'll see the total hours.
Keep in mind that:
- All the steps also equally applies to setting planned times as well. The only difference is you drag the yellow slider instead.
You may notice:
- That even though the times are before or after midnight, the times still belong to the day's timesheet.
For advanced usage:
- Remember that clocked-in timesheet time is always paid as part of the payslip the timesheet date belongs to.
- So, what happens if a January pay period had a 1st of January timesheet, with hours worked before midnight?
- In the example, those hours before midnight, in reality, were worked on December 31st.
- However, because those hours were recorded on the 1st of January timesheet, the hours are be paid as part of the January pay period.
And that's it! That's everything you need to know about setting your timesheet when you work past midnight!
How do I set the number of minutes it takes to trigger an absence?
 2:08
2:08
"How do I set the number of minutes it takes to trigger an absence?"
"Absence trigger minutes" is where you give their people a few minutes leeway before marking them as absent.
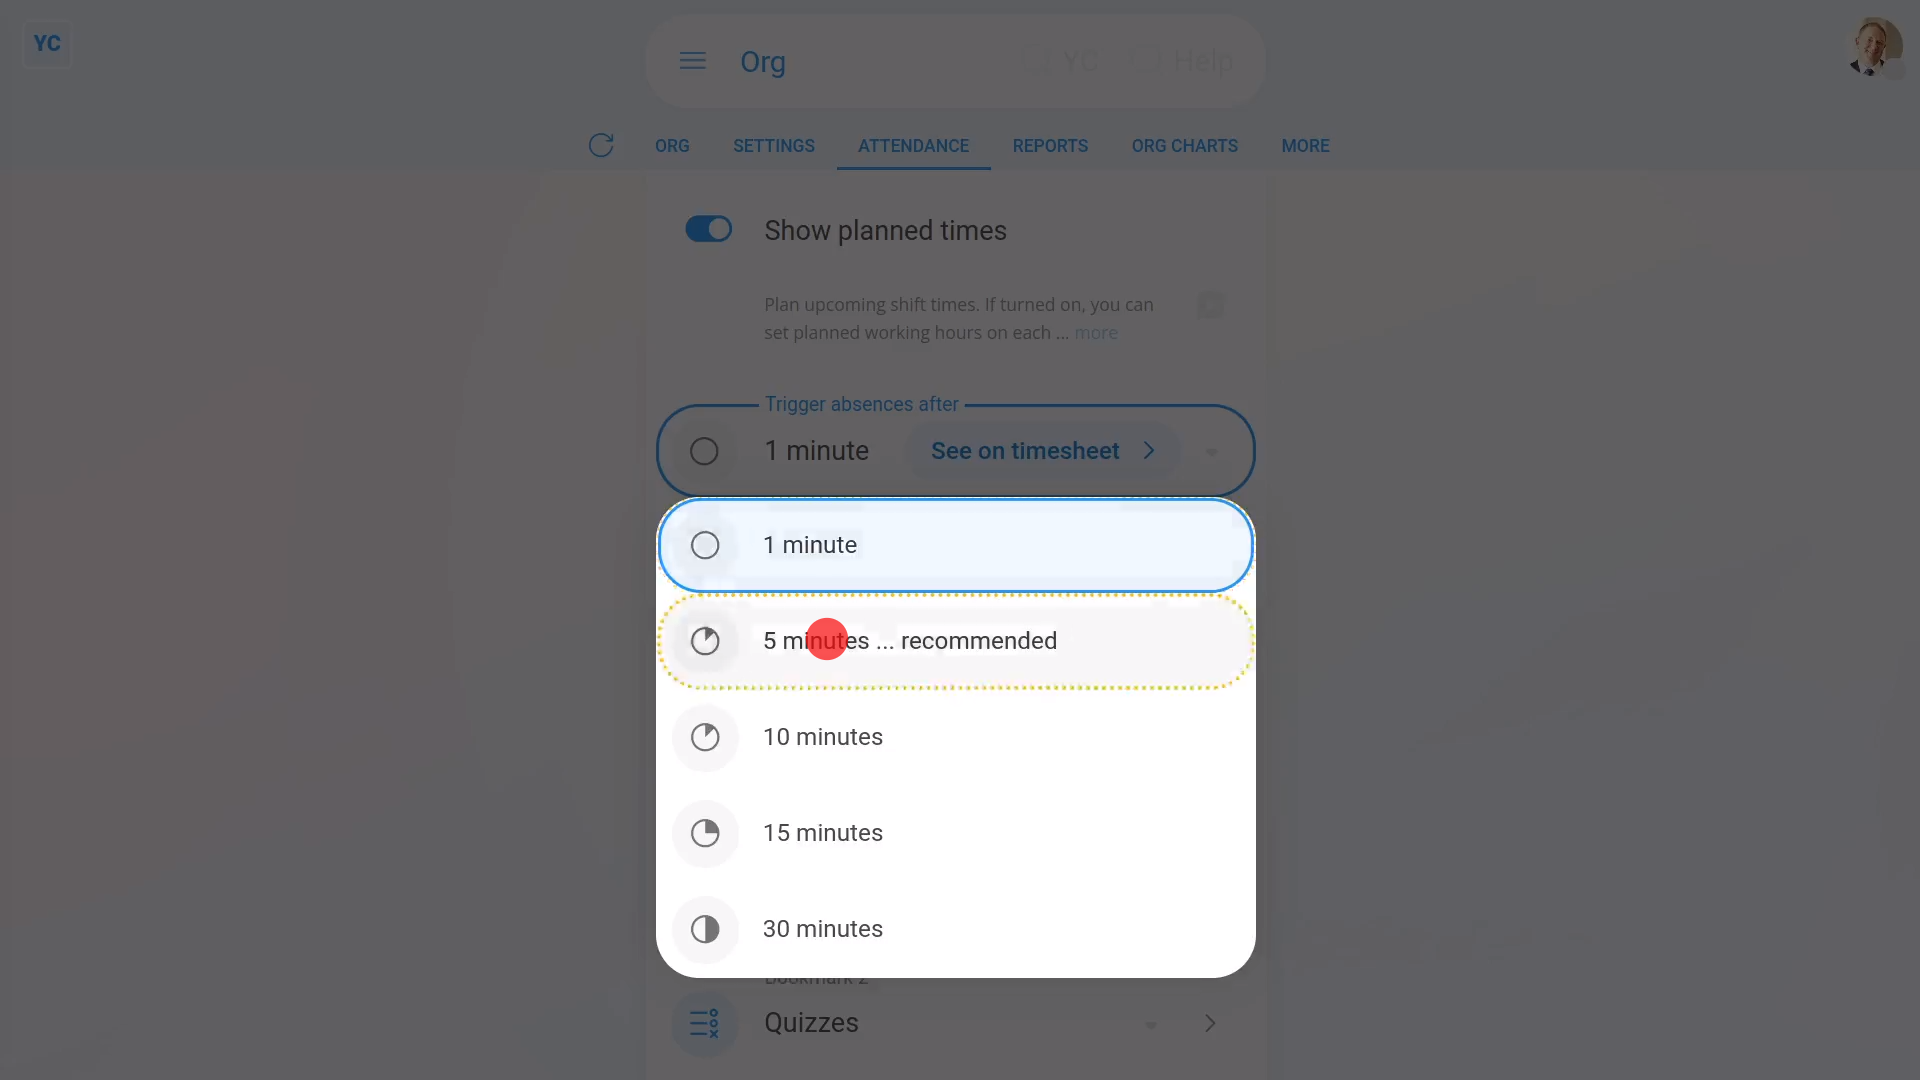
To set your org's absence trigger minutes:
- First, open your org on: "Menu", then "Orgs"
- Then tap: "Attendance", then "Attendance settings"
- Then scroll down and select the number of minutes to: "Trigger absences after"
- Then tap: Save
- Now, with the trigger set, open a timesheet to see the effect it's got.
- It's best to open yesterday's timesheet because absence warnings don't show up until the current day's totally finished.
- Currently, because both planned and done times exactly match, no absence has been triggered yet.
- To try triggering an absence, set the person to start late by exactly the trigger minutes.
- As expected, when you tap the "Reload tab" button: (at the top), still no absence has been triggered yet, as the person still hasn't gone over the trigger minutes.
- Next, set the person to start late by slightly more than the trigger minutes.
- Now when you tap the "Reload tab" button: (at the top), an absence has now been triggered.
- And finally, you can now see the absence warning for the number of minutes late.
Keep in mind that:
- The "Trigger absences after" setting applies equally to all people with planned times in your org.
- A very strict org may set the absence trigger to only 1 minute. A lax org could set it to 30 minutes. Either way, it's your choice, but if you don't change it, the default is 5 minutes.
- Also, for tracking absences to work, planned times need to be turned on.
To learn more:
- About how to turn on "Show planned times", watch the video on: Turning on planned times
And that's it! That's everything you need to know about setting your org's "absence trigger minutes"!
How do I turn on the planned times feature?
 2:17
2:17
"How do I turn on the planned times feature?"
Setting planned times allows you to schedule, publish, and track upcoming shift hours for your people.
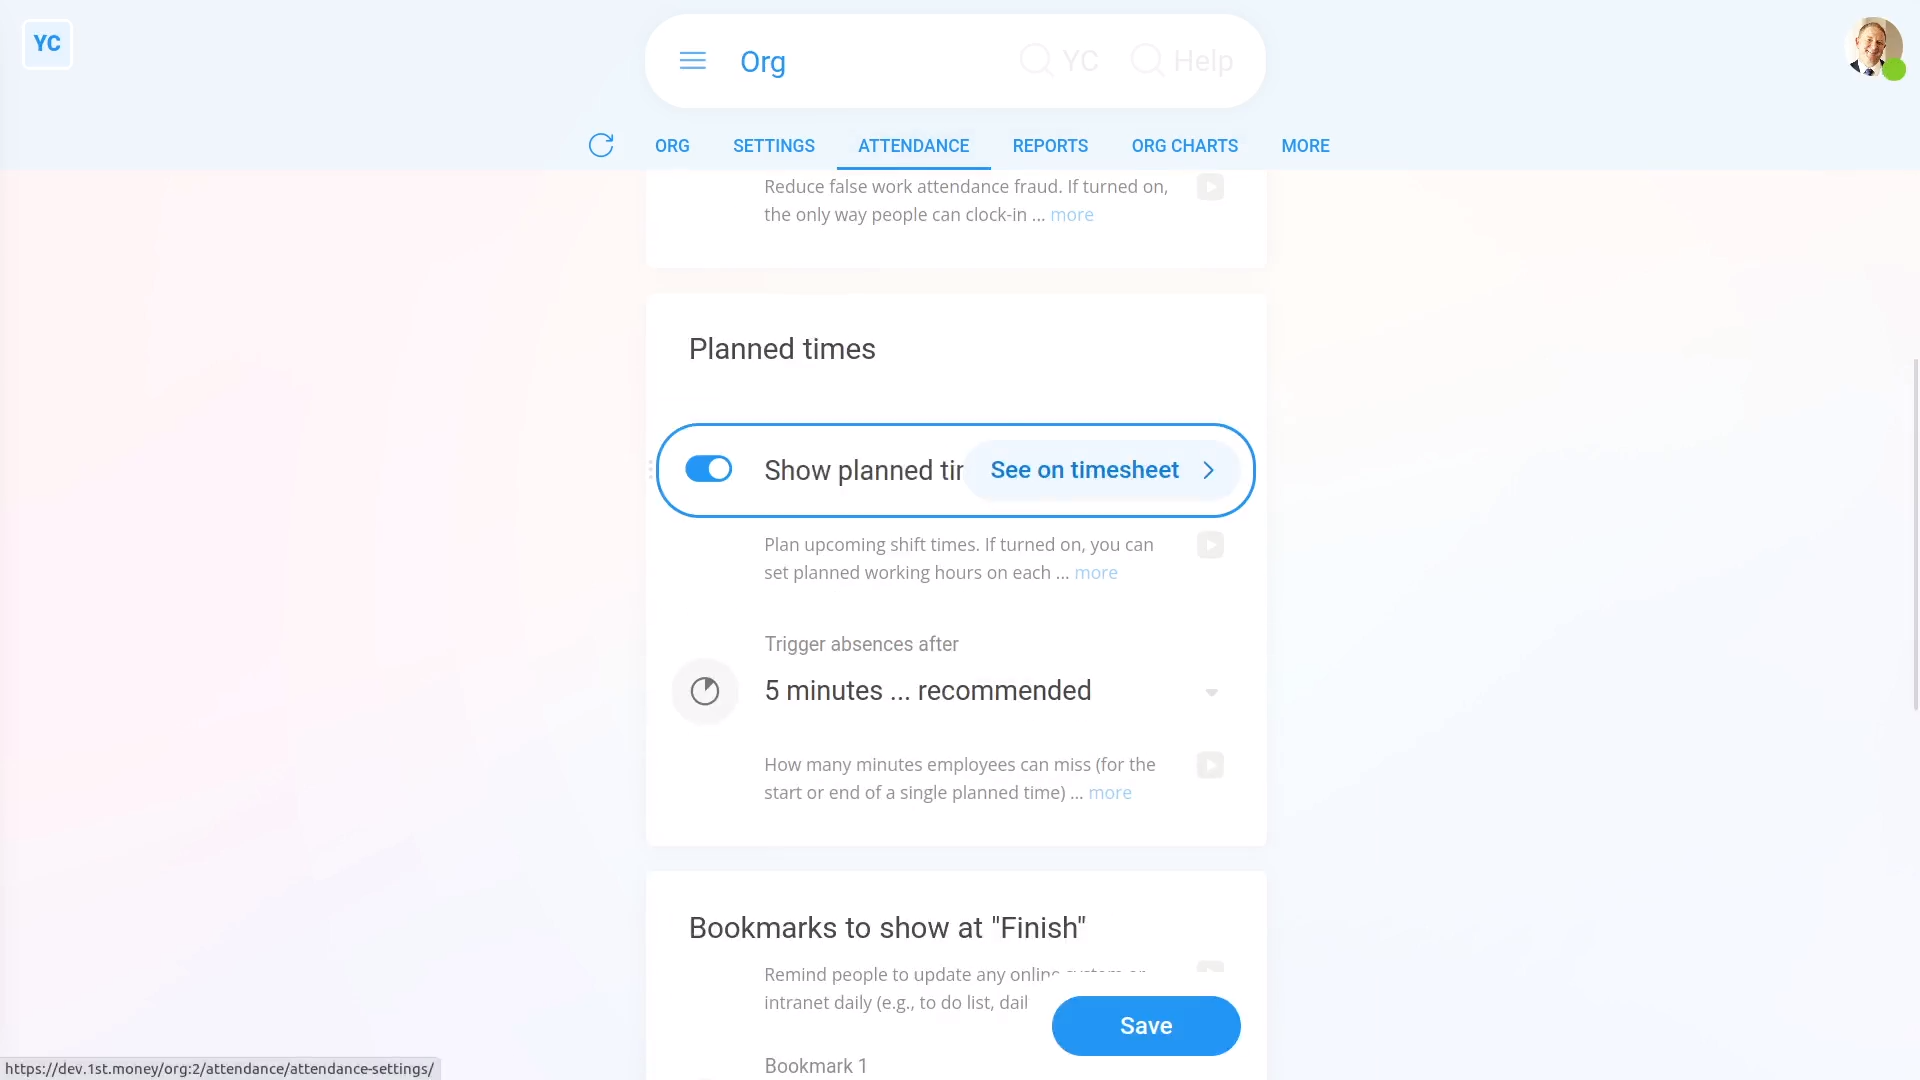
To turn on "Show planned times":
- First, open your org on: "Menu", then "Orgs"
- Then tap: "Attendance", then "Attendance settings"
- And turn on: "Show planned times"
- Then tap: Save
- And finally, "Show planned times" is now turned on.
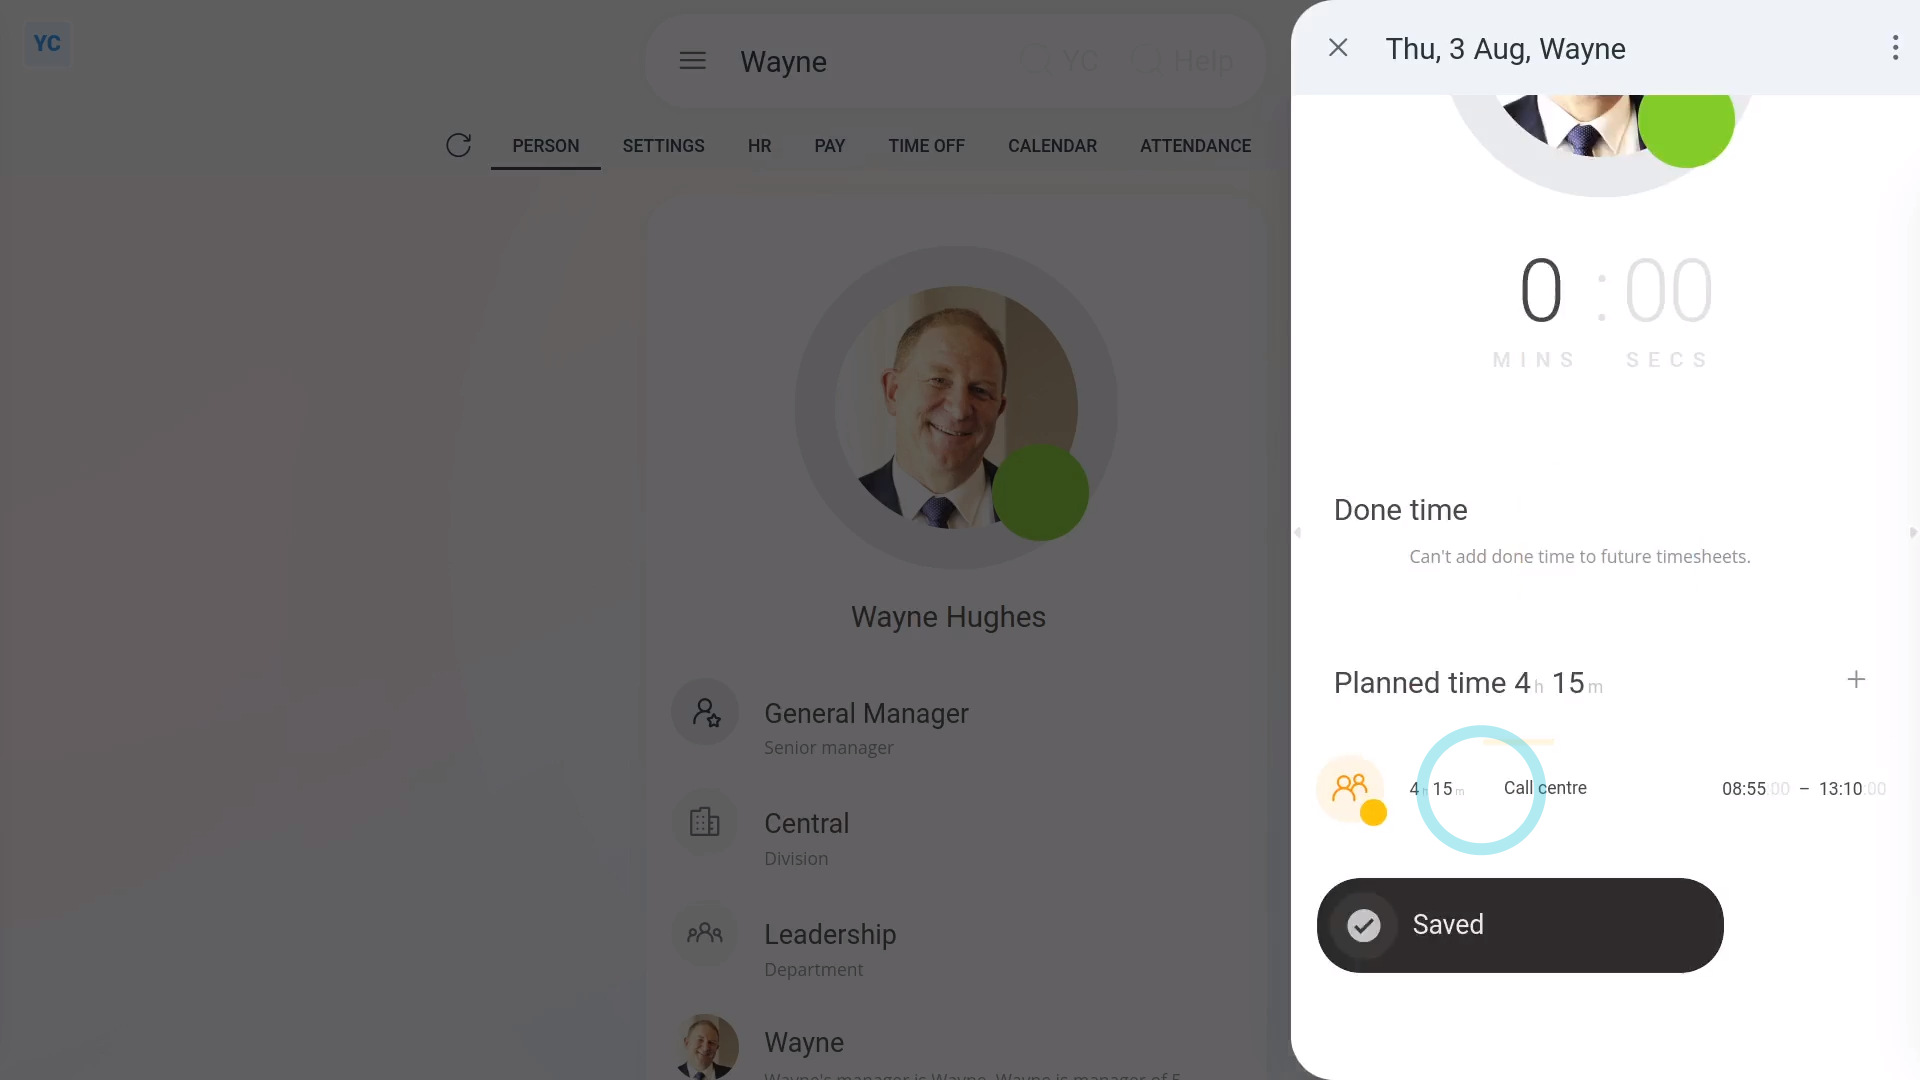
To set a planned time for a person:
- First, go to a person.
- Then tap: Calendar
- Next, tap the date on the calendar you'd like to set a planned time for.
- Once it slides out on the right, beside the "Planned time" heading, tap the "Add" button:
- Drag the sliders to set the planned time's start and stop times.
- Optionally, you can also select the project that you'd like the planned time to be saved into.
- Then tap: Save
- Now, you'll see the new planned time saved to the timesheet.
- And finally, when the person opens their "Work-time menu" (top-right), the person can now see the new planned time as one of their: "Upcoming times"
Keep in mind that:
- Planned times is an optional feature.
- It's useful for jobs that require people on shift at fixed times of the day. For example: call centres, restaurants, and retail.
- If all you need is to track your people's actual hours worked, you can keep it turned off. Time tracking continues to work fine without it.
- Also keep in mind that only admins or managers can change the "Show planned times" setting.
You may notice:
- The "Show planned times" setting applies to every person in your org.
- If you've got some people that don't need "Show planned times", but others that do, turn it on anyway.
- You can then use the "Show planned times" feature for those that do need it, and ignore it for those that don't.
And that's it! That's all you need to do to add a planned time!
How do I understand the attendance averages?
 2:31
2:31
"How do I understand the attendance averages?"
The attendance averages provides a set of metrics that describe a person's work patterns. The metrics allow you to compare attendance patterns between people.
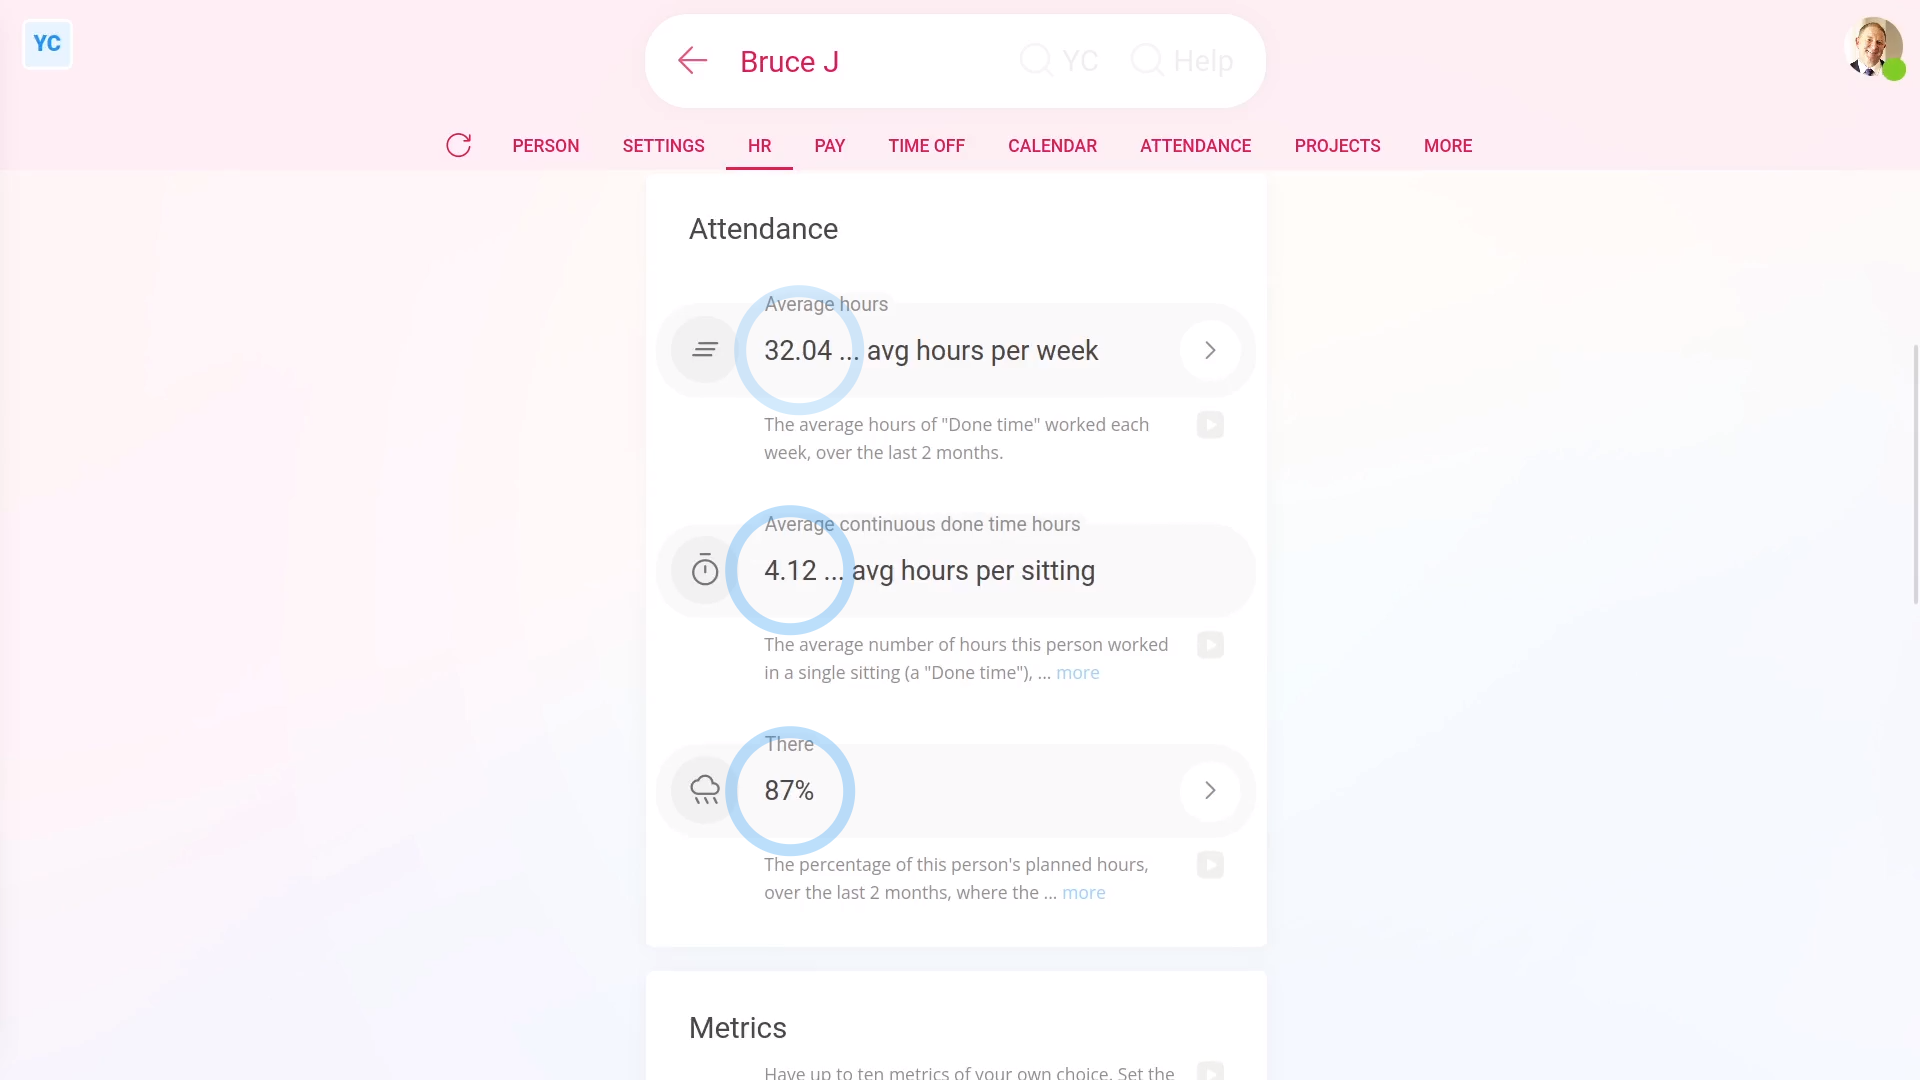
To see a person's attendance averages:
- First, select the person on: "Menu", then "People"
- Then tap: "HR", then "Assessment"
- Then scroll down to the "Attendance" heading.
- And finally, you'll see the person's attendance averages.
Average hours: To understand "Average hours":
- You'll see an estimate of the average hours of "Done time" worked each week by the person.
- The average is based on their attendance over the last two months.
- To see an exact figure, tap the "Edit" button:
- And you'll see it slide out from the right, showing two months worth of weekly "Done time" totals.
- You'll also see the exact overall weekly average (at the bottom).
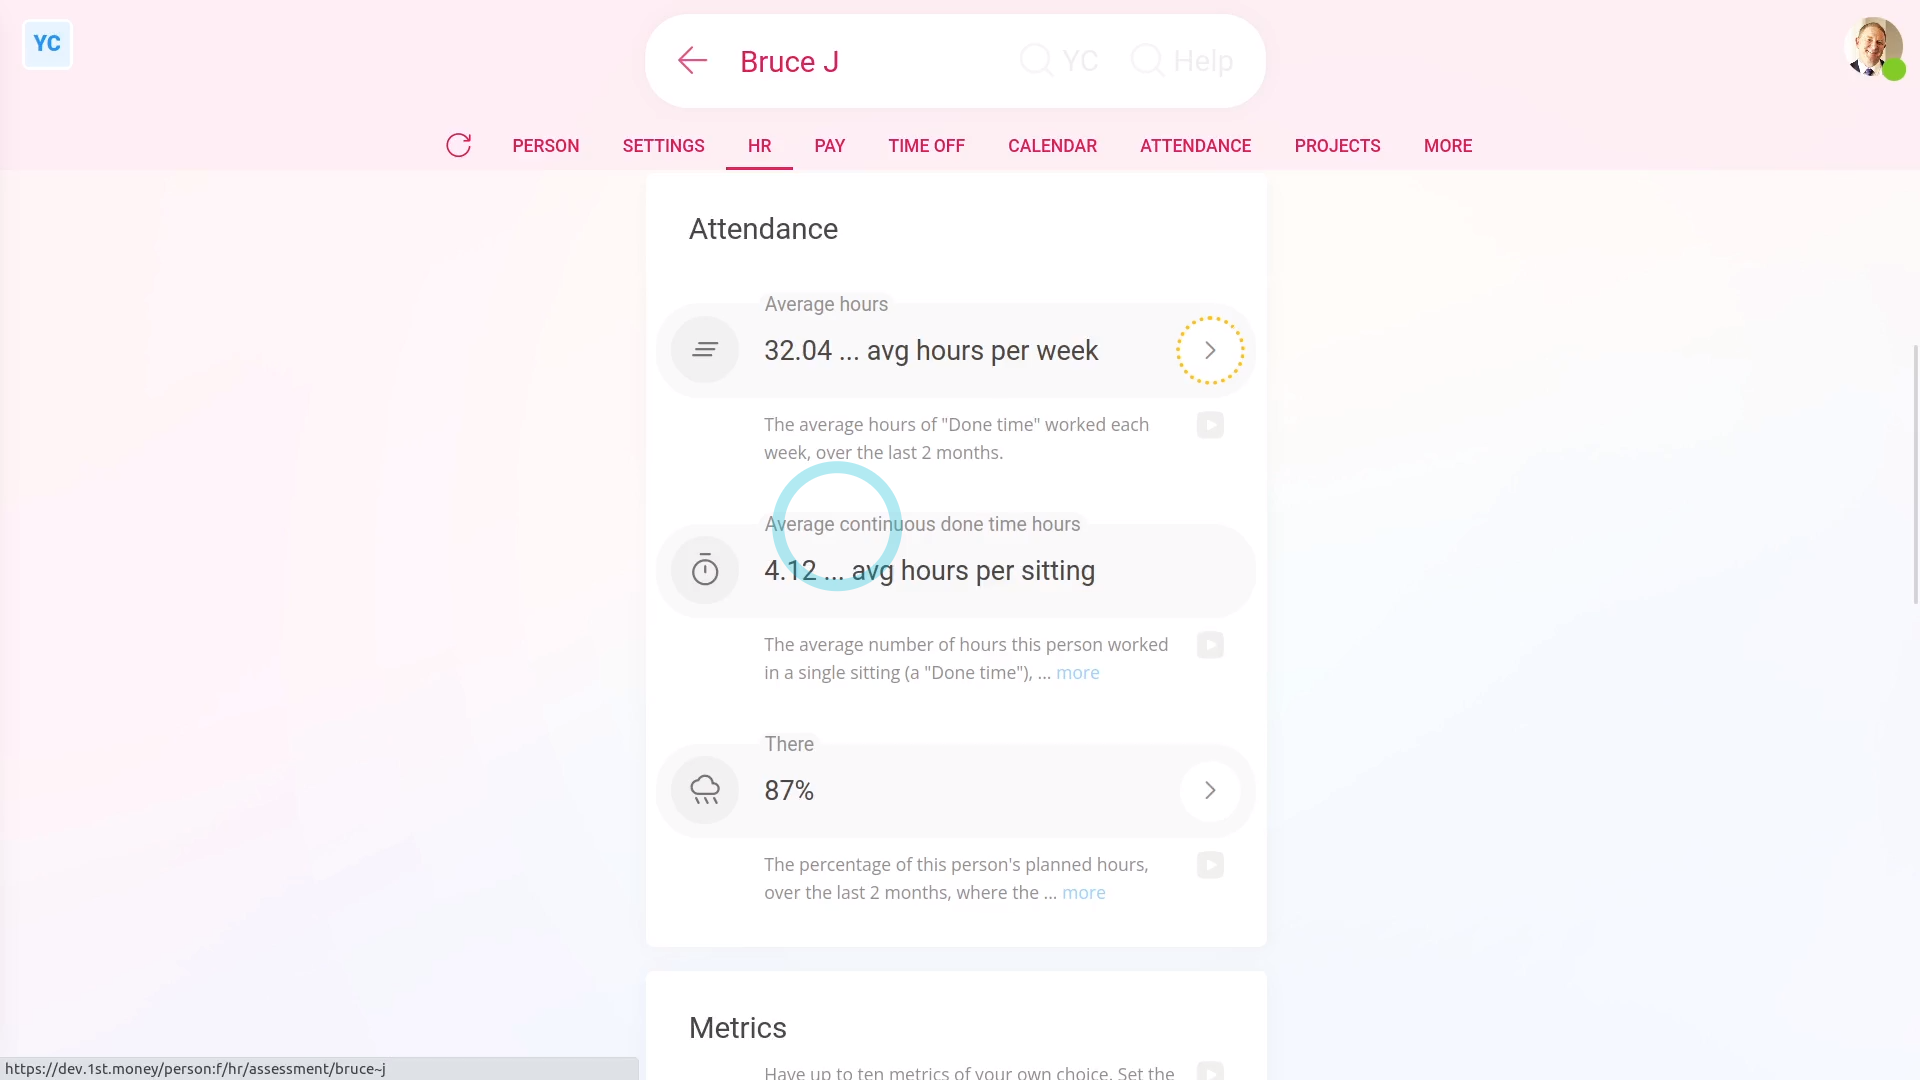
Average continuous done time hours: To understand "Average continuous done time hours":
- You'll see the average "Done time" worked in a single sitting by the person.
- The average is also based on their attendance over the last two months.
- A bigger number means that the person typically works continuously for a longer period, before taking a break.
- For jobs that require concentration, like problem solving, a bigger "Average continuous done time hours" is better.
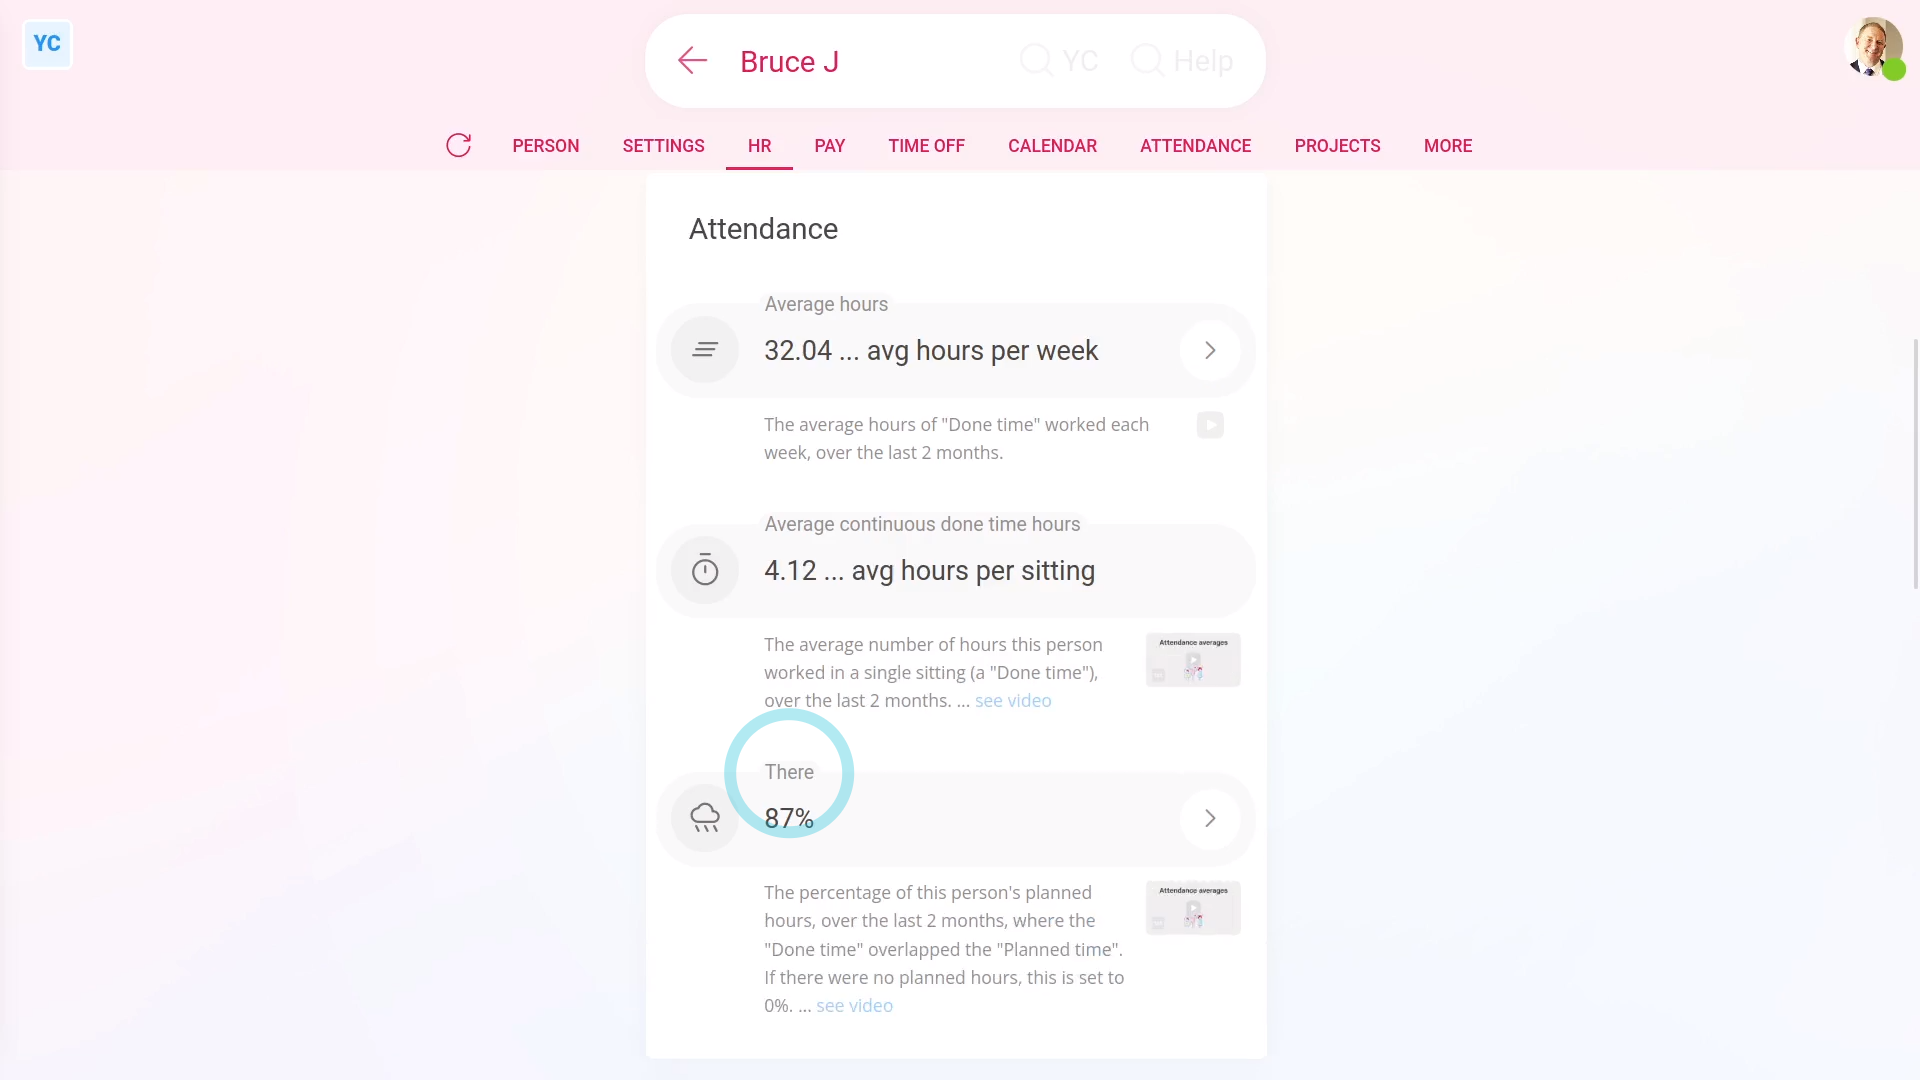
There: To understand a person's "There" percentage:
- You'll see the percentage of the person's planned hours, over the last 2 months, where the "Done time" overlapped the: "Planned time"
- In other words, what percent of the time the person was there, compared to when you planned for them to be there.
- The percentage is also based on attendance over the last two months.
- For jobs that require shift planning, like restaurants and call centres, a "There" percentage closer to 100% is better.
- When there's no planned hours, it shows as 0%.
- When "Show planned times" is turned off, it doesn't show.
To learn more:
- About how to turn on "Show planned times", watch the video on: Turning on planned times
And that's it! That's everything you need to know about attendance averages!
How do I use a person's 'Timelines ... weekly' report?
 2:24
2:24
"How do I use a person's "Timelines ... weekly" report?"
The "Timelines ... weekly" report shows you a one page summary of one person's timesheets for a single week.
The "Timelines ... weekly" report, and all other "Attendance" reports, are available to be opened by:
- Each person, to see their own weekly timelines.
- The person's direct manager and supervisors.
- And also to anyone with at least "View org admin" permissions.
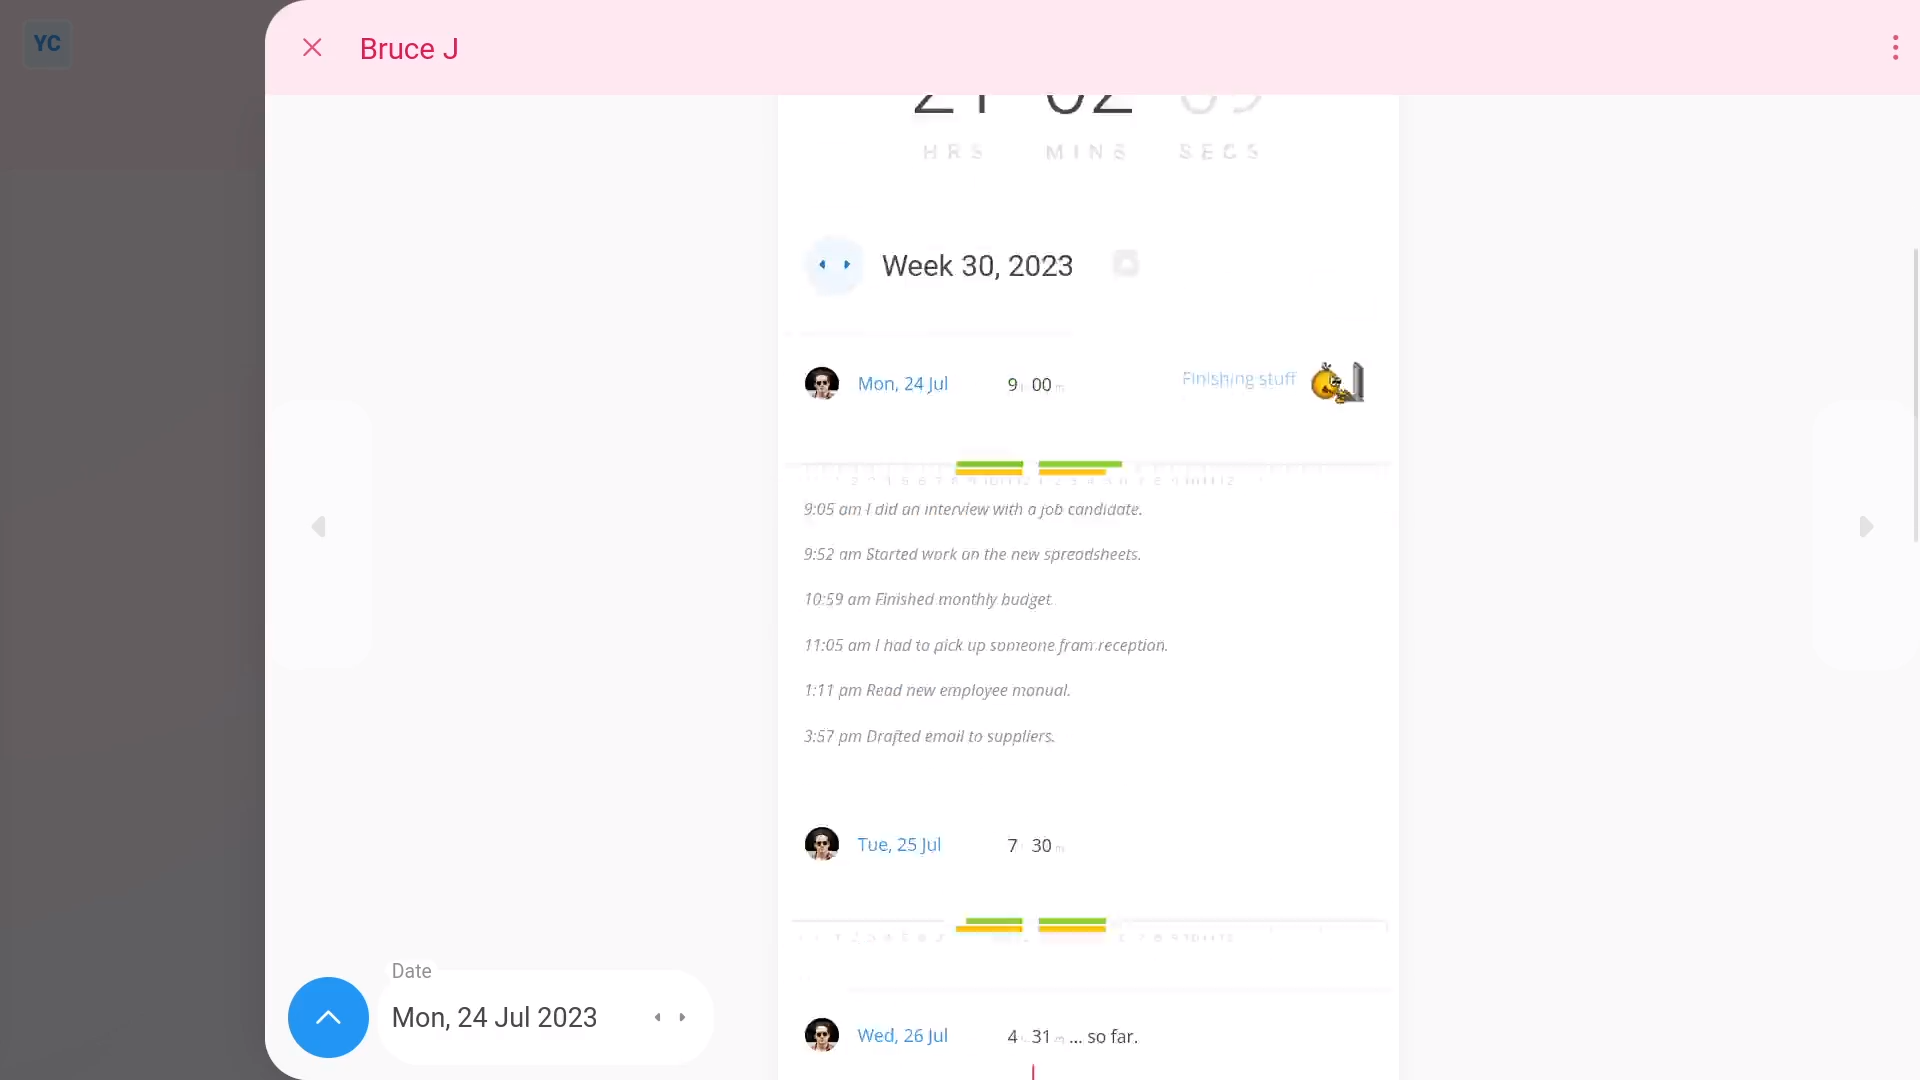
To see a person's "Timelines ... weekly" report:
- First, select the person on: "Menu", then "People"
- Then tap: "Attendance", then "Timelines ... weekly"
- Once it opens, you'll see a list of timesheets for the person, for the week.
- The red line shows the time right now. In other words, using the "Timelines ... weekly" report you can see the real-time status of the selected person.
- The other way to see a person's "Timelines ... weekly" report, is to tap: Calendar (at the top)
- Then to go to a specific week, tap one of the grey week number circles (at the start of each week).
- And finally, you can go backwards or forwards, a week at a time, when you tap the triangles. Including the heading triangles, the side triangles, and the date triangles.
You may notice:
- The "Timelines ... weekly" report includes the total hours done, for the whole week (at the top).
- And then as you scroll down, you can see each day's total hours done.
- As well as their feeling, upon reaching the end of each day.
- And notes that the person's written throughout each day.
For advanced usage:
- When you scroll to the bottom of the page you'll see a useful summary of all hours worked by the person for that week.
- Including:
- The hours worked by the selected person, for the week you picked.
- The person's average daily start and average finish time for that week.
- It also includes their average continuous done time, or how long the person continuously works for, before going on a break.
And that's it! That's everything you need to know about using a person's "Timelines ... weekly" report!
How do I use a project's 'Timelines ... daily' report?
 2:19
2:19
"How do I use a project's "Timelines ... daily" report?"
The "Timelines ... daily" report shows you a one page summary of all of a project's timesheets for a single working day.
The "Timelines ... daily" report, and all other "Attendance" reports, are available to be opened by:
- Anyone with at least "View org admin" permissions.
- And also a project's owners and observers.
To see a project's "Timelines ... daily" report:
- First, select the project on: "Menu", then "Projects"
- Then tap: "Attendance", then "Timelines ... daily"
- Once it opens, you'll see a list of timesheets for people who worked in the project for today.
- The red line shows the time right now. In other words, you can see the real-time status of all the people in the project, all on one page.
- To go to a specific date, you can pick a day on the calendar.
- And finally, you can go backwards or forwards, a day at a time, when you tap the triangles. Including the heading triangles, the side triangles, and the date triangles.
You may notice:
- The "Timelines ... daily" report includes the total hours done, by everyone (at the top).
- And then as you scroll down, you can see each person's total hours done.
- As well as their feeling, upon reaching the end of their day.
- And notes that the person's written throughout their day.
For advanced usage:
- When you scroll to the bottom of the page you'll see a useful summary of all hours worked in the project for that day.
To compare a set of selected project people's timelines:
- First, tap:
" Show settings", then "Show people" - Then control + tap the people you want to compare.
- You'll now see multiple timesheets for the selected people, and the summary (at the bottom) is now only showing the selected people also.
- And finally, to return back to everyone, tap: All
And that's it! That's everything you need to know about using a project's "Timelines ... daily" report!
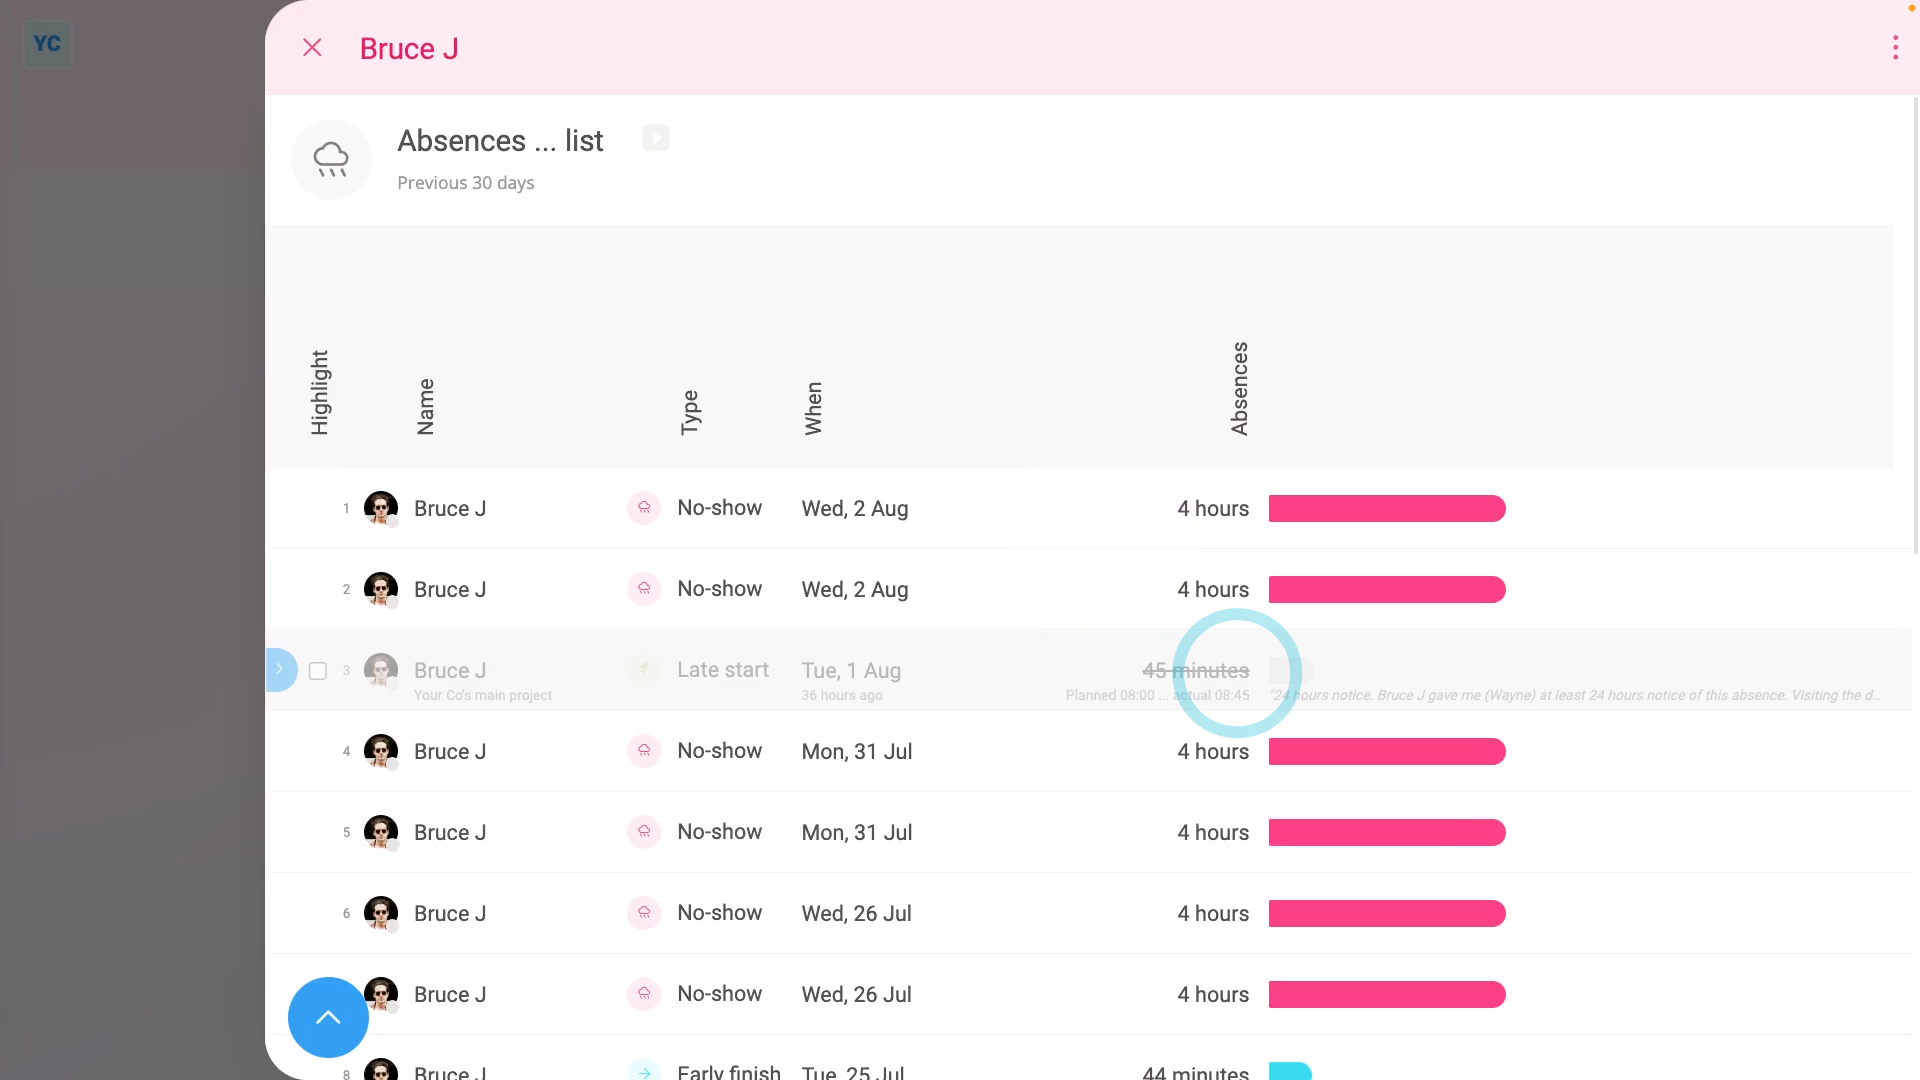
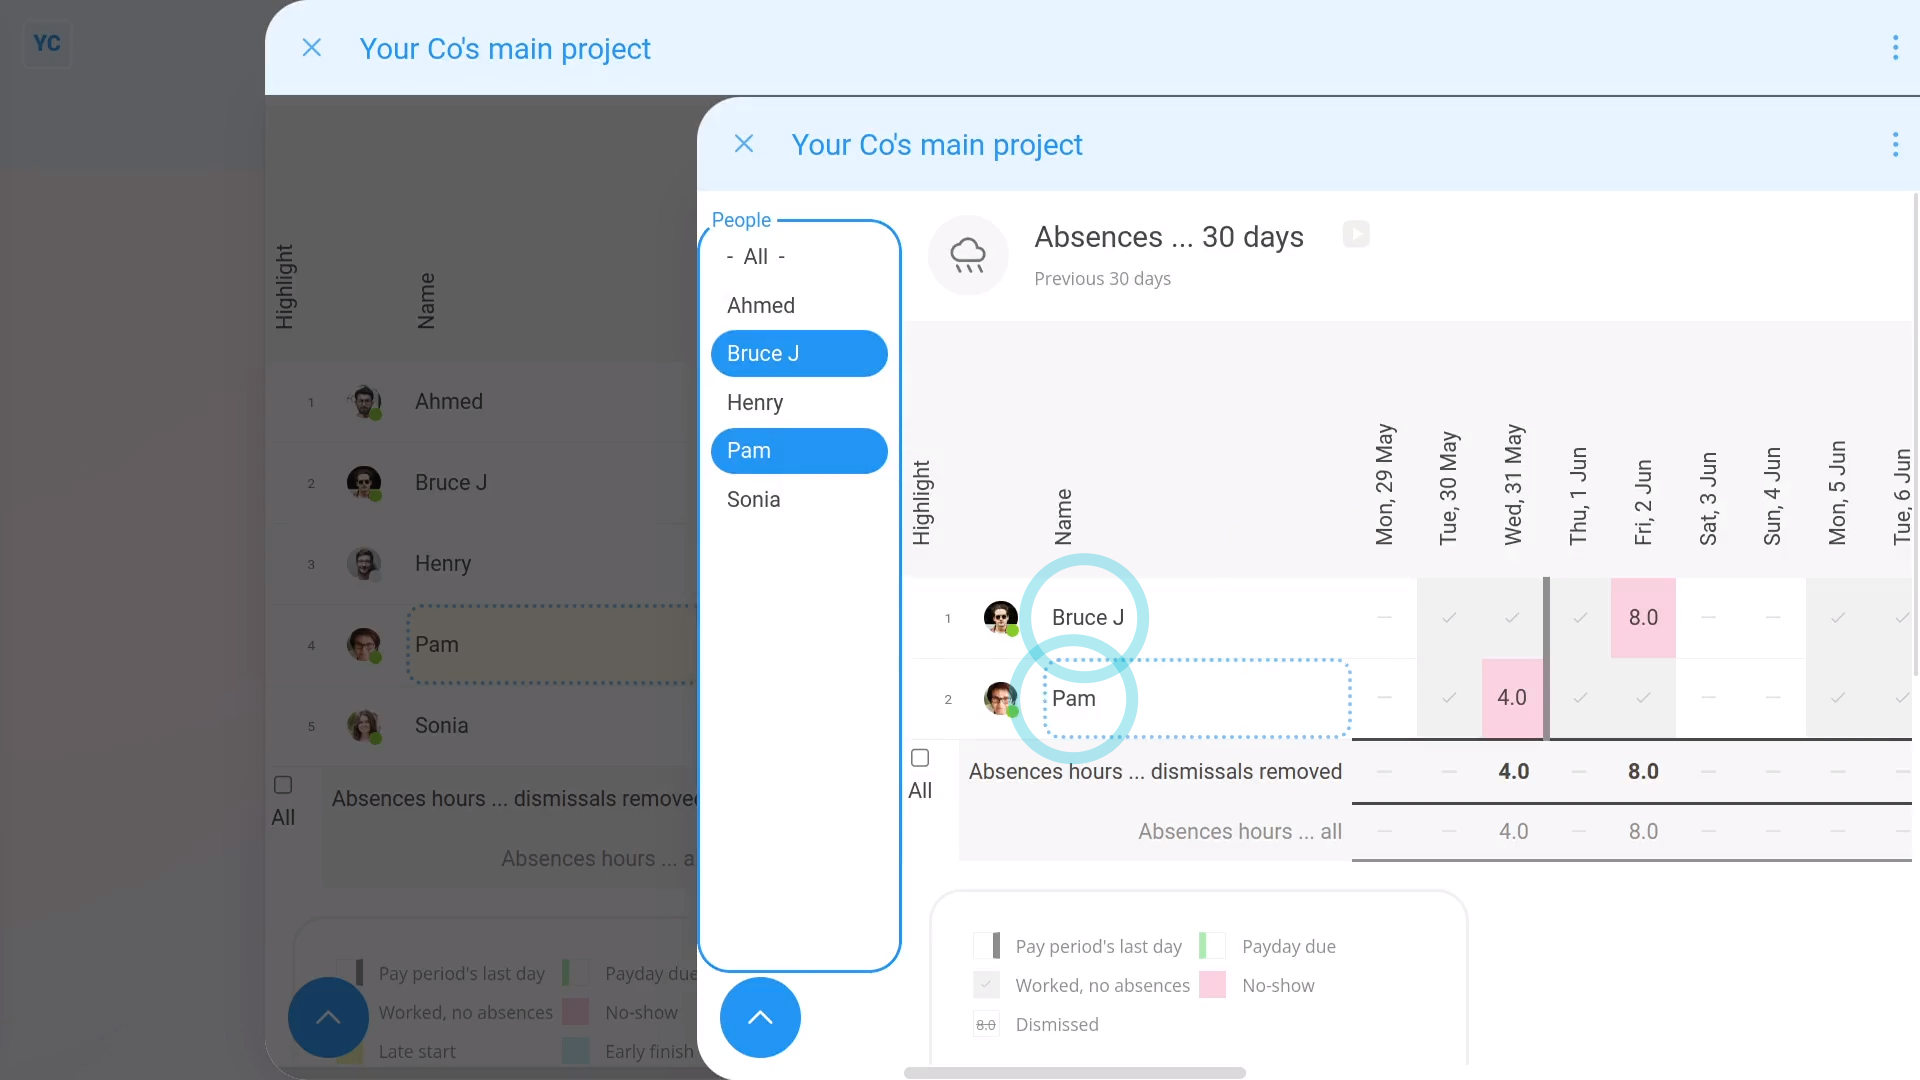
How do I use the 'Absences 30 days' report?
 3:29
3:29
"How do I use the "Absences 30 days" report?"
The "Absences 30 days" report shows you a colour-coded overview of every absence for the selected person, project, or even your whole org. It's useful for spotting patterns in absences.
A person or project's "Absences 30 days" report, and all other "Attendance" reports, are available to be opened by:
- Each person, to see their own "Absences 30 days" report.
- The person's direct manager and supervisors.
- Also to anyone with at least "View org admin" permissions.
- And also a project's owners and observers.
You may notice:
- When you go to a project and look on the Attendance menu, it may not show the "Absences 30 days" report.
- If not, it means your org hasn't turned on "Show planned times" yet.
To learn more:
- About how to turn on "Show planned times", watch the video on: Turning on planned times
When a person or project has no planned times entered then the "Absences 30 days" report is empty.
To see a project's "Absences 30 days" report:
- First, select the project on: "Menu", then "Projects"
- Then tap: "Attendance", then "Absences ... 30 days"
- And finally, once it opens, you'll see a list of every absence of every person in the project, over the last 30 days.

To only see all absences of a single person:
- First, tap their name.
- And finally, it slides out on the right, showing absences for only that person.
To understand all three kinds of absences:
- First, there's "Late starts" in green, where a person started later than their planned start time.
- Then there's "Early finishes" in blue, where a person finished earlier than their planned finish time.
- And finally, there's "No-shows" in pink, where a person didn't show up at all.
To only see "no-shows":
- Tap:
" Show settings", "Filter", then "No-shows only"
To compare a set of selected people on an "Absences 30 days" report:
- First, tap:
" Show settings", then "Show people" - Then control + tap the people you want to compare.
- And finally, you'll now only see no-show absences for the selected people.
Now, switching back to "All people" and: "All absences"
You can see (at the bottom of the grid) the totals for each day, including with and without excused absences.
Any excused absences show in lighter grey, and crossed out.
When you mouse over each excused absence, you'll see the explanation added by the manager who excused the absence.
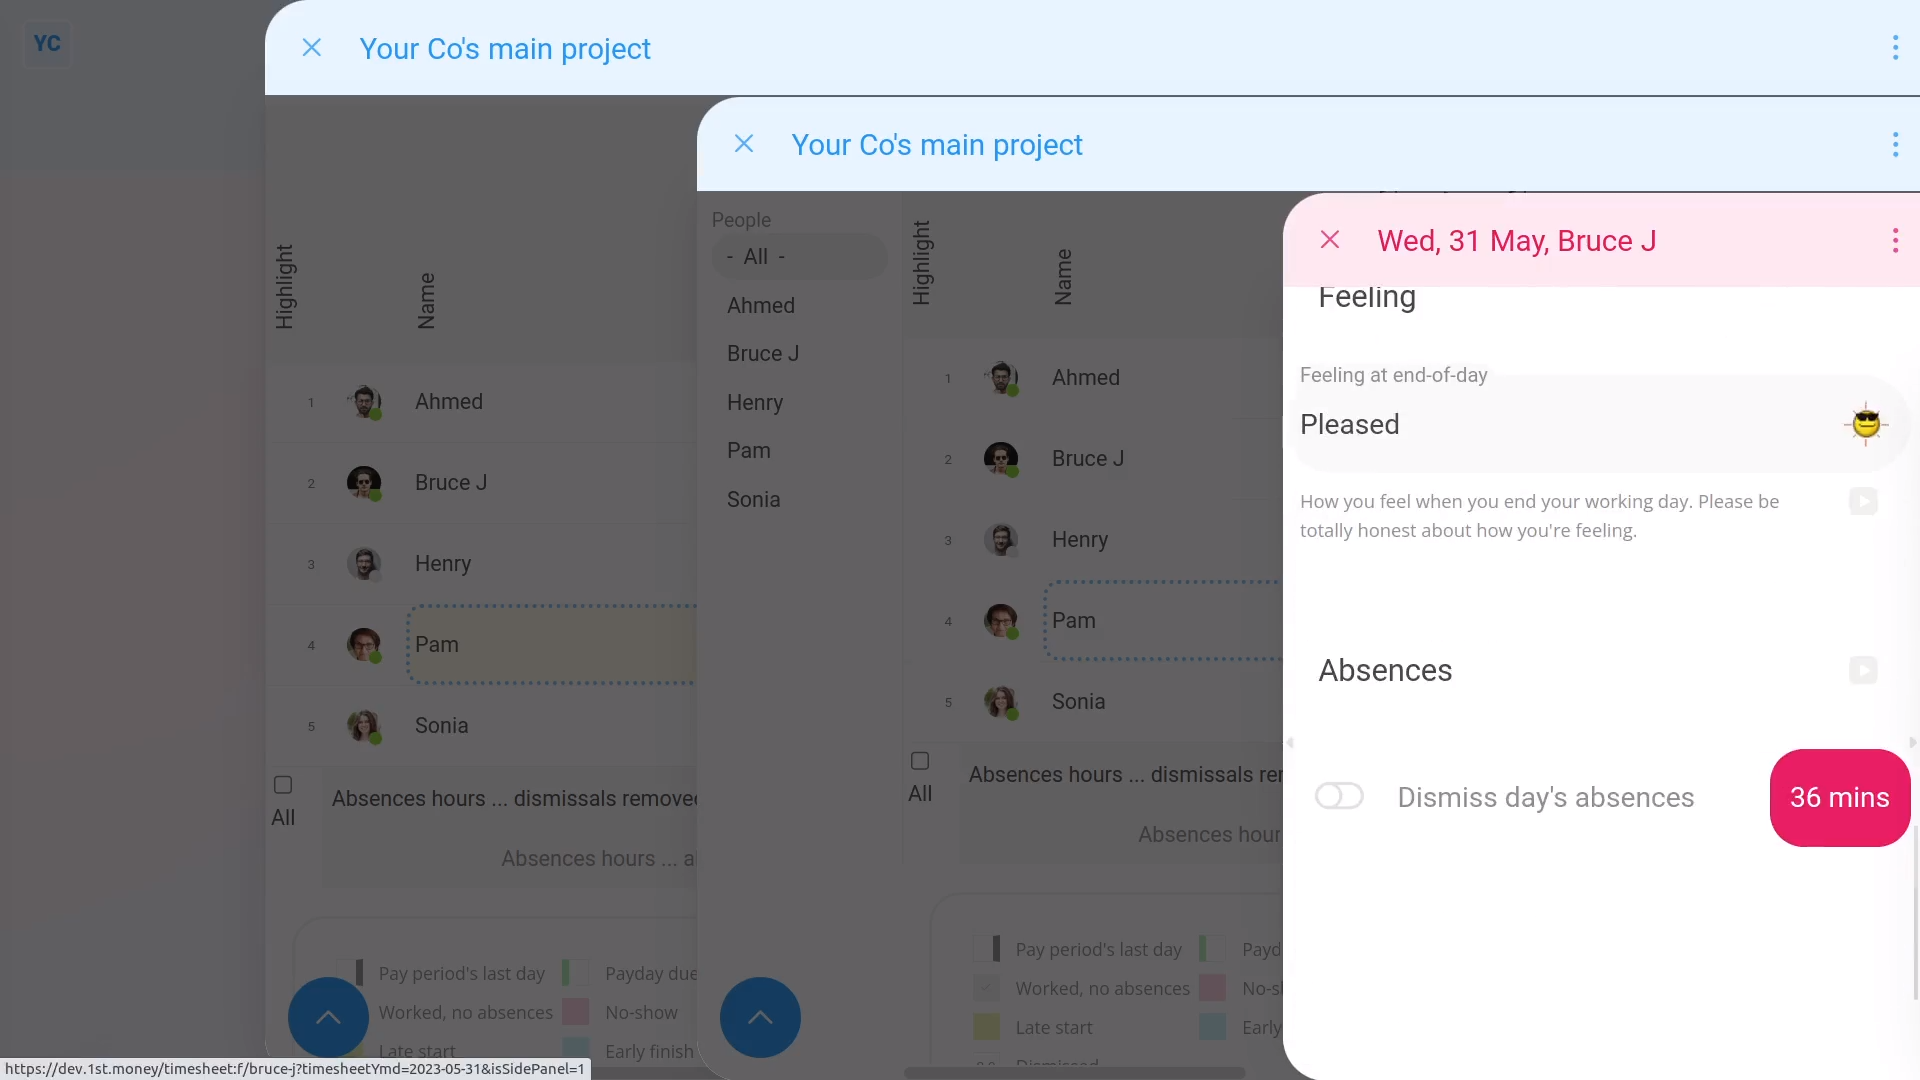
To see a person's "excuse options":
- First, tap any cell.
- And finally, you'll see that person's timesheet for that day.
And that's it! That's everything you need to know about using "Absences 30 days" reports!
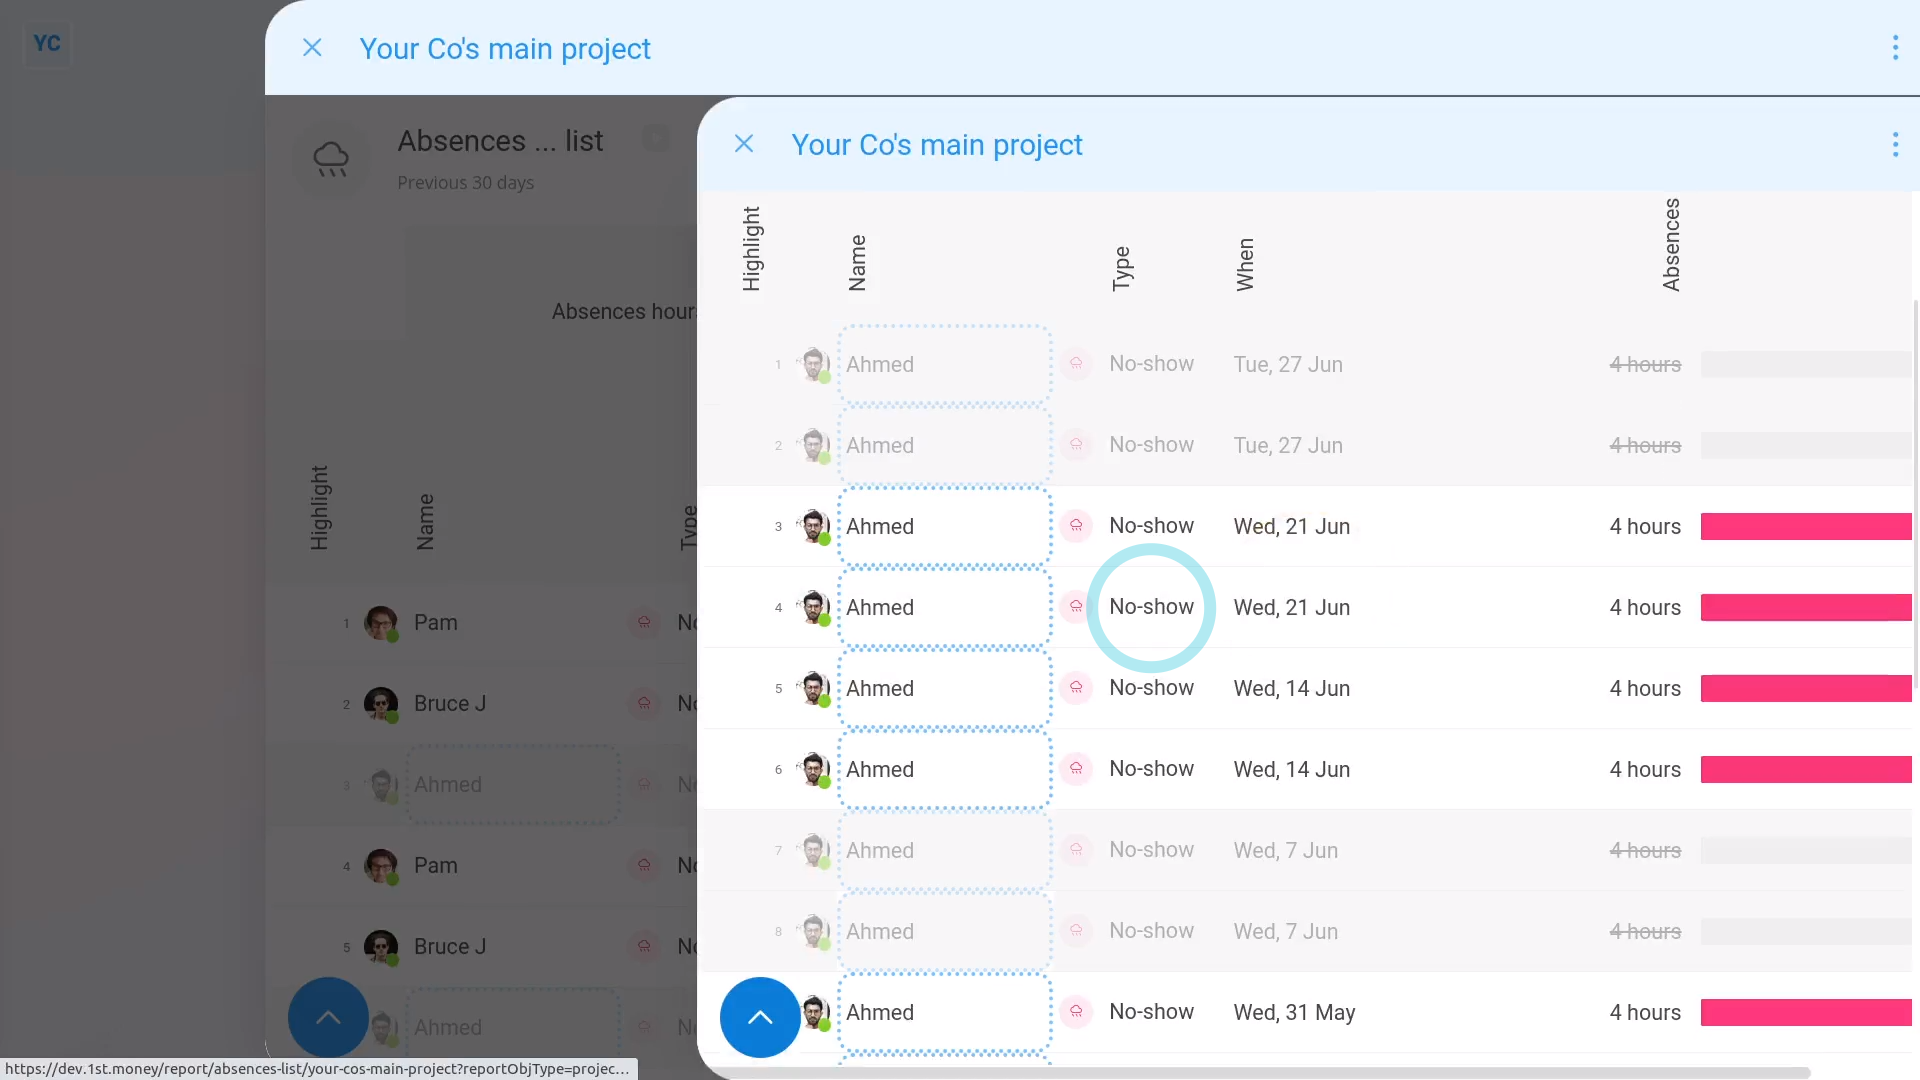
How do I use the 'Absences list' report?
 3:20
3:20
"How do I use the "Absences list" report?"
The "Absences list" report shows you a list of every absence for the selected person, project, or even your whole org.
A person or project's "Absences list" report, and all other "Attendance" reports, are available to be opened by:
- Each person, to see their own "Absences list" report.
- The person's direct manager and supervisors.
- Also to anyone with at least "View org admin" permissions.
- And also a project's owners and observers.
You may notice:
- When you go to a project and look on the Attendance menu, it may not show the "Absences list" report.
- If not, it means your org hasn't turned on "Show planned times" yet.
To learn more:
- About how to turn on "Show planned times", watch the video on: Turning on planned times
To see a project's "Absences list" report:
- First, select the project on: "Menu", then "Projects"
- Then tap: "Attendance", then "Absences ... list"
- And finally, once it opens, you'll see a list of every absence of every person in the project, over the last 30 days.
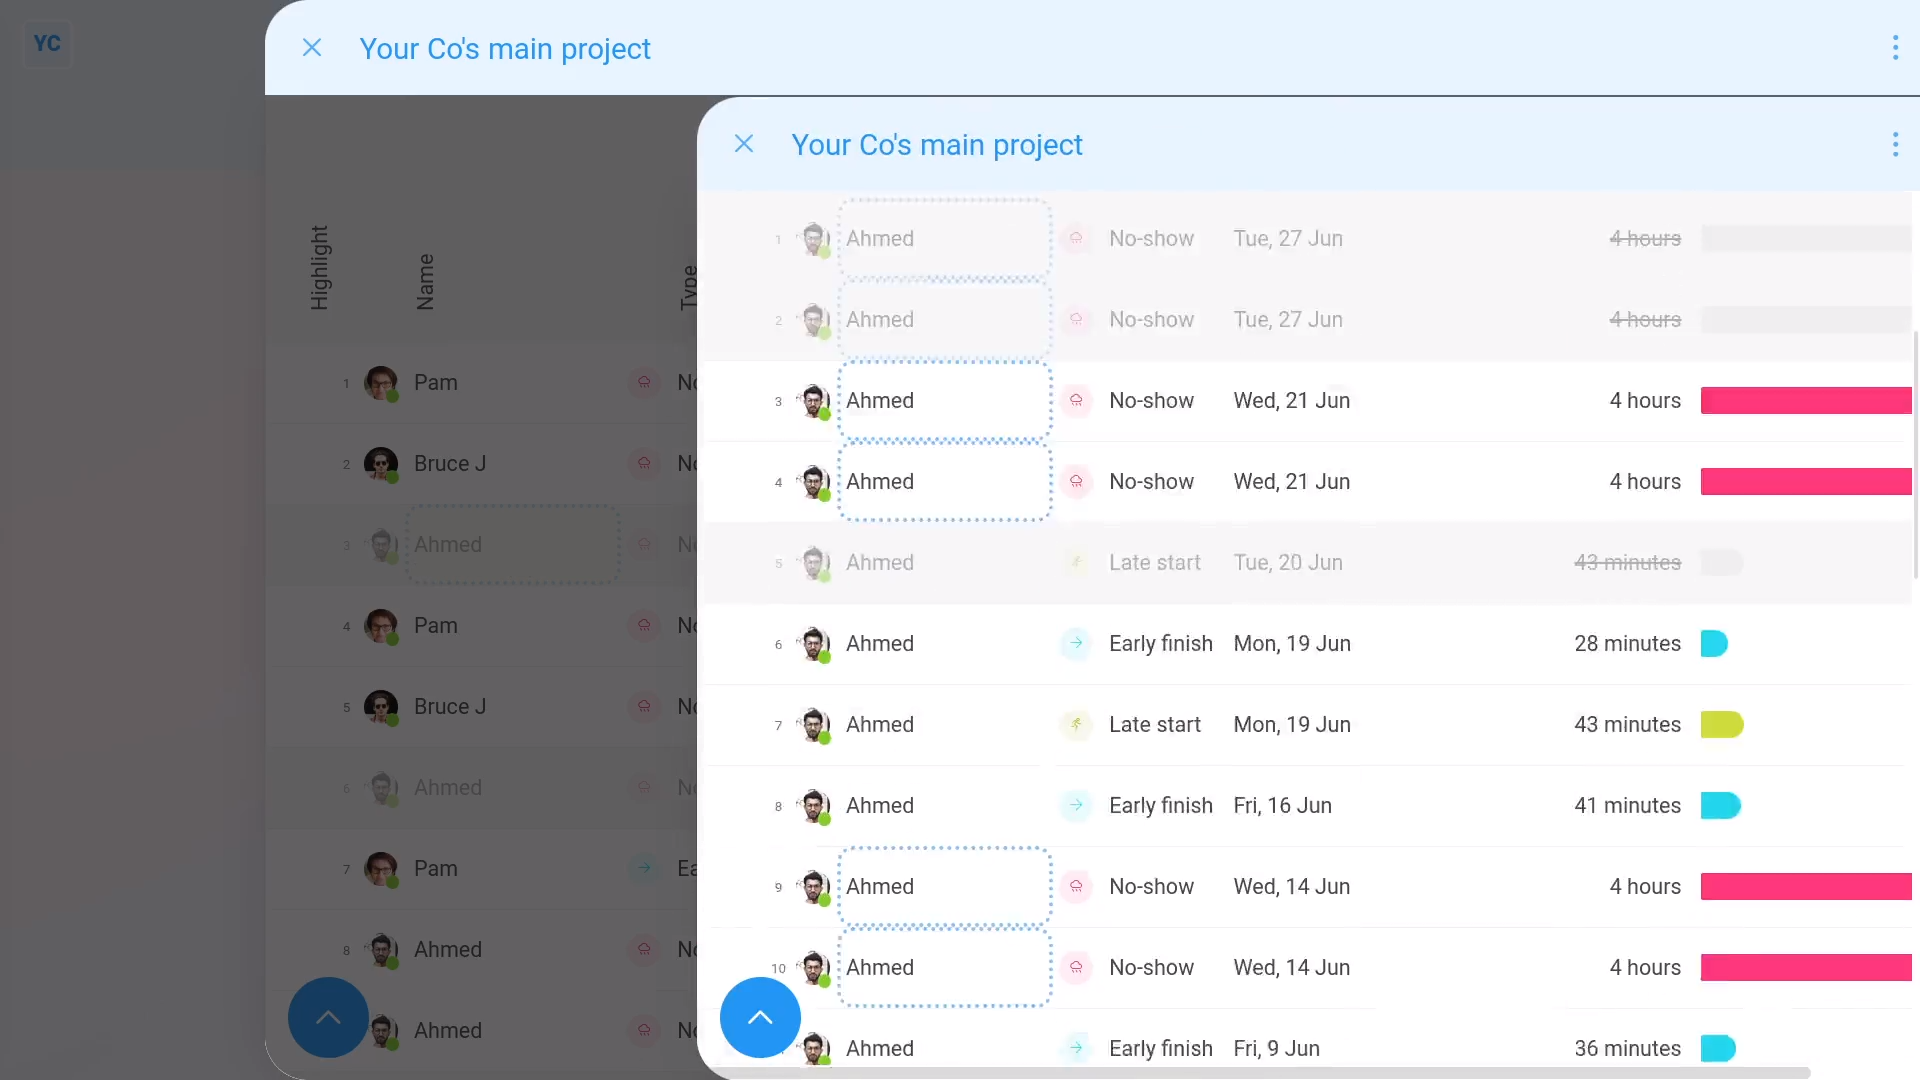
To only see all absences of a single person:
- First, tap their name.
- And finally, it slides out on the right, showing absences for only that person.
To understand all three kinds of absences:
- First, there's "Late starts" in green, where a person started later than their planned start time.
- Then there's "Early finishes" in blue, where a person finished earlier than their planned finish time.
- And finally, there's "No-shows" in pink, where a person didn't show up at all.
To see an "Absences list" report with only "no-shows":
- Tap:
" Show settings", "Filter", then "No-shows only"
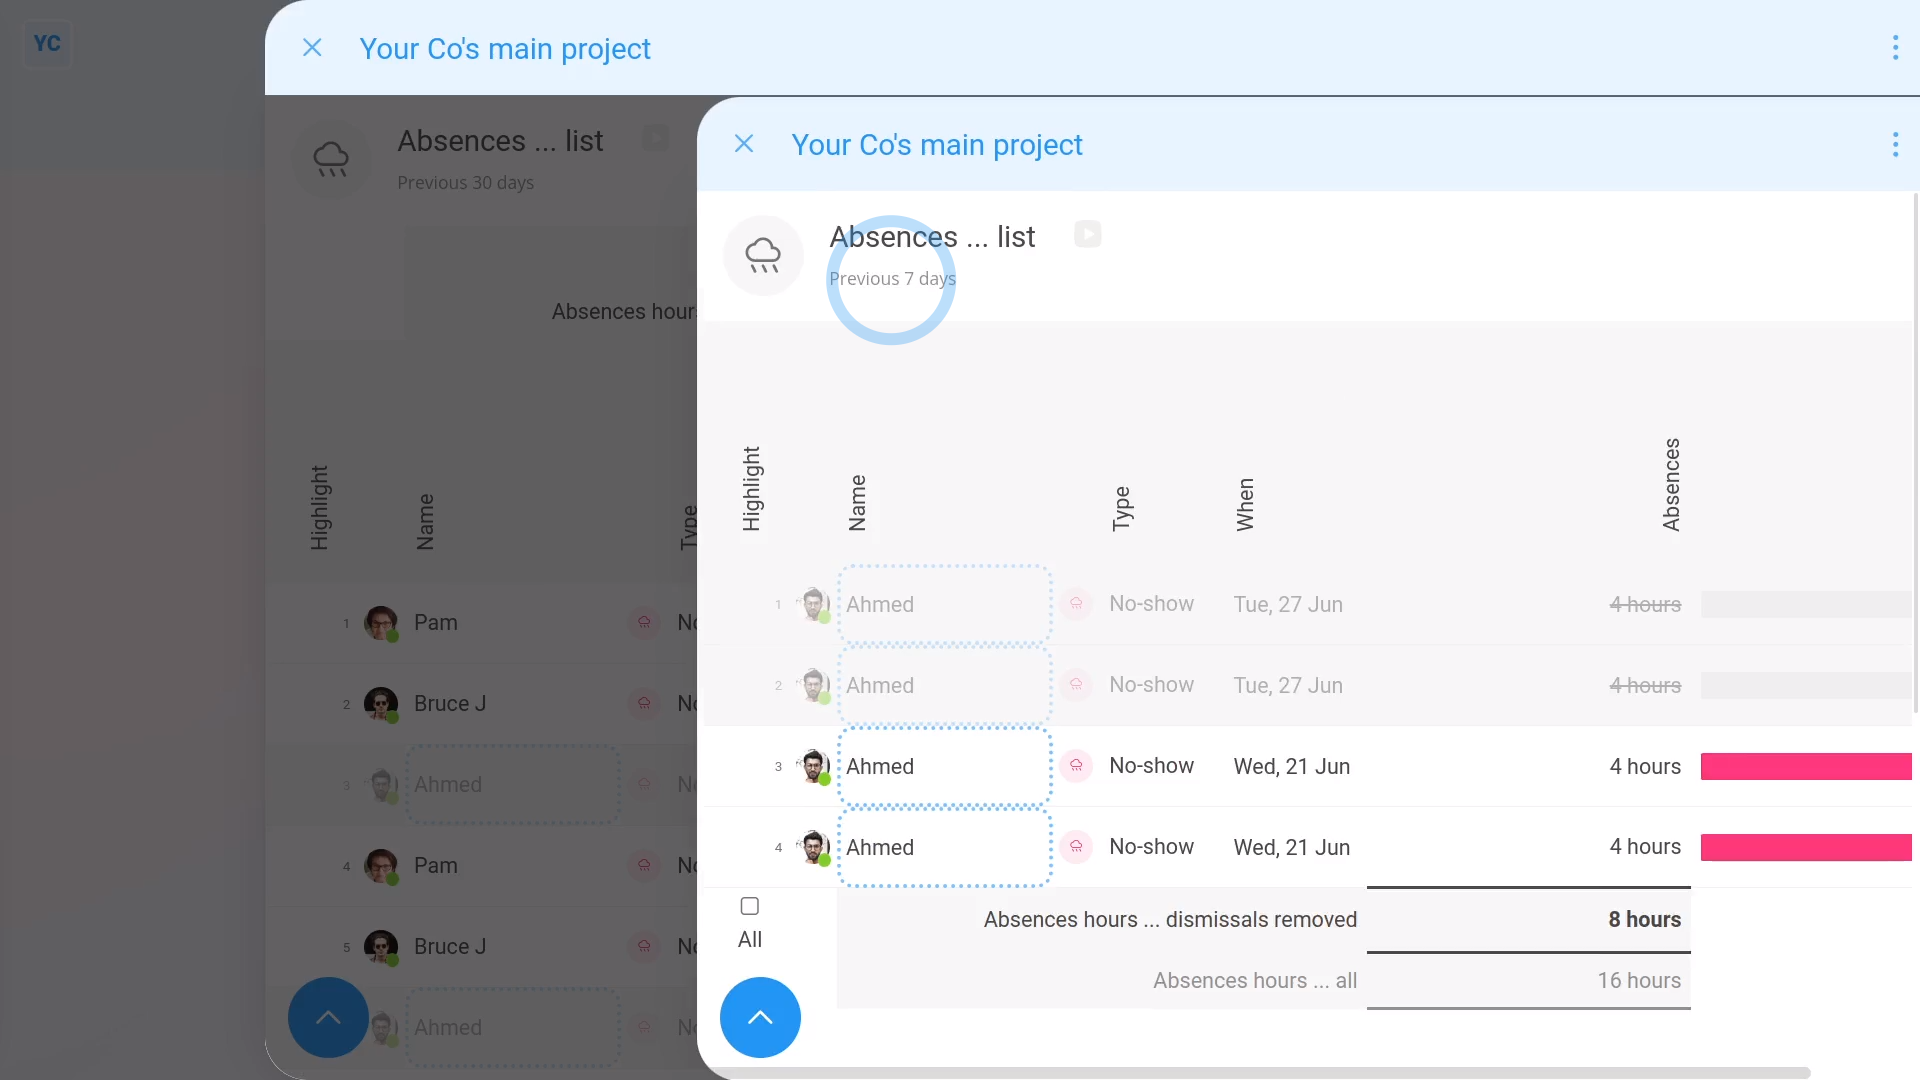
To see an "Absences list" report of your last 7 days:
- Tap:
" Show settings", "Dates", then "Previous 7 days"

To compare a set of selected people on an "Absences list" report:
- First, tap:
" Show settings", then "Show people" - Then control + tap the people you want to compare.
- You'll now only see no-show absences for the selected people, over the last 7 days.
- You can see (at the bottom), the total of all absences hours.
- You can also see that after removing excused absences, there's less hours of absences.
- That's because the absence was excused, so it now shows in grey, and doesn't count towards the total.
- When you mouse over each excused row, you'll see the explanation added by the manager who excused the absence.
- And finally, to see the "excuse options", tap any row.
And that's it! That's everything you need to know about using "Absences list" reports!
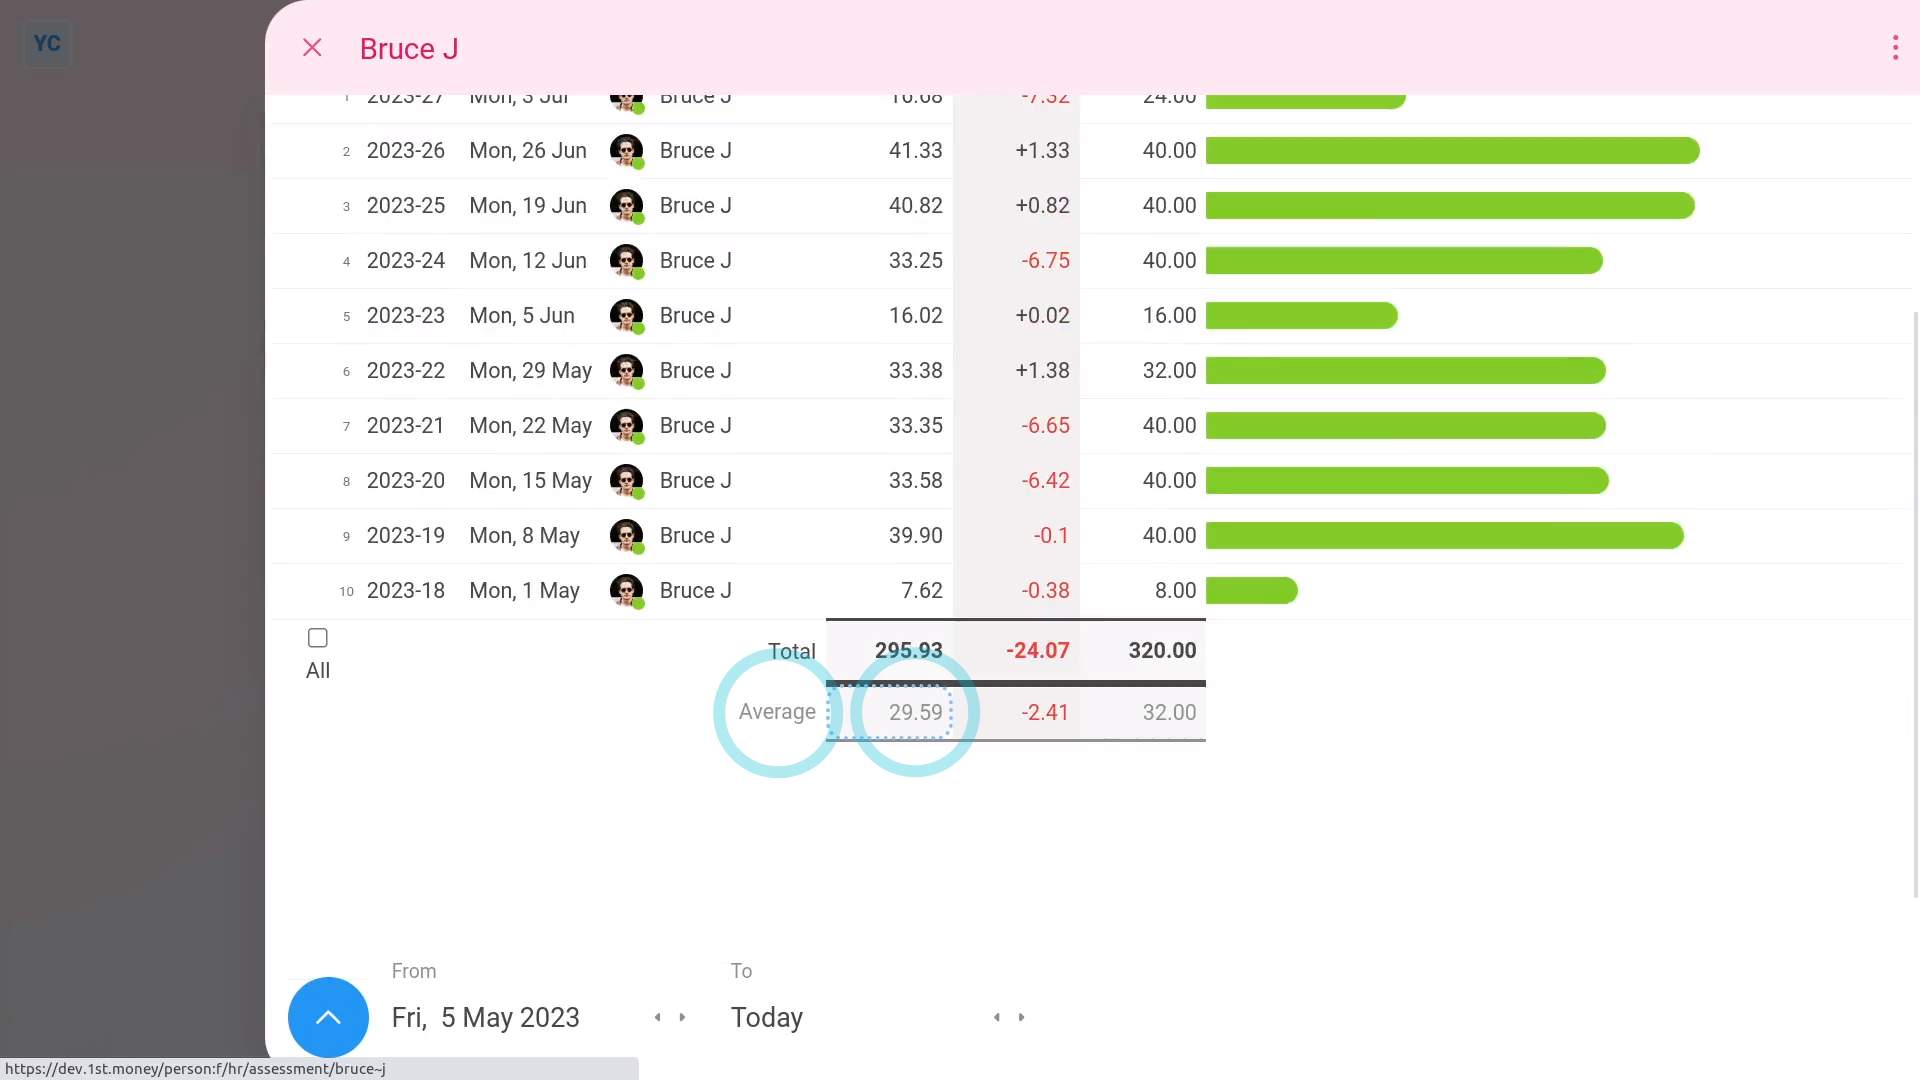
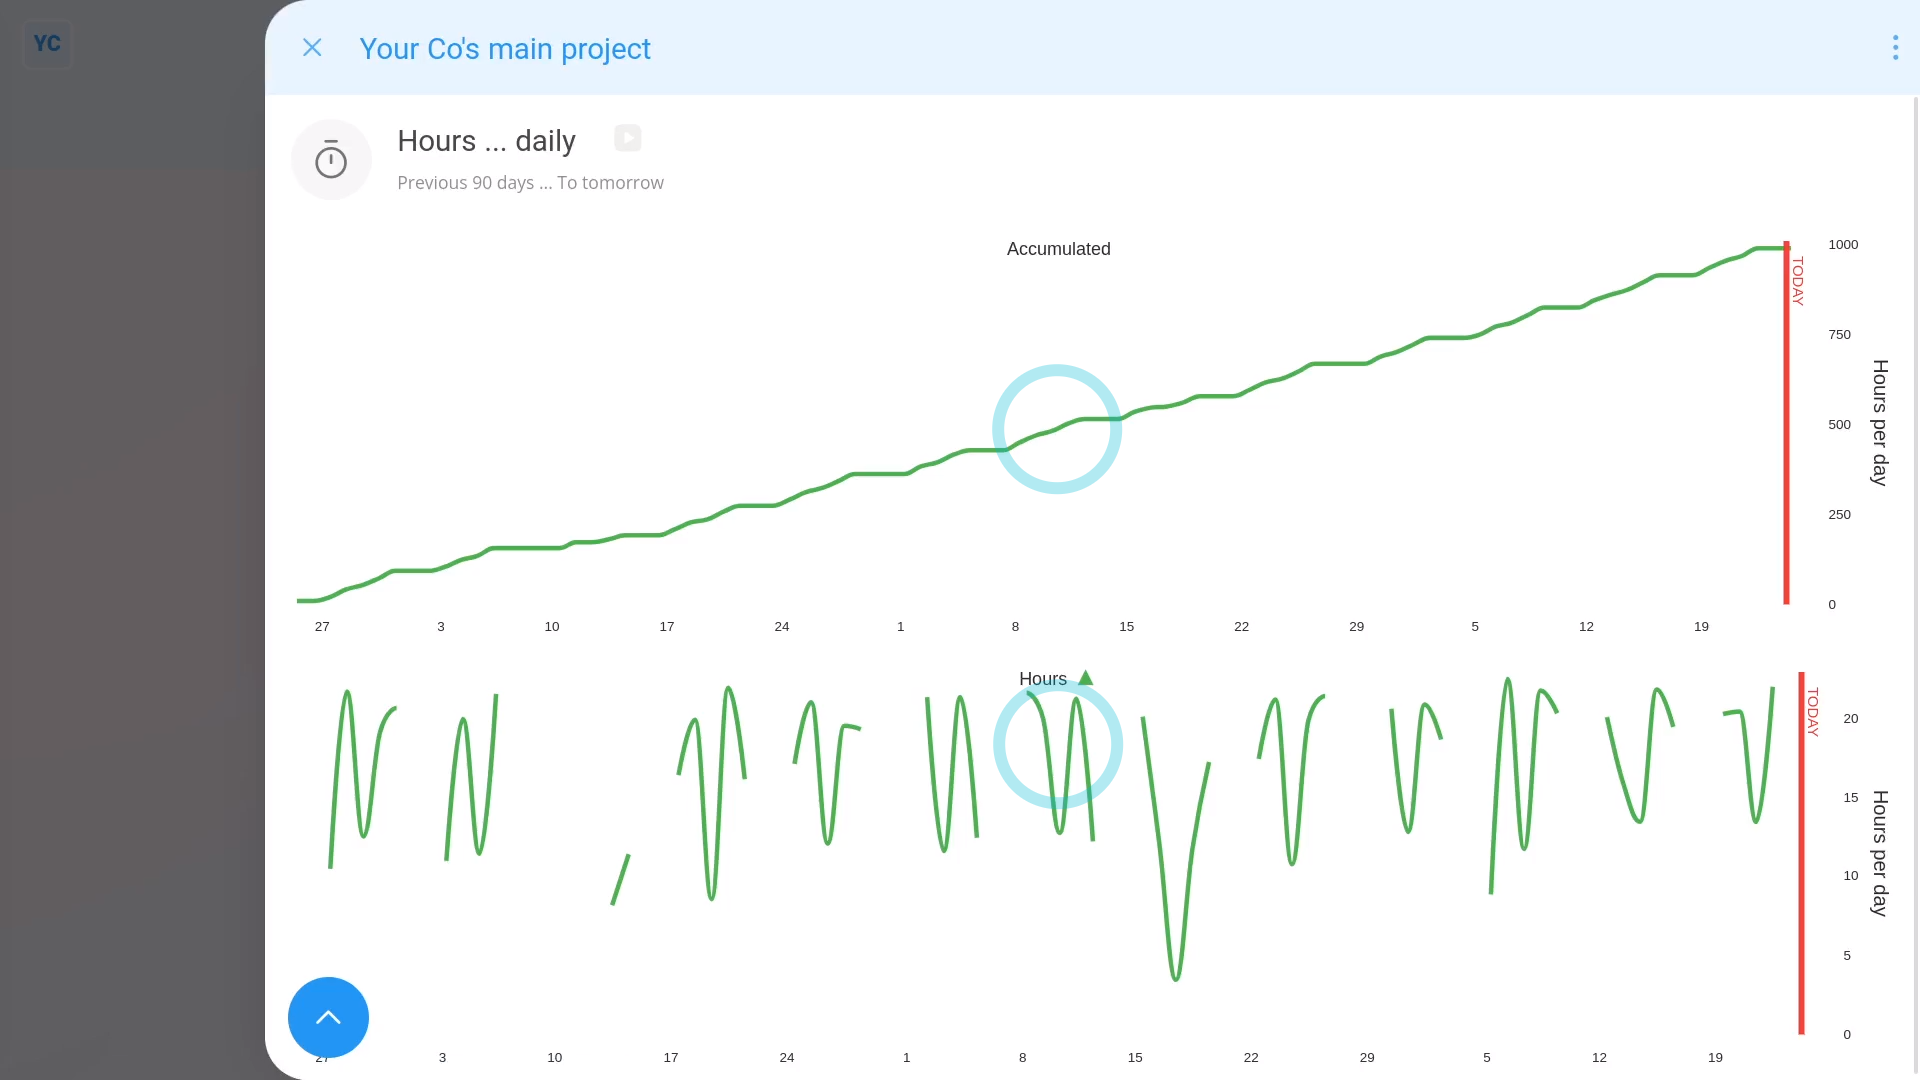
How do I use the 'Daily hours' and 'Weekly hours' reports?
 4:33
4:33
"How do I use the "Daily hours" and "Weekly hours" reports?"
The "Daily hours" and "Weekly hours" reports shows you the actual timesheet done time of your people.
A person or project's "Daily hours" and "Weekly hours" reports, and all other "Attendance" reports, are available to be opened by:
- Each person, to see their own "Daily hours" and "Weekly hours" reports.
- The person's direct manager and supervisors.
- Also to anyone with at least "View org admin" permissions.
- And also a project's owners and observers.
To see a project's "Daily hours" or "Weekly hours" report:
- First, select the project on: "Menu", then "Projects"
- And finally, "Attendance", then "Hours ... daily"
To understand both different line colours:
- First, once it opens, you'll see two green lines representing the done time of everyone in the project, over the last 90 days.
- The upper green line is the accumulated done time over the time period, which in the example is 90 days.
- And finally, the lower green lines are the actual daily done times.
To see a person's done time in a project:
- First, tap:
" Show settings", "Line type", then "Show each person" - And finally, when you hover your mouse over each line, you'll see additional details. Like who the line's for, and how much done time the person's worked.
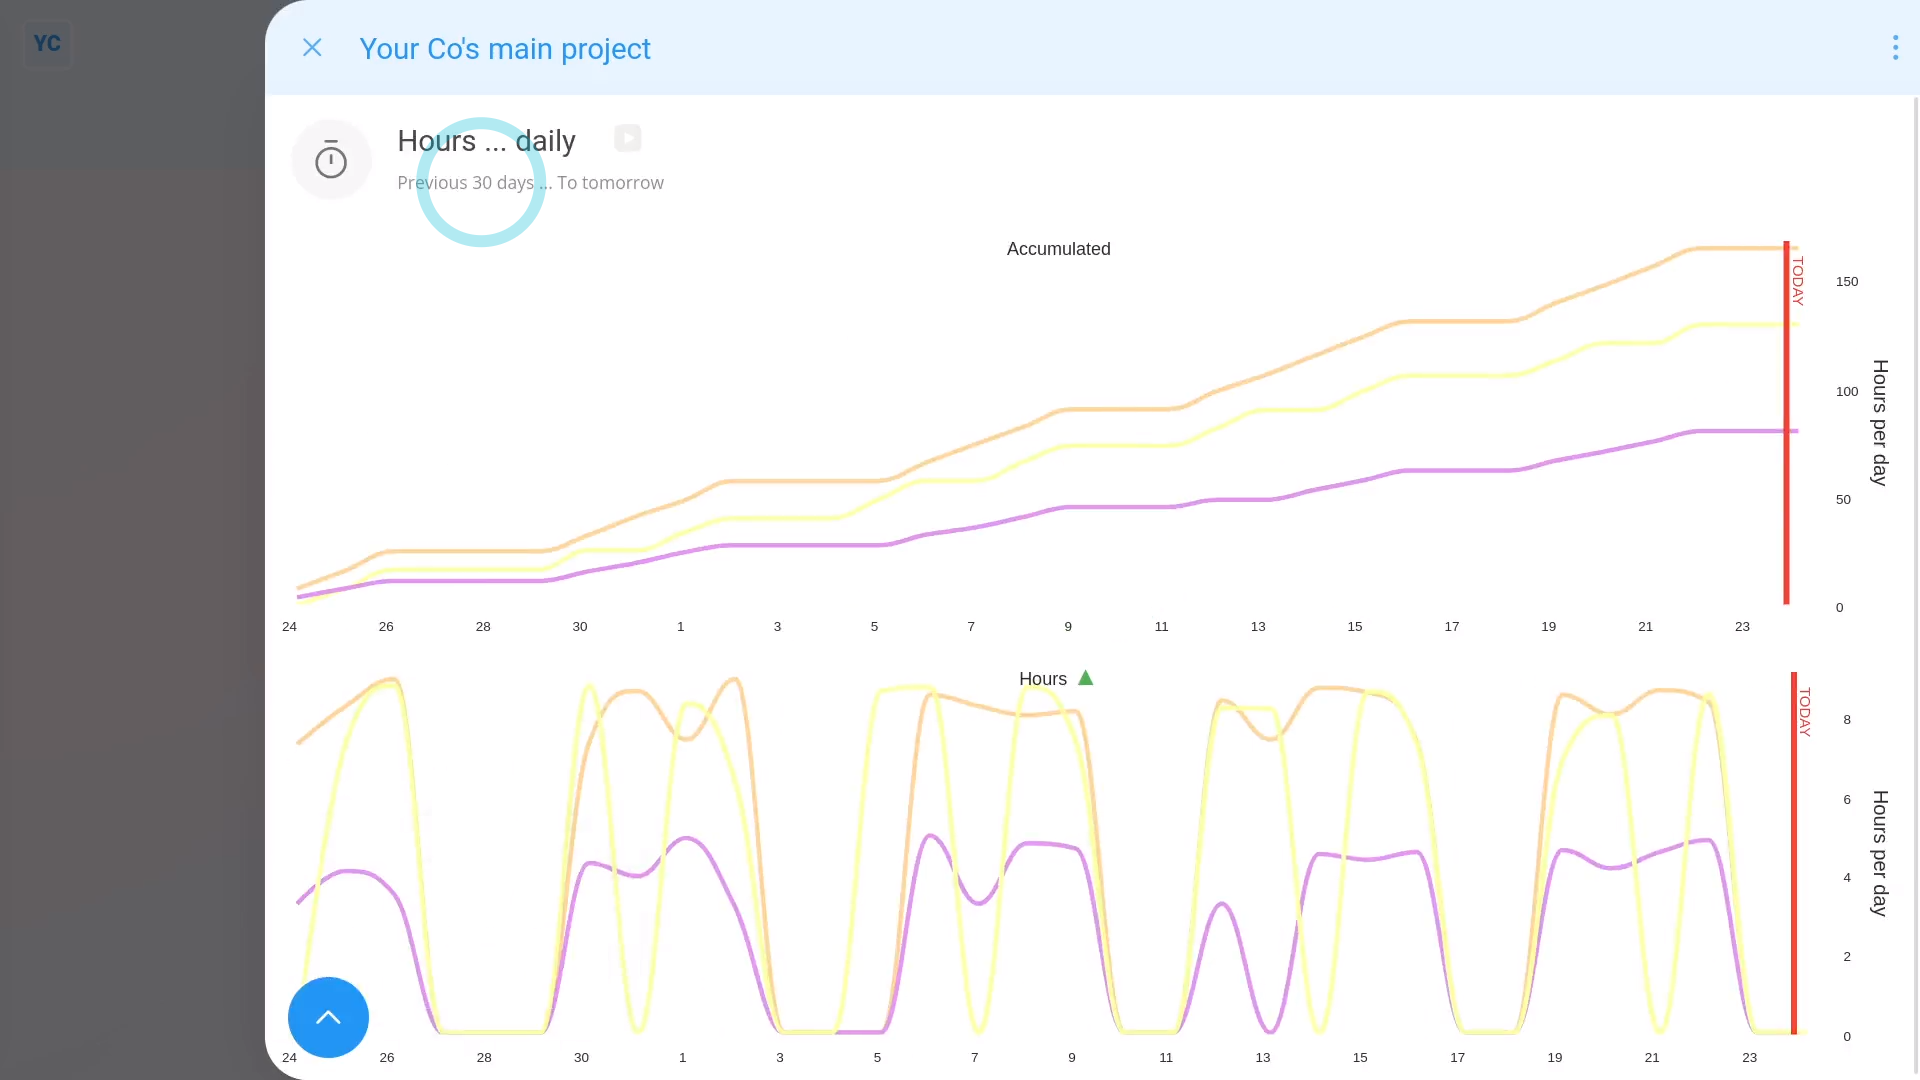
To see a project's most recent 30 days of done times:
- Tap:
" Show settings", "Dates", "From", then "Previous 30 days"
Now, switching back to 90 days.

To compare a set of selected people's done time:
- First, tap:
" Show settings", then "Side settings ... show" - Then find the People in the list.
- Then control + tap each person you want to compare the done time of.
- You'll now only see a line for each of your selected people.
- Because each line's a different colour, you can compare each person.
- And finally, if you tap any point on a line, it slides out on the right, showing that day's timesheet for that person. The timesheet gives you more info about their done time, including exact start and stop times throughout their working day.
You may notice:
- When you go to the "Daily hours" or "Weekly hours" report, it may not show the yellow planned times lines.
- If not, it means your org hasn't turned on "Show planned times" yet.
To learn more:
- About how to turn on "Show planned times", watch the video on: Turning on planned times
Now:
- Switching back to all people.
- Hiding the side settings.
- And combining back into one line.
Now that planned times is turned on, you can now see the difference between the yellow planned time and the green done time.
Also, to see how far into the future that planned times have been entered:
- Tap:
" Show settings", "Dates", "To", then "Next 30 days"
You may also notice:
- That additional weeks of planned times may have been entered for the coming week's shifts.
- You may also notice the total planned target hours per day.
Now, switching back to: "Today"
To see differences between planned time and done time in a number format:
- First, tap:
" Show settings", then "Show grid" - Now you'll see a clear day-by-day breakdown of which days, in red, were under the planned hours, and by how much.
- And finally, (at the top) you'll also see the average and total planned versus done time for all the people, over the entire date range selected.
Keep in mind that:
- When you tap the Attendance menu, you'll also find a weekly version called the "Weekly hours" report.
- In addition, when you go to a specific person, you can also see more "Attendance" reports, also under the Attendance menu.
- The person "Attendance" reports are similar to the project "Attendance" reports, except the person "Attendance" reports only show hours done for a single person.
And that's it! That's everything you need to know about using "Daily hours" and "Weekly hours" reports!
How do I use the 'Feeling' report?
 2:47
2:47
"How do I use the "Feeling" report?"
The "Feeling" report shows you how your people are feeling upon reaching the end of their working day.
A person or project's "Feeling" report, and all other "Attendance" reports, are available to be opened by:
- Each person, to see their own "Feeling" report.
- The person's direct manager and supervisors.
- Also anyone with at least "View org admin" permissions.
- And also a project's owners and observers.
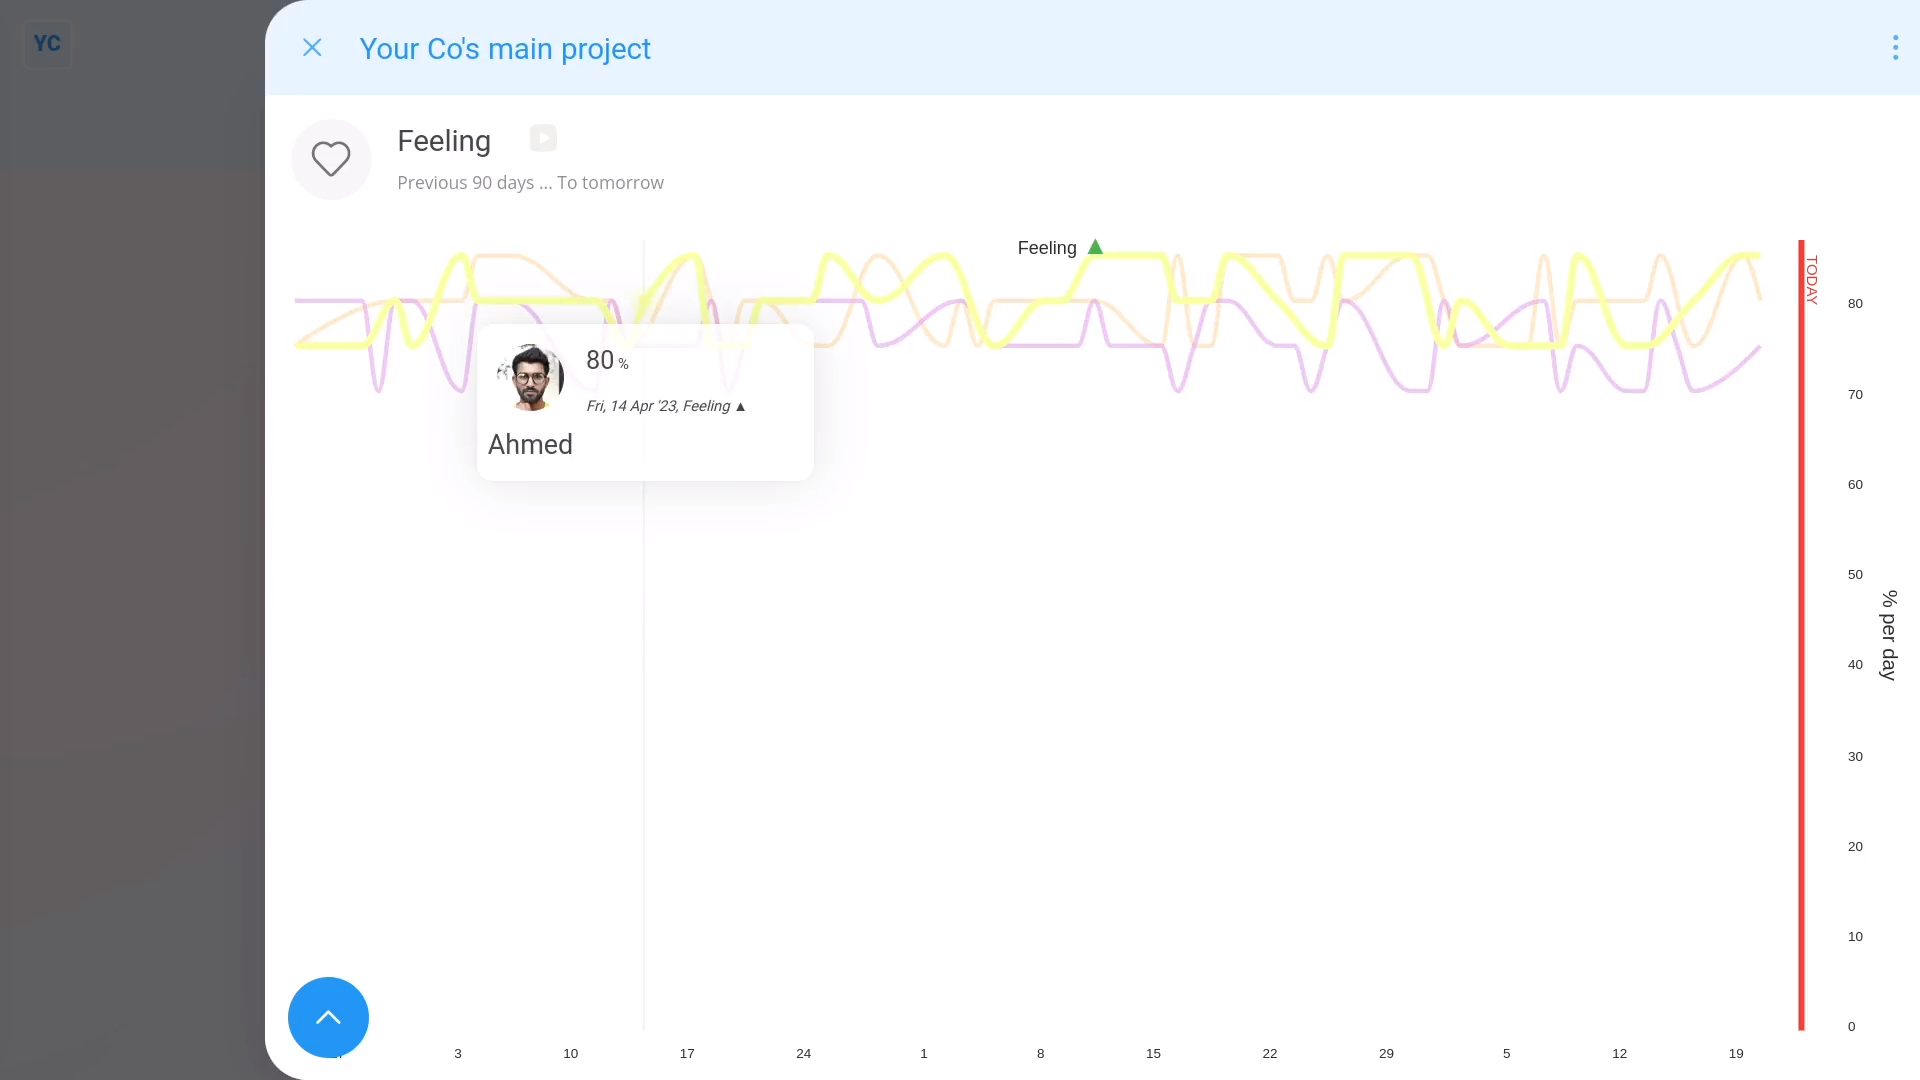
To see a "Feeling" report:
- First, select the project on: "Menu", then "Projects"
- Then tap: "Attendance", then "Feeling"
- Once it opens, you'll see lines representing the feelings of everyone in the project, over the last 90 days.
- And finally, when you hover your mouse over each line, you'll see additional details. You'll see details like who that line's for, and what their feeling is, as a percent.
To see a "Feeling" report of your last 7 days:
- Tap:
" Show settings", "Dates", "From", then "Previous 7 days"
Now, switching back to 90 days.
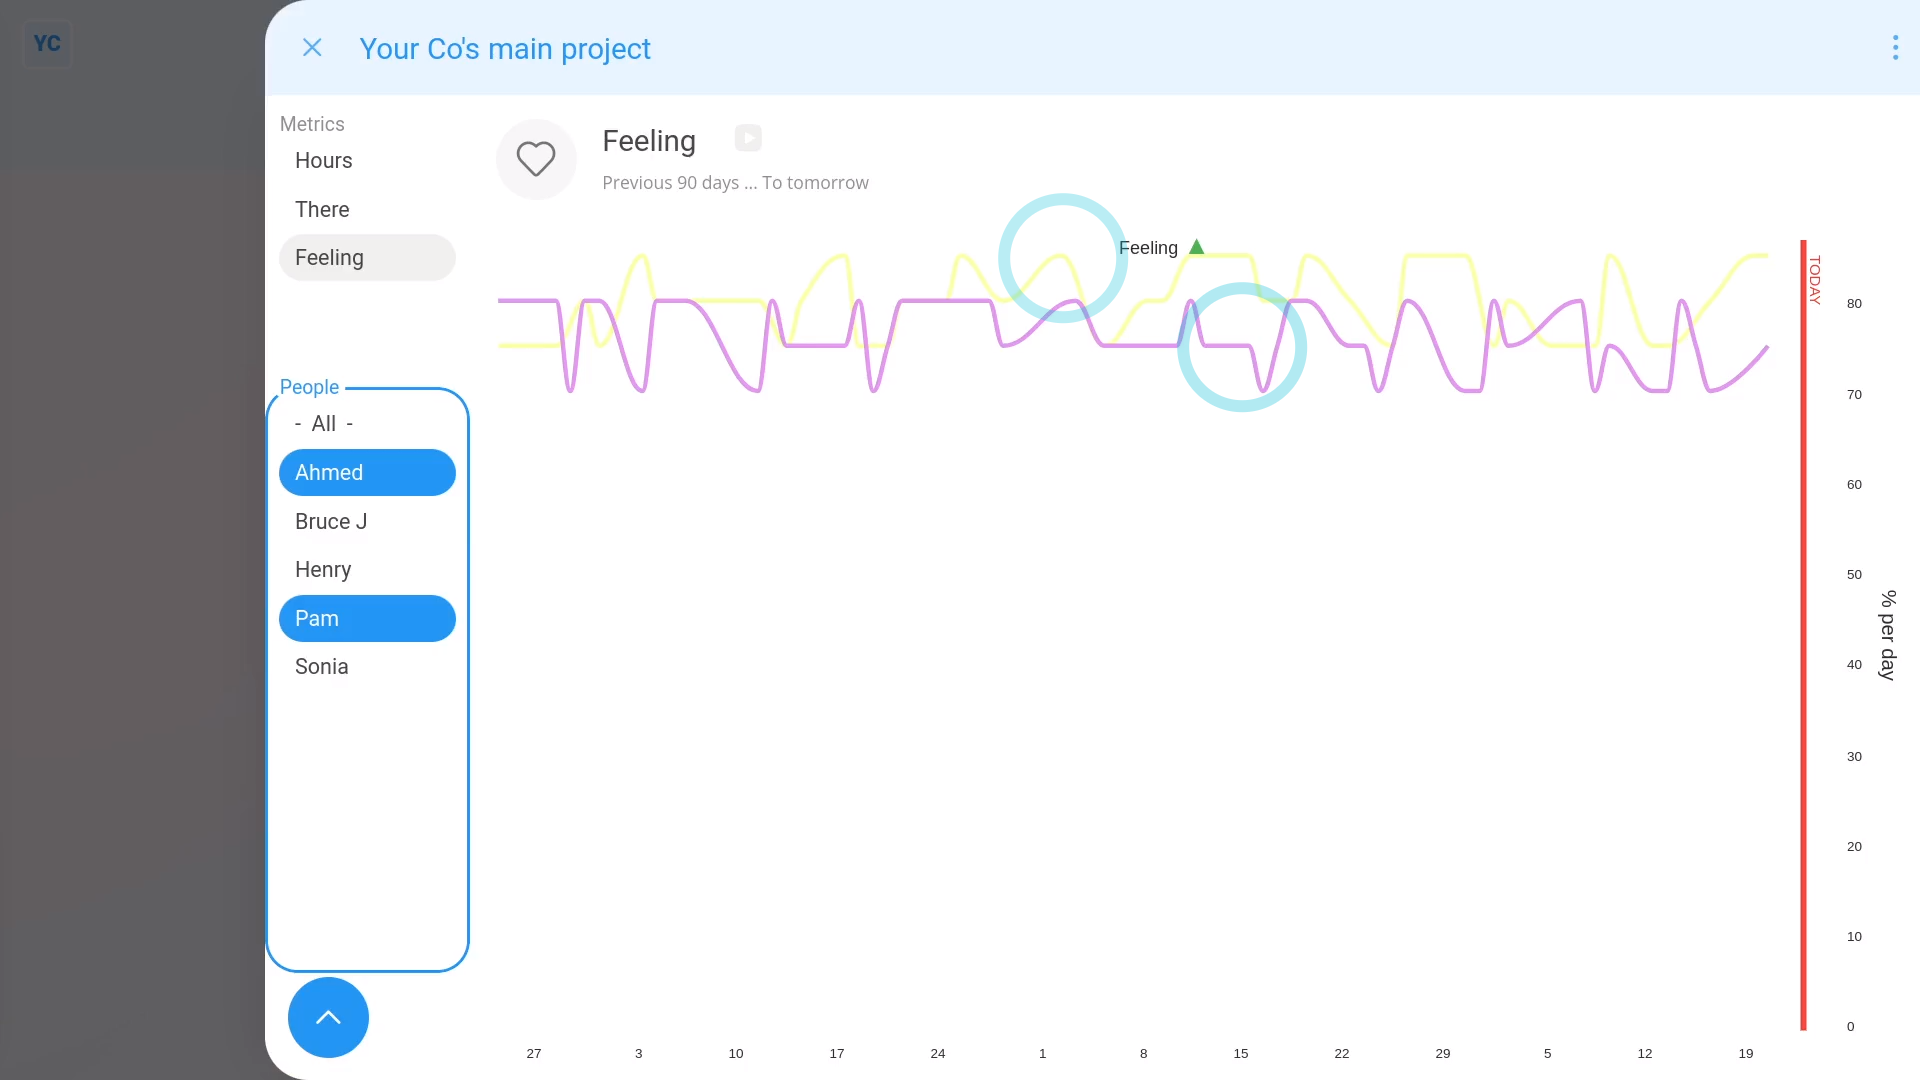
To compare a set of selected people on a "Feeling" report:
- First, tap:
" Show settings", then "Side settings ... show" - Then find the People in the list.
- Then control + tap the people you want to compare.
- You'll now see a line for each of your selected people.
- Because each line's a different colour, you can compare each person.
- And finally, when you tap any point on a line, it slides out on the right, showing that day's timesheet for that person. The timesheet gives you much more info about their working day.
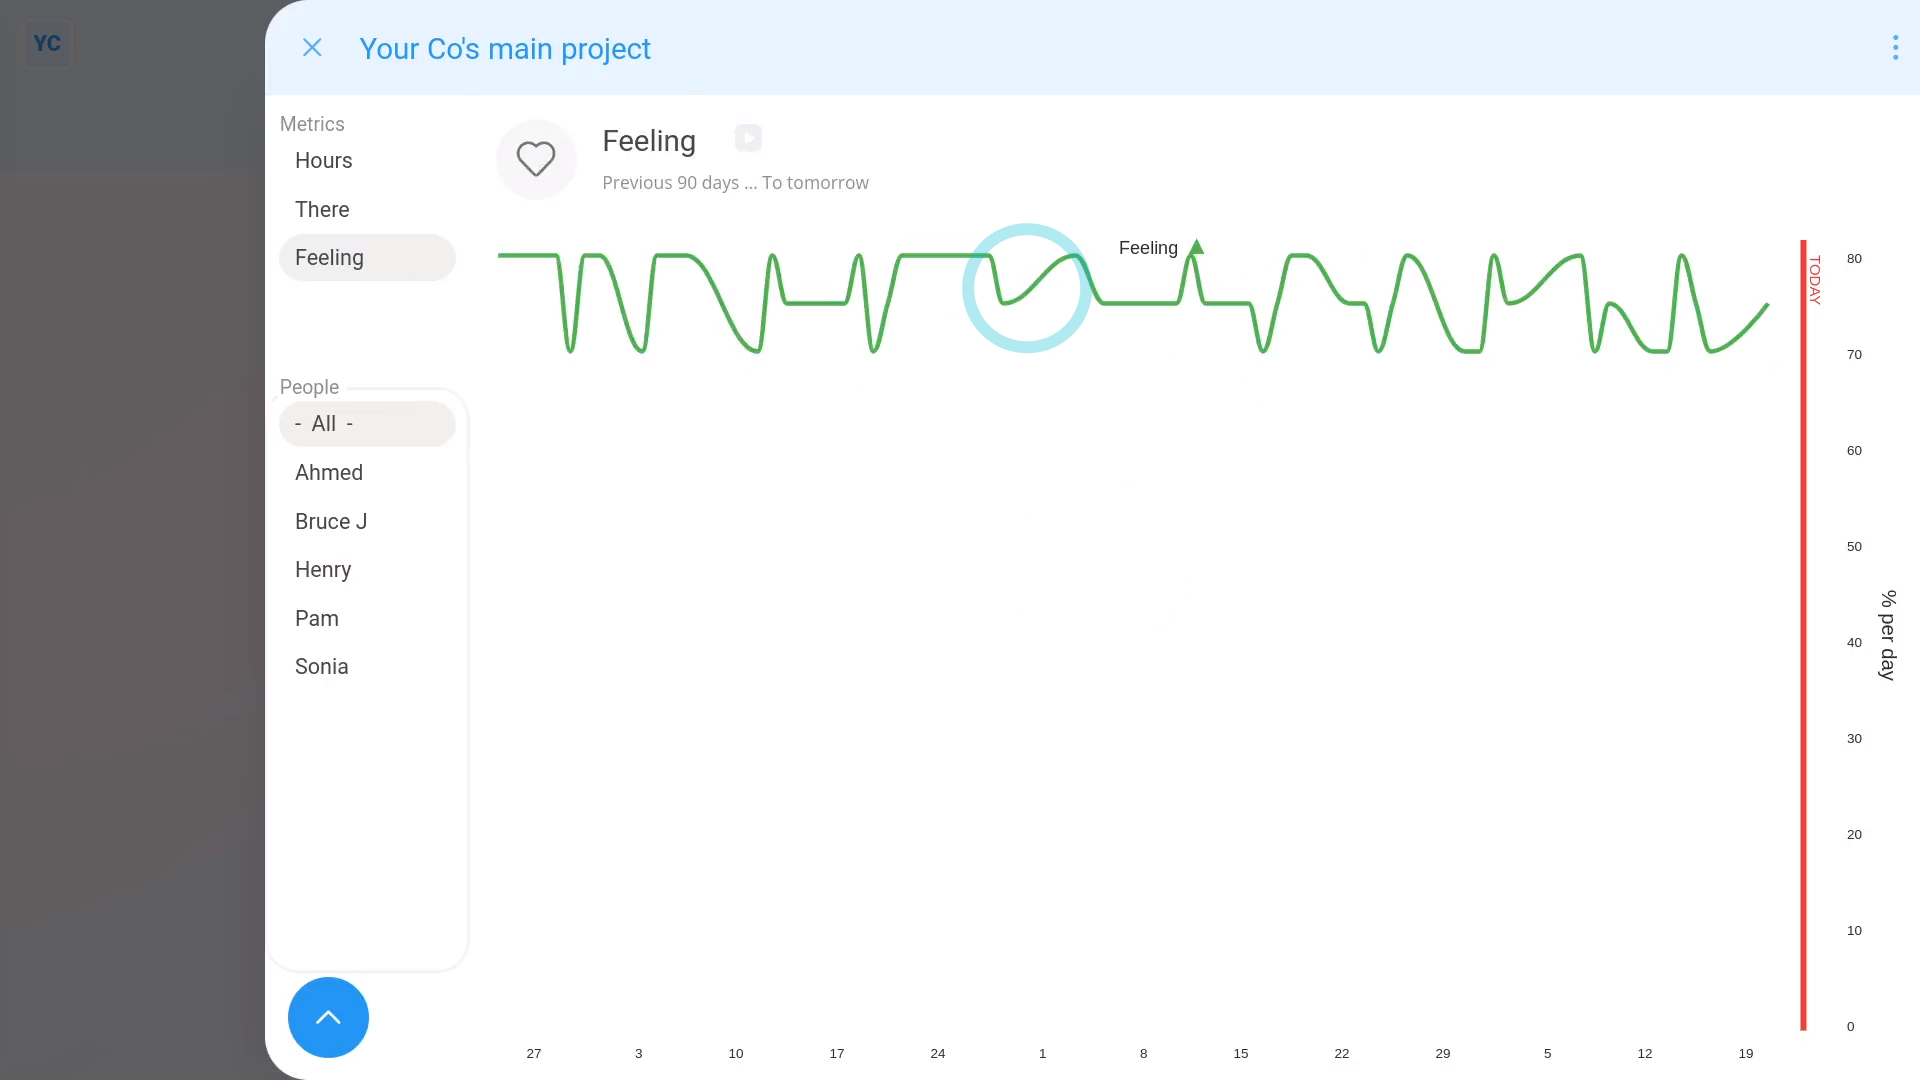
To show a single line averaging everyone's feelings in a project:
- First, tap back to All people.
- And finally, tap:
" Show settings", "Line type", then "Combine into 1 line"
Now, switching back to: "Show each person"
To see all feelings in a number format:
- Tap:
" Show settings", then "Show grid"

To remind your people to share their feeling upon reaching their end to each day:
- First, remind them to select a feeling when your people tap: "Work-time menu", then "Finish"
- Encourage them to select any one of the feelings.
- Remind them to be honest in choosing their feeling.
- And finally, their selected feeling also shows up in the daily timesheets email, and near the bottom of each timesheet.
And that's it! That's everything you need to know about using "Feeling" reports!
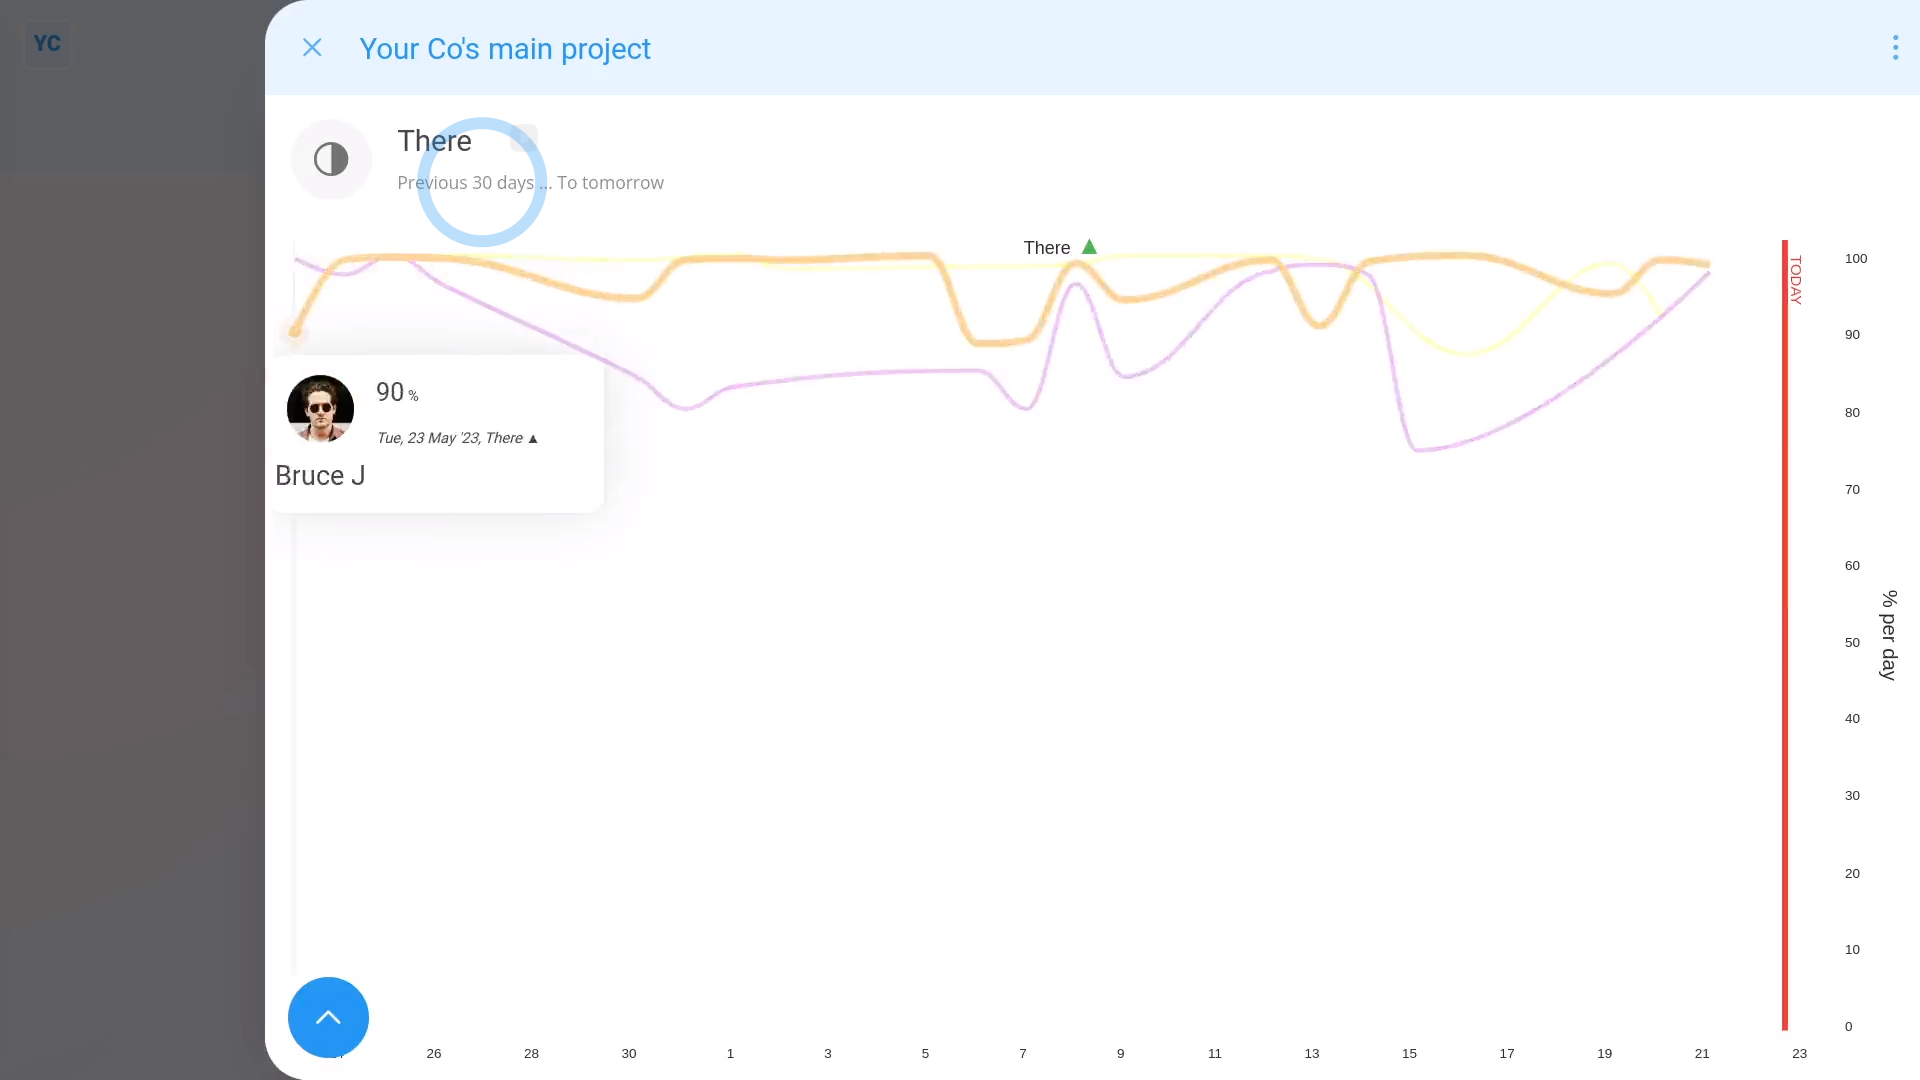
How do I use the 'There' report?
 2:56
2:56
"How do I use the "There" report?"
The "There" report shows you the percentage difference between planned time and done time.
A person or project's "There" report, and all other "Attendance" reports, are available to be opened by:
- Each person, to see their own "There" report.
- The person's direct manager and supervisors.
- Also anyone with at least "View org admin" permissions.
- And also a project's owners and observers.
You may notice:
- When you go to a project and look on the Attendance menu, you may not see the "There" report listed.
- If not, it means your org hasn't turned on "Show planned times" yet.
To learn more:
- About how to turn on "Show planned times", watch the video on: Turning on planned times
To see a project's "There" report:
- First, select the project on: "Menu", then "Projects"
- Then tap: "Attendance", then "There"
- Once it opens, you'll see lines representing the "there" time percent of everyone in the project, over the last 90 days.
- And finally, when you hover your mouse over each line, you'll see additional details. Like who that line's for, and how high their "there" time is, as a percent.
To see a project's most recent 30 days of "there" percents:
- Tap:
" Show settings", "Dates", "From", then "Previous 30 days"
Now, switching back to 90 days.
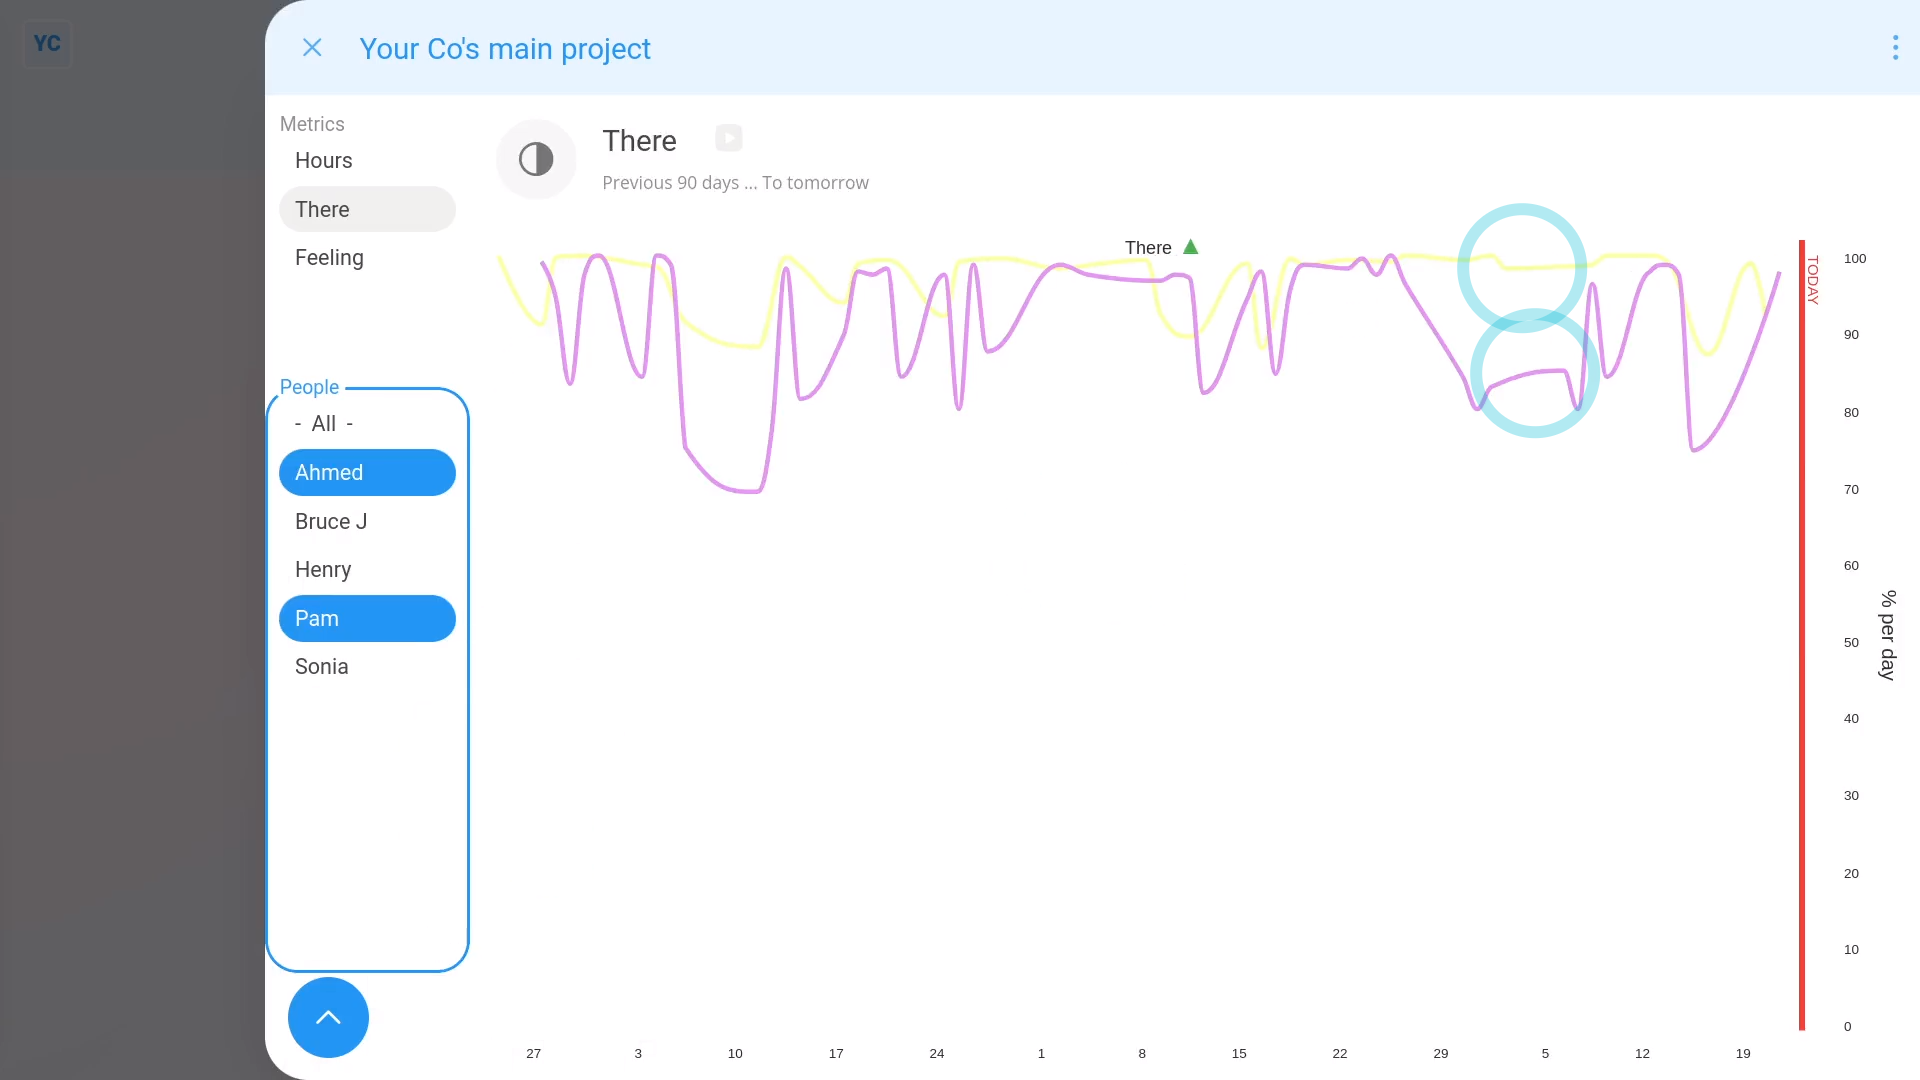
To compare "there" percents of a set of selected people:
- First, tap:
" Show settings", then "Side settings ... show" - Then find the People in the list.
- Then control + tap the people you want to compare.
- You'll now see a line for each of your selected people.
- Because each line's a different colour, you can compare each person.
- And finally, when you tap any point on a line, it slides out on the right, showing that day's timesheet for that person. The timesheet gives you more info about their absence, like whether the absence was excused or not.
Now, switching back to all people and hiding the side settings.
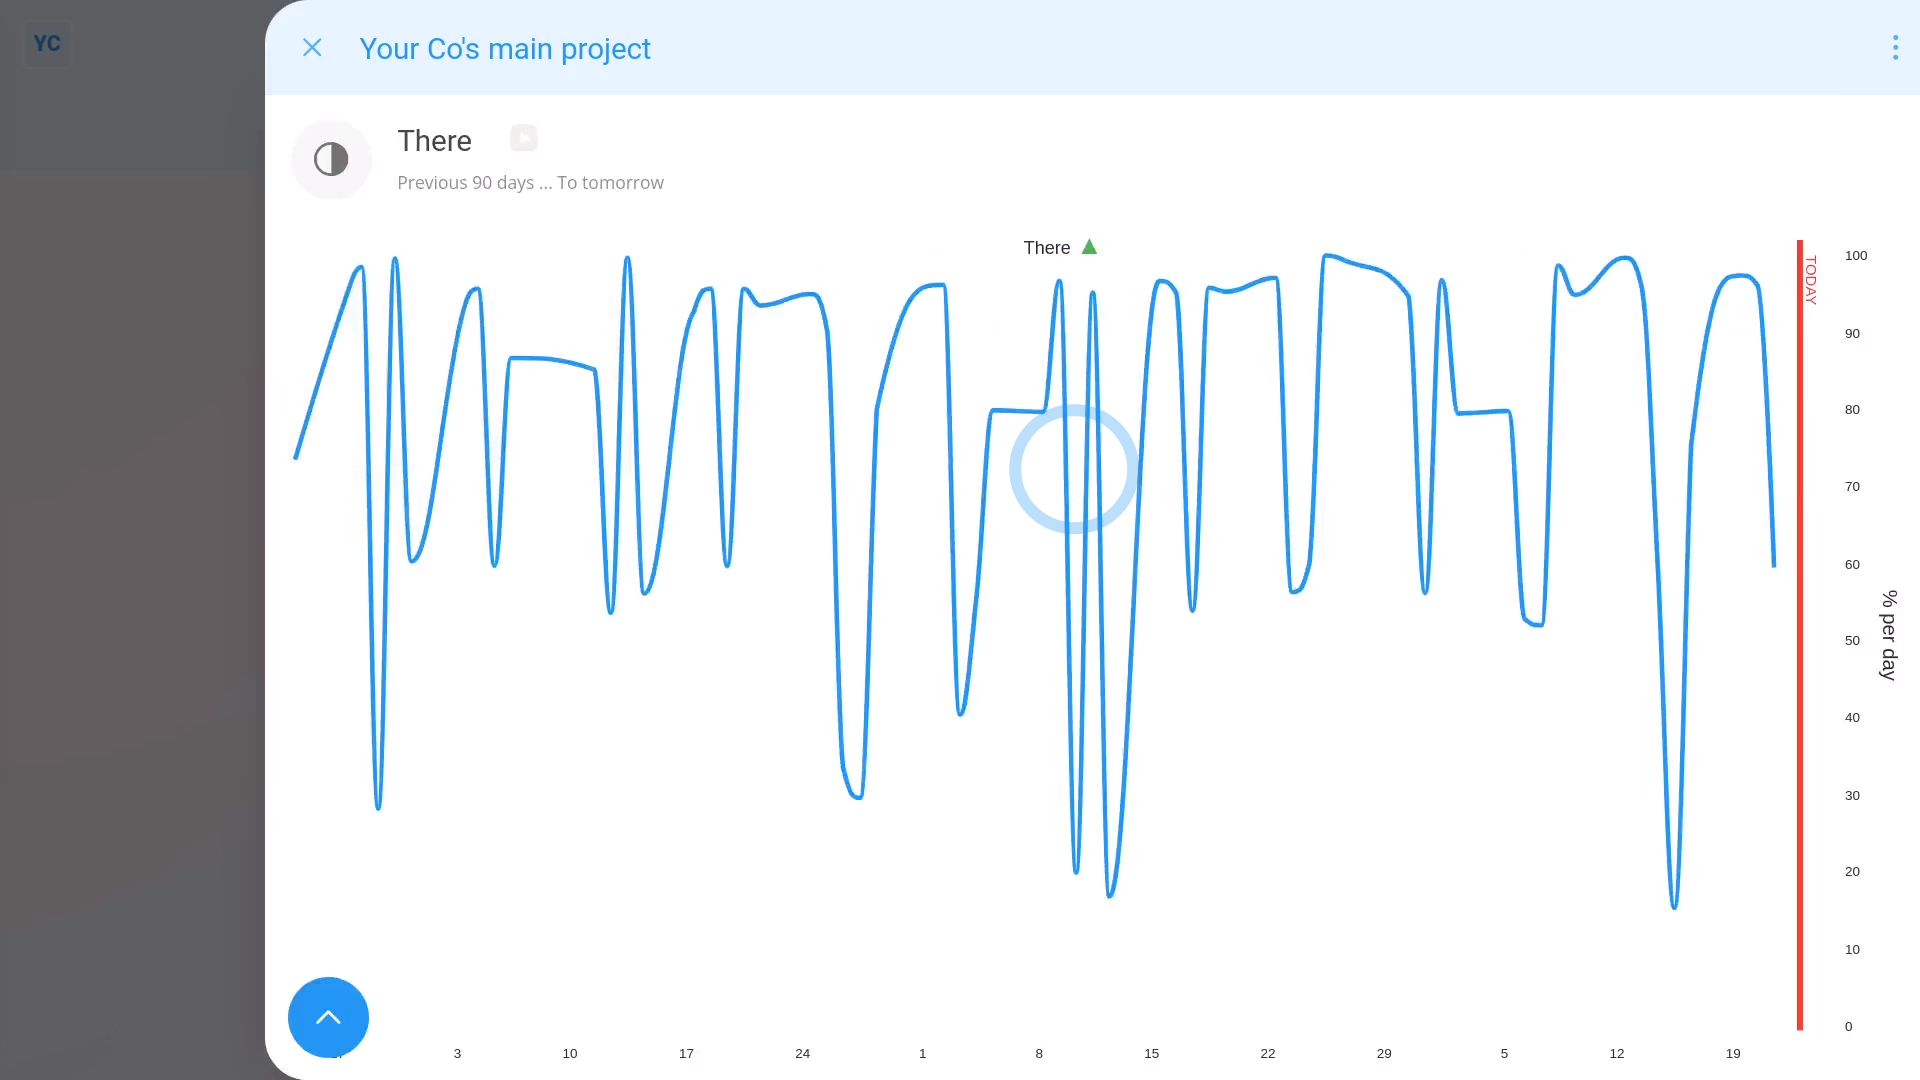
To show a single line averaging everyone's "there's" in a whole project:
- Tap:
" Show settings", "Line type", then "Combine into 1 line" - Now, switching back to: "Show each person"

To see all "there" percents in a number format:
- First, tap:
" Show settings", then "Show grid" - And finally, (at the top) you'll also see a single average "there" percentage for all the people, over the entire date range selected.
And that's it! That's everything you need to know about using "There" reports!
What's the daily timesheets email?
 2:45
2:45
"What's the daily timesheets email?"
The daily timesheets email is an optional once-a-day email that gives you a summary of timesheets from the previous day.
Your daily timesheets email shows you timesheets for all the people you've followed (as long as you've not been ghosted by them).
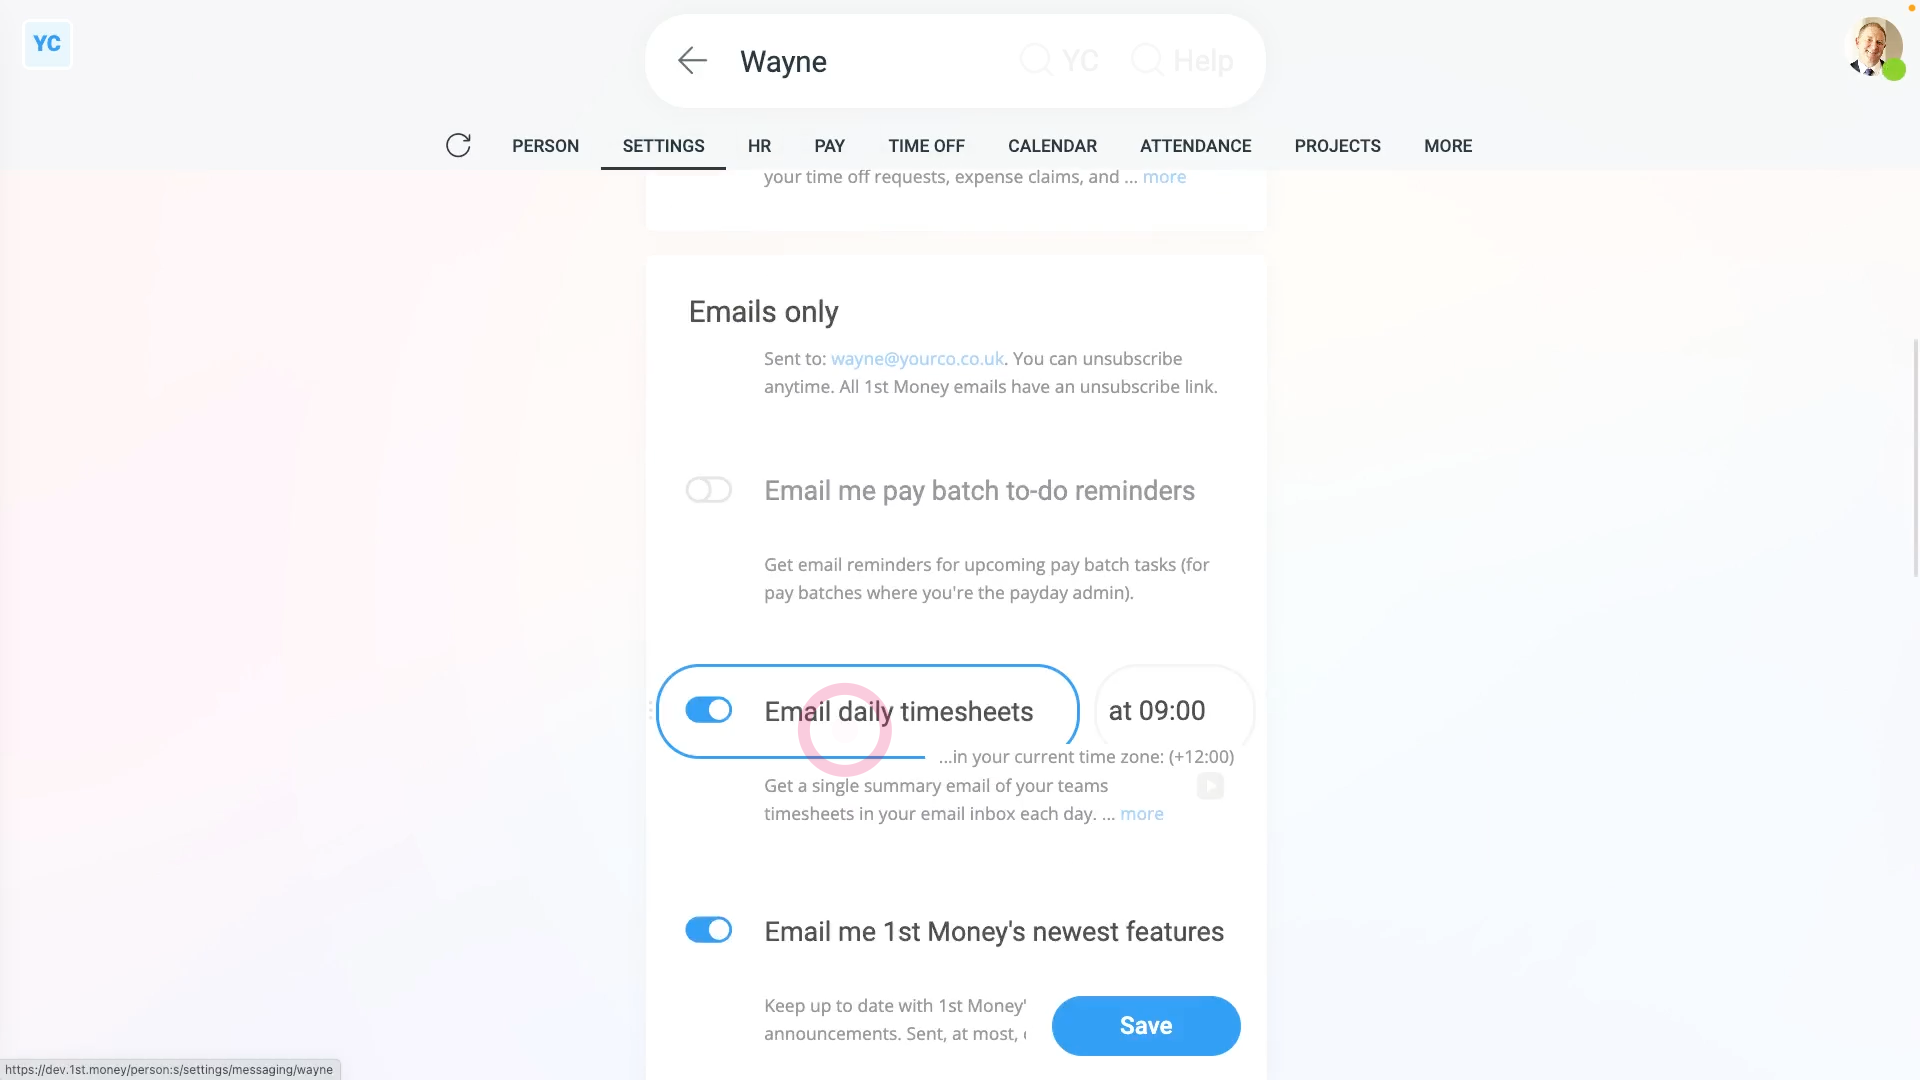
To turn on your daily timesheets email:
- First, open yourself on: "Menu", then "Me"
- Then tap: "More", then "Messaging"
- Then turn on: "Email daily timesheets"
- Now you're all set to receive the email at 9 am tomorrow.
- And finally, if you ever want to change the time it's sent, tap the time of day, and select a different time.
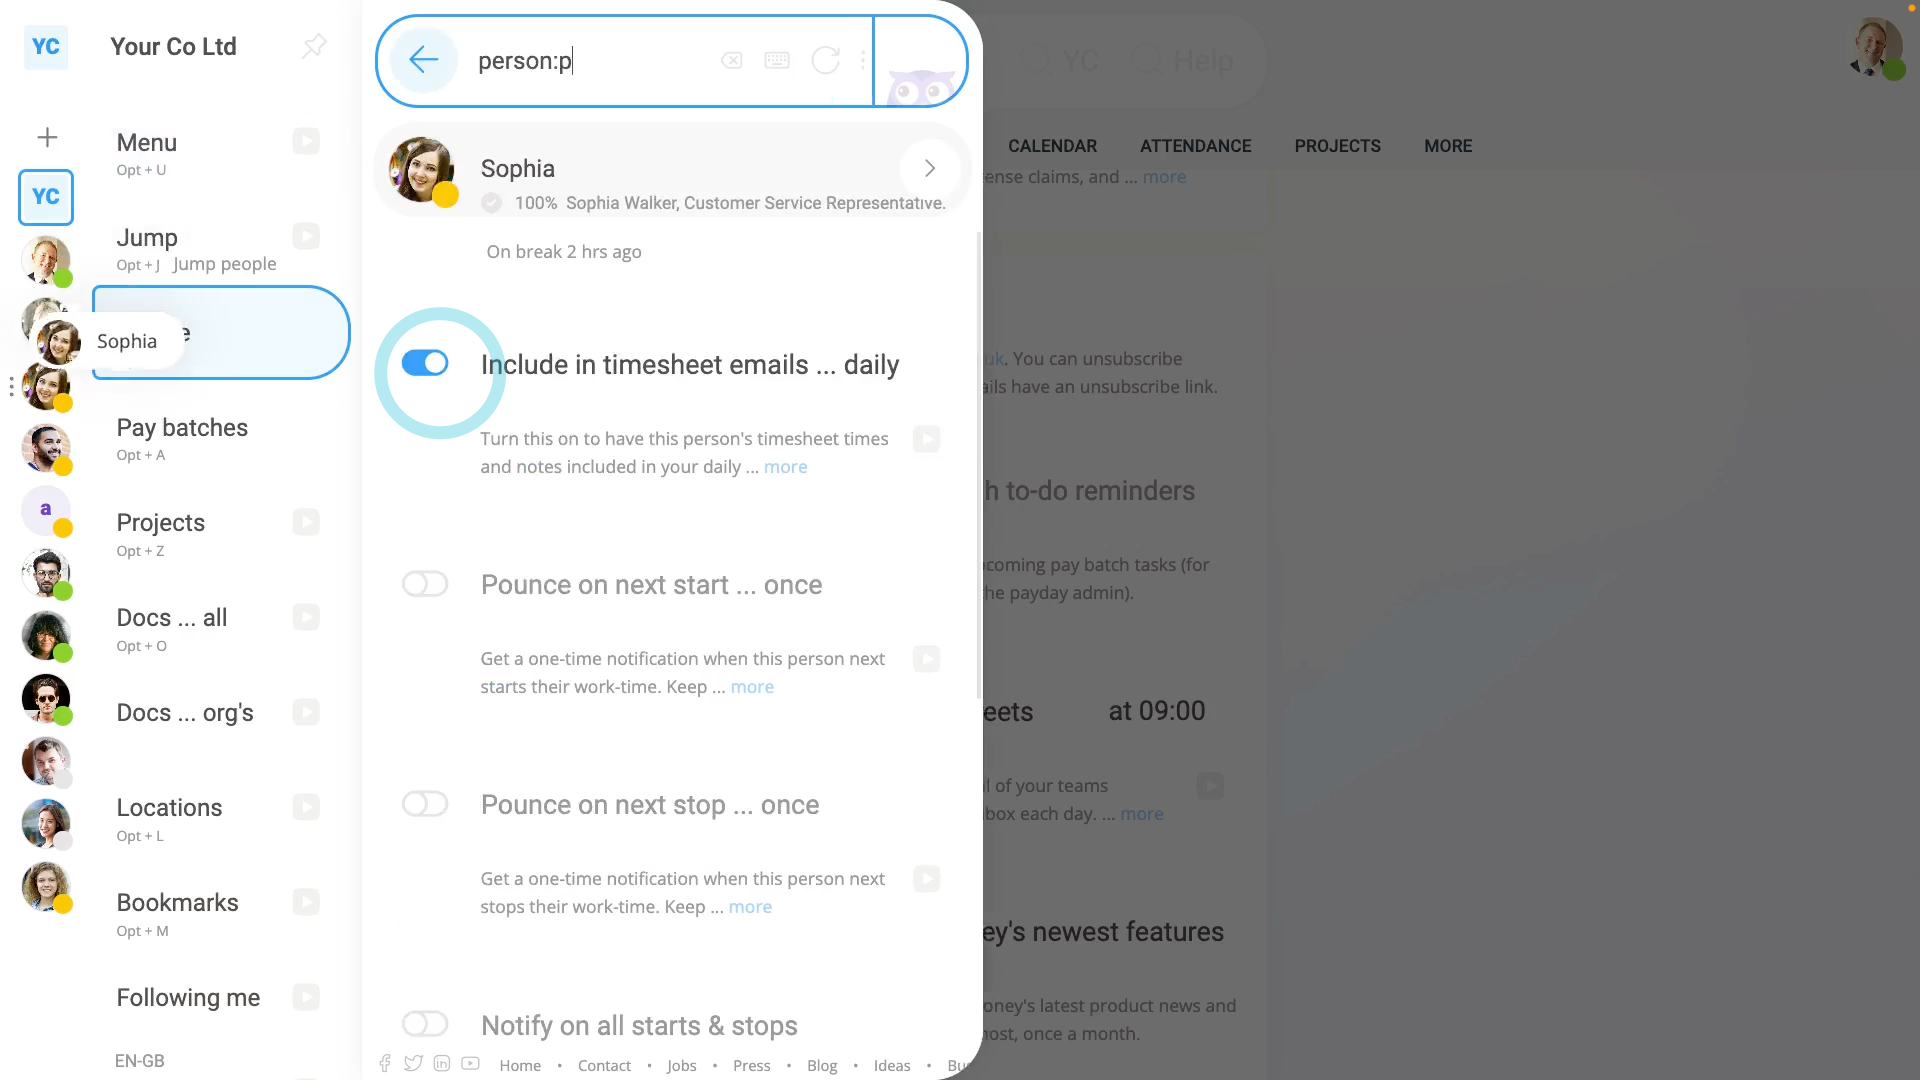
To check who'll be included in your daily timesheets email:
- First, tap: "Menu"
- On each person in your follow list, tap the three dots: (on the far left)
- And check if Include in timesheet emails ... daily is turned on.
- And finally, turn it on for anyone you'd like to include, who you haven't already turned on yet.
Keep in mind that:
- Even if you've got "Include in timesheet emails ... daily" turned on for a person you're following, if the person's ghosted you, their timesheet won't be included in your daily timesheets email.
To see if a person's ghosted you:
- First, look for the person on: "Menu", then "People"
- If you see a "Ghost" image under their name, it means the person's ghosted you.
- Being ghosted means the person's blocked your access to their starts, stops, and timesheet emails.
- And finally, if you really need them included on your daily timesheets email, talk to them, and ask them to "Un-ghost" you.

To completely turn off your daily timesheets email, and stop getting any daily timesheets emails anymore:
- First, open yourself on: "Menu", then "Me"
- Then tap: "More", then "Messaging"
- And turn off: "Email daily timesheets"
- And finally, regardless of what else is turned on, if it's set to off, you won't get daily timesheets emails anymore.
- The other way to stop getting daily timesheets emails is to tap the "Unsubscribe" link (at the bottom of the email).
- And finally, as soon as you tap it, you're instantly unsubscribed.
And that's it! That's everything you need to know about your daily timesheets email!
What does it mean when a timesheet's locked?
 2:48
2:48
"What does it mean when a timesheet's locked?"
Once a payslip is filed, all the timesheets covered by that payslip's pay period are automatically locked. Once locked, no more changes can be made to those timesheets.
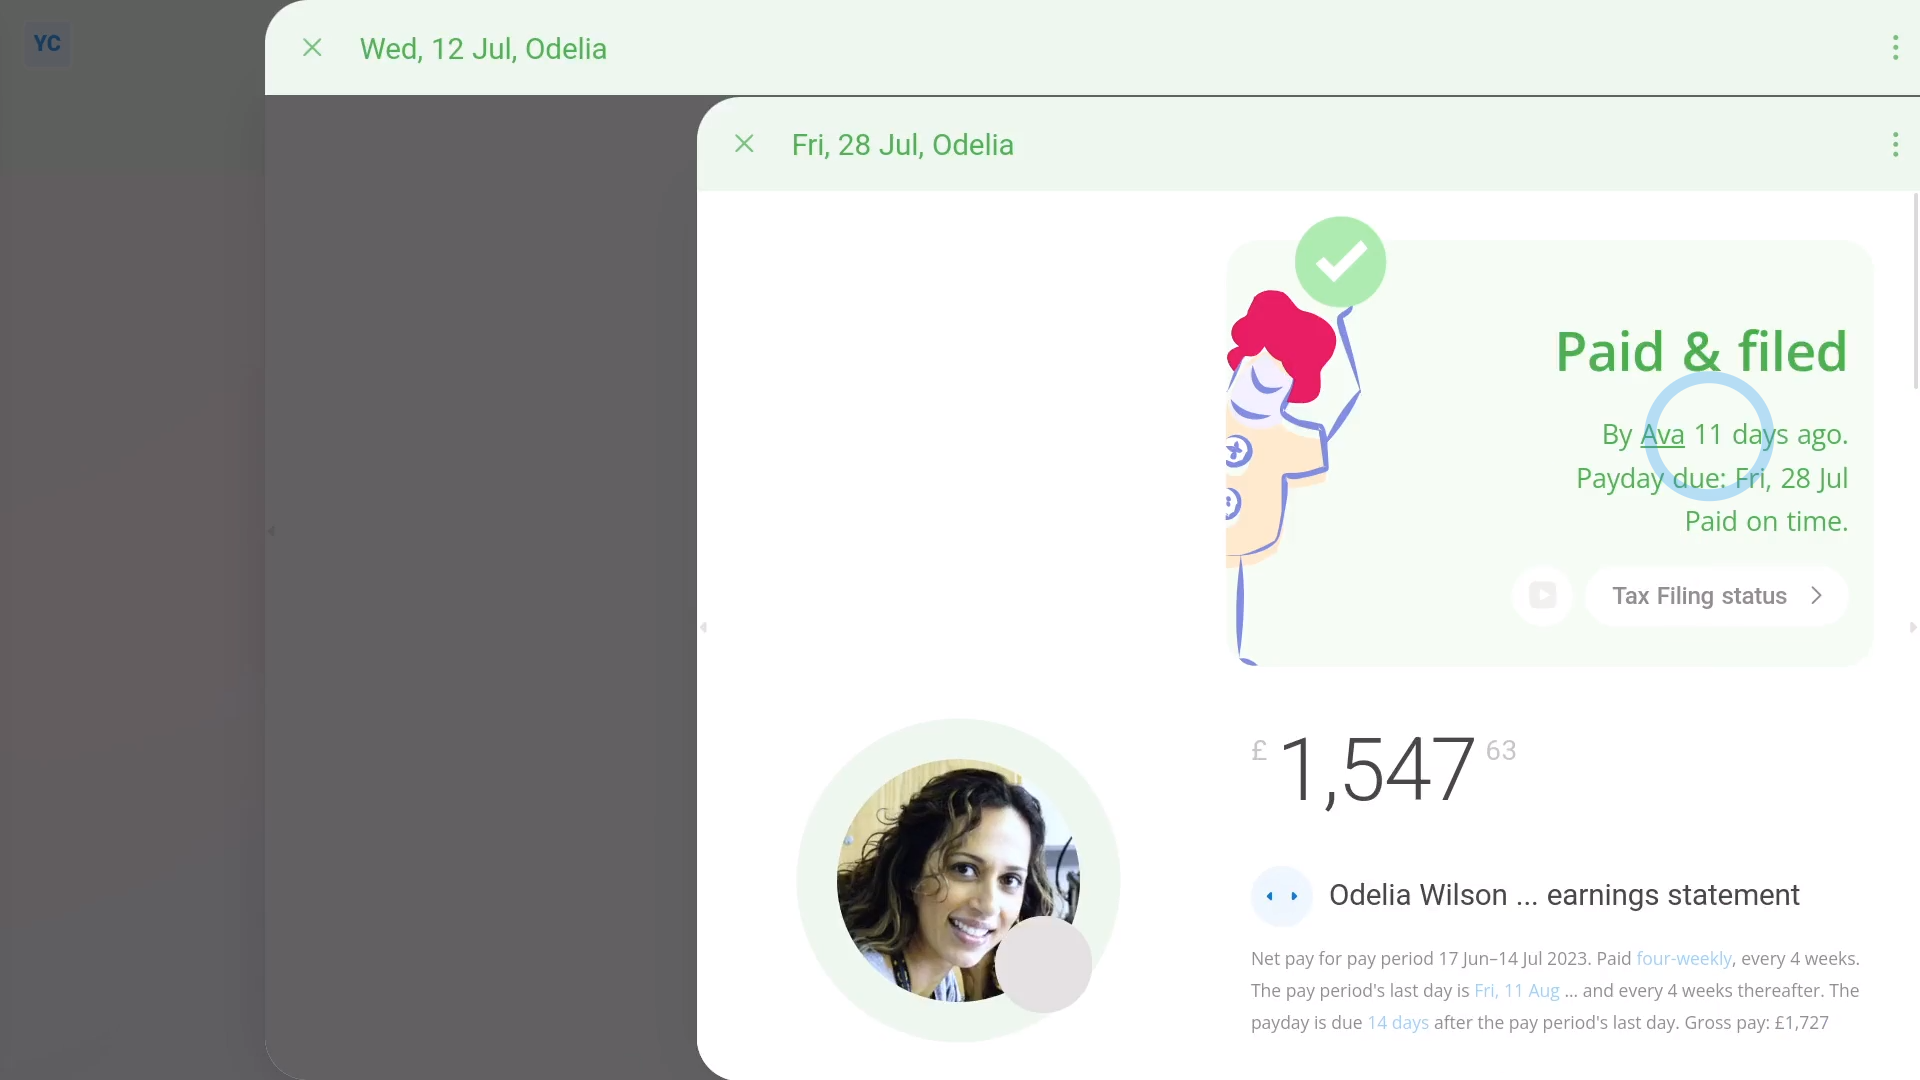
To see which payslip locked a single timesheet:
- First, select the person on: "Menu", then "People"
- Then tap: Calendar
- Next, tap the date on the calendar for the timesheet you'd like to open.
- Then tap the date on the "Locked by" message.
- You'll now see the payslip that locked the timesheet.
- And finally, you'll see how long ago it was filed.
To see which timesheets have been locked by a payslip:
- First, with the payslip open, tap the three dots: (in the top-right corner)
- Then tap: Open in new tab
- Then with the payslip now in its own tab, tap: "More", then "Hours worked"
- Once it slides out on the right, you'll see a list of all the timesheet hours worked over the entire pay period of the payslip.
- And finally, tap any of the dates, and once it slides out on the right, you'll see each locked timesheet.
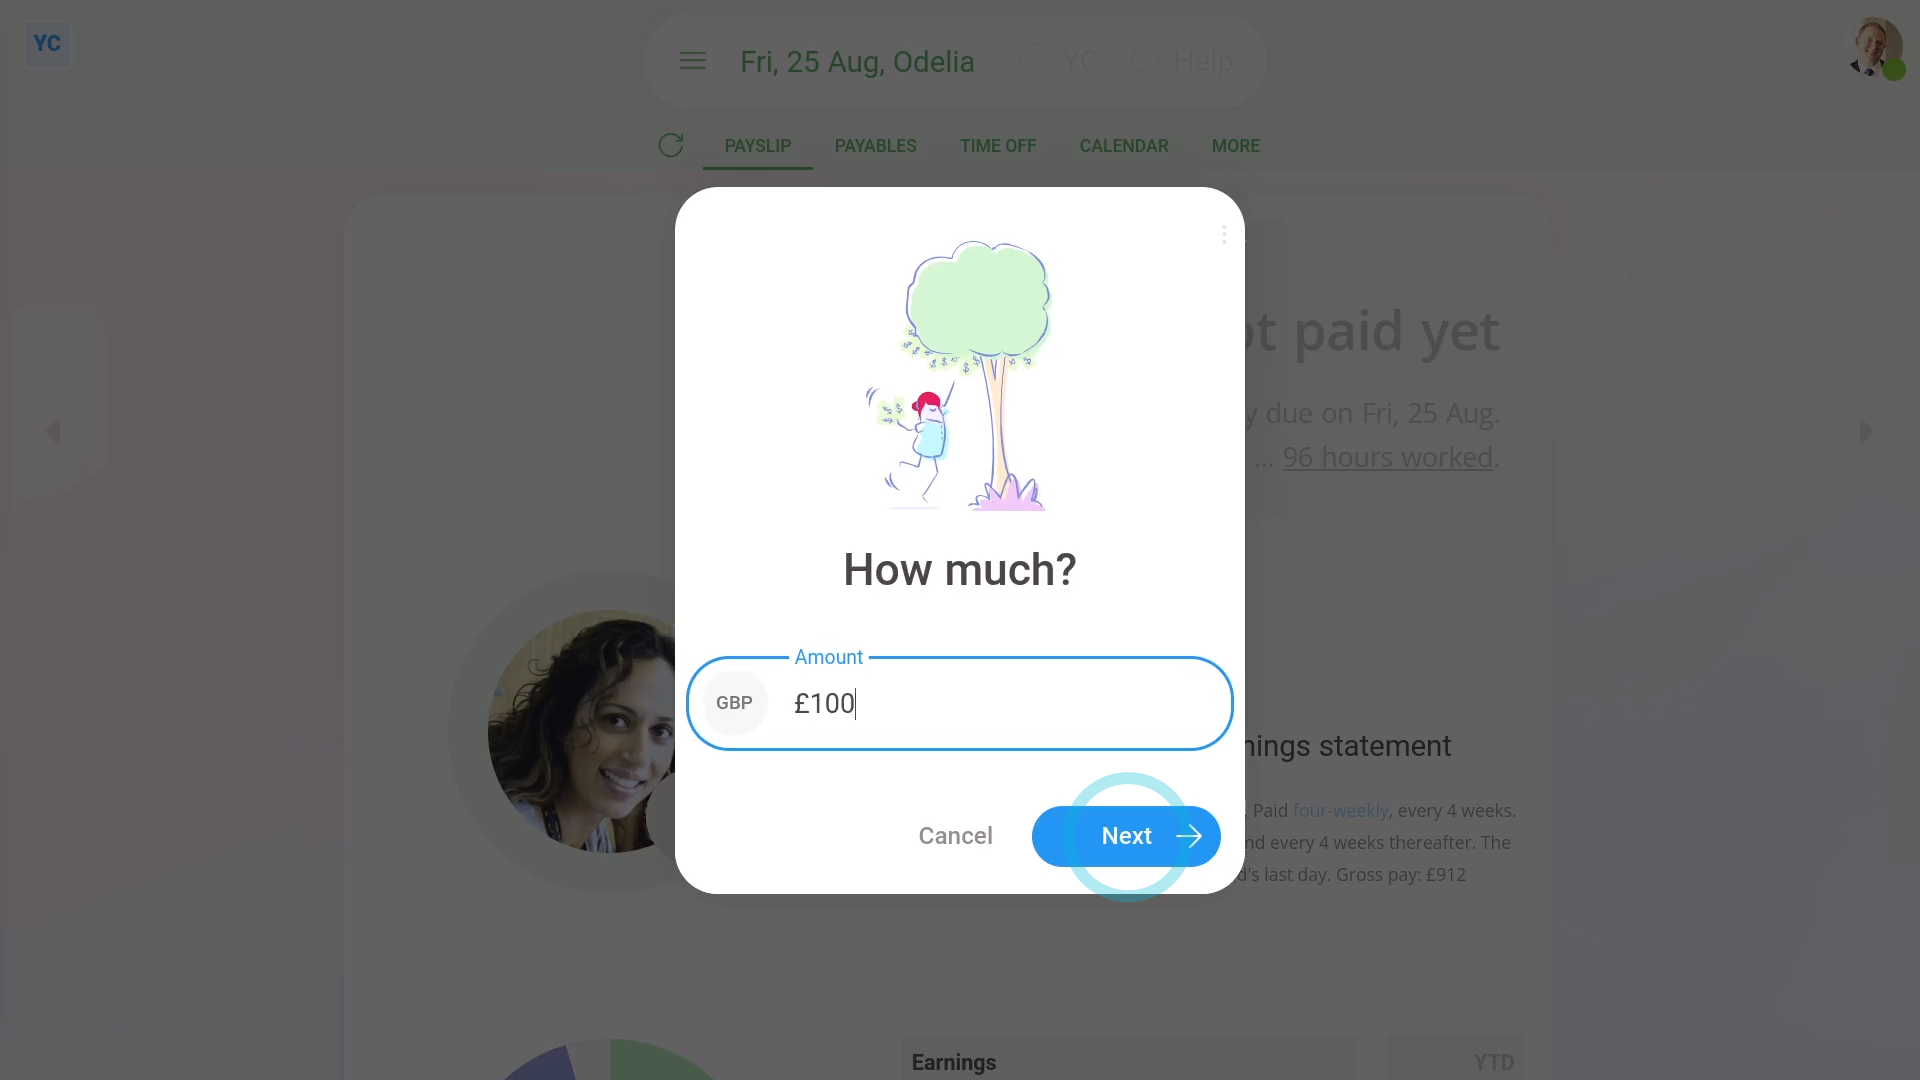
To correct payslip payments when a big error's found on a locked timesheet:
- First, the safest option is to calculate the money value of the error.
- Then go to the next un-filed payslip.
- Then tap: Payables
- Then: "New payable"
- And then select the item that best matches the correction you'd like to make, for example: "Earnings underpayment correction"
- Next enter the money value of the error, and carry on through the steps.
- However, if you still want to unlock a locked timesheet, you'll need to go back to the filed payslip.
- Then tap: "More", then "Delete"
- And then tap: Yes ... delete
- Now that the payslip is deleted, to see the unlocked timesheets, you can tap: "More", then "Hours worked"
- Next, when you tap any of the dates, you'll see that each timesheet is no longer locked.
- And finally, keep in mind that you're strongly warned to NOT delete a filed payslip. It isn't recommended because you'll need to manually redo bank payments and accounting entries.
Keep in mind that:
- If the person is paid a salary, or in other words the person isn't paid hourly, there usually won't be any timesheets connected to the payslip. Which means the "Hours worked" list shows as empty.
And that's it! That's everything you need to know about working with timesheets that're locked!
What if I start my clocked-in timesheet time and then forgot to stop?
 1:24
1:24
"What if I start my clocked-in timesheet time and then forgot to stop?"
If you're paid using "Per hour ... timesheet hours", you'll need to stop your clocked-in timesheet time each day, when you stop working. If you went on break, and forgot to stop it, do the following.
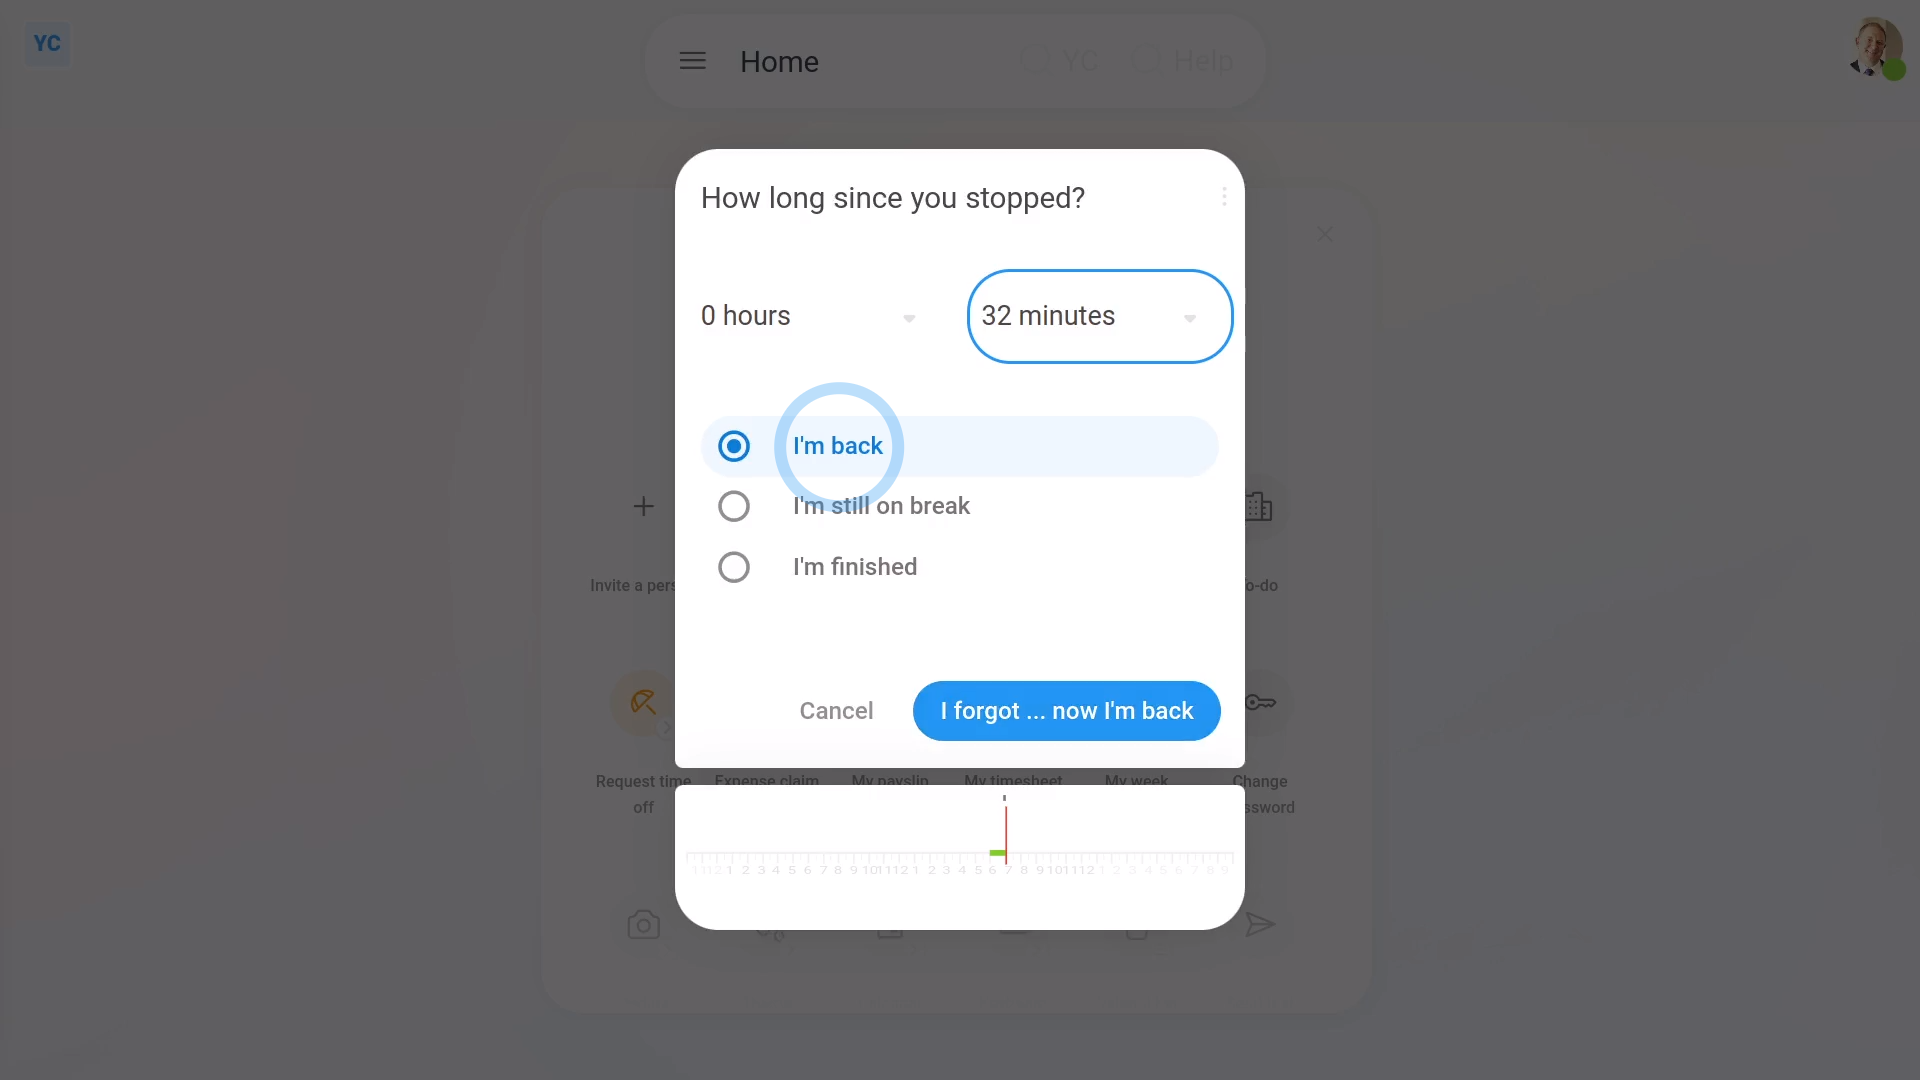
To correct your clocked-in timesheet time when you went on break and forgot to stop it:
- First, once you're back, tap: "Work-time menu", then "I forgot"
- Set how long it's been since you stopped working, and started your break.
- Next, decide if you're back to working, if you're still on break, or if you're finishing your working day.
- And finally, tap: I forgot
Keep in mind that:
- The "I forgot" feature is only for when you missed entering a stop time. Or, in other words, you finished working, but accidentally left your clocked-in timesheet time still started.
- If, instead, you missed entering a start time, ask your admin to do a manual adjustment.
And that's it! That's all you need to do to correct your clocked-in timesheet time, if you forgot to enter a stop when you went on break!